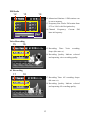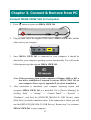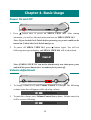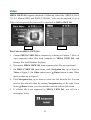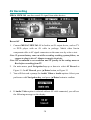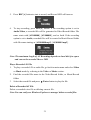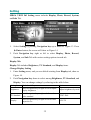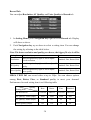
1
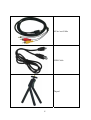
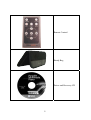
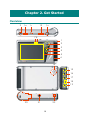
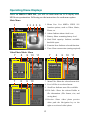
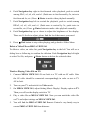
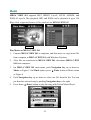
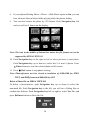
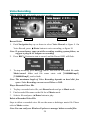
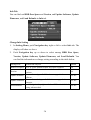
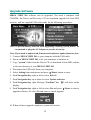
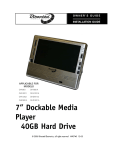
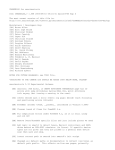
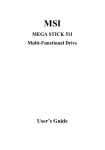
MEGA VIEW 561 User’s Guide G52-U5561X1 Table of Contents Safety Instructions............................................................................................... 4 Chapter 1. Introduction ...................................................................................... 5 How to Use This Guide................................................................................ 6 Unpack ......................................................................................................... 7 Chapter 2. Get Started ...................................................................................... 10 Overview.................................................................................................... 10 Operating Menu Displays .......................................................................... 12 Main Menu ....................................................................................... 12 Video/Photo/Music Menu................................................................. 12 FM Radio.......................................................................................... 13 Voice Recording ............................................................................... 13 AV Recording ................................................................................... 13 Setting Menu .................................................................................... 14 Tripod......................................................................................................... 14 USB Hard Disk .......................................................................................... 14 Hard Disk Capacity .................................................................................... 15 Hard Disk Space Rest Reference ...................................................... 15 Lock Switch ............................................................................................... 15 Remote Control .......................................................................................... 15 Li-ion Battery Recharging.......................................................................... 16 Battery Consuming Reference .......................................................... 16 Chapter 3. Connect & Remove from PC ......................................................... 17 Connect MEGA VIEW 561 to Computer ................................................. 17 For systems with Windows 98SE ..................................................... 18 *Format MEGA VIEW 561............................................................. 18 Safely Remove MEGA VIEW 561 from Computer.................................. 19 Chapter 4. Basic Usage...................................................................................... 20 Power On and Off ...................................................................................... 20 Volume Adjustment .................................................................................... 20 Video .......................................................................................................... 21 Music.......................................................................................................... 23 Photo .......................................................................................................... 25 FM Radio ................................................................................................... 27 Search a FM Station.......................................................................... 27 Store a FM station............................................................................. 28 Select a stored FM station................................................................. 28 Record voice from a FM station ....................................................... 28 Voice Recording ......................................................................................... 29 Record Voice..................................................................................... 29 Play a Recorded Voice File............................................................... 29 Delete a Recorded Voice File............................................................ 29 AV Recording............................................................................................. 30 Record AV......................................................................................... 30 Play a Recorded AV File................................................................... 31 Delete a Recorded AV File................................................................ 31 Setting ........................................................................................................ 32 Display Tab....................................................................................... 32 Photo Tab.......................................................................................... 33 Record Tab........................................................................................ 34 System Tab ....................................................................................... 35 Info Tab............................................................................................. 36 Appendix A. Specifications ............................................................................... 37 Appendix B. Drivers and Recovery CD ........................................................... 38 Upgrade Software....................................................................................... 39 Upgrade Firmware ..................................................................................... 40 Safety Instructions 1. Always read the safety instructions carefully. 2. Keep this User’s Guide for future reference. 3. Keep MEGA VIEW 561 away from humidity. 4. Keep MEGA VIEW 561 away from long exposure to the sun light. 5. Never pour any liquid into MEGA VIEW 561 to avoid damages or electrical shock. 6. If any of the following situations occurs, get MEGA VIEW 561 checked by a service personnel: z Liquid has penetrated into MEGA VIEW 561. z MEGA VIEW 561 has been exposed to moisture. z MEGA VIEW 561 has not worked well or you can not get functions to work correctly according to User’s Guide. z MEGA VIEW 561 has dropped and damaged. 7. DO NOT use MEGA VIEW 561 in the following situations: z While driving or riding a vehicle. z While operating something dangerous. z While walking on street. z Be in any situations or environments require concentration. 8. If you need to format MEGA VIEW 561 hard disk, please select FAT32 format. DO NOT PARTITION MEGA VIEW 561 HARD DISK. 9. DO NOT use any liquids or aerosol sprays to clean this device. Use a clean dampened cloth instead. 10. Adjust to proper volume while listening with earphone to avoid permanent harm to hearing capability. 11. Use a wrong battery may cause explosion! Follow the instruction on the battery section to use battery properly. 12. The used battery is not garbage and should be recycled. 4 Chapter 1. Introduction Thank you for purchasing MEGA VIEW 561. We are proud to tell you that MEGA VIEW 561 is thoroughly tested and certified product. The new MEGA VIEW 561 will improve the convenience of storing your personal data and enjoyment of using various video/ audio functions. MEGA VIEW 561 is a high performance portable digital video/ audio player and recorder which comes with a Li-ion rechargeable and removable battery. On MEGA VIEW 561, you can play video and audio files in various formats, listen to FM radio broadcast, and record video/audio. MEGA VIEW 561 is also a portable USB storage to which you are able to manage and store personal data. Following are the main features of MEGA VIEW 561: Video Player – supports MPEG-4, DivX 3.11/4.x/5.x, Motion JPEG, and WMV-9 SP@ML format video playback. Audio Player – supports MP3, MPEG 1 Layer 2, LPCM, ADPCM, and WMA-9 Layer 2a format audio files playback. Photo Viewer – supports JPEG, GIF, BMP, and TIFF photos. You can download photos to MEGA VIEW 561 and browse them with this function. FM Radio – supports FM Radio function. You are able to store up to 8 favorite FM stations. You can also record the FM radio into audio files. Recording – supports recording function for video and audio. You can use this function to record voice, music, FM radio, and video. USB Storage – supports USB 2.0 storage. You can use the built-in 20GB hard disk for data storage. We sincerely thank you for choosing MEGA VIEW 561. We hope that you will continue to turn to us for quality products as your needs and interests grow. 5 How to Use This Guide This User’s Guide provides instructions and illustrations on how to install and operate your MEGA VIEW 561. With step-by-step instructions, we will guide you through MEGA VIEW 561 driver installation process. If you are not familiar with computer operating system, we suggest you to learn more information about Microsoft Windows from your Microsoft Windows manual and help documents before installing MEGA VIEW 561 driver. Chapter 1, Introduction, shows you all MEGA VIEW 561 accessories in the package. Please check out if you have all of them included when you open the packing box. If any item is damaged or missing, please contact your vendor directly. Chapter 2, Get Started, introduces the function keys of MEGA VIEW 561, the LCD Display status in different modes, and how to recharge the built-in Li-ion battery. Chapter 3, Connect and Remove from Computer, describes how to connect and remove MEGA VIEW 561 from your computer. Chapter 4, Basic Usage, describes how to operate all the functions of MEGA VIEW 561. We suggest you to read this chapter carefully before using MEGA VIEW 561. Appendix A, Specifications, provides MEGA VIEW 561 specifications. Appendix B, Driver and Recovery CD, describes how to use the bundled Driver and Recovery CD. 6 Unpack1 MEGA VIEW 561 Strap Stereo Earphones AC Adapter2 1 The accessories of MEGA VIEW 561 package may be different from those shown above. 2 MEGA VIEW 561 battery should be charged ONLY with the provided Adapter! 7 AV-in/ out Cable USB Cable Tripod 8 Remote Control Handy Bag Driver and Recovery CD 9 Chapter 2. Get Started Overview 9 10 11 12 13 78 1 2 3 4 5 6 14 15 16 17 18 19 20 22 21 10 1. Strap Hole Tie the supplied Strap here. 2. Navigation key The 4-way Navigation key moves among selections. 3. /Enter Press to play/ pause or execute your desired action. 4. /Exit Press to stop or go to the previous menu. 5. LCD Display Show menus and playing. 6. Hold Handle The hold handle of MEGA VIEW 561. 7. Power LED This LED is on when MEGA VIEW 561 is power on, blinking when charging battery. 8. Record LED This LED is on when recording. 9. Power On/ Off Press to power on/ off MEGA VIEW 561. 10. Lock Switch When this Switch is locked, all key press commands are disabled to prevent unwanted key pressing. 11. MIC Built-in Microphone for voice recording. 12. Volume Control Pull it to the right to increase volume, to the left to decrease volume. Press it down to mute. 13. REC[●] Press to start or stop the recording. 14. Speaker Built-in speaker. 15. AV Line-in Jack Plug AV cable here to enable AV Line-in recording. 16. Earphone Jack Plug the earphones here. 17. AV Line-out Jack Plug AV cable here to enable AV Line-out to external display (TV). 18. USB Connector Connect the mini USB connector of the supplied USB cable here, and the other end to PC host. 19. DC-in Jack Plug in the supplied AC Adapter here to recharge. 20. Battery cap Press the latch and push the cap forward to replace the rechargeable battery. 21. Tripod Screw Hole Secure the tripod here to hold MEGA VIEW 561. 22. CIR Receiver Receive command signals from supplied remote control. 11 Operating Menu Displays Power on MEGA VIEW 561, you will see main menu on LCD display after MSI boot-up animation. Following are the instructions for each menu option. Main Menu 2 3 4 5 6 1 1. Menu List: List MEGA VIEW 561 function options, such as Video, Music, Photo, etc. 2. Alarm: Indicate alarm clock is set. 3. Battery: Show remaining battery level. 4. Hard Disk capacity: Indicate available hard disk space. 5. Function Icon: Indicate selected function. 6. Time: Show current time (tuning required). Video/Photo/Music Menu 7 8 9 10 11 7 8 9 10 7 8 9 10 11 7. Menu Title: Show the selected menu title. 8. List: All files in a selected menu. 9. Scroll bar: Indicate more files available. 10. File Info.: Show the selected folder or file information. (File format, size, and saving date). 11. Preview: Show video/ photo preview when push the Navigation key to the right on a selected video/ photo. 12 FM Radio 12 13 14 12. Memorized Stations: 8 FM stations can be set to memory. 13. Frequency Bar: Find a FM station from 87.5 to 108.0 with Navigation key. 14. Channel Frequency: Current FM tune-in frequency. Voice Recording 15 16 15. Recording Time: Voice recording elapse (hh: mm: ss). 16. Recording Quality: Indicate selected and operating voice recording quality. AV Recording 17 18 17. Recording Time: AV recording elapse (hh: mm: ss). 18. Recording Quality: Indicate selected and operating AV recording quality. 13 Setting Menu 19 20 21 22 19 19. Scroll bar: Mean more tabs are available. 20. Tabs: Include Display, Music, Recording, System, and Info Tabs. 21. Setting Items: List tab item for adjusting. 22. Setting Options: Show setting options of each item. Tripod MEGA VIEW 561 has a tripod socket where you can secure the supplied Tripod. After MEGA VIEW 561 is secured with the Tripod, it will stand on your table. You can then watch Video file without holding it. Note: you can also purchase other secure tripod for MEGA VIEW 561. But screw length can not be longer than 6 mm. USB Hard Disk MEGA VIEW 561 has a mini hard disk inside. You can operate MEGA VIEW 561 as an USB hard disk and save personal data to it. Simply connect MEGA VIEW 561 to computer, and use Windows Explorer to manage your data. 14 Hard Disk Capacity The mini hard disk of MEGA VIEW 561 has 20GB capacity. You can check Hard Disk Capacity icon on LCD display for the capacity status. Hard Disk Space Rest Reference Capacity display Low usage Full Lock Switch MEGA VIEW 561 has a Lock Switch to avoid accidental operation. Slide the Lock Switch to lock position while power is on; you will see the following right figure to indicate all function keys are disabled. Remote Control MEGA VIEW 561 remote control is for you to operate MEGA VIEW 561 in a longer distance. You can press Menu button to back to Main Menu. Press TV/LCD button to switch viewing device between TV and MEGA VIEW 561. Use the buttons as the buttons on MEGA VIEW 561. Note: The Power button can only power off MEGA VIEW 561, not power it up. 15 Li-ion Battery Recharging MEGA VIEW 561 comes with a Li-ion rechargeable and removable battery. Charge the battery until full when you use MEGA VIEW 561 for the first time by following the steps below: 1. 2. Connect the supplied AC Adapter to AC outlet, and plug in the other end of the AC Adapter to the DC-in jack of MEGA VIEW 561. While recharging, Power LED will keep blinking. If you power on MEGA VIEW 561 while recharging, you will see the following right power charging figure on LCD display. 3. When the battery is full, the Power LED will stop blinking. On main menu, you will see icon at battery position. To stop recharging, disconnect the Adapter from MEGA VIEW 561. Note 1: Charge MEGA VIEW 561 only with the supplied AC Adaptor. Note 2: Do NOT open the battery cap while the power is on! Note 3: You can still operate MEGA VIEW 561 while recharging; but the recharging time will be longer. Battery Consuming Reference Battery display Full Critical low MEGA VIEW 561 uses a 2200mAhr, 3.7V, 1 Cell rechargeable removable Li-ion battery. The battery consuming reference will vary in different operating modes. A fully recharged battery consumption reference is as following: z Video Playback/ Video Record: can be used for about 3 hours. z Music Playback/ Music Record: can be used for about 8 hours. z FM Radio/ Photo Viewer: can be used for about 7 hours. 16 Chapter 3. Connect & Remove from PC Connect MEGA VIEW 561 to Computer 1. Press button to power on MEGA VIEW 561. 2. Plug the mini end of the supplied USB cable to MEGA VIEW 561, and the other end to your computer. 3. Once MEGA VIEW 561 is connected to your computer, it should be detected by your computer operating system automatically. You will see the following message showing on MEGA VIEW 561. Note: If the operating system of your computer is Windows 98SE or ME, a new driver installation is required to activate MEGA VIEW 561 on your computer. Please refer to Appendix B. for driver installation. 4. After connection is initialized, your computer operating system will recognize MEGA VIEW 561 as a hard disk. Go to [Device Manager] by clicking “Start” → “Setting” → “Control Panel” → “System” → “Hardware”, and look for [HITACHI_DK14FA-20 USB Device] under [Disk Drive] to check connection status. If the connection is failed, you will not find [HITACHI_DK14FA-20 USB Device]. Repeat step 2 to reconnect MEGA VIEW 561 to your computer. 17 5. After your computer operating system recognizes MEGA VIEW 561 as a hard disk, you can move, copy, or delete files with Windows Explorer. For systems with Windows 98SE After connecting MEGA VIEW 561 to a Windows 98SE operating system computer, the Windows system will detect MEGA VIEW 561 and ask to install driver. Place the supplied driver CD in the CD-ROM drive, and refer to Appendix B. to complete the driver installation. *Format MEGA VIEW 561 We strongly suggest not to format MEGA VIEW 561 hard disk! MEGA VIEW 561 display interfaces will not function correctly if the hard disk is formatted. If you do need to format MEGA VIEW 561 hard disk, connect MEGA VIEW 561 to your computer first and format it with Windows formatting tool. When formation is completed, please refer to Appendix B for how to recover the system files, software, and firmware. Note: If you format MEGA VIEW 561 hard disk, all data and files stored in will all be erased! Note: Use Windows Disk Defragmenter or other defragmenter tool to reduce MEGA VIEW 561 hard disk fragment to improve hard disk access speed and for longer battery life. 18 Safely Remove MEGA VIEW 561 from Computer After managing files or update firmware, please follow the steps below to safely remove MEGA VIEW 561 from computer: 1. When MEGA VIEW 561 is connected to computer, icon will be shown on computer system tray. To remove MEGA VIEW 561, close all the related programs first. Double click the icon to bring up Safely Remove Hardware dialog box. Click on USB Mass Storage Device and Stop button. 2. You will see following window, click on USB Mass Storage Device and OK. 3. When you see following message MEGA VIEW 561 can now be safely removed from computer. 19 Chapter 4. Basic Usage Power On and Off 1. Press button once to power on MEGA VIEW 561. After startup animation, you will see the main menu and can use MEGA VIEW 561. Note: If you locked Lock Switch before powering on, power would not be turned on. Unlock the Lock Switch and go on. 2. To power off MEGA VIEW 561, press button again. You will see following message on display, and MEGA VIEW 561 will be shut down. Note: If MEGA VIEW 561 can not be shut down by one short press, press and hold the power button for 4 seconds to force power off. Volume Adjustment 1. To change volume level, push Volume Control to left/right. The following volume status bar will appear while adjusting volume. 2. To mute the volume, press Volume Control button down. Volume status bar will be seen as following. 20 Video MEGA VIEW 561 supports playback of following video files: MPEG-4, DivX 3.11/4/5, Motion JPEG, and WMV-9 SP@ML. Video can be playback at up to 30fps. Only supported file format will be playback on MEGA VIEW 561. Figure 1 Figure 2 Play Video on MEGA VIEW 561 1. Connect MEGA VIEW 561 to computer by referring to Chapter 3. Move or copy supported video files from computer to MEGA VIEW 561, and manage files with Windows Explorer. 2. Disconnect MEGA VIEW 561 from computer after files are transferred. 3. On MEGA VIEW 561 main menu, push Navigation key up or down to Video as Figure 1. On Video option, press /Enter button to enter Video menu as showing in Figure 2. 4. Push Navigation key up or down to select one file from the list. You can preview the selected video by pushing Navigation key to the right. Press down /Enter button, you can watch the selected video in full screen. 5. If selected file is not supported by MEGA VIEW 561, you will see a message as below. 21 6. Push Navigation key right to fast-forward video playback, push to switch among FFx2, x4, x8, x16, and x1. (Push once to fast-forward by 2x, twice to fast-forward 4x, etc.) Press /Enter to make video playback normally. 7. Push Navigation key left to rewind the playback, push to switch among RWx2, x4, x8, x16, and x1. (Push once to rewind by 2x, push twice to rewind 4x, etc.) Press /Enter button to make video playback normally. 8. Push Navigation key up or down to adjust the brightness of the display. There are 16 levels to adjust, please find the level that meets your need. 9. Press /Exit button to stop video playing, and go back to Video Menu. Delete a Video File on MEGA VIEW 561 To delete a video, on video list, push Navigation key to the left. You will see a dialog box as following to confirm the deletion. Push Navigation key left/right to select Yes/No, and press /Enter button to delete the selected video. Watch a Playing Video File on TV: 1. Connect MEGA VIEW 561 AV-out Jack to a TV with an AV cable. Note the AV cable should be connected correspondingly in color or text to TV AV-in Jack. 2. Turn on your TV and switch it to Video mode. 3. On MEGA VIEW 561, adjust Setting Menu\ Display\ Display option to TV. Then you will see the display switch to TV. 4. Play a video file on MEGA VIEW 561. Now you can watch the video file on TV and adjust settings on MEGA VIEW 561. 5. You will find the MEGA VIEW 561 Remote Control a very handy way to control MEGA VIEW 561 from distance. 22 Music MEGA VIEW 561 supports MP3, MPEG1 Layer2, LPCM, ADPCM, and WMA-9 Layer 2a files playback. MP3 and WMA can be playback at up to 320 Kbps. Only supported format will be playback on MEGA VIEW 561. Figure 4 Figure 3 Play Music on MEGA VIEW 561 1. Connect MEGA VIEW 561 to computer, and then move or copy music file from computer to MEGA VIEW 561 with Windows Explorer. 2. After files are transferred to MEGA VIEW 561, disconnect MEGA VIEW 561 from computer. 3. On MEGA VIEW 561 main menu, push Navigation key up or down to Music as Figure 3. On Music option, press /Enter button to Music menu as Figure 4. 4. Push Navigation key up or down to select one file from the list. You can pre-hear the selected song by pushing Navigation key to the right. 5. Press down /Enter button to play the song with Virtual Music Player. 23 6. If the selected file is not supported by MEGA VIEW 561, you will see a message as below. 7. Push Navigation key up or down to choose from Random/ Repeat/ EQ/ Playback Status/ Song. You can adjust any of the following modes according to your preference. Random Repeat EQ Playback Status Song 8. Push Navigation key right or left: On/Off Push Navigation key right or left: Single/All/Off Push right or left: Normal, Rock, Dance, Jazz, Classic Press /Enter key: to play/ pause playback Push right: 2X/ 4X fast-forward/ Play Push left: 2X/ 4X rewind/ Play Push left: go to previous song Push right: go to next song Press / Exit button once to stop music playing. Delete a Music file on MEGA VIEW 561 To delete a music file, select it from the list. Push Navigation key to the left; you will see a Dialog Box to confirm the deletion. Push Navigation key left or right to select Yes/ No, and press /Enter button to delete the file. 24 Photo MEGA VIEW 561 supports viewing JPEG, GIF, BMP, and TIFF file format. Only supported file format will be viewed on MEGA VIEW 561. Figure 5 Figure 6 View Photo or Picture 1. Connect MEGA VIEW 561 to computer first, and move or copy supported pictures from computer to MEGA VIEW 561 with Windows Explorer. 2. Disconnect MEGA VIEW 561 from computer after files are transferred. 3. On MEGA VIEW 561 main menu, push Navigation key up or down to Photo as Figure 5. On Photo option, press /Enter button to Photo menu as Figure 6. 4. Push Navigation key up or down to select one photo/picture file from the list. You can preview the selected file by pushing Navigation key to the right. Press /Enter button, you can see the file in full screen. 5. While viewing the photo in full screen, you can push Navigation key up or down to view previous or next photo. 6. If you want to rotate the photo, push Navigation key to the right. One press will make the photo rotates 90 degrees. 7. Otherwise, press /Enter button to start Slide Show. Files slide in certain seconds adjusted in Setting Menu→ Photo→ Slide Interval. Press /Enter button again to stop slide show. 25 8. If you adjusted Setting Menu→ Photo→ Slide Music option to On, you can hear all music files in Music folder playing while the photos sliding. 9. You can also browse the photo by 3X3 format. Push Navigation key left and you will see 9 frames on the display. Note: The icon in the middle of bottom line means the file format can not be supported by MEGA VIEW 561. 10. Push Navigation key to the right or left to select previous or next photo. Push Navigation key up or down to select last 9 or next 9 photos. Press /Enter button to view the selected photo in full screen. 11. Press /Exit button to stop photo viewing. Note: Photos/pictures are best viewed at resolution of 1600x1200 for JPEG, TIFF, and BMP format and 800x600 for GIF. Delete a Photo file on MEGA VIEW 561 To delete a photo/picture, push Navigation key up or down to select the unwanted file. Push Navigation key to the left, you will see a Dialog Box to confirm the deletion. Push Navigation key left or right to select Yes/ No, and press /Enter button to delete the file. 26 FM Radio The MEGA VIEW 561 has a built-in FM Radio function. Figure 7 Figure 8 Search a FM Station 1. Fist of all, plug earphones to earphone jack. The earphones are also used as antenna for MEGA VIEW 561. “Plug in Earphone!” message will appear on LCD display if you do not plug it in. Radio quality might vary from regions and angles. Disconnecting earphones might cause radio noise. 2. Push Navigation key up or down to select FM Radio as Figure 7, and then press /Enter button. The display will show as Figure 8. 3. You can see 8 default stations showing on display. Press /Enter button to select Frequency Bar to search a different radio station. 4. Press /Enter button to select Scan or Fine Tune. When Scan is selected, by pushing Navigation key to the right or left, an available station will be found. If Fine Tune is selected, frequency bar will be adjusted by 0.1 MHz on each Navigation key move. 5. On searching, you can see frequency showing on display. 27 Store a FM station 1. 2. 3. To store a FM station, press /Enter button on your current radio station. Station number 1 will be flashing. Select station number from 1 to 8 by pushing Navigation key to left or right, and press /Enter button to save frequency to the assigned station number. Repeat steps 1-2 to store other stations. Select a stored FM station 1. 2. To select a stored station, push Navigation key up to Station List. Push Navigation key to the left or right to select a number and press /Enter button to listen to the selected station. Record voice from a FM station 1. 2. 3. You can also record radio broadcast into .mp3 format with MEGA VIEW 561. Select a station and press REC[y] button to record. You will see Record Quality, Record Time, and Frequency information and Record LED will be on. To stop recording, press REC[y] button again. Upon recording stopped, saving information will be shown as following figure. You will see a recorded file under Music\record folder and file name starts with [FM000000.mp3], [FM000001.mp3], and so forth. Go to Music mode to select and listen to it. 28 Voice Recording MEGA VIEW 561 also works as a voice recorder. Figure 9 Figure 10 Record Voice 1. Push Navigation key up or down to select Voice Record as figure 9. On Voice Record, press /Enter button to voice recording, as figure 10. Note: To prevent battery runs out while recording resulting system failure, we suggest to plug in AC Adaptor on recording. 2. Press REC[y] button to start to record, and the Record LED will flash. 3. To stop recording, press REC[y] button. You will see a recorded file under Music\record folder and file name starts with [VO000000.mp3], [VO000001.mp3], and so forth. Note: The maximum length of Voice Recording depends on hard disk free space. Voice Recording can not exceed 24hrs or 2GB. Play a Recorded Voice File 1. 2. 3. To play a recorded voice file, exit Record mode and go to Music mode. Find recorded file name on the file list of Music mode. Select a file and press /Enter button to play. Delete a Recorded Voice File Steps to delete a recorded voice file are the same as deleting a music file. Please refer to Music section. Note: You can easily use Windows Explorer to manage/ delete recorded files. 29 AV Recording MEGA VIEW 561 can also record AV signal from other devices. Figure 11 Figure 12 Record AV 1. Connect MEGA VIEW 561 AV-in Jack to an AV output device, such as TV or DVD player with an AV cable in package. Match video line-in component cable to AV signal connecters on the same row by color or text. Note: To prevent battery runs out while recording resulting system failure, we suggest to plug in the AC Adaptor to supply electricity. Note: We recommend to set resolution and AV quality in the setting menu to Best before recording from TV. 2. On main menu, push Navigation key up or down to select AV Record as Figure 11. On AV Record, press /Enter button, as Figure 12. 3. You will first read a prompt for Audio/ Video or Audio options. Select your preference with Navigation key, and press /Enter button to confirm. 4. If Audio/ Video option is selected without AV cable connected, you will see the following message on the display. 30 5. Press REC[y] button to start to record, and Record LED will turn on. 6. To stop recording, press REC[y] button. If the recording option is set to Audio/Video, a recorded file will be generated in Video\Record folder. File name starts with [AV000000], [AV000001], and so forth. If the recording option is set to Audio, recorded files will be created in Music\Record folder with file name starting as [AU000000.mp3], [AU000001.mp3]. Note: The maximum length of AV Recording depends on hard disk free space and can not be exceeded 3hrs or 2GB. Play a Recorded AV File 1. To play a recorded AV or audio file, go back to main menu and select Video or Music mode by referring to the Video or Music section. 2. Find the recorded file name in the Video\Record folder, or Music\Record folder. 3. Select the record file and press /Enter button to play the file. Delete a Recorded AV File Delete a recorded voice file as deleting a music file. Note: You can easily use Windows Explorer to manage/ delete recorded files. 31 Setting MEGA VIEW 561 Setting menu includes Display, Photo, Record, System, and Info Tab. Figure 13 1. Figure 14 Select Setting by pushing Navigation key up or down as Figure 13. Press /Enter button, the screen will show as Figure 14. 2. Push Navigation key right or left to select Display, Photo, Record, System, and Info Tab with various setting options in each tab. Display Tab Display Tab includes Brightness, TV Standard, and Display items. Change Display Setting 1. Enter Setting menu, and you are default starting from Display tab, show as Figure 14. 2. Push Navigation key down to select among Brightness, TV Standard, and Display. You can change settings by referring to the table below. Setting Item Method and Purpose Options Brightness Push Navigation key to right or left to adjust display brightness Adjust brightness by need TV Standard Push Navigation key to right or left to select video standard NTSC/ PAL Display Push Navigation key to right or left to select output device LCD/TV 32 Photo Tab You can adjust photo settings, such as Slide Music, Slide Repeat, and Slide Interval in Photo tab to meet your demand. Change Photo Setting 1. In Setting Menu, push Navigation key right or left to go to Photo as figure above. 2. Push Navigation key up or down to select among Slide Music, Slide Repeat, and Slide Interval. You can change setting by referring to the following table. Setting Item Adjust way and purpose Options Push Navigation key right or left to enable or disable the background music Push Navigation key right or left to enable or Slide Repeat disable the repetition Push Navigation key right or left to adjust the Slide Interval interval between each photo Slide Music 33 On, Off On, Off 1/ 3/ 5/ 10/ 20/ 30 sec Record Tab You can adjust Resolution, AV Quality, and Voice Quality in Record tab. 1. In Setting Menu, push Navigation key right or left to Record tab. Display will show as above. 2. Push Navigation key up or down to select a setting item. You can change the setting by referring to the table below. Note: The better resolution and quality you choose, the bigger file size it will be. Setting Item Resolution Method and purpose Push Navigation key right or left to adjust record resolution Options Standard, Fine, Better, Best AV Quality Push Navigation key right or left to adjust AV Standard, Fine, Better, Best quality Voice Quality Push Navigation key right or left to adjust voice quality Standard, Fine, Better, Best MEGA VIEW 561 can record video at up to 30fps. You can choose options among Best, Better, Fine, or Standard quality to meet your demand. Performance for each setting item is as following table: Quality Best Better Fine Standard 320x240 288x216 272x204 240x180 AV Quality: Video (kbps) 2000 1600 1200 800 AV Quality: Audio (kbps) 128 112 96 64 Voice Quality (kbps) 192 128 96 64 Setting Item AV Resolution 34 System Tab You can adjust various system options in System tab. Change System Setting 1. In Setting Menu, push Navigation key right or left to System tab. The display will show as above. 2. Push Navigation key up or down to select among Display Off, Power Off, Language, Date Format, Date Setting, Time Setting, Time Format, Alarm, and Alarm Time. Change setting according to the table below. Setting Item Method and Purpose Push Navigation right or left to set Display shut down Display Off on idling to protect LCD panel Push Navigation right or left to set power off Power Off automatically Options Off /3 sec/5 sec/10 sec /15 sec/30 sec/1 min Off /1 min/2 mins/ 3 mins/5 mins/10 mins Language Push Navigation right or left to select language Vary from versions Date Format Push Navigation right or left to select date format on display y/m/d, m/d/y, d/m/y Date Setting Push Navigation right or left to select year/ month/day Set the exact date Push Navigation up or down to change property Time Setting Push Navigation right or left to select hour/ minute/sec Set the exact time Push Navigation up or down to change property Time Format Push Navigation right or left to select time format on display 12hrs/ 24 hrs Alarm Push Navigation right or left to enable or disable the alarm function Off/ On Alarm Time Push Navigation right or left to select hour/ minute/sec Set the alarm time Push Navigation up or down to change property 35 Info Tab You can find out HDD Free Space and Version, and Update Software, Update Firmware, and Load Defaults in Info tab. Change Info Setting 1. In Setting Menu, push Navigation key right or left to select Info tab. The display will show as above. 2. Push Navigation key up or down to select among HDD Free Space, Version, Update Software, Update Firmware, and Load Defaults. You can find the information or change setting according to the table below. Setting Item Method and Purpose Options HDD Free Space Press /Enter button to show free space in HDD. Press /Enter button to show software and firmware versions. Please refer to Appendix B for how to upgrade the Update Software software. Please refer to the Appendix B for how to upgrade the Update Firmware firmware. Push Navigation key right and select YES to load default Load Defaults setting when needed. Version 36 NA NA Yes/ No Yes/ No Yes/ No Appendix A. Specifications MEGA VIEW 561 Dimension 119 x 76 x 21/24.5 mm Weight About 240 g Operating Temperature 5 °C ~ 35°C Storage Temperature -20°C ~ +70 °C Operating Humidity 5% ~ 90% Audio Spec Earphone Output: 30mW rms (15mW / channel) Frequency: 20 to 20K Hz Supports OS SNR: ~85dB Windows 98SE, Windows ME, Windows 2000, Windows XP Home/ Pro, MAC OS 9.1/9.22/10.2 (Windows 98SE system requires driver installation.) USB Profile Meet USB 2.0 Profile LCD Display 3.5” Hard Disk 20 GB I/O Input Output: mini-USB connector, Earphone Jack, AV-in Jack, AV-out Jack, AC Adaptor connector, CIR, Speaker, and Microphone EMI and Safety Battery Power Adapter BSMI, FCC, CB, CE, VCCI, CCC Li-ion rechargeable battery (Built-in), 2200 mAhr / 3.7V Video Playback: 3 hours Audio Playback: 8 hours 100 ~240 V (vary from country to country) * Battery life test is under the condition of Temperature/Humidity 25℃, 50%RH, System Setting: Brightness: 10 /16 Level, Volume: 50%, Audio Output: Headphone, Test File: Resolution: 240x180, Video bitrate: 800Kbps, Audio bitrate: 64Kbps, File size: 1.1GB, MP4+MP3, Power Sources: Battery, Test Duration: 4 hours. 37 Appendix B. Drivers and Recovery CD MSI MEGA VIEW 561 package includes a Driver and Recovery CD. Insert the supplied CD into your CD-ROM, and the CD will auto run Setup program. On computer screen, you will see the display shown as below. z Install Windows98 USB Driver: For Windows 98 system computer users, click this option to install the USB Driver. Once the installation completed, Windows 98 system will be able to recognize MEGA VIEW 561. z Restore Preload Image: Restore MEGA VIEW 561 firmware, software, Video clips, Music files, and pictures to manufacture default as you first day purchase it. z Exit: Exit and close the setup program. 38 Upgrade Software MEGA VIEW 561 software can be upgraded. You need a computer with CD-ROM, the Driver and Recovery CD (or download upgrade file from MSI website), and the supplied USB cable ready for the following procedures: Note: To prevent battery runs out while upgrading resulting system failure, we recommend to plug the AC Adaptor to provide electricity. Note: If you need to update both firmware and software, update firmware first. 1. Connect MEGA VIEW 561 to your computer with the USB cable. 2. Power on MEGA VIEW 561 to let your computer to initialize it. 3. Copy "system" folder from the Driver CD, or download it from MSI website, to the root directory of your MEGA VIEW 561. 4. Disconnect the USB cable from your computer. 5. Select Setting from main menu and press /Enter button to enter. 6. Push Navigation key right or left to select Info tab. 7. Push Navigation key up or down to select Update software. 8. Push Navigation key right. Message "Confirm? Yes No" will show on the display. 9. Push Navigation key right or left to select Yes and press /Enter to start to upgrade software. Or select No and enter to cancel upgrade. 10. When software upgrade completes, system will restart. 39 Upgrade Firmware MEGA VIEW 561 firmware can be upgraded. You need a computer with CD-ROM, the Driver and Recovery CD (or download upgrade file from MSI website), and the supplied USB cable ready for the following procedures: Note: To prevent battery runs out while upgrading and causes system failure, it is recommended to plug the AC Adaptor to provide electricity. Note: If you need to update both firmware and software, update firmware first. 1. Connect MEGA VIEW 561 to your computer with the USB cable. 2. Power on MEGA VIEW 561 to let your computer to initialize it. 3. Copy "system" folder from the Driver CD, or download it from MSI website, to the root directory of your MEGA VIEW 561. 4. Disconnect the USB cable from your computer. 5. Select Setting from main menu and press /Enter button to enter. 6. Push Navigation key right or left to select Info tab. 7. Push Navigation key up or down to select Update software. 8. Push Navigation key right. Message "Confirm? Yes No" will appear on the display. 9. Push Navigation key right or left to select Yes and press /Enter to start to upgrade firmware. Or select No and enter to cancel upgrade. 10. When firmware upgrade completes, system will restart. 40