1
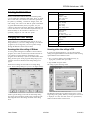
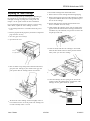
EPSON ActionLaser 1400
Paper size:
Paper:
Type
Letter
Legal
Executive
A4
Size
8.5 x 11 inches
8.5 x 14 inches
7.25 x 10.5 inches
210 x 297 mm
Envelopes:
Type
Monarch
Commercial-10
DL
C5
International B5
Size
3% x 7% inches
4% x 9% inches
110 x 220 mm
162 x 229 mm
l76 x 250 mm
Printable area:
4 mm from paper edge
Paper feed
alignment and
direction:
Center alignment for all sizes
Paper feed:
Automatic or manual feed
Printer Specifications
Input paper
supply
(20 lb paper):
100 sheets
5-10 envelopes, depending on thickness
Printing
Paper eject:
Face down
Output tray
capacity
(20 lb paper):
50 sheets
Printing method:
Laser beam scanning and dry
electrophotographic process
Resolution:
600 x 600,300 x 300 dpi, switchable
Printing speed:
Up to 4 pages per minute (depending on
the font and quantity of data)
Warm-up time:
Approximately 45 seconds
Internal
emulations:
HP® LaserJet® 4P
Resident fonts:
Toner cartridge
1 bitmap font, 35 Intellifonts,®
10 TrueType® fonts
Paper weight:
Laser Printers
u
u
u
u
r
u
u
S051023
Storage
temperature:
32° to 95° F (0° to 35° C)
Shelf life:
24 months after production
Storage humidity: 15 to 85% RH
Life:
Paper specifications
Types:
Model number:
Plain paper
Special paper
Labels
Envelopes
Transparencies
Colored paper
Card stock
Typical toner cartridge life is up to
4000 pages under the following
conditions: Letter-size paper, continuous
printing, and 5% print ratio
Note:
The number of pages that you can print with a toner cartridge
varies depending on the type of printing you do. If you print a few
pages at a time or print dense text exceeding 5% print ratio, your
cartridge may print fewer pages.
Since the quality of a particular brand or
type of paper may be changed by the
manufacturer at any time, EPSON cannot
guarantee any particular brand or type of
paper. Always test samples of paper
stock before purchasing large quantities.
Dimensions and
weight:
Height
Width
Depth
Weight
Plain paper: 16-24 lb, 60-90 g/m2
Card stock: 24-36 lb, 90-135 g/m2
(single-sheet feed only)
Durability:
5 years or 100,000 sheets, whichever
comes first
Mechanical
10/15/94
10.5 inches (265 mm)
13 inches (330 mm)
10.5 inches (269 mm)
Approx. 17 lb (7.6 kg)
including the toner cartridge
AL1400-1
EPSON ActionLaser 1400
Installing the SIMM
Electrical
Rated voltage:
90 to 132 VAC
Rated frequency:
50 to 60 Hz ± 3 Hz
Power
consumption:
Approximately 400 W (powers down to
less than 30 W in power save mode)
Rated current:
Approximately 3.2 amps
Warning:
w High voltages are present inside the printer when the power is
on. Do not attempt to install a SIMM until you turn off and
unplug the printer.
1. Turn off the printer and unplug the power cable from the
electrical outlet.
2. Turn the printer so the back of the printer is facing you.
Controller hardware
CPU:
Intel® 80960SA, 16 MHz
RAM:
2MB expandable to 18MB
Environmental
Temperature:
Operation:
Storage:
41° to 95° F (5° to 35° C)
-4° to 104° F (-20° to 40° C)
Humidity:
Operation:
Storage:
15 to 85% RH
5 to 95% RH
Altitude:
8200 feet (2500 meters) maximum
Options
3. Use a crosshead screwdriver to remove the five screws that
secure the metal access cover. Lift off the access cover.
Warning:
w Avoid touching the electrical components that alp exposed
after you remove the metal access cover. They may he very hot
if the printer has been used recently.
4. Hold the first SIMM so the notched end is at the bottom
and insert it into the J1 socket.
5. Rotate the SIMM to the left so it fits securely into the small
latches at the top and bottom.
6. If you have a second SIMM, install it into the J2 socket in
the same way.
7. Reattach the access cover.
Single In-Line Memory Modules (SIMMs)
8. Reattach the power cord.
You can install one or two SIMMs with a capacity of 1,2,4,
or 8MB. This allows you to increase memory capacity up to
18MB.
9. Turn on the printer.
PostScrip® Level 2 Compatible Option
The PostScript Level 2 Compatible option allows you to use
your printer to print documents formatted for PostScript.
Adding Memory
By installing one or two 1MB, 2MB, 4MB, or 8MB Single
In-Line Memory Modules (SIMMs), you can increase printer
memory up to 18MB. You may want to add additional
memory if you are having difficulty printing complex,
graphics-intensive pages or if you regularly use many
downloaded fonts.
You can purchase SIMMs from various vendors. Be sure the
SIMMs you purchase meet the following requirements:
Now you need to update the printer driver’s Memory
setting. If you’re using Windows, follow the instructions
below. If you’re using DOS, see “Accessing printer settings
in DOS” for information on changing settings in DOS.
1. In the Program Manager, double-click the Control Panel
icon. Then double-click the Printer’s icon.
2. Choose the ActionLaser 1400 printer driver in the list of
Installed Drivers.
3. Choose the Setup button.
4. Once the Setup dialog box is open, choose the Printer tab.
5. Change the Memory setting for the amount of memory
now installed in the printer. (Be sure to include the 2MB
already installed.)
u 72-pin type
6. Choose OK. When you return to the Printers dialog box,
choose Close.
u Capacity of 1,2,4, or 8MB
Checking the memory
u Access speed of 100ns or less
To verify that memory is correctly installed, print a test sheet
by pressing the reset button at the back of the printer.
If an incorrect amount of memory is shown on the test sheet,
turn off the printer and remove the metal access cover. Make
sure you correctly installed the SIMMs. If the amount of
RAM is still incorrect, contact your dealer or a qualified
service person for assistance.
AL1400-2
10/15/94
Laser Printers
EPSON ActionLaser 1400
Selecting the Printer Driver
When you install the software that comes with the printer,
you also install the ActionLaser 1400 printer driver. A printer
driver works with your software to control the operation of
the printer by translating a document’s margins, fonts, and
other settings into control codes that the printer understands.
To get the full functionality from your printer, use your
software to select the ActionLaser 1400 driver. Although you
can use other drivers, such as the HP LaserJet 4P driver, you
should normally use the ActionLaser 1400 since it is
specifically designed to work with this printer.
Changing the Printer Settings
Printer settings are controlled through software. If you’re
using Windows,TM you access settings through your software
program. If you’re using DOS, you access printer settings
through the EPSON Control Panel for DOS.
Menu
Items
Paper
Paper Size
Orientation
Number of Copies
Paper Feed Source
Auto Continue
Green
Toner
Edge
Toner
Power
Power
Graphics
Graphics Mode
Graphics Quality
Gray Scale
TrueType Mode
Use Printer TrueType Fonts
Printer
Printer Memory
Page Protection
Resolution
Fonts
Opens the Font Manager so you can download PCL
fonts
About
Displays software version information
Saving
Smoothing
Density
Saving
Saving Interval
Accessing printer driver settings in Windows
Accessing printer driver settings in DOS
To access printer settings from a Windows-based software
program, choose Print or Print Setup from the File menu of
your software program and then, depending on your
program, choose the Setup, Options, or Printer button of the
dialog box that opens. Some programs then prompt you to
select the ActionLaser 1400 before the Setup dialog boxes
appear.
If you are not running Windows, you can control printer
settings through the EPSON Control Panel for DOS. To bring
up the EPSON Control Panel for DOS:
Printer driver settings are accessible on six Setup dialog
boxes. The first Setup dialog box you see is for Paper settings:
This brings up the following screen:
At the top of the dialog box are tabs for each Setup dialog
box: Paper, Green, Graphics, Printer, Fonts, and About. The
following table shows the settings available on the dialog
boxes.
Laser Printers
1. At a C: prompt, change to the PANEL directory by
typing CD \ PANEL. Then press Enter.
2. Type PANEL and press Enter.
The EPSON Control Panel for DOS consists of five screens:
Page Setup, Font, Quality, Memory, and Options. One screen
is displayed at a time, and other screens are represented by
buttons to the left of the current screen.
10/15/94
AL1400-3
EPSON ActionLaser 1400
The five screens are listed below, along with the items
available on each
Menu
Page Setup
Font
Quality
Memory
Options
Items
Copies
Lines per Page
Orientation
Paper Feed
Paper Size
Auto Continue
Typeface
Point/Pitch
Symbol Set
Toner Saving
Edge Smoothing
Resolution
Toner Density
Page Protection
Power Save Mode
Power Save Interval
Status and Error Messages
Ready
Off
Slow
flashing
Flashing
Error
Off
Off
On
Off
Off
On
Off
Flashing
Flashing
On
Flashing
On
Flashing
On
T
Off
I
I
Printer status
Printer is off.
Printer is in power save mode.
Print data is being received at the printer or
has already been received.
Printer is ready to receive print data.
Either the paper tray is empty or there is a
paper feed problem.
One of the following errors has occurred:
. Paper has jammed inside the printer.
. The front cover is open.
. The toner cartridge is not installed.
One of the following errors has occurred:
. Insufficient memory to print job.
. Printer is in manual feed mode and is
waiting for the next sheet.
. There is a printer overrun error.
The printer is warming up.
A printer engine or controller error has
occurred. Contact your dealer or a qualified
service person.
Loading Paper
Status, error, and caution messages appear on screen to
notify you of the printer status and alert you to problems.
Error messages tell you how to correct any problems that
occur.
To load a stack of paper in the printer’s paper tray:
1. Remove any paper remaining in the paper tray. Do not add
paper to a partial stack.
2. Pull the paper release lever toward the front of the printer.
Front Panel Lights
The two lights on the front panel allow you to monitor the
status of the printer. The green Ready light is on when the
printer is on and is ready to receive print data. As data is
received from the computer, the Ready light flashes.
The orange Error light indicates an error condition. If the
Error light is on continuously, it indicates that no paper is
loaded or that there is a paper feed jam. A flashing Error light
indicates one of the following: an internal paper jam has
occurred, the front cover is open, or the toner cartridge is not
installed.
Other status conditions are indicated by the combination of
the Ready and Error lights. The following table describes all
status conditions that can be indicated by the printer’s
Ready and Error lights:
3. Fan a stack of paper and load the paper in the paper tray.
Place the paper side you want printed face down in the
paper tray. Up to 100 sheets can fit in the paper tray.
4. Slide the paper guides against the paper stack so the paper
fits loosely between them. The paper guides should not fit
too tightly against the paper.
5. Push the paper release lever toward the back of the printer.
This places the feed roll in contact with the paper stack.
Paper will not feed properly if the paper release lever is
not in the feed position.
AL1400-4
10/15/94
Laser Printers
EPSON ActionLaser 1400
7. Discard the cartridge with nonburnable items.
Replacing the Toner Cartridge
8. Remove the new toner cartridge from the shipping bag.
The toner cartridge prints up to 4000 pages, depending on
the complexity of your print jobs. You can make toner
cartridges last longer by using toner saving mode. See
Chapter 2 in the printer manual for more information.
9. Remove the shipping spacer from the cartridge by pulling
up the horizontal tab. Then remove the protective cap at
the end of the cartridge.
l0. Gently shake the toner cartridge back and forth a few
times to distribute the toner evenly.
If your printed images become too faint or you notice long,
white streaks, replace the toner cartridge as follows:
1. Turn off the printer if it is on and disconnect the power
cord.
2. Remove paper from the paper tray and remove all printed
pages from the exit tray.
11. While holding the cartridge steady with one hand, firmly
grip the tab on the left side of the cartridge. Pull the clear
seal all the way out with firm, even pressure as shown. Do
not pull up on the seal.
3. Close the paper and exit trays.
4. Open the front cover.
12. With one hand, hold the toner cartridge in the middle.
Place the other hand on the rear of the printer to hold it
steady while you insert the cartridge.
5. Rest one hand on top of the printer. With the other hand,
grasp the toner cartridge by the molded center grip and
pull upward until the cartridge unlocks and releases.
13. Insert the cartridge into the opening at the front of the
printer. Position the locking knobs on both sides of the
cartridge into the guides inside the printer.
6. Tilt the front of the cartridge downward slightly until it is
level and then slide it out of the printer. The cartridge will
not slide smoothly unless it is level.
Laser Printers
10/15/94
AL1400-5
EPSON ActionLaser 1400
4. Open the front cover.
14. Slide the cartridge into the printer until it stops. Then
push the cartridge firmly until it locks in place.
Warning:
w When you open the printer or remove the printer cartridge,
you expose components inside the printer that can he very hot.
Avoid touching the fuser area, which is located immediately
above the toner cartridge when you open the front cover; and
the motor; which is further inside the printer.
15. Close the front cover and press the top corners to lock it
into position.
Feed Jam
Rest one hand on top of the printer. With your other hand,
grasp the toner cartridge by its molded center grip.
If the printer stops printing and the Error light is on while the
Ready light is off, follow these steps.
Pull upward on the cartridge until it unlocks and releases.
1. Unlock the paper release lever by pulling it toward the
front of the printer.
2. Remove paper from the paper tray.
3. Remove any sheets that have misfed from the paper tray
into the paper feeder area.
4. Tap the edges of the paper stack on a flat surface and
carefully reload paper into the paper tray.
5. Push the paper release lever toward the back of the printer.
Paper Jam
If the printer stops printing and the Error light is flashing
while the Ready light is off, follow these steps:
Unlock the paper release lever by pulling it toward the
front of the printer.
Remove paper from the paper tray and remove all printed
pages from the exit tray.
Tilt the front of the toner cartridge downward slightly until
it is level; then slide it out of the printer. The cartridge will
not slide out smoothly unless it is level.
Close the exit tray.
Jammed paper may have caught in the toner cartridge,
making it difficult to remove the cartridge. Pull firmly to
remove the paper along with the cartridge.
If the paper comes out along with the toner cartridge,
remove the paper from the cartridge by pulling it toward
the front of the cartridge.
C
AL1400-6
10/15/94
Caution:
Never pull jammed paper out from the rear of the toner
cartridge.
Laser Printers
EPSON ActionLaser 1400
9. If the jammed paper does not come out with the toner
cartridge, look inside the printer. If the paper is still
inside, draw it out from the front of the printer.
l0. After removing the jammed paper, reinstall the toner
cartridge and close the front cover.
11. Open the exit tray.
12. Tap the edges of the paper stack on a flat surface and
carefully reload paper into the paper tray.
13. Push the paper release lever toward the back of the printer.
Information Reference List
Engineering Change Notices
None.
Product Support Bulletins
None.
Technical Information Bulletins
None.
Related Documentation
TM-ACTL1400T ActionLaser 1400 Service Manual
PL-ACTL1400
ActionLaser 1400 Parts Price List
600E97870
ActionLaser 1400 Reference Guide
600E97880
ActionLaser 1400 Read This First Guide
600E97890
Your First Laser Printer
Laser Printers
10/15/94
AL1400-7