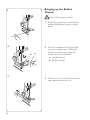
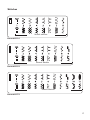
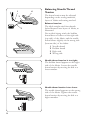
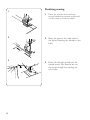
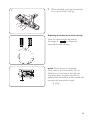
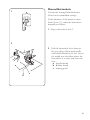
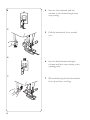
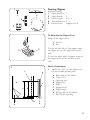
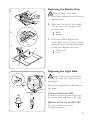
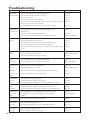
1
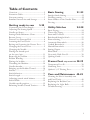
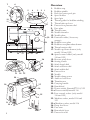
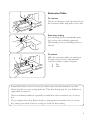
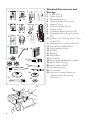
User’s Guide
KEEPING THE WORLD SEWING™
This houshold sewing machine is designed to comply with IEC/EN 60335-2-28 and UL1594
IMPORTANT SAFETY INSTRUCTIONS
When using an electrical appliance, basic safety precautions should always be followed, including
the following:
Read all instructions before using this household sewing machine.
DANGER - To reduce the risk of electric shock:
•
•
A sewing machine should never be left unattended when plugged in. Always unplug this sewing machine from the electric outlet immediately after using and before cleaning.
Always unplug before relamping. Replace bulb with same type rated 15 Watt (for model 116) or
5 Watts (for model 118 and 122).
WARNING - To reduce the risk of burns, Àre, electric
shock, or injury to persons:
•
•
•
•
•
•
•
•
•
•
•
•
•
•
•
•
•
This sewing machine is not intended for use by persons (including children) with reduced
physical, sensory or mental capabilities, or lack of experience and knowledge, unless they
have been given supervision or instruction concerning use of the sewing machine by a person
responsible for their safety.
Children should be supervised to ensure that they do not play with the sewing machine.
Use this sewing machine only for its intended use as described in this manual. Use only attachments recommended by the manufacturer as contained in this manual.
Never operate this sewing machine if it has a damaged cord or plug, if it is not working properly, if it has been dropped or damaged, or dropped into water. Return the sewing machine to
the nearest authorized dealer or service center for examination, repair, electrical or mechanical
adjustment.
Never operate the sewing machine with any air openings blocked. Keep ventilation openings
of the sewing machine and foot controller free from the accumulation of lint, dust, and loose
cloth.
Keep Àngers away from all moving parts. Special care is required around the sewing machine
needle.
Always use the proper needle plate. The wrong plate can cause the needle to break.
Do not use bent needles.
Do not pull or push fabric while stitching. It may deÁect the needle causing it to break.
Wear safety glasses.
Switch the sewing machine off (“0”) when making any adjustment in the needle area, such as
threading needle, changing needle, threading bobbin, or changing presser foot, etc.
Always unplug sewing machine from the electrical outlet when removing covers, lubricating, or
when making any other user servicing adjustments mentioned in the instruction manual.
Never drop or insert any object into any opening.
Do not use outdoors.
Do not operate where aerosol (spray) products are being used or where oxygen is being administrated.
To disconnect, turn all controls to the off (“0”) position, then remove plug from outlet.
Do not unplug by pulling on cord. To unplug, grasp the plug, not the cord.
SAVE THESE INSTRUCTIONS
Table of Contents
Overview ........................................................2
Extension Table.............................................3
Free-arm sewing ............................................3
Standard Accessories and Storage ..............4
Getting ready to sew
5-20
Connecting the Power Supply .....................5
Adjusting the Sewing Speed ........................6
Needle up/down ...........................................6
Sewing Guide Reference Chart ...................7
Reverse Lever .................................................8
Presser Foot Pressure Dial ..........................8
Lowering the Feed Teeth .............................8
Raising and Lowering the Presser Foot ......9
Changing the Presser Foot ..........................9
Changing the Needle ..................................10
Placing the thread spool
on the spool pin ..........................................11
Removing the bobbin .................................11
Bobbin Winding ..........................................12
Placing the bobbin ......................................13
Threading the Machine ..............................14
Needle threader ...........................................15
Bringing up the Bobbin Thread................16
Stitches ..........................................................17
Stitch Selection ............................................18
Stitch Length ................................................18
Adjusting stretch stitch balance ................19
Stitch Width .................................................19
Variable needle position .............................19
Balancing Needle Thread Tension ...........20
Basic Sewing
21-23
Straight Stitch Sewing .................................21
Finishing sewing ..........................................22
Seam Guides on the Needle Plate ............23
Pivoting .........................................................23
Utility Stitches
24-38
Basic Zigzag ................................................ 24
Three-step Zigzag ...................................... 24
Seam and Overcast .................................... 24
Reinforced Straight Stitch ......................... 25
Button Sewing ............................................ 25
Automatic Buttonhole ............................... 26
Corded Buttonhole .................................... 30
Manual Buttonhole .................................... 31
Sewing Zipper ............................................. 33
Blind Hem ................................................... 37
Non-stick Glide Foot H ............................ 38
Quilting Guide ............................................ 38
Presser Feet only model 122 38-39
Transparent Foot B .................................... 38
Gathering Foot ........................................... 39
Quilter’s 1/4” Piecing Foot ...................... 39
Care and Maintenance 40-42
Cleaning the Hook Assembly area
and Feed Teeth ........................................... 40
Replacing the Bobbin Case ....................... 41
Replacing the Light Bulb .......................... 41
Troubleshooting ......................................... 42
1
7
Overview
6
8
5
4
2
3
1
9
10
11
1.
2.
3.
4.
5.
6.
7.
23
8.
9.
10.
11.
12.
22 13.
21
16
17
18 19
20
26
27
25
24
28
12
13
14 15
29
30
37
36
35
34
31
32
33
31.a
2
33.a
Bobbin stop
Bobbin spindle
Hole for extra spool pin
Spool holder
Spool pin
Thread guide for bobbin winding
Thread take-up lever
Presser foot pressure dial
Face plate
Thread cutter
Needle threader
Needle plate
Extension table (Accessory
storage)
14. Bobbin cover plate
15. Bobbin cover plate release button
16. Thread tension dial
17. Needle up/down button (only
model 118 and 122)
18. Speed control slider (only model
118 and 122)
19. Reverse stitch lever
20. Sewing Guide
21. Stitch length dial
22. Stitch selection dial
23. Stitch width dial
24. Presser foot
25. Needle
26. Needle clamp screw
27. Ankle to hold foot
28. Thumbscrew
29. Carrying handle
30. Handwheel
31. Power switch, Emerald™ 118/122
31.a Power switch,Emerald 116
32. Foot control socket (only model
118 and 122)
33. Machine socket, model 118 and
122
33.a Machine socket, model 116
34. Drop feed lever
35. Free-arm
36. Buttonhole lever
37. Presser foot lift
Extension Table
To remove
Hook your Àngers on the bottom left of
the extension table and pull it to the left.
Free-arm sewing
For stitching sleeves, waistbands, pant
legs or any other tubular garments.
For darning socks or mending knees or
elbows.
To attach
1
2
Slide the extension table on and insert
the pins into the holes and push the
extension table to snap it in place.
1 Pin
2 Hole
Some fabrics have a lot of excess dye which can cause discoloration on other
fabric but also on your sewing machine. This discoloring may be very difÀcult or
impossible to remove.
Fleece and denim fabric in especially red and blue often contain a lot of excess
dye.
If you suspect that your fabric/ready-to-wear garment contains a lot of excess
dye, always pre-wash it before sewing to avoid the discoloring.
3
1
2
4
3
5
6
7
9
10
11
8
Standard Accessories and
Storage
1.
2.
3.
4.
5.
6.
7.
8.
9.
10.
12
15
11.
12.
13.
14.
15.
16.
17.
18.
19.
20.
21.
22.
23.
14
13
16
18
17
19
21
20
22
23
4
Utility Foot A
Utility Foot B
Buttonhole Foot C
Adjustable Blind Hem Foot
Zipper Foot E
Non-stick Glide Foot H
Edging Foot J
Automatic Buttonhole Foot R
Transparent Foot B (only model
122)
Quilter’s 1/4” Piecing Foot P (only
model 122)
Gathering Foot (only model 122)
Self-adhesive Glide Plates
Edge/quilting Guide
Needles
Bobbins
Screwdriver
Lint brush
Seam ripper (Buttonhole opener)
Spool holder (Large)
Spool holder (Small)
Vertical spool pin
Felt cushion
Accessory storage (Open the
extension table for storing
accessories.)
Getting ready to sew
For Emerald 118 and 122
1
6
5
Connecting the Power Supply
Turn the power switch off.
3
Insert the foot control plug into the
machine socket.
4
2
For Emerald 116
1
6
5
Insert the power supply plug into the
machine and the wall outlet.
Turn the power switch on.
1 Power switch
2 Foot control plug
3 Machine plug
4 Machine socket
5 Power supply plug
6 Wall outlet
Before connecting to the power
supply, make sure the voltage shown on
the machine conforms to your electrical
power.
NOTE:
4
2, 3
The foot control model that has to be
used for each sewing machine model are
shown in the table below.
For the USA and Canada:
This sewing machine has a polarized
plug (one blade wider than the
other). To reduce the risk of electric
shock, this plug is intended to Àt in a
polarized outlet only one way. If the
plug does not Àt fully in the outlet,
reverse the plug. If it still does not
Àt, contact a qualiÀed electrician to
install the proper outlet.
DO NOT modify the plug in any
way!
Foot control Model
Model
21361
Emerald
122 and
118
120V or
230 - 240V
Model
YC-190
Emerald
116
230 - 240V
Model
YC-482
Emerald
116
120V
5
Adjusting the Sewing Speed
You can control the sewing speed in two
ways; with the speed control slide or
with the foot control.
Speed control slide (model 118 and
122)
With the speed control slide, you can
change the sewing speed to suit your
needs. The slide limits how fast you can
sew.
To increase the sewing speed, slide the
bar to the right.
To reduce the sewing speed, slide the bar
to the left.
Foot control
For model 118 and 122
You can control the sewing speed by using
the foot control. The harder you press the
foot control, the faster the machine sews.
If you press the foot control all the way,
the machine runs at the maximum speed
set by the speed control slide.
For model 116
Needle up/down (model 118 and
122)
1
6
Touch this button to move the needle
down or up. The setting of the needle
stop position is changed at the same
time.
1 Needle up/down
Sewing Guide Reference Chart
1
3
1
2
3
4
5
6
7
8
4
5
Fabric
Presser foot pressure
Sewing technique
Stitch
Presser foot
Thread tension
Stitch length
Stitch width
2
6 7
8
Consult the Sewing Guide Reference Chart
for the fast easy way to select the best
stitch, stitch length, stitch width, thread
tension, presser foot and presser foot
pressure for your sewing technique and
fabric.
Look in the column for your fabric type:
WOVEN FABRICS: for stable fabrics
that have no stretch. Usually woven.
STRETCH FABRICS: for fabrics that
have stretch. Usually knit.
LEATHER/VINYL: for suede, real
leather and for artiÀcial leather and
suede.
Select the stitch for the technique you want
to sew:
SEAM: sews two pieces of fabric
together.
NOTE: For Stretch Fabrics the Sewing
Guide Reference Chart recommends
setting the zig zag stitch length to
1.5 and stitch width to 1.5 for a seam
that stretches with the fabric.
OVERCAST: overcast fabric edges to
prevent them from fraying and to
help them lay Áat.
SEAM/OVERCAST: sews the seam and
overcasts the edge all at one time.
BASTE: a temporary stitching for
Àtting garments, gathering and
marking. Use maximum stitch length.
NOTE: Basting will leave permanent
holes in leather and vinyl.
BLIND HEM: creates an invisible hem
on garments. Is not recommended
for light weight fabric or for leather/
vinyl.
HEM: sews the best visible or top
stitch hem for your fabric type and
weight.
BUTTONHOLE: sews the best
buttonhole possible for your fabric.
7
Reverse Lever
1
1
When you press the reverse lever
downwards, the machine will sew in
reverse. The machine will only sew in
reverse as long as the reverse lever is
pressed down.
1 Reverse lever
Presser Foot Pressure Dial
Turn the pressure dial to adjust the
pressure of the presser foot on the
fabric when sewing on different
thicknesses of fabric. The pressure dial
should be set at 3 for regular sewing.
Reduce the pressure to 2 for appliqué,
cutwork and basting. Set the setting mark
at 1 when sewing stretch fabrics, chiffon,
lace, organdy and other Àne fabrics. Set
on 0 for free motion.
1 Setting mark
Lowering the Feed Teeth
1
2
8
The drop feed lever is located on the
free-arm on the back of the machine.
To lower the feed teeth, push the lever in
the direction of the arrow, as illustrated.
To raise the feed teeth, push the lever in
the direction of the arrow, as illustrated,
and turn the handwheel toward you or
start sewing to bring the feed teeth up.
The feed teeth must be up for regular
sewing.
1 Raised position
2 Lowered position
Raising and Lowering the
Presser Foot
3
3
2
2
1
1
The presser foot is raised and lowered
with the presser foot lever. The presser
foot must be down when sewing.
By raising the presser foot lever as far as
it goes the lift height of the presser foot
can be increased by 1/4” (0.6 cm). This
is useful for easy removal of the presser
foot or when placing heavy fabrics under
the foot.
1 Lowered position
2 Normal lift height
3 Extra lift height
Changing the Presser Foot
Turn off the power switch
2
1
Make sure the needle is in the
highest position. Pull the presser
foot towards you.
2
To put foot on, line up the cross pin
on the foot between the spring and
the presser foot ankle. Press back
until the foot snaps into place.
9
1
Changing the Needle
2
a
c
c
b
Turn off the power switch.
Your machine uses standard sewing
machine needles.
1 Lower the presser foot. Loosen the
screw in the needle clamp by turning
it counterclockwise. Remove the
needle.
2 Push up the new needle as far as it
will go with the Áat side away from
you. Tighten the screw Àrmly by
turning it clockwise.
a Stop
b Flat side
c Needle clamp screw
To check for a good needle:
Put the Áat side of the needle onto
something Áat (needle plate, glass etc.).
The gap between the needle and the Áat
surface should be consistent.
Never use a blunt needle. A damaged
needle can cause permanent snags or
runs in knits, Àne silks and silk-likefabrics.
NOTE: Check the needle frequently for
barbed or blunt points.
10
Placing the thread spool on
the spool pin
Place the thread spool on the spool pin
with the thread coming off as illustrated.
With large thread spools, the large
holder is placed in front of the thread. If
you use narrow thread spools, the small
holder is placed in front of the thread.
1
1 Large spool holder
2 Small spool holder
2
Removing the bobbin
1
a
Turn off the power switch.
1
Push the bobbin cover release
button to the right and remove the
cover.
a Release button
b Bobbin cover plate
b
2
2
Lift out the bobbin.
11
3
1
b
a
c
2
Bobbin Winding
1
1
2
2
3
3
4
4
5
5
6
6
7
7
Pull the handwheel out to put the
machine in bobbin wind position (the
needle will not go up and down).
Guide the thread around the bobbin
thread tension guide into the tension
disk.
Thread through the hole in the
bobbin from the inside to the outside.
Put the bobbin on the bobbin winder
spindle with the free end of the
thread coming out at the top.
Slide the bobbin winder spindle to the
right.
NOTE: Do not move the bobbin
winder spindle while the machine is
running.
With the free end of the thread held
in your hand, press the foot control.
Stop the machine when the bobbin
has made a few turns, and cut the
thread as illustrated.
Press the foot control again. When
the bobbin is fully wound, it will stop
automatically. Slide the bobbin winder
to its original position by moving the
spindle to the left, and cut the thread
as illustrated.
Push in the handwheel.
To use the vertical spool pin, set the felt
and the spool as shown above.
a Vertical spool pin
b Spool pin felt
c Spool pin hole
12
Placing the bobbin
1
Turn off the power switch
2
1
Place the bobbin in the bobbin
case with the thread pulling off as
illustrated.
2
Guide the thread into the front
notch (a) on the front side of the
bobbin case. Draw the thread to the
left, sliding it between the tension
spring blades.
3
Continue to draw the thread lightly
until the thread slips into the side
notch (b).
4
Pull out about 10 cm (4”) of thread.
Attach the bobbin cover. Check the
threading by referring to the chart
shown on the bobbin cover.
a
3
b
4
13
1
Threading the Machine
3
Turn off the power switch
Make sure the presser foot is raised and
the needle is in the up position.
1
Bring the thread from the spool and
pass it through the thread guide.
Then draw it down along the right
slot.
2
Guide the thread around the bottom
of the thread guide plate.
3
Firmly draw the thread from right to
left over the take-up lever and down
into the take-up lever eye.
4
Slide the thread from the left behind
the needle bar thread guide.
5
Use the needle threader to thread
the needle (see page 15).
2
4
5
1
2
3
4
14
5
Needle threader
1
Turn off the power switch
1
Raise the needle to its highest position.
Lower the needle threader as far as it
will go. The hook comes through the
needle eye from behind.
2
Bring the thread from the left around
the guide and under the hook.
a Guide
b Hook
3
Release the knob slowly while
holding the thread end with your
hand. A loop of the thread is pulled
through the needle eye.
4
Pull the loop of thread behind the
needle eye.
2
3
a
b
4
15
Bringing up the Bobbin
Thread
1
Turn off the power switch.
2
b
1
Raise the presser foot and hold the
needle thread lightly with your left
hand.
2
Turn the handwheel slowly toward
you one complete turn. Bring the
bobbin thread up by pulling the
needle thread as illustrated.
a
a Needle thread
b Bobbin thread
3
16
3
Pull 10 cm (4”) of both threads back
and under the presser foot.
Stitches
Stretch stitches
Emerald 116
Stretch stitches
Emerald 118
Stretch stitches
Emerald 122
17
Stitch selection
2
Raise the needle to its highest position.
Turn the stitch selection dial to set the
desired stitch pattern number at the
setting mark.
1
1 Stitch selection dial
2 Setting mark
NOTE: Always raise the needle above the
fabric and presser foot before you turn
the stitch selction dial.
2
Stitch Length
Turn the stitch length dial to set the
desired stitch length number at the
setting mark. The higher the number, the
longer the stitch.
mark shows the adjustment
The
range when sewing the buttonhole.
3
3 Stitch length dial
2
Set the stitch length dial at “stretch”
when sewing stretch stitches.
3
18
NOTE: Always raise the needle above the
fabric and presser foot before you turn
the stitch length dial.
Adjusting stretch stitch
balance
If the stretch stitches are unbalanced
when you sew on a particular fabric,
balance them by turning the stitch length
dial, within the stretch range.
To adjust the distorted stitches:
If the stitches are spread out (a),
correct them by turning the dial in the
“–” direction. If the stitches are close
together (b), correct them by turning the
dial in the “+” direction.
a
b
Stitch Width
1
2
Turn the stitch width dial to set the
desired stitch width number at the
setting mark.
The higher the number, the wider the
stitch.
1 Stitch width dial
2 Setting mark
NOTE: Always raise the needle above the
fabric and presser foot before you turn
the stitch width dial.
Variable needle position
The needle position of the straight
stitches can be varied between the center
(5) and left (0) with the stitch width dial.
19
1
4
Balancing Needle Thread
Tension
The thread tension may be adjusted
depending on the sewing materials,
layers of fabric and sewing method.
3
Balanced tension:
2
The ideal straight stitch has threads
locked between two layers of fabric, as
illustrated.
For an ideal zigzag stitch, the bobbin
thread does not show on the right side
(top side) of the fabric, and the needle
thread shows slightly on the wrong side
(bottom side) of the fabric.
1
2
3
4
Needle thread
Bobbin thread
Right side
Wrong side
Needle thread tension is too tight:
The bobbin thread appears on the right
side of the fabric. Loosen the needle
thread tension by moving the dial to a
lower number.
Needle thread tension is too loose:
The needle thread appears on the wrong
side of the fabric. Tighten the needle
thread tension by moving the dial to a
higher number.
20
Basic sewing
Straight Stitch Sewing
Machine setting
Consult the Sewing Guide Reference
Chart for the settings recommended.
Starting to sew
Raise the presser foot and position the
fabric next to a seam guide line on the
needle plate. Lower the needle to the
point where you want to start. Lower the
presser foot and pull the threads toward
the back. Press the foot control. Gently
guide the fabric along the seam guide
line letting the machine feed the fabric.
Changing the sewing direction
Stop the machine and press the Needle
Up/Down button (model 118 and 122) or
turn the handwheel (model 116) to bring
the needle down into the fabric. Raise the
presser foot. Pivot the fabric to change
sewing direction as desired. Lower the
presser foot and continue sewing in the
new direction.
21
1
2
3
22
Finishing sewing
1
Press the reverse lever and sew
several stitches in reverse at the end
of the seam, to lock the stitch.
2
Raise the presser foot and remove
the fabric, drawing the threads to the
back.
3
Draw the threads up and into the
thread cutter. The threads are cut
the proper length for starting the
next seam.
Seam Guides on the Needle
Plate
The seam guides on the needle plate help
you measure seam allowance.
The numbers indicate the distance
between the center needle position and
the seam guide.
1 Seam guides
1
Number
15
20 4/8 5/8 6/8
Spacing
(cm)
1.5
2.0 1.3
1.6
1.9
Pivoting
Seam along the 5/8” guide. Stop stitching
and lower the needle when the fabric edge
facing you lines up with the cornering
guides as shown. Raise the presser foot
and pivot the fabric to line up to the edge
with the 1.6 cm (5/8”) seam guide. Lower
the presser foot and begin sewing in the
new direction.
2 Cornering guide
2
23
Utility Stitches
Consult the Sewing Guide Reference
Chart for the fast easy way to select the
best stitch, stitch length, stitch width,
thread tension, presser foot and presser
foot pressure for your sewing technique
and fabric.
Basic Zigzag
Simple zigzag stitching is widely used for
overcasting, sewing on buttons etc.
Three-step Zigzag
When using the Edging Foot J for
three-step zigzag, make sure the
needle does not hit the pin in the
needle hole.
Three-step zigzag is suitable for
overcasting most fabrics. It is used on the
seam allowance to prevent fabrics from
fraying at raw edges. Make sure that the
needle sews over the edge of the fabric.
Seam and Overcast
The Seam/Overcast stitch sews the seam
and overcasts the edge all at one time.
24
1
Reinforced Straight Stitch
2
3
4
Machine setting
1 Stitch pattern: 1
2 Stitch width: 0 or 5
3 Stitch length: stretch
4 Thread tension: 2 – 5
5 Presser foot: Utility foot A
5
This stitch is stronger than regular straight
stitch, due to the fact that it is a triple and
elastic stitch.
The reinforced straight stitch can be used
for heavy stretch fabrics, for crotch seams
which are subject to considerable strain
and for topstitching in heavy fabrics.
1
4
5
Button Sewing
2
3
Machine setting:
1 Stitch: 2
2 Stitch width: Adjust as necessary
3 Stitch length: Any
4 Thread tension: 3 – 7
5 Feed teeth: Lowered
Mark the fabric where the button is to
be located. Lower the feed teeth. Place
the material under the presser foot ankle.
Place the button on marking and lower
the presser bar so that the presser foot
ankle is between the holes of the button.
Hold the thread ends to one side. Turn
the handwheel and check to be sure that
the needle goes into the holes of the
button. Sew 5-6 stitches. Set the stitch
width dial to 0 and lock the threads with a
few stitches.
NOTE: Do not use this technique if
the button is less than 1 cm (3/8”) in
diameter.
Raise the feed teeth after button sewing.
25
1
Automatic Buttonhole
2
3
4
5
1
Machine setting
1 Stitch pattern:
2 Stitch width: 4 – 5
3 Stitch length:
4 Thread tension:
3–5
5 Presser foot: Automatic buttonhole
foot R
NOTES: The size of buttonhole is
automatically set by placing the button
in the automatic buttonhole foot R. The
button holder of the foot takes a button
size up to 2.5 cm (1”) in diameter. Make
a test buttonhole on a fabric sample
duplicating the interfacing and seams of
the actual garment. Use stabilizer under
all fabric.
Turn the handwheel toward you to raise
the needle to its highest position.
2
1
2
26
Snap on the automatic buttonhole
foot R
Pull the button holder to the back,
and place the button in it. Push back
the button holder against the button
to hold it tight.
3
3
Pull the buttonhole lever down as far
as it will go.
a Buttonhole lever
a
4
4
d
Raise the foot and put the needle
thread through the hole and under
the foot. Draw both threads to the
left. Insert the fabric under the foot
and lower the needle at the starting
point. Lower the foot.
b
c
d
e
b
e
Needle thread
Bobbin thread
Hole
Starting point
NOTE: Make sure there is no gap
between the slider and front stop. If
there is a gap, the length of the right and
left rows of the buttonhole will differ.
c
f
i
h
f
g
h
i
Slider
Front stop
Difference
There should be no gap.
g
27
5
6
5
Sew slowly. The machine will stitch
the complete buttonhole. Stop the
machine at the starting point when
the buttonhole is completed.
The machine sews the front bartack
and left column Àrst, then the back
bartack and right column.
6
Raise the foot and remove the
fabric.Cut both needle and bobbin
threads leaving about 10 cm (4”) of
thread ends loose. Draw the needle
thread to wrong side of the fabric
by pulling the bobbin thread. Then,
knot the threads. Place a pin on one
end of the bartack position so that
you do not need to worry about
cutting the end of the buttonhole.
Then cut the opening with seam
ripper.
To sew another buttonhole, turn the
stitch selector to , then back to
again, as shown. Move fabric to next
buttonhole marking.
Now, simply step on the foot control to
sew an identical buttonhole.
28
7
7
When Ànished, push the buttonhole
lever up as far as it will go.
Adjusting the buttonhole stitch density
Turn the stitch length dial within
to adjust the
the range of
buttonhole stitch density.
1
NOTE: If the button is extremely
thick, make a test buttonhole. If it is
difÀcult to Àt the button through the
test buttonhole, lengthen the size by
pulling back the button holder which will
increase the buttonhole length.
1 Gap
29
1
Corded Buttonhole
2
3
4
5
Machine setting:
1 Stitch pattern:
2 Stitch width: 4 – 5
3 Stitch length:
4 Thread tension: 3 – 5
5 Presser foot: Automatic buttonhole
foot R
1
1
a Spur
a
2
2
d
c
30
Draw both needle and bobbin
thread to the left. Lower the needle
into the fabric where the buttonhole
will start and lower the foot. Press
the foot control gently and sew
the buttonhole over the cord. The
sewing sequence is the same as the
automatic buttonhole.
b Needle thread
c Bobbin thread
d Starting point
b
3
With the buttonhole foot raised,
hook the Àller cord on the spur at
the back of the buttonhole foot.
Bring the cord under the foot and
hook the Àller cord into the notches
on the front of the foot to hold
them tight.
3
Pull the left end of the Àller cord
to tighten it. Thread the end of the
cord through a darning needle, draw
to the wrong side of the fabric and
cut. To cut the buttonhole opening,
refer to the instructions on page 28.
Manual Buttonhole
1
Consult the Sewing Guide Reference
Chart for recommended settings.
If the diameter of the button is more
than 2.5 cm (1”), make the buttonhole
manually as follows:
1 Snap on buttonhole foot C.
2
2
a
b
Pull the buttonhole lever down as
far as it will go. Draw both needle
and bobbin thread to the left. Lower
the needle into the fabric where the
buttonhole is to start, and lower the
foot.
a Needle thread
b Bobbin thread
c Starting point
c
31
4
4
Sew the front bartack and left
column to the desired length then
stop sewing.
5
Pull the buttonhole lever toward
you.
6
Sew the back bartack and right
column and then stop sewing at the
starting point.
7
When Ànished, push the buttonhole
lever up as far as it will go.
5
6
7
32
1
Sewing Zipper
2
Machine setting
1 Stitch pattern: 1
2 Stitch width:
5
3 Stitch length: 1.5 – 4
4 Thread tension: 3 – 6
5 Presser foot:
Zipper foot E
3
4
5
To Snap On the Zipper Foot
Snap on the zipper foot.
1 Groove
2 Pin
To sew the left side of the zipper, snap
on zipper foot on the right bar on the
side.
2
1
To sew the right side of zipper, snap on
the zipper foot on the left bar on the
side.
Fabric Preparation
1
1
i
g
h
f
c
d
b
a
Add 1 cm (3/8”) to the zipper size
for the overall opening size.
a
b
c
d
e
f
g
h
i
Right side of the fabric
1 cm (3/8”)
Opening size
Zipper size
Slider
Zipper teeth
Zipper tape
Wrong side of the fabric
End of the opening
e
33
2
n
2
l
m
k
j
k
l
m
n
j
a
1
1
Snap on the zipper foot with the bar
on the right side. Turn under the
right seam allowance to form a 0.4
cm (1/8”) fold.
a Lower layer
b End of opening
c Zipper teeth
d 0.4 cm margin
e Wrong side of the fabric
f Opening size
g Fold
h Basting stitch line
2
Place zipper teeth next to the fold
and pin in place. Align the zipper
foot with the fold. Return thread
tension and stitch length to original
settings. Sew a seam the entire length
of zipper tape, removing pins as you
go.
d
f
e
h
2
g
c
e
34
2 cm (5/8”)
Basting
Reverse stitch
End of the opening
Straight stitch
To sew
c
b
Place right sides of the fabric
together. Sew a seam from the
bottom 2 cm (5/8”) from the
right edge to the end of the zipper
opening. Sew a few stitches in
reverse to lock. Increase the stitch
length to “4”, set needle thread
tension to “1”, and baste the length
of the zipper opening.
3
3
Sew through all layers next to the
fold. Stop just before the zipper
foot reaches the slider on the zipper
tape. Lower the needle slightly into
the fabric. Raise the zipper foot and
open the zipper. Lower the foot and
stitch the remainder of the seam.
i Slider
j 5 cm (2”)
4
Close the zipper and spread the
fabric Áat with the right side facing
up. Baste the opened fabric and
zipper tape together.
i
j
4
i
k Basting
l Zipper tape
k
l
35
5
5
n
Remove the zipper foot and snap
on with pin on left side. Guide the
edge of the foot along the zipper
teeth and stitch through the fabric
and zipper tape, about 1 cm (3/8”)
distance from the basting line. Stop
about 5 cm (2’’) from the top of the
zipper.
m Remove the basting stitches
n 1 cm (3/8”)
m
6
6
36
Unzip a few centimeters/inches to
clear a path for the stitch. At end of
seam, sew a few stitches in reverse
to lock. Once both sides of zipper
are sewn, use the seam ripper to
open the rest of the basting stitch.
1
Blind Hem
b
a
b
a
c
Consult the Sewing Guide Reference
Chart for recommended settings.
1
d
2
Fold the hem under the fabric
as illustrated for Àne or medium
fabrics. Fold a hem with the wrong
side up forming a 0.5 cm (1/8”)
allowance.
a
b
c
d
3
2
Snap on the adjustable blind hem
foot. Place hem under the presser
foot. When the needle comes to the
left side, position the fabric so that
the folded edge comes to the left
side of the guide. Lower the presser
foot.
3
Turn the orange dial on the blind
hem foot backward or forward to
adjust the foot from side to side
until the wide stitch of the blind
hem barely catches the fabric.
4
Open the fabric after sewing and
press Áat.
4
e
Wrong side of the fabric
0.5 cm (1/8”)
Heavy weight fabric
Light/medium weight fabric
e Right side of the fabric
37
Non-stick Glide Foot H
Consult the Sewing Guide Reference
Chart for recommended settings.
When sewing foam, plastic, plastic
coated fabrics, leather and imitation
leathers, the Non-stick Glide Foot
H feeds over the fabric without
sticking. Use it for general sewing and
buttonholes on plastic and leather type
fabrics.
Snap on the Non-stick Glide Foot H.
Select desired stitch and sew.
Quilting Guide
1
3
2
The quilting guide will help keep
stitching lines straight.
Slide the guide into the clip on the ankle.
Adjust from side to side to the correct
position. Sew, guiding the quilt guide
over the previous row of stitching.
1 Clip
2 Quilting guide
3 Seam spacing
Presser Feet
only model 122
Transparent Foot B
Satin stitch applique, taper stitches and
decorative stitches. Length as desired.
The tunnel on the underside of the
foot feeds smoothly over the stitches.
Because it is clear and has red guidelines,
visibility and accuracy is improved. Use
stabilizers as needed.
Snap on foot. Set decorative or satin
stitch. Sew.
38
Gathering Foot
Gather fabric or gather and attach a
rufÁe in one step. Suitable for light to
medium weight fabrics. Straight stitch,
(left needle position), length 4. The
longer the length, the more fabric will
gather. Snap on Gathering Foot.
For gathered fabric:
Place fabric under Gathering Foot and
sew. Increase upper tension for tighter
gathers.
To gather and attach gathered fabric
in one step:
Place fabric to be gathered under the
presser foot right side up. Place fabric to
have rufÁe attached to it in the groove
of the foot right side down. Sew, guiding
the under fabric but do not hold it
back. Keep the top fabric in the groove
moving steadily as needed. Increase the
stitch length and the upper tension for
more gathers.
Quilter’s 1/4” Piecing Foot
Sew a scant 1/4” seam allowance. Red
lines mark 1/4” and 1/8” pivot points in
front of and behind the needle. Straight
stitch, length 2.0-2.5.
Place to pieces of fabric right sides
together. Sew with edge of fabric at
edge of foot. To pivot 1/4” from end
of fabric, stop sewing with needle stop
down, when fabric edge reaches Àrst red
mark on foot.
39
Care and
maintenance
1
Turn off the power switch.
a
2
Do not dismantle the machine other
than as explained in this section. Clean
the outside of the machine with a soft
cloth and mild soap.
Cleaning the Hook Assembly
area and Feed Teeth
1
Remove the presser foot and needle.
Remove screw on the left side of
the needle plate with the screwdriver
supplied with the machine. Remove
the needle plate and take out the
bobbin.
a Screw
2
Lift up the bobbin case and remove
it.
3
Brush out dust and lint.
4
Clean the feed teeth and hook
assembly area with the lint brush.
5
Wipe out gently with a soft, dry
cloth.
3
4
5
40
NOTE: You may also use a vacuum
cleaner.
Replacing the Bobbin Case
1
Turn off the power switch.
1
Insert the bobbin case into the hook
assembly area.
2
Make sure the knob of the bobbin
case Àts next to the stopper in the
assembly area.
2
a Knob
b Stopper
b
3
a
3
c
Insert the bobbin. Replace the
needle plate, inserting the two needle
plate guide pins into the holes in the
needle plate. Replace the screw.
c Guide holes
d Screw
d
c
Replacing the Light Bulb
Turn off the power switch. Wait
for the light bulb to cool down before
touching it.
Remove the cap and screw. Remove the
face plate.
(1)
(2)
(1) Emerald 116 (max 15W)
To remove: Push and twist to the left.
To replace: Push and twist to the right.
(2) Emerald 118 and 122 (12V, 5W)
To remove: Draw out slowly.
To replace: Push in.
41
Troubleshooting
Condition
42
Cause
Reference
The needle
1. The needle thread is not threaded properly.
thread breaks. 2. The needle thread tension is too tight.
3. The needle is bent.
4. The needle is incorrectly inserted.
5. The needle thread and the bobbin thread are not placed under
the presser foot at start of sewing.
6. The threads were not drawn to the rear after sewing.
Page 14
Page 20
Page 10
Page 10
Page 21
The bobbin 1. The bobbin thread is not threaded properly in the
thread breaks.
bobbin case.
2. Lint has collected in the bobbin case.
3. The bobbin is damaged and does not turn smoothly.
Page 13
The needle
breaks.
1.
2.
3.
4.
5.
Page 10
Page 10
Page 21
Page 10
Page 10
Skipped
stitches
1. The needle thread is not threaded properly.
2. A poor quality needle is used.
3. The needle thread tension is too tight.
Page 14
Change the needle.
Page 20
Seam
puckering
1. The needle thread is not threaded properly.
2. The stitch length is too long for the fabric.
Page 14
Make stitch shorter.
The cloth is
not fed
smoothly.
1. The feed teeth are packed with lint.
2. The stitchlength is too short.
3. The feed teeth are not raised after ”drop feed” sewing.
Page 40
Make stitch longer.
Page 8
The needle is incorrectly inserted.
The needle clamp screw is loose.
The threads were not drawn to the rear after sewing.
The needle is incorrectly inserted, bent or blunt.
The needle and/or threads are not suitable for the fabric being
sewn.
Page 22
Page 40
Change the bobbin.
Loops on the 1. The needle thread tension is too loose.
seams
Page 20
The machine
does not
work.
1. The machine is not plugged in.
2. Thread has been caught in the hook.
3. The bobbin winder spindle is still in the winding position.
Page 5
Page 40
Page 12
Noisy
operation
1. Thread has been caught in the hook assembly area.
2. Lint has built up in the hook assembly area or bobbin case.
Page 40
Page 40
Buttonhole
is not sewn
neatly.
1. The stitch density is not suitable for the fabric being sewn.
2. Interfacing is not used when sewing on the stretch
fabrics.
Page 29
Use interfacing.
Layer slippage 1. Foot pressure is not adjusted properly.
Page 8
Buttonhole
won't sew
1. Pull down buttonhole lever.
2. Be sure the buttonhole lever is in the back position.
Page 32
Page 32
Buttonhole
has gaps
1. Button must be tight in foot.
2. There is space in foot. Check gap.
Page 27
Page 27
We reserve the right to change the machine equipment and
the assortment of accessories without prior notice, or make
modiÀcations to the performance or design.
Such modiÀcations, however, will always be to the beneÀt of
the user and the product.
Please note that on disposal, this product must be safely
recycled in accordance with relevant National legislation
relating to electrical/electronic products. If in doubt please
contact your retailer for guidance
Intellectual property
HUSQVARNA, VIKING, the "Crowned H-mark" and
EMERALD are registered trademarks or trademarks of
VSM Group AB or its licensor.
412 96 59 - 26F • InHouse • © 2005-2009 VSM Group AB • All rights reserved • Printed on environmentally-friendly paper
VSM Group AB • SE-561 84 Huskvarna, Sverige
www.husqvarnaviking.com