1
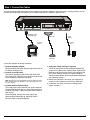
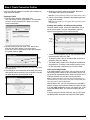
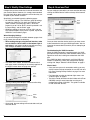
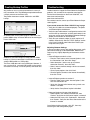
Eicon 1550/1551
WAN Router
Quickstart Guide
www.eicon.com
Introduction
Thank you for purchasing the Eicon 1550/1551 WAN
Router from Eicon Networks. Please read through this
guide carefully, as it contains important and useful installation information.
Package Contents
Your package should include the following:
To learn more about products from Eicon Networks, visit our
web site at www.eicon.com.
Country-specific
Power Adapter
Eicon 1550/1551 WAN Router
About your Eicon 1550/1551
Eicon 1550/1551 WAN Routers are intelligent, multi-protocol routers capable of connecting IP-based Ethernet
devices to leased-line PPP or Wide Area Networks via
X.25. As settings are changed through a web browser, the
Eicon 1550/1551 is very easy to use and configure.
Both the Eicon 1550 and Eicon 1551 are equipped with four
Ethernet ports and one VHSI port. The Eicon 1551 is also
equipped with an ISDN port, designed to be used as a
backup in case the VHSI connection fails. More than one
backup connection can be configured.
More information on the Eicon 1550/1551, including regulatory information and specifications, can be found in the
User’s Guide, located in the ‘doc’ folder on the
Eicon CD-ROM.
System Requirements
Eicon
1550/1551
CD-ROM
Straight-through
Ethernet Cable
(blue)
ISDN Cable
(grey)
Eicon 1551 only
Quickstart
VHSI cables are not included with your Eicon 1550/1551.
Cables can be ordered from Eicon Networks, or you can
build your own (see the User’s Guide for more information).
Note: The blue cable is a straight-through Ethernet cable and is used to
connect the Eicon 1550/1551 to a single computer.
About the Eicon CD-ROM
The Eicon CD-ROM contains the following:
•
•
•
•
User’s Guide in PDF and HTML formats
Quickstart in PDF format
Release notes in text format
Installers for Adobe Acrobat Reader (for reading PDF
files) and Microsoft Internet Explorer, along with other
software
Before you begin, review the system requirements, as outlined below.
Networking Requirements
When connecting the Eicon 1550/1551 directly to a computer, the following is required:
• A 10Base-T Ethernet network interface card, properly
installed and configured to use the TCP/IP protocol. A
100 Mbps Ethernet card can be used if the card supports
auto-sensing.
• TCP/IP communications protocol configured to obtain its
IP address automatically (DHCP client), and not
configured to use a DNS server.
If you are unsure about these topics, consult the documentation for your operating system or network adapter for more
information.
Web Browser Requirements
The Eicon 1550/1551 is configured via web pages stored
on the device itself. To access the web interface, you must
have Netscape Navigator 4 or Microsoft Internet Explorer 4,
or later versions.
Additionally, your Web browser must be configured to connect to the Internet via a local area network (LAN) and not
through a proxy server.
An installer for Microsoft Internet Explorer is included on the
Eicon CD-ROM for all Windows operating systems except
Windows 3.1. Windows NT 4.0 requires SP3 or later, available from www.microsoft.com.
2
Parameter Worksheets
During setup, you must change several parameters (such
as X.25 settings, VHSI settings, as well as usernames and
passwords) related to your particular setup.
The User’s Guide, located in the ‘doc’ folder on the Eicon
CD-ROM, contains several worksheets detailing available
settings, their defaults, and the possible values. You may
find it useful to print and fill out these worksheets before
changing configuration settings.
LAN Setup
In order to supply access to more than four computers, the
Eicon 1550/1551 can also be connected to a network hub.
More information on this topic can be found in the ‘Setup’
section in the User’s Guide, located in the ‘doc’ folder on the
Eicon 1550/1551 CD-ROM.
Step 1: Connect the Cables
This section will describe how to connect one computer to the Eicon 1550/1551. Once the setup is running correctly, you can
connect up to three other LAN devices, such as other computers or a network-capable printer.
3
4
2
1
Blue Ethernet cable
(Straight-through)
VHSI
VHSI cable
To network
adapter
Power
Adapter
To power
outlet
To modem or
leased line
Leave your computer on during installation.
1. Connect the power adapter.
When connected, the Power indicator light (on the front of
the device) should turn on.
2. Connect your VHSI cable.
Connect the appropriate end of the cable to the VHSI
port of the Eicon 1550/1551, then connect the other end
to your modem or leased line connector.
Note: VHSI cables are not included with your Eicon 1550/1551. Cables
can be ordered from Eicon Networks, or you can build your own (see
the User’s Guide).
3. Connect the blue Ethernet cable.
4. Verify your TCP/IP settings, if required.
TCP/IP for your Ethernet card should be configured to
acquire its IP address from a DHCP server automatically.
Ethernet cards are normally set this way by default. See
the ‘TCP/IP Settings’ section in the User’s Guide for
details on how to do this, or consult the help included with
your operating system.
5. Restart your computer. This forces your computer to
acquire a new IP address from the Eicon 1550/1551.
6. To continue, see ‘Step 2: Access the Configuration
Pages’ on page 4.
This cable plugs into the Ethernet port of your computer.
Plug the other end into your any of the Ethernet ports on
the Eicon 1550/1551. It does not matter which Ethernet
port you use.
Once connected, the Ethernet status light for the
connected port should light up, indicating that the
Ethernet cable is connected properly.
3
Step 2: Access the Configuration Pages
Changes to settings are made through a web browser. The
web pages reside on the Eicon 1550/1551 itself.
1. Launch your web browser.
2. Click ‘File’, ‘Open’, then enter the following IP address:
192.168.1.1
Step 3: Select the VHSI Protocol
Settings for particular connections are contained in profiles
on the Eicon 1550/1551. However, before you begin creating connection profiles, including any backup profiles, you
should verify the protocol setting for the VHSI port (set to
‘X.25’ by default). This is due to the fact that all connection
profiles are deleted when the protocol is changed.
Note: Configuration settings can be saved to a file on your hard drive. This
is useful if you have many connection profiles already defined but need to
change the VHSI protocol. See the User’s Guide for more information.
To select the VHSI protocol:
1. From the menu at the left of the screen, click on the small
3. Click ‘OK’. You should see the ‘Log in’ page.
‘+’ next to ‘VHSI Port’ to expand the VHSI Port group,
then click the ‘Protocol’ link.
‘Protocol’ link
2. From the ‘Protocol’ drop-down menu, select a protocol.
Note: If you receive an error message from your browser, and you
cannot access this web page, see ‘If you cannot access the
Eicon 1550/1551 Log in page’ on page 7.
4. Click the ‘Log in’ button.
By default there is no password.
5. The main menu should appear, as shown below.
‘Protocol’
menu
3. If you changed the protocol, click the ‘Save’ button,
located at the bottom right of the web page, when
finished. You may have to scroll down in order to locate
the button.
Note: If you do not click ‘Save’, any changes will be lost when you
move to another page.
6. To continue, see ‘Step 3: Select the VHSI Protocol’ on
page 4.
4
Step 4: Create Connection Profiles
Once the VHSI port protocol is verified, you can begin creating connection profiles.
Creating a Profile
1. From the menu, click the ‘Connection’ link.
The ‘Connection Profiles’ page appears. As no profiles
yet exist, the only section on this page is an area to
create a new profile.
4. Make the required changes to the profile. Be sure to
scroll down and inspect all parameters.
Note: Online help is available by clicking on the setting names (in blue).
5. Click the ‘Save’ button (located at the bottom right of the
page) when finished.
Note: If you do not click ‘Save’, the changes will be lost when you move
to another page.
Creating more profiles, or editing existing profiles
To create another profile, click on the ‘Connection’ link at
the left of the screen. The new ‘Connections’ page will
appear. Existing profiles will be listed at the top.
Profile
you
created
2. To add a profile, enter the name in the ‘Name’ field
then click the ‘Done’ button. If you are using an
Eicon 1551, you can also select the port to be used by
this profile (VHSI or ISDN).
‘Name’
field
‘Port’
setting
Note: The ISDN port (available on the Eicon 1551 only) is used mainly
for backup purposes.
3. The settings for your new profile will be displayed, along
with configuration parameters. The parameters available
will differ depending on the protocol used.
• To edit an existing profile, click on the radio button to the
left of the profile, then click ‘Edit’.
• To delete a profile, click on the radio button to the left of
the profile, then click ‘Delete’.
• The ‘New Profile’ section will be located at the bottom of
the profiles list. To create a new profile, enter the name
for the new profile, choose the port, and click ‘Done’.
Limits on Creating Profiles
If the VHSI protocol is set to X.25, you can create up to 32
connection profiles. When set to Frame Relay, you can create up to eight connection profiles. When using PPP as the
VHSI port protocol, you may only create one profile.
Note: It is not recommended to mix Frame Relay and X.25 profiles. It is
recommended that you either create all X.25 (with or without ISDN) or all
Frame Relay (with or without ISDN) profiles.
With the Eicon 1551, you can also create up to two ISDN
profiles. However, the maximum number of profiles for both
X.25 and ISDN combined is still 32. This means, that, if you
create two ISDN profiles, you are then limited to 30 X.25
profiles.
If you are using PPP for the VHSI port, you can still create
two ISDN profiles along with the single PPP/VHSI profile.
5
Step 5: Modify Other Settings
Step 6: Reset and Test
Changes that you have made thus far do not take effect until
you reset the device. However, it is strongly recommended
that you check other device settings to ensure that they correspond to your network situation.
For your settings to take effect, you must reset the device by
clicking the ‘Reset Device’ button at the top of the browser
window.
Specifically, you should inspect the following pages:
• All VHSI Port settings. The ‘VHSI Port’ group of settings
includes the ‘VHSI Port’ link itself, the ‘Protocol’ page
(which includes a second page, ‘HDLC’, when the
protocol is set to X.25 or ‘DLCI’, when the protocol is set
to Frame Relay), and the ‘Dialer’ page.
‘Reset
Device’
button
• ISDN Port settings. If you have an Eicon 1551 and you
have selected ‘ISDN’ as the port for a profile, inspect the
‘ISDN Port’ and ‘Protocol’ pages.
When Changing Settings
As you will be moving back and forth between pages of settings, please take note of the following:
• When making changes using the web interface, make
sure to click the ‘Save’ button on the bottom right of
each page. If you move to another page without saving,
your changes will not be saved to the device.
‘Save’
button
• The ‘Reset Form’ button, located at the bottom left of
each page, reverts all settings in the current page back to
the original values when the page was opened.
‘Reset
form’
button
• Clicking a setting name displays context-sensitive help.
Online
help
window
• Once saved, the new settings will not take effect until you
reset the device.
6
Once you have reset the device, test that you have access
to the remote device using your WAN application. You can
also ping the remote device to which you are attempting to
connect.
Troubleshooting the VHSI Connection
When the VHSI connection is working properly, the VHSI
port indicator light should stay solid. However, note that this
light blinks when data is being transmitted over the VHSI
port.
If the VHSI light blinks continuously, and if the VHSI connection is not working, check your configuration settings,
starting with ‘Step 3: Select the VHSI Protocol’ on page 4.
What’s Next?
• Once you have your main connection working, you may
wish to create a backup connection in case the main one
fails. See ‘Creating Backup Profiles’ on page 7 for more
information.
• For information on what the indicator lights mean, see
‘Indicator Lights’ on page 8.
• The User’s Guide (located in the ‘doc’ folder on the Eicon
CD-ROM) contains more information on using and
configuring the Eicon 1550/1551. The guide is available
in PDF and HTML formats.
Creating Backup Profiles
Troubleshooting
Any profile can act as a backup connection in case a primary connection fails. The following example demonstrates
a simple scenario on the Eicon 1551.
Two profiles have been created: VHSI-main and ISDNbackup.
To obtain technical support for Eicon Networks Corporation
products, visit our web site at www.eicon.com/support.
For the latest information on the Eicon 1550/1551, visit
www.eicon.com/wan1550
www.eicon.com/wan1551.
For customer service, contact your Eicon Networks Corporation supplier.
If you cannot access the Eicon 1550/1551 Log in page
• Verify that all cables are connected properly. The power
and Ethernet lights should be on.
As shown below, on the profile page for ‘VHSI-main’, the
profile ‘ISDN-backup’ has been defined as the backup profile for ‘VHSI-main’.
‘Backup’
setting
• Verify that your web browser is configured to use the LAN
and not a dial-up connection, and that your browser is not
set to use a proxy server. See Adjusting Browser Settings
(below) for instructions on how to do this.
• Verify that your network adapter is set to acquire its IP
address automatically. See the ‘TCP/IP Settings’ section
in the User’s Guide for more information. Restart your
computer and try again.
Adjusting Browser Settings
If you are not able to access the configuration pages, verify
your browser settings as described below. Note that the
steps may vary slightly depending on the browser version
used.
• Internet Explorer version 5 or later:
Additionally, you could assign a backup profile to ‘ISDNbackup’ in case that connection is unavailable. It could be
another ISDN profile or a VHSI profile.
The Eicon 1550 does not have an ISDN port. However, if
you are using X.25, a second VHSI profile can be created
and used as a backup in case the primary connection fails.
– From the ‘Tools’ menu, select ‘Internet Options’, click
the ‘Connections’ tab, then click ‘Setup’.
– Select the option ‘I want to set up my Internet
connection manually’, then click ‘Next’.
– Select ‘I want to connect through a local area network’,
then click ‘Next’.
– Clear all proxy options, then click ‘Next’.
– Clear the option ‘Connect to the Internet immediately’,
then click ‘Finish’.
• Internet Explorer previous to version 5:
– From the ‘View’ menu, select ‘Internet Options’, then
click the ‘Connection’ tab.
– Verify that ‘Connect to the internet using a local area
network’ is enabled.
– Verify that the ‘Proxy Server’ option is disabled.
• Netscape Navigator (do one of the following):
– Under Options, click ‘Network Preferences’, then
‘Proxies’. Verify that the ‘No Proxies’ option is selected.
– Under the ‘Edit’ menu, click ‘Preferences’, ‘Advanced’,
then ‘Proxies’. Verify that the ‘Direct Connection to the
Internet’ is enabled.
Once finished making changes, click ‘OK’, then retry
accessing the web configuration pages.
7
Indicator Lights
The following diagram describes the behavior of the indicator lights on the Eicon 1550/1551.
Note that the ISDN lights apply only to the Eicon 1551.
B2
B1
Note: ISDN lights (B, ISDN,
and Link) are available on
the Eicon 1551 only.
Power Light
VHSI Light
B Lights
Solid green: Power adapter is
properly connected.
Flashing red only: Device firmware
is being upgraded. Do not reset or
unplug the power adapter.
Flashing red/green: Device is in
boot mode. If you are not
upgrading firmware while in boot
mode, press the Reset button
once to return the device to
normal.
If you are upgrading firmware
while in boot mode, do not press
Reset for at least one minute after
transferring the firmware to the
device.
Rapidly flashing red: A fault has
occurred. Press the reset button
once to return to normal.
If you are using X.25:
ON: The X.25 layer is ready.
FLASHING: The X.25 layer is not
ready.
OFF: The X.25 port is closed or the
cable is disconnected.
If you are using PPP:
ON: The PPP layer is connected.
FLASHING: The PPP layer is trying
to connect to a remote site.
OFF: The PPP layer is closed or
the cable is disconnected.
If you are using Frame Relay:
ON: The Frame Relay layer is
connected.
FLASHING: The Frame Relay layer
is opening.
OFF: The Frame Relay layer is
closed or the cable is disconnected.
OFF: No call activity on
the B-channel.
FLASHING: A call is
being established on the
B-channel.
SOLID: A call is connected
on the B-channel.
Console Port Light
ON or Flashing:
Data is being sent or received
via the Console port.
Off: The Console port serial
cable is not connected or data
is not being sent or received via
the Console port.
Ethernet Lights
ON: The Ethernet cable is
connected properly.
OFF: The Ethernet cable is not
connected, or the wrong cable is
connected (straight-through or
crossover).
FLASHING: Data is being sent or
received via the Ethernet cable.
E4 Flashing red: An Ethernet
collision has occurred. If infrequent,
this is a normal occurrence that will
correct itself.
ISDN Light
International Firmware:
OFF: D turns on to indicate
a properly configured line.
However, when the line is
idle, many networks
automatically disconnect
the D-channel (turning off
the D light) to conserve
power.
SOLID: D will turn on just
before the B light when the
Eicon 1551 makes a call.
When solid, the D light
indicates a properly
configured ISDN line.
Link Light
OFF: The ISDN physical interface is not synchronized, or the ISDN
cable is improperly connected.
FLASHING: The ISDN physical interface is synchronizing.
SOLID: The ISDN physical interface is active.
Note: Flashing stops when synchronization is complete.
Continuous flashing indicates an error. Make sure that the line is
plugged in properly and that you are using the correct interface (S/T
or U). For S/T with an NT1, make sure your ISDN line is terminated
(see your ISDN provider for more details).
Copyright © 1999-2002 Eicon Networks Corporation / 227-196-02
8