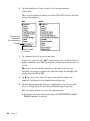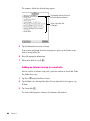
1
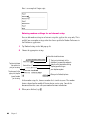
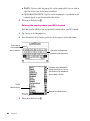
1 Getting Started The Newton Internet Enabler (NIE) software lets you browse the World Wide Web, send and receive electronic mail, or e-mail, and access information services using a Newton device. The NIE software is enabling technology that runs in the background of the Newton operating system. If you’re familiar with the Internet and want to get started using it with NIE right away, see “Quick Start” later in this chapter. If you’re not familiar with the Internet, read the next section, “What Is the Internet?” After that you can review the “Requirements” section to find out exactly what you’ll need to access the Internet. What is the Internet? The Internet is a worldwide network of computer networks. Through the Internet, you can contact millions of computers and their users. Without leaving your chair, you can use the Internet to m stay in touch with friends, relatives, and colleagues around the world (through e-mail) at a fraction of the cost of phone calls or air mail m discuss everything from archaeology to zoology with people all over the world m tap into hundreds of information databases and libraries worldwide m retrieve documents, journals, books, and computer programs m stay up-to-date with news, sports, and weather reports 1 m work on your company’s private network (or “intranet”) m browse the World Wide Web Browsing the Web The World Wide Web is an online hypertext system that spans the Internet. Hypertext means you can browse through text, expanding items that interest you. When you expand an item, you actually follow a link to new information. Web sites are documents that people post on the World Wide Web. Web sites often contain text, graphics, video segments, and sound. Using Web browser software, you can “visit” Web sites, see what’s there, and click items to explore them. Recently many elaborate Web sites—both frivolous and serious—have appeared, through which you can shop, comment on political candidates, learn about your favorite TV stars, search for a partner, order pizza, and more. To visit Web sites on your Newton device, you need Web browser software. Sending and receiving e-mail Through an Internet e-mail system you can send mail to virtually any networked computer on the planet. An e-mail message arrives within minutes (or at the most, a few hours) after you send it. E-mail is a great way to communicate with friends and relatives. You can send and receive text, images, and voice annotations, and even conduct e-mail conferences with several Internet e-mail users. To use e-mail on your Newton device, you need e-mail software. You can send and receive e-mail from many types of e-mail systems. Newton devices support e-mail from m Internet service providers (ISPs), such as EarthLink, Netcom, and Sprynet m online services, like America Online m LAN-based e-mail networks using cc:Mail, Microsoft Mail, Notes Mail, or QuickMail m wireless mail services, such as RadioMail and WyndMail m Internet mail, such as Eudora, Netscape Mail, and Microsoft Internet Mail 2 Chapter 1 Accessing information services and your company’s intranet You can access a range of information services using your Newton device and thirdparty applications, including m Telnet m File Transfer Protocol (FTP) m newsgroups m Internet-Related Chat (IRC) From outside the office, you can also call into your company’s intranet for access to corporate systems and databases. Features of the NIE software NIE offers the following features: m LocalTalk and MacIP support m Ethernet support (including support for DHCP, or Dynamic Host Configuration Protocol) m support for TCP and UDP protocols over PPP (Point-to-Point Protocol) or SLIP (Serial Line Interface Protocol) m a domain name resolver m a dialer with scripting capability m support for PAP (Password Authentication Protocol) and CHAP (Challenge Handshake Authentication Protocol) authentication m SecurID® card support To use NIE, you should be familiar with basic Newton functions (described in the documentation that came with your Newton device). Requirements You can connect to the Internet using NIE in several ways: using an Ethernet or AppleTalk network, using a modem, or using a serial connection. There are several things you’ll need to use the Internet no matter how you connect: Getting Started 3 m a Newton device, with 1 MB or more of system memory, running the Newton 2.1 operating system or later m adequate storage space—the NIE software requires approximately 800K (Keep in mind that you’ll need additional space for any Internet applications and their associated data.) Depending on the type of connection you’re using, you may not need as much space. m the latest Newton OS System Update (System updates are required when using NIE.) m an account with an Internet service provider (ISP) or equivalent, such as one established through your work or school, or access to a private company intranet m one or more Internet applications for the Newton operating system, such as Web browser software and e-mail software m an Internet setup stored in the internal memory or on a PC card (You use NIE to create Internet setups.) Additional requirements Depending on how you are connecting, you may also need the following: Ethernet m Ethernet PC card m Ethernet network running the TCP/IP protocol LocalTalk m a LocalTalk cable connected to an AppleTalk network bridged to a TCP/IP network and a MacIP server or m an Ethernet PC card connected to an EtherTalk network bridged to a TCP/IP network and a MacIP server Modem m an analog phone line or cellular telephone m an external modem or a PC card modem compatible with your Newton device m a modem setup file for your particular modem 4 Chapter 1 Serial m a serial cable connected to a computer that’s connected to the Internet The following sections provide detailed information about some of the above components. Newton OS System Updates For information on system updates, including which system update you may need and how to get it, check the Newton OS System Updates page at http://www.newton.apple.com/product_info/SW/system_updates.html Internet application software You can’t explore the Internet using NIE alone; you’ll need e-mail software, a Web browser, or other software to do more than simply establish an Internet connection. For a list of Internet applications available for Newton devices, check the Internet Application Software page at http://www.newton.apple.com/product_info/sw/nie/niesoftware.html An analog phone line or cellular phone You can use a regular analog telephone line or a cellular handset. A compatible external modem (cellular or PC card) You can use a variety of modems with your Newton device. For the latest information, check the Modems for Newton OS Computers page at http://www.newton.apple.com/product_info/thirdparty/modemintro.html Note: Most modem manufacturer specifications are subject to change without notice. These changes may result in incompatibilities between your modem and Internet service providers. Apple cannot guarantee the operability of any individual modem and is not liable for damages resulting from the use of any modem. Please contact the modem manufacturer for any additional information. Important Most modem PC cards require a lot of power and shorten the life of batteries. When using a modem, it is best to use the NiMH Rechargeable Battery Pack with your Newton device, or plug in the optional AC adapter. Getting Started 5 A modem setup for the modem you’re using Most Newton devices come with several modem setup files already installed. Your dealer or the modem manufacturer can tell you which modem setup will work with your modem. If the modem setup that you need is not included with your Newton device, check the Modems for Newton OS Computers page at http://www.newton.apple.com/product_info/thirdparty/modemintro.html If you can’t find the file there, contact your modem manufacturer. You’ll then need to install the modem setup package on your Newton device using connection software, such as the Newton Connection Utilities. An Internet service provider (ISP) ISPs typically provide you with a telephone number to dial, an Internet mailbox, and access to the Web. Check the following when choosing an ISP: m Make sure the ISP allows you to connect using either the PPP (Point-to-Point Protocol) or SLIP (Serial Line Interface Protocol) communications protocol. Note: NIE works both with and without PAP (Password Authentication Protocol) or CHAP (Challenge Handshake Authentication Protocol) authentication. PAP and CHAP are forms of password exchange with the ISP’s host computer that provide added security at connection time. m Tell the ISP what modem you intend to use, and make sure it’s compatible with the modems used by the ISP. m Ask the ISP if they have special software for configuring your Newton device. If they do, obtain the software and follow their configuration instructions. Corporate or private intranet If you’re connecting to a corporate or private intranet, you need to contact the network administrator to get a user ID or login name and password, as well as the access phone number. Many corporations have security policies that may restrict your use of a Newton device on their intranet. Check with your network administrator before attempting to connect your Newton device to your company’s intranet. 6 Chapter 1 Account information To create Internet setups on your Newton device, you may need some or all of the following information from your ISP or network administrator: m if you’re using an ISP, the ISP template file (several are included with NIE) m if you’re using a modem or serial connection, the link protocol you should use (PPP or SLIP) m telephone access number(s) m your user ID (also known as your user name or login name) m password m if you’re using a LocalTalk connection, the MacIP zone you’re connecting to m if you’re not using a server to connect, the local IP address m if you’re not using a server to connect, a gateway/router address m if you’re connecting via Ethernet, the subnet mask m the DNS/Name server address m the domain name m steps in the login and logout sequence, if necessary (if your ISP uses PAP or CHAP authentication, you don’t need this) m if you’re going to use e-mail, you need e-mail information, such as your POP account (user ID), password, and mail servers (for incoming and outgoing mail) See the document Using E-Mail With Your Newton Device for more information. Note: Only your ISP or network administrator can provide you with this information. Apple does not have this information. An Internet setup An Internet setup is a set of information that allows your Newton device to communicate with your ISP or network. You need an Internet setup that includes the appropriate account information, listed in the previous section. All Internet setups you create using NIE must be in the internal memory of your Newton device, or on a PC card that you insert in your Newton device. If you’re connecting to the Internet using an ISP, you can use an existing ISP template file to help you create your Internet setup. ISP templates for some of the more popular ISPs are included with NIE. Getting Started 7 To view the list of template files, follow these steps: 1 Tap or press Extras E. 2 Tap the folder tab and in the list that appears, tap Setup. The Setup folder opens. 3 Tap the Internet Setup icon. 4 Tap New. A list appears that includes some of the ISP templates that are configured for your Newton device. ISPs may modify their networks; if so, template files included with your Newton device may not work correctly. Check with your ISP if you have any questions. Apple Computer is not responsible for the proper functioning of any ISP templates. Important 5 Do one of the following: If your ISP is in the list, use that template when you create your Internet setup. If your ISP is not in the list, contact your ISP to get help in creating an Internet setup. If you want to use your corporate intranet, your network administrator may be able to tell you how to create an Internet setup or provide you with an appropriate template. Installing the NIE software If the latest version of NIE is not already installed on your Newton device, you first need to install the NIE software onto a Mac OS- or Windows-based computer. If your Newton device came with a CD that has NIE, you can use the CD to install the software onto your computer. You can also download the NIE software from the World Wide Web. Then use connection software, such as the Newton Connection Utilities, to install the files you need onto your Newton device. To download NIE from the Web, visit Apple’s Newton Web site at http://www.newton.apple.com 8 Chapter 1 Installing the NIE software onto your computer If you received NIE on a CD with your Newton device, follow these instructions to copy NIE onto your Mac OS– or Windows-based computer. 1 Insert the CD with the NIE software into the CD-ROM drive of your computer. 2 Double-click the CD icon to open it. 3 Double-click the NIE folder to open it. 4 Double-click the Installer icon to open the Installer. 5 Follow the onscreen instructions and install the desired files onto your computer. 6 When you’re finished, remove the CD and store it in a safe place. If you have an earlier version of NIE If you’re using an earlier version of NIE, you need to delete it from your Newton device before you can install the latest version of NIE. The packages you’ll need to delete from an earlier version are m Newton Internet Enabler.pkg m ISP Templates.pkg m Internet Setup.pkg For more information about deleting items, see the documentation that came with your Newton device. After you install the latest version of NIE and open the Internet Setup application, a message appears telling you that your setup information from the earlier version will be converted. Once you convert the setup information, you won’t be able to use it with earlier versions of NIE. If you want to continue to use an earlier version of NIE, back up the packages listed above using connection software or a PC card. You’ll also need to back up your Internet setup information in the Storage folder in the Extras Drawer. For more information on backing up, see the documentation that came with your connection software. Getting Started 9 Installing the NIE software onto your Newton device To install the latest version of NIE, you use connection software, such as the Newton Connection Utilities. In order to connect to the Internet, you must install the following packages in the internal memory of your Newton device: m Internet Setup.pkg (this can also be stored on a PC card) m Newton Internet Enabler.pkg In addition, you’ll need to install one or more of the packages listed below in the internal memory of your Newton device, depending on how you are connecting to the Internet: m NIE Ethernet Support.pkg m NIE LocalTalk Support.pkg m NIE Modem-Serial Support.pkg m Newton Devices.pkg (needed only if you’re using an Ethernet PC card) m third-party Ethernet driver file (available from the manufacturer of your Ethernet PC card; needed only if you’re using an Ethernet PC card) Note: To save memory, only install the packages necessary for the type of connection you are making. For example, if you’re using a modem to connect to an ISP, you don’t need to install Newton Devices.pkg, NIE Ethernet Support.pkg, or NIE LocalTalk Support.pkg. Follow the instructions that came with your connection software to install the packages on your Newton device. If you’re connecting using Ethernet, you must install Newton Devices.pkg before you install any third-party Ethernet driver files. Important Once installed, Internet Setup is automatically stored in the Setup folder in the Extras Drawer, and all of the other NIE files are stored in the Extensions folder in the Extras Drawer. 10 Chapter 1 Quick start You can use NIE with your Newton device to connect to the Internet using an Ethernet network, an AppleTalk network, a modem, or a serial cable connection. Once you get everything you need for the type of connection you are making, you’ll need to install NIE on your Newton device, and then create an Internet setup for each type of connection. Follow these steps to quickly use NIE to access the Internet: 1 Get all of the requirements for the type of connection you’re using. See “Requirements” earlier in this chapter. 2 If necessary, install the NIE software on a Mac OS- or Windows-based computer. See “Installing the NIE Software Onto Your Computer” earlier in this chapter. 3 Use connection software to install the desired NIE software on your Newton device. See “Installing the NIE Software Onto Your Newton Device” earlier in this chapter. 4 On your Newton device, open Internet Setup and create an Internet setup for each type of connection you’re using. See Chapter 2, “Creating Internet Setups.” 5 Open your Internet software and connect to the Internet. See Chapter 3, “Connecting and Disconnecting.” 6 When you’re done, disconnect from the Internet. See Chapter 3, “Connecting and Disconnecting.” Getting Started 11 2 Creating Internet Setups An Internet setup is a collection of information you need to connect to the Internet using a network or a particular ISP. To easily create an Internet setup, you can use one of the templates provided with the NIE software. There are two different kinds of templates—Generic Setup and ISP templates. The latter are for use with many of the popular Internet service providers. Accessing a corporate or private intranet If you want to use your corporate intranet, your network administrator or Management Information Systems (MIS) department may be able to tell you how to create an Internet setup or provide you with the appropriate information. Many corporations have security policies that may restrict your use of a Newton device on their intranet. Check with your network administrator before attempting to connect your Newton device to your company’s intranet. Important 13 Creating a new Internet setup To create an Internet setup, follow these steps: 1 Tap Extras E to open the Extras Drawer. 2 Tap the folder tab at the top of the Extras Drawer and in the list that appears, tap Setup. Tap Setup to open the Setup folder. 3 Tap the Internet Setup icon. The Internet Setup application opens. If you don’t have any Internet setups, you’ll see this message. Tap here to create a new Internet setup. 14 Chapter 2 Note: If you’ve already created one or more Internet setups, you’ll see an overview, or list, of your Internet setups. 4 Tap Generic Setup to start with a blank template. In the Internet Setup slip, tap New. Tap SecurID if you’re using a SecurID card. Tap UNIX to connect to a UNIX-based network. If you’re using an ISP, tap it in the list. 5 Tap your choice: m If you’re using an ISP, choose it in the list. If your ISP is not in the list, contact your ISP to determine which ISP template to use or to get help in creating an Internet setup. Note: ISPs may modify their networks; if so, their template files may not work correctly. Check with your ISP if you have any questions. Apple Computer is not responsible for the proper functioning of any ISP templates. m If you’re using a SecurID card, tap SecurID®. A SecurID card provides authorized users access to protected computer systems, such as a corporate intranet. The SecurID card is a credit card-like device that generates a unique value, which you enter when you log in. The ISP host uses this value to verify your identity. Check with your network administrator for more information. m If you’re connecting to a UNIX-based network, tap UNIX®. Note: Templates for using a SecurID card and UNIX include login script steps that are based on common login scripts. Check with your network administrator to make sure the login script is correct. m If you want to start with a blank setup and you’re connecting using Ethernet, LocalTalk, a modem, or a serial connection, tap Generic Setup. Creating Internet Setups 15 6 Refer to one of the following sections to learn how to enter specific information for Internet setups: m If you’re starting with a blank Internet template (you chose Generic Setup), see one of the following sections, depending on how you are connecting: “Entering Information for an Ethernet Setup,” “Entering Information for a LocalTalk Setup,” “Entering Information for a Modem Setup,” or “Entering Information for a Serial Setup.” m If you’re creating an Internet setup for an ISP, SecurID card, or UNIX, see “Entering Information for a Modem Setup.” Entering information for an Ethernet setup If you tapped Generic Setup in the New pop-up list, you’ll see the New Internet Setup slip. 1 Tap “Connect using” and in the pop-up list, tap Ethernet. Tap Ethernet. Your choice appears in the slip. This shows how you are connecting. Tap here to view onscreen help. 16 Chapter 2 After you’ve chosen how you’re connecting, tap Continue. 2 Tap Continue. 3 In the first setup slip that appears, enter the appropriate information. Tap here and in the pop-up list, tap your configuration— Manual or DHCP Server. Enter a name for this Internet setup. Tap here and in the pop-up list, tap the name of the Ethernet PC card you’re using. Tap Continue to go to the next slip. m Setup Name—Enter a name for this setup, such as Work, Home, School, or Atlanta Field Office. m Configuration—Tap Manual if you are using a static IP address (the address is assigned to you); tap DHCP Server if the server assigns you an IP address each time you log in. m Card—Tap the name of the Ethernet PC card you are using. If your Ethernet card is not in the list, check with the manufacturer of the card to see if they have driver software you can use with your Newton device. Once you install the driver file on your Newton device, the card’s name should appear in this list. 4 When you’re ready, tap Continue. If you do not enter all of the necessary information, a message appears telling you that you need to enter information to continue. Tap X to close the message slip, then enter the necessary information. 5 In the second setup slip, enter the appropriate information. Creating Internet Setups 17 The information that appears in the slip depends on your configuration—manual or DHCP server. Enter the local IP address here. Enter the subnet mask address here. Enter the gateway/ router address here. Enter the DNS/Name server address here. Tap here to use the onscreen keyboard to enter information. Enter the domain name here. Tap Go Back to return to the previous screen. Tap Done when you’ve entered all of the appropriate information. m Local IP Address—Enter the numeric address for your device. m Subnet Mask—Enter the numeric address that identifies the subnetwork you’re using. m Gateway/Router Address—Enter the numeric address for the gateway that directs information to and from your device. m Primary DNS/Name Server Address—Enter the numeric address that identifies the computer that contains a list of IP addresses and their associated names. m Domain Name—Enter the alphabetic address for the network you’re connected to. 6 When you’re finished, tap Done. If you do not enter all of the information, a message appears telling you that you need to enter information to continue. Tap Cancel to close the message slip, then enter the necessary information. 18 Chapter 2 The summary slip appears, showing you the information you just entered. This is the name of your Internet setup. Tap here to go through the setup process again. Tap an individual item to change it. Tap here to add other DNS/Name server addresses and a disconnect delay. When you’re finished, tap here to close this Internet setup. m To add other DNS/Name server addresses and a disconnect delay, see “Adding Other Information to a Setup” later in this chapter. m To change an item, tap it. For more information, see “Changing Information in an Internet Setup” in Chapter 4. Setting AppleTalk preferences If you’re using an Ethernet PC card to connect to an AppleTalk network, you need to specify your AppleTalk preference—whether you connect using LocalTalk or EtherTalk. Important If you use EtherTalk, you must have Newton Devices.pkg and a thirdparty Ethernet driver file installed on your Newton device. You’ll also need to insert an Ethernet PC card into a card slot on your Newton device when you connect to the Internet. To set your AppleTalk preference, follow these steps: 1 Tap or press Extras E. 2 Tap the folder tab, then tap Unfiled Icons. (If you filed Prefs in another folder, tap that name.) 3 Tap Prefs π. Creating Internet Setups 19 4 In the Preferences slip, tap AppleTalk. Tap here to set preferences for connecting to an AppleTalk network. 5 Tap “Connect using” and in the pop-up list, tap LocalTalk or EtherTalk. Tap here and in the pop-up list, tap LocalTalk or EtherTalk. Your choice now appears in the AppleTalk slip. If you chose EtherTalk, a Card option appears in the AppleTalk slip. 6 If necessary, tap Card and in the pop-up list, tap the Ethernet PC card you’re using. Tap Card and in the pop-up list, tap the Ethernet PC card you’re using. The selected card name appears in the AppleTalk slip. 7 20 Chapter 2 When you’re finished, tap all X’s to close the slips. Entering information for a LocalTalk setup If you tapped Generic Setup in the New pop-up list, you’ll see the New Internet Setup slip. 1 Tap “Connect using” and in the pop-up list, tap LocalTalk. Tap LocalTalk. Your choice appears in the slip. This shows how you are connecting. After you’ve chosen how you’re connecting, tap Continue. Tap here to view onscreen help. 2 Tap Continue. Creating Internet Setups 21 3 In the first setup slip that appears, enter the appropriate information. Tap here and in the pop-up list, tap your configuration. Enter a name for this Internet setup. Tap here and in the pop-up list, tap the AppleTalk zone you’re using. If you tap Other AppleTalk Zone, a slip appears. Choose the desired zone from the slip. Tap Continue to go to the next slip. m Setup Name—Enter a name for this setup, such as Work, Home, School, or Atlanta Field Office. m Configuration—Tap Manual if you are using a static IP address (the address is assigned to you); tap MacIP Server if the server assigns you an IP address each time you log in. m Zone—Tap the name of the AppleTalk zone you’re using. If you tap Other AppleTalk Zone, a slip appears showing the different zones. Tap the zone you want to use. 4 22 Chapter 2 When you’re ready, tap Continue. 5 In the second setup slip, enter the appropriate information. The information that appears in the slip depends on your configuration—manual or MacIP server. Enter the local IP address here. Enter the gateway/router address here. Enter the DNS/Name server address here. Enter the domain name here. Tap here to use the onscreen keyboard to enter information. Tap Go Back to return to the previous screen. Tap Done when you’ve entered all of the appropriate information. m Local IP Address—Enter the numeric address for your device. m Gateway/Router Address—Enter the numeric address for the gateway that directs information to and from your device. m Primary DNS/Name Server Address—Enter the numeric address that identifies the computer that contains a list of IP addresses and their associated names. m Domain Name—Enter the alphabetic address for the network you’re connected to. 6 When you’re finished, tap Done. If you do not enter all of the information, a message appears telling you that you need to enter information to continue. Tap Cancel to close the message slip, then enter the necessary information. Creating Internet Setups 23 The summary slip appears, showing you the information you just entered. This is the name of your Internet setup. Tap here to go through the setup process again. Tap an individual item to change it. Tap here to add other DNS/Name server addresses and a disconnect delay. When you’re finished, tap here to close this Internet setup. m To add other DNS/Name server addresses and a disconnect delay, see “Adding Other Information to a Setup” later in this chapter. m To change an item, tap it. For more information, see “Changing Information in an Internet Setup” in Chapter 4. Note: If you’re using an Ethernet PC card over an AppleTalk network, see the earlier section “Setting AppleTalk Preferences.” Entering information for a modem setup If you tapped Generic Setup in the New pop-up list, you’ll see the New Internet Setup slip. If you tapped SecurID, UNIX, or a specific ISP, skip steps 1 and 2 and go to step 3. 1 Tap “Connect using” and in the pop-up list, tap Modem. Tap Modem. 24 Chapter 2 Your choice appears in the slip. This shows how you are connecting. After you’ve chosen how you’re connecting, tap Continue. Tap here to view onscreen help. 2 Tap Continue. 3 In the first setup slip that appears, enter the appropriate information. Tap here and in the pop-up list, tap PPP or SLIP. Enter a name for this Internet setup. Tap here and in the pop-up list, tap Manual or Server. Enter the access number. Enter your user ID or user name. Tap here to set a password. (If you already set a password, this says Edit Password.) Tap here and in the pop-up list, choose a disconnect delay. Tap here to use the onscreen keyboard to enter information. Tap Continue to go to the next slip. Creating Internet Setups 25 m Setup Name—Enter a name for this setup, such as Work, Home, School, or Atlanta Field Office. m Protocol—Tap PPP or SLIP, depending on the communications protocol you’re using. m Configuration—Tap Manual if you are using a static IP address (the address is assigned to you); tap Server if the server assigns you an IP address each time you log in. m Access Number—Enter the telephone number that allows you to connect to and access your ISP or private intranet. m User ID—Enter your user name (also known as your login ID). m Set Password—Tap here and follow the onscreen instructions to enter your password, if you have one. (If you already set your password, the button is labeled Edit Password.) m When closing, disconnect—Tap here and in the pop-up list, tap the time you want to wait until the connection is closed after you close an Internet application. 4 26 Chapter 2 When you’re ready, tap Continue. 5 In the second setup slip, enter the appropriate information. The information that appears in the slip depends on your configuration—manual or server. Enter the local IP address here. Enter the gateway/router address here. Enter the DNS/Name server address here. Enter the domain name here. Tap here to use the onscreen keyboard to enter information. Tap Go Back to return to the previous screen. Tap Done when you’ve entered all of the appropriate information. m Local IP Address—Enter the numeric address for your device. m Gateway/Router Address—Enter the numeric address for the gateway that directs information to and from your device. m Primary DNS/Name Server Address—Enter the numeric address for the computer that contains a list of IP addresses and their associated names. m Domain Name—Enter an alphabetic address for the network you’re connected to. 6 When you’re finished, tap Done. If you do not enter all of the information, a message appears telling you that you need to enter information to continue. Tap Cancel to close the message slip, then enter the necessary information. Creating Internet Setups 27 The summary slip appears, showing you the information you just entered. Tap here to go through the setup process again. This is the name of your Internet setup. Tap an individual item to change it. Tap here to add information to this Internet setup. When you’re finished, tap here to close this Internet setup. Note: If you chose the SecurID or UNIX setup, a login script is automatically added, based on common login scripts. Make sure you check with your network administrator to verify the login script is correct. m To add other information, including alternate access numbers, DNS/Name server addresses, a login script, a logout script, modem settings, redial settings, and the country where your ISP is located, see “Adding Other Information to a Setup” later in this chapter. m To change an item, tap it. For more information, see “Changing Information in an Internet Setup” in Chapter 4. 28 Chapter 2 Entering information for a serial setup If you tapped Generic Setup in the New pop-up list, you’ll see the New Internet Setup slip. 1 Tap “Connect using” and in the pop-up list, tap Serial. Tap Serial. Your choice appears in the slip. This shows how you are connecting. After you’ve chosen how you’re connecting, tap Continue. Tap here to view onscreen help. 2 Tap Continue. Creating Internet Setups 29 3 In the first setup slip that appears, enter the appropriate information. Tap here and in the pop-up list, tap PPP or SLIP. Enter a name for this Internet setup. Tap here and in the pop-up list, tap Manual or Server. Enter your user ID or user name. Tap here to set a password. (If you already set a password, this says Edit Password.) Tap here and in the pop-up list, choose a disconnect delay. Tap here to use the onscreen keyboard to enter information. Tap Continue to go to the next slip. m Setup Name—Enter a name for this setup, such as Work, Home, School, or Atlanta Field Office. m Protocol—Tap PPP or SLIP, depending on the communications protocol you’re using. m Configuration—Tap Manual if you are using a static IP address (the address is assigned to you); tap Server if the server assigns you an IP address each time you log in. m User ID—Enter your user name (also known as your login ID). m Set Password—Tap here and follow the onscreen instructions to enter your password, if you have one. (If you already set your password, the button is labeled Edit Password.) m When closing, disconnect—Tap here and in the pop-up list, tap the time you want to wait until the connection is closed after you close an Internet application. 4 30 Chapter 2 When you’re ready, tap Continue. 5 In the second setup slip, enter the appropriate information. The information that appears in the slip depends on your configuration—manual or server. Enter the local IP address here. Enter the gateway/router address here. Enter the DNS/Name server address here. Enter the domain name here. Tap here to use the onscreen keyboard to enter information. Tap Go Back to return to the previous screen. Tap Done when you’ve entered all of the appropriate information. m Local IP Address—Enter the numeric address for your device. m Gateway/Router Address—Enter the numeric address for the gateway that directs information to and from your device. m Primary DNS/Name Server Address—Enter the numeric address for the computer that contains a list of IP addresses and their associated names. m Domain Name—Enter an alphabetic address for the network you’re connected to. 6 When you’re finished, tap Done. If you do not enter all of the information, a message appears telling you that you need to enter information to continue. Tap Cancel to close the message slip, then enter the necessary information. Creating Internet Setups 31 The summary slip appears, showing you the information you just entered. Tap here to go through the setup process again. This is the name of your Internet setup. Tap an individual item to change it. Tap here to add information to this Internet setup. When you’re finished, tap here to close this Internet setup. m To add other information, including DNS/Name server addresses, a login script, a logout script, modem settings, redial settings, and the country where your ISP is located, see “Adding Other Information to a Setup” later in this chapter. m To revise an item, tap it. For more information, see “Changing Information in an Internet Setup” in Chapter 4. Completing an Internet setup After you’ve completed an Internet setup, its name will appear in the Internet Setup slip. It’s a good idea to connect to the Internet using each of your Internet setups to make sure they work properly. The Internet setups you create are stored in the file called “Internet Setups” in the Storage folder in the Extras Drawer. Once you’ve created your Internet setups, you can delete the Internet Setup application and the ISP Templates package to free up storage space. If you need to change, add, or view setups later, you’ll need to reinstall the Internet Setup application. 32 Chapter 2 If you no longer need or use an Internet setup, you may want to delete it. For information about deleting Internet setups, see “Duplicating or Deleting an Internet Setup” in Chapter 4. s Do not delete Internet Enabler or the support file that you’re using (for example, Modem-Serial Support.pkg). You can’t connect to the Internet without the appropriate software. Also, Internet Setup doesn’t work without the Internet Enabler file. s Warning Viewing your Internet setups To view your Internet setups, you must have the Internet Setup application installed on your Newton device. To view Internet setups, follow these steps: 1 Tap Extras E to open the Extras Drawer. 2 Tap the folder tab at the top of the Extras Drawer and in the list that appears, tap Setup. 3 Tap the Internet Setup icon. The Internet Setup application opens and a list of your setups appears. These icons represent the type of connection for the setup. Tap a setup to view it. Tap here when you’re done viewing your Internet setups. Creating Internet Setups 33 4 To view a setup, tap it. The summary slip for the selected Internet setup appears. 5 When you’re finished viewing setups, tap all X’s to close the slips. Adding other information to a setup You can add other information to an Internet setup after you’ve entered the basic information. Depending on how you are connecting, you can add m alternate access numbers m DNS/Name server addresses m a disconnect delay m a login script m a logout script m modem settings (for an individual setup only) m redial settings m advanced settings (such as data rate, stop bits, and parity) m the country where your ISP is located To add information to a completed setup, follow these steps: 1 Go to the desired setup. 2 Tap Add and in the pop-up list, tap your choice. Tap what you want to add. (Depending on how you are connecting, your slip may look different.) 3 In the slip that appears, enter the appropriate information. For detailed information on the items you can add, see the next few sections. 34 Chapter 2 4 When you’re finished, tap X. Entering alternate access numbers 1 Tap Alternate Access Number in the Add pop-up list. 2 Enter a new number in the Alternate Access Number slip. Use the keypad to quickly enter the access number. Tap here when you’re finished. 3 When you’re finished, tap X. Entering alternate DNS/Name server addresses 1 Tap DNS/Name Server Address in the Add pop-up list. 2 Enter a new setting in the DNS/Name Server Address slip. Use the keypad to quickly enter the access number. Tap here when you’re finished. 3 When you’re finished, tap X. Creating Internet Setups 35 Entering a disconnect delay You can set a disconnect delay if you want to wait a specified time before disconnecting from the Internet. This saves time if you use several Internet applications one after another, because you won’t have to reconnect each time you open a new application. 1 Tap Disconnect Delay in the Add pop-up list. 2 Tap “When closing, disconnect.” Tap here to choose a disconnect delay. 3 In the pop-up list, tap the desired time interval. Tap the desired disconnect delay. s 4 Warning Choosing “never” will drain the batteries in your Newton device. (The device can’t sleep to conserve battery power while it’s connected.) s When you’re finished, tap X. The disconnect delay you choose applies to this specific Internet setup only. Entering a login script or a logout script A login script is a set of commands that are executed in order when you log in to your ISP. In many cases, your ISP will provide you with a login script. If your ISP doesn’t specify a login script (and doesn’t use PAP or CHAP authentication), you can determine your ISP’s login sequence by logging in through a terminal emulator program on your Newton device (for example, PocketCall) or desktop computer (for example, MicroPhone). 36 Chapter 2 As you log in, make note of the prompts and responses sent by the ISP’s computer. They are the steps you need in the login script. The same applies for logout scripts. When you log out, make a note of the prompts and responses sent by the ISP’s computer. A particular ISP may have different login sequences for different dial-in sites. For example, the login sequence for London users of a particular ISP may be different from the login sequence for San Francisco users of the same ISP. 1 Tap Login Script or Logout Script in the Add pop-up list. The Script slip appears. (The slip for Login Script and Logout Script options are the same, except for the title of the slip.) Tap here and in the pop-up list, tap the desired command. Tap here and in the pop-up list, tap a time out interval. Tap this checkbox to show the login or logout activity. When you’re finished, tap here. Creating Internet Setups 37 2 Tap the diamond next to “Done” to open a list of scripting commands (shown below). What’s in the list depends on whether you choose PPP or SLIP in the first slip of the Internet Setup sequence. PPP: SLIP: Tap here to insert the command you just selected one line above. Tap here to delete a command. 3 Tap a command in the list to put it in your script. In most cases, you’ll start with a Send ¶ command (the same as the Return key on a computer keyboard), then a Wait For command, and then write in the characters to wait for. Tip: If you’re not sure whether a word you’re waiting for has the first letter capitalized, you can enter a portion of the word. For example, entering ogin will let you wait for either Login or login. 4 Tap u Done again (a new “Done” list appears beneath the first login script command), and choose the next command for your login script. 5 Continue choosing commands until you’ve completed the script. (Tap the scroll arrows at the right side of the slip if you need to look through a long script.) Here are examples of some ways to use the script commands: m To send your user name and password, choose the Send User Name and Send Password commands, respectively. 38 Chapter 2 m m m m 6 Note: If you want to keep your Internet account more secure, you can exclude the Send Password command from your script. Replace it with a Prompt command (for example, “Prompt Enter Password:”). Then when you log in, your Newton device will prompt you to enter your password, rather than send it automatically. This makes it harder for unauthorized users to access your Internet account. To send a Return character, you must add a Send ¶ command to the script; returns are not sent automatically. Alternatively, you can insert a Send command and then tap Return on the keyboard. You need a Send ¶ command after most other send commands (including the Send User Name and Send Password commands). To send information to the ISP computer (other than your name or password), choose the Send command and enter the characters to send. The list of scripting commands for SLIP has two additional choices—Get local IP address and Get gateway IP address—for SLIP hosts that dynamically assign IP addresses and print them as part of a welcome message when you log in. These commands scan the data being sent by the host and pick up the IP addresses. Contact your ISP to find out where in the login script they should go. The last command in a script is always the Done command. Note: When you insert a Done command in a script, any subsequent commands disappear. This makes it easy to remove unneeded commands. If you want to set a time interval for logging in or out, tap Time Out and in the popup list, tap your choice. Tap the desired time interval. If any step in the login or logout script takes longer than the time out value, the login or logout operation will be canceled. 7 To view the login or logout script activity as it happens, make sure the checkbox labeled “Display script activity” has a checkmark in it. 8 When you’re finished, tap X. Creating Internet Setups 39 Here’s an example of a login script: Entering modem settings for an Internet setup You can add modem settings to an Internet setup that apply to that setup only. This is useful if you use modem settings other than those specified in Modem Preferences in the Preferences application. 1 Tap Modem Settings in the Add pop-up list. 2 Choose the appropriate settings. Tap the slider to set the volume. Tap to put a checkmark in this checkbox if you want the modem to listen for a dial tone before dialing. Tap the type of dialing on your telephone system. Tap here to choose the card slot or port you’re using. Tap here and in the pop-up list, tap the type of modem you’re using. When you’re finished, tap here. In the modem setup list, choose a modem that’s similar to yours. The modem choices depend on the model of Newton device you’re using. Consult the documentation that came with your modem for more information. 3 40 Chapter 2 When you’re finished, tap X. Entering redial settings 1 Tap Redial Settings in the Add pop-up list. 2 Choose the appropriate settings. Tap here to choose the numbers to use when redialing. Tap here to choose the number of times to redial. Tap here to choose how long you want to wait before dialing again. 3 When you’re finished, tap here. When you’re finished, tap X. Entering advanced settings 1 Tap Advanced Settings in the Add pop-up list. 2 Choose the appropriate settings. To use hardware for flow control, tap to put a checkmark in this checkbox. Tap the item you want to set and in the pop-up list, tap your choice. When you’re finished, tap here. m Port—Tap to choose the port or card slot that you’re using. m Data Rate—Tap here and in the pop-up list, tap the speed at which data is transferred, measured in bits per second. m Parity—Tap here and in the pop-up list, tap the parity you’re using. Parity is a simple form of error detection in which an extra bit (called a parity bit) is appended to each data byte. Creating Internet Setups 41 m Stop Bits—Tap here and in the pop-up list, tap the number of bits that are used to signal the end of a byte that is being transmitted. m Use Hardware Flow Control—Tap here and in the pop-up list, tap whether or not hardware signals are used to control the flow of data. 3 When you’re finished, tap X. Entering the country where your ISP is located You’ll only need to add this if you are outside the country where your ISP is located. 1 Tap Country in the Add pop-up list. 2 Enter the country, or tap Country and in the slip that appears, make your choice. To use a pop-up list to choose the country, tap here. If you want, use the onscreen keyboard to enter the country. If necessary, tap a lettered tab to move around in the list. (You can also tap the scroll arrows below to go up or down in the list.) Tap the desired country. When you’re finished, tap here. 3 42 Chapter 2 When you’re finished, tap X. 3 Connecting and Disconnecting To connect to the Internet, you need Internet application software, such as a Web browser or e-mail software, installed on your Newton device. For more information, see the documentation that came with your Internet software. Connecting to the Internet To connect to the Internet, follow these steps: 1 Open your Internet application software. A connection slip should appear. 2 Tap here to choose a different worksite or owner. Tap here to choose a different Internet setup or edit a setup. If necessary, change any information, such as your worksite or the Internet setup you’re using. Depending on the Internet application you’re using, the information in the connection slip may be different. When you’re ready, tap Connect. 43 No matter how you are connecting, you can change the owner or worksite and edit your Internet setups. To use another Internet setup, tap it in the list. Tap here to edit a setup. m If you’re connecting via Ethernet, you can tap Card to change the card you’re using. m If you’re connecting via LocalTalk, you can tap Zone to change the zone you’re connecting to. m If you’re connecting via modem, you can tap Phone to change the access number you want to dial. Note: If the ISP is in a country other than the one from which you’re dialing, make sure you add the country of your ISP and enter the telephone codes for the ISP’s city and country. For information about adding the country of your ISP to an Internet setup, see “Entering the Country Where Your ISP Is Located” in Chapter 2. 3 When you’re ready, tap Connect. Disconnecting from the Internet To disconnect, close any Internet applications that are open. When you quit an Internet application, you can choose to stay connected to the Internet. This saves time if you use several Internet applications, one after another— you won’t have to reconnect each time you open a new application. m If you want to stay connected, you need to set a disconnect delay, or the amount of time that elapses before you disconnect. For more information, see the next section, “Using a Disconnect Delay,” or “Entering a Disconnect Delay” in Chapter 2. m If you don’t set a disconnect delay, when you quit all Internet applications, you will automatically disconnect from the Internet. 44 Chapter 3 Using a disconnect delay You can set a disconnect delay if you want to wait a specified time before disconnecting from the Internet. To set a disconnect delay, see the section “Entering a Disconnect Delay” in Chapter 2. If you specify a disconnect delay, a blinking star appears at the top of the screen when you quit all Internet applications. The star reminds you that you’re still connected to the Internet. If you decide you want to disconnect from the Internet before the disconnect delay elapses, follow these steps: 1 Tap the blinking star at the top of the screen. 2 In the list that appears, tap Internet Connection. 3 Tap OK in the slip that appears. Turning off your Newton device Before you can turn off your Newton device, you must disconnect from the Internet. If you try to turn off your Newton device before disconnecting, a warning message appears. To disconnect from the Internet, close any Internet applications that are open. If there’s a blinking star at the top of the screen after all the Internet applications are closed, this means you’re still connected (most likely because you’ve set a disconnect delay). Connecting and Disconnecting 45 Follow these steps to disconnect: 46 Chapter 3 1 Tap the blinking star at the top of the screen. 2 In the list that appears, tap Internet Connection. 3 Tap OK in the slip that appears. 4 Working With Internet Setups After you’ve created your Internet setups, you can do a number of things with them. You can change the information in them or add them to a worksite, store them on a PC card, and move them to or from a PC card. If you want to fax, beam, or e-mail your setups, you can do that as well. Finally, you can delete Internet setups that you no longer need or use. For detailed information on how to do any of these, see the appropriate section in this chapter. Changing information in an Internet setup You can easily change the information in an Internet setup—for example, if your ISP changes access numbers. To edit information in an existing Internet setup, do the following: 1 Tap Extras E to open the Extras Drawer. 2 Tap the folder tab at the top of the Extras Drawer and in the list that appears, tap Setup. 3 Tap the Internet Setup icon. An overview, or list, of Internet setups appears. 4 Tap the Internet setup you want to edit. 47 The summary slip for the selected setup appears. Tap the setup name to go through the entire setup process again. Tap an individual item to change it. 5 Tap the information you want to change. If you want to go through the entire setup process again, tap the Internet setup name at the top of the slip. 6 Enter the appropriate information. 7 When you’re finished, tap all X’s. Adding an Internet setup to a worksite You can associate an Internet setup with a particular worksite in Owner Info. To do this, follow these steps: 1 Tap Extras E to open the Extras Drawer. 2 Tap the folder tab at the top of the Extras Drawer and in the list that appears, tap All Icons. 3 Tap Owner Info 8. The Owner Info slip opens, showing a list of owners and worksites. 48 Chapter 4 4 Tap the worksite to which you want to attach an Internet setup. Tap the worksite to which you want to add the Internet setup. The worksite slip opens. 5 Tap Add and in the list that appears, tap Internet Access. Tap Add and in the pop-up list, tap Internet Access. An Internet Access slip appears for the worksite. Tap Internet Setup to choose a setup. Working With Internet Setups 49 6 Tap Internet Setup and in the pop-up list, tap the desired setup. Tap the Internet setup you want to add to the worksite. Tap Edit Setups to create a new setup or change an existing Internet setup. Alternatively, you can tap Edit Setups to configure a new Internet setup or modify an existing Internet setup. 7 When you’re finished, tap X. 8 If you want to view all information for the worksite, tap Show, then tap All Info. The selected Internet setup appears in the worksite slip. The Internet setup you selected appears in the worksite slip. 9 Tap X to close Owner Info. Storing Internet setups on a PC card If you have a PC storage card in your Newton device, you can store your Internet setups on the card. To do this, follow these steps: 50 Chapter 4 1 Tap Extras E to open the Extras Drawer. 2 Tap the folder tab at the top of the Extras Drawer and in the list that appears, tap Setup. 3 Tap the Internet Setup icon. 4 Tap the Information button ; and in the list that appears, tap Prefs. Tap Prefs. 5 In the Internet Setup Preferences slip, make sure the checkbox labeled “Always store new setups internally” is unchecked (tap it, if necessary, to remove the checkmark). To store setups on a PC card, make sure this checkbox does not have a checkmark in it. All subsequent Internet setups will be saved on the card. This setting overrides the storage setting in the Card slip in the Extras Drawer. To store setups in the internal memory, tap the checkbox again to put a checkmark in it. Moving an Internet setup to or from a PC card You can move Internet setups from a PC card to the internal memory and vice versa. Here’s how: 1 Insert a PC card into a card slot in your Newton device. A card slip appears. Tap here to close the card slip. 2 Tap X to close the card slip. Working With Internet Setups 51 3 If necessary, open Internet Setup. The far right column tells you where each Internet setup is stored (Card or Internal). This column tells you where each Internet setup is stored— in the internal memory or on a PC card. Tap the checkbox next to each setup you want to move. Selected setups have a checkmark in the checkbox. After you select the setups you want to move, tap the Folder button. 4 Tap the checkbox next to each setup you want to move, so a checkmark appears in the checkbox. 5 Tap the Folder button ƒ. 6 In the slip that appears, tap Internal to store the setups in the internal memory, or tap the button for a card to store setups on the PC card. Tap the location where you want to store the setups. When you’re ready, tap File. 52 Chapter 4 7 Tap File. The selected Internet setups are filed in the new location. The Internet Setup slip shows where the setups are stored. Sending an Internet setup to another Newton device You can mail or beam an Internet setup to another Newton device—for example, to save a friend the trouble of manually creating the setup. s If your Internet setup includes the password for your account, you should delete the password from the setup before sending it, to prevent unauthorized access to your Internet account. s Warning Note: Your password is not displayed when you print, fax, or send the setup over e-mail. To delete your password before sending an Internet setup, follow these steps: 1 Tap or press Extras E, tap the folder tab, then tap Setup. 2 Tap the Internet Setup icon. An overview, or list, of your Internet setups appears. 3 Tap the Internet setup you are sending. A summary slip appears. 4 Tap User ID, then tap Edit Password. 5 Tap Set. A slip appears asking if you don’t want to require a password. 6 Tap OK. 7 Tap all X’s to close the slips. You can now send your Internet setup without your password. After you send the setup, don’t forget to open that setup and add your password again. Working With Internet Setups 53 To send an Internet setup to another Newton device, do the following: 1 Tap Extras E to open the Extras Drawer. 2 Tap the folder tab at the top of the Extras Drawer and in the list that appears, tap Setup. 3 Tap the Internet Setup icon. 4 Tap the checkbox next to each setup you want to send. Tap the checkbox next to each setup you want to send. After you select the setups you want to send, tap the Routing button. 5 Tap the Routing button ∫ and in the pop-up list, tap your choice. The selected setups have a checkmark in their checkboxes. Tap your choice in the pop-up list. 54 Chapter 4 m If you’re beaming, make sure the Newton devices are approximately three feet apart and the infrared windows are pointed towards one another. m If you’re printing, faxing, or mailing, a routing slip appears. 6 If necessary, enter information in the routing slip, then tap Print, Fax, or Mail. For more information, see the documentation that came with your Newton device or e-mail software. Duplicating or deleting an Internet setup You can duplicate an Internet setup if, for example, you want to create an Internet setup that’s similar. If you no longer need an Internet setup, you can delete it. To duplicate or delete an Internet setup, follow these steps: 1 Tap Extras E to open the Extras Drawer. 2 Tap the folder tab at the top of the Extras Drawer and in the list that appears, tap Setup. 3 Tap the Internet Setup icon. 4 In the Internet Setup slip, tap the checkbox next to the setup(s) you want to duplicate or delete. Tap the checkbox next to each setup you want to duplicate or delete. After you select the setups you want to duplicate or delete, tap the Routing button. Working With Internet Setups 55 5 Tap the Routing button ∫ and in the list that appears, tap Duplicate or Delete. Tap Duplicate to make a copy of a setup. Tap Delete to delete a setup. If you tap Duplicate, a copy of the selected setup(s) appears with the word “Copy” next to the name. 6 If a message appears asking if you really want to delete the selected setup(s), tap OK. The selected setups are deleted. 56 Chapter 4 5 Solutions to Common Problems If you’ve followed the instructions in the previous chapters and encounter problems connecting to the Internet with NIE, take a few minutes to read the information in this chapter. When you see an error message, you don’t have to take action immediately. The message stays on the screen until you tap a button or press Return. Keep in mind that many factors can cause poor performance or a failed connection— including noisy phone lines, heavy network traffic, a busy name server, or problems with a Web browser or other Internet software. As a general rule, once you’ve determined that your Internet setups are configured correctly, try several times to establish a connection. Note: If you suspect something is wrong with your Newton device, check the service and support information that came with the Newton device. Problems creating or using Internet setups I can’t create any Internet setups. m You may not have installed the Internet Setup application, which is a component of NIE. Use connection software to install Internet Setup on your Newton device. 57 When I tap the Internet Setup icon, an error message appears saying that I can’t use Internet Setup because I don’t have any module packages installed. m You may not have installed the files you need to connect, such as Ethernet Support.pkg, LocalTalk Support.pkg, or Modem-Serial Support.pkg. Use connection software to install one or more of the files you need; then you should be able to open the Internet Setup application. The connection method I’m using does not appear in the “Connect using” pop-up list. m You may not have installed the support file, or package, for the desired type of connection on your Newton device. Use connection software to install the appropriate file(s). m If you’re connecting using Ethernet, you need to install a third-party Ethernet driver file for the Ethernet PC card you’re using on your Newton device. (Before you install the driver file, you need to install the file Newton Devices.pkg, or you’ll get an error message.) I’m using an Ethernet PC card, but when I create an Internet setup, the Card popup list says “Unrecognized Card.” m You may not have installed the file Newton Devices.pkg or the third-party Ethernet driver file. Use connection software to install these files onto your Newton device. m Make sure the Ethernet PC card you’re using is inserted properly into the card slot. If you have a Card Lock switch on the back of your Newton device, make sure it’s in the locked position. Problems connecting When I try to connect, a message appears saying that I can’t use Internet Setup because Newton Internet Enabler is not installed. m You may have inadvertently deleted the Internet Enabler, which is a component of NIE. To use the Internet Setup application and any Internet setups, you need to have the Internet Enabler package installed on your Newton device. Use connection software to install Internet Enabler on your Newton device. 58 Chapter 5 When I try to connect, I see the message “No modem is connected,” even though I’m sure my modem is connected. m Make sure your modem is turned on. m Make sure the modem is connected to a working telephone line. m You may have inserted a PC card modem but forgotten to lock the card in place. If you have a Card Lock switch on the back of your Newton device, make sure it’s in the locked position. m If you’re using a battery-powered modem, its batteries may be low. Check the modem’s batteries. m Your modem may have attempted to establish a connection, then failed in an interim state. Turn your modem off, then back on. m You may have selected the wrong modem preferences. m If you added modem settings to an Internet setup, make sure the settings are correct. Open the Internet Setup application and tap the desired setup. Tap Modem Settings and in the slip that appears, check the settings. Tap all X’s to close the slips and try connecting again. If the connection still fails, try another modem setup. m If you’re using the same modem settings for all applications, tap or press Extras, then tap Prefs. In the Preferences slip, tap Modem. Check to make sure the settings are correct. Tap all X’s to close the slips and try connecting again. If the connection still fails, try another modem setup. Note: For more information about which modem setup to use for a particular modem, contact your modem manufacturer or visit the Modems for Newton OS Computers page at http://www.newton.apple.com/product_info/thirdparty/modemintro.html When I try to connect, the login script proceeds, then stops at the last step, “Waiting for...,” and then times out. A message appears saying that the Internet Enabler had a problem establishing the link. m Your user name and/or password may be misspelled or missing, or may contain inappropriate spaces or capital letters. Open the Internet setup you’re using and check carefully to make sure your user name and password are entered exactly as specified (including capital letters) by your ISP or network administrator. Solutions to Common Problems 59 When I try to connect, the login script proceeds, says “Establishing PPP connection,” and then times out. m Your user name and/or password may be misspelled or missing, or may contain inappropriate spaces or capital letters. Open the Internet setup you’re using and check carefully to make sure your user name and password are entered exactly as specified (including capital letters) by your ISP or network administrator. Make sure there are no leading or trailing spaces. m You may have entered an incorrect IP address. Open the Internet setup you’re using and check carefully to make sure the IP address settings are entered exactly as specified by your ISP or network administrator. I’m using a LocalTalk connection, but can’t seem to connect. m You may have selected the wrong AppleTalk zone. Go back to the Internet setup you’re using and make sure the zone is correct. If you still have problems, contact your network administrator. There may be problems with the network you’re using. I’m using an Ethernet PC card on an AppleTalk network and can’t connect or print. m Make sure you selected the correct AppleTalk preference in Prefs—EtherTalk or LocalTalk. For more information, see the section “Setting AppleTalk Preferences” in Chapter 2, “Creating Internet Setups.” m You may have checked the preference to use the PC card for AppleTalk and then removed the card. Try reinserting the card. To change your AppleTalk preference, reinsert the card and when the card slip appears, make sure there is no checkmark in the checkbox next to “Use card for AppleTalk.” You can also see the section “Setting AppleTalk Preferences” in Chapter 2, “Creating Internet Setups.” m Make sure the Ethernet PC card you’re using is inserted properly into the card slot. If you have a Card Lock switch on the back of your Newton device, make sure it’s in the locked position. m You may not have installed the third-party Ethernet driver file for the Ethernet PC card you’re using. Use connection software to install the file on your Newton device. If you still have problems, contact the manufacturer of the card. 60 Chapter 5 Problems with the telephone line My telephone has call waiting, and when I receive a call while connected to the Internet, my Newton device resets. m You can temporarily turn off call waiting on your phone while using NIE by selecting the “*70, (No Call Waiting)” dialing prefix. You can do this in two ways: m You can change the dialing prefix in the worksite you’re using. Open the Extras Drawer, tap Owner Info, and open the desired worksite. Tap Dialing Prefix and in the pop-up list, tap “*70, (No Call Waiting).” m In some Internet applications, you can tap the Assist button q in the Connect slip each time you connect. Then tap Dialing Prefix and in the pop-up list, tap “*70, (No Call Waiting).” The modem hangs up when I’m downloading large amounts of information. m Your modem might not be compatible with the modems used by your ISP. Check compatibility with your ISP. If there’s a problem, try a different modem or another ISP. m The phone line your modem is using may be noisy. Try again later, or try a different phone line. Problems accessing remote hosts When I’m using a Web browser or other Internet application, it can’t find the addresses of remote hosts. A message such as “Unknown host name” appears. m Make sure you’ve entered the host name correctly. If you’re following a link, make sure it’s up-to-date. m You may have entered an incorrect IP address for the name server. Open the Internet setup you’re using and make sure the domain name server address (DNS/Name Server Address) is entered exactly as specified by your ISP or network administrator. m There may be a problem with the domain name server. Ask your ISP or network administrator if the name server is a “recursive resolver” that supports clients with only “stub DNS resolvers.” If not, ask them to provide you with the address of a recursive DNS resolver, or switch to another ISP that provides one. m The ISP’s name server host may be overloaded. Try again later, or ask your ISP for another domain name server address to use. Solutions to Common Problems 61 If you need more help If you’re still having difficulties after reading this chapter, you may want to contact m your modem’s manufacturer m your ISP or network administrator m the manufacturer of the Internet software you’re using In all cases, you might want to do the following: m Make a note of exactly what you were doing when the problem occurred. Write down the message on the screen and its ID number (if any). m List the programs you were using and the names of any software or other items installed on your Newton device. This information may help a customer support person diagnose the problem, if you need to call later. m Check the screen for any clues. Is a button selected? What programs and items (such as papers, drawings, or notes) are open? Note anything else that seems relevant. m Ask other Newton users about the problem you’re having; they may have a solution for it. 62 Chapter 5 Newton Internet Enabler User’s Manual K Apple Computer, Inc. © 1997 Apple Computer,Inc. All rights reserved. Please note: Under U.S. and International copyright laws, this manual may not be copied, in whole or in part, without the written consent of Apple. Your rights to the software described in this manual are governed by the accompanying software license agreement. Apple Computer, Inc. 1 Infinite Loop Cupertino, CA 95014-2084 408-996-1010 http://www.apple.com Apple, the Apple logo, AppleTalk, EtherTalk, the Light Bulb logo, LocalTalk, Mac, Macintosh, MessagePad, and the Newton Technology logo, are trademarks of Apple Computer, Inc., registered in the U.S. and other countries. Adobe, Adobe Illustrator, Adobe Photoshop, and PostScript are trademarks of Adobe Systems Incorporated or its subsidiaries and may be registered in certain jurisdictions. SecurID is a registered trademark of Security Dynamics Technologies, Inc. UNIX is a registered trademark in the United States and other countries, licensed exclusively through X/Open Company, Ltd. Windows is a registered trademark of Microsoft Corp. Other products and company names mentioned herein may be trademarks of their respective companies. Mention of third-party products is for informational purposes only and constitutes neither an endorsement nor a recommendation. Apple Computer assumes no responsibility with regard to the performance or use of these products. Simultaneously published in the United States and Canada. Created 9/23/97 Contents 1 Getting Started 1 What is the Internet? 1 Features of the NIE software 3 Requirements 3 Installing the NIE software 8 Quick start 11 2 Creating Internet Setups 13 Accessing a corporate or private intranet 13 Creating a new Internet setup 14 Completing an Internet setup 32 Viewing your Internet setups 33 Adding other information to a setup 34 3 Connecting and Disconnecting 43 Connecting to the Internet 43 Disconnecting from the Internet 44 Turning off your Newton device 45 4 Working With Internet Setups 47 Changing information in an Internet setup 47 Adding an Internet setup to a worksite 48 Storing Internet setups on a PC card 50 Moving an Internet setup to or from a PC card 51 Sending an Internet setup to another Newton device 53 Duplicating or deleting an Internet setup 55 iii 5 Solutions to Common Problems Problems creating or using Internet setups 57 Problems connecting 58 Problems with the telephone line 61 Problems accessing remote hosts 61 If you need more help 62 iv Contents 57 The Apple Publishing System This Apple manual was written, edited, and produced on a desktop publishing system using Apple Macintosh computers and QuarkXPress. Technical illustrations were drawn in Adobe™ Illustrator; screen shots were created and modified with system software, ExposurePro, and Adobe Photoshop. Final pages were output using PostScript™ technology. Text type is Apple Garamond® Light, display type is Apple Helvetica® Black International, and cover type is Apple Garamond, Apple’s corporate font. Ornaments are custom symbols designed for Apple Computer. Some elements, such as computer voice, are set in Courier, a fixed-width font. PostScript, the LaserWriter page-description language, was developed by Adobe Systems Incorporated. Apple Computer, Inc. 1 Infinite Loop Cupertino, California 95014-2084 408-996-1010 http://www.apple.com 034-0314-A Printed in U.S.A.