1
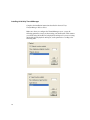
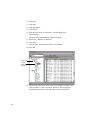
a
Integrating the Thomson Grass Valley
Group Profile® into the Avid Workgroup
Important Information
Avid recommends that you read all the information in this document
thoroughly before installing or using any new software release.
This document describes the steps required to successfully connect an Avid
NewsCutter® or Avid Unity™ TransferManager system for the
Windows® 2000 or Windows XP operating system and a Thomson Grass
Valley Group Profile video file server via a Fibre Channel switch and ethernet
connection.
The NewsCutter system initiates transfers to the Profile system through either
a local or independent TransferManager for playback or ingest using the
Emulex IP over Fibre Channel connection.
These installation instructions also provide information on making transfers
between these two systems and list all known bugs and limitations associated
with the software and hardware.
Contents
If You Need Help . . . . . . . . . . . . . . . . . . . . . . . . . . . . . . . . . . . . . . . . . . . . . . 3
Symbols and Conventions . . . . . . . . . . . . . . . . . . . . . . . . . . . . . . . . . . . . . . . 3
Fibre Channel Workgroup Overview . . . . . . . . . . . . . . . . . . . . . . . . . . . . . . . 4
Setting Up the Fibre Channel Network. . . . . . . . . . . . . . . . . . . . . . . . . . . . . . 5
Installing the Fibre Channel Board in the TransferManager Server or
Standalone NewsCutter . . . . . . . . . . . . . . . . . . . . . . . . . . . . . . . . . . . . 5
Installing Fibre Channel Drivers on the TransferManager Server or the
Standalone NewsCutter . . . . . . . . . . . . . . . . . . . . . . . . . . . . . . . . . . . . 6
Configuring the Emulex Drivers For LP1050 . . . . . . . . . . . . . . . . . . 8
Install the Network Driver . . . . . . . . . . . . . . . . . . . . . . . . . . . . . . . . . 9
Setting up the Network . . . . . . . . . . . . . . . . . . . . . . . . . . . . . . . . . . 10
Configure the F/C Address for your TransferManager: . . . . . . . . . 11
Configuring the Profile . . . . . . . . . . . . . . . . . . . . . . . . . . . . . . . . . . . . . . 11
Changing the Profile to Switch Mode . . . . . . . . . . . . . . . . . . . . . . . 11
Configuring the Fibre Channel Adapter . . . . . . . . . . . . . . . . . . . . . 12
Modifying the Services File on the Profile. . . . . . . . . . . . . . . . . . . . 13
Modifying the Hosts File . . . . . . . . . . . . . . . . . . . . . . . . . . . . . . . . . 14
Installing the Grass Valley Transfer Server Application . . . . . . . . . . . . . . . . 16
Adding the Tserver Application to the Start Menu . . . . . . . . . . . . . . . . . 16
Configuring the Fibre Channel Switch . . . . . . . . . . . . . . . . . . . . . . . . . . 17
Installing Software on the TransferManager Platform . . . . . . . . . . . . . . 17
Installing Avid Unity TransferManager . . . . . . . . . . . . . . . . . . . . . . 18
Installing the Grass Valley Group Profile Remote Software . . . . . . 19
Known Bugs and Limitations . . . . . . . . . . . . . . . . . . . . . . . . . . . . . . . . . . . . 22
Technical Support Information . . . . . . . . . . . . . . . . . . . . . . . . . . . . . . . . . . . 24
2
If You Need Help
If You Need Help
If you are having trouble connecting your workgroup components:
1. Retry the action, carefully following the instructions given for that task. It
is especially important to check each step of your workflow.
2. Check the release notes for the latest information that might have become
available after the documentation was published.
3. Check the documentation that came with your Avid application or your
hardware for maintenance or hardware-related issues.
4. Visit the online Knowledge Center at www.avid.com/support. Online
services are available 24 hours per day, 7 days per week. Search this
online Knowledge Center to find answers, to view error messages, to
access troubleshooting tips, to download updates, and to read/join online
message-board discussions.
5. For Technical Support, please call 800-800-AVID (800-800-2843).
For Broadcast On-Air Sites and Call Letter Stations, call
800-NEWSDNG (800-639-7364).
Symbols and Conventions
This document uses the following special symbols and conventions:
n
A note provides important related information, reminders, recommendations,
and strong suggestions.
c
A caution means that a specific action you take could cause harm to your
computer or cause you to lose data.
➤
An arrow indicates a known bug or limitation. Where appropriate, a
workaround is provided.
3
Fibre Channel Workgroup Overview
The Fibre Channel workgroup is a concept that combines an Avid NewsCutter,
the Grass Valley Group Profile video file server, a Fibre Channel network, and
an ethernet connection. These elements are tightly integrated in an
environment that enhances speed and content quality in news editing and news
production. The workgroup’s Fibre Channel and Ethernet connections
encourage a streamlined workflow, from the ingest of raw material from the
Profile to the NewsCutter, to editing of the material on the NewsCutter, to
playout of the finished story on the Profile.
n
Playout of finished material (called “playback”) is initiated by the
TransferManager software installed on the NewsCutter (in standalone
workgroups) or by the TransferManager server (in Avid Unity™ workgroups).
This document contains instructions on how to configure the TransferManager
software in both standalone and Avid Unity workgroups. In this document, the
system running the TransferManager software is referred to as the
“TransferManager platform” for both types of workgroups.
The NewsCutter and the Profile store digital media in a format that is known
on both systems. As a result, ingest of the material from the Profile to the
NewsCutter is possible via a Fibre Channel connection.
When the material reaches the NewsCutter for editing, the Fibre Channel
network allows the material to be edited and transferred between multiple
NewsCutter systems. When the story is ready for broadcast, it is transferred to
the Profile for playback via the Fibre Channel connection and
TransferManager software. In standalone mode, each edit and playback
system maintains its own storage space, while in a workgroup configuration
the editors share from a single pool of storage space making a physical
transfer of the material necessary.
To minimize on-air failures, an optional second Profile can be used to ensure
that a backup playback system is available. The NewsCutter can make
transfers using a dual-send configuration, sending media to both a primary and
secondary Profile.
4
Setting Up the Fibre Channel Network
Setting Up the Fibre Channel Network
c
These installation instructions assume that basic installations for the
NewsCutter and the Profile have been completed. Therefore, if you have
not yet performed the basic installation for either system, you should
complete that process first and then return to these installation
instructions.
The NewsCutter, TransferManager, Profile, and Fibre Channel setup and
installation is described in the following sections:
•
Installing Fibre Channel Drivers on the TransferManager Server or the
Standalone NewsCutter
•
Configuring the Profile
•
Configuring the Fibre Channel Switch
•
Installing Software on the TransferManager Platform
When you have completed the setup process, see “Known Bugs and
Limitations” on page 22.
Installing the Fibre Channel Board in the TransferManager Server or
Standalone NewsCutter
For instructions on installing the board in your NewsCutter and, depending on
your type of workgroup, TransferManager server, see the documentation
included with the Fibre Channel adapter.
The Profile is shipped with the Fibre Channel adapter pre installed.
The Emulex LP1050 card should be located in the following slots:
n
•
SR2200 system - middle slot
•
ISP2150 system - top slot
The standard Emulex driver for Avid Unity is pre-installed for use when
Emulex card is in the bottom slot (Location 4).
5
Installing Fibre Channel Drivers on the TransferManager Server or the
Standalone NewsCutter
n
The Emulex LP1050 fibre channel card is recommended. The Emulex LP8000
and LP982 fibre channel cards are supported. The Emulex LP1050 and LP982
fibre channel cards are shipped with the required firmware. If you are using an
Emulex LP8000 fibre channel card, you can obtain the firmware from the
Emulex Web site at www.emulex.com.
After you install the Fibre Channel board, you must install the required
Emulex drivers. The required Emulex drivers are provided on the Avid Unity
TransferManager CD. Search the CD for the Profile folder. The driver version
5.2.21.8 has been tested.
The driver files are WinZip® files located on the TransferManager CD. You
need to copy the files from the TransferManager CD to your system drive. You
will need WinZip to access the files.
To copy the drivers from the TransferManager CD to the TransferManager
server or standalone NewsCutter:
1. Create the following folder on the TransferManager server or standalone
NewsCutter: D:\Installers
2. Open the TransferManager CD.
3. Open to the Profile folder.
4. Copy the files in the Profile folder to D:\Installers folder.
5. From the D:\Installers folder, unzip each zipped file into the same folder.
To install the necessary firmware and drivers, follow these steps:
1. Right-click My Computer and select Manage.
2. Select Device Manager.
3. Right-click Fibre Channel Controller (the one with the yellow
exclamation).
4. Select Properties and click the Driver tab.
5. Select Update Driver and click Next.
6. Select Search for Suitable driver for my device.
7. Click Next.
8. Select Specify a Location.
6
Setting Up the Fibre Channel Network
9. Click Next.
10. Browse to the D:\Installers\Emulex LP982_LP1050 folder.
11. Select elxscsi.inf and click Open.
12. Click OK.
13. Click Next to install the driver.
This step takes a few minutes.
14. Click Finish.
15. Click Update Driver.
16. Click Next.
17. Click Display list of Known Drivers and click Next.
18. Select “Point to Point Automap SCSI devices”.
19. Click Next.
20. Click Next.
The SCSI driver starts installation.
21. Click Finish.
22. Click Close.
7
Configuring the Emulex Drivers For LP1050
To configure the Emulex drivers for the LP1050:
1. Browse to the D:\Installers\Emulex LP982_LP1050\Applications folder.
2. Click elxcfg.exe.
The Emulex Configuration Tool opens.
3. Click Network.
4. Click Enable Networking.
8
Setting Up the Fibre Channel Network
5. Click OK.
6. Click Apply.
7. Click Exit.
Install the Network Driver
To install the network driver:
1. Right-click My Computer and select Manage.
2. Select Device Manager.
3. Click in the right hand pane of the window.
4. From Action select Scan for Hardware Changes.
The Hardware Wizard appears for a Network Adapter.
5. Click Next.
6. Select Search for Suitable driver for my device.
7. Click Next.
8. Select Specify a Location.
9. Click Next.
10. Locate the oemsetup file in D:\Installers\Emulex LP982_LP1050 folder.
11. Select oemsetup.inf and click Open.
12. Click OK
13. Click Next.
14. Click Finish.
Emulex LPX000 FC LAN should be listed under Network Adapters.
15. Close the Computer Management window.
16. Restart your system.
9
Setting up the Network
Before you perform this procedure verify which local area connection is your
Emulex card.
To setup the network:
1. Right-click My Network Places and select Properties.
2. From the Advanced menu, select Advanced Settings.
3. Make sure your primary ethernet connection (not your Fibre Channel
connection) is listed at the top of the Connections list. Use the Up and
Down arrows to manipulate the list.
4. Click OK.
n
10
Any updates to drivers will change the order of the ethernet connections. You
will have to repeat this procedure to ensure the primary ethernet connection is
at the top of the list.
Setting Up the Fibre Channel Network
Configure the F/C Address for your TransferManager:
To configure the F/C address for your TransferManager:
1. In the Network Connections window, right click the Fibre Channel
interface. Select Properties.
2. Click Configure.
3. Click Advanced and select MTU Size and set value at 32758.
4. Click OK.
5. Highlight the Internet Protocol (TCP/IP) and click Properties.
6. Set your Fibre Channel Address.
7. Click OK.
8. Click OK.
This procedure might require a restart.
Configuring the Profile
To set up the Profile for playback, you must change the Profile to Switch
mode, configure the Fibre Channel adapter, and, finally, modify the Services
file on the Profile and install the T Server.
Changing the Profile to Switch Mode
The Profile contains a tool that you need to open and run before attempting to
use the switch for Fibre Channel transfers. This tool automatically downloads
the microcode necessary to put the Profile in Switch mode.
To download the microcode:
1. Quit all applications and log in as an administrator on the Profile.
2. Click the Start button and select Programs > PDR Debug Tools >
FC Switch-mode Microcode.
The FC Switch-mode Microcode dialog box appears.
3. Press Enter.
4. Restart the Profile.
11
Configuring the Fibre Channel Adapter
The Configuration Manager software that runs on the Profile allows you to
configure your Fibre Channel adapter and to enable playback from the
TransferManager or Standalone NewsCutter to the Profile.
To configure the Fibre Channel adapter:
1. Start the Configuration Manager on the Profile.
2. Select Options > Fibre Channel Networking.
The Fibre Channel Network Configuration dialog box appears.
3. Type the Profile’s IP Address and Netmask in the corresponding text
boxes.
c
Your network administrator should provide the network number (for
example, 10.0) for the Fibre Channel address. This number must be
different from the network number for the Ethernet address (for
example, 154.165). A Fibre Channel network number beginning with 10 is
recommended, as this number is a reserved Class A network for private
intranets.
4. Select the additional options shown in the following illustration.
5. Type a unique hardware address (obtained from your network
administrator) in the Hardware Address text box. This number must be
different for each Profile in the workgroup and cannot be 0 (auto
configure).
6. Record the Hostname and IP Address. You will use this information in the
TransferManager platform’s Hosts file. (See “Modifying the Hosts File”
on page 14.)
c
12
Make sure the Use TCP Checksums option is selected.
Setting Up the Fibre Channel Network
Modifying the Services File on the Profile
You must enable the TransferManager platform’s Playback Protocol in the
Services file on the Profile.
To configure the Services file:
1. Open Notepad on the Profile.
2. Open the Services file located in the following directory:
C:\Winnt\system32\drivers\etc\Services
3. Add the following in the Services file:
com.avid.mct6532/tcp
com.avid.pbp6535/tcp
com.avid.xmgr6539/tcp
You should place this entry in the appropriate ascending numeric location
according to the numbers contained in the Services file.
n
The TransferManager software will not be able to transfer to the Profile
without these changes.
13
Modifying the Hosts File
For the TransferManagers and Profiles to communicate, the Hosts files for the
TransferManager platform and the Profiles must have the TCP/IP and Fibre
Channel addresses added manually.
To add the TCP/IP and Fibre Channel addresses:
1. Open Notepad on the TransferManager platform.
2. Open the Hosts file located in the following directory:
C:\Winnt\system32\drivers\etc\Hosts
3. Setup the Hosts file.
The following is an example of how to set the hosts file on the
TransferManager server or Avid editor running local TransferManager.
This allows you to send to a Mirrored profile configuration (2 Profiles
simultaneously) or to a single Profile system.
In addition to the conventional naming in the hosts file an additional line
must be added that will serve as an alias. (MIRROR has been used for this
setup, more specifics will need to be added. Ex: MIRRORXP1 as more
Profiles are added.) IP addresses need to be the same for the conventional
and new names.
## TGV Profile LAN Address Range (3.199.56.51 to
3.199.56.70)
3.199.56.51
NYDPSXP01
nydpsxp01
XP01
xp01
3.199.56.51
MIRROR
mirror
3.199.56.52
NYDPSXP02
nydpsxp02
XP02
xp02
3.199.56.52
MIRROR2
mirror2
3.199.56.53
NYDPSXP03
nydpsxp03
XP03
xp03
3.199.56.54
NYDPSXP04
nydpsxp04
XP04
xp04
Options for hosts file setup:
The following examples can be used for Profile configurations:
•
Send to a Single Profile:
3.199.31.51
14
NYDPSXP01_fc0
NYDPSXP01_fc0_0
Setting Up the Fibre Channel Network
•
•
Send to separate Profiles (one at a time):
3.199.31.51
NYDPSXP01_fc0
NYDPSXP01_fc0_0
3.199.31.52
NYDPSXP02_fc0
NYDPSXP02_fc0_0
Send to a Profile and have data mirror to a second Profile simultaneously:
3.199.31.51
NYDPSXP01_fc0
NYDPSXP01_fc0_0
3.199.31.52
_fc0_1
NYDPSXP02_fc0
NYDPSXP02_fc0_0
NYDPSXP01
The send will go to XP01 and data to XP01 will be also sent to XP02.
To have both options (Mirror or single send) the above described alias
name must be implemented into the fc0 setup.
3.199.31.51
NYDPSXP01_fc0
NYDPSXP01_fc0_0
3.199.31.51
MIRROR_fc0
MIRROR_fc0_0
3.199.31.52
NYDPSXP02_fc0
NYDPSXP02_fc0_0
3.199.31.52
MIRROR2_fc0
MIRROR2_fc0_0
MIRROR_fc0_1
This will allow the Single sends to happen with the conventional names
(NYDPSXP01 and NYDPSXP02) and the Mirrored sends to happen through
the alias name (MIRROR).
The alias name MIRROR that is mapping to the IP for the mirrored send to
will need to be added to the TM config file on the TransferManager Server
or Editor (local mode). In this example “MIRROR” was entered into the
TM config send to playback section. (TransferManager server will then be
able to find to correct IP to initiate mirrored transfers).
4. Save the file.
Repeat this process for each TransferManager platform and Profile on the
network that you will use for transfers.
15
Installing the Grass Valley Transfer Server
Application
n
For the latest information on installing the Grass Valley Transfer Server
application, search for this document on the Avid Knowledge Center at
www.avid.com.
Install the Grass Valley Transfer Server application (Tserver) software on the
Profile PDR 400 system. The Tserver software enables transfers to the
TransferManager.
To install the Tserver software:
1. Open the TransferManager CD.
2. Copy the file Profile\Tserver_2104.zip to C:\Installers folder.
3. From the C:\Installers folder, unzip the Tserver_2104.zip file to the
same folder.
4. Double-click Setup, which starts the installation of the software. You may
receive a message indicating you are running Windows 2000. Click OK.
5. Click Next in the Welcome window.
6. Select the default location, which is the C:\Profile directory, in the Choose
Destination Location window.
7. Click Next.
8. Click Yes to restart your Profile.
Adding the Tserver Application to the Start Menu
The Tserver application is included with the Grass Valley Group Profile
software.
To add Tserver to the Start menu:
1. Click the Start button, and select Settings > Taskbar.
The Taskbar Properties dialog box appears.
2. Click the Start Menu Programs tab and then click Add.
The Create Shortcut dialog box appears.
3. Click Browse and navigate to the C:\Profile directory.
16
Installing the Grass Valley Transfer Server Application
4. Select the Tserver.exe application and then click Open.
The Tserver application appears in the Command line text box.
5. Click Next.
The Select Program Folder dialog box appears.
6. Double-click the Startup item.
The Select a Title for the Program dialog box appears.
7. Type the name you want to see in the Start menu and then click Finish.
Configuring the Fibre Channel Switch
See the documentation shipped with the switch for instructions. Verify that the
following has been performed at the factory:
•
Set the Brocade to OFFLINE. Activate the menu display. Toggle to
Operations menu. Select Operations Menu. Toggle to Switch Offline.
Select Switch Offline. Select Accept? Yes Press left arrow to accept Yes.
The 16 port lights should begin blinking slowly. Go back to the menu top
level (Operations Menu).
•
Set Non-SCSI Tachyon Mode to 1. Toggle to Configure menu. Select
Configure Menu. Toggle to Non-SCSI Tachyon Mode. Select Non-SCSI
Tachyon Mode. Toggle to “1” Select “1” Select Accept? Yes Wait while
“Updating Configuration” is displayed.
•
Set VC Priority 6 and VC Priority 7 to 2. Toggle to VC Priorities Select
VC Priorities Set VC Priorities to 0, 1, 2, 2, 2, 2, 2, 2. Select settings.
Select Accept? Yes. Press left arrow to accept Yes. Wait while “Updating
Configuration” is displayed.
Installing Software on the TransferManager Platform
The following software must be installed on the TransferManager platform
when it is configured in a workgroup:
n
•
Avid Unity TransferManager
•
Grass Valley Group Profile remote software
For information on obtaining the latest qualified versions of the Grass Valley
Group Profile remote software, contact Grass Valley Group Product Support.
17
Installing Avid Unity TransferManager
Complete the installation instructions described in the Avid Unity
TransferManager Release Notes.
Make sure when you configure the TransferManager server, you set the
following parameters exactly as shown using your Profile name. This assumes
you will be using the Profile for both playback and ingest. If you are not using
the Profile for both playback and ingest, set the parameters according to the
following table.
18
Installing the Grass Valley Transfer Server Application
Playback
Max.
simultaneous
transfers
Ingest
Max.
simultaneous
transfers
Total Transfer
Max.
simultaneous
transfers
Playback and Ingest
2
1
4
Playback Only
3
0
3
Ingest Only
0
1
2
Installing the Grass Valley Group Profile Remote Software
The Grass Valley remote software is installed on the NewsCutter editing
systems. The remote software automatically places a shortcut to the Grass
Valley Media Manager application on your desktop. Using Media Manager,
you can drag clips from the Profile and drop them into the Record tool on the
NewsCutter.
To install the profile remote software:
1. Browse to the folder D:\Installers\profile_5216s1_xp\Disk1.
2. Double-click Setup.exe.
3. Click Next.
4. Click Yes to proceed.
5. Click Yes to accept the license.
6. Click Next again.
7. Select “PC Software Installation” and click Install.
8. Click OK.
9. Click Finish to reboot.
After reboot, the Microsoft XML Parser and SDK Setup Wizard opens.
10. Click Next.
11. Select Accept the license agreement.
19
12. Click Next.
13. Click Next.
14. Click Install Now.
15. Click Finish.
16. From the Start menu, click Programs > Profile Application >
Media Manager.
The Grass Valley Media Manager application opens.
17. Select File > Add/Remove Machine.
18. Click Add.
19. Type the name of the Ethernet address of your Profile.
20. Click OK.
Array name
Default
destination
directory
21. Check for the name of the array. In the above example, it is INT1. Also
verify that there is a directory named “default” in the expanded list.
TransferManager relies on a default path to send media to Profile.
20
Installing the Grass Valley Transfer Server Application
If the volume name is something other than INT1, for example EXT, the
volume name must be changed using the following Thomson Grass Valley
procedure.
21
Known Bugs and Limitations
This section describes known software and hardware bugs and limitations.
When a workaround exists, it appears in the paragraph directly following the
bug description.
➤
Ingesting more than one stream is unreliable and is not currently supported.
➤
PAL DV 420 media is not currently supported for ingest or “Send to
playback.”
➤
Mirrored transfers will fail if one Profile is powered down. This situation can
occur if you have your Hosts files set up for a Master/Slave mirrored-transfer
configuration. If either server loses power, both transfers will fail and can
error-out with an “invalid tape ID” or “Req function not implemented” error.
If the failed server cannot be restarted or remains offline for an extended
period of time, the Hosts file will need to be reconfigured in order to transfer.
The Hosts file should be reconfigured to point at the remaining online server
only.
➤
22
Overwrite will not work when sending to a target directory that is labeled
anything other than INT1. This situation can occur when external drives are
mounted to the Profile. The external drives will, by default, be labeled ‘EXT’
in the directory. This can cause either a “movie already exists” or “none of the
profiles are reachable over FC” error. To bypass these errors you will need to
rename the default external drive directory to INT1. See the following
Thomson Grass Valley procedure:
Known Bugs and Limitations
➤
Playback and ingest transfers terminate with “None of the Profiles reachable
over fiber channel” error message. This is due to a configuration issue.
➤
Ingested MPEG media cannot be played back in NewsCutter Adrenaline FX.
Problem occurred because the channel on the Profile Video Server was not
configured for MPEG D10 media. You must have MPEG D10 selected in
order for it to work with NewsCutter Adrenaline FX.
23
Technical Support Information
Most products feature a number of coverage options. Avid Assurance service
offerings are designed to facilitate your use of Avid solutions. Service options
include extended telephone coverage, automatic software maintenance,
extended hardware warranty, and preferred pricing on replacement parts.
For more information regarding Avid’s service offerings, visit
www.avid.com/support or call Avid Sales at 800-949-AVID (800-949-2843).
Program availability and details might vary depending on geographic location
and are subject to change without notice. Contact your local Avid office or
your local Avid Reseller for complete program information and pricing.
However, if you need help locating an Avid office or Avid Reseller near you,
please visit www.avid.com or call in North America 800-949-AVID
(800-949-2843). International users call 978-275-2480.
24
Copyright and Disclaimer
Copyright and Disclaimer
Product specifications are subject to change without notice and do not represent a commitment on the part
of Avid Technology, Inc.
The software described in this document is furnished under a license agreement. You can obtain a copy of
that license by visiting Avid's Web site at www.avid.com. The terms of that license are also available in the
product in the same directory as the software. The software may not be reverse assembled and may be
used or copied only in accordance with the terms of the license agreement. It is against the law to copy the
software on any medium except as specifically allowed in the license agreement.
Avid products or portions thereof are protected by one or more of the following United States Patents:
4,746,994; 4,970,663; 5,045,940; 5,267,351; 5,309,528; 5,355,450; 5,396,594; 5,440,348; 5,452,378;
5,467,288; 5,513,375; 5,528,310; 5,557,423; 5,577,190; 5,584,006; 5,640,601; 5,644,364; 5,654,737;
5,715,018; 5,724,605; 5,726,717; 5,729,673; 5,745,637; 5,752,029; 5,754,851; 5,799,150; 5,812,216;
5,828,678; 5,842,014; 5,852,435; 5,987,501; 6,061,758; 6,223,211; 6,301,105; 6,546,190; 6,636,869.
Other patents are pending.
No part of this document may be reproduced or transmitted in any form or by any means, electronic or
mechanical, including photocopying and recording, for any purpose without the express written permission
of Avid Technology, Inc.
Copyright © 2004 Avid Technology, Inc. and its licensors. All rights reserved.
Attn. Government User(s). Restricted Rights Legend
U.S. GOVERNMENT RESTRICTED RIGHTS. This Software and its documentation are “commercial
computer software” or “commercial computer software documentation.” In the event that such Software or
documentation is acquired by or on behalf of a unit or agency of the U.S. Government, all rights with
respect to this Software and documentation are subject to the terms of the License Agreement, pursuant to
FAR §12.212(a) and/or DFARS §227.7202-1(a), as applicable.
Trademarks
888 I/O, Adrenaline, AirPlay, AirSPACE, AirSPACE HD, AniMatte, AudioSuite, AudioVision, AutoSync, Avid,
Avid DNA, AVIDdrive, AVIDdrive Towers, Avid Mojo, AvidNet, AvidNetwork, AVIDstripe, Avid Unity,
Avid Xpress, AVoption, AVX, CamCutter, ChromaCurve, ChromaWheel, DAE, D-Fi, D-fx, Digidesign,
Digidesign Audio Engine, Digidesign Intelligent Noise Reduction, DigiDrive, Digital Nonlinear Accelerator,
DigiTranslator, DINR, D-Verb, Equinox, ExpertRender, FieldPak, Film Composer, FilmScribe, FluidMotion,
HIIP, HyperSPACE, HyperSPACE HDCAM, IllusionFX, Image Independence, Intraframe, iS9, iS18, iS23,
iS36, Lo-Fi, Magic Mask, make manage move | media, Marquee, Matador, Maxim, MCXpress,
Media Composer, MediaDock, MediaDock Shuttle, Media Fusion, Media Illusion, MediaLog,
Media Reader, Media Recorder, MEDIArray, MediaShare, Meridien, MetaSync, NaturalMatch, Nearchive,
NetReview, NewsCutter, Nitris, OMF, OMF Interchange, OMM, Open Media Framework,
Open Media Management, ProEncode, Pro Tools, QuietDrive, Recti-Fi, RetroLoop, rS9, rS18, Sci-Fi,
Softimage, Sound Designer II, SPACE, SPACEShift, Symphony, the Avid|DS logo, Trilligent, UnityRAID,
Vari-Fi, Video Slave Driver, VideoSPACE, and Xdeck are either registered trademarks or trademarks of
Avid Technology, Inc. in the United States and/or other countries.
iNEWS, iNEWS ControlAir, and Media Browse are trademarks of iNews, LLC.
Grass Valley and Profile are either registered trademarks or trademarks of Grass Valley Group in the
United States and/or other countries. IBM and IntelliStation are registered trademarks of International
Business Machines Corporation. Microsoft and Windows NT are registered trademarks of Microsoft
Corporation in the United States and/or other countries. All other trademarks contained herein are the
property of their respective owners.
Integrating the Thomson Grass Valley Group Profile® Into the Avid Workgroup • 0130-06044-01A •
June 2004
25
26
m a k e m a n a g e m ove | m e d i a ™
Avid
®