1
easyToUCH Operator ’s Manual
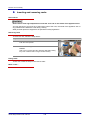
Use and Care Instructions
The MINI
Model Number:
OES 6.08 mini, OES 3.10 mini, OES 6.10 mini,
OES 10.10 mini, OES 6.10 mini 2in1
Cleveland Range, LLC
1333 East 179th Street
Cleveland, Ohio 44110
Phone: (216) 481- 4900
Fax: (216) 481 - 3782
www.clevelandrange.com
Part No. OES-MINI-ET-OPM Rev C 01/13
FOR YOUR SAFETY
Do not store or use gasoline or
other flammable vapors or liquids
in the vicinity of this or any other
appliance.
Improper installation, adjustment, alteration, service or
maintenance can cause property damage, injury or death.
Read the installation, operating and maintenance instructions
thoroughly before installing or servicing this equipment.
Disconnect power at the main external power switch before servicing or repairing a MINI.
Failure to disconnect power can result in death, injury, and property damage.
ALL SERVICE MUST BE PERFORMED BY A QUALIFIED
CLEVELAND RANGE AUTHORIZED TECHNICIAN.
Do not connect the MINI Oven-Steamer drain connection to any drain material that
cannot sustain 140o Fahrenheit.
Using drain material that cannot withstand 140o Fahrenheit can result in injury,
equipment damage, and property damage.
This Operation Manual is a part of your new MINI. You must keep and maintain it for the
entire life span of your MINI and pass it on to the next owner of the MINI.
This manual may be subject to new technical developments, modifications, and unforeseen errors.
KEEP THIS MANUAL FOR REFERENCE
The MINI Convotherm by Cleveland Combi/Oven-Steamers are intended for other than household use.
For caster equipped MINIs: If the Restraining Device must be
disconnected, it must be reconnected after the MINI has been
returned to its originally installed position BEFORE restarting
the MINI.
CONVOTHERM by Cleveland STATEMENT OF POLICIES
LIMITED WARRANTY
CONVOTHERM by Cleveland products are warranted to the original purchaser to be free from defects in materials and
workmanship under normal use and service for the standard warranty period of one year from date of installation or 18
months from date of shipment, whichever comes first.
CONVOTHERM by Cleveland agrees to repair or replace, at its option, f.o.b. factory, any part which proves to be defective
due to defects in material or workmanship during the warranty period, providing the equipment has been unaltered, and has
been PROPERLY INSTALLED, MAINTAINED, AND OPERATED IN ACCORDANCE WITH THE CONVOTHERM by
Cleveland OWNER’S MANUAL.
CONVOTHERM by Cleveland agrees to pay any FACTORY AUTHORIZED EQUIPMENT SERVICE AGENCY (within the
continental United States, and Hawaii) for reasonable labor required to repair or replace, at our option, f.o.b. factory, any part
which proves to be defective due to defects in material or workmanship, during the labor warranty period. This warranty
includes travel time not to exceed two hours and mileage not to exceed 50 miles (100 miles round-trip), BUT DOES NOT
INCLUDE POST START-UP, TIGHTING LOOSE FITTINGS, MINOR ADJUSTMENTS, MAINTENANCE, CLEANING OR
DESCALING.
The standard labor warranty allows factory payment of reasonable labor required to repair or replace such defective parts.
CONVOTHERM by Cleveland will not reimburse the expense of labor required for the repair or replacement of parts after the
standard warranty period, unless an Extended Labor Warranty Contract has been purchased to cover the equipment for the
balance of the warranty period from the date of equipment installation, start-up, or demonstration.
PROPER INSTALLATION IS THE RESPONSIBILITY OF THE DEALER, THE OWNER-USER, OR INSTALLING
CONTRACTOR, AND IS NOT COVERED BE THIS WARRANTY. Many local codes exist, and it is the responsibility of the
owner and installer to comply with these codes. Cleveland Range equipment is built to comply with applicable standards for
manufacturers, including UL, AGA, NSF, ASNE/Ntl. Bd, CSA, CGA, ETL and others.
BOILER (Steam Generator) MAINTENANCE IS THE RESPONSIBILITY OF THE OWNER-USER AND IS NOT COVERED
BY THIS WARRANTY. The use of good quality feed water is the responsibility of the Owner-User (see Water Quality
Recommendations below). THE USE OF POOR QUALITY FEED WATER WILL VOID EQUIPMENT WARRANTIES. Boiler
maintenance supplies, including boiler hand gaskets, are not warranted beyond the first 90 days after the date the equipment
is placed into service. Preventive maintenance records must be available showing descaling per applicable Cleveland
Operator Manual for Boiler Proration Program considerations.
WATER QUALITY RECOMMENDATIONS (NEW)
TDS………………………50-125 ppm
Total Alkalinity………….50-100 ppm
Silica……………………..<13 ppm
Chloride………………….< 25ppm
pH Factor…………..7.0-8.5
Free Chlorine………< 0.1 ppm
Hardness……………50-100 ppm (3-6gpg)
Water Pressure 35-80 psi
The foregoing shall constitute the sole and exclusive remedy of original purchaser and the full liability of CONVOTHERM by
Cleveland for any breach of warranty. THE FOREGOING IS EXCLUSIVE AND IN LIEU OF ALL OTHER WARRANTIES,
WHETHER WRITTEN, ORAL. OR IMPLIED, INCLUDING ANY WARRANTY OF PERFORMANCE, MERCHANTABILITY, OR
FITNESS FOR PURPOSE, AND SUPERSEDES AND EXCLUDES ANY ORAL WARRANTIES OR REPRESENTATIONS, OR
WRIT-TEN WARRANTIES OR REPRESENTATIONS, NOT EXPRESSLY DESIGNATED IN WRITING AS A “WARRANTY”
OR “GUARANTEE” OF CLEVELAND RANGE MADE OR IMPLIED IN ANY MANUAL, LITERATURE, ADVERTISING
BROCHURE OR OTHER MATERIALS.
CONVOTHERM by Cleveland liability on any claim of any kind, including negligence, with respect to the goods or services
covered hereunder, shall in no case exceed the price of the goods or services, or part thereof, which gives rise to the claim. IN
NO EVENT SHALL CONVOTHERM by Cleveland BE LIABLE FOR SPECIAL, INCIDENTAL, OR CONSEQUENTIAL
DAMAGES, OR ANY DAMAGES IN THE NATURE OF PENALTIES.
LIMITED EXTENDED WARRANTY COVERAGE
The purchase of a Limited Extended Warranty Contract extends the standard warranty coverage to the purchased period of time (one to
two years) from the date of installation, start-up, or demonstration, whichever is sooner.
*An additional two years Parts and Labor Warranty can be purchased with each piece of Cleveland equipment for an additional 3.5% of
the List Price per year. The 3.5% of list price charge will be the net invoice amount for each year of extended warranty purchased.
- Extended warranty must be purchased at the same time the equipment is purchased.
- Extended Warranty has the same exclusions as stated in our standard warranty.
Your MINI in Action
You can cook a variety of foods in your MINI Convotherm by Cleveland Combi/OvenSteamer using hot air, steam, and MINI hot air and steam.
Your MINI is extremely versatile and can cook sous-vide as well as steam, blanch, poach,
stew, boil, roast, braise, bake, grill, “fry,” rethermalize and defrost.
Just place food in containers or on wire racks, select the cooking mode, and time, or core
temperature and start cooking with your MINI.
NOTICE: MINIs are intended for commercial use only.
NOTICE: The ambient temperature for operating your new MINI must be between 40°F
and 95°F.
Table of Contents
Table of Contents
FOR YOUR SAFETY
1
General information
7
►
►
►
►
Error! Bookmark not defined.
9
10
12
Environmental protection
Identifying your combi steamer
About this user manual
Layout and function
►
►
►
14
Intended use of your combi steamer
Design and function of the combi steamer
Technical data
For your safety
►
►
►
►
►
►
►
23
Basic safety code
Warning signs on the combi steamer
Summary of hazards
Hazards and safety precautions
Safety devices
Requirements to be met by personnel, working positions
Personal protective equipment
Layout of the touchscreen pages
1.1
1.2
1.3
The work pages
► Layout of the work pages
► The Start page
► The Cook page
► The Press&Go page
► The Regenerate page
► The Clean page
The cookbook
► Layout of the cookbook pages
► The Favorites page
► The recipe groups page
► The recipes page
The Settings
► The Settings page
► The General page
► The Import/Export page
► The easySystem page
► The Backup/Restore page
1.5
First operating steps
► Turning the combi steamer on / off
► Cooking with Press&Go
Boiling
► Basic working procedure for cooking
► Entering a cooking program
minis easyTOUCH user manual
24
25
26
28
30
32
33
34
35
36
37
38
41
42
44
45
46
48
50
52
54
55
56
57
58
59
How to operate the touchscreen
1.4
15
17
19
4
60
61
62
63
65
66
67
Table of Contents
1.6
1.7
1.8
► Entering the Delta-T cooking program
► Boiling
► Manual steaming during cooking
► Using spare shelves during cooking
Regenerate
► Basic working procedure for regenerating
► Entering the regenerating program
► Regenerate
► Using spare shelves during regenerating
How to work in emergency mode
► Basic working procedure in emergency mode
Working with the cookbook
► Retrieving a recipe from the cookbook
► Creating a cooking recipe
► Changing the name and picture of a recipe
► Removing a recipe from the cookbook
► Saving / removing a recipe under Favorites
► Creating a new recipe group
► Changing the name and picture of a recipe group
► Saving / removing a recipe in a Recipe group
► Deleting a recipe group
Working with the mini 2in1
►
►
►
96
Working with the mini 2in1
Layout of the mini 2in1 touchscreen pages
The Settings - General page for the mini 2in1
Your combi-steamer cooking programs
►
►
►
►
►
►
Steam
Superheated steam
Convection
Regenerate
Core temperature control
Delta-T cooking
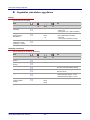
Vegetables, side dishes, egg dishes
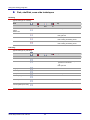
Fish, shellfish, sous-vide techniques
Meat, sausage products, large roasting joints
Meat, sausage products, small roasting cuts
Game and poultry
Baked dishes and desserts
Potato products, Oriental food, finger food
115
117
118
119
120
122
124
126
Cleaning and maintenance schedule
Semi-automatic oven cleaning
Fully automatic oven cleaning (CONVOClean system option)
Cleaning agents
Troubleshooting
Rectifying faults - Irregularities during operation
minis easyTOUCH user manual
104
114
Cleaning and Maintenance
►
►
►
►
►
►
97
99
102
105
107
108
109
110
112
Using the cooking programs
►
►
►
►
►
►
►
68
69
71
72
74
75
76
77
79
81
82
83
84
86
87
88
89
91
92
93
95
5
127
130
132
134
135
137
Table of Contents
How to do it correctly
►
►
►
►
►
►
►
►
►
►
►
138
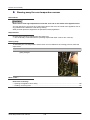
Opening the appliance door safely
Inserting and removing racks
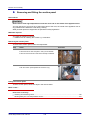
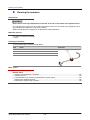
Loading / removing food
Stowing away the core temperature sensor
Removing and fitting the suction panel
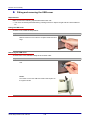
Fitting and removing the USB cover
Cleaning the double glass door
Cleaning the hygienic plug-in gasket
Cleaning the armature
Filling the cleaning drawers
Operating the CONVOVent mini
minis easyTOUCH user manual
6
139
140
141
143
144
145
146
148
149
150
152
General information
General information
Purpose of this chapter
This chapter shows you how to identify your combi steamer and provides guidance on using this manual.
Contents
This chapter contains the following topics:
Page
9
10
12
Environmental protection
Identifying your combi steamer
About this user manual
minis easyTOUCH user manual
7
General information
minis easyTOUCH user manual
8
General information
►
Environmental protection
Statement of principles
Our customers' expectations, the legal regulations and standards and our company's own reputation
set the quality and service for all our products.
We have an environmental management policy that not only ensures compliance with all environmental regulations and laws, but also commits us to continuous improvement of our green credentials.
We have developed a quality and environmental-management system in order to guarantee the continued manufacture of high-quality products, and to be sure of meeting our environmental targets.
This system satisfies the requirements of ISO 9001:2000 and ISO 14001:2004.
Environmental protection procedures
We observe the following procedures:
Use of residue-free compostable wadding materials
Use of RoHS-compliant products
Multiple re-use of cardboard packaging
Recommendation and use of bio-degradable cleaning agents
Recycling of electronic waste
Environmentally friendly disposal of old appliances via the manufacturer
Join us in a commitment to environmental protection.
minis easyTOUCH user manual
9
General information
►
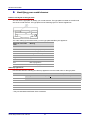
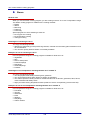
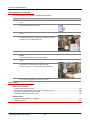
Identifying your combi steamer
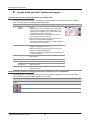
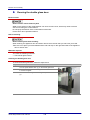
Position and layout of the type plate
You can use the type plate to identify your combi steamer. The type plate is located on the left-hand
side of the combi steamer. The type plate has the following layout on electric appliances:
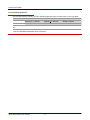
The code making up the trade name (1) in the type plate identifies your appliance:
Elements of the trade
name
Meaning
Letters
1. letter
O = Eco (always present)
2. letter
E = Electric appliance
3. letter
S = Appliance with injection
Numerical values
xx.yy
Appliance size
Letters
mini
table-top appliance
mini 2in1
Floor-standing appliance
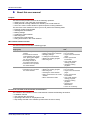
Table-top appliances
Use the table below to identify your table-top appliance from the trade name on the type plate:
Model
Number of shelves
Optional shelves
Capacity 2 ½“ Stm PN*
Capacity < 1“ Stm PN *
Number of plates
2/3 Stm PN
1/1 Stm PN
2/3 Stm PN
1/1 Stm PN
Ø 26 cm
Ø 28 cm
OES 6.08 mini
4
-
6
-
4
4
OES 3.10 mini
-
4
-
6
8
-
OES 6.10 mini
-
4
-
6
8
-
OES 10.10 mini
-
6
-
10
12
-
* Only use standard sized Steam Pans containers.
minis easyTOUCH user manual
10
General information
Floor-standing appliances
Use the table below to identify your floor-standing appliance from the trade name on the type plate:
Model
OES 6.10 mini
2in1
Number of shelves
Optional shelves
Capacity 2 ½“ Stm PN*
Capacity < 1“ Stm PN *
Number of plates
2/3 Stm PN
1/1 Stm PN
2/3 Stm PN
1/1 Stm PN
Ø 26 cm
Ø 28 cm
-
8
-
12
16
-
* Only use standard sized Steam Pans containers.
minis easyTOUCH user manual
11
General information
►
About this user manual
Purpose
This user manual provides answers to the following questions:
What food can I cook using the combi steamer?
What particular cooking methods are offered by the combi steamer?
How can I use the combi steamer to perform specific cooking methods?
The aim of this user manual is to show you how to perform the following tasks:
Entering cooking program data
Working with the cookbook
Making settings
Loading the combi steamer
Removing food
Cleaning the combi steamer
Fitting accessories in the combi steamer
Who should read this manual
This user manual is aimed at the following groups:
Name of
target group
Qualifications
Tasks
Chapter to read before
task
Chef
Has relevant professional
Entering cooking program data
Editing recipes in the cookbook
Managing settings
Layout and function
For your safety
Layout of the touchscreen
Loading the combi steamer
Starting the cooking program
Removing food
How to operate the
training
Knows relevant national
food legislation and regulations, plus hygiene legislation and regulations
Must keep records in
accordance with HACCP
Trained in how to operate
the combi steamer
User
Semiskilled
Trained in how to operate
the combi steamer
pages
touchscreen
Your combi-steamer
cooking programs
Using the cooking
programs
Loading the combi steamer
Starting the cooking program
Removing food
Cleaning the combi steamer
Fitting accessories in the combi
steamer
Minor maintenance tasks
Layout and function
For your safety
Layout of the touchscreen
pages
How to operate the
touchscreen
Your combi-steamer
cooking programs
Using the cooking
programs
Cleaning and
Maintenance
How to do it correctly
Documents included in the Customer documentation
The customer documentation for the combi steamer includes the following documents:
Installation manual
User manual (this document)
Operating instructions for easySystem mode
Help facility included in the software (extracts from the user manual)
minis easyTOUCH user manual
12
General information
Chapters in the user manual
The table below lists the chapters in this manual and summarizes their content, purpose and target
groups:
Chapter/section
Purpose
Target
group
General information
Shows you how to identify your combi steamer
Provides guidance on using this manual
Chef
User
Layout and function
Specifies the intended use of the combi steamer
Explains the functions of the combi steamer and shows the
Chef
User
position of its components
Summarizes the technical data
For your safety
Describes the hazards posed by the combi steamer and suitable
preventive measures
You should read this chapter carefully in particular.
Chef
User
Layout of the touchscreen
pages
Describes the user interface
Chef
User
How to operate the touchscreen
Contains instructions for the basic operation of the combi
Chef
User
Working with the mini 2in1
Explains those areas of operation particular to the mini 2in1
steamer using the touchscreen
combi steamer
Describes the mini 2in1 user interface
Chef
User
Your combi-steamer
cooking programs
Describes the cooking programs
Chef
User
Using the cooking
programs
Gives examples of how to use the cooking programs
Chef
User
Cleaning and Maintenance
Contains the cleaning schedule
Contains the maintenance schedule where relevant to the user
Contains cleaning instructions
User
How to do it correctly
Contains instructions for regularly used operating procedures for
User
the combi steamer
Symbols used for safety instructions
Safety instructions are categorized according to the following hazard levels:
Hazard level
Caution
minis easyTOUCH user manual
Consequences
Likelihood
Death / serious injury (irreversible)
Immediate risk
Death / serious injury (irreversible)
Potential risk
Minor injury (reversible)
Potential risk
Damage to property
Potential risk
13
Layout and function
Layout and function
Purpose of this chapter
This chapter specifies the intended use of the combi steamer and explains its functions.
Contents
This chapter contains the following topics:
Page
15
17
19
Intended use of your combi steamer
Design and function of the combi steamer
Technical data
minis easyTOUCH user manual
14
Layout and function
►
Intended use of your combi steamer
Intended use
The combi steamer must only be used for the purposes specified below:
The combi steamer is designed and built solely for cooking different foodstuffs. Steam, convection
and superheated (non-pressurized) steam are used for this purpose.
The combi steamer is intended solely for professional, commercial use.
The ambient temperature must lie between 4 °C and 35 °C.
Do not exceed the maximum permissible loading weight per combi steamer.
In addition, the combi steamer is only being used as intended when the following conditions are met:
To avoid accidents and damage to the combi steamer, the owner must train staff regularly. The
combi steamer must only be operated by trained staff.
The manufacturer regulations for operation and maintenance of the combi steamer must be observed.
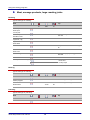
Maximum permissible loading weight
The following table shows the maximum permissible loading weight per combi steamer. Each shelf
may only be loaded with a maximum of 5 kg.
Model
Max. permissible loading weight
per combi steamer
per shelf
OES 6.08 mini
13 kg
5 kg
OES 3.10 mini
20 kg
5 kg
OES 6.10 mini
20 kg
5 kg
OES 10.10 mini
30 kg
5 kg
OES 6.10 mini 2in1
40 kg
(20 kg per oven compartment)
5 kg
Restrictions on use
The following restrictions on use must be observed:
The combi steamer must only be operated when all safety devices are fitted and in working order.
Dry powder or granulated material must not be heated in the combi steamer.
Easily inflammable objects with a flash point below 270 °C must not be heated in the combi
steamer. These include items such as highly flammable oils, fats or cloths.
Food in sealed tins or jars must not be heated in the combi steamer.
Requirements to be met by personnel
The following requirements must be met by personnel:
The combi steamer must only be operated by trained personnel.
Personnel must be aware of the risks and regulations associated with handling heavy loads.
minis easyTOUCH user manual
15
Layout and function
Requirements relating to the operating condition of the combi steamer
The following requirements relating to the operating condition of the combi steamer must be met:
The combi steamer must only be operated when all safety devices are working correctly.
The combi steamer must only be operated when all appliance covers and panels are fitted correctly.
Requirements relating to the operating environment of the combi steamer
The following requirements relating to the operating environment of the combi steamer must be met:
The combi steamer must not be operated in the vicinity of flammable gases or liquids.
The combi steamer must not be operated in toxic or potentially explosive atmospheres.
The combi steamer must be sheltered from the rain if operated outdoors.
The kitchen floor must be kept dry to reduce the risk of accidents.
Cleaning requirements
The following requirements must be met during cleaning:
Only original cleaning agents must be used.
High-pressure cleaners or water jets must not be used for cleaning.
The combi steamer must not be treated with acids or exposed to acid fumes.
minis easyTOUCH user manual
16
Layout and function
►
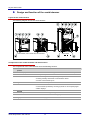
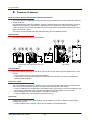
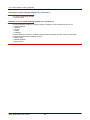
Design and function of the combi steamer
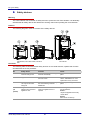
Layout of the combi steamer
The following diagram shows the combi steamer:
OES 6.08 mini, OES 3.10/6.10 mini, OES 10.10 mini
OES 6.10 2in1
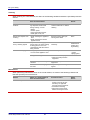
Components of the combi steamers and their function
The components of the combi steamer have the following function:
No.
Name
picture
Function
1
Ventilation pipe
External air intake for removing the moisture from the oven compartment
2
Air vent
Lets vapor escape
3
Door handle
Has the following functions depending on its position:
Pointing vertically downwards: combi steamer closed
Turned: Combi steamer open
4
Appliance door:
Closes the oven compartment
5
Touchscreen
Central control of combi steamer
Combi steamer operated by touching symbols on control-panel pages
Status displays
6
Switches the combi steamer on and off
7
Oven compartment
Contains the food during cooking
8
rack
Used to hold GN containers or baking trays
9
Type plate
Used for identifying the combi steamer
minis easyTOUCH user manual
17
Layout and function
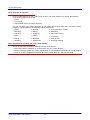
Basic principle of operation
In your combi steamer you can cook a range of food. The combi steamer can employ the following
main cooking programs to do this:
Steam
Convection
Superheated steam (not under pressure).
You can use these main cooking programs to cook food in almost all possible ways. The main cooking
programs can be applied to the following cooking techniques:
Steam
Braising
Low-temperature cooking
Blanching
Baking
Defrosting
Poaching
Scalloping
Sous-vide cooking
Stew
Grilling
T cooking
Boiling
Roasting
Gratinate
Regenerate
Cook & Hold
Overnight cooking
Basic procedure for working with your combi steamer
These are the basic principles of working with the combi steamer:
Place food, held in containers or on shelf racks, into your combi steamer.
Set the cooking program, the cooking temperature or core temperature and start the combi steamer.
Once the cooking program has finished, take out the food, which is in the required state.
minis easyTOUCH user manual
18
Layout and function
►
Technical data
Dimensions and weights
The following table shows appliance dimensions and weights:
OES mini
Table-top appliances
6.08 mini
3.10 mini
Floorstanding
appliances
10.10 mini
6.10 2in1
6.10 mini
Width
with packaging
[mm]
580
580
580
580
without packaging
[mm]
515
515
515
515
with packaging
[mm]
740
910
910
935
without packaging
[mm]
599
777
777
802
with packaging
[mm]
830
830
1065
1305
without packaging
(standard controls)
[mm]
627
627
857
-
without packaging
(easyTOUCH controls)
[mm]
647
647
877
1122
Depth
Height
Height with CONVOClean system
with packaging
[mm]
970
970
1205
1305
without packaging
(standard controls)
[mm]
767
767
997
-
without packaging
(easyTOUCH controls)
[mm]
787
787
1017
1122
with packaging
[kg]
57
67
82
115
without packaging
[kg]
45
54
69
99
Weight
Weight with CONVOClean system
with packaging
[kg]
68
82
97
without packaging
[kg]
56
69
84
Rear
[mm]
50
50
50
50
Right-hand side
[mm]
50
50
50
50
Left-hand side
[mm]
50
50
50
50
Above*
[mm]
500
500
500
500
Safety clearances
* for ventilation
minis easyTOUCH user manual
19
Layout and function
Electrical installed load ratings
The following table shows the typical electrical installed load ratings (always refer to the rating plate in
order to determine the rating of the specific model you own):
1.1
Model Number
OES 10.10 mini
OES 6.10 mini 2in1
VOLTS
PHASE
WIRES
CYCLE
HERTZ
MAX
LOAD
AMPS
208
240
208
240
3
3
3
3
3
3
3
3
60
60
60
60
23.6
27.1
31.3
35.9
Models using heating elements (5KW)
Model Number
OES 6.10 mini
OES 3.10 mini
OES 6.10 mini
OES 3.10 mini
VOLTS
PHASE
WIRES
CYCLE
HERTZ
MAX
LOAD
AMPS
208
208
208
220
240
208
240
1
3
1
1
1
3
3
2
3
2
2
3
3
3
60
60
60
60
60
60
60
26.2
15.1
21.6
22.7
24.5
12.5
14.2
Models using heating elements (6.4 KW)
Model Number
OES 6.10 mini
OES 3.10 mini
minis easyTOUCH user manual
VOLTS
PHASE
WIRES
CYCLE
HERTZ
MAX
LOAD
AMPS
208
240
3
3
3
3
60
60
15.7
17.9
20
Layout and function
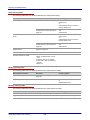
Water supply and water quality
The following table shows the values for the water supply and water quality:
OES mini
Table-top appliances
6.08 mini
3.10 mini
Floor-standing
appliances
10.10 mini
6.10 2in1
6.10 mini
Water supply (cold only)
Shut-off valve
with non-return valve and dirt filter
Water supply
without CONVOClean
system
1 x G 3/4'', permanent connection
recommended
2 x G 3/4'', permanent
connection recommended
with CONVOClean system
1 x G 3/4'', permanent connection
recommended
3 x G 3/4'', permanent
connection recommended
Flow pressure
without CONVOClean
system
[kPa]
200 - 600
(2 – 6 bar)
with CONVOClean system
[kPa]
300 - 600
(3 – 6 bar)
DN
40
40
Water drain*
Type
40
50
50
* Permanent connection (recommended) or funnel waste trap
OES mini
Table-top appliances
Floor-standing
appliances
Injection, condenser, cleaning
Injection,
cleaning
Condenser
Drinking water quality (install water treatment unit if necessary)
Total hardness
(German degrees of
hardness)
[°dH]
4-7
4-7
4 - 20
(French degrees of
hardness)
[TH]
7 - 13
7 - 13
7 - 27
(English degrees of
hardness)
[°e]
5-9
5-9
5 - 19
[ppm]
70 - 125
70 - 125
70 - 270
[mmol/l]
0,7 - 1,3
0,7 - 1,3
0,7 - 2,7
Temperature (T)
[°C]
max. 40
max. 40
max. 40
Conductivity
[µS/cm]
min. 20
min. 20
min. 20
7.0 - 8,5
7.0 - 8,5
7.0 - 8,5
[mg/]l
max. 100
max. 100
max. 100
[mg/l]
max. 150
max. 150
max. 150
[mg/l]
max. 0.1
max. 0.1
max. 0.1
pH
Cl
-
SO4
2-
Fe
minis easyTOUCH user manual
21
Layout and function
Appliance technical standards
The following table shows the technical standards for the appliance:
OES mini
Table-top appliances
6.06 mini
3.10 mini
6.10 mini
Degree of protection
IPX4
Approval mark*
UL/CUL
Noise emission
measured
minis easyTOUCH user manual
[dBA]
< 60
22
Floor-standing
appliances
10.10 mini
6.06 2in1
6.10 2in1
For your safety
For your safety
Purpose of this chapter
This chapter provides you with all the information you need in order to use the combi steamer safely
without putting yourself or others at risk.
This is a particularly important chapter that you should read through carefully.
Contents
This chapter contains the following topics:
Basic safety code
Warning signs on the combi steamer
Summary of hazards
Hazards and safety precautions
Safety devices
Requirements to be met by personnel, working positions
Personal protective equipment
minis easyTOUCH user manual
23
Page
24
25
26
28
30
32
33
For your safety
►
Basic safety code
Object of this safety code
This safety code aims to ensure that all persons who use the combi steamer have a thorough knowledge of the hazards and safety precautions, and that they follow the safety instructions given in the
user manual and on the combi steamer. If you do not follow this safety code, you risk potentially fatal
injury and property damage.
Working with the user manual
Follow the instructions below:
Read in full the Safety chapter and chapters that relate to your work.
Always keep the user manual to hand for reference.
Pass on the user manual with the combi steamer if it changes ownership.
Working with the combi steamer
Follow the instructions below:
Only those persons who satisfy the requirements stipulated in this user manual are permitted to use
the combi steamer.
People (including children) who, because of their physical, sensory or intellectual capabilities, or
because of their lack of experience or knowledge, are incapable of using the appliance safely,
should not use this equipment without the supervision or guidance of a responsible person.
Only use the combi steamer for the specified use. Never, under any circumstances, use the combi
steamer for other purposes that may suggest themselves.
Take all the safety precautions specified in this user manual and on the combi steamer. In particular,
use the prescribed personal protective equipment.
Only stand in the working positions specified.
Do not make any changes to the combi steamer, e.g. removing parts or fitting un-approved parts. In
particular, you must not disable any safety devices.
More on this
Related topics
Intended use of your combi steamer .................................................................................................. 15
Warning signs on the combi steamer ................................................................................................. 25
Summary of hazards .......................................................................................................................... 26
Requirements to be met by personnel, working positions ................................................................. 32
Personal protective equipment........................................................................................................... 33
minis easyTOUCH user manual
24
For your safety
►
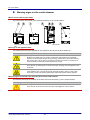
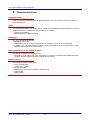
Warning signs on the combi steamer
Where are the hazard signs fitted?
The hazard signs are located in the following positions on the combi steamer:
OES 6.08 mini, OES 3.10/6.10 mini, OES 10.10
mini
OES 6.10 2in1
Warnings on the appliance door
The following warning signs are fitted on the appliance door above the door handle (2):
Warning sign
Description
Warning of hot liquids
Spillage of hot liquid foods can result in scalds if the upper shelves are loaded with
liquids or foods that produce liquid during cooking. Shelves above the level marked by
this warning sign (1.60 m) may not be seen by all users and should not, therefore, be
used for liquids or foods that produce liquid during cooking.
Warning of hot steam and vapor
There is a risk of scalding from hot steam and vapor escaping when the appliance door
is opened.
Warning of corrosive cleaning agents injected into oven
If the appliance door is opened during fully automatic cleaning, there is a risk of skin
burns from contact with cleaning agents being injected during the cleaning program.
Warning signs on the side cover and rear panel of the combi steamer
The following warnings are located on the side cover and rear panel (1) of the combi steamer:
Warning sign
Description
Warning of electric shock
There is a risk of electric shock from live parts if the appliance cover is opened.
minis easyTOUCH user manual
25
For your safety
►
Summary of hazards
General rules for dealing with hazards and safety precautions
The combi steamer is designed to protect the user from all hazards that can reasonably be avoided by
design measures.
The actual purpose of the combi steamer, however, means that there are still residual risks; you must
therefore take precautions to avoid them. A safety device can provide you with a certain degree of
protection against some of these hazards. You must ensure, however, that these safety devices are in
place and in working order.
The nature of these residual risks and what effect they have are described below.
Hazard points
The following diagram shows the hazard points:
OES 6.08 mini, OES 3.10/6.10 mini, OES 10.10
mini
OES 6.10 2in1
Heat generation
The combi steamer becomes hot inside the oven (5) and on the inside (6) of the appliance door. This
causes:
A fire risk from heat given off by the combi steamer
a risk of burns on hot surfaces outside and inside the combi steamer, and also on hot appliance
parts and food containers
Hot steam / vapor
The combi steamer generates hot steam or vapor, which must escape when the door is opened, and
which is removed through the air vent on the top of the combi steamer. This causes:
A risk of scalding from hot steam when the appliance door (3) is opened. You are protected from the
hot steam by the appliance door, provided you make sure that the appliance door is intact.
Risk of scalding from hot steam if water is sprayed into hot fat (5).
a risk of scalding from high temperatures at the air vent (1)
Hot liquids
Foodstuffs are cooked in the combi steamer. These foodstuffs may also be liquid, or liquefy during
cooking. This causes:
a risk of scalding from hot liquids, which may be spilled if not handled properly
minis easyTOUCH user manual
26
For your safety
Live components
The combi steamer contains live parts. This means:
a risk from live parts if the cover (2) to the electrical compartment is not in place.
Fan
The combi steamer contains a fan. This causes:
a risk of hand injuries from the fan in the oven behind the suction panel (4) if the suction panel is not
fitted in place properly.
Cleaning agents
The combi steamer must be cleaned using special cleaners. This causes:
A risk from cleaning agents, some of which can cause skin burns.
Loading the oven in advance
When loading the oven ahead of time, e.g. for pre-setting the start time of the cooking program, the
cold chain of chilled foodstuffs may be broken. This causes:
a risk to your guests from microbiological contamination of foodstuffs
Risk of hands being crushed
For various actions, such as opening/shutting the appliance door or cleaning the appliance door, there
is the risk that you will crush or cut your hand.
minis easyTOUCH user manual
27
For your safety
►
Hazards and safety precautions
Operating the combi steamer
When operating the combi steamer, be aware of the following hazards and take the specified preventive actions:
Hazard
Where or in what situations
does the hazard arise?
Preventive action
Safety
device
A fire risk from heat given When flammable gases or liquids
off by the combi steamer are stored near the combi
steamer.
Do not store flammable
gases or liquids near the
combi steamer.
None
Risk of burns from hot
surfaces
Outside of appliance door
Do not touch surfaces for any
length of time
None
Inside the whole interior, includ-
Wear specified protective
clothing, in particular protective gloves
None
ing all parts that are inside
during cooking, such as
Racks
Suction panel
Core temperature sensor
Shelf-grills etc.
On the inside of the appliance
door
Risk of scalding from
water jet
If a container of hot fat is standing in the oven into which water
is sprayed through a water jet.
Do not spray into liquid fat
None
Risk of scalding from hot
liquid
Inside oven
Outside the combi steamer
Only load containers hold-
None
Risk of scalding from hot
steam
In front of the combi steamer
Check safety device
Appliance door:
In front of the appliance door
use safety device
Check safety device
Do not put your head in the
Door-catch
setting
ing liquid or liquefying food
into shelf levels that allow a
proper view inside the container, and always hold
horizontally when removing
Wear protective gloves
oven
Risk of burns from hot
vented air
Air vent on top of combi steamer
Do not get near it
None
Risk from live parts
Under the cover
Check safety device
Cover
Check safety device
Suction panel
Electrical
Risk of hand injuries from In oven
fan
cutout for
appliance
door
Risk from microbiological
contamination of food
When the food cold-chain is
broken by loading the oven in
advance
Risk of hand injuries from When closing the appliance
crushing
door
minis easyTOUCH user manual
28
Make sure that the cold chain
is not broken:
Do not store food temporarily in combi steamer
Only allow qualified staff to
perform low-temperature
cooking (< 65 °C)
None
Exercise caution when
performing these tasks
None
For your safety
Cleaning
When cleaning the combi steamer, be aware of the following hazards and take the specified preventive
actions:
Hazard
Where or in what situations
does the hazard arise?
Preventive action
Safety
device
Risk of burns from hot
surfaces
Inside the whole interior, including all parts that are inside
during cooking, such as
Racks
Suction panel
Core temperature sensor
Shelf-grills, racks, etc.
Wait until the interior has
cooled to below 60 °C before
cleaning
None
Risk of hand injuries from
crushing
When cleaning the appliance
Exercise caution when performing these tasks
None
Risk of food contamination by cleaning agents
Only for floor-standing appliances ("2in1") in which cooking
is taking place in one oven
compartment while the other is
being cleaned.
Do not cook and clean simultaneously
Block on
simultaneous
cooking and
regenerating
Risk from cleaning agents
During fully automatic cleaning:
In front of the appliance door
Check safety device
Automatic
During all cleaning tasks
Do not breathe in spray
Wear personal protective
When handling the cleaning
canisters
Wear personal protective
equipment
None
When corrosive cleaning agents
are used
Only use original cleaning
agents
None
door
When cleaning the interior
appliance door
rinsing
Spray-guard
None
equipment
Maintenance
When performing maintenance work on the combi steamer, be aware of the following hazards and
take the specified preventive actions:
Hazard
Where or in what situations
does the hazard arise?
Preventive action
Safety
device
Risk from live parts
Under the cover
Work on the electrical
Cover
system must only be performed by an approved
customer service engineer
Professional working
Disconnect power supply
before removing the cover
minis easyTOUCH user manual
29
For your safety
►
Safety devices
Meaning
The combi steamer has a number of safety devices to protect the user from hazards. It is absolutely
essential that all safety devices are fitted and in working order when operating the combi steamer
Position
The following diagrams show the location of the safety devices:
OES 6.08 mini, OES 3.10/6.10 mini, OES 10.10
mini
OES 6.10 2in1
Functions
The following table enumerates all the safety devices on the combi steamer, explains their function
and describes the check procedure:
No.
Safety device
Function
Check
1
Covers can only be
removed using a tool
Prevents live parts from being
touched accidentally
Check that the covers are in
place
2
Appliance door:
Protects the outside environment
from hot steam
Check regularly for scratches,
cracks, indentations etc. and
replace door if any are found
3
Suction panel in oven;
can only be removed
using tool
Prevents access to the moving
fan and ensures good heat
distribution.
Removing and fitting the suction
panel
4
Magnetic door switch:
electrical door sensor in
appliance door
Switches off the fan and heater
when the appliance door is
opened
Check magnetic door switch at
low temperature:
Action:
(no
picture)
Open the appliance door fully
Press Start
Result:
Motor must not start up
minis easyTOUCH user manual
30
For your safety
No.
Safety device
Function
Check
5
(no
picture)
Automatic rinsing after
power failure in case
cleaning agent left in
combi steamer
Re-starts fully automatic cleaning
in a defined state after power
failure
This test is a software function.
There is no need for the operator
to perform a test.
6
Spray-guard
Stops the cleaning agent being
injected during fully automatic
cleaning when the appliance door
is opened
Prompt to close the appliance
door
Prevents cooking being performed
in one oven compartment while
the other is being cleaned.
The operability of the magnetic
door switch is checked by the
software at the beginning of each
cleaning program
(no
picture)
7
(no
picture)
Only for floor-standing
appliances ("2in1"):
Block on simultaneous
cooking and regenerating
minis easyTOUCH user manual
31
This test is a software function.
There is no need for the operator
to perform a test.
For your safety
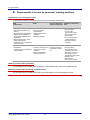
►
Requirements to be met by personnel, working positions
Requirements to be met by personnel
Those people using the combi steamer must meet the following requirements:
Staff
qualifications
Tasks
Personal protective
equipment required
Chapter to read before
task
Chef
Has relevant professional
training
Knows relevant national food
legislation and regulations,
plus hygiene legislation and
regulations
Must keep records in accordance with HACCP
Trained in how to operate the
combi steamer
Chef
Entering cooking
program data
Editing recipes in the
cookbook
Managing settings
None
Layout and function
For your safety
Layout of the
User
User
Semiskilled
Trained in how to operate the
Loading / removing food
Cleaning the combi
combi steamer
touchscreen pages
How to operate the
touchscreen
Your combi-steamer
cooking programs
Using the cooking
programs
steamer
Fitting accessories in
the combi steamer
As specified in
Personal protective
equipment on page
33
Layout and function
For your safety
The instructions for
"Switching the combi
steamer on and off" in
the chapter "How to
operate the touchscreen"
Cleaning and
Maintenance
How to do it correctly
Working positions during operation
The working position for staff when operating the combi steamer is in front of the appliance door.
Working positions during cleaning and maintenance
The working position for staff during cleaning and maintenance is the entire appliance area.
minis easyTOUCH user manual
32
For your safety
►
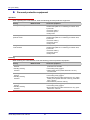
Personal protective equipment
Operation
When operating the combi steamer, wear the following personal protective equipment:
Activity
Materials used
Protection equipment
Loading / removing food
None
Work wear as specified in country-specific standards
and directives (BGR 111 in Germany) for kitchen work,
in particular:
Protective clothing
Protective gloves
Safety boots
Removing the core temperature sensor
None
Work wear as specified in country-specific standards
and directives (BGR 111 in Germany) for kitchen work,
in particular:
Protective clothing
Protective gloves
Safety boots
Fitting accessories in the
combi steamer
None
Work wear as specified in country-specific standards
and directives (BGR 111 in Germany) for kitchen work,
in particular:
Protective clothing
Protective gloves
Safety boots
Cleaning
When cleaning the combi steamer, wear the following personal protective equipment:
Activity
Materials used
Protection equipment
Cleaning the combi
CONVOClean new
Breathing mask with type P2 / P3 particle filter for
steamer
Handling cleaning
canisters
protection from aerosols
Close-fitting safety goggles
Nitrile-rubber gloves (rubber thickness 0.35 mm)
recommended
Cleaning the combi
Breathing mask with type P2 particle filter
Close-fitting safety goggles
Butyl-rubber gloves (rubber thickness 0.5 mm); nitrile-
CONVOClean forte
steamer
Handling cleaning
canisters
Cleaning the combi
rubber gloves (rubber thickness 0.35mm); penetration
time > 480 min
Alkali-resistant protective clothing
Breathing mask with type P2 particle filter
Close-fitting safety goggles
Butyl-rubber gloves (rubber thickness 0.5 mm); pene-
CONVOCare K
steamer
Handling cleaning
canisters
minis easyTOUCH user manual
tration time > 480 min
33
Layout of the touchscreen pages
Layout of the touchscreen pages
The touchscreen and its control buttons
Your combi steamer is operated using a touchscreen. This means that all the combi-steamer functions
are presented as control buttons on various pages of the touchscreen. Simply touch the buttons with
your finger to select a function.
This section presents each touchscreen page in turn, and explains the buttons available on each page
plus their functions.
Contents
This chapter includes the following topics:
Page
35
45
54
The work pages
The cookbook
The Settings
minis easyTOUCH user manual
34
Layout of the touchscreen pages
1.1 The work pages
The touchscreen functions for cooking, regenerating and cleaning
This section presents the touchscreen pages that you need for you everyday work, i.e. cooking, regenerating and cleaning, and explains the functions available on each of the pages.
Contents
This section contains the following topics:
Page
36
37
38
41
42
44
Layout of the work pages
The Start page
The Cook page
The Press&Go page
The Regenerate page
The Clean page
minis easyTOUCH user manual
35
Layout of the touchscreen pages
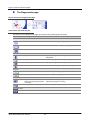
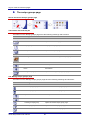
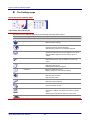
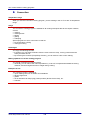
►
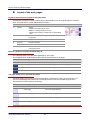
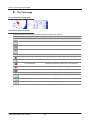
Layout of the work pages
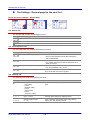
Layout of the touchscreen pages for everyday tasks
The following screenshot uses the 'Cook' page to illustrate the layout of a typical page for everyday
work. The page sectors contain the following functions:
No.
Name
Function
1
Header
Always:
Displays the page that you are in.
While the cooking program is running:
Displays the remaining cooking time or regenerating
time.
2
Main selection
Selection of the main cooking program or main regenerating program
3
Data input
Temperature, time input etc.
4
Program
Program start/stop
Management
Various functions
Navigation area
Functions common to all pages
Various functions
5
Illustration
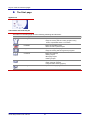
Buttons common to all pages and what they do
The individual buttons are described separately for each page.
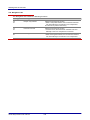
The navigation area contains buttons that have the same function in all pages:
Button
Meaning
Function
Close page
On the main pages: returns to Start page.
Cancel
On the input pages: cancels the entry.
Help
Opens the Help facility.
Navigation area
The page display icons and what they mean
The page display icons are the inverse representation of the buttons used to open the pages concerned. The following table shows just an example selection from the complete range of icons.
The indicators have the following meanings:
Indicator
Meaning
Description
'Cook' page
The 'Cook' page selected.
'Press&Go' page
The 'Press&Go' page selected.
'Regenerate' page
The 'Regenerate' page selected.
'Clean' page
The 'Clean' page selected.
Header
minis easyTOUCH user manual
36
Layout of the touchscreen pages
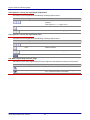
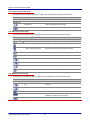
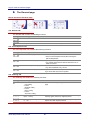
►
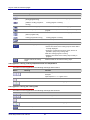
The Start page
Appearance
The buttons and what they do
The buttons in the Start page have the following meanings and functions:
Button
Meaning
Function
Boiling
Opens the 'Cook' page:
Page for entering data for cooking programs using
steam, superheated steam or convection
Press&Go
Opens the 'Press&Go' page
Direct access to preset recipes
Regenerate
Opens the 'Regenerate' page
Page for entering data for regenerate programs
Cookbook
Opens the cookbook:
Editing recipes
Managing recipes
Starting recipes
Clean
Opens the 'Clean' page:
Semi-automatic cleaning
Fully automatic cleaning (option)
Settings
Opens the 'Settings' page.
minis easyTOUCH user manual
37
Layout of the touchscreen pages
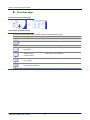
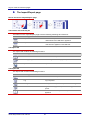
►
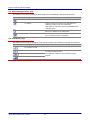
The Cook page
How to access the 'Cook' page
The buttons and what they do
The buttons on the 'Cook' page have the following meanings and functions:
Button
Meaning
Function
Steam
Selects the Steam cooking program.
Superheated steam
Selects the Superheated steam cooking program.
Convection
Selects the Convection cooking program.
Cooking temperature
Displays the keypad for entering the cooking temperature.
Cooking time
Displays the keypad for entering the cooking time.
Core temperature
Displays the keypad for entering the core temperature.
Extra functions
Opens the 'Extra cooking functions' page.
Crisp&Tasty
Opens the 'Crisp&Tasty' page.
Start with intelligent preheating
Starts the cooking program with preheating.
Start
Starts the cooking program.
Stop
Stops the cooking program.
Main selection
Data input
Program
minis easyTOUCH user manual
38
Layout of the touchscreen pages
Button
Meaning
Function
Back one cooking step
Goes back one step of the cooking program.
Management
(during program entry)
Tray Timer
(while the cooking program is
running)
Starts the use of empty trays (shelves) while the main
cooking program is running.
Forward one cooking step
Goes forward one step of the cooking program.
Insert cooking step
Inserts an extra step after the last step in the cooking
program.
Delete data
Deletes all data for the current cooking step.
(before program start)
Manual steaming (while the
cooking program is running)
Starts the manual steaming function while the main
Save recipe
Saves the recipe in the cookbook.
Current cooking step
During program entry
cooking program is running.
Navigation area
Shows the number of the cooking step for which data is
currently displayed.
Opens the Cooking step summary page, where it is
possible to jump to any cooking step.
While the cooking program is running
Displays the number of the cooking step currently in
progress.
Deletes data for all cooking
steps
Deletes all data for all entered cooking steps.
The keypad for entering cooking temperature and core temperature
The buttons on the keypad have the following meanings and functions:
Button
Meaning
Function
Numerical values
For entering numbers in the hundreds, tens and units
Example:
input sequence 1 - 2 - 0 gives 120 °C
Clear
Deletes all entries.
Confirm
Saves all entries in the cooking program.
The keypad for entering the cooking time
The buttons on the keypad have the following meanings and functions:
Button
Meaning
Function
Numerical values
For entering hours, minutes and seconds
Clear
Deletes all entries.
Confirm
Saves all entries in the cooking program.
Continuous operation
Disables the timer
minis easyTOUCH user manual
39
Layout of the touchscreen pages
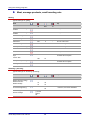
The 'Extra cooking functions' page
The buttons on the 'Extra cooking functions' page have the following meanings and functions:
Button
Meaning
Function
Lower fan speed
Reduces the air-flow speed inside the oven.
T cooking
Cooking program in which the oven temperature increases according to the core temperature.
Not possible in conjunction with the superheated steam
cooking program.
Start-time preset
Delays the start of the cooking program to a defined start
time or to a defined end-of-cooking time.
Vapor reducer
Reduces the amount of vapor released through the air
vent. Increases the water consumption.
The 'Crisp&Tasty' page
The buttons on the page for setting the Crisp &Tasty level have the following meanings and functions:
Button
Meaning
Function
No moisture removal
Low moisture removal
Crisp&Tasty level; specifying the amount of excess moisture removed from the oven.
Medium moisture removal
Not possible in conjunction with the Steam cooking
program.
Strong moisture removal
minis easyTOUCH user manual
40
Layout of the touchscreen pages
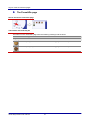
►
The Press&Go page
How to access the 'Press&Go' page
The buttons and what they do
The buttons on the 'Press&Go' page have the following meanings and functions:
Button
Meaning
Function
Recipe e.g. rolls
Starts the cooking program immediately.
Recipe e.g. vegetables
Starts the cooking program immediately.
Program
minis easyTOUCH user manual
41
Layout of the touchscreen pages
►
The Regenerate page
How to access the 'Regenerate' page
The buttons and what they do
The buttons on the 'Regenerate' page have the following meanings and functions:
Button
Meaning
Function
Plate
Selects the Plate regenerating program.
Gastronorm
Selects the Gastronorm regenerating program.
Banquet
Selects the Banquet regenerating program.
Regeneration temperature
Displays the keypad for entering the regeneration
temperature.
Regeneration time
Displays the keypad for entering the regeneration time.
Core temperature
Displays the keypad for entering the core temperature.
Extra functions
Opens the 'Extra regenerating functions' page.
Start
Starts the regenerating program.
Stop
Stops the regenerating program.
Tray Timer
(while the regenerating program
is running)
Starts the use of empty trays (shelves) while the main
regenerating program is running.
Saving a regenerating recipe
Saves the regenerating recipe in the cookbook.
Delete all data
Deletes all data.
Main selection
Data input
Program
Management
Navigation area
minis easyTOUCH user manual
42
Layout of the touchscreen pages
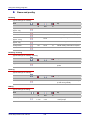
The keypad for entering the regeneration temperature
The buttons on the keypad have the following meanings and functions:
Button
Meaning
Function
Numerical values
For entering numbers in the hundreds, tens and units
Example:
input sequence 1 - 2 - 0 gives 120 °C
Clear
Deletes all entries.
Confirm
Saves all entries in the cooking program.
The keypad for entering the regeneration time
The buttons on the keypad have the following meanings and functions:
Button
Meaning
Function
Numerical values
For entering hours, minutes and seconds
Clear
Deletes all entries.
Confirm
Saves all entries in the cooking program.
Continuous operation
Disables the timer
The 'Extra regenerating functions' page
The buttons on the 'Extra regenerating functions' page have the following meanings and functions:
Button
Meaning
Function
Lower fan speed
Reduces the air-flow speed inside the oven.
Vapor reducer
Reduces the amount of vapor released through the air
vent. Increases the water consumption.
minis easyTOUCH user manual
43
Layout of the touchscreen pages
►
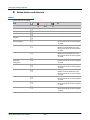
The Clean page
How to access the 'Clean' page
The buttons and what they do
The buttons on the 'Clean' page have the following meanings and functions:
Button
Meaning
Function
Semi-automatic cleaning
Starts semiautomatic cleaning.
CONVOClean system
Fully automatic cleaning (option)
Cleaning level 1:
Starts fully automatic cleaning.
Program
Program
light soiling
Cleaning level 2:
Starts fully automatic cleaning.
moderate soiling
Cleaning level 3:
Starts fully automatic cleaning.
Heavy soiling
Cleaning level 4:
Starts fully automatic cleaning.
Heavy soiling with Shine+
minis easyTOUCH user manual
44
Layout of the touchscreen pages
1.2 The cookbook
The cookbook
This section presents the touchscreen cookbook pages and explains the functions available on each of
the pages.
Contents
This section contains the following topics:
Page
46
48
50
52
Layout of the cookbook pages
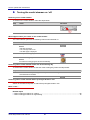
The Favorites page
The recipe groups page
The recipes page
minis easyTOUCH user manual
45
Layout of the touchscreen pages
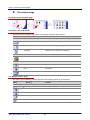
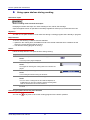
►
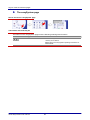
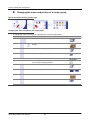
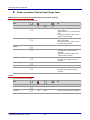
Layout of the cookbook pages
Layout of the main cookbook pages
The following screenshot uses the 'Recipe groups' page from the 3 main cookbook pages to illustrate
their typical layout. The page sectors contain the following functions:
No.
Name
Function
Illustration
1
Header
Displays the page that you are in
2
Main selection
Selection of cookbook section
3
Selection
Selection of recipe or recipe group
4
Management
Access to next sub-page
Scroll functions
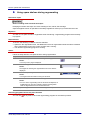
5
Navigation area
Functions common to all pages
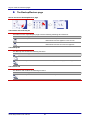
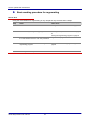
Layout of the cookbook sub-pages
The following screenshot uses the 'Edit recipe groups' page from the cookbook sub-pages to illustrate
their typical layout. The page sectors contain the following functions:
No.
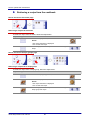
Name
Function
Illustration
1
Header
Displays the page that you are in
Input field for name
Picture depicting recipe or recipe group
2
Selection fields
Recipes
Recipe group
3
Functions
Access to next sub-pages
Assignment functions
Sorting functions
Delete functions
Scroll functions
Buttons common to all pages and what they do
The individual buttons are described separately for each page.
The navigation area contains buttons that have the same function in all pages:
Button
Meaning
Function
Close page
On the main pages: returns to Start page.
Navigation area
On the sub-pages: cancels the action.
Help
Opens the Help facility.
Confirm
On pop-up pages
Cancel
On pop-up pages
minis easyTOUCH user manual
46
Layout of the touchscreen pages
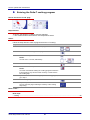
The page display icons and what they mean
The page display icons are the inverse representation of the buttons used to open the pages concerned. The following table shows just an example selection from the complete range of icons.
The indicators have the following meanings:
Indicator
Meaning
Description
Cookbook
The 'Favorites' page is selected.
The 'Recipe groups' page is selected.
The 'Recipes' page is selected.
Recipe group
The
The
The
The
The 'Create recipe group' page
The 'Create recipe group' page is selected.
Recipes
The 'Manage recipes' page is selected.
Pages
'Edit favorites' page is selected.
'Manage recipe groups' page is selected.
'Edit recipe group' page is selected.
'Manage pictures' page is selected.
The 'Manage pictures' page is selected.
Selection fields
Recipes in a recipe group
Recipes in the Favorites
Recipes in a recipe group
All recipes
All available recipes
All recipe groups
All available recipe groups
minis easyTOUCH user manual
47
Layout of the touchscreen pages
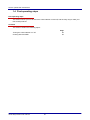
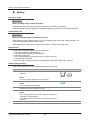
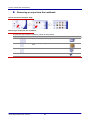
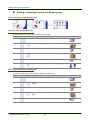
►
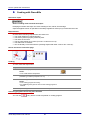
The Favorites page
How to access the 'Favorites' page
The buttons and what they do
The buttons on the 'Favorites' page have the following meanings and functions:
Button
Meaning
Function
Favorites
Displays a list of selectable favorite recipes .
Recipe groups
Opens the 'Recipe groups' page.
All recipes
Opens the 'Recipes' page.
Main selection
Examples of selections
Pretzel
Selects the pretzel recipe
Up
Scroll up.
Down
Scroll down.
Edit Favorites
Opens the 'Edit Favorites' page.
Management
minis easyTOUCH user manual
48
Layout of the touchscreen pages
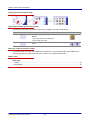
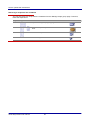
The 'Edit Favorites' page
The buttons on the 'Edit Favorites' page have the following meanings and functions:
Button
Meaning
Function
Text field
Displays the recipe group name Favorites
Cannot be changed
Move recipe up
Moves the selected recipe up the Favorites list.
Move recipe down
Moves the selected recipe down the Favorites list.
Up
Scroll up.
Down
Scroll down.
Remove
Removes the selected recipe from the Favorites list.
Add
Adds the selected recipe to the Favorites list.
Clear
Removes the selected recipe from the system.
Edit picture
Has no action on the 'Edit Favorites' page.
Main selection
minis easyTOUCH user manual
49
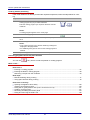
Layout of the touchscreen pages
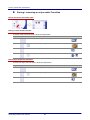
►
The recipe groups page
How to access the 'Recipe groups' page
The buttons and what they do
The buttons on the 'Recipe groups' page have the following meanings and functions:
Button
Meaning
Function
Favorites
Opens the 'Favorites' page.
Recipe groups
Displays all recipe groups for selection.
All recipes
Opens the 'Recipes' page.
Main selection
Examples of selections
Baked goods
Selection for the baked goods recipe group
Up
Scroll up.
Down
Scroll down.
Manage recipe groups
Opens the 'Manage recipe groups' page.
Management
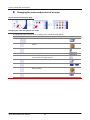
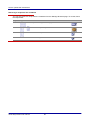
The 'Manage recipe groups' page
The buttons on the 'Manage recipe groups' page have the following meanings and functions:
Button
Meaning
Function
Move recipe group up
Moves the selected recipe group up the list.
Move recipe group down
Moves the selected recipe group down the list.
Up
Scroll up.
Down
Scroll down.
Creating a recipe group
Opens the 'Create recipe group' page.
Edit recipe group
Opens the 'Edit recipe group' page.
Clear
Deletes the selected recipe group.
Main selection
minis easyTOUCH user manual
50
Layout of the touchscreen pages
The 'Create recipe group' page
The buttons on the 'Create recipe group' page have the following meanings and functions:
Button
Meaning
Function
Keypad
Entering the recipe group name via the keypad.
Edit picture
Opens the 'Manage pictures' page.
Confirm
Saves the entry and closes the page.
Main selection
The 'Edit recipe group' page
The buttons on the 'Edit recipe group' page have the following meanings and functions:
Button
Meaning
Function
Edit text
Displays the keypad for text input.
Move recipe group up
Moves the selected recipe group up the list.
Move recipe group down
Moves the selected recipe group down the list.
Remove
Removes the selected recipe from the Favorites list.
Add
Adds the selected recipe to the Favorites list.
Up
Scroll up.
Down
Scroll down.
Manage pictures
Opens the 'Manage pictures' page.
Clear
Deletes the selected recipe.
Main selection
The 'Manage pictures' page
The buttons on the 'Manage pictures' page have the following meanings and functions:
Button
Meaning
Function
Up
Scroll up.
Down
Scroll down.
Folder
Selects the folder containing the picture.
USB
Selects the USB port as the source for the picture (only
enabled if a USB device is connected).
Confirm
Saves the entry and closes the page.
Main selection
minis easyTOUCH user manual
51
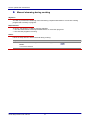
Layout of the touchscreen pages
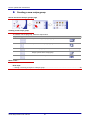
►
The recipes page
How to access the 'Recipes' page
The buttons and what they do
The buttons on the 'Recipes' page have the following meanings and functions:
Button
Meaning
Function
Favorites
Opens the 'Favorites' page.
Recipe groups
Opens the 'Recipe groups' page.
All recipes
Displays a list of all recipes for selection.
Main selection
Examples of selections
Rolls
Selection for the rolls recipe
Up
Scroll up.
Down
Scroll down.
Managing recipes
Opens the 'Manage recipes' page.
Management
The 'Manage recipes' page
The buttons on the 'Manage recipes' page have the following meanings and functions:
Button
Meaning
Function
Edit text
Displays the keypad for text input
Down
Scroll up
Down
Scroll down
Manage pictures
Opens the 'Manage pictures' page
Clear
Removes the selected recipe from the system
Main selection
minis easyTOUCH user manual
52
Layout of the touchscreen pages
The 'Manage pictures' page
The buttons on the 'Manage pictures' page have the following meanings and functions:
Button
Meaning
Function
Up
Scroll up.
Down
Scroll down.
Folder
Selects the folder containing the picture.
USB
Selects the USB port as the source for the picture (only
enabled if a USB device is connected).
Confirm
Saves the entry and closes the page.
Main selection
minis easyTOUCH user manual
53
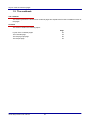
Layout of the touchscreen pages
1.3 The Settings
The Settings
This section presents the touchscreen pages on which you can make settings, and explains the functions available on each of the pages.
Contents
This section contains the following topics:
Page
55
56
57
58
59
The Settings page
The General page
The Import/Export page
The easySystem page
The Backup/Restore page
minis easyTOUCH user manual
54
Layout of the touchscreen pages
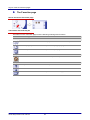
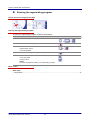
►
The Settings page
How to access the 'Settings' page
The buttons and what they do
The buttons on the 'Settings' page have the following meanings and functions:
Button
Meaning
Function
General information
Opens the 'General' menu:
General system settings
Languages
Opens the 'Languages' menu:
Changing the user interface language
Selecting the cookbook in the required language
Data transfer
Opens the 'Transfer' menu:
Configuring data transfer from the appliance to a server
Only possible if appliance has this custom option installed
Service
Opens the 'Service' menu:
Password protected; only accessible to service engineers
Logbook
Opens the 'Logbook' menu:
Displaying the logbook
Deleting entries from the logbook
Date/time
Opens the 'Date/Time' menu:
Making changes to date and time settings
Sounds
Opens the 'Sounds' menu:
Selecting signal sounds
Adjusting the volume
Password
Opens the 'Password' menu:
Selecting a new password.
Import/Export
Opens the 'Import/Export' page:
Import and Export of data
Backup / Restore
Opens the 'Backup/Restore' page:
Saving the cookbook and easyTOUCH data on the SD
card.
Restoring the easyTOUCH data from the SD card.
easySystem
Enables easySystem, password protected.
Main selection
minis easyTOUCH user manual
55
Layout of the touchscreen pages
►
The General page
How to access the 'General' page
The 'General' tab
The 'General' tab contains the following functions:
Menu type
Meaning
Function
Cookbook
Selects the cookbook
Number of shelves
Selects the number of shelves that can be used
Temperature units
Selects °C or °F as the temperature units
The 'Food inspection' tab
The 'Food inspection' tab contains the following functions:
Menu type
Meaning
Function
Preheat time (sec)
Preheat time input:
Time for which temperature held after reaching the
preheat temperature
Preheat tolerance ( °C)
Input of preheat temperature tolerance:
e.g. preheat temperature is deemed reached at 20 °C
lower for instance
HACCP temp interval (sec)
Input of HACCP data transfer interval:
e.g. data transferred every 120 sec
Max. failure time (sec)
Input of maximum time for a power failure before a warning is issued that the product is spoiled.
The 'Cleaning' tab
The 'Cleaning' tab contains the following functions:
Menu type
Meaning
Function
Level 1 -
Selection of cleaning level(s) to be available on the 'Clean'
page
Light soiling
Level 2 Moderate soiling
Level 3 Heavy soiling
Level 4 Very heavy soiling
AutoClean temperature
(60°C - 100°C)
Input of fully automatic cleaning temperature when using
cleaning agents other than original products
Cleaning agent dosage
(1 - 10)
Input of cleaning agent dosage when using cleaning
agents other than original products
minis easyTOUCH user manual
56
Layout of the touchscreen pages
►
The Import/Export page
How to access the 'Import/Export' page
The buttons and what they do
The buttons on the 'Import/Export' page have the following meanings and functions:
Button
Meaning
Function
Import
Selects the 'Import' tab:
Data transfer from USB stick to appliance
Export
Selects the 'Export' tab:
Transfer from appliance to the USB stick
The Import tab
The 'Import' tab contains the following functions:
Button
Meaning
Function
Cookbook
The cookbook is imported.
Start page logo
Custom logo for the start page is imported.
Update
Update is run.
The Export tab
The 'Export' tab contains the following functions:
Button
Meaning
Function
HACCP
HACCP data are exported.
Log
Log is exported.
Settings
Settings can be exported for import into another appliance.
Controls
Appliance settings (control parameter settings) are exported.
Cookbook
The cookbook can be exported for import into another
appliance.
minis easyTOUCH user manual
57
Layout of the touchscreen pages
►
The easySystem page
How to access the 'easySystem' page
The buttons and what they do
The buttons on the 'easySystem' page have the following meanings and functions:
Button
Meaning
Function / Further details...
Password
Password entry:
Factory set to 'Shift A'
Please refer to the easySystem operating instructions for
further details.
minis easyTOUCH user manual
58
Layout of the touchscreen pages
►
The Backup/Restore page
How to access the 'Backup/Restore' page
The buttons and what they do
The buttons on the 'Import/Export' page have the following meanings and functions:
Button
Meaning
Function
Backup
Selects the 'Backup' tab:
Data transfer from the appliance to the SD card
Restore
Selects the 'Restore' tab:
Data transfer from the SD card to the appliance
The Backup tab
The 'Backup' tab contains the following functions:
Button
Meaning
Function
Cookbook
Saves the cookbook.
easyTOUCH
Saves the easyTOUCH data (system backup).
The Restore tab
The 'Restore' tab contains the following functions:
Button
Meaning
Function
easyTOUCH
Restores the easyTOUCH data.
minis easyTOUCH user manual
59
How to operate the touchscreen
How to operate the touchscreen
Basic operating principles for the touchscreen
This chapter contains step-by-step instructions for basic operations using the touchscreen.
Contents
This chapter includes the following topics:
Page
61
65
74
81
83
First operating steps
Boiling
Regenerate
How to work in emergency mode
Working with the cookbook
minis easyTOUCH user manual
60
How to operate the touchscreen
1.4 First operating steps
First operating steps
This section shows you how to switch the combi steamer on and off, and the easy way to make your
first cooked products.
Contents
This section contains the following topics:
Page
62
63
Turning the combi steamer on / off
Cooking with Press&Go
minis easyTOUCH user manual
61
How to operate the touchscreen
►
Turning the combi steamer on / off
Switching on the combi steamer
To switch on the combi steamer, follow the steps below:
Step
Action
1
Switch on the combi steamer.
Illustration
What happens when you switch on the combi steamer
The combi steamer performs the following routine when switched on:
Phase
Description
1
Switch on the combi steamer.
Result:
Button
Self-test performed
The oven light will turn on.
The Start page is displayed.
2
Select your cooking program.
3
Start the cooking program.
Result:
the selected cooking program will start immediately.
Switching off the combi steamer at the end of the working day
To switch off the combi steamer at the end of the working day, follow the steps below:
Step
Action
Button
1
Perform the necessary cleaning tasks as specified in the cleaning
and maintenance schedule.
2
Switch off the combi steamer.
Switching off the combi steamer before prolonged breaks in use
Switch off the water and power on site before prolonged breaks in use.
More on this ...
Related topics
Basic working procedure for cooking ................................................................................................. 66
Basic working procedure for regenerating ......................................................................................... 75
minis easyTOUCH user manual
62
How to operate the touchscreen
►
Cooking with Press&Go
Hot steam / vapor
Risk of scalding from hot steam and vapor
Escaping hot steam and vapor can cause scalding to face, hands, feet and legs.
Open the appliance door as specified in the safety regulations. Never put your head into the oven!
Requirements
Check that the following requirements have been met:
The combi steamer is cleaned properly.
The suction panel is properly locked in place.
The racks are secured.
The air guide panels are in place (on mini 6.10 and mini 10.10)
The USB cover is inserted.
You are already conversant with the operating steps listed under "How to do it correctly".
How to access the 'Press&Go' page
Cooking
To cook, follow the steps below:
Step
Action
Button
1
Select the recipe you want, such as Rolls.
Result:
Your combi steamer will preheat.
2
Place the food inside the oven as soon as the appliance is
preheated (you will be prompted to do so).
3
Close the appliance door.
Result:
Your cooking program is running.
An audible signal is given as soon as the cooking program is
finished.
4
Open the appliance door and remove the cooked product.
Canceling programs before they have finished
You can use
at any time to cancel the preheat or cooking program.
minis easyTOUCH user manual
63
How to operate the touchscreen
More on this ...
How to do it correctly
Opening the appliance door safely .................................................................................................. 139
Inserting and removing racks ........................................................................................................... 140
Fitting the air guide panel to rack (mini 6.10 and mini 10.10) .......................................................... 141
Loading / removing food ................................................................................................................... 141
Removing and fitting the suction panel ............................................................................................ 144
Fitting and removing the USB cover ................................................................................................ 145
minis easyTOUCH user manual
64
How to operate the touchscreen
1.5 Boiling
Cooking in detail
This section shows you what steps you need to follow when cooking, and how to use all the touchscreen functions for cooking.
Contents
This section contains the following topics:
Page
66
67
68
69
71
72
Basic working procedure for cooking
Entering a cooking program
Entering the Delta-T cooking program
Boiling
Manual steaming during cooking
Using spare shelves during cooking
minis easyTOUCH user manual
65
How to operate the touchscreen
►
Basic working procedure for cooking
How to do it
Using the combi steamer for cooking is very simple and only involves these 5 steps:
Step
Action
How to do it:
1
Switch on the combi steamer.
Turning the combi steamer on / off on page 62
2
Select or enter your cooking program.
Retrieving a recipe from the cookbook on page
84
Entering a cooking program
Entering the Delta-T cooking program on page
68
3
Start the cooking program and place the food in
the combi steamer once the oven has preheated.
Boiling on page 69
4
You can use various extra functions during the
cooking program.
Cooking with manual steaming on page 71
5
Remove your finished product.
minis easyTOUCH user manual
66
Using spare shelves during cooking on page 72
How to operate the touchscreen
►
Entering a cooking program
How to access the 'Cook' page
Entering a cooking program
To enter a cooking program, follow the steps below:
Step
Action
1
Select a main cooking program.
Button
or
2
Enter the cooking temperature.
3
Define the switch-off criteria:
Cooking time or
Core temperature
or
or
4
Select the 'Extra cooking functions' page.
5
Select one of the following extra functions if required:
Lower fan speed
Vapor reducer
Start-time preset
For T cooking follow the instructions under Entering the Delta-T
cooking program
6
Select the Crisp&Tasty level.
Result:
You have now finished entering the cooking program information
if the program is only meant to have one step, or if this was the
last cooking step.
7
If you want to add another cooking step to this cooking program,
go to step 8.
8
Add a cooking step.
9
Repeat steps 1 to 7.
You can open the page containing a summary of the cooking
steps using:
More on this ...
How to do it
Entering the Delta-T cooking program ............................................................................................... 68
Next steps
Boiling ................................................................................................................................................. 69
minis easyTOUCH user manual
67
How to operate the touchscreen
►
Entering the Delta-T cooking program
How to access the 'Cook' page
Requirements
To do this, the following conditions must be satisfied:
Your combi steamer comes with a core temperature sensor.
Action
Follow the steps below to enter a program that uses T cooking:
Step
Action
Button
1
Select one of the steam or convection programs.
or
2
Select the 'Extra cooking functions' page.
3
Select T cooking.
Result:
You are now in T mode, indicated by :
or
4
Enter the temperature.
5
Enter the final core temperature.
Result:
You have now finished entering the cooking program information
if the program is only meant to have one step, or if this was the
last cooking step.
6
If you want to add another cooking step to this cooking program,
go to step 7.
7
Add a cooking step.
8
Repeat steps 1 to 6.
You can open the page containing a summary of the cooking
steps using:
More on this ...
Next steps
Boiling ................................................................................................................................................. 69
minis easyTOUCH user manual
68
How to operate the touchscreen
►
Boiling
Hot steam / vapor
Risk of scalding from hot steam and vapor
Escaping hot steam and vapor can cause scalding to face, hands, feet and legs.
Open the appliance door as specified in the safety regulations. Never put your head into the oven!
Contamination risk
Risk from microbiological contamination of food
When loading the oven ahead of time, e.g. for pre-setting the start time of the cooking program, the
cold chain of chilled foodstuffs may be broken.
When planning the loading times, always ensure there is no break in the cold chain.
Requirements
Check that the following requirements have been met:
The combi steamer is cleaned properly.
The suction panel is properly locked in place.
The racks are secured.
The air guide panels are in place (on mini 6.10 and mini 10.10)
The USB cover is inserted.
You are already conversant with the operating steps listed under "How to do it correctly".
Cooking with preheating
If the combi steamer is still cold, follow the steps below for cooking:
Step
Action
Button
1
Enter the cooking program you require or retrieve it from the
cookbook.
or
Result:
A cooking program appears on the 'Cook' page.
2
Start the cooking program.
Result:
Your combi steamer will preheat.
3
Place the food inside the oven as soon as the appliance is
preheated (you will be prompted to do so).
4
Close the appliance door.
Result:
Your cooking program runs, with the remaining cooking time
displayed in the page header.
An audible signal is given as soon as the cooking program is
finished.
5
Open the appliance door and remove the cooked product.
minis easyTOUCH user manual
69
How to operate the touchscreen
Cooking without preheating
If the combi steamer has already reached the required temperature, follow the steps below for cooking:
Step
Action
Button
1
You do not need to perform this step if you wish to use the same
cooking program as you just used. Otherwise:
Enter the cooking program you require or retrieve it from the
cookbook.
or
Result:
A cooking program appears on the 'Cook' page.
2
Start the cooking program.
3
Place the food inside the oven as soon as you are prompted to
do so.
3
Close the appliance door.
Result:
Your cooking program runs, with the remaining cooking time
displayed in the page header.
An audible signal is given as soon as the cooking program is
finished.
4
Open the appliance door and remove the cooked product.
Canceling programs before they have finished
You can use
at any time to cancel the preheat or cooking program.
More on this ...
How to do it
Entering a cooking program ............................................................................................................... 67
Entering the Delta-T cooking program ............................................................................................... 68
Retrieving a recipe from the cookbook .............................................................................................. 84
Next steps
Manual steaming during cooking ....................................................................................................... 71
Using spare shelves during cooking .................................................................................................. 72
How to do it correctly
Opening the appliance door safely .................................................................................................. 139
Inserting and removing racks ........................................................................................................... 140
Fitting the air guide panel to rack (mini 6.10 and mini 10.10) .......................................................... 141
Loading / removing food ................................................................................................................... 141
Removing and fitting the suction panel ............................................................................................ 144
Fitting and removing the USB cover ................................................................................................ 145
minis easyTOUCH user manual
70
How to operate the touchscreen
►
Manual steaming during cooking
Objective
You wish to provide extra steaming of the food during a superheated steam or convection cooking
program that is already in progress.
Requirements
To do this, the following conditions must be satisfied:
You have selected one of the superheated steam or convection programs.
One of these programs is running.
Action
Follow the steps below to steam the food during cooking:
Step
Action
Button
1
Select the Manual steaming function on the 'Cook' page.
Result:
The food is steamed.
minis easyTOUCH user manual
71
How to operate the touchscreen
►
Using spare shelves during cooking
Hot steam / vapor
Risk of scalding from hot steam and vapor
Escaping hot steam and vapor can cause scalding to face, hands, feet and legs.
Open the appliance door as specified in the safety regulations. Never put your head into the oven!
Objective
You wish to use spare shelves to cook other food during a cooking program that is already in progress.
Requirements
To do this, the following conditions must be satisfied:
Apart from the cooking time, the additional food to be cooked needs the same conditions as the
food in the current program that is running.
The relevant cooking program is running.
Action
Follow the steps below to use spare shelves during cooking:
Step
Action
Button
1
Select the Tray Timer function on the 'Cook' page.
Result:
The 'Tray Timer' page is displayed.
2
Select an empty shelf.
Result:
The keypad for entering the cooking time for this shelf is displayed
3
Enter the required cooking time.
Result:
The cooking time starts running for this shelf.
4
Place the food in the oven and close the appliance door.
Result:
As soon as the cooking time for this shelf has elapsed, an
audible signal is given and a display appears showing which
shelf the cooked food can be removed from.
5
Open the appliance door and remove the cooked product from
this shelf.
Canceling programs before they have finished
You can use
at any time to cancel the cooking program for the shelf in question.
minis easyTOUCH user manual
72
How to operate the touchscreen
Optimizing the process by setting continuous operation
The continuous operation setting is recommended if you wish to cook shelf-by-shelf over a prolonged
period.
To get to continuous operation, select the following buttons, starting from the start page:
minis easyTOUCH user manual
73
How to operate the touchscreen
1.6 Regenerate
Regenerating in detail
This section shows you what steps you need to follow for regenerating, and how to use all the touchscreen functions for regenerating.
Contents
This section contains the following topics:
Page
75
76
77
79
Basic working procedure for regenerating
Entering the regenerating program
Regenerate
Using spare shelves during regenerating
minis easyTOUCH user manual
74
How to operate the touchscreen
►
Basic working procedure for regenerating
How to do it
Using the combi steamer for regenerating is very simple and only involves these 5 steps:
Step
Action
How to do it:
1
Switch on the combi steamer.
Turning the combi steamer on / off on page 62
2
Select or enter your regenerating program.
Retrieving a recipe from the cookbook on page
84
3
Start the cooking program and place the food in
the combi steamer once the oven has preheated.
Regenerate on page 77
4
You can use various extra functions during the
regenerating program.
Using spare shelves during regenerating on
page 79
5
Remove your finished product.
Entering the regenerating program on page 76
minis easyTOUCH user manual
75
How to operate the touchscreen
►
Entering the regenerating program
How to access the 'Regenerate' page
Entering the regenerating program
To enter your regenerating program, follow the steps below:
Step
Action
1
Select a main regenerating program.
2
Enter the regenerating temperature.
3
Define the switch-off criteria:
Regeneration time or
Core temperature
Button
or
or
or
4
Select the 'Extra regenerating functions' page.
5
Select the extra function if required:
lower fan speed
Vapor reducer
Result:
You have now finished entering your regenerating program.
More on this ...
Next steps
Regenerate......................................................................................................................................... 77
minis easyTOUCH user manual
76
How to operate the touchscreen
►
Regenerate
Hot steam / vapor
Risk of scalding from hot steam and vapor
Escaping hot steam and vapor can cause scalding to face, hands, feet and legs.
Open the appliance door as specified in the safety regulations. Never put your head into the oven!
Requirements
Check that the following requirements have been met:
The combi steamer is cleaned properly.
The suction panel is properly locked in place.
The racks are secured.
The air guide panels are in place (on mini 6.10 and mini 10.10)
The USB cover is inserted.
You are already conversant with the operating steps listed under "How to do it correctly".
Regenerating with preheating
If the combi steamer is still cold, follow the steps below for regenerating:
Step
Action
Button
1
Enter the regenerating program you require or retrieve it from the
cookbook.
Result:
A regenerating program appears on the 'Regenerate' page.
2
Start the regenerating program.
Result:
Your combi steamer will preheat.
3
Place the food inside the oven as soon as the appliance is
preheated (you will be prompted to do so).
4
Close the appliance door.
Result:
Your regenerating program runs, with the remaining regenera-
tion time displayed in the page header.
An audible signal is given as soon as the regenerating program
is finished.
5
Open the appliance door and remove the regenerated product.
minis easyTOUCH user manual
77
or
How to operate the touchscreen
Regenerating without preheating
If the combi steamer has already reached the required temperature, follow the steps below for regenerating:
Step
Action
Button
1
You do not need to perform this step if you wish to use the same
regenerating program as you just used. Otherwise:
or
Enter the regenerating program you require or retrieve it from the
cookbook.
Result:
A regenerating program appears on the 'Regenerate' page.
2
Start the regenerating program
3
Place the food inside the oven as soon as you are prompted to
do so.
4
Close the appliance door.
Result:
Your regenerating program runs, with the remaining regenera-
tion time displayed in the page header.
An audible signal is given as soon as the regenerating program
is finished.
5
Open the appliance door and remove the regenerated product.
Canceling programs before they have finished
You can use
at any time to cancel the preheat or regenerating program.
More on this ...
How to do it
Entering the regenerating program .................................................................................................... 76
Retrieving a recipe from the cookbook .............................................................................................. 84
Next steps
Using spare shelves during regenerating .......................................................................................... 79
How to do it correctly
Opening the appliance door safely .................................................................................................. 139
Inserting and removing racks ........................................................................................................... 140
Fitting the air guide panel to rack (mini 6.10 and mini 10.10) .......................................................... 141
Loading / removing food ................................................................................................................... 141
Stowing away the core temperature sensor ..................................................................................... 143
Removing and fitting the suction panel ............................................................................................ 144
Fitting and removing the USB cover ................................................................................................ 145
minis easyTOUCH user manual
78
How to operate the touchscreen
►
Using spare shelves during regenerating
Hot steam / vapor
Risk of scalding from hot steam and vapor
Escaping hot steam and vapor can cause scalding to face, hands, feet and legs.
Open the appliance door as specified in the safety regulations. Never put your head into the oven!
Objective
You wish to use spare shelves to regenerate other food during a regenerating program that is already
in progress.
Requirements
To do this, the following conditions must be satisfied:
Apart from the regeneration time, the additional food to be regenerated needs the same conditions
as the regeneration food in the current program that is running.
The relevant regenerating program is running.
Action
Follow the steps below to use spare shelves during regeneration:
Step
Action
Button
1
Select the Tray Timer function on the 'Regenerate' page.
Result:
The 'Tray Timer' page is displayed.
2
Select an empty shelf.
Result:
The keypad for entering the regeneration time for this shelf is
displayed
3
Enter the required regeneration time.
Result:
The regeneration time starts running for this shelf.
4
Place the food in the oven and close the appliance door.
Result:
As soon as the regenerating time for this shelf has elapsed, an
audible signal is given and a display appears showing which
shelf the regenerated food can be removed from.
5
Open the appliance door and remove the regenerated product.
Canceling programs before they have finished
You can use
at any time to cancel the regenerating program for the shelf in question.
minis easyTOUCH user manual
79
How to operate the touchscreen
Optimizing the process by setting continuous operation
The continuous operation setting is recommended if you wish to cook shelf-by-shelf over a prolonged
period.
To get to continuous operation, select the following buttons, starting from the start page:
minis easyTOUCH user manual
80
How to operate the touchscreen
1.7 How to work in emergency mode
Operating your combi steamer in emergency mode
Your combi steamer has an emergency mode that lets you continue to use it when it has a fault than
cannot be resolved quickly.
This gives you continued but limited use of the appliance even though it has a fault. Always notify your
customer service office however.
This section shows you how to operate the combi steamer in emergency mode.
Contents
This section contains the following topics:
Page
82
Basic working procedure in emergency mode
minis easyTOUCH user manual
81
How to operate the touchscreen
►
Basic working procedure in emergency mode
Limitations
You need to note the following limitations:
The cooking times may change significantly. So pay particular attention to the cooking process and
the cooked condition of your product.
The water consumption may rise significantly.
Only feasible functions are available for selection.
How to do it
Using the combi steamer for cooking in emergency mode is very simple and only involves these 5
steps:
Step
Action
How to do it:
1
The appliance is on fault mode.
Troubleshooting on page 135
Result:
A signal sounds and the error code is shown in
the display.
Contact customer service
2
Confirm that you have noted the error.
Result:
Only those cooking programs unaffected by the
error are available.
3
Place the food in the combi steamer and start
the available cooking program or regenerating
program.
Boiling on page 69
4
You can use various extra functions during the
cooking program or regenerating program.
Extra functions on page 38
5
Remove your finished product.
minis easyTOUCH user manual
82
Regenerate on page 77
How to operate the touchscreen
1.8 Working with the cookbook
The combi steamer cookbook
This section shows you how to create, edit and manage recipes in the cookbook.
Contents
This section contains the following topics:
Retrieving a recipe from the cookbook
Creating a cooking recipe
Changing the name and picture of a recipe
Removing a recipe from the cookbook
Saving / removing a recipe under Favorites
Creating a new recipe group
Changing the name and picture of a recipe group
Saving / removing a recipe in a Recipe group
Deleting a recipe group
minis easyTOUCH user manual
83
Page
84
86
87
88
89
91
92
93
95
How to operate the touchscreen
►
Retrieving a recipe from the cookbook
How to access the 'Favorites' page
Retrieving a recipe from Favorites
To retrieve a recipe from Favorites, follow the steps below:
Step
Page
1
Action
Button
Select the recipe you want, such as Rolls.
Result:
The recipe information is displayed.
You can start the recipe.
2
If necessary you can scroll up and down when selecting the
recipe.
How to access the 'Recipe groups' page
Retrieving a recipe from a recipe group
To retrieve a recipe from a recipe group, follow the steps below:
Step
Page
Action
Button
1
Select the recipe group you want, such as Baked items.
2
Select the recipe you want, such as Rolls.
Result:
The recipe information is displayed.
You can start the recipe.
3
minis easyTOUCH user manual
If necessary you can scroll up and down when selecting the
recipe group and recipe.
84
How to operate the touchscreen
How to access the 'Recipes' page
Retrieving a recipe from the saved recipes
To retrieve a recipe from the recipes saved in the cookbook, follow the steps below:
Step
Page
1
Action
Button
Select the recipe you want, such as Rolls.
Result:
The recipe information is displayed.
You can start the recipe.
2
If necessary you can scroll up and down when selecting the
recipe.
Were you unable to find your recipe?
If you did not find the recipe you wanted in the cookbook, it may be because the right cookbook has
not been imported yet. Import the cookbook, or talk to your system administrator.
More on this ...
Next steps
Boiling ................................................................................................................................................. 69
Regenerate......................................................................................................................................... 77
minis easyTOUCH user manual
85
How to operate the touchscreen
►
Creating a cooking recipe
Creating a cooking recipe
To create a cooking recipe, follow the steps below:
Step
Page
Action
Button
1
Enter a cooking program. Use the 'Cook' page to do this.
2
Save the program as a cooking recipe.
3
Give the cooking recipe a name.
4
Assign a picture to the cooking recipe.
5
Confirm the name and picture.
Creating a regenerating recipe
To create a regenerating recipe, follow the steps below:
Step
Page
Action
Button
1
Enter a regenerating program. Use the 'Regenerate' page to
do this.
2
Save the program as a regenerating recipe.
3
Give the regenerating recipe a name.
4
Assign a picture to the regenerating recipe.
5
Confirm the name and picture.
More on this ...
Next steps
Saving / removing a recipe under Favorites ...................................................................................... 89
Saving / removing a recipe in a Recipe group ................................................................................... 93
minis easyTOUCH user manual
86
How to operate the touchscreen
►
Changing the name and picture of a recipe
How to access the 'Recipes' page
Changing the name and picture of a recipe
To change the name and picture of a cooking recipe, follow the steps below:
Step
Page
Action
Button
1
Open the 'Manage recipes' page.
2
Select the recipe whose name and picture you wish to
change.
3
Display the keypad.
4
Use the keypad to enter the name.
5
Confirm your entry.
You can close the keypad with Esc.
6
Open the 'Manage pictures' page.
7
Select where the pictures are held: folder or USB device
8
Select a picture.
9
Confirm your selection.
minis easyTOUCH user manual
87
or
How to operate the touchscreen
►
Removing a recipe from the cookbook
How to access the 'Recipes' page
Removing a recipe from the cookbook
To remove a recipe from the cookbook, follow the steps below:
Step
Page
Action
Button
1
Open the 'Manage recipes' page.
2
Select the recipe that you wish to remove from the cookbook.
3
Remove the recipe from the cookbook.
4
Confirm that you wish to remove it.
minis easyTOUCH user manual
88
How to operate the touchscreen
►
Saving / removing a recipe under Favorites
How to access the 'Favorites' page
Saving a recipe under Favorites
To save a recipe under Favorites, follow the steps below:
Step
Page
Field
Action
Button
1
Open the 'Manage favorites' page.
2
Select the recipe that you wish to add to Favorites.
3
Add the recipe to Favorites.
4
If required, change the order within Favorites.
or
Removing a recipe from Favorites
To remove a recipe from Favorites, follow the steps below:
Step
Page
Field
Action
Button
1
Open the 'Manage favorites' page.
2
Select the recipe that you wish to remove from Favorites.
3
Remove the recipe from Favorites.
minis easyTOUCH user manual
89
How to operate the touchscreen
Removing a recipe from the cookbook
You can also remove a recipe from the cookbook from the 'Manage favorites' page. To do this, follow
the steps below:
Step
Page
Field
Action
Button
1
Open the 'Manage favorites' page.
2
Select the recipe that you wish to remove from the cookbook.
3
Remove the recipe from the cookbook.
4
Confirm that you wish to remove it.
minis easyTOUCH user manual
90
How to operate the touchscreen
►
Creating a new recipe group
How to access the 'Recipe groups' page
Creating a new recipe group
To create a new recipe group, follow the steps below:
Step
Page
Action
Button
1
Open the 'Manage recipe group' page.
2
Open the 'Create recipe group' page.
3
Give the recipe group a name.
4
Assign a picture to the recipe group.
5
Confirm the name and picture.
More on this ...
Next steps
Saving / removing a recipe in a Recipe group ................................................................................... 93
minis easyTOUCH user manual
91
How to operate the touchscreen
►
Changing the name and picture of a recipe group
How to access the 'Recipe groups' page
Changing the name and picture of a recipe group
To change the name and picture of a recipe group, follow the steps below:
Step
Page
Field
Action
Button
1
Open the 'Manage recipe group' page.
2
Select the recipe group whose name and picture you wish to
change.
3
Open the 'Edit recipe group' page.
4
Display the keypad.
5
Use the keypad to enter the name.
6
Confirm your entry.
You can close the keypad with Esc.
7
Open the 'Manage pictures' page.
8
Select where the pictures are held: folder or USB device
9
Select a picture.
10
Confirm your selection.
minis easyTOUCH user manual
92
or
How to operate the touchscreen
►
Saving / removing a recipe in a Recipe group
How to access the 'Recipe groups' page
Saving a recipe in a Recipe group
To save a recipe in a recipe group, follow the steps below:
Step
Page
Field
Action
Button
1
Open the 'Manage recipe group' page.
2
Select the recipe group in which you wish to add a recipe.
3
Open the 'Edit recipe group' page.
4
Select the recipe that you wish to add to the recipe group.
5
Add the recipe to the recipe group.
6
If required, change the order within the recipe group.
or
Removing a recipe from a recipe group
To remove a recipe from a recipe group, follow the steps below:
Step
Page
Field
Action
Button
1
Open the 'Manage recipe group' page.
2
Select the recipe group from which you wish to remove a
recipe.
3
Open the 'Edit recipe group' page.
4
Select the recipe that you wish to remove from the recipe
group.
5
Remove the recipe from the recipe group.
minis easyTOUCH user manual
93
How to operate the touchscreen
Removing a recipe from the cookbook
You can also remove a recipe from the cookbook from the 'Manage recipe group' page. To do this,
follow the steps below:
Step
Page
Field
Action
Button
1
Open the 'Manage recipe group' page.
2
Select the recipe that you wish to remove from the cookbook.
3
Remove the recipe from the cookbook.
4
Confirm that you wish to remove it.
minis easyTOUCH user manual
94
How to operate the touchscreen
►
Deleting a recipe group
How to access the 'Recipe groups' page
Deleting a recipe group
To delete a recipe group, follow the steps below:
Step
Page
Field
Action
Button
1
Open the 'Manage recipe group' page.
2
Select the recipe group that you wish to delete.
3
Delete the recipe group.
4
Confirm that you wish to remove it.
minis easyTOUCH user manual
95
Working with the mini 2in1
Working with the mini 2in1
The mini 2in1 touchscreen and its control buttons
In this section we explain the operating features particular to the mini 2in1 combi steamer, and present
the layout of the pages in the mini 2in1 touchscreen.
Almost all of the pages described in the chapter Layout of the touchscreen pages on page 34 are
identical in terms of their functions to those of the mini 2in1; the only difference is the extra functions
described in mini 2in1 easyTOUCH: Layout of the mini 2in1 touchscreen pages on page 99.
The only page containing extra functions for the mini 2in1 is the 'Settings - General' page. This is why
we will describe the 'Settings - General' page for the mini 2in1 in detail.
Contents
This chapter includes the following topics:
Page
97
99
102
Working with the mini 2in1
Layout of the mini 2in1 touchscreen pages
The Settings - General page for the mini 2in1
minis easyTOUCH user manual
96
Working with the mini 2in1
►
Working with the mini 2in1
Functions of the mini 2in1
Your mini 2in1 combi steamer has two oven compartments, which can you can operate independently
of each other. This means that the two oven compartments can run different cooking programs at the
same time or even work separately in easyTOUCH and easySystem mode simultaneously. The two
oven compartments are operated from the same touchscreen.
The basic working procedures when cooking, regenerating and in easySystem mode are identical to
the working procedures for a mini table-top appliance. Your mini 2in1 works as though you had two
mini table-top appliances side-by-side.
You cannot, however, cook in one oven compartment while cleaning the other, because this would
pose a risk of food contamination.
Other differences in operation arise from the fact that there is only one touchscreen available for both
oven compartments. This means that you need to switch between one oven compartment and the
other.
Identifying the oven compartments
The oven compartments are identified in red or blue. The following table shows the identifiers used on
the appliance and on the touchscreen:
Oven
compart
ment
Identifier on the
appliance
Identifier on the touchscreen
1
Red number (1)
Red border around the display
2
Blue number (2)
Blue border around the display
Illustration
How to switch the touchscreen from oven compartment 1 to oven compartment 2
minis easyTOUCH user manual
97
Working with the mini 2in1
What happens when you switch over the touchscreen
The touchscreen behaves as follows when switched over:
After being switched to another oven compartment, the touchscreen always displays the page that
was last displayed for this oven compartment.
Example: You were on the 'Cook' page for oven compartment 1 and started a cooking program from
there. Then you switched over to oven compartment 2 and opened there the 'Regenerate' page.
When you switch back to oven compartment 1 you are taken directly to the 'Cook' page again.
If you switch from oven compartment 1 to oven compartment 2 while a cooking program is running
in oven compartment 1, the status data for this cooking program is displayed in the 'oven compartment 1' button (see Layout of the 2in1 work pages on page 99).
When certain events happen, the touchscreen switches automatically to the other oven compartment. You can preset the events for which this shall occur (see The General page for 2in1 on page
102, 'Navigation' tab).
It is not possible to switch to the other oven compartment from the 'Settings' page or any of its subpages.
Making settings on the mini 2in1
When making settings on the mini 2in1 there are certain features particular to the mini 2in1:
The settings that are made always apply to both oven compartments.
In order to be able to configure all the functions on the 'Settings' page, the touchscreen must have
already displayed the start page of the other oven compartment before it was switched over. Otherwise not all the functions are available on the 'Settings' page.
It is not possible to switch to the other oven compartment from the 'Settings' page or any of its subpages.
minis easyTOUCH user manual
98
Working with the mini 2in1
►
Layout of the mini 2in1 touchscreen pages
Layout of the mini 2in1 touchscreen pages for everyday tasks
The following screenshot uses the 'Cook' page to illustrate the layout of a typical page for everyday
work. The page sectors contain the following functions:
No.
Name
Function
1
Header
mini 2in1
Always:
Displays which oven compartment is currently being
shown on the touchscreen; also indicated by a red
border (oven compartment 1) or a blue border (oven
compartment 2) around the display.
Button for selecting the oven compartment that you
wish to display on the touchscreen.
While the cooking program is running in the oven compartment not currently being displayed:
The button indicates the status of the cooking program
of the other oven compartment.
2
Header
Always:
Displays the page that you are in.
While the cooking program is running in the oven compartment currently being displayed:
Displays the remaining cooking time, regenerating time
or core temperature.
3
Main selection
Selection of the main cooking program or main regenerating program
4
Data input
Temperature, time input etc.
5
Program
Program start/stop
Management
Various functions
Navigation area
Functions common to all pages
Various functions
6
Illustration
Buttons that are common to all pages and used for selecting the oven compartment
The page header on the mini 2in1 contains buttons for switching the touchscreen over to the other
oven compartment. These buttons appear on every page:
Button
Meaning
Function
Select oven compartment 1
Switches the touchscreen over to oven compartment 1.
Select oven compartment 2
Switches the touchscreen over to oven compartment 2.
mini 2in1
header
minis easyTOUCH user manual
99
Working with the mini 2in1
Buttons common to all pages and what they do
The individual buttons are described separately for each page.
The navigation area contains buttons that have the same function in all pages:
Button
Meaning
Function
Close page
On the main pages: returns to Start page.
Cancel
On the input pages: cancels the entry.
Help
Opens the Help facility.
Navigation area
Displaying the cooking-program status of the oven compartment not currently shown.
A number of indicators are used on the mini 2in1 to display the cooking-program status of the oven
compartment not currently shown on the touchscreen. These indicators are illustrated in the table
below for the example situation in which oven compartment 1 is not currently displayed on the touchscreen. They also apply to the opposite situation.
The indicators have the following meanings:
Indicator
Meaning
Description
Status of oven compartment 1
Depending on the cooking program and current status in
oven compartment 1, displays
mini 2in1
header
Preheat status in the form of an animated thermometer
Switch-off criteria, i.e. the set cooking time, regenerating
time or core temperature
Remaining cooking time or regenerating time
Current core temperature
Flashing
End of cooking program in oven
compartment 1
Cooking program in oven compartment 1 has finished.
Oven compartment 1 cannot be
selected
Touchscreen cannot be switched over to oven compartment 1.
Action required
An action is required in the oven compartment not currently being displayed.
The page display icons and what they mean
The page display icons are the inverse representation of the buttons used to open the pages concerned. The following table shows just an example selection from the complete range of icons.
The indicators have the following meanings:
Indicator
Meaning
Description
'Cook' page
The 'Cook' page selected.
'Press&Go' page
The 'Press&Go' page selected.
'Regenerate' page
The 'Regenerate' page selected.
'Clean' page
The 'Clean' page selected.
Header
minis easyTOUCH user manual
100
Working with the mini 2in1
Layout of the mini 2in1 cookbook pages
The cookbook pages differ from the cookbook pages for the mini table-top appliances (see The cookbook on page 45) by containing buttons for selecting the oven compartment and status indicators for
the cooking program in the oven compartment not currently displayed. All other functions are identical.
minis easyTOUCH user manual
101
Working with the mini 2in1
►
The Settings - General page for the mini 2in1
How to access the 'Settings - General' page
The 'General' tab
The 'General' tab contains the following functions:
Menu type
Meaning
Function
Cookbook
Selects the cookbook
Number of shelves
Selects the number of shelves that can be used
Temperature units
Selects °C or °F as the temperature units
The 'Food inspection' tab
The 'Food inspection' tab contains the following functions:
Menu type
Meaning
Function
Preheat time (sec)
Preheat time input:
Time for which temperature held after reaching the
preheat temperature
Preheat tolerance ( °C)
Input of preheat temperature tolerance:
e.g. preheat temperature is deemed reached at 20 °C
lower for instance
HACCP temp interval (sec)
Input of HACCP data transfer interval:
e.g. data transferred every 120 sec
Max. failure time (sec)
Input of maximum time for a power failure before a warning is issued that the product is spoiled.
The 'Cleaning' tab
The 'Cleaning' tab contains the following functions:
Menu type
Meaning
Function
Level 1 -
Selection of cleaning level(s) to be available on the 'Clean'
page
Light soiling
Level 2 Moderate soiling
Level 3 Heavy soiling
Level 4 Very heavy soiling
AutoClean temperature
(60°C - 100°C)
Input of fully automatic cleaning temperature when using
cleaning agents other than original products
Cleaning agent dosage
(1 - 10)
Input of cleaning agent dosage when using cleaning
agents other than original products
minis easyTOUCH user manual
102
Working with the mini 2in1
The 'Navigation' tab
The 'Navigation' tab contains the following functions:
Menu type
Meaning
Function
Recipe / tray finished
Selects the changeover function:
When a recipe has finished, the touchscreen switches
over automatically to the relevant oven compartment
This function is preset in the factory.
Fault has occurred
Selects the changeover function:
If a fault occurs, the touchscreen switches over automatically to the oven compartment concerned
Cleaning finished
Selects the changeover function:
When cleaning has finished, the touchscreen switches
over automatically to the relevant oven compartment
minis easyTOUCH user manual
103
Your combi-steamer cooking programs
Your combi-steamer cooking programs
The cooking programs
Your combi steamer provides you with the following preset main cooking programs:
Steam
Superheated steam
Convection
Regenerate
Working from these main cooking programs, you can cook all sorts of food to a high quality and in
shorter times.
In addition to the main cooking programs, your combi steamer also provides a number of special
cooking programs that are based on the main cooking methods:
Low-temperature cooking, suitable for low-oxygen slow cooking and overnight cooking
Delta-T cooking
Cook & Hold
overnight cooking
You can combine the core temperature control function with all main and special cooking programs; for
some special cooking programs e.g. sous-vide cooking, you must use this function.
General advantages of your combi steamer
You can enjoy the following advantages for all methods of cooking:
You always achieve the optimum atmosphere inside the oven.
Flavors are not transferred when you cook different foods in one load.
You do not need to enter humidity levels manually.
Developing your own recipes
You can combine the main and special cooking programs (plus the core temperature control function if
required) into your own single-stage or multistage recipes. You can then save them in the cookbook for
retrieval using Press&Go.
This section provides basic guidelines for adapting the cooking programs to suit the specific requirements of your products. How you design your own personal recipes is obviously up to you and your
customers.
Contents
This chapter contains the following topics:
Page
105
107
108
109
110
112
Steam
Superheated steam
Convection
Regenerate
Core temperature control
Delta-T cooking
minis easyTOUCH user manual
104
Your combi-steamer cooking programs
►
Steam
General uses
When you use the Steam cooking program, you are working in the 30 °C to 120 °C temperature range.
The Steam cooking program is suitable for the cooking methods
Boiling
Steam
Blanching
Poaching
Preserving
Special programs in which steaming is used are
low-oxygen slow cooking
low-temperature cooking
overnight cooking
Advantages of steaming at 100 °C
You enjoy the following benefits:
Steaming is particularly good at preserving vitamins, minerals and secondary plant substances such
as color and fiber.
You can work quickly because steam is constantly available.
Examples of use for steaming at 100 °C
In this temperature range, the cooking program is suitable for foods such as
Vegetables
Rice
Durum wheat pasta
Potato dumplings
Dumplings
Small dumplings
Potatoes
Advantages of low-temperature steaming between 30 °C and 99 °C
You enjoy the following benefits:
You can prepare foods while preserving their goodness.
You can avoid burst skins when boiling or heating up sausages.
You achieve optimum culinary results for sensitive foods such as terrines, galantines, flans, farces,
crème caramels and dietary foods.
Highly accurate cooking temperatures allow proteins in food to cook perfectly (such as with fish).
Examples of use for low-temperature steaming between 30 °C and 99 °C
In this temperature range, the cooking program is suitable for foods such as
Fish fillets
Terrines
Galantines
Flans
Stuffings
Dumplings
Crème caramel
minis easyTOUCH user manual
105
Your combi-steamer cooking programs
Advantages of quick steaming between 101 °C and 120 °C
You enjoy the following benefits:
You save time.
Examples of use for quick steaming between 101 °C and 120 °C
In this temperature range, the cooking program is suitable for less sensitive foods such as
Jacket potatoes
Beetroot
Turnips
Pulses
Cabbage
In this temperature range, the cooking program is also particularly good for food for which slight
browning is required with steaming, such as
Rolls of beef
Stuffed cabbage
Beef goulash
minis easyTOUCH user manual
106
Your combi-steamer cooking programs
►
Superheated steam
Temperature range
When you use the Superheated steam cooking program, you are working in the 100 °C to 250 °C
temperature range.
Usage
The Superheated steam cooking program is suitable for all foodstuffs for which moisture or steam is
added manually in the traditional cooking methods, for instance
Roast pork by basting
Danish pastries for optimum "rising"
Advantages
You enjoy the following benefits:
Food does not dry out.
Baked items such as yeast and bread dough or puff pastry rise perfectly during baking.
If required, you can extract moisture from the oven (Crisp &Tasty function) to achieve juicy, crispy
products that are evenly browned all over.
Making optimum use of the cooking program
You should remember the following points:
Generally you can reduce the oven temperature by 10 to 20% compared with traditional cooking
methods, and avoid significant loss in weight during cooking.
Examples of use
The cooking program is suitable for
Large roasting joints
Poultry (duck, goose)
Gratins and bakes
Baked items such as Danish pastries, baguettes etc.
Cheesecake
Apple strudel
minis easyTOUCH user manual
107
Your combi-steamer cooking programs
►
Convection
Temperature range
When you use the Convection cooking program, you are working in the 30 °C to 250 °C temperature
range.
Usage
The Convection cooking program is suitable for all cooking techniques that do not require moisture,
such as
roasting
roasting bones
baking
grilling
scalloping
Special programs in which convection is used are
low-temperature cooking
overnight cooking
Advantages
You enjoy the following benefits:
If required, you can extract moisture from the oven to achieve crisp, crunchy products that are
evenly browned all over.
By removing the moisture (Crisp&Tasty function), you can achieve a fine crust in baking.
Making optimum use of the cooking program
You should remember the following points:
Generally you can reduce the oven temperature by 10 to 20% compared with traditional cooking
methods, and avoid significant loss in weight during cooking.
Examples of use
The cooking program is suitable for
quick roasting cuts such as steaks and medallions
fat-free finger food
gratins
as an alternative to deep-frying potato products (fat-free french fries), etc.
fruit tarts
minis easyTOUCH user manual
108
Your combi-steamer cooking programs
►
Regenerate
Usage
The Regenerate cooking program is suitable for regenerating prepared dishes that have already been
arranged on plates, platters or in GN containers.
Temperature range and regeneration time
The regeneration time and temperature depend on the product, its thickness and on the number of
plates or GN containers to be regenerated (see recommended values in this section).
Advantages
You enjoy the following benefits:
Cook & Chill concept: you can create dishes during quiet times when you are less busy and arrange
them cold on plates or platters.
You can regenerate on demand however many plates you need.
Pre-prepared dishes do not dry out during regeneration.
There are no puddles of condensation on the plates or dry edges.
Mixed regeneration of plates / GN containers is possible.
Making optimum use of the cooking program
You should remember the following points:
Solid foodstuffs such as dumplings, rolled food or casseroles take longer to regenerate than items
such as slices of meat, vegetable accompaniments, rice or quartered or diced potatoes.
When arranging the food, avoid large areas of food overlapping and different heights of food.
Place fish and meat on a bed of rice or the like to ensure even regeneration without sticking to the
plate.
Pre-cook food to 80% of its final requirement; for instance only roast meat until it is rare, if medium
is the final result required after regeneration.
Butter vegetables, rice and pasta before regenerating.
Do not add sauces to the plate until after regenerating.
Examples of use
The regenerate program is suitable for
almost all types of dishes
Recommended values for regenerating
Follow these rules for regenerating:
Always preheat the combi steamer.
After each regenerate cycle, always reheat to the preheat temperature. You can start the regenerating program again as soon as the preheat temperature is reached.
minis easyTOUCH user manual
109
Your combi-steamer cooking programs
►
Core temperature control
The principle
The core temperature control function uses the core temperature inside the food to control the length
of the cooking process rather than the time.
The core temperature control function can be used with all main cooking programs.
Usage
Measuring the core temperature is particularly recommended for cooking slow roasts and achieving a
precise result (medium, rare etc.).
Advantages
You enjoy the following benefits:
You can cook with precision regardless of joint size or weight, guaranteeing perfect quality every
time.
There is no need to waste time and energy keeping an eye on the joint and checking the degree of
cooking.
The multipoint sensor takes measurements at several points along the sensor tip, and automatically
identifies the coolest core temperature it measures as the center of the joint of meat. The multipoint
sensor prevents false readings and makes it easier to use the sensor.
Combined with the cooking programs, you can achieve up to a 50% improvement in cooking.
Making optimum use of the cooking method
You should remember the following points:
When setting the final core temperature, remember that slow roasts continue to cook inside after
they have been removed from the combi steamer.
At the end of cooking, you should remove the slow roast from the combi steamer immediately and
chill it. This prevents overcooking.
minis easyTOUCH user manual
110
Your combi-steamer cooking programs
Recommended values for the core temperature
Please follow the recommended values below:
Food
Degree of cooking
Core temperature
Filet of beef, roast beef
Medium
50 - 54 °C
Braised beef
Well done
82 - 90 °C
Rolled beef, topside
Well done
82 - 95 °C
Saddle of veal
Medium
54 - 58 °C
Breast of veal, shoulder of veal
Well done
75 - 80 °C
Leg of veal
Well done
76 - 78 °C
Loin of pork
Medium
68 - 72 °C
Neck of pork
Medium
68 - 72 °C
Belly of pork, knuckle of pork
Well done
72 - 78 °C
Cured pork
Medium
65 - 68 °C
Leg of lamb
Medium
54 - 64 °C
Saddle of lamb
Medium
52 - 56 °C
Whole chicken
Well done
75 - 82 °C
Breast of chicken
Well done
75 - 77 °C
Chicken leg
Well done
75 - 82 °C
Medium
63 - 65 °C
Beef
Veal
Pork
Lamb
Poultry
Fish
Cuts of salmon
minis easyTOUCH user manual
111
Your combi-steamer cooking programs
►
Delta-T cooking
The principle
T cooking is a cooking program in which the oven temperature increases according to the core temperature. This option must always be used with the core temperature sensor.
The Delta-T cooking program
Enter the cooking program data in the 'Cook' page. You must enter the following values:
Button
Meaning
Function
temperature
Specifies the temperature in the oven relative to the core temperature.
Core temperature
The cooking program is stopped when this value is reached.
The cooking process
The following diagram shows the cooking process:
No.
Meaning
Description
Temperature inside Temperature curve inside the oven
the oven
Core temperature
minis easyTOUCH user manual
Value entered for the core temperature
112
Your combi-steamer cooking programs
No.
Meaning
Description
0
Start of phase 1
Program start: The temperature inside the food and Heating-up phase
inside the oven rises.
1
End of phase 1
The oven temperature equals the sum of the
temperature and the actual core temperature.
2
3
Phase 2
End of phase 2
Temperature inside the
oven
The oven temperature continues to rise in line with
the instantaneous core temperature until the core
temperature has reached the specified value.
End of program:
The core temperature
is reached.
+
moment
at that
+
moment
at that
+
Usage
T-cooking is particularly suitable for gentle cooking of boiled ham, entire fish, galantines and egg
royale.
Advantages
You enjoy the following benefits:
Meat stays juicy and tender and suffers little shrinkage during roasting.
Use the start time preset to make the most of low-usage periods when performing T cooking (for
instance at night).
Making optimum use of the cooking method
You should remember the following points:
The higher the temperature the greater the loss in weight and the higher the level of browning of
the food.
minis easyTOUCH user manual
113
Using the cooking programs
Using the cooking programs
Tried and tested recipes to inspire you
This section contains some tried and tested recipes to inspire you to develop your own recipes.
Contents
This chapter contains the following topics:
Page
115
117
118
119
120
122
124
Vegetables, side dishes, egg dishes
Fish, shellfish, sous-vide techniques
Meat, sausage products, large roasting joints
Meat, sausage products, small roasting cuts
Game and poultry
Baked dishes and desserts
Potato products, Oriental food, finger food
minis easyTOUCH user manual
114
Using the cooking programs
►
Vegetables, side dishes, egg dishes
Boiling
Typical settings for boiling:
Dish
Pasta (durum wheat
semolina)
Tip
°C
min
°C
120
10-15
–
Use unperforated containers; no
need to stir
1 part pasta, min. 5 parts cold water
Long-grain rice
Short-grain rice
Basmati rice
Fresh vegetables
cauliflower, carrots,
asparagus - in stock
100
30-40
–
Use unperforated containers
1 part rice
35-40
25
100
8-15
Soak for 20 minutes
1.5 to 2 parts cold water or stock
–
Diced
Steaming / blanching
Typical settings for steaming / blanching:
Dish
Tip
°C
min
°C
Frozen vegetables (small
pieces)
100
8-15
–
Frozen vegetables (large
pieces)
100
15-20
–
Potatoes (quartered)
100
35-45
–
Soak in salted water or sprinkle with
fine salt 15 minutes before cooking
Dumplings
100
20-25
–
Place on greased baking sheets or
directly in stock
Eggs
100
8-15
–
No need to skewer
Soft-boiled after approx. 10 min
Hard-boiled after approx. 15 min
110-115
20-45
–
Cabbage/kale/pulses
Jacket potatoes
Turnips
minis easyTOUCH user manual
25-40
20-40
115
Using the cooking programs
Poaching
Typical settings for poaching:
Dish
Tip
°C
min
°C
Royale
90
20-25
–
Frozen scrambled eggs
Frozen omelet
90
15-20
–
Baking
Typical settings for baking:
Dish
Vegetable bake containing
eggs and cheese
minis easyTOUCH user manual
Tip
°C
min
°C
165
35
–
116
Steam vegetables before preparing
Using the cooking programs
►
Fish, shellfish, sous-vide techniques
Roasting
Typical settings for roasting:
Dish
Tip
°C
min
°C
Trout
Plaice
Whole sole
230
8-12
–
Use every other shelf
Salmon steak
235
5-8
–
Use every other shelf
Use grill rack
Frozen breaded fish filet
220
10-12
–
Use every other shelf
Use roasting and baking sheet
Prawns
180
4-8
–
Use every other shelf
Use roasting and baking sheet
Poaching
Typical settings for poaching:
Dish
Tip
°C
min
°C
Mussels
96
10-12
–
Trout
72
12-15
–
Place trout with stomach flaps
opened out onto sheet
or
Use spit rack
Large prawns
80
4-8
–
Salmon portions
85
8-10
–
Fish pâté
80
60-70
60-65
Fish dumplings
72
8-12
–
Vacuum-packed trout
70
18-24
65
Terrines, galantines in
vacuum packs (sous vide)
70
–
65
minis easyTOUCH user manual
117
Use every other shelf
Sous vide 65°C core temperature
Using the cooking programs
►
Meat, sausage products, large roasting joints
Roasting
Typical settings for roasting:
Dish
Tip
°C
min
°C
130
60-90
72-78
130-160
70-90
78
Liver loaf, fresh sausagemeat, 4 kg
125
60-90
65-68
Leg of lamb
Roast lamb
145
60
64
Meat loaf
140
70-80
82
Rolled roast veal
Roast veal
135
80-100
85
Beef Wellington
170
35-40
52
Roast beef
135
40-45
52
90
10
–
155
–
65
Neck of pork
Roast pork
Loin of pork
Knuckle of pork
Knuckle of veal
Roast pork with crackling
1.
2.
After steaming for 10 minutes, score
the rind
Shape into a loaf or firm into baking
tin
Brush pastry lightly with egg, sauté
fillet first
Score rind
2-step recipe
Braising
Typical settings for braising:
Dish
Tip
°C
min
°C
Rolled cabbage
Stuffed peppers
135
45-60
82
Use overnight cooking
Rolled beef
Braised beef
130
40-60
82
Use overnight cooking
70-90
82
Poaching
Typical settings for poaching:
Dish
Tip
°C
Boiled ham
minis easyTOUCH user manual
min
85
°C
65
118
Using the cooking programs
►
Meat, sausage products, small roasting cuts
Grilling
Typical settings for grilling:
Dish
Tip
°C
min
°C
Fillet steak, beef 200 g,
medium
220
7
52
Use grill rack
Rump steak 180-200 g,
medium
220
8
52
Use grill rack
Veal steak 160 g
220
9
56
Pork fillet 80 g
210
8
56
Sliced liver
250
6
–
Do not coat in flour
Rissoles 150 g
180
12-15
78
Grease baking sheets
Cured pork cutlet 160 g
180
12-15
69
Grease baking sheets
Lamb carrée
180
10-15
51
Meat kebab
180
20
–
Use spit rack
Breaded cutlet or escalope
190
7
–
For larger quantities, switch on the
moisture removal option
Cordon bleu
180
10
Turkey escalope 200 g
190
9
–
For larger quantities, switch on the
moisture removal option
Sausages
195
7
–
Steaming / poaching
Typical settings for steaming / poaching:
Dish
Tip
°C
min
°C
Bottled sausage (230g)
Bottled liver loaf
Boiled sausage
100
90
72
75
30
75
70
Tinned sausage 200 g
Tinned sausage 400 g
100
65
Veal sausage
Wiener sausage
minis easyTOUCH user manual
–
90
dependin
g on skin
approx.
80
10-15
119
75
Pour in bottled weight + 15g
Close lid; cool down afterwards
Using the cooking programs
►
Game and poultry
Roasting
Typical settings for roasting:
Dish
Tip
°C
min
°C
Leg of boar
approx. 2 kg
135
100-120
65
Venison trimmed off bone
135
70-80
65
Rub with fat or marinate if required
Duck
140
50-65
75
Stuff with apples and onions if required
Goose
approx. 4.5 kg
130
3-3.5
hours
75
overnight cooking
Turkey
approx. 3 kg
130
110-120
78
Fill with stuffing and herbs if required
Turkey breast
140
40-50
72
Fill with stuffing and herbs if required
Saddle of hare
160
15-20
60-65
Roasting / braising
Typical settings for roasting / braising:
Dish
Leg of hare
Tip
°C
min
°C
140
45-50
72
Dot with fat or braise in stock if required
Braising
Typical settings for braising:
Dish
Roast venison
Tip
°C
min
°C
130
90
65
Place joint in deep container and top
up with stock gradually
Baking
Typical settings for baking:
Dish
Venison pie
minis easyTOUCH user manual
Tip
°C
min
°C
1. 160
1. 15
65
2. 120
2. 60
120
Always use pie funnels
2-step recipe
Using the cooking programs
Grilling
Typical settings for grilling:
Dish
Chicken (1100g fresh)
Tip
°C
min
°C
180
35
75
Special chicken grill with fat collecting
tray
Rub in seasoning well
Chicken leg
minis easyTOUCH user manual
190
20-25
121
78
Using the cooking programs
►
Baked dishes and desserts
Baking
Typical settings for baking:
Dish
Tip
°C
min
°C
160-170
40-50
–
Sponge bases
160
12-20
–
Cheesecakes
145
45
78
Use every other shelf
Madeira cake
fruit tarts
140-160
50-60
–
Use every other shelf
130
12-15
–
Number on sheet depends on size
Do not place items too close together
Baked slices
Small biscuits and cakes
Shortcrust pastry
Use every other shelf
on sheet
Apple strudel, fresh
175
15-20
–
Use every other shelf
Number on sheet depends on size
Do not place items too close together
on sheet
Brown bread
150-170
30-40
–
Use every other shelf
Number on sheet depends on size
Do not place items too close together
on sheet
Buns/rolls
Puff pastry
Flaky pastry
165
Frozen croissants
165
15-25
–
Number on sheet depends on size
Do not place items too close together
on sheet
15-20
–
Number on sheet depends on size
Do not place items too close together
on sheet
Bun twist
150
25-35
–
Use every other shelf
Number on sheet depends on size
Do not place items too close together
on sheet
Frozen buns/rolls
165
10-15
–
Number on sheet depends on size
Do not place items too close together
on sheet
Frozen baguettes
170
8-15
–
Number on sheet depends on size
Do not place items too close together
on sheet
Frozen pretzels
155
15-20
–
Number on sheet depends on size
Do not place items too close together
on sheet
minis easyTOUCH user manual
122
Using the cooking programs
Poaching
Typical settings for poaching:
Dish
Crème caramel
Crème Brûlée
Crème Catalane
minis easyTOUCH user manual
Tip
°C
min
°C
80
30-40
–
123
Using the cooking programs
►
Potato products, Oriental food, finger food
Baking without fat using the Crisp&Tasty function (moisture removal)
Typical settings for baking without fat:
Dish
French fries
Tip
°C
min
°C
200
8-12
–
Use frying basket
Rule of thumb:
3 kW power for 1 kg of frozen french
fries
For larger quantities, switch on the
moisture removal option
Potato wedges / cubes
220
10-12
–
Use frying basket
Every other shelf
For larger quantities, switch on the
moisture removal option
Gaufrettes (potato
waffles)
210
8-10
–
Use frying basket
Mini spring rolls
210
8-10
–
Use frying basket
Coat with fat to help browning if
required
For larger quantities, switch on the
moisture removal option
Shrimp roll
210
8-10
–
Use frying basket
Coat with fat to help browning if
required
Cheese nuggets
210
8-10
–
Use roasting and baking sheet
Vegetable tempura
200
8-10
–
Use roasting and baking sheet
Samosa
210
8-10
–
Use frying basket
Coat with fat to help browning if
required
Steam
Typical settings for steaming:
Dish
Tip
°C
min
°C
Dim Sum
100
8-12
–
Sushi rice
100
30-45
–
minis easyTOUCH user manual
124
Use a 65 mm Gastronorm container
Using the cooking programs
Frying using the Crisp&Tasty function (moisture removal)
Typical settings for frying with Crisp&Tasty:
Dish
Tip
°C
min
°C
Chicken fingers
Chicken wings
Chicken sticks
210
10-14
–
BBQ ribs
180
minis easyTOUCH user manual
Use roasting and baking sheet or grill
rack
–
125
75-78
Place on shelf-grill
Use overnight cooking
Cleaning and Maintenance
Cleaning and Maintenance
Cleaning and maintaining the combi steamer
This chapter presents the cleaning and maintenance schedule and gives cleaning instructions for your
combi steamer.
Contents
This chapter contains the following topics:
Cleaning and maintenance schedule
Semi-automatic oven cleaning
Fully automatic oven cleaning (CONVOClean system option)
Cleaning agents
Troubleshooting
Rectifying faults - Irregularities during operation
minis easyTOUCH user manual
126
Page
127
130
132
134
135
137
Cleaning and Maintenance
►
Cleaning and maintenance schedule
Hot steam
Risk of scalding from hot steam
If water is sprayed into the hot oven (e. g. using the hand shower), steam will be produced that may
scald.
Do not clean until the oven interior has cooled to below 60 °C.
Skin and eye irritation
Risk of skin and eye irritation
Direct contact with the CONVOClean new and CONVOCare cleaning agents will irritate the skin and
eyes.
Do not inhale the spray mist.
Do not let CONVOClean new come into contact with eyes or skin.
Wear protective gloves and safety goggles as specified in safety regulations.
Skin burns
Risk of skin burns
Direct contact with the CONVOClean forte cleaning agent will result in burns.
Do not inhale the spray mist.
Do not let CONVOClean forte come into contact with eyes or skin.
Wear protective clothing, protective gloves and safety goggles as specified in safety regulations.
Requirements
Check that the following requirements have been met before carrying out any cleaning or maintenance
tasks:
You are already conversant with the operating steps listed in the manual under "How to do it correctly".
minis easyTOUCH user manual
127
Cleaning and Maintenance
Daily cleaning tasks
The following table lists the cleaning tasks that you must perform daily:
What must be cleaned?
Procedure
Cleaning agents
Oven compartment
Semi-automatic oven cleaning
CONVOClean new for slightly
soiled ovens
or
CONVOClean forte for normal to
heavily soiled ovens
Fully automatic oven cleaning
(CONVOClean system option) on
page 132
CONVOClean forte
and
CONVOCare
Semi-automatic oven cleaning
CONVOClean new for slightly
soiled ovens
or
CONVOClean forte for normal to
heavily soiled ovens
Fully automatic oven cleaning
(CONVOClean system option) on
page 132
CONVOClean forte
and
CONVOCare
Hygienic gasket also around
appliance door
Cleaning the hygienic plug-in
gasket on page 148
using a commercial detergent
Outside of appliance
Clean by hand with a soft cloth
Commercial stainless steel cleaner
Oven interior if a white deposit or
dark discoloration is visible
In this case
Spray on cleaner when oven is
cold
Leave to work for 10 minutes
polish with a soft, non-abrasive
sponge
Rinse out
CONVOCare
Fan compartment behind suction
panel
Weekly cleaning tasks
The following table lists the cleaning tasks that you must perform weekly:
What must be cleaned?
Procedure
Cleaning agents
Interior double glass door
Cleaning the double glass door on
page 146
Commercial glass cleaner
Door and appliance drip tray
Clean by hand
CONVOClean new
or
CONVOClean forte
Monthly cleaning tasks
The following table lists the cleaning tasks that you must perform monthly:
What must be cleaned?
Procedure
Cleaning agents
Oven stand (option)
Clean by hand with a soft cloth
Commercial stainless steel cleaner
Hygienic gasket
Dishwasher
using a commercial detergent
minis easyTOUCH user manual
128
Cleaning and Maintenance
Carrying out maintenance tasks
You will need to carry out a few regular maintenance tasks yourself. Any more extensive maintenance
tasks must only be performed by Customer Services.
Daily maintenance tasks that you must perform yourself
The following table lists the maintenance tasks that you must perform daily:
What must be serviced?
Procedure
Materials / tools
Water treatment must be readjusted if you can see a white
deposit inside the oven
Call customer service
-
Maintenance tasks that Customer Services must perform
The following table lists the service intervals between maintenance by the approved Customer Services.
How often?
What must be serviced?
Annually
General maintenance
More on this ...
How to do it correctly
Cleaning the double glass door........................................................................................................ 146
Cleaning the hygienic plug-in gasket ............................................................................................... 148
Cleaning the armature ...................................................................................................................... 149
Filling the cleaning drawers .............................................................................................................. 150
Related topics
Cleaning agents ............................................................................................................................... 134
Semi-automatic oven cleaning ......................................................................................................... 130
Fully automatic oven cleaning (CONVOClean system option) ........................................................ 132
minis easyTOUCH user manual
129
Cleaning and Maintenance
►
Semi-automatic oven cleaning
Skin and eye irritation
Risk of skin and eye irritation
Direct contact with the CONVOClean new and CONVOCare cleaning agents will irritate the skin and
eyes.
Do not inhale the spray mist.
Do not let CONVOClean new come into contact with eyes or skin.
Wear protective gloves and safety goggles as specified in safety regulations.
Skin burns
Risk of skin burns
Direct contact with the CONVOClean forte cleaning agent will result in burns.
Do not inhale the spray mist.
Do not let CONVOClean forte come into contact with eyes or skin.
Wear protective clothing, protective gloves and safety goggles as specified in safety regulations.
Requirements
Check that the following requirements have been met:
You are already conversant with the operating steps listed under "How to do it correctly".
Materials required
You need the following materials:
CONVOClean new / forte cleaning agent in the spray bottle
Using the spray bottle
Please follow this guidance when using the spray bottle:
Never leave the spray bottle unused under pressure for prolonged periods. Open the pump head
slowly to release the pressurized air.
Rinse out the spray bottle weekly.
Rinse out the nozzle, nozzle extension and nozzle pipe after each use.
minis easyTOUCH user manual
130
Cleaning and Maintenance
Semi-automatic oven cleaning
For semi-automatic oven cleaning, follow the steps below:
Step
Action
Illustration
1
Remove the larger items of burnt food residues from the
oven.
2
Open the Cleaning page on the control panel and start the
semi-automatic cleaning program.
3
As soon as a signal sounds, remove the rack and suction
panel.
4
Spray inside the oven, including behind the suction panel, and
into the drain in the floor using the spray bottle (1) of CONVOClean new or CONVOClean forte.
5
Refit the suction panel and rack.
6
Close the appliance door.
Result:
The program continues running automatically.
7
Switch off the combi steamer as soon as you hear the next
signal.
8
Use a soft cloth to wipe out thoroughly the oven interior, the
fittings and the area behind the suction panel (2).
For heavy soiling, you can repeat the cleaning program.
9
Do not close the appliance door, but leave it ajar.
More on this ...
How to do it correctly
Inserting and removing racks ........................................................................................................... 140
Fitting the air guide panel to rack (mini 6.10 and mini 10.10) .......................................................... 141
Removing and fitting the suction panel ............................................................................................ 144
Fitting and removing the USB cover ................................................................................................ 145
Related topics
Cleaning and maintenance schedule ............................................................................................... 127
Cleaning agents ............................................................................................................................... 134
minis easyTOUCH user manual
131
Cleaning and Maintenance
►
Fully automatic oven cleaning (CONVOClean system option)
Requirements
Check that the following requirements have been met:
No food has been left in the oven.
For 6.10 2in1 mini and3.10 mini, make sure that both drawers are filled correctly and that both
drawers contain enough cleaning fluid.
For 3.10 mini, make sure the cleaning fluid containers are connected to the unit and that both containers contain enough cleaning fluid.
You are already conversant with the operating steps listed under "How to do it correctly".
Materials required
You need the following materials:
CONVOClean forte cleaning agent in a canister with a red label
CONVOCare nozzle detergent in a canister with a green label
Spray bottle containing CONVOClean new or CONVOClean forte cleaning agent for aftercare
Spray bottle containing CONVOCare nozzle detergent for aftercare
Fully automatic oven cleaning
For fully automatic oven cleaning, follow the steps below:
Step
Action
Button
1
Turn the armature nozzle on the top of the over through one
complete turn to ensure that it moves freely.
2
Remove the larger items of burnt food residues from the oven.
3
Close the door.
4
Open the Cleaning page on the control panel.
Result:
The combi steamer prompts you to make sure that the oven is
empty.
5
Start the fully automatic cleaning program by selecting the level
of cleaning.
or
or
or
6
Open the appliance door when prompted by the system, ensure
that the oven is empty and close the door.
Result:
The combi steamer starts the fully automatic cleaning program.
Caution:
Never interrupt this cycle. Do not open the door.
Oven aftercare
For very heavy soiling, we recommend following this cycle with semi-automatic cleaning when you can
target any remaining dirt.
minis easyTOUCH user manual
132
Cleaning and Maintenance
Faults that may occur
The following table shows what faults might occur and the appropriate actions:
Fault
Action
"Not enough water" appears in display
Check the water supply.
"No cleaner pressure" appears in display
Check which canister is almost empty and re-fill it. In
an emergency use water.
Power failure
or
You have interrupted the fully automatic cleaning
cycle.
If cleaning solutions have been used, the combi
steamer will automatically rinse the oven before it can
be operated.
More on this ...
How to do it correctly
Removing and fitting the suction panel ............................................................................................ 144
Inserting and removing racks ........................................................................................................... 140
Related topics
Cleaning and maintenance schedule ............................................................................................... 127
Cleaning agents ............................................................................................................................... 134
Semi-automatic oven cleaning ......................................................................................................... 130
Cleaning the armature ...................................................................................................................... 149
Filling the cleaning drawers .............................................................................................................. 150
minis easyTOUCH user manual
133
Cleaning and Maintenance
►
Cleaning agents
Cleaning agents
Use only original cleaning agents to clean the oven interior.
Please note:
Damage caused as a result of improper cleaning without using the specified cleaning agents will invalidate any warranty claims.
The table below lists the original cleaning agents available, where they are used and what container
they are kept in:
Product
Use
Container
CONVOClean new
Eco-friendly detergent for light
soiling (not for fully automatic
oven cleaning)
Cleaning inside the oven
by hand
semi-automatic
Spray bottle
CONVOClean forte
Eco-friendly detergent for normal to
heavy soiling
Cleaning inside the oven
by hand
semi-automatic
Spray bottle
Cleaning inside the oven
fully automatic
Canisters attached to the cleaning
system or cleaning shelves under
the combi steamer
Cleaning inside the oven
fully automatic
Canisters attached to the cleaning
system or cleaning shelves under
the combi steamer
Manual aftercare of oven interior
Spray bottle
Stainless steel cleaning spray
Caring for the external surfaces of
the combi steamer
-
Stainless steel cleaner
Caring for the external surfaces of
the combi steamer
-
CONVOCare
nozzle detergent
Using cleaning agents
You must wear protective gear as specified in Personal protective equipment on page 33 when using
cleaning agents.
Follow guidance on EU safety datasheets.
Staff are to be trained regularly by the owner of the combi steamer.
minis easyTOUCH user manual
134
Cleaning and Maintenance
►
Troubleshooting
Structure of the error message
The following screenshot shows a typical error message to illustrate the layout of all error messages:
Elements of the error messages and their function
The elements of the error messages have the following function:
No.
Name
Function
1
Error number
Serial number of the detected error (errors are numbered consecutively)
2
Error code
ID number to identify the error
date
Date on which the error occurred
time
Time at which the error occurred
3
Description of fault
Short description of error with error code
4
Service number
Service phone number of manufacturer
Errors and required responses
The following table explains the error codes used in the display:
Error
code
Error
code
Description of fault
Required response
E01.0
33
Not enough water: Water pressure is less than
0.5 bar 3 seconds after valve activation
1. Open the water supply
2. Contact customer service
E02.0
24
Wiring compartment too hot
The secondary fan is turned on at temperatures
> 45°C. The error threshold is 80°C.
1. Clean fluff filter (oven floor)
2. Contact customer service
E03
72
Fan fault
1. Check fuse
2. Contact customer service
E03.0
29
Motor thermal protection (bimetal strip) has
tripped
1. Check fuse
2. Contact customer service
E04.0
36
Secondary-fan fault in electrical compartment
Contact customer service
E11.0
23
Over-temperature detected by oven sensor
Contact customer service
E12.1
25
26
Over-temperature detected by core temperature sensor
Correct the sensor position
E12.2
E12.3
27
E12.4
28
E15.0
21
Over-temperature detected by condenser
sensor
Contact customer service
minis easyTOUCH user manual
135
Cleaning and Maintenance
Error
code
Error
code
Description of fault
Required response
E16.0
38
Dehumidifier flap error: the dehumdifier flap
cannot be initialized
1. Restart the appliance
2. Contact customer service
E21.0
5
Oven sensor B6 disconnected
Contact customer service
E21.1
14
Sensor B6 in front of the fan wheel has a
ground fault
Contact customer service
E22.1
6
Core temperature sensor disconnected
Contact customer service
E22.2
7
E22.3
8
E22.4
9
E25.0
3
Condenser sensor B3 disconnected
Contact customer service
E25.1
12
Sensor B3 in the condenser has a ground fault
Contact customer service
E27.0
19
Over-temperature detected by safety temperature limiter
Contact customer service
E29.1
15
16
Core temperature sensor is touching the
appliance housing
Contact customer service
E29.2
E29.3
17
E29.4
18
E83.0
47
The cooking program is not recognized
1. Re-enter the cooking program
2. Contact customer service
E89.1
48
Invalid data in IDM
1. Unplug the appliance for approx. 10
seconds and restart
2. Contact customer service
E96.0
30
Communication error between SM and BM
1. Unplug the appliance for approx. 10
seconds and restart
2. Contact customer service
E99.9
32
General initialization error
Unplug the appliance for approx. 10
seconds and restart
minis easyTOUCH user manual
136
Cleaning and Maintenance
►
Rectifying faults - Irregularities during operation
Errors and required responses
The following table contains a list of possible irregularities during operation and how to rectify them:
Irregularity
Possible cause
Required response
Uneven browning
Suction panel not closed correctly
mini easyTOUCH: Removing and fitting
the suction panel on page 144
Air guide panel not fitted correctly or
not fitted at all
Fixing the air guide panel to the rack on
page 141
Oven compartment not preheated
Preheat the oven compartment
Oven temperature too high
Select a lower oven temperature and
extend the cooking time
Appliance does not respond
to any inputs on the screen
Software has crashed
Press ON/OFF for 5 seconds or disconnect the appliance from the mains
supply for 5 seconds
No longer able to switch the
appliance on or off
ON/OFF is blocked for 3 seconds
Try again after 3 seconds.
Water runs out underneath
the appliance when closing
the door
Whatever the cause
Caution: risk of contamination:
Discard any food that has come into
contact with this water.
Complete or partial blockage of
Check customer's drain system and
clean if necessary
waste water pipe
Permanent drain connection on
appliances with CONVOClean
system
Use permanent connection if applicable
Air vent blocked or covered
Remove obstruction
Appliance drain clogged
Clean out the drain
Water standing in oven
compartment
Appliance drain clogged
Rinse out the drain
White marks in the oven
compartment
Water too hard
Adjusting the water hardness
Incorrect cleaning agent
Use CONVOClean forte for automatic
cleaning
Limescale on oven compartment wall
Black marks in the oven
compartment
Use CONVOClean forte or CONVOClean new for semi-automatic cleaning
Poor cleaning result
Water pressure too low
Testing the water pressure
If necessary, increase the customer's
water pressure
Incorrect soiling level set
Select a higher cleaning level
Incorrect cleaning agent used
Use CONVOClean forte for automatic
cleaning
Use CONVOClean forte or CONVOClean new for semi-automatic cleaning
minis easyTOUCH user manual
137
How to do it correctly
How to do it correctly
Main handling operations for the combi steamer
This chapter describes how to perform some of the main repetitive handling tasks that will arise when
operating the combi steamer.
Contents
This chapter contains the following topics:
Page
139
140
141
143
144
145
146
148
149
150
152
Opening the appliance door safely
Inserting and removing racks
Loading / removing food
Stowing away the core temperature sensor
Removing and fitting the suction panel
Fitting and removing the USB cover
Cleaning the double glass door
Cleaning the hygienic plug-in gasket
Cleaning the armature
Filling the cleaning drawers
Operating the CONVOVent mini
minis easyTOUCH user manual
138
How to do it correctly
►
Opening the appliance door safely
Hot surfaces
Risk of burns from high temperatures inside the oven and on the inside of the appliance door
You may get burnt if you touch any of the interior parts of the oven, the inside of the appliance door or
any parts that were inside the oven during cooking.
Wear personal protective equipment as specified in safety regulations.
Hot steam / vapor
Risk of scalding from hot steam and vapor
Escaping hot steam and vapor can cause scalding to face, hands, feet and legs.
Open the appliance door as specified in the safety regulations. Never put your head into the oven!
Opening the appliance door safely
To open the appliance door, follow the steps below:
Step
Action
1
Turn the door handle upwards (1).
2
Open the door slowly (2).
minis easyTOUCH user manual
Illustration
139
How to do it correctly
►
Inserting and removing racks
Hot surfaces
Risk of burns from high temperatures inside the oven and on the inside of the appliance door
You may get burnt if you touch any of the interior parts of the oven, the inside of the appliance door or
any parts that were inside the oven during cooking.
Wear personal protective equipment as specified in safety regulations.
Removing racks
To remove a rack, follow the steps below:
Step
Action
Illustration
1
Push the rack upwards.
2
Un-hook the rack (2).
Caution:
Take care not to bend the rails, otherwise shelf-grills, baking
trays and containers will no longer be held securely.
Fitting racks
To fit a rack, follow the steps in the reverse order.
More on this ...
minis easyTOUCH user manual
140
How to do it correctly
►
Loading / removing food
Hot surfaces
Risk of burns from high temperatures inside the oven and on the inside of the appliance door
You may get burnt if you touch any of the interior parts of the oven, the inside of the appliance door or
any parts that were inside the oven during cooking.
Wear personal protective equipment as specified in safety regulations.
Hot steam / vapor
Risk of scalding from hot steam and vapor
Escaping hot steam and vapor can cause scalding to face, hands, feet and legs.
Open the appliance door as specified in the safety regulations. Never put your head into the oven!
Hot liquids
Risk of scalding from hot liquids
Spilling liquid foods can result in scalds to face and hands.
Those containers holding liquids or food that will liquefy during cooking must only be placed on
shelves that are below a height of 1.60 m, indicated by the warning sign "Hot Liquids" on the appliance or loading trolley. Only these shelves can be seen by all users.
During loading, make sure that the racks are fixed in place properly.
During movement, cover containers holding hot liquids.
Requirements
Check that the following requirements have been met:
You are already conversant with the operating steps listed under "How to do it correctly".
minis easyTOUCH user manual
141
How to do it correctly
Loading
To load the oven, follow the steps below:
Step
Action
Illustration
1
Open the appliance door (1).
2
Place the food onto the required shelf levels (2).
Start from the bottom.
When using shelf racks to place the food in the oven, leave
the lowest shelf level empty.
WARNING
Please note that containers holding liquids or food that will
liquefy during cooking must be placed on shelf levels that
allow a proper view inside the container.
Removing food
To remove the food, follow the steps below:
Step
Action
1
Open the appliance door.
2
Hold the food horizontally when removing it.
More on this ...
How to do it correctly
Opening the appliance door safely .................................................................................................. 139
minis easyTOUCH user manual
142
How to do it correctly
►
Stowing away the core temperature sensor
Hot surfaces
Risk of burns from high temperatures inside the oven and on the inside of the appliance door
You may get burnt if you touch any of the interior parts of the oven, the inside of the appliance door or
any parts that were inside the oven during cooking.
Wear personal protective equipment as specified in safety regulations.
Requirements
Check that the following requirements have been met:
You are already conversant with the operating steps listed under "How to do it correctly".
Stowing away
To stow away the core temperature sensor when it is not needed for the cooking process, follow the
steps below:
Step
Action
Illustration
1
Slide the sensor into the holder. Otherwise the sensor risks
getting damaged.
More on this ...
How to do it correctly
Opening the appliance door safely .................................................................................................. 139
Loading / removing food ................................................................................................................... 141
minis easyTOUCH user manual
143
How to do it correctly
►
Removing and fitting the suction panel
Hot surfaces
Risk of burns from high temperatures inside the oven and on the inside of the appliance door
You may get burnt if you touch any of the interior parts of the oven, the inside of the appliance door or
any parts that were inside the oven during cooking.
Wear personal protective equipment as specified in safety regulations.
Materials required
You need the following materials:
Suitable tools for undoing the screws e.g. screwdriver
Removing the suction panel
To remove the suction panel, follow the steps below:
Step
Action
Illustration
1
Insert first tool into slot and push in until you feel release.
Insert second tool into slot and rotate until clip is released.
2
Push the suction panel upwards and remove it (2).
Fitting the suction panel
To fit the suction panel, follow the steps in the reverse order.
More on this ...
How to do it correctly
Inserting and removing racks ........................................................................................................... 140
Stowing away the core temperature sensor.....................................................................................143
minis easyTOUCH user manual
144
How to do it correctly
►
Fitting and removing the USB cover
Requirements
Make sure that the following requirements have been met:
The cover must always be fitted during cooking so that no vapors can get into the control electronics.
Fitting the USB cover
To fit the cover, follow the steps below:
Step
Action
Illustration.
1
Press the rubber cover into the hole for the USB stick.
Make sure that the cover makes a complete seal all around its
edge.
Removing the USB cover
To remove the cover, follow the steps in the reverse order:
Step
Action
Illustration.
1
Pull the rubber cover for the USB stick out on the left-hand
side.
Result:
The rubber cover for the USB stick remains held in place on
the right-hand side.
minis easyTOUCH user manual
145
How to do it correctly
►
Cleaning the double glass door
Electric shock
Risk of electric shock from live parts
Water on the exterior of the combi steamer can cause a short-circuit, which may result in electric
shock on touching the combi steamer.
Do not spray the exterior of the combi steamer with water.
Protect from rain if operated outdoors.
Risk of crushing
Risk of hand injuries from crushing
When cleaning the appliance door and interior door there is the risk that you will crush your hand.
Take care not to place your hand between door and end stop on the right-hand side of the appliance
door or interior door.
Materials required
You need the following materials:
Commercial glass cleaner
Cleaning the double glass door
To clean the double glass door, follow the steps below:
Step
Action
1
Turn the quick-release catch (1) on the double glass door.
2
Clean the double glass door with glass cleaner. Take care not
to scratch the glass.
3
Re-close the double glass door using the quick-release catch
(1).
minis easyTOUCH user manual
Illustration
146
How to do it correctly
More on this ...
Related topics
Cleaning and maintenance schedule ............................................................................................... 127
Cleaning agents ............................................................................................................................... 134
Semi-automatic oven cleaning ......................................................................................................... 130
Fully automatic oven cleaning (CONVOClean system option) ........................................................ 132
Cleaning the hygienic plug-in gasket ............................................................................................... 148
Filling the cleaning drawers .............................................................................................................. 150
minis easyTOUCH user manual
147
How to do it correctly
►
Cleaning the hygienic plug-in gasket
Hot steam
Risk of scalding from hot steam
If water is sprayed into the hot oven using the hand shower, steam will be produced that may scald.
Do not clean until the oven interior has cooled to below 60 °C.
Electric shock
Risk of electric shock from live parts
Water on the exterior of the combi steamer can cause a short-circuit, which may result in electric
shock on touching the combi steamer.
Do not spray the exterior of the combi steamer with water.
Protect from rain if operated outdoors.
Materials required
You need the following materials:
commercial, mild, odorless detergent
soft cloth
no tools
Cleaning the removable hygienic plug-in gasket
To clean the removable hygienic gasket, follow the steps below:
Step
Action
1
Clean the hygienic plug-in gasket with detergent.
2
Dry the hygienic plug-in gasket thoroughly.
More on this ...
Related topics
Cleaning and maintenance schedule ............................................................................................... 127
Cleaning agents ............................................................................................................................... 134
Semi-automatic oven cleaning ......................................................................................................... 130
Fully automatic oven cleaning (CONVOClean system option) ........................................................ 132
Cleaning the double glass door........................................................................................................ 146
Filling the cleaning drawers .............................................................................................................. 150
minis easyTOUCH user manual
148
How to do it correctly
►
Cleaning the armature
Hot surfaces
Risk of burns from high temperatures inside the oven and on the inside of the appliance door
You may get burnt if you touch any of the interior parts of the oven, the inside of the appliance door or
any parts that were inside the oven during cooking.
Wear personal protective equipment as specified in safety regulations.
Materials required
You need the following materials:
None
Cleaning the armature
To clean the armature, follow the steps below:
Step
Action
Illustration
1
Unscrew the knurled screw (1) from the armature.
2
Wash the armature in the dishwasher.
3
Screw the armature back on.
4
Check that it can move freely.
More on this ...
Related topics
Cleaning and maintenance schedule ............................................................................................... 127
Cleaning agents ............................................................................................................................... 134
Fully automatic oven cleaning (CONVOClean system option) ........................................................ 132
Cleaning the double glass door........................................................................................................ 146
Cleaning the hygienic plug-in gasket ............................................................................................... 148
minis easyTOUCH user manual
149
How to do it correctly
►
Filling the cleaning drawers1
Skin and eye irritation
Risk of skin and eye irritation
The CONVOClean new and CONVOCare cleaning agents will irritate the skin and eyes if there is any
direct contact, and care must be exercised when handling the cleaning canisters.
Do not inhale the spray mist.
Do not let CONVOClean new or CONVOCare come into contact with eyes or skin.
Never open the appliance door during fully automatic cleaning.
Wear protective gloves and safety goggles as specified in safety regulations.
Skin burns
Risk of skin burns
The CONVOClean forte cleaning agent will cause skin burns if there is any direct contact, and care
must be exercised when handling the cleaning canisters.
Do not inhale the spray mist.
Do not let CONVOClean forte come into contact with eyes or skin.
Never open the appliance door during fully automatic cleaning.
Wear protective clothing, protective gloves and safety goggles as specified in safety regulations.
Cleaning agents coming into contact with food
Risk of cleaning agents coming into contact with food
If CONVOClean and CONVOCare are swapped over, there is a health risk from eating the cooked
dishes.
Make sure that you fill the CONVOClean and CONVOCare drawers with the correct cleaning product.
Use only products approved by the manufacturer.
Never open the appliance door on the combi steamer during the cleaning process.
Materials required
You need the following materials:
CONVOClean forte
CONVOCare K concentrate (1 l) in refill container
Empty canister for mixing CONVOCare
Funnel or similar item for pouring cleaning agent into the drawers
1
This section applies only to the 6.10 2in1 mini and the 10.10 mini. Cleaning fluid containers are connected directly to a 3.10 mini unit.
minis easyTOUCH user manual
150
How to do it correctly
Filling the cleaning drawer with CONVOClean forte
To fill the cleaning drawer with CONVOClean forte, follow the steps below:
Step
Action
Illustration
1
Remove the cap from the CONVOClean forte cleaning-agent
canister.
2
Open the tank of the cleaning-agent drawer.
3
Fill the tank with CONVOClean forte.
Mixing the CONVOCare solution
To avoid excessive foaming, follow the procedure below when mixing the CONVOCare concentrate
with water:
Step
Action
1
Have available:
an empty CONVOCare canister
CONVOCare concentrate
a sufficient amount of soft water
2
Read the label on the CONVOCare concentrate canister for the mixing instructions.
3
First add the water to the empty canister.
4
Add the correct amount of CONVOCare concentrate to the water.
5
Mix the two together thoroughly by stirring.
Fill the detergent drawer with CONCOCare
To change the cleaning canisters containing CONVOCare K, follow the steps below:
Step
Action
Illustration
1
Remove the cap from the CONVOCare concentrate bottle.
2
Open the tank of the CONVOCare drawer.
3
Fill the tank with the mixed CONVOCare.
More on this ...
Related topics
Fully automatic oven cleaning (CONVOClean system option) ........................................................ 132
minis easyTOUCH user manual
151
How to do it correctly
►
Operating the CONVOVent mini
Front panel
Fit the front panel in front of the condensation hood.
The front panel must be removed at regular intervals and washed in the dishwasher. Observe manufacturer's data.
Operation
Always switch the condensation hood on when the combi steamer is running. Otherwise condensation
may collect in the appliance.
Waste water temperature
The average waste water temperature from the combi steamer equals 68°C. In order to reduce the
cold-water consumption, the maximum temperature of the waste water can be changed locally to 80°C
in the Service level.
minis easyTOUCH user manual
152
CONVOTHERM
OES minis
7016868_01 07/09
easyTOUCH
CONVOTHERM Elektrogeräte
GmbH
Talstraße 35
D-82436 Eglfing
Tel,+49 (0)
8847/67-0
Fax +49 (0)
8847/414
[email protected]
www.convotherm.de