1
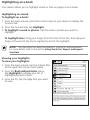
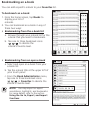
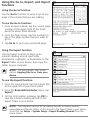
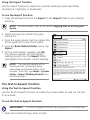
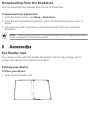
Eee Reader
DR-900
User Manual
E5973 / First Edition V1 / October 2010
Table of contents
Safety information......................................................................................... 3
1 A quick look
Package contents........................................................................................... 4
Your Eee Reader............................................................................................. 5
2 Getting started
Charging your device..................................................................................... 6
Turning your device ON................................................................................. 7
Turning your device OFF................................................................................ 7
Waking up your device from Sleep mode..................................................... 7
Shutting down your device.......................................................................... 7
Hard resetting your device............................................................................ 7
Installing a microSD card into your device.................................................. 8
Copying files to or from your device............................................................ 8
3 Using your device
The Home screen............................................................................................ 9
Using the touch gestures............................................................................. 9
Accessing e-books........................................................................................ 10
Reading an e-book.................................................................................... 10
Annotating an e-book............................................................................... 11
Highlighting an e-book.............................................................................. 13
Bookmarking an e-book............................................................................ 14
Using the Go to, Export, and Import functions........................................... 15
The Text-to-Speech function...................................................................... 16
Tagging an e-book..................................................................................... 17
Accessing News Reader............................................................................... 18
Subscribing to news feeds......................................................................... 18
Getting connected wirelessly...................................................................... 18
Using the Wi-Fi function............................................................................ 18
Using the 3G function............................................................................... 19
Connecting to the Internet......................................................................... 20
Table of contents
Updating the firmware................................................................................ 20
Activating your digital reader for DRM-protected files............................ 21
4 Downloading online
Downloading from the Webstore............................................................... 21
Downloading from the Bookstore.............................................................. 22
5 Accessories
Eee Reader case............................................................................................ 22
Storing your device.................................................................................... 22
6 FAQs
Frequently Asked Questions (FAQs)........................................................... 23
Appendices
Notices.......................................................................................................... 24
ASUS Contact information.......................................................................... 28
Safety information
Wipe the device using a clean cellulose sponge or chamois cloth dampened with
a solution of nonabrasive detergent and a few drops of warm water then remove
any extra moisture with a dry cloth.
DO NOT place on uneven or
unstable work surfaces. Seek
servicing if the casing has been
damaged. Refer all servicing to
qualified service personnel.
DO NOT expose to or use near
liquids, rain, or moisture.
SAFE TEMP: This device should
only be used in environments with
ambient temperatures between
5oC (41oF) and 35oC (95oF).
DO NOT place or drop items that
may damage or scratch the device.
DO NOT expose to extreme high
temperature or to direct sunlight.
1 A quick look
Package contents
Eee Reader
DR-900
Quick Start Guide
DR-900 Eee Reader
Quick Start Guide
micro-USB cable
USB charger
Eee Reader case
Warranty card
NOTES:
•If any of the items is damaged or missing, contact your retailer.
•The USB charger varies with regions.
Your Eee Reader
1
8
7
2
6
3
4
5
9
1
2
3
10
11
12
9
Power key: Turns your device on/off.
Touch panel: Lightly touch the screen to navigate through the features and
functions of your device.
Function key: Press to display the function bar. You may also move
your finger in an upward motion to show the function bar.
4
Back key: Press to go back to the previous screen.
5
Home key: Press to go to the Home screen.
6
Page up key: Press to go back to the previous page.
7
Page down key: Press to go to the next page.
8
9
10
Volume key: Press to increase/decrease the volume.
Built-in speakers: The device is equipped with two built-in high quality stereo
speakers.
3.5mm Earphone jack: Insert your headphone connector into this jack. Using
this jack automatically disables the built-in speakers.
11
microSD card slot: Insert a microSD card into this slot.
12
micro-USB port: Insert the micro-USB cable into this port.
NOTE: Some ASUS Eee Reader models may include a built-in 3G function.
2 Getting started
Charging your device
3
2
1
To charge your device:
1.Connect the USB cable’s micro-USB connector to the
micro-USB port of your device.
2.Connect the micro-USB cable to the USB charger.
3.Connect the USB charger to a power outlet.
NOTES:
• You may also connect the micro-USB cable to your computer’s USB port to
charge your device.
•Use only the USB charger that comes with your device. Using a different USB
charger may damage your device.
•The bundled USB charger varies with regions.
•Your device has an extended internal battery life of up to two weeks on a single
charge.
•All battery claims depend on several factors such network settings or wireless
usage and actual results may vary.
Turning your device ON
To turn your device ON:
• Long press the Power key for about three seconds.
Turning your device OFF
Waking up your device from Sleep mode
NOTE: By default, your device automatically enters the Sleep or Suspend mode
when you are not operating your device for some time.
To wake up your device from Sleep mode:
• Short press the Power key to wake up the system.
Shutting down your device
To shut down your device, do any of the following:
• From the home screen, tap Setup > Shut Down, then tap Yes on the
confirmation message.
• Long press the Power key for about three seconds to shut down your device.
Hard resetting your device
To hard reset your device:
• Simultaneously press the Home, Function, and Power keys.
Installing a microSD card into your
device
Your device is equipped with a microSD card slot. A microSD card provides you
with extended memory where you can store your files and other data.
To insert a microSD card:
1.Locate the microSD card slot at the bottom
of the device.
2.Insert the microSD card into the card slot.
microSD card slot
Copying files to or from your device
You can download pdf, ePub, txt, or mp3 files from your computer to your device
and vice versa.
To copy files to your device:
1.Turn on your device.
2.Using the bundled micro-USB cable, connect your device to your computer’s
USB port.
3.Tap Connect to PC to display the directory on your device.
4.Copy the files to your preferred destination path.
IMPORTANT!
•For text format files such as ePub, pdf, or txt files: Create a folder named
Book and copy the ePub and pdf files into this folder.
•For audio format files such as mp3 files: Create a folder named Audio and
copy the audio files into this folder.
5.When done, click the Safely remove hardware icon on the taskbar at the
bottom right of your computer screen.
3 Using your device
The Home screen
With the tap of your finger on the touch
panel, My Reader screen enables you to
quickly access Books, News Reader,
Dictionary, Audio Player, Sketch Book,
Favorites, Web Store, Bookstore, Web
Browser, and Setup.
Using the touch gestures
Touch gestures are movements that you make with your finger to select items or
navigate around your digital reader's touch panel.
NOTE: Use light pressure when making a touch gesture.
IMPORTANT! Do not use any objects in place of your finger to operate the
touch panel. Doing so may damage or scratch the touch panel’s surface.
Standard gestures
Show the function bar
When reading an e-book, move your
finger in an upward motion on the
touch panel.
Hide the function bar
When reading an e-book, move your
finger in a downward motion on the
touch panel.
Single tap
Tap once to select an item.
Next page
When reading an e-book, move your
finger from right to left on the touch
panel.
Previous page
When reading an e-book, move your
finger from left to right on the touch
panel.
Accessing e-books
Reading an e-book
To read an e-book:
1.From the home screen, tap Books.
2.From the menu at the bottom of the screen, tap Title, Author, Added Time,
Read Time or Tag to select an
e-book under these lists.
NOTES:
•Added Time contains e-books that are sorted based on the time that a certain
e-book is copied or downloaded to your device.
•Read Time contains e-books that are sorted based on the time that a certain
e-book was last read on your device.
•Tag contains e-books that are sorted based on types or categories. Refer to the
next section Tagging a book for more details.
3.Do any of the following:
•Press the Page up / Page down keys ( / ) to go to the next page or go
back to the previous page.
• Tap Rotate to change the page orientation.
• Tap Zoom and select an option from the Zoom menu list.
NOTES:
•You may highlight words or lines and write annotations while reading an
e-book. For more details, refer to the next sections.
You may use the Go to function to jump or go to a specific page in an open
e-book. For more details, refer to the section Using the Go to, Import, and
Export functions.
Annotating an e-book
Your device allows you to annotate or write notes about certain lines on pages in
an e-book.
Annotating an e-book
To annotate an e-book:
1.From the open e-book, press the Function key on your device to display the
function bar.
2.From the Function bar, tap Annotation.
3.On the e-book, tap the line that you want to annotate.
4.Tap the annotation icon at the left side of the line that you tapped.
5.Use the virtual keyboard to write notes.
6.When done, tap Save.
NOTE: You may import or export
annotations, highlights, and bookmarks.
For more details, refer to the section
Using the Go to, Export, and Import
functions.
Viewing your annotations
To view your list of annotations:
1.From the open e-book, tap the e-book title
at the upper left of your touch panel.
2.From the Book Administrator menu,
tap Annotations to display your list of
annotations.
3.From the list, select the page that you want
to view.
Highlighting an e-book
Your device allows you to highlight words or lines on pages in an e-book.
Highlighting an e-book
To highlight an e-book:
1.From the open e-book, press the Function key on your device to display the
function bar.
2.From the Function bar, tap Highlight.
3.To highlight a word or phrase: Tap the word or phrase you want to
highlight.
To highlight lines: Drag your finger from the start of the line, then tap your
finger at the end of the line to signify the end of the highlight.
NOTE: You may import or export annotations, highlights, and bookmarks.
For more details, refer to the section Using the Go to, Export, and Import
functions.
Viewing your highlights
To view your highlights:
1.From the open e-book, tap the e-book title
at the upper left of your touch panel.
2.From the Book Administrator menu,
tap Highlights to display your list of
highlighted words or lines.
3.From the list, tap the page that you want
to view.
Bookmarking an e-book
You can add a specific e-book to your Favorites list.
To bookmark an e-book:
1.From the home screen, tap Books to
display your list of
e-books.
2.You can bookmark an e-book in any of
these two ways:
•Bookmarking from the e-book list
a.Browse through your e-book list for the
e-book that you want to bookmark.
b.Tap one to three bookmark icons
to denote the
e-book’s favorite level.
•Bookmarking from an open e-book
a. S elect and open an e-book from your
e-book list.
b. T ap the e-book title at the upper left of
your touch panel
c. F rom the Book Administrator menu,
tap one to three bookmark icons
in Favorites to denote the
e-book’s favorite level.
NOTE: You may import or export
annotations, highlights, and bookmarks.
For more details, refer to the section
Using the Go to, Export, and Import
functions.
Using the Go to, Export, and Import
functions
Using the Go to function
Use the Go to function to jump or go to any
page in the e-book that you are reading.
To use the Go to function:
1.From an open e-book, tap the current page
number at the upper right of the touch
panel for about three seconds.
2.From the Page screen, tap the numbers to
key in the page number that you want to
go to.
3.Tap Go to to go to your preferred page.
Using the Export function
Use the Export function to back up an
e-book’s reading records specifically
annotations, highlights, or bookmarks to the
Export folder in your device, then copy this
folder to your computer.
NOTE: For more details, refer to the
section Copying files to or from your
device.
To use the Export function:
1.From the open e-book, tap the e-book title
at the upper left of your touch panel.
2.From the Book Administrator menu, tap
Export.
3.On the confirmation message, tap OK to
save the e-book’s reading records to the
Export folder in your device.
NOTE: You may also back up all the reading records, including reading
percentage and favorite rating, of all e-books to the Export folder in your device.
To do this, tap Setup > System Setup > Export Reading Records from the
home screen.
Using the Import function
Use the Import function to replace an e-book’s reading records specifically
annotations, highlights, or bookmarks.
To use the Import function:
1.Copy the backup files from the Export to the Import folder in your device’s
directory.
NOTE: For more details, refer to the section Copying files to or from your
device.
2.Select and open an e-book from your
e-book list.
3.From the open e-book, tap the e-book title
at the upper left of your touch panel.
4.From the Book Administrator menu, tap
Import.
5.On the confirmation message, tap OK.
Your device searches for the e-book’s
reading records from the Import folder
and replaces the e-book’s current reading
NOTE: You may also replace all the
reading records, including reading
percentage and favorite rating, of all
e-books. To do this, tap Setup > System
Setup > Import Reading Records from
the home screen.
The Text-to-Speech function
Using the Text-to-Speech function
Use the Text-to-Speech function to enable the virtual reader to read out the text
of an e-book.
To use the Text-to-Speech function:
IMPORTANT!
The Text-to-Speech function can only work on txt format files.
1.Open the e-book that you want to read.
NOTE: For more details, refer to the previous section Reading an e-book.
2.From the menu at the bottom of the screen, tap TTS.
3.Tap From beginning for the virtual reader to read from the beginning of the
book. Tap From clicking word for the virtual reader to read from the word
that you tap. Tap Pause Reading to temporarily stop the virtual reader from
reading the e-book.
NOTE: By default, the virtual reader’s reading speed and tone are set to normal.
Setting up the Text-to-Speech function
To set up the Text-to-Speech function:
1.From the home screen, tap Setup.
2.From the Setup screen, tap Text to Speech.
3.Tap the sliders to set up your preferred speed and tone settings.
Tagging an e-book
Tagging e-books provides you with an easy way to organize or group your e-books
into categories or types.
Creating a new tag
To create a new tag:
1.From the home screen, tap Books.
2.Tap to open the e-book that you want to tag.
3.Tap the book title, then tap Tag on the menu list.
4.In the Selected Tag column, tap Add.
5.Key in the name for the tag. The tag appears in the Available Tag column.
Using an available tag
To use an available tag:
1.From the home screen, tap Books.
2.Tap to open the e-book that you want to tag.
3.Tap the e-book title, then tap Tag on the menu list.
4.In the Available Tag column, tap the tag that you want to use and drag it to
the Selected Tag column. You can use multiple tags for an e-book.
Accessing News Reader
Tap News Reader to subscribe to your favorite websites and get news feeds.
Subscribing to news feeds
Subscribe to your favorite news feeds to receive news updates on your device.
To subscribe to news feeds:
1.From the home screen, tap News Reader.
2.Tap Connect to connect to a network. Your device searches for available
wireless networks.
3.From the Network Manager screen, select the network that you want to
connect to. Key in the password, if required.
IMPORTANT! Tap the password field to display the virtual keyboard. Use the
virtual keyboard to key in the network’s password.
4.In the News Reader screen, tap the URL field. The virtual keyboard appears.
5.Key in the web address. The web address is added to the list.
6.To get the latest updates, tap the news web address that you want to get the
latest news feed from.
7.Wait for a while until the news feed is displayed.
Getting connected wirelessly
Use your device’s built-in Wi-Fi capability or built-in 3G function to connect to
a wireless network or wireless hotspot. This enables you to wirelessly access
websites or Internet-related applications such as the News Reader on your device.
NOTE: Some ASUS Eee Reader models include a built-in 3G function.
Using the Wi-Fi function
To use the Wi-Fi function:
1.From the home screen, tap Setup.
2.From the Setup screen, tap Network.
3.From the Connection Manager screen,
select Wi-Fi. The device searches for
available networks.
4.From the list of networks, tap the network
that you want to connect to. Tap Refresh
to refresh the network list.
5.If required, key in the password or passkey,
then click OK.
IMPORTANT! Tap the password field
to display the virtual keyboard. Use the
virtual keyboard to key in the network’s
password.
Using the 3G function
IMPORTANT! Ensure that you subscribe to a mobile 3G service. Contact your
mobile service provider for more details about subscribing to this service.
NOTE: The built-in 3G function is included only in selected ASUS Eee Reader
models.
To use the 3G function:
1.From the home screen, tap Setup.
2.From the Setup screen, tap Network.
3.From the Connection Manager screen,
select 3G.
4.Key in the PIN code, and tap OK. Wait for
your device to connect to your 3G network
provider.
Connecting to the Internet
IMPORTANT! Ensure that you have
connected to a wireless network before
connecting to the Internet. For more
details, refer to the previous section
Getting connected wirelessly.
To connect to the Internet:
1.From the home screen, tap Web Browser.
2.Tap the URL field to display the virtual
keyboard.
3.Use the virtual keyboard to key in the URL
address of the website that you want to
visit.
Updating the firmware
IMPORTANT!
firmware.
Ensure that your device is turned off before updating the
To update the firmware:
1.Create a folder named upfw either in your microSD card or in your device and
copy all the firmware files to this folder.
IMPORTANT! Ensure that you install a microSD card into the device’s card slot
if you want to upgrade from a microSD card.
2.Connect your device’s USB adapter to a power outlet.
3.Simultaneously press the Power key and the Page up key .
4.Press the Page up key to update from the device.
Press the Page down key to update from the microSD card.
CAUTION: DO NOT remove the microSD card from your device during the
upgrading process. Doing so will cause permanent damage to your device.
5.When the upgrading process is completed, press the Page up key to reboot
the device.
6.From the home screen, tap Setup > System Setup > Language, then select
your preferred language from the list.
NOTES:
•To check the firmware version on your device, tap Setup > About from the
home screen.
•Download the latest firmware from the ASUS Support website at
http://support.asus.com/download/.
Activating your digital reader for DRM-protected files
Some e-books or digital publications that you have purchased or downloaded
online may contain Digital Rights Management (DRM) protection. You need to
activate your digital reader using an Adobe ID to access DRM-protected files.
IMPORTANT!
•Obtain a free Adobe ID from the Adobe membership website.
•Ensure that you connect to the Internet via wired connection.
To activate your digital reader for DRM-protected files:
1.From the home screen, tap Setup > Digital Rights Management.
2.Key in your Adobe ID and password.
3.When done, tap Activate Adobe ID.
4 Downloading online
IMPORTANT! Ensure that you connect to the Internet via wired connection.
Downloading from the Webstore
Webstore provides you with the list of webstores where you can browse, buy,
download e-books on your device.
To download from a webstore:
1.From the home screen, tap Setup > Web Store.
2.From the list of available webstores, select the webstore that you want to
access.
3.You may now start to browse, buy, or download e-books from your accessed
webstore.
Downloading from the Bookstore
You can download free e-books from the list of bookstores.
To download from a bookstore:
1.From the home screen, tap Setup > Bookstore.
2.From the list of available bookstores, select the bookstore that you want to
access.
3.You may now start to browse or download e-books from your accessed
bookstore.
NOTE: Some online bookstores that will be added to the list may require some
mode of payment to download e-books.
5 Accessories
Eee Reader case
Your device comes with the durable Eee Reader case for easy storage and to
protect your device from scratches and dents.
Storing your device
To store your device:
1.Open the Eee Reader case.
2.Place and secure your device into the Eee Reader case.
6FAQs
Frequently Asked Questions (FAQs)
The screen response is slow.
ASUS Eee Reader uses the e-paper (electronic paper) technology, which mimics
texts and images like on ordinary paper and does not use a backlight unlike the
LCD panel display. This allows you to comfortably read e-books or e-files on your
ASUS Eee Reader. But these features may provide a slower screen response time
than the LCD panel display.
The screen response slows down when I use my ASUS Eee Reader in cold
temperature.
A change in temperature may slow down the screen response on your ASUS Eee
Reader. Use your ASUS Eee Reader in environments with ambient temperatures
between 5oC (41oF) and 35oC (95oF).
There are some visible shadows or imprints on my ASUS Eee Reader
after some period of inactivity or when I use it in a high temperature
environment.
After some period of inactivity or in a high temperature environment, the images
or texts on your screen may partially leave some imprints or visible shadows,
which is known as “ghosting”. Press the Page up / Page down keys ( / ) to
refresh the screen.
Appendices
Notices
Federal Communications Commission Statement
This device complies with Part 15 of the FCC Rules. Operation is subject to the
following two conditions:
• This device may not cause harmful interference.
• This device must accept any interference received, including interference that
may cause undesired operation.
This equipment has been tested and found to comply with the limits for a class
B digital device, pursuant to part 15 of the FCC Rules. These limits are designed
to provide reasonable protection against harmful interference in a residential
installation.
This equipment generates, uses and can radiate radio frequency energy and, if
not installed and used in accordance with the instructions, may cause harmful
interference to radio communications. However, there is no guarantee that
interference will not occur in a particular installation. If this equipment does cause
harmful interference to radio or television reception, which can be determined
by turning the equipment off and on, the user is encouraged to try to correct the
interference by one or more of the following measures:
• Reorient or relocate the receiving antenna.
• Increase the separation between the equipment and receiver.
• Connect the equipment into an outlet on a circuit different from that to which
the receiver is connected.
• Consult the dealer or an experienced radio/TV technician for help.
CAUTION: Any changes or modifications not expressly approved by the party
responsible for compliance could void the user’s authority to operate the
equipment.
Prohibition of Co-location
This device and its antenna(s) must not be co-located or operating in conjunction
with any other antenna or transmitter.
Safety Information
To maintain compliance with FCC’s RF exposure guidelines, this equipment should
be installed and operated with minimum distance 20cm between the radiator and
your body. Use on the supplied antenna.
Declaration of Conformity for R&TTE directive 1999/5/EC
Essential requirements – Article 3
Protection requirements for health and safety – Article 3.1a
Testing for electric safety according to EN 60950-1 has been conducted. These are
considered relevant and sufficient.
Protection requirements for electromagnetic compatibility – Article 3.1b
Testing for electromagnetic compatibility according to EN 301 489-1 and EN 301
489-17 has been conducted. These are considered relevant and sufficient.
Effective use of the radio spectrum – Article 3.2
Testing for radio test suites according to EN 300 328- 2 has been conducted.
These are considered relevant and sufficient.
CE Mark Warning
This is a Class B product, in a domestic environment, this product may cause radio
interference, in which case the user may be required to take adequate measures.
NCC 警語
經型式認證合格之低功率射頻電機,非經許可,公司、商號或使用者均
不得擅自變更頻率、
加大功率或變更原設計之特性及功能。
低功率射頻電機之使用不得影響飛航安全及干擾合法通信;經發現有干
擾現象時,應立即
停用,並改善至無干擾時方得繼續使用。
前項合法通信,指依電信法規定作業之無線電通信。
低功率射頻電機須忍受合法通信或工業、科學及醫療用電波輻射性電機
設備之干擾。
REACH
Complying with the REACH (Registration, Evaluation, Authorisation, and
Restriction of Chemicals) regulatory framework, we published the chemical
substances in our products at ASUS REACH website at
http://csr.asus.com/english/index.aspx
GOST-R Certificate of Conformity (Russia)
This product complies with Russia’s GOST-R Certificate of
Conformity.
Copyright © 2010 ASUSTeK Computer Inc. All Rights Reserved.
No part of this manual, including the products and software described in it, may be reproduced,
transmitted, transcribed, stored in a retrieval system, or translated into any language in any form
or by any means, except documentation kept by the purchaser for backup purposes, without the
express written permission of ASUSTeK Computer Inc. (“ASUS”).
Product warranty or service will not be extended if: (1) the product is repaired, modified or altered,
unless such repair, modification of alteration is authorized in writing by ASUS; or (2) the serial
number of the product is defaced or missing.
ASUS PROVIDES THIS MANUAL “AS IS” WITHOUT WARRANTY OF ANY KIND, EITHER EXPRESS
OR IMPLIED, INCLUDING BUT NOT LIMITED TO THE IMPLIED WARRANTIES OR CONDITIONS
OF MERCHANTABILITY OR FITNESS FOR A PARTICULAR PURPOSE. IN NO EVENT SHALL ASUS,
ITS DIRECTORS, OFFICERS, EMPLOYEES OR AGENTS BE LIABLE FOR ANY INDIRECT, SPECIAL,
INCIDENTAL, OR CONSEQUENTIAL DAMAGES (INCLUDING DAMAGES FOR LOSS OF PROFITS,
LOSS OF BUSINESS, LOSS OF USE OR DATA, INTERRUPTION OF BUSINESS AND THE LIKE), EVEN IF
ASUS HAS BEEN ADVISED OF THE POSSIBILITY OF SUCH DAMAGES ARISING FROM ANY DEFECT
OR ERROR IN THIS MANUAL OR PRODUCT.
SPECIFICATIONS AND INFORMATION CONTAINED IN THIS MANUAL ARE FURNISHED FOR
INFORMATIONAL USE ONLY, AND ARE SUBJECT TO CHANGE AT ANY TIME WITHOUT NOTICE,
AND SHOULD NOT BE CONSTRUED AS A COMMITMENT BY ASUS. ASUS ASSUMES NO
RESPONSIBILITY OR LIABILITY FOR ANY ERRORS OR INACCURACIES THAT MAY APPEAR IN THIS
MANUAL, INCLUDING THE PRODUCTS AND SOFTWARE DESCRIBED IN IT.
Products and corporate names appearing in this manual may or may not be registered trademarks
or copyrights of their respective companies, and are used only for identification or explanation and
to the owners’ benefit, without intent to infringe.
Offer to Provide Source Code of Certain Software
This product contains copyrighted software that is licensed under the General Public License
(“GPL”), under the Lesser General Public License Version (“LGPL”) and/or other Free Open Source
Software Licenses. Such software in this product is distributed without any warranty to the extent
permitted by the applicable law. Copies of these licenses are included in this product.
Where the applicable license entitles you to the source code of such software and/or other
additional data, such data should have been shipped along with this product.
You may also download it for free from http://support.asus.com/download. The source code is
distributed WITHOUT ANY WARRANTY and licensed under the same license as the corresponding
binary/object code.
ASUSTeK is eager to duly provide complete source code as required under various Free
Open Source Software licenses. If however you encounter any problems in obtaining the full
corresponding source code we would be much obliged if you give us a notification to the email
address [email protected], stating the product and describing the problem (please do NOT send large
attachments such as source code archives etc to this email address).
ASUS Contact information
ASUSTeK COMPUTER INC. (Asia Pacific)
Address
Website
15 Li-Te Road, Peitou, Taipei, Taiwan 11259
www.asus.com.tw
Technical Support
Telephone
Support Fax
Online support
+886228943447
+886228907698
support.asus.com
ASUS COMPUTER INTERNATIONAL (America)
Address
Telephone
Fax
Website
Online support
800 Corporate Way, Fremont, CA 94539, USA
+15029550883
+15029338713
usa.asus.com
support.asus.com
ASUS COMPUTER GmbH (Germany and Austria)
Address
Fax
Website
Online contact
Harkort Str. 21-23, D-40880 Ratingen, Germany
+492102959911
www.asus.de
www.asus.de/sales
Technical Support
Telephone (Component)
Telephone
(System/Notebook/Eee/LCD)
Fax
Online support
+491805010923*
+491805010920*
+492102959911
support.asus.com
* EUR 0.14/minute from a German fixed landline; EUR 0.42/minute from a mobile phone.


![MC95XX Series Regulatory Guide [English] (P/N 72-118502](http://vs1.manualzilla.com/store/data/005760097_1-2f741b3a88b00c5f81d3f7718b174271-150x150.png)
![TC55 Regulatory Guide [English] (P/N MN000016A03 Rev. A)](http://vs1.manualzilla.com/store/data/006084957_1-919751c600ce55e2e6481c06e14d0eb9-150x150.png)