1
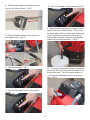
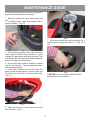
Sanitaire®
10 GALLON
Box Extractor
SC6088 Series
Part No. SC6088 Rev 2 (3/14)
Owner’s Guide
IMPORTANT
Do not return this product to the store.
Call 1-800-800-8975*
Monday - Friday 8:00 AM to 7:30 PM
and Saturday 10 AM to 6:30 PM
Central time or visit our web site,
www.sanitairevac.com for any of the
following:
• assembly problems
• replacement of broken or missing
items
• to review repair parts list
• to order replacement parts and
accessories
• to locate the nearest Sanitaire
warranty station
*En Mexico llame al 5670-6169
www.sanitairevac.com
PLEASE RETAIN
We suggest you record the model, type, and serial numbers
below. They are located on the silver rating plate on your
unit. For prompt and complete service information, always
refer to these numbers when inquiring about service.
Model & Type____________________________
Serial No._______________________________
It is also important to keep your receipt as proof of date of
purchase.
©2014 Electrolux Home Care Products Ltd.
1
X1063
WARRANTY
Your new Sanitaire unit is a high quality, precision-made product. All parts used in the manufacturing of this unit have
passed rigid quality control standards prior to assembly. The motor is warranted for 1 year from the date of purchase
as shown on your receipt / invoice. All other parts are warranted for 90 days from the date of purchase. Failures due to
misuse, neglect, abuse or normal wear and tear are not covered by this warranty. Sanitaire shall not be responsible for
any incidental or consequential damages. Please safeguard the original receipt / invoice. If you experience any problems
with your unit during the warranty period, the original receipt / invoice will act as proof of purchase. Contact Sanitaire for
any warranty inquiries. Do not return a failed unit to the place of purchase or service center. Any charges for the shipping
of a Sanitaire unit under warranty are purchaser’s responsibility unless Sanitaire requests such return in writing. This
warranty gives you specific legal rights, and you may also have other rights, which vary from state to state. There are no
warranties, express or implied, written or verbal, which extend beyond the description found in this manual.
GROUNDING INSTRUCTIONS
This appliance must be grounded If it should malfunction or breakdown, grounding provides a path
of least resistance for electric current to reduce the risk of electric shock. This appliance is equipped
with a cord having an equipment grounding conductor and grounding plug. The plug must be inserted
into an appropriate outlet that is properly installed and grounded in accordance with all local codes
and ordinances.
WARNING - Improper connection of the equipment grounding conductor can result in a risk of
electric shock. Check with a qualified electrician or service person if you are in doubt as to whether
the outlet is properly grounded. Do not modify the plug provided with the appliance, if it will not fit the
outlet, have a proper outlet installed by a qualified electrician.
This appliance is for use on a nominal 120-volt circuit and has a grounding attachment plug that looks
like the plug illustrated in sketch (A). Make sure that the appliance is connected to an outlet having
the same configuration as the plug. No adaptor should be used with this appliance.
2
SAFETY INSTRUCTIONS & WARNINGS
IMPORTANT SAFETY INSTRUCTIONS
READ AND UNDERSTAND ALL INSTRUCTIONS BEFORE USING THIS UNIT
Read and understand this owner’s manual and all labels on the unit before operating. Safety is a
combination of common sense,staying alert and knowing how your unit works. Use this unit only as
described in this manual. Use only manufacturer’s recommended attachments. To reduce the risk of
personal injury or damage to your unit use only Sanitaire recommended accessories
When using an electrical appliance, basic precautions should always be followed including the
following:
WARNING: TO REDUCE THE RISK OF FIRE, ELECTRICAL SHOCK OR INJURY:
• Do not run the unit unattended
• WARNING - To reduce the risk of Electrical Shock - Use indoors only.
• WARNING - To Reduce the Risk of Fire - Do not use a flammable or combustible liquid to clean a
floor.
• Do not use this unit near flammable liquids, gases, or explosive vapors like gasoline or other fuels,
lighter fluids, cleaners, oil-based paints, natural gas, hydrogen, or explosive dusts like coal dust,
magnesium dust, grain dust, or gun powder. Sparks inside the motor can ignite flammable vapors
or dust.
• Keep the cord away from heated surfaces.
• Do not expose to rain. Store indoors in an area above 32°F where the machine will not freeze.
• Do not unplug by pulling on cord. To unplug, grasp the plug not the cord.
• Do not use with damaged cord, plug, or other parts.
• If the unit is not working as it should, has been dropped, damaged, left outdoors, or dropped into
water, return it to a service center.
• Do not pull or carry by the cord, use the cord as a handle, close a door on a cord, or pull cord
around sharp edges or corners.
• Do not run the unit over the cord.
• Do not handle the plug or the unit with wet hands.
• To reduce the risk of health hazards from vapors or dusts, do not vacuum toxic materials.
• Do not store near hazardous materials.
• Do not use the unit with damaged filters or without the filters installed.
• Do not allow it be used as a toy. Close attention is necessary when used by or near children.
• To reduce the risk of injury from accidental starting, unplug power cord before cleaning, making
adjustments or repairs.
• Do not leave the unit unattended when plugged in. Unplug from wall outlet when not in use and
before servicing.
• Turn off the all controls before unplugging.
• Do not put any object into ventilation openings. Do not operate with any ventilation openings
blocked; keep free of dust, lint, hair or anything that may reduce air flow.
• Keep hair, loose clothing, fingers and all parts of the body way from openings and moving parts.
• To reduce the risk of falls, use extra care when using the unit on stairs.
• Do not pick up flammable or combustible liquids, such as gasoline, or use in areas where they
may be present.
• Do not pick up hot ashes, coals, toxic, flammable or other hazardous materials.
• If the machine tips over during use, shut it off immediately and set it upright and wait for the motor
to stop completely.
• Do not use the unit without the ball float and cage in place
SAVE THIS MANUAL FOR FUTURE REFERENCE
3
EXTENSION CORDS
When using an extension cord with your unit, refer to the following table to determine the required
A.W.G. wire size. Before using the cleaner make sure the power cord and extension cord are in good
working condition. Make repairs or replacements before using the carpet extractor.
Only use extension cords that are rated for outdoor use.
Length of Extension Cord
25 Feet
50 Feet
100 Feet
150 Feet
7.5 Meter
15.25 Meter
30.5 Meter
45.7 Meter
A.W.G. Wire Size
18
16
16
14
18
16
14
12
16
16
14
12
14
12
Not recommended
110V-120V
Amps
0-6
7-10
11-12
13-16
GENERAL INSTRUCTIONS
Shipping and Damage
This equipment is thoroughly inspected, tested, and packaged to provide equipment in good
operating condition. It is beyond our control after the equipment is turned over to a freight carrier.
The freight carrier received and signed for the equipment in good condition. Consequently, it is
important to protect your interest by carefully complying with the following instructions:
Please inspect your cartons for any damage (including concealed damage) that might have occurred
during shipment. Any damage is the responsibility of the freight carrier and should be reported to the
freight carrier immediately. It is your responsibility to issue a claim and to receive compensation from
the freight carrier for any damage done in transit. Damage of this sort is not covered under warranty.
Follow these step-by-step instructions to ensure proper operating performance.
1. Fill up the fresh water tank with tap water
3. Attach two power cords, provided, to each
that is 120-135° F (49-57° C) and approved
pigtail cord located on the lower backside of
carpet cleaning chemical, if you are not prethe unit. Each pigtail cord is labeled. One pigtail
spraying your chemical on the carpet. (Fig 1)
cord supplies power to the vacuum motor and
pump. The other pigtail cord supplies power to
the heater. If you do not need to use the heater
do not plug in the pigtail. (Fig 2)
1
2
3
4
Fig 1
2. Add de-foamer solution to the recovery
tank per the de-foamer manufacturer’s instructions.
Fig 2
4
4. Assemble the wand by sliding the top portion into the lower portion. (Fig 3)
8. Turn on the heater. Begin cleaning. (Fig 7)
Fig 7
9. Empty the recovery tank by using the drain
hose on the front of the machine. Do not use
the same pail to fill the solution tank as this can
result in putting dirt and grit into the solution
line that can plug filters, orifices, and degrade system (do not reuse solution). (Fig 8)
Fig 3
5. Attach the hose system to the unit and to
your carpet wand. (Fig 4)
Fig 4
Fig 8
6. Turn on the pump. (Fig 5)
10. To empty solution tank, detach the vacuum
hose from the end of the wand and insert it into
the solution tank. Turn the vacuum switch to
“on” position and transfer solution to recovery
tank. (Fig 9)
Fig 5
7. Turn vacuum switch to the “on” position.
(Fig 6)
Fig 9
Fig 6
5
MAINTENANCE GUIDE
To receive reliable service from this equipment,
regular daily maintenance is required.
1. Keep the equipment clean, both inside and
out.
2. Lubricate brass quick disconnects with a
quality lubricant. (Fig 10)
Fig 12
7. At the end of each day, run the vacuum for 3
minutes with lid open and filter off. (Figs 12 &
13)
Fig 10
3. Flush solution systems after use with clear,
clean water. (A white vinegar solution of 1 part
vinegar to 8 parts water may also be used). This
will counter-act hard water and alkaline deposits
and aid in keeping orifices clean.
4. Do not allow fluid, either in solution or waste
tank, to sit overnight. The unit should be emptied and cleaned daily.
5. Clean the strainer in the solution tank, the
filters on the vacuum stack in vacuum tank, and
all lint filters in the inlet or vacuum tanks daily. (Fig 11)
Fig 13
CAUTION - Do not operate without the filter
and ball float valve in place.
Fig 11
6. When the unit is not in use, leave the vacuum
tank lid open. (Fig 11)
6
STORAGE OF EQUIPMENT
1. Store extractor indoors in dry area.
2. Recovery and solution tank should be empty and clean when the extractor is not in use.
3. Leave the recovery lid and dump valve open to air out the recovery tank.
4. Do not store in freezing temperature.
5. A small amount of windshield washer fluid may be left in the pump and internal solution line for
protection against freezing.
WARNINGS
1. Do not use citrus-based (D-Limonene) cleaners in this machine.
2. The use of any chemicals with abrasive additives voids the warranty.
3. Do not use water in excess of 140° F (62° C) through the pump system.
4. Failure to comply with the above warnings instructions will void the warranty.
TROUBLESHOOTING
NO ELECTRICAL POWER
SOLUTION:
1) Replace.
2) Turn circuit breaker on or replace fuse
Unplug any equipment using the same circuit.
CAUSE:
1) Defective power cord
2) Circuit breaker off or blown fuse
INTERMITTENT POWER TO MOTORS
CAUSE:
1) Faulty electrical cable.
2) Defective switches.
3) Loose or dirty terminals
SOLUTION:
1) Replace
2) Replace
3) Replace or clean
LITTLE OR NO VACUUM AT WAND
CAUSE:
1) Defective vacuum hose
2) Kinks in Vacuum hose
3) Vacuum hose disconnected
SOLUTION:
1) Replace
2) Straighten hose
3) Check external and internal hose connections
7
LOW VACUUM AT THE MACHINE
CAUSE:
1) Drain hose open
2) Lint screen clogged
3) Damaged recovery tank
4) Clogged vacuum motor exhaust port
CAUSE:
1) Faulty vacuum motor
2) Float activated
SOLUTION:
1) Close drain hose
2) Clean
3) Replace
4) Clean
MOTOR RUNNING AND NO VACUUM
SOLUTION:
1) Replace
2) Empty tank or clean float cage
PREMATURE FLOAT ACTIVATION OR FAILURE OF FLOAT TO RELEASE
CAUSE:
1) Dirty or clogged float cage.
2) Float coated with detergent or other debris
3) Float cage slightly out of round
SOLUTION:
1) Remove and clean float cage.
2) Clean and rinse float
3) Carefully bend float cage by squeezing by
hand
FOAM/DIRTY SOLUTION COMING OUT OF VACUUM EXHAUST PORT
CAUSE:
1) Foam from carpet bypassing float.
SOLUTION:
1) Add additional de-foamer.
NO SPRAY FROM JETS
CAUSE:
1) Clogged or faulty solution control valve
2) Clogged or faulty quick disconnect
SOLUTION:
1) Check valve for debris
2) Depress plunger on solution hose quick
disconnect on against inside wall of solution
tank housing. If solution is flowing at this
point, the system is O.K. If no solution flows, check the quick disconnect for lint and other foreign matter.
3) Replace with diaphragm repair kit.
4) Clean jets on wand or tool
3) Punctured pump diaphragm.
4) Clogged jets
UNEVEN SPRAY FROM JETS
CAUSE:
1) Clogged strainer in solution tank.
2) Clogged jets.
SOLUTION:
1) Remove debris.
2) Remove and clean
LEAKING OR STUCK SOLUTION VALVE
CAUSE:
1) Foreign material in valve.
2) Loose brass hex nut.
3) Worn valve or seals.
SOLUTION:
1) Clean and replace.
2) Reseal hex and plug.
3) Replace worn parts.
PUMP MOTOR NOT WORKING
CAUSE:
1) Loose wiring.
2) Defective pump pressure switch.
3) Motor burned out.
SOLUTION:
1) Tighten wiring.
2) Replace switch.
3) Replace.
8
LOW PUMP PRESSURE
CAUSE:
1) Clogged strained in solution tank
2) Punctured pump diaphragm
3) Defective rectifier or motor
SOLUTION:
1) Clean and replace.
2) Replace.
3) Replace.
PUMP PRESSURE VARIES
CAUSE:
1) Defective pump.
SOLUTION:
1) Replace pressure control switch.
9