1
ENGLISH
ESPAÑOL
Canon Inkjet Photo All-In-One
Equipo multifunción fotográfico Canon Inkjet
series
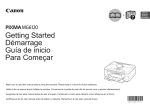
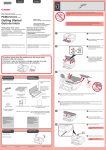
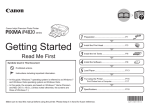
Getting Started
Read Me First
Guía de inicio
Léame en primer lugar
Make sure to read this manual before using the machine. Please keep it in hand for future reference.
Asegúrese de leer este manual antes de usar el equipo. Consérvelo a mano para utilizarlo como referencia en el futuro.
■ Contents
1 Preparation P.4
■ Symbols Used in This
Document
Prohibited actions.
4 Align the Print Head P.14
5 Load Paper P.16
6 Select Connection Method P.19
7 Install the Software (USB Connection)
P.20
8 Wireless Setup P.26
Wireless Setup Using Easy Setup P.27
Wireless Setup Using WPS (Wi-Fi Protected
Setup) P.31
Wireless Setup Using WCN (Windows
Connect Now) P.34
Instructions including important
information.
• In this guide, Windows 7 operating system is
referred to as Windows 7 and Windows Vista
operating system as Windows Vista.
• In this guide, the screens are based on
Windows 7 Home Premium and Mac OS X
v.10.6.x. (Unless noted otherwise, the screens
are those of Windows 7.)
Print Photos from a Memory Card P.50
Try Copying P.53
Print Photos from a Computer P.55
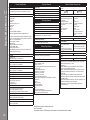
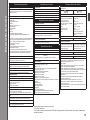
13 Specifications P.56
Acciones prohibidas.
5 Carga del papel P.16
6 Selección del método de conexión P.19
7 Instalación del software (Conexión USB)
P.20
8 Configuración inalámbrica P.26
Configuración inalámbrica mediante
Configuración fácil (Easy Setup) P.27
Configuración inalámbrica mediante WPS
(Wi-Fi Protected Setup) P.31
Configuración inalámbrica mediante WCN
(Windows Connect Now) P.34
Instrucciones que incluyen
información importante.
• En esta guía, para referirse al sistema operativo
Windows 7 se utiliza el término Windows 7 y para
referirse al sistema operativo Windows Vista se
utiliza el término Windows Vista.
• Las pantallas de esta guía se basan en
Windows 7 Home Premium y Mac OS X v.10.6.x.
(A menos que se indique lo contrario, las
pantallas serán de Windows 7).
9 Conexión por cable P.35
10 Instalación del software (Conexión
de red) P.38
11 Use from Additional Computers P.48
4 Alineación del cabezal de impresión P.14
Install the Software P.39
Registration (Macintosh) P.42
Information P.45
12 Try Using the Machine P.49
3 Instalación de los depósitos de tinta P.11
9 Wired Setup P.35
10 Install the Software (Network
Connection) P.38
1 Preparativos P.4
■ Símbolos utilizados en este
documento
2 Instalación del cabezal de impresión P.8
2 Install the Print Head P.8
3 Install the Ink Tanks P.11
■ Contenido
• Microsoft is a registered trademark of Microsoft
Corporation.
• Windows is a trademark or registered trademark
of Microsoft Corporation in the U.S. and/or other
countries.
• Windows Vista is a trademark or registered
trademark of Microsoft Corporation in the U.S.
and/or other countries.
• Internet Explorer is a trademark or registered
trademark of Microsoft Corporation in the U.S.
and/or other countries.
• Macintosh, Mac, and AirPort are trademarks
of Apple Inc., registered in the U.S. and other
countries.
• Bonjour is a trademark of Apple Inc., registered
in the U.S. and other countries.
Model Number: K10360 (MG6120)
Instalación del software P.39
Registro (Macintosh) P.42
Información P.45
11 Uso desde ordenadores adicionales P.48
12 Pruebe el equipo P.49
Impresión de fotos desde una tarjeta de
memoria P.50
Realice una prueba de copia P.53
Impresión de fotografías desde un ordenador P.55
13 Especificaciones P.57
• Microsoft es una marca comercial registrada
de Microsoft Corporation.
• Windows es una marca comercial o una marca
comercial registrada de Microsoft Corporation
en EE UU y/u otros países.
• Windows Vista es una marca comercial o una
marca comercial registrada de Microsoft
Corporation en EE UU y/u otros países.
• Internet Explorer es una marca comercial
o una marca comercial registrada de Microsoft
Corporation en EE UU y/u otros países.
• Macintosh, Mac y AirPort son marcas
comerciales de Apple Inc., registradas en
EE UU y en otros países.
• Bonjour es una marca comercial de Apple Inc.,
registrada en EE UU y en otros países.
Número de modelo: K10360 (MG6120)
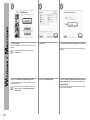
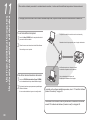
■ Machine Installation
Flow
Network Connection
Conexión de red
USB Connection
■ Flujo de instalación
del equipo
Conexión USB
Wireless Connection
Wired Connection
Conexión inalámbrica
Conexión por cable
Using from Additional
Computers
(when the machine is already
connected to the network and you
want to add computers from which
to use the machine)
Machine Preparation
P.3 – 18
Preparación del equipo
Machine Wireless Setup
Machine Wired Setup
Configuración inalámbrica
del equipo
Conexión por cable
del equipo
P.19, 26 – 34
Uso desde ordenadores
adicionales
(cuando el equipo ya está
conectado a la red y se quieren
añadir ordenadores desde los
cuales utilizarlo)
P.19, 35 – 37
Software Installation
Software Installation
Software Installation
Instalación del
software
Instalación del software
Instalación del software
P.19 – 25
P.38 – 47
Installation Complete
Try Using the Machine
Instalación finalizada
Pruebe el equipo
P.48, 38 – 47
P.49 – 55
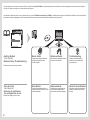
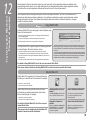
On-screen manuals can be viewed on a computer. They are included on the Setup CD-ROM and are installed during the software installation. For some languages parts of the manual may be displayed
in English. For details on opening the on-screen manuals, refer to page 49.
Los manuales en pantalla se pueden ver en un ordenador. Se incluyen en el CD-ROM de instalación (Setup CD-ROM) y se instalan durante el proceso de instalación del software. Quizá en algunos idiomas
haya partes del manual que aparezcan en inglés. Para obtener más información sobre cómo abrir los manuales en pantalla, consulte la página 49.
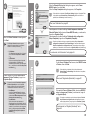
• Getting Started
(this manual)
• Network Setup Troubleshooting
Basic Guide
Describes basic operations and media,
and gives an introduction to other
functions available.
Advanced Guide
Troubleshooting
Guía avanzada
Solución de problemas
Describes various operating procedures
to make full use of machine.
Describes troubleshooting tips for
problems you may encounter when
using the machine.
Describes how to set up and use your machine.
• Guía de inicio
(este manual)
• Solución de problemas
de configuración de red
Describe cómo configurar y usar el equipo.
Guía básica
Describe las operaciones básicas y los
soportes y ofrece una introducción a otras
funciones disponibles.
Describe distintos procedimientos de
funcionamiento para aprovechar al
máximo todas las funciones del equipo.
Proporciona consejos para solucionar los
problemas que puedan surgir al utilizar
el equipo.
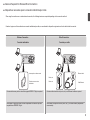
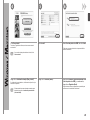
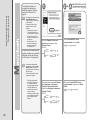
■ Devices Required for Wireless/Wired Connection
■ Dispositivos necesarios para la conexión inalámbrica/por cable
When using the machine over a wireless/wired connection, the following devices are required depending on the connection method.
Cuando el equipo se utilice mediante una conexión inalámbrica/por cable, se necesitarán los dispositivos siguientes en función del método de conexión.
Wireless Connection
Wired Connection
Conexión inalámbrica
Conexión por cable
Access point or wireless router
Ethernet cable
Router, etc.
Punto de acceso o router
inalámbrico
Router, etc.
Cable Ethernet
A commercial access point or router that supports IEEE802.11b/g/n is required.
A commercial network device (router, etc.) and Ethernet cable are required.
Se necesita un punto de acceso o router disponibles en comercios que sea
compatible con IEEE802.11b/g/n.
Se necesita un dispositivo de red (router, etc.) y un cable Ethernet (disponibles
en comercios).
Preparation
Preparativos
1
1
A
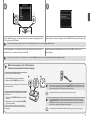
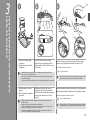
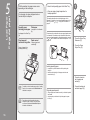
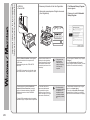
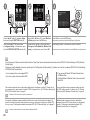
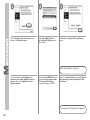
• Do not install the machine where an object may fall on it. In addition,
do not place any object on the top of the machine. It may fall into the
machine when opening covers, resulting in malfunction.
• Paper Output Tray (A) automatically opens when printing starts.
Do not place anything in front of the Paper Output Tray.
Remove all orange tape and protective materials from the inside and
outside of the machine.
• No instale el equipo en ningún lugar en el que le pudiera caer un
objeto encima. Además, no coloque ningún objeto encima del equipo.
Podría caer en el mismo al abrir las tapas, provocando un fallo de
funcionamiento.
• La bandeja de salida del papel (A) se abre automáticamente cuando
comienza la impresión.
No coloque nada frente a la bandeja de salida del papel.
Retire todas las cintas naranjas y todos los materiales protectores
del interior y el exterior del equipo.
• The tape and protective materials may differ in shape and position from what
they actually are.
• La forma y la posición de la cinta y los materiales protectores pueden variar
respecto a las reales.
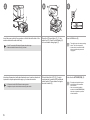
2
A
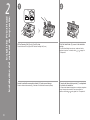
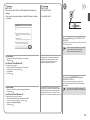
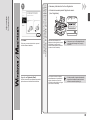
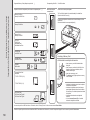
Make sure all the following items are supplied.
Some accessories (1) are stored within the Paper Output Tray (A). Open the Paper Output Tray to remove them.
1.Print Head
2.Ink tanks (6: M, BK, GY, PGBK, C, Y)
3.Manuals
4.Power cord
5.Setup CD-ROM (containing the drivers, applications and on-screen manuals)
6.Matte Photo Paper MP-101 (for Automatic Print Head Alignment)
7.Other documents
• A USB cable is necessary to connect the machine with
your computer (USB connection only).
Compruebe que no falta ninguno de los elementos siguientes.
Algunos accesorios (1) se guardan dentro de la bandeja de salida del papel (A). Abra la bandeja de salida del papel para extraerlos.
1.Cabezal de impresión
2.Depósitos de tinta (6: M, BK, GY, PGBK, C, Y)
3.Manuales
4.Cable de alimentación
5.CD-ROM de instalación (Setup CD-ROM) (contiene los controladores, las aplicaciones y los manuales en pantalla)
6.Papel Fotográfico Mate (Matte Photo Paper) MP-101 (para la alineación automática del cabezal de impresión)
7.Otros documentos
• Se necesita un cable USB para conectar el equipo
al ordenador (sólo mediante conexión USB).
3
4
5
C
E
B
D
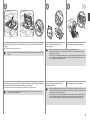
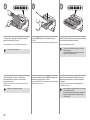
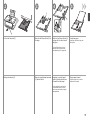
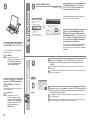
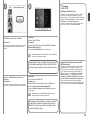
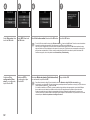
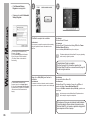
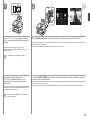
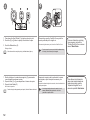
Insert the power cord into the connector on the left side at the back of the
machine and into the wall outlet firmly.
Press the LCD open button (C) (1), then
adjust the LCD (Liquid Crystal Display) (D)
to a comfortable viewing angle (2).
Press the ON button (E).
Pulse el botón Abrir LCD (C) (1), ajuste
a continuación la pantalla LCD (pantalla de
cristal líquido) (D) para obtener un ángulo
de visión cómodo (2).
Pulse el botón ACTIVADO (ON) (E).
• Do NOT connect the USB cable or Ethernet cable at this stage.
• Make sure that the Document Cover (B) is closed.
Introduzca firmemente el cable de alimentación en el conector situado a la
izquierda de la parte posterior del equipo y a la toma de corriente.
• NO conecte el cable USB o Ethernet en este momento.
• Asegúrese de que la cubierta de documentos (B) esté cerrada.
• The machine may make some operating
noises. This is normal operation.
• It takes about 4 seconds for the ON
button to work after the power cord
is plugged in.
• El equipo puede producir algunos
ruidos durante el funcionamiento.
Esto es normal.
• Una vez conectado el cable de
corriente, el botón ACTIVADO (ON)
tarda unos 4 segundos en ponerse
en funcionamiento.
6
7
F
G
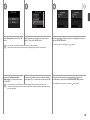
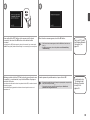
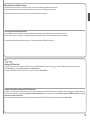
Use the { or } button (F) on the Operation Panel to select the language for the
LCD, then touch the OK button.
When the above screen is displayed, touch the OK button and go to the next step.
• If an unintended language is displayed on the LCD, touch the Back button (G) to return to the Language selection screen.
Utilice el botón { o } (F) del panel de control para seleccionar el idioma de la
pantalla LCD y, a continuación, toque el botón OK.
Cuando aparezca la pantalla anterior, toque el botón OK y continúe con el
paso siguiente.
• Si el idioma de la pantalla LCD no es el deseado, toque el botón Atrás (Back) (G) para volver a la pantalla Selección idioma (Language selection).
When it is necessary to turn off the machine
Cuando sea necesario desconectar el equipo
Be sure to follow the procedure below.
1.Press the ON button to turn off the machine.
2.Make sure that the POWER lamp (H) is not lit.
H
Operating noise may continue for up to 25 seconds until
the machine turns off.
• When removing the power plug, make sure that the POWER lamp is not lit before removing
the plug. Removing the power plug while the POWER lamp lights up or flashes may cause
drying and clogging of the Print Head, resulting in poor printing.
Asegúrese de seguir el procedimiento que se explica
a continuación.
1.Pulse el botón ACTIVADO (ON) para desconectar
el equipo.
2.Asegúrese de que la luz de encendido (POWER)
(H) no está iluminada.
• The specification of the power cord differs for each country or region.
Hasta que el equipo se apague, se podrán seguir
escuchando ruidos de funcionamiento durante hasta
25 segundos.
• Antes de retirar el cable de alimentación, asegúrese de que no esté iluminada la luz de
encendido (POWER). Si se retira el cable de alimentación mientras la luz de encendido
(POWER) está iluminada o parpadea, el cabezal de impresión se podría secar y obstruir,
teniendo como resultado una impresión de mala calidad.
• Las especificaciones del cable de alimentación varían según el país o la región de uso.
Install the Print Head
Instalación del cabezal de impresión
2
1
2
B
B
A
C
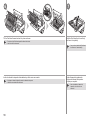
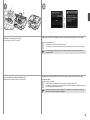
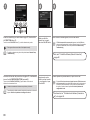
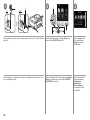
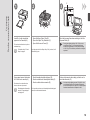
Lift the Scanning Unit (Cover) (A) until it stops.
Close the Document Cover (B) and lift it with the Scanning Unit (Cover).
Levante la unidad de escaneado (cubierta) (A) hasta que se detenga.
Cierre la cubierta de documentos (B) y levántela con la unidad de escaneado (cubierta).
The Print Head Holder (C) moves to the installation
position.
If the Print Head Holder does not move, make sure that the
machine is turned on. For details, refer to
to
on page 6 in
“1 Preparation”.
El soporte del cabezal de impresión (C) se desplazará
a la posición de instalación.
Si el soporte del cabezal de impresión no se desplaza, asegúrese
de que el equipo esté encendido. Para conocer todos los
detalles, consulte de
a
en la página 6 de "1 Preparativos".
3
4
5
G
F
D
E
Firmly lift the part (D) of the Print Head Lock Lever in the Print Head Holder until
it stops.
The Print Head Lock Lever may feel heavy.
• Do not touch the inside of the Print Head Holder (E). The machine may not print properly if you
touch it.
Levante firmemente la parte (D) de la palanca de bloqueo del cabezal de impresión
del soporte del cabezal de impresión hasta que se detenga.
La palanca de bloqueo del cabezal de impresión puede ofrecer cierta resistencia.
• No toque el interior del soporte del cabezal de impresión (E). Si se toca, es posible que el
equipo no imprima correctamente.
Remove the Print Head from the
silver package.
Remove the orange protective cap.
• Handle the Print Head carefully. Do not drop or apply excessive pressure to it.
• Do not touch the inside (F) or metal parts (G) of the Print Head. The machine may not print
properly if you touch them.
• There may be some transparent or light blue ink on the inside of the bag the Print Head comes
in, or the inside of the protective cap - this has no effect on print quality. Be careful not to get
ink on yourself when handling these items.
Retire el cabezal de impresión del
embalaje plateado.
Retire la tapa protectora naranja.
• Maneje el cabezal de impresión con cuidado. No lo deje caer ni le aplique una presión excesiva.
• No toque el interior (F) ni las piezas metálicas (G) del cabezal de impresión. Si los toca, puede
que el equipo no imprima correctamente.
• Puede haber un poco de tinta transparente o de color azul claro dentro de la bolsa en la que
viene el cabezal de impresión o dentro de la tapa protectora: esto no afecta a la calidad de
impresión. Tenga cuidado para no mancharse de tinta al manipular estos componentes.
6
7
Tilt the Print Head forward and set it in place as shown.
• Do not knock the Print Head against the sides of the holder.
• Install in a well-lit environment.
Incline el cabezal de impresión hacia adelante y sitúelo como se muestra.
• No golpee el cabezal de impresión contra los laterales del soporte.
• Instálelo en un ambiente bien iluminado.
10
Hold the Print Head Lock Lever firmly
and lower it completely.
• Once you have installed the Print Head,
do not remove it unnecessarily.
Sujete firmemente la palanca de
bloqueo del cabezal de impresión
y bájela por completo.
• Una vez instalado el cabezal de
impresión, no lo retire si no es
necesario.
Install the Ink Tanks
Instalación de los depósitos de tinta
3
1
2
A
3
B
C
D
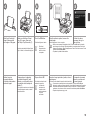
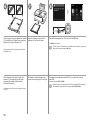
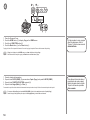
1. Remove the orange tape
completely.
2. Remove the protective film
completely.
Hold the ink tank with the orange
protective cap (A) pointing up while
being careful not to block the L-shape
air hole (B).
• Handle the ink tanks carefully. Do not drop or apply excessive pressure to them.
• Be sure to use the supplied ink tanks.
• If the orange tape remains on the L-shape air hole, ink may splash or the machine
may not print properly.
• If you push the sides of the ink tank with the L-shape air hole blocked, ink may splash.
1. Retire totalmente la cinta
naranja.
2. Retire totalmente la película
protectora.
Mantenga el depósito de tinta con
la tapa protectora (A) naranja hacia
arriba teniendo cuidado de no bloquear
el orificio de ventilación con forma
de L (B).
• Maneje los depósitos de tinta con cuidado. No los deje caer ni les aplique una
presión excesiva.
• Asegúrese de usar los depósitos de tinta suministrados.
• Si queda cinta naranja en el orificio de ventilación con forma de L, la tinta podría
salpicar o el equipo podría no imprimir correctamente.
• Si se aprietan los laterales de un depósito de tinta con el orificio de ventilación
en forma de L bloqueado, la tinta podría salpicar.
Hold the ink tank by its sides and slowly twist the orange
protective cap 90 degrees horizontally to remove it off.
Do not push the sides of the ink tank.
Go to the next page.
• Do not touch the inside (C) of the orange protective cap or the open
ink port (D). The ink may stain your hands if you touch them.
Sujete el depósito de tinta por los laterales y gire lentamente la
tapa protectora naranja 90 grados en horizontal para retirarla.
No apriete los laterales del depósito de tinta.
Vaya a la siguiente página.
• No toque el interior (C) de la tapa protectora naranja ni la salida de
tinta abierta (D). Si los toca, podría mancharse las manos de tinta.
11
4
5
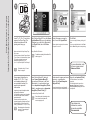
Tilt the ink tank, then insert it under the label and
against the back end of the slot.
Make sure that the color of the label matches the ink tank.
Press the PUSH mark on the ink tank firmly until
it clicks.
When the installation is completed properly, the Ink lamp lights red.
Asegúrese de que el color de la etiqueta coincide con el del
depósito de tinta.
• Instálelo en un entorno bien iluminado.
12
Install all the other ink tanks in the same way according
to the color order indicated on the label.
Make sure all the Ink lamps light red.
• Once you have installed the ink tanks, do not remove
them unnecessarily.
• If the Print Head Holder moves to the right, close and
reopen the Scanning Unit (Cover).
• Install in a well-lit environment.
Incline el depósito de tinta y, a continuación,
introdúzcalo bajo la etiqueta y contra la parte
trasera de la ranura.
6
Presione firmemente la marca PUSH del depósito de
tinta hasta que haga clic en su lugar.
Cuando la instalación finaliza correctamente, la lámpara de tinta
(Ink) se ilumina de color rojo.
Instale los demás depósitos de tinta de la misma
manera según el orden de los colores indicado en
la etiqueta.
Asegúrese de que todas las lámparas de tinta (Ink) están
encendidas de color rojo.
• Una vez instalados los depósitos de tinta, no los extraiga
a menos que sea necesario.
• Si el soporte del cabezal de impresión se desplaza hacia
la derecha, cierre la unidad de escaneado (cubierta)
y vuelva a abrirla.
7
8
F
E
Close the Scanning Unit (Cover) (E).
Make sure the Inner Cover (F) is closed.
Make sure that the LCD changes as shown in the illustration and go to the next step.
Do not touch the OK button yet.
• It takes about 5 minutes before the LCD changes.
• The machine may make some operating noises when preparing to print. This is normal operation.
• If an error message is displayed on the LCD, make sure that the Print Head and the ink tanks are
correctly installed.
Cierre la unidad de escaneado (cubierta) (E).
Asegúrese de que la cubierta interior (F) esté cerrada.
Asegúrese de que la pantalla LCD cambie como se muestra en la ilustración y vaya
al siguiente paso.
No toque todavía el botón OK.
• Deberán transcurrir alrededor de 5 minutos para que cambie la pantalla LCD.
• Es posible que el equipo emita ciertos ruidos de funcionamiento mientras se prepara para imprimir.
Esto es parte del funcionamiento normal.
• Si aparece un mensaje de error en la pantalla LCD, asegúrese de que el cabezal de impresión y los
depósitos de tinta estén correctamente instalados.
13
Align the Print Head
Alineación del cabezal de impresión
4
14
1
2
3
A
D
C
B
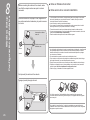
Prepare the Paper Support (A).
1. Open it.
2. Withdraw it upwards.
3. Tilt it back.
Move the Paper Guides
(B) to both edges.
Load a sheet of supplied specialty paper (Matte Photo Paper MP-101)
in the Rear Tray (C).
Load paper in portrait orientation so that the cut corner (D) is at the top right.
• Be sure to use MP-101 for Print Head Alignment.
Prepare el soporte del papel (A).
1. Ábralo.
2. Tire de él hacia arriba.
3. Échelo hacia atrás.
Desplace las guías del
papel (B) hasta ambos
bordes.
Cargue una hoja del papel especial suministrado (Papel Fotográfico
Mate (Matte Photo Paper) MP-101) en la bandeja posterior (C).
Cargue el papel con orientación vertical de manera que la esquina del corte (D)
esté en la parte superior derecha.
• Asegúrese de utilizar el papel MP-101 para la alineación del cabezal
de impresión.
4
5
6
F
Slide the left and right
Paper Guides against
both edges of the paper.
8
E
Make sure the Paper Output
Tray (E) is open, then open
the Output Tray Extension (F).
If printing starts while the Paper Output
Tray is closed, it will automatically open.
Deslice las guías
de papel izquierda
y derecha contra ambos
bordes del papel.
7
Compruebe que la bandeja
de salida del papel (E) está
abierta y, a continuación, abra
la extensión de la bandeja de
salida (F).
Si la impresión comienza con la bandeja
de salida del papel cerrada, se abrirá
automáticamente.
Touch the OK button.
Print Head Alignment starts.
• Print Head
Alignment takes
about 4 minutes
to complete.
Toque el botón OK.
Se iniciará la alineación del
cabezal de impresión.
• La alineación
del cabezal de
impresión tarda
aproximadamente
4 minutos
en finalizar.
When the pattern is printed, remove the
printed paper.
Confirm the above
message, then go to
the next step.
Cuando se haya imprimido el patrón, retire el
papel impreso.
Compruebe el mensaje
anterior y continúe con
el paso siguiente.
Print Head Alignment is now complete.
• When an error message is displayed on the LCD, touch the OK button to clear the
error, then go to the next step. After the installation is complete, perform Print Head
Alignment by referring to “When Printing Becomes Faint or Colors Are Incorrect” in the
on-screen manual: Basic Guide.
• The pattern is printed in black and blue.
La alineación del cabezal de impresión habrá concluido.
• Si se muestra un mensaje de error en la pantalla LCD, toque el botón OK para
eliminarlo y continúe con el paso siguiente. Cuando finalice la instalación, lleve acabo
la alineación del cabezal de impresión tal como se explica en “Cuando la impresión
es borrosa o los colores no son los correctos” del manual en pantalla: Guía básica.
• El patrón se imprime en negro y azul.
15
Load Paper
Carga del papel
5
With the machine, the paper source varies
depending on the media type.
Con el equipo, el origen del papel varía en
función del tipo de soporte.
□ How to load specialty paper in the Rear Tray
□ Cómo se carga el papel especial en la
bandeja posterior
This section describes how to load plain paper in the
Cassette. For details on how to load specialty paper in the
Rear Tray, refer to
to
in “4 Align the Print Head” on
page 14.
Specialty paper
Plain paper
including photo paper Load paper in the Cassette
(B).
Load paper in the Rear Tray
(A).
Papel especial,
Papel normal
incluido el fotográfico Cargue el papel en el
En esta sección se describe cómo se carga el papel normal
en el cassette. Para obtener más información sobre cómo
se carga el papel especial en la bandeja posterior, consulte
de
a
de "4 Alineación del cabezal de impresión" en la
página 14.
cassette (B).
Cargue el papel en la
bandeja posterior (A).
1
D
E
1. Close the Output Tray
Extension (D).
2. Close the Paper
Output Tray (E).
C
A
Loading specialty paper
B
• Load paper in portrait orientation with the printing side
facing up.
• Make sure that the height of the paper stack does not
exceed the line (C).
1. Cierre la extensión
de la bandeja de
salida (D).
• For details on how to handle paper, refer to “Loading
Paper” in the on-screen manual: Basic Guide after
installation is complete.
• Para obtener más información sobre cómo
manipular el papel, consulte “Carga del papel”
en el manual en pantalla: Guía básica después
de finalizar la instalación.
16
Carga de papel especial
• Cargue el papel con orientación vertical y el lado de impresión
hacia arriba.
• Asegúrese de que la altura de la pila de papel no supere
la línea (C).
2. Cierre la bandeja de
salida del papel (E).
2
3
4
5
G
H
F
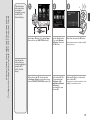
Pull out the Cassette (F).
Move the left Paper Guide (G) to
the edge.
Slide the front Paper Guide (H)
to align with the actual size of
the paper.
Load plain paper.
Load paper with the printing side
facing down.
The front Paper Guide will click
and stop when it aligns with the
corresponding mark of paper size.
Extraiga el cassette (F).
Mueva la guía del papel izquierda
(G) hasta el límite.
Desplace la guía del papel
frontal (H) para alinearla con
el tamaño real del papel.
Cargue papel normal.
Cargue el papel con la cara de
impresión hacia abajo.
La guía del papel frontal hará clic
y se detendrá cuando se alinee
con la marca del tamaño de papel
correspondiente.
17
6
7
8
I
Align the paper to the right side of the Cassette
(1), and slide the left Paper Guide completely
against the left edge of the paper (2).
Insert the Cassette slowly into the
machine until it clicks into place.
The HOME screen appears.
• The LCD will turn off if the machine is not operated for about 5 minutes. To restore the
display, touch any button except the ON button.
Make sure that the height of the paper stack does not
exceed the line (I).
Alinee el papel con el lateral derecho del
cassette (1) y desplace la guía del papel
izquierda por completo hasta el lateral
izquierdo del papel (2).
Compruebe que la altura de la pila de papel no supere
la línea (I).
18
Confirm the message on the LCD, then touch the OK button.
Introduzca el cassette despacio en el
equipo hasta que haga clic en su lugar.
Compruebe el mensaje de la pantalla LCD y, a continuación, toque el
botón OK.
Aparecerá la pantalla INICIO (HOME).
• Cuando el equipo no se utiliza durante unos 5 minutos, la pantalla LCD se desconecta.
Para restaurarla, toque cualquier botón excepto el botón ACTIVADO (ON).
Select Connection Method
Selección del método de conexión
6
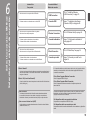
Intended Use
Uso previsto
Connection Method
Método de conexión
• Want to connect to a computer with a USB cable.
USB Connection
Go to "7 Install the Software
(USB Connection)" on page 20.
• Si desea conectar a un ordenador con un cable USB.
Conexión USB
Vaya a "7 Instalación del software
(Conexión USB)" en la página 20.
• Want to connect to computers without using cables.
• Want to use from multiple computers.
Wireless Connection
Go to "8 Wireless Setup" on page 26.
• Si desea conectar a ordenadores sin usar cables.
• Si desea utilizarlo desde varios ordenadores.
Conexión inalámbrica
Vaya a "8 Configuración inalámbrica"
en la página 26.
• Want to use from multiple computers.
• Want to connect to a computer with an Ethernet cable.
Wired Connection
Go to "9 Wired Setup" on page 35.
• Si desea utilizarlo desde varios ordenadores.
• Si desea conectarlo a un ordenador con un cable Ethernet.
Conexión por cable
Vaya a "9 Conexión por cable" en la
página 35.
What is Network?
A system to exchange information between computers by connecting them to
each other with cables or via wireless communication. The Internet and LAN
are types of networks.
What is LAN (Local Area Network)?
A type of network that connects computers to each other within a limited area
(room, building, etc.).
¿Qué es una red?
Un sistema de intercambio de información entre ordenadores mediante
la conexión de éstos entre sí con cables o a través de comunicaciones
inalámbricas. Internet y las redes de área local (LAN) son tipos de redes.
¿Qué es una red de área local (LAN)?
Un tipo de red que conecta ordenadores entre sí dentro de un área limitada
(habitación, edificio, etc.).
If it is uncertain whether your device (access point, router, etc.) supports wireless
connection or wired connection, refer to the manual supplied with the device,
or contact its manufacturer.
If Your Device Supports Wireless Connection
Check if it supports IEEE802.11b/g/n.
If Your Device Supports Wired Connection
Check if it supports simultaneous connection of multiple computers and
network devices.
Si no sabe si el dispositivo (punto de acceso, router, etc.) admite una conexión
inalámbrica o por cable, consulte el manual proporcionado con el mismo
o póngase en contacto con el fabricante.
Si el dispositivo admite una conexión inalámbrica
Compruebe si es compatible con IEEE802.11b/g/n.
Si el dispositivo admite una conexión por cable
Compruebe si admite la conexión simultánea de varios ordenadores y dispositivos
de red.
19
Install the Software (USB Connection)
Instalación del software (Conexión USB)
7
20
Do not connect the USB cable yet.
No conecte aún el cable USB.
□ For Spanish Users in the U.S.A.:
□ Para los usuarios de habla hispana en EE. UU.:
• To use the machine by connecting it to a computer, software including the
drivers needs to be copied (installed) to the computer’s hard disk. The
installation process takes about 20 minutes. (The installation time varies
depending on the computer environment or the number of application
software to be installed.)
•
•
•
•
Quit all running applications before installation.
Log on as the administrator (or a member of the Administrators group).
Do not switch users during the installation process.
Internet connection may be required during the installation. Connection
fees may apply. Consult the internet service provider.
• It may be necessary to restart your computer during the installation
process. Follow the on-screen instructions and do not remove the
Setup CD-ROM during restarting.
The installation resumes once your computer has restarted.
• For the system requirements, refer to “13 Specifications”.
Refer to the "Información adicional para usuarios españoles"
sheet to install the Spanish version of the software.
• Para poder utilizar el equipo conectado a un ordenador, se debe copiar (instalar)
el software, incluidos los controladores, en el disco duro del ordenador. El
proceso de instalación lleva unos 20 minutos. (El tiempo necesario para instalar
varía en función del entorno del ordenador o de cuánto software de aplicación
se vaya a instalar.)
• Cierre las aplicaciones que se estén ejecutando antes de la instalación.
• Inicie la sesión como administrador (o miembro del grupo de
administradores).
• No cambie de usuario durante el proceso de instalación.
• Durante la instalación, es posible que se tenga que conectar a Internet.
Esto puede implicar gastos de conexión. Consulte con el proveedor de
servicios de Internet.
• Es posible que deba reiniciar el ordenador durante el proceso de
instalación. Siga las instrucciones en pantalla y no retire el CD-ROM
de instalación (Setup CD-ROM) mientras se reinicia el equipo.
La instalación se reanudará una vez reiniciado el ordenador.
• Para obtener información sobre los requisitos del sistema, consulte
"13 Especificaciones".
Consulte la hoja "Información adicional para usuarios españoles"
para instalar la versión en español del software.
1
□ If you connect the machine via USB cable before installing the
software:
□ Easy-WebPrint EX
□ Si se conecta el equipo mediante un cable USB antes de instalar
el software:
□ Easy-WebPrint EX
A
Press the ON button (A) to TURN OFF THE
MACHINE.
Operating noise may continue for up to 25 seconds until
the machine turns off.
• Do NOT connect the USB cable to the computer
and the machine yet. If you have already
connected the cable, disconnect it now.
For Windows 7
1. Remove the USB cable connected to your computer.
2. Proceed to .
For Windows Vista/Windows XP
Easy-WebPrint EX is Web print software that
is installed on the computer when installing the
supplied software. Internet Explorer 7 or later
is required to use this software. An Internet
connection is required for installation.
This dialog box may appear.
1. Remove the USB cable connected to your computer.
If the dialog box closes, proceed to
2. Click Cancel.
3. Proceed to .
.
Pulse el botón ACTIVADO (ON) (A) para
APAGAR EL EQUIPO.
Para Windows 7
1. Quite el cable USB que conecta el equipo al ordenador.
2. Continúe con .
Para Windows Vista/Windows XP
Easy-WebPrint EX es un software de impresión
para web que se instala en el ordenador al instalar
el software incluido. Para utilizar este software es
necesario Internet Explorer 7 o posterior. Para la
instalación, es necesario estar conectado a Internet.
Hasta que el equipo se apague, se podrán seguir
escuchando ruidos de funcionamiento durante hasta
25 segundos.
• NO conecte aún el cable USB al ordenador ni al
equipo. Si ya lo ha conectado, desconéctelo ahora.
Puede aparecer este cuadro de diálogo.
1. Retire el cable USB que esté conectado al ordenador.
Si se cierra el cuadro de diálogo, continúe con
2. Haga clic en Cancelar (Cancel).
3. Continúe con .
.
21
2
3
Windows 7/Windows Vista
Windows XP
Click Run Msetup4.exe on the AutoPlay
screen, then click Yes or Continue on the
User Account Control dialog box.
If the User Account Control dialog box reappears in
following steps, click Yes or Continue.
Haga clic en Ejecutar Msetup4.exe (Run
Msetup4.exe) en la pantalla Reproducción
automática (AutoPlay) y, a continuación, haga
clic en Sí (Yes) o en Continuar (Continue) en
el cuadro de diálogo Control de cuentas de
usuario (User Account Control).
Turn on the computer, then insert the
Setup CD-ROM into the CD-ROM drive.
Si vuelve a aparecer el cuadro de diálogo Control de
cuentas de usuario (User Account Control) en los
pasos siguientes, haga clic en Sí (Yes) o en Continuar
(Continue).
If you are using Windows, the setup program
starts automatically.
For Windows
• If the program does not start
automatically, double-click the CD-ROM
icon in Computer or My Computer.
When the CD-ROM contents appear,
double-click MSETUP4.EXE.
Encienda el ordenador y, a continuación,
introduzca el CD-ROM de instalación
(Setup CD-ROM) en la unidad de
CD-ROM.
Si usa Windows, el programa de instalación se
inicia automáticamente.
Para Windows
• Si el programa no se inicia
automáticamente, haga doble clic
en el icono del CD-ROM en Equipo
(Computer) o Mi PC (My Computer).
Cuando aparezca el contenido del
CD-ROM, haga doble clic en
MSETUP4.EXE.
22
3
Double-click the Setup icon of the CD-ROM folder to proceed to the
following screen. Enter your administrator name and password, then
click OK.
If the CD-ROM folder does not open automatically, double-click the CD-ROM icon on
the desktop.
If you do not know your administrator name or password, click the help button, then follow
the on-screen instructions.
Haga doble clic en el icono Setup de la carpeta del CD-ROM para pasar a la
pantalla siguiente. Introduzca el nombre de administrador y la contraseña;
a continuación, haga clic en OK.
Si la carpeta del CD-ROM no se abre automáticamente, haga doble clic en el icono del
CD-ROM del escritorio.
Si no sabe su nombre o contraseña de administrador, haga clic en el botón de ayuda y,
a continuación, siga las instrucciones que aparezcan en pantalla.
4
5
Click Easy Install.
Click Install.
The drivers, application software, and on-screen manuals
are installed.
6
Select Use the printer via USB, then click Next.
Follow any on-screen instructions to proceed with the
software installation.
• If you want to select particular items to install, click
Custom Install.
Haga clic en Instalación simple (Easy Install).
Se instalarán los controladores, el software de aplicación y los
manuales en pantalla.
• Si desea seleccionar unos elementos concretos para
instalarlos, haga clic en Instalación personalizada
(Custom Install).
Haga clic en Instalar (Install).
Seleccione Utilizar la impresora mediante USB
(Use the printer via USB) y, a continuación,
haga clic en Siguiente (Next).
Siga las instrucciones que aparezcan en pantalla para
continuar con la instalación del software.
23
Important Information for the Installation
Información importante para la instalación
□ USB Port
□ Puerto USB
□ Necessary Information for the User Registration
□ Información necesaria para el Registro de usuario
(User Registration)
□ Si aparece la pantalla Extended
Survey Program
B
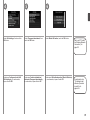
When the Printer Connection screen appears,
connect the machine to the computer with
a USB cable.
After connecting the cable, TURN ON THE
MACHINE.
When the serial number is not
displayed on the registration
screen automatically, input the
serial number located inside
the machine (as shown in the
illustration).
• If the power is on,
the Print Head
Holder will move
when the Scanning
Unit (Cover) (B)
is opened.
If you can agree to Extended Survey Program,
click Agree.
If you click Do not agree, the Extended
Survey Program will not be installed. (This has
no effect on the machine’s functionality.)
Si el número de serie no
aparece automáticamente
en la pantalla de registro,
introduzca el que viene en el
interior del equipo (en el lugar
que muestra la ilustración).
• Si está encendido,
el soporte del cabezal
de impresión se
desplazará cuando
se abra la unidad de
escaneado (cubierta)
(B).
Si desea admitir Extended Survey Program,
haga clic en Aceptar (Agree).
Si hace clic en No aceptar (Do not agree),
Extended Survey Program no se instalará.
(Esto no afecta al funcionamiento del equipo).
The USB Port is located on the right side at the
back of the machine. The lower port is for USB.
Cuando aparezca la pantalla Conexión de
impresora (Printer Connection), conecte el
equipo al ordenador mediante un cable USB.
Después de conectar el cable, ENCIENDA
EL EQUIPO.
El puerto USB se encuentra en la parte posterior
derecha del equipo. El puerto inferior es para USB.
24
□ If the Extended Survey Program
screen appears
7
8
Installing the XPS Printer Driver
In Windows 7 and Windows Vista SP1 or later, the XPS
Printer Driver can be installed additionally. To install,
perform from
in “7 Install the Software (USB Connection)”
on page 21. Click Custom Install in , then select XPS
Printer Driver in the Custom Install screen.
For details on useful functions of the XPS Printer Driver,
refer to the on-screen manual: Advanced Guide.
Click Exit to complete the installation.
For Windows
For Macintosh
It is necessary to restart the computer before scanning
using the Operation Panel on the machine for the
first time.
For Macintosh
Solution Menu EX starts.
Solution Menu EX starts when clicking OK in the Canon
Solution Menu EX dialog.
Remove the Setup CD-ROM and keep it in a safe place.
• The buttons displayed on Solution Menu EX may vary depending
on the country or region of purchase.
Congratulations! Setup is complete. Proceed to page 49
for information regarding the Solution Menu EX and the
on-screen manual or page 50 to start using the machine.
Haga clic en Salir (Exit) para finalizar la
instalación.
Para Macintosh
Es necesario reiniciar el ordenador antes de escanear
por primera vez mediante el panel de control del equipo.
Para Windows
Se iniciará Solution Menu EX.
Para Macintosh
Solution Menu EX se iniciará al hacer clic en OK en el
cuadro de diálogo Canon Solution Menu EX.
Instalación del Controlador de impresora XPS
(XPS Printer Driver)
En Windows 7 y Windows Vista SP1 o posterior, también
se puede instalar el Controlador de impresora XPS
(XPS Printer Driver). Para instalarlo, ejecute a partir de
de "7 Instalación del software (Conexión USB)" en
la página 21. Haga clic en Instalación personalizada
(Custom Install) en
y, a continuación, seleccione
Controlador de impresora XPS (XPS Printer Driver) en
la pantalla Instalación personalizada (Custom Install).
Para conocer todos los detalles sobre las prácticas
funciones del Controlador de impresora XPS (XPS Printer
Driver), consulte el manual en pantalla: Guía avanzada.
Extraiga el CD-ROM de instalación (Setup CD-ROM) y guárdelo en
un lugar seguro.
• Los botones que muestre Solution Menu EX pueden variar
en función del país o la región de adquisición.
Enhorabuena. Habrá finalizado la instalación. Consulte
la página 49 para obtener información sobre Solution
Menu EX y el manual en pantalla o la página 50 para
empezar a utilizar el equipo.
25
Wireless Setup
Configuración inalámbrica
8
Before connecting the machine to the network, make
sure that the computer and access point or router is
connected.
Antes de acceder con el equipo a la red, asegúrese de
que estén conectados el ordenador y el punto de acceso
o el router.
Access point or wireless
router, etc.
■ Notes on Wireless Connection
■ Notas acerca de la conexión inalámbrica
• The configuration, router functions, setup procedures and security settings of the network
device vary depending on your system environment. For details, refer to your device’s
instruction manual or contact its manufacturer.
• In an office setup, consult your network administrator.
• If you connect to a network that is not protected with security measures, there is a risk of
disclosing data such as your personal information to a third party.
• The machine cannot be used over a wireless and wired connection at the same time.
• If an error message appears or if you have trouble with the network connection, refer to the
printed manual: Network Setup Troubleshooting.
• Place the machine and computer on the same network segment.
Punto de acceso o router
inalámbrico, etc.
Internet
Internet
• La configuración, las funciones del router, los procedimientos de instalación y la configuración
de seguridad del dispositivo de red varían en función del entorno del sistema. Si desea
obtener más información, consulte el manual de instrucciones del dispositivo o póngase
en contacto con el fabricante.
• En una instalación corporativa, consulte con el administrador de red.
• Si se conecta a una red que no está protegida con medidas de seguridad, existe el riesgo
de divulgar información, como sus datos personales, a terceros.
• El equipo no se puede utilizar con una conexión por cable e inalámbrica al mismo tiempo.
• Si aparece un mensaje de error o si tiene problemas con la conexión de red, consulte el
manual impreso: Solución de problemas de configuración de red.
• Sitúe el equipo y el ordenador en el mismo segmento de red.
Add (connect) the machine to the network.
Agregue (conecte) el equipo a la red.
An “Ad-hoc connection,” which establishes a direct connection to the computer over
a wireless connection without using an access point, is not supported. Be sure to prepare
an access point.
No se admite la “conexión ad-hoc”, es decir, la que establece una conexión directa al
ordenador a través de una conexión inalámbrica sin utilizar un punto de acceso. Asegúrese
de preparar un punto de acceso.
26
Wireless Setup Using Easy Setup
Configuración inalámbrica mediante Configuración fácil (Easy Setup)
■ Check the Information for Wireless Connection
■ Comprobación de la información para la conexión inalámbrica
In most cases, “Easy Setup” will be used to connect the machine to your access point or router. Before you continue, you must gather the
information below which will be required during the installation. For your convenience, you may record the information in the provided spaces
and then proceed to page 28.
• For other connection methods, please refer to page 28.
En la mayoría de los casos se utilizará "Configuración fácil (Easy Setup)" para conectar el equipo al punto de acceso o router. Antes de continuar,
se debe reunir la información siguiente que se necesitará durante la instalación. Para su comodidad, puede anotar la información en los espacios
proporcionados y continuar después con la página 28.
• Para obtener información sobre otros métodos de conexión, consulte la página 28.
For details on how to check the following information, refer to the manual of your access point or router, or contact its manufacturer.
Para obtener todos los detalles sobre cómo consultar la información siguiente, consulte el manual de instrucciones del punto de acceso
o router, o póngase en contacto con el fabricante.
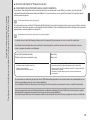
Access Point Name/Network Name:
Nombre de punto de acceso/nombre de red:
Network Key:
Clave de red:
* Also referred to as SSID.
An identifier to identify the specific access point.
* También se conoce como SSID.
Identificador del punto de acceso específico.
* Also referred to as encryption key, WEP key or WPA/WPA2 passphrase, Pre-Shared key.
A password required to set to prevent unauthorized access to communication.
* También se conoce como clave de codificación, clave WEP o contraseña WPA/WPA2,
clave previamente compartida.
Contraseña que se debe establecer para evitar el acceso no autorizado a las
comunicaciones.
You can retrieve your network key by using the Canon PIXMA Wireless Setup Assistant or the instructions which can be downloaded from the
Canon support webpage (www.usa.canon.com/downloadlibrary).
If you are unable to retrieve the network key or other settings, refer to the manual of your access point or router, or contact its manufacturer.
Se puede recuperar la clave de red utilizando el Asistente de configuración inalámbrica de Canon PIXMA o las instrucciones que se pueden
descargar desde la página web de soporte de Canon (www.usa.canon.com/downloadlibrary).
Si no puede recuperar la clave de red u otros ajustes, consulte el manual del punto de acceso o del router y póngase en contacto con el fabricante.
27
1
2
A
C
3
D
B
Use the { or } button (A) to display Setup,
then touch the right FUNCTION button (B).
Use the [ or ] button (C) to select Wireless
LAN setup, then touch the OK button.
Select Yes, then touch the OK button.
Utilice el botón { o } (A) para acceder
a Configurar (Setup); a continuación, toque
el botón FUNCIÓN (FUNCTION) derecho (B).
Utilice el botón [ o ] (C) para seleccionar
Configurac. LAN inalámbrica (Wireless LAN
setup) y, a continuación, toque el botón OK.
Seleccione Sí (Yes) y, a continuación, toque el botón OK.
When wireless connection is enabled, the Wi-Fi lamp (D) lights blue.
Cuando se active la conexión inalámbrica, la luz de Wi-Fi (D) se encenderá en azul.
If you choose one of these connection methods, skip the “Easy Setup” section and proceed the desired section (WPS (Wi-Fi Protected Setup) or WCN (Windows
Connect Now)).
Si elige uno de estos métodos de conexión, pase la sección "Configuración fácil (Easy Setup)" y continúe con la sección que desee (WPS (Wi-Fi Protected Setup)
o WCN (Windows Connect Now)).
□ If your access point or router supports WPS
□ Si el router o punto de acceso admite WPS
□ If you are using Windows 7/Windows Vista and have
a USB flash drive
□ Si utiliza Windows 7/Windows Vista y tiene una unidad
flash USB
The wireless connection can be setup without gathering the information on page 27. Please refer to
your access point or router manual to confirm if WPS is supported. If so, Go to “Wireless Setup Using
WPS (Wi-Fi Protected Setup)” on page 31.
You can configure wireless connection settings by using
the WCN function as well. For details, refer to “Wireless
Setup Using WCN (Windows Connect Now)” on page 34.
• For details on WPS, refer to the manual of your access point.
La conexión inalámbrica se puede establecer fácilmente sin reunir la información de la página 27.
Consulte el manual de instrucciones del punto de acceso o router para confirmar si se admite WPS.
Si es así, vaya a "Configuración inalámbrica mediante WPS (Wi-Fi Protected Setup)" en la página 31.
• Consulte en el manual del punto de acceso todos los detalles sobre WPS.
28
También puede configurar la conexión inalámbrica
mediante la función WCN. Para obtener más información,
consulte "Configuración inalámbrica mediante WCN
(Windows Connect Now)" en la página 34.
4
5
Select Easy setup, then touch the OK
button.
Select the access point name you wrote down on
page 27, then touch the OK button.
• If you are living in an apartment, nearby access points in use may be detected.
• The access point names with 2-byte characters are not displayed properly, however, can be selected.
Seleccione Configuración fácil
(Easy setup) y, a continuación, toque
el botón OK.
Seleccione el nombre del punto de acceso anotado
en la página 27 y, a continuación, toque el botón OK.
• Si se encuentra en un piso, es posible que se detecten puntos de acceso cercanos que estén en uso.
• Los nombres de los puntos de acceso que tengan caracteres de 2 byte no se muestran correctamente, aunque
se pueden seleccionar.
6
Make sure that one of the above screens is displayed, then touch
the right FUNCTION button.
If the above screen is not displayed, go to
on page 30.
Asegúrese de que aparece una de las pantallas anteriores y,
a continuación, toque el botón FUNCIÓN (FUNCTION) derecho.
Si la pantalla anterior no aparece, continúe con
de la página 30.
29
7
8
E
F
Enter the network key you wrote down on page 27, then touch the
left FUNCTION button (E).
Touch the center FUNCTION button (F) to switch character entry modes.
Make sure that the
network key is correct,
then touch the OK button.
• Enter upper and lower case letters of the alphabet correctly.
• For details on character entry, refer to the printed manual: Network Setup
Troubleshooting.
Introduzca la clave de red que anotó en la página 27; a continuación,
toque el botón FUNCIÓN (FUNCTION) izquierdo(E).
Toque el botón FUNCIÓN (FUNCTION) (F) para cambiar de un modo de
introducción de caracteres a otro.
• Introduzca correctamente las letras en mayúsculas y minúsculas.
• Consulte todos los detalles sobre la introducción de caracteres en el manual
impreso: Solución de problemas de configuración de red.
30
9
When the above screen appears, touch the OK button.
• If Failed to connect to the access point. appears, touch the OK button,
make sure that the network key is correct, then enter it again. If a connection
still cannot be established, refer to the printed manual: Network Setup
Troubleshooting.
Next, read “10 Install the Software (Network Connection)”
on page 38!
Asegúrese de que la
clave de red es correcta
y, a continuación, toque
el botón OK.
Cuando aparezca la pantalla anterior, toque el botón OK.
• Si aparece Error al conectar con el punto de acceso. (Failed to connect
to the access point.), toque el botón OK, cerciórese de que la clave de red
es correcta y vuelva a introducirla. Si pese a ello no se puede establecer
la conexión, consulte el manual impreso: Solución de problemas de
configuración de red.
A continuación, lea "10 Instalación del software (Conexión de
red)" en la página 38.
Wireless Setup Using WPS (Wi-Fi Protected Setup)
Configuración inalámbrica mediante WPS (Wi-Fi Protected Setup)
Read this section
only when setting
up a wireless
connection by using
the WPS (Wi-Fi
Protected Setup).
1
2
C
3
D
A
B
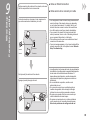
Use the { or } button (A) to display Setup,
then touch the right FUNCTION button (B).
Use the [ or ] button
(C) to select Wireless
LAN setup, then touch
the OK button.
Utilice el botón { o } (A) para acceder
a Configurar (Setup); a continuación, toque
el botón FUNCIÓN (FUNCTION) derecho (B).
Utilice el botón [ o ]
(C) para seleccionar
Configurac. LAN
inalámbrica (Wireless
LAN setup) y,
a continuación, toque
el botón OK.
Select Yes, then touch the OK button.
When wireless connection is enabled, the Wi-Fi
lamp (D) lights blue.
Lea esta sección
sólo si utiliza una
conexión inalámbrica
mediante WPS
(Wi-Fi Protected
Setup).
Seleccione Sí (Yes) y, a continuación,
toque el botón OK.
Cuando se active la conexión inalámbrica, la luz
de Wi-Fi (D) se encenderá en azul.
31
4
Select Other setup, then
touch the OK button.
5
Select WPS, then touch
the OK button.
6
7
Select Push button method, then touch the OK button.
Touch the OK button.
• To use the PIN code method for setup, select PIN code method in , then touch the OK button. Follow the on-screen instructions
to operate the machine and access point. When the screen in appears, touch the OK button.
If the setup is not completed within 10 minutes and the timeout error screen appears, touch the OK button to perform the setup
again and set the new PIN code displayed on the screen to the access point. If the timeout error screen appears even though the
setup has been completed within 10 minutes, select the method other than the PIN code method to perform the wireless LAN.
If another error appears, refer to the printed manual: Network Setup Troubleshooting.
Seleccione Otra
configuración (Other
setup) y, a continuación,
toque el botón OK.
32
Seleccione WPS y,
a continuación, toque
el botón OK.
Seleccione Método de pulsador (Push button method)
y, a continuación, toque el botón OK.
Toque el botón OK.
• Para utilizar el método de código PIN en la instalación, seleccione Método de código PIN (PIN code method) en y,
a continuación, toque el botón OK. Siga las instrucciones en pantalla para hacer las operaciones en el equipo y el punto de acceso.
Cuando aparezca la pantalla de , toque el botón OK.
Si no finaliza la instalación en 10 minutos y aparece la pantalla de error de tiempo de espera agotado, toque el botón OK para
llevar a cabo de nuevo la instalación y establezca el nuevo código PIN que aparezca en la pantalla en el punto de acceso.
Si aparece la pantalla de error de tiempo de espera agotado aunque haya finalizado la instalación antes de que transcurran
10 minutos, seleccione un método distinto al del código PIN para configurar la LAN inalámbrica. Si se produce otro error, consulte
el manual impreso: Solución de problemas de configuración de red.
8
Press and hold the WPS button on the access point (for about
5 seconds), then touch the OK button on the machine within
2 minutes.
For details on the WPS button pressing, refer to the manual of your access point.
The Wi-Fi lamp (blue) flashes while searching for or connecting to an access point.
Mantenga pulsado el botón WPS del punto de acceso (durante unos
5 segundos) y, a continuación, toque el botón OK en el equipo en
menos de 2 minutos.
Para obtener más información sobre cómo pulsar el botón WPS, consulte el manual
del punto de acceso.
La luz de Wi-Fi (azul) parpadeará mientras se busca el punto de acceso o al
conectarse a él.
9
When the above screen appears, touch the OK button.
• If the timeout error screen appears, touch the OK button, then start over
from .
• If another error appears, refer to the printed manual: Network Setup
Troubleshooting.
Cuando aparezca la pantalla anterior, toque el botón OK.
• Si aparece la pantalla de error de tiempo de espera agotado, toque el botón
OK y vuelva a empezar desde .
• Si se produce otro error, consulte el manual impreso: Solución de
problemas de configuración de red.
Next, read “10 Install
the Software (Network
Connection)” on
page 38!
A continuación, lea
"10 Instalación del
software (Conexión
de red)" en la
página 38.
33
Wireless Setup Using WCN (Windows Connect Now)
Configuración inalámbrica mediante WCN (Windows Connect Now)
Read this section only when setting up a wireless connection by using the WCN (Windows Connect Now) function of Windows 7/Windows Vista.
Lea esta sección sólo si configura una conexión inalámbrica mediante la función WCN (Windows Connect Now) de Windows 7/Windows Vista.
34
A
Setup on the Computer
Configuración en el ordenador
Windows 7
1.Click Start > Control Panel > View network status and tasks > Manage wireless networks.
2.Select the network name (SSID) and right-click it, then select Properties.
3.Select Copy this network profile to a USB flash drive.
Follow the on-screen instructions to complete the settings on the computer.
4.Go to
.
1.Haga clic en Iniciar (Start) > Panel de control (Control Panel) > Ver el estado y las tareas de red
(View network status and tasks) > Administrar redes inalámbricas (Manage wireless networks).
2.Seleccione el nombre de red (SSID) y haga clic en ella con el botón secundario; a continuación,
seleccione Propiedades (Properties).
3.Seleccione Copiar este perfil de red en una unidad flash USB (Copy this network profile to
a USB flash drive).
Siga las instrucciones en pantalla para finalizar la configuración en el ordenador.
4.Vaya a
.
Windows Vista
1.From the Start menu of the Windows side, select Network, then click Add a wireless device on
the menu.
2.Click I want to add a wireless device or computer that is not on the list, using a USB flash drive.
3.Click Add the device or computer using a USB flash drive.
4.Select the network name (SSID), then click Next.
Follow the on-screen instructions to complete the settings on the computer.
5.Go to
.
1.Desde el menú Iniciar (Start) de Windows, seleccione Red (Network); a continuación, haga clic en
Agregar un dispositivo inalámbrico (Add a wireless device) en el menú.
2.Haga clic en Deseo agregar un dispositivo inalámbrico o equipo que no está en la lista
mediante el uso de una unidad USB flash (I want to add a wireless device or computer that
is not on the list, using a USB flash drive).
3.Haga clic en Agregar el dispositivo o equipo usando una unidad USB flash (Add the device
or computer using a USB flash drive).
4.Seleccione el nombre de la red (SSID) y haga clic en Siguiente (Next).
B
Setup on the Machine
Configuración en el equipo
1.Select Wireless LAN setup of the Setup menu
screen on the LCD (A), then touch the OK button.
2.Select Other setup, then touch the OK button.
3.Select WCN, then touch the OK button.
4.Connect the USB flash drive to the Direct Print Port
(USB connector) (B) on the front right of the machine,
then touch the OK button.
5.When Wireless LAN settings completed. screen
is displayed, touch the OK button and eject the USB
flash drive.
1.Seleccione Configurac. LAN inalámbrica
(Wireless LAN setup) en Menú Configurar (Setup
menu) de la pantalla LCD (A); a continuación, toque
el botón OK.
2.Seleccione Otra configuración (Other setup);
a continuación, toque el botón OK.
3.Seleccione WCN; a continuación, toque el botón OK.
4.Conecte la unidad flash USB al puerto de impresión
directa (conector USB) (B) que se encuentra en la
parte delantera derecha del equipo y, a continuación,
toque el botón OK.
5.Cuando aparezca la pantalla Configuración LAN
inalámbrica completa. (Wireless LAN settings
completed.), toque el botón OK y expulse la unidad
flash USB.
A
Siga las instrucciones en pantalla para finalizar la configuración en el ordenador.
5.Vaya a
.
The machine supports “WCN-UFD”.
• Canon assumes no responsibility for any damage or loss of data stored on your USB flash drive regardless
of the cause even within the warranty period.
• Operation may not be guaranteed depending on your USB flash drive. USB flash drives with security enabled
may not be used.
El equipo es compatible con “WCN-UFD”.
• Canon no asume ninguna responsabilidad en el caso de que se pierdan o dañen los datos almacenados en la
unidad flash USB, con independencia del motivo, incluso dentro del periodo de garantía.
• No se garantiza el funcionamiento dependiendo de la unidad flash USB utilizada. No se pueden utilizar
unidades USB flash con la función de seguridad ya habilitada.
B
Next, read “10 Install the Software (Network
Connection)” on page 38!
A continuación, lea "10 Instalación del software
(Conexión de red)" en la página 38.
Wired Setup
Conexión por cable
9
Before connecting the machine to the network, make sure
that the computer and router is connected.
Antes de acceder con el equipo a la red, asegúrese de
que estén conectados el ordenador y el router.
Internet
Router, etc.
Internet
Router, etc.
Add (connect) the machine to the network.
Agregue (conecte) el equipo a la red.
■ Notes on Wired Connection
■ Notas acerca de la conexión por cable
• The configuration, router functions, setup procedures and
security settings of the network device vary depending
on your system environment. For details, refer to your
device's instruction manual or contact its manufacturer.
• In an office setup, consult your network administrator.
• If you connect to a network that is not protected with
security measures, there is a risk of disclosing data such
as your personal information to a third party.
• The machine cannot be used over a wireless and wired
connection at the same time.
• If an error message appears or if you have trouble with the
network connection, refer to the printed manual: Network
Setup Troubleshooting.
• La configuración, las funciones del router, los procedimientos
de instalación y la configuración de seguridad del dispositivo
de red varían en función del entorno del sistema. Si
desea obtener más información, consulte el manual de
instrucciones del dispositivo o póngase en contacto con
el fabricante.
• En una instalación corporativa, consulte con el
administrador de red.
• Si se conecta a una red que no está protegida con
medidas de seguridad, existe el riesgo de divulgar
información como sus datos personales a terceros.
• El equipo no se puede utilizar con una conexión por
cable e inalámbrica al mismo tiempo.
• Si aparece un mensaje de error o si tiene problemas
con la conexión de red, consulte el manual impreso:
Solución de problemas de configuración de red.
35
1
A
B
2
3
E
C
D
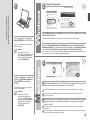
Remove the Cap (A), then connect a network device (router, etc.) with an Ethernet
cable (B).
Use the { or } button (C) to display Setup, then
touch the right FUNCTION button (D).
Use the [ or ] button
(E) to select Device
settings, then touch
the OK button.
Retire la tapa (A); a continuación, conéctese a un dispositivo de red (router, etc.)
con un cable Ethernet (B).
Utilice el botón { o } (C) para acceder a Configurar
(Setup); a continuación, toque el botón FUNCIÓN
(FUNCTION) derecho (D).
Utilice el botón [ o ]
(E) para seleccionar
Configuración
de dispositivo
(Device settings) y,
a continuación, toque
el botón OK.
36
4
5
6
Select LAN settings, then touch the
OK button.
Select Change wireless/wired, then
touch the OK button.
Select Wired LAN active, touch the OK button.
Seleccione Configuración de LAN
(LAN settings) y, a continuación,
toque el botón OK.
Seleccione Cambiar inalámbrica/
cableada (Change wireless/wired) y,
a continuación, toque el botón OK.
Seleccione LAN cableada activa (Wired LAN active)
y, a continuación, toque el botón OK.
Next, read “10 Install
the Software (Network
Connection)” on
page 38!
A continuación, lea
"10 Instalación del
software (Conexión
de red)" en la
página 38.
37
Install the Software (Network Connection)
Instalación del software (Conexión de red)
10
38
• To use the machine by connecting it to a computer, software including
the drivers needs to be copied (installed) to the computer’s hard disk.
The installation process takes about 20 minutes. (The installation
time varies depending on the computer environment or the number
of application software to be installed.)
□ For Spanish Users in the U.S.A.:
□ Para los usuarios de habla
hispana en EE. UU.:
□ Easy-WebPrint EX
Refer to the "Información adicional
para usuarios españoles" sheet to
install the Spanish version of the
software.
Easy-WebPrint EX is Web print
software that is installed on
the computer when installing
the supplied software. Internet
Explorer 7 or later is required to use
this software. An Internet connection
is required for installation.
Consulte la hoja "Información
adicional para usuarios españoles"
para instalar la versión en español
del software.
Easy-WebPrint EX es un software
de impresión para web que se
instala en el ordenador al instalar
el software incluido. Para utilizar
este software es necesario Internet
Explorer 7 o posterior. Para la
instalación, es necesario estar
conectado a Internet.
□ Easy-WebPrint EX
• Quit all running applications before installation.
• Log on as the administrator (or a member of the
Administrators group).
• Do not switch users during the installation process.
• Internet connection may be required during the installation.
Connection fees may apply. Consult the internet service
provider.
• It may be necessary to restart your computer during the
installation process. Follow the on-screen instructions and
do not remove the Setup CD-ROM during restarting.
The installation resumes once your computer has restarted.
• If the firewall function of your security software is turned
on, a warning message may appear that Canon software is
attempting to access the network. If such a warning message
appears, set the security software to always allow access.
• For the system requirements, refer to “13 Specifications”.
• Para poder utilizar el equipo conectado a un ordenador, se debe
copiar (instalar) el software, incluidos los controladores, en el disco
duro del ordenador. El proceso de instalación lleva unos 20 minutos.
(El tiempo necesario para instalar varía en función del entorno del
ordenador o de cuánto software de aplicación se vaya a instalar.)
• Cierre las aplicaciones que se estén ejecutando antes de
la instalación.
• Inicie la sesión como administrador (o miembro del grupo
de administradores).
• No cambie de usuario durante el proceso de instalación.
• Durante la instalación, es posible que se tenga que conectar
a Internet. Esto puede implicar gastos de conexión. Consulte
con el proveedor de servicios de Internet.
• Es posible que deba reiniciar el ordenador durante el proceso
de instalación. Siga las instrucciones en pantalla y no retire
el CD-ROM de instalación (Setup CD-ROM) mientras se
reinicia el equipo.
La instalación se reanuda una vez reiniciado el ordenador.
• Si tiene activada la función de firewall en el software de
seguridad, puede aparecer un mensaje indicando que el
software de Canon está intentando acceder a la red. Si
aparece dicho mensaje, configure el software de seguridad
para que permita siempre el acceso.
• Para obtener información sobre los requisitos del sistema,
consulte "13 Especificaciones".
Install the Software
Instalación del software
1
2
Turn on the computer, then insert the
Setup CD-ROM into the CD-ROM drive.
If you are using Windows, the setup program
starts automatically.
For Windows
• If the program does not start
automatically, double-click the CD-ROM
icon in Computer or My Computer.
When the CD-ROM contents appear,
double-click MSETUP4.EXE.
Encienda el ordenador y, a continuación,
introduzca el CD-ROM de instalación
(Setup CD-ROM) en la unidad de
CD-ROM.
Si usa Windows, el programa de instalación
se inicia automáticamente.
Para Windows
• Si el programa no se inicia
automáticamente, haga doble clic
en el icono del CD-ROM en Equipo
(Computer) o Mi PC (My Computer).
Cuando aparezca el contenido del
CD-ROM, haga doble clic en
MSETUP4.EXE.
Windows 7/Windows Vista
Windows XP
Click Run Msetup4.exe on the AutoPlay screen, then click Yes or Continue on the User
Account Control dialog box.
If the User Account Control dialog box reappears in following steps, click Yes or Continue.
Haga clic en Ejecutar Msetup4.exe (Run Msetup4.exe) en la pantalla Reproducción
automática (AutoPlay) y, a continuación, haga clic en Sí (Yes) o en Continuar (Continue)
en el cuadro de diálogo Control de cuentas de usuario (User Account Control).
Si vuelve a aparecer el cuadro de diálogo Control de cuentas de usuario (User Account Control) en los
pasos siguientes, haga clic en Sí (Yes) o en Continuar (Continue).
2
Double-click the Setup icon of the CD-ROM folder to proceed to the following screen.
Enter your administrator name and password, then click OK.
If the CD-ROM folder does not open automatically, double-click the CD-ROM icon on the desktop.
If you do not know your administrator name or password, click the help button, then follow the
on-screen instructions.
Haga doble clic en el icono Setup de la carpeta del CD-ROM para pasar a la pantalla
siguiente. Introduzca el nombre de administrador y la contraseña; a continuación,
haga clic en OK.
Si la carpeta del CD-ROM no se abre automáticamente, haga doble clic en el icono del CD-ROM
del escritorio.
Si no sabe su nombre o contraseña de administrador, haga clic en el botón de ayuda y, a continuación,
siga las instrucciones que aparezcan en pantalla.
39
3
4
Click Easy Install.
Click Install.
The drivers, application software, and on-screen manuals are
installed.
Se instalarán los controladores, el software de aplicación y los
manuales en pantalla.
• Si desea seleccionar unos elementos concretos para
instalarlos, haga clic en Instalación personalizada
(Custom Install).
40
Select Use the printer on network, then click Next.
Follow any on-screen instructions to proceed with the software
installation.
• If you want to select particular items to install, click
Custom Install.
Haga clic en Instalación simple (Easy Install).
5
Haga clic en Instalar (Install).
Seleccione Utilizar la impresora de la red (Use the
printer on network) y, a continuación, haga clic en
Siguiente (Next).
Siga las instrucciones que aparezcan en pantalla para continuar
con la instalación del software.
6
7
When the Detected Printers List dialog box appears, select Canon
MG6100 series, then click Next.
When the Setup Completion dialog box appears, click Complete.
• If the machine is not detected, Check Printer Settings dialog box is displayed. Refer
to the printed manual: Network Setup Troubleshooting. Make sure there is no
problem, then click Next again on the screen in .
Next, read “Information” on page 45!
Cuando aparezca el cuadro de diálogo Lista de impresoras detectadas
(Detected Printers List), seleccione Canon MG6100 series y, a continuación,
haga clic en Siguiente (Next).
Cuando aparezca el cuadro de diálogo Finalización de la configuración
(Setup Completion), haga clic en Completada (Complete).
When the Printer Detection screen appears,
click Next.
• Cuando no se detecte el equipo, se mostrará el cuadro de diálogo Comprobar la
configuración de impresora (Check Printer Settings). Consulte el manual impreso:
Solución de problemas de configuración de red. Compruebe que no haya ningún
problema y, a continuación, vuelva a hacer clic en Siguiente (Next) en la pantalla de .
• If the Printer Connection screen appears
instead of the screen above, the connection
method is not correctly selected in .
−
−
For Windows
Click Cancel and start again from , then be
sure to select Use the printer on network
in .
For Macintosh
Follow on-screen instructions and proceed
with the installation. Click Exit on the
installation complete screen, then start again
from
and be sure to select Use the printer
on network in .
Cuando aparezca la pantalla Detección de
impresora (Printer Detection), haga clic en
Siguiente (Next).
A continuación, lea "Información" en la página 45.
7
On the Canon IJ Network Tool screen, select MG6100 series
in Printers, then click Next.
• If the machine is not detected, refer to the printed manual:
Network Setup Troubleshooting. Make sure there is no problem,
then click Update.
Next, read “Registration (Macintosh)” on page 42!
• Si aparece la pantalla Conexión de impresora
(Printer Connection) en vez de la pantalla
anterior, significa que no se ha seleccionado
correctamente el método de conexión en .
−
−
Para Windows
Haga clic en Cancelar (Cancel) y comience
de nuevo desde ; a continuación, asegúrese
de seleccionar Utilizar la impresora de la red
(Use the printer on network) en .
Para Macintosh
Siga las instrucciones que aparezcan en
pantalla y continúe con la instalación. Haga clic
en Salir (Exit) en la pantalla de finalización de la
instalación y, a continuación, vuelva a empezar
desde y asegúrese de seleccionar Utilizar
la impresora de la red (Use the printer on
network) en .
En la pantalla Canon IJ Network Tool, seleccione MG6100
series en Impresoras (Printers); a continuación, haga clic
en Siguiente (Next).
• Si el equipo no se detecta, consulte el manual impreso: Solución
de problemas de configuración de red. Asegúrese de que no
exista ningún problema y luego haga clic en Actualizar (Update).
A continuación, lea "Registro (Macintosh)" en la
página 42.
41
Registration (Macintosh)
Registro (Macintosh)
This section describes how
to register the machine on a
Macintosh computer. Windows
users: read “Information” on
page 45.
• The alphanumeric characters after
Canon MG6100 series is the
machine’s Bonjour service name
or MAC address.
• If the machine has not been
detected, make sure of the
following.
− The machine is turned on.
− The firewall function of any
security software is turned off.
− Wireless Connection: The
computer is connected to the
access point.
− Wired Connection: The
machine is connected to
the network device with
the Ethernet cable.
En esta sección se describe cómo
registrar el equipo en un ordenador
Macintosh. Usuario de Windows:
lea "Información" en la página 45.
2
1
-
A
Mac OS X v.10.6.x/v.10.5.x
Mac OS X v.10.4.11
1
Select Canon MG6100 series
canonijnetwork and click Add.
When the Register Printer and
Scanner screen appears, click
Register Printer.
Mac OS X
v.10.6.x
v.10.5.x
v.10.4.11
Go to
-
Go to
on page 44.
.
Go to
page 43.
on
• Los caracteres alfanuméricos
que aparecen después de Canon
MG6100 series son el nombre
del servicio Bonjour o la dirección
MAC del equipo.
• Si no se ha detectado el equipo,
compruebe lo siguiente.
−
−
−
−
El equipo está encendido.
La función de cortafuegos
de cualquier software de
seguridad está desactivada.
Conexión inalámbrica: el
ordenador está conectado
al punto de acceso.
Conexión por cable: el equipo
está conectado al dispositivo
de red mediante el cable
Ethernet.
Cuando aparezca la pantalla Registro
de la impresora y del escáner
(Register Printer and Scanner),
haga clic en Registrar la impresora
(Register Printer).
Mac OS X
v.10.6.x
v.10.5.x
v.10.4.11
42
Vaya a
-
Vaya a
la página 43.
.
en
Seleccione Canon MG6100 series
canonijnetwork y haga clic en Añadir
(Add).
Vaya a
en la página 44.
-
2
-
B
Mac OS X v.10.4.11
1
2
3
4
When the Printer List window
appears, click Add.
Click More Printers in the Printer
Browser window.
Select Canon IJ Network in the pop-up
menu, select Canon MG6100 series in
the list of printers, then click Add.
Make sure that Canon MG6100
series is added to the list of printers.
• When the You have no printers
available. screen appears,
click Add.
Cuando aparezca la ventana Lista
de impresoras (Printer List), haga
clic en Añadir (Add).
• Cuando aparezca la pantalla No hay
impresoras disponibles. (You have
no printers available.), haga clic en
Añadir (Add).
Go to
Haga clic en Más impresoras (More
Printers) en la ventana Navegador
de impresoras (Printer Browser).
Seleccione Canon IJ Network en el
menú emergente, elija Canon MG6100
series en la lista de impresoras y,
a continuación, haga clic en Añadir
(Add).
on page 44.
Asegúrese de que se ha agregado
Canon MG6100 series a la lista
de impresoras.
Vaya a
en la página 44.
43
3
When the Register Printer and Scanner screen
appears, click Register Scanner.
4
Select Canon MG6100 series on
the Scan-from-PC Settings screen,
then click OK.
5
Click Next on the Register Printer and Scanner
screen.
Next, read “Information” on page 45!
Cuando aparezca la pantalla Registro de la
impresora y del escáner (Register Printer and
Scanner), haga clic en Registrar el escáner
(Register Scanner).
Seleccione Canon MG6100 series en
la pantalla Conf. de escaneo desde
PC (Scan-from-PC Settings) y,
a continuación, haga clic en OK.
Haga clic en Siguiente (Next) en la pantalla Registro
de la impresora y del escáner (Register Printer
and Scanner).
A continuación, lea "Información" en la página 45.
44
Click Next.
Follow any on-screen instructions to proceed
with the software installation.
Haga clic en Siguiente (Next).
Siga las instrucciones que aparezcan en pantalla
para continuar con la instalación del software.
Important Information for the Installation
Información importante para la instalación
Information
Información
1
□ Necessary Information for the User Registration
□ Información necesaria para el Registro de usuario
(User Registration)
A
When the serial number is not
displayed on the registration screen
automatically, input the serial
number located inside the machine
(as shown in the illustration).
• If the power is on, the Print Head Holder will
move when the Scanning Unit (Cover) (A)
is opened.
Si el número de serie no aparece
automáticamente en la pantalla de
registro, introduzca el que viene
en el interior del equipo (en el lugar
que muestra la ilustración).
• Si está encendido, el soporte del cabezal de
impresión se desplazará cuando se abra la
unidad de escaneado (cubierta) (A).
45
□ If the Extended Survey
Program screen appears
2
3
□ Si aparece la pantalla Extended
Survey Program
Click Exit to complete the installation.
For Windows
For Macintosh
It is necessary to restart the computer before scanning
using the Operation Panel on the machine for the
first time.
For Macintosh
If you can agree to Extended Survey
Program, click Agree.
If you click Do not agree, the Extended
Survey Program will not be installed.
(This has no effect on the machine’s
functionality.)
Solution Menu EX starts.
Solution Menu EX starts when clicking OK in the Canon
Solution Menu EX dialog.
Remove the Setup CD-ROM and keep it in a safe place.
• The buttons displayed on Solution Menu EX may vary depending
on the country or region of purchase.
Congratulations! Setup is complete.
Proceed to page 49 for information regarding the
Solution Menu EX and the on-screen manual or page 50
to start using the machine.
Si desea admitir Extended Survey
Program, haga clic en Aceptar (Agree).
Si hace clic en No aceptar (Do not agree),
Extended Survey Program no se instalará.
(Esto no afecta al funcionamiento del
equipo).
Haga clic en Salir (Exit) para finalizar la
instalación.
Para Windows
Para Macintosh
Es necesario reiniciar el ordenador antes de escanear
por primera vez mediante el panel de control del equipo.
Para Macintosh
Se iniciará Solution Menu EX.
Solution Menu EX se iniciará al hacer clic en OK en el
cuadro de diálogo Canon Solution Menu EX.
Extraiga el CD-ROM de instalación (Setup CD-ROM) y guárdelo en un
lugar seguro.
• Los botones que muestre Solution Menu EX pueden variar en
función del país o la región de adquisición.
Enhorabuena. El proceso de instalación habrá finalizado.
Consulte la página 49 para obtener información sobre
Solution Menu EX y el manual en pantalla o la página 50
para empezar a utilizar el equipo.
46
Using the Machine from Additional Computers
Now that the wireless/wired connection of the machine is complete, it can be used from additional computers on the same network.
Install software including the drivers on the computer from which you want to use the machine. Other settings are not required.
To add computers from which to use the machine, go to “11 Use from Additional Computers” on page 48.
Uso del equipo desde ordenadores adicionales
Una vez finalizado el proceso de instalación de la conexión inalámbrica/por cable del equipo, se puede utilizar desde otros ordenadores de la misma red.
Instale el software, incluidos los controladores, en el ordenador desde el que desee utilizar el equipo. No es necesario establecer ninguna otra configuración.
Para añadir ordenadores desde los que utilizar el equipo, vaya a "11 Uso desde ordenadores adicionales" en la página 48.
Installing the XPS Printer Driver
In Windows 7 and Windows Vista SP1 or later, the XPS Printer Driver can be installed additionally. To install, perform from
Click Custom Install in , then select XPS Printer Driver in the Custom Install screen.
For details on useful functions of the XPS Printer Driver, refer to the on-screen manual: Advanced Guide.
in “10 Install the Software (Network Connection)” on page 39.
Instalación del Controlador de impresora XPS (XPS Printer Driver)
En Windows 7 y Windows Vista SP1 o posterior, también se puede instalar el Controlador de impresora XPS (XPS Printer Driver). Para instalarlo, ejecute a partir de
de "10 Instalación del software
(Conexión de red)" en la página 39. Haga clic en Instalación personalizada (Custom Install) en
y, a continuación, seleccione Controlador de impresora XPS (XPS Printer Driver) en la pantalla
Instalación personalizada (Custom Install).
Para conocer todos los detalles sobre las prácticas funciones del Controlador de impresora XPS (XPS Printer Driver), consulte el manual en pantalla: Guía avanzada.
47
Use from Additional Computers
Uso desde ordenadores adicionales
11
If the machine is already connected to a wireless/wired connection, it can be used from additional computers on the same network.
Si el equipo ya está conectado a una conexión inalámbrica/por cable, se puede utilizar desde otros ordenadores de la misma red.
To use from additional computers
1
2
Computer from which the machine can be used currently
Insert the Setup CD-ROM into the computer from which
you want to use the machine.
Ordenador desde el que se puede usar el equipo actualmente
Follow the on-screen instructions to install the software.
Other settings are not required.
Additional computers on the same network
It enables the computer to use the machine.
Para utilizar desde ordenadores adicionales
1
2
Inserte el CD-ROM de instalación (Setup CD-ROM)
en el ordenador desde el que desee utilizar el equipo.
Siga las instrucciones que aparezcan en pantalla para
instalar el software.
No se necesita establecer ninguna otra configuración.
Otros ordenadores de la misma red
Permite que el ordenador utilice el equipo.
For details on the software installation procedure, refer to "10 Install the Software
(Network Connection)" on page 38.
Para obtener más información sobre el procedimiento de instalación del software,
consulte "10 Instalación del software (Conexión de red)" en la página 38.
48
Try Using the Machine
Pruebe el equipo
12
Use the Operation Panel on the machine to print your own items easily. Various application software are installed on the
computer along with the drivers. You can print creative items by correcting/enhancing photos using the application software.
For details on how to use the application software and the machine, refer to the on-screen manual.
Utilice el panel de control del equipo para imprimir fácilmente sus propios elementos. Junto con los controladores, en el
ordenador se instala diverso software de aplicación. Con el software de aplicación se pueden imprimir elementos creativos
corrigiendo/mejorando las fotos, Para obtener más información sobre cómo utilizar el software de aplicación y el equipo,
consulte el manual en pantalla.
Easy-WebPrint EX
Use Easy-WebPrint EX to print web pages in Internet Explorer easily.
Some of its features include:
• Printing a web page by reducing its size to fit the paper width automatically
without cropping edges.
• Printing only the pages you want by selecting them from preview.
• Printing selected portions of various pages after editing them.
Con Easy-WebPrint EX se pueden imprimir fácilmente páginas web
en Internet Explorer. Entre otras funciones, incluye:
• Impresión de páginas web reduciendo el tamaño para que se ajuste
automáticamente a la anchura del papel sin tener que recortar los bordes.
• Impresión únicamente de las páginas deseadas mediante su selección en la
vista preliminar.
• Impresión de partes seleccionadas de varias páginas después de editarlas.
When Easy-WebPrint EX is installed, the Easy-WebPrint EX toolbar appears
in Internet Explorer. This toolbar can be used any time while Internet Explorer
is running.
Cuando se instala Easy-WebPrint EX, la barra de herramientas de Easy-WebPrint
EX aparece en Internet Explorer. Esta barra de herramientas se puede utilizar en
cualquier momento mientras se esté ejecutando Internet Explorer.
For details on Easy-WebPrint EX, refer to the on-screen manual: Basic Guide.
Para conocer todos los detalles sobre Easy-WebPrint EX, consulte el manual en pantalla: Guía básica.
Solution Menu EX
Solution Menu EX is a gateway to functions and information
that allow you to make full use of the machine! For example,
• Open the on-screen manual.
• Open various application software.
Solution Menu EX es una puerta de acceso a funciones
e información que permiten aprovechar al máximo todas
las funciones del equipo. Por ejemplo,
• Apertura del manual en pantalla.
• Inicio de diverso software de aplicación.
For details on Solution Menu EX, refer to the on-screen
manual: Basic Guide.
Para conocer todos los detalles sobre Solution Menu EX,
consulte el manual en pantalla: Guía básica.
How to open the on-screen
manual
How to start Solution Menu EX
Click Help & Settings, then click this
icon to open the on-screen manual.
Click this icon on the desktop (Windows)
or on the Dock (Macintosh) to start
Solution Menu EX.
Cómo abrir el manual en
pantalla
Cómo iniciar Solution Menu EX
Haga clic en Ayuda y configuración
(Help & Settings) y, a continuación,
haga clic en este icono para abrir
el manual en pantalla.
Haga clic en este icono del escritorio
(Windows) o del Dock (Macintosh) para
iniciar Solution Menu EX.
49
Supported Memory Cards (Adapter required for
.)
Print Photos from a Memory Card
Impresión de fotos desde una tarjeta de memoria
Tarjetas de memoria compatibles (se necesita un adaptador para
Memory Stick Duo
Memory Stick PRO Duo
Memory Stick Micro
.)
Corresponding Card Slot
Card Slot Location
Ranura para tarjetas
correspondiente
Ubicación de la ranura para tarjetas
The Card Slot is located in the area indicated by the dotted line.
Open the Card Slot Cover (A).
La ranura para tarjetas se encuentra en el área indicada por la línea
discontinua.
Abra la cubierta de la ranura para tarjetas (A).
Memory Stick
Memory Stick PRO
SD Card
SDHC Card
MultiMediaCard
MultiMediaCard Plus
A
miniSD Card
miniSDHC Card
microSD Card
microSDHC Card
□ Inserting a Memory Card
□ Introducción de una tarjeta de memoria
RS-MMC
MMCmobile
Compact Flash Card*
Microdrive
*TYPE I / TYPE II (3.3V)
*TIPO I/TIPO II (3,3 V)
xD-Picture Card
xD-Picture Card Type M
xD-Picture Card Type H
• Insert a memory card with the labeled side
facing left.
B • Insert a memory card into the Card Slot in the
direction of the arrow on the label, with the
labeled side facing left.
• Insert only one memory card.
• The Access lamp (B) lights up when a memory
card is inserted.
• Introduzca la tarjeta de memoria con la etiqueta
mirando hacia la izquierda.
• Introduzca la tarjeta de memoria en la ranura
para tarjetas siguiendo la dirección de la flecha
de la etiqueta y con dicha etiqueta mirando hacia
la izquierda.
• Introduzca exclusivamente una tarjeta de
memoria.
• La luz de acceso (Access) (B) se iluminará
al introducir la tarjeta de memoria.
You can also print from USB flash drives. For details, refer to "Printing Photos" in the on-screen manual: Basic Guide.
También se puede imprimir desde una unidad flash USB. Para obtener más información, consulte "Impresión fotográfica" en el manual en pantalla: Guía básica.
50
2
1
E
C
D
Load 4" x 6" (10 x 15 cm) photo paper in the Rear
Tray (C) in portrait orientation with the printing side
facing up.
Make sure that the Paper Output Tray (D) is open.
If printing starts while the Paper Output Tray is closed, it will
automatically open.
While the HOME screen appears, open the Card Slot Cover, insert a memory card into the Card Slot.
When inserting a memory card into the Card Slot, the photos on the memory card are read and the screen to specify photos and the
number of copies to print appears.
Make sure that the Access lamp (E) has lit up, then close the Card Slot Cover.
• For details, refer to "5 Load Paper" on page 16.
Cargue papel fotográfico de tamaño 4" x 6"
(10 x 15 cm) en la bandeja posterior (C) con
orientación vertical y la superficie de impresión
hacia arriba.
Asegúrese de que la bandeja de salida del papel (D) está abierta.
Si la impresión comienza con la bandeja de salida del papel
cerrada, se abre automáticamente.
Con la pantalla INICIO (HOME) a la vista, abra la cubierta de la ranura para tarjetas e introduzca una tarjeta
de memoria en la ranura para tarjetas.
Al introducirla en la ranura para tarjetas, se leerán las fotos de la tarjeta de memoria y aparecerá la pantalla para especificar qué fotos
se van a imprimir y el número de copias.
Cerciórese de que esté encendida la luz de acceso (Access) (E) y, a continuación, cierre la cubierta de la ranura para tarjetas.
• Para obtener más información, consulte "5 Carga del
papel" en la página 16.
51
4
3
F
G
1. Trace along the Scroll Wheel (F) to display a photo to print.
2. Touch the [+] or [-] button to specify the number of copies.
After printing, open the Card Slot Cover, pinch the
memory card and pull it straight out.
3. Touch the Color button (G).
After removing the memory card, close the Card Slot Cover.
Printing will start.
• When the machine is ready for printing, the Color button lights up.
1. Deslice el dedo por la rueda de navegación (F) para acceder
a una fotografía que desee imprimir.
2. Toque el botón [+] o [-] para especificar el número de copias.
3. Toque el botón Color (G).
Se iniciará la impresión.
• Cuando el equipo esté preparado para imprimir, el botón Color se iluminará.
52
For more information on printing
from a memory card, refer to
"Printing Photos" in the on-screen
manual: Basic Guide.
• Do not remove the memory card while the Access lamp
is flashing. Saved data may be damaged.
Después de imprimir, abra la cubierta de la ranura
para tarjetas, sujete la tarjeta de memoria y tire
de ella.
Después de retirar la tarjeta de memoria, cierre la cubierta de la
ranura para tarjetas.
• No extraiga la tarjeta de memoria cuando la luz de
acceso (Access) esté parpadeando. Los datos
guardados se pueden dañar.
Para obtener más información
sobre cómo imprimir desde una
tarjeta de memoria, consulte
"Impresión fotográfica" en el
manual en pantalla: Guía básica.
Try Copying
Realice una prueba de copia
1
2
3
A
C
B
E
D
F
Load A4 or Letter-sized plain
paper into the Cassette (A).
This section describes how to perform
a standard copy.
• For details, refer to "5 Load
Paper" on page 16.
Cargue papel normal de tamaño
A4 o Carta en el cassette (A).
En esta sección se describe cómo
llevar a cabo una copia normal.
• Para obtener más información,
consulte "5 Carga del papel"
en la página 16.
1. Open the Paper Output Tray (B).
2. Open the Output Tray Extension (C).
3. Open the Document Cover (D).
If printing starts while the Paper Output Tray is closed, it will
automatically open.
1. Abra la bandeja de salida del papel (B).
2. Abra la extensión de la bandeja de salida (C).
3. Abra la cubierta de documentos (D).
Si la impresión comienza con la bandeja de salida del papel
cerrada, se abrirá automáticamente.
Place the document face-down and align it with the
Alignment Mark (E).
• Do not place objects weighing 4.4 lb / 2.0 kg or more
on the Platen Glass (F), or do not apply pressure to
the document by pressing on it with a force exceeding
4.4 lb / 2.0 kg. The scanner may malfunction or the glass
may break.
Coloque el documento boca abajo y alinéelo con la
marca de alineación (E).
• No coloque ningún objeto que pese 2,0 kg/4,4 lb o más
en el cristal de la platina (F) ni presione el documento
con una fuerza superior a 2,0 kg/4,4 lb. El escáner podría
funcionar incorrectamente o romperse el cristal.
53
4
G
H
I
J
1. Close the Document Cover.
2. Touch the HOME button (G) to display Copy on the HOME screen.
3. Touch the left FUNCTION button (H).
4. Touch the Black button (I) or the Color button (J).
Copying will start. Do not open the Document Cover until copying is complete. Remove the document after printing.
For the procedure to copy on paper
other than plain paper, refer to
"Copying" in the on‑screen manual:
Advanced Guide.
• If Copy is not displayed on the HOME screen, use the { or } button to display Copy.
• When the machine is ready for copying, the Black button and Color button light up.
1. Cierre
2. Toque
3. Toque
4. Toque
la
el
el
el
cubierta de documentos.
botón INICIO (HOME) (G) para acceder a Copiar (Copy) en la pantalla INICIO (HOME).
botón FUNCIÓN (FUNCTION) izquierdo (H).
botón Negro (Black) (I) o Color (J).
Comenzará la copia. No abra la cubierta de documentos hasta que termine la copia. Retire el documento después de imprimir.
• Si no aparece Copiar (Copy) en la pantalla INICIO (HOME), utilice el botón { o } para acceder a Copiar (Copy).
• Cuando el equipo esté preparado para copiar, el botón Negro (Black) y el botón Color se iluminarán.
54
Para obtener información sobre el
procedimiento de copia en papel
distinto del papel normal, consulte
“Copia” en el manual en pantalla:
Guía avanzada.
Print Photos from a Computer
Impresión de fotografías desde un ordenador
1
2
C
3
4
A
B
Load 4" x 6" (10 x 15 cm) photo
paper in the Rear Tray (A) in
portrait orientation with the
printing side facing up.
Start Solution Menu EX from the Canon
Solution Menu EX icon on the desktop
(Windows) or on the Dock (Macintosh),
click Photo Print, then click Photo
Print (C).
Make sure that the Paper Output Tray
(B) is open.
If printing starts while the Paper Output
Tray is closed, it will automatically open.
This section explains how to print
borderless photos using 4" x 6"
(10 x 15 cm) Photo Paper Plus Glossy II.
Easy-PhotoPrint EX starts.
Select the image you want to
print, then click Layout/Print.
When a photo is selected, the number
of copies is set to "1".
Asegúrese de que la bandeja de salida
del papel (B) está abierta.
Si la impresión comienza con la bandeja
de salida del papel cerrada, se abrirá
automáticamente.
En esta sección se explica cómo
imprimir fotografías sin bordes en Papel
Fotográfico Brillo II (Photo Paper Plus
Glossy II) de tamaño 4" x 6" (10 x 15 cm).
• Para obtener más información,
consulte "5 Carga del papel"
en la página 16.
If you are using Windows, printing will
start.
If you are using Macintosh, click Print
on the Print dialog box to start printing.
• For details on starting Solution Menu EX,
refer to page 49.
For more information, refer
to the on-screen manual:
Advanced Guide.
• For details, refer to "5 Load
Paper" on page 16.
Cargue papel fotográfico de
tamaño 4" x 6" (10 x 15 cm)
en la bandeja posterior (A)
con orientación vertical y la
superficie de impresión
hacia arriba.
Click Print.
Inicie Solution Menu EX desde el
icono Canon Solution Menu EX
del escritorio (Windows) o del Dock
(Macintosh) y, a continuación, haga
clic en Impresión fotográfica (Photo
Print) y, seguidamente, en Impresión
fotográfica (Photo Print) (C).
Seleccione la imagen que desee
imprimir y, a continuación,
haga clic en Diseño/Imprimir
(Layout/Print).
Cuando se selecciona una fotografía,
el número de copias se establece en “1”.
Haga clic en Imprimir (Print).
Si utiliza Windows, se iniciará la
impresión.
Si utiliza Macintosh, haga clic en
Imprimir (Print) en el cuadro de
diálogo Imprimir (Print) para iniciar
la impresión.
Se iniciará Easy-PhotoPrint EX.
• Para obtener más información sobre
cómo iniciar Solution Menu EX,
consulte la página 49.
Para obtener más
información, consulte
el manual en pantalla:
Guía avanzada.
55
Copy Specifications
General Specifications
Specifications
13
Printing resolution (dpi)
Multiple copy
9600* (horizontal) X 2400 (vertical)
* Ink droplets can be placed with a pitch of 1/9600 inch at minimum.
Intensity adjustment
Interface
USB Port:
Hi-Speed USB *1
Direct Print Port:
PictBridge
Bluetooth v2.0 (Option) *2 *3 *4
USB flash drive
Infrared Port:
IrDA IR *5
LAN Port:
Wired LAN: 100BASE-TX/10BASE-T
Wireless LAN: IEEE802.11n/IEEE802.11g/IEEE802.11b *6
*1A computer that complies with Hi-Speed USB standard is required.
Since the Hi-Speed USB interface is fully upwardly compatible with
USB 1.1, it can be used at USB 1.1.
*2Maximum speed: 1.44 Mbps
*3JPEG/PNG only
*4Bluetooth connection is for printing only.
*5Maximum speed: 4 Mbps
Operating range: within 20 cm
*6Setup possible through Easy setup, WPS (Wi-Fi Protected Setup)
or WCN (Windows Connect Now).
Print width
8 inches/203.2 mm
(for Borderless Printing: 8.5 inches/216 mm)
Operating environment
Temperature: 5 to 35°C (41 to 95°F)
Humidity: 10 to 90% RH (no condensation)
Storage environment
Temperature: 0 to 40°C (32 to 104°F)
Humidity: 5 to 95% RH (no condensation)
Power supply
AC 100-240 V, 50/60 Hz
Power consumption
Printing (Copy): Approx. 24 W
Standby (minimum): Approx. 2.0 W*
OFF: Approx. 0.5 W*
*USB connection to PC
External dimensions
Approx. 18.5 (W) X 14.5 (D) X 6.9 (H) inches
Approx. 470 (W) X 368 (D) X 173 (H) mm
*With the Paper Support and Paper Output Tray retracted.
Weight
max. 99 pages
9 positions, Auto intensity (AE copy)
Reduction/Enlargement
25% – 400% (1% unit)
Scan Specifications
Scanner driver
TWAIN/WIA (for Windows 7/Windows Vista/Windows XP)
Maximum scanning size
A4/Letter, 8.5" X 11.7" /216 X 297 mm
Scanning resolution
Optical resolution (horizontal X vertical) max: 4800 dpi X 4800 dpi
Interpolated resolution max: 19200 dpi X 19200 dpi
Gradation (Input/Output)
Gray: 16 bit/8 bit
Color: 48 bit/24 bit (RGB each 16 bit/8 bit)
Network Specifications
Communication protocol
TCP/IP
Wired LAN
Supported Standards:IEEE802.3u (100BASE-TX)/IEEE802.3 (10BASE-T)
Transfer speed: 10 M/100 Mbps (auto switching)
Wireless LAN
Minimum System Requirements
Conform to the operating system’s requirements when higher than those
given here.
Supported Standards: IEEE802.11n/IEEE802.11g/IEEE802.11b
Frequency bandwidth: 2.4GHz
Channel: 1-11 or 1-13
*Frequency bandwidth and available channels differ depending on
country or region.
Transfer speed (Standard value):
IEEE802.11n: max. 150 Mbps
IEEE802.11g: max. 54 Mbps
IEEE802.11b: max. 11 Mbps
Communication distance: Indoors 50 m
*Effective range varies depending on the installation environment
and location.
Security:
WEP (64/128 bits)
WPA-PSK (TKIP/AES)
WPA2-PSK (TKIP/AES)
Setup:
WCN (WCN-UFD/WCN-NET)
WPS (Push button configuration/PIN code method)
Other Features: Administration password
Operating System/Processor/RAM
Windows 7
1 GHz or faster 32-bit (x86) or 64-bit
(x64) processor
1 GB (32-bit)/2 GB (64-bit)
Windows Vista, Vista SP1, Vista SP2
1 GHz processor
512 MB
Windows XP SP2, SP3
300 MHz processor
128 MB
Browser
Internet Explorer 6 or later
Safari 3
Hard Disk Space
1.5 GB
Note: For bundled software
installation.
The necessary amount of hard disk
space may be changed without notice.
1.5 GB
Note: For bundled software installation.
The necessary amount of hard disk
space may be changed without notice.
CD-ROM Drive
Required
Required
Display
SVGA 800 x 600
XGA 1024 x 768
• Easy-PhotoPrint Pro is a software plug-in for Canon Digital Photo
Professional Ver. 2.1 or later, Adobe Photoshop CS4, CS3, CS2, CS and
Adobe Photoshop Elements 6, 7*, and 8.
* Windows only.
• Windows: Operation can only be guaranteed on a PC with Windows 7,
Windows Vista or Windows XP pre-installed.
• Windows: Uninstall software bundled with the Canon inkjet printer before
upgrading from Windows Vista to Windows 7, then, install the bundled
software again.
• Some functions may not be available with Windows Media Center.
• Macintosh: Hard Disk must be formatted as Mac OS Extended (Journaled)
or Mac OS Extended.
• Macintosh: After upgrading from Mac OS X v.10.5 or lower to Mac OS X v.10.6,
install software bundled with the Canon inkjet printer.
• Internet Explorer 7 or later is required to install Easy-WebPrint EX.
For Windows use only.
Approx. 9.2 kg (Approx. 20.2 lb)
*With the Print Head and ink tanks installed.
Print Head/Ink
Total 6144 nozzles (PgBK 512 nozzles, Y/DyeBK each 512 nozzles,
C/M/GY each 1536 nozzles)
Specifications are subject to change without notice.
About Consumables
Consumables (ink tanks / FINE Cartridges) are available for 5 years after production has stopped.
56
Mac OS X v.10.6
Intel processor
1 GB
Mac OS X v.10.5
Intel processor, PowerPC G5,
PowerPC G4
(867 MHz or faster)
512 MB
Mac OS X v.10.4.11
Intel processor, PowerPC G5,
PowerPC G4, PowerPC G3
256 MB
Especificaciones de copia
Especificaciones
Especificaciones generales
Resolución de impresión (ppp)
Copia múltiple
9600* (horizontal) x 2400 (vertical)
* Las gotas de tinta se pueden situar con una separación de 1/9600 de
pulgada como mínimo.
Ajuste de intensidad
Interfaz
Puerto USB:
Hi-Speed USB *1
Puerto de impresión directa:
PictBridge
Bluetooth v2.0 (opcional) *2 *3 *4
Unidad flash USB
Puerto de infrarrojos:
IrDA IR *5
Puerto LAN:
LAN cableada: 100BASE-TX/10BASE-T
LAN inalámbrica: IEEE802.11n/IEEE802.11g/IEEE802.11b *6
*1Es necesario un ordenador compatible con el estándar Hi-Speed USB.
Puesto que la interfaz Hi-Speed USB es totalmente compatible con
USB 1.1, también se puede utilizar con USB 1.1.
*2Velocidad máxima: 1,44 Mbps
*3Sólo JPEG/PNG
*4La conexión Bluetooth sólo sirve para imprimir.
*5Velocidad máxima: 4 Mbps
Alcance operativo: dentro de una distancia de 20 cm
*6Configuración posible a través de Configuración fácil (Easy setup),
WPS (Wi-Fi Protected Setup) o WCN (Windows Connect Now).
Ancho de impresión
8 pulg./203,2 mm
(para la impresión sin bordes: 8,5 pulg./216 mm)
Entorno de funcionamiento
Temperatura: de 5 a 35 °C (41 a 95 °F)
Humedad: del 10 al 90% (humedad relativa sin condensación)
Entorno de almacenamiento
Temperatura: de 0 a 40 °C (32 a 104 °F)
Humedad: del 5 al 95% (humedad relativa sin condensación)
Suministro eléctrico
100 a 240 V de CA, 50/60 Hz
Consumo
Impresión (copia): 24 W aprox.
En espera (mínimo): 2,0 W aprox.*
Apagado: 0,5 W aprox.*
*Conexión USB al ordenador
Dimensiones externas
18,5 (An) x 14,5 (Pr) x 6,9 (Al) pulg. aprox.
470 (An) x 368 (Pr) x 173 (Al) mm aprox.
*Con el soporte del papel y la bandeja de salida del papel retraídos.
Requisitos mínimos del sistema
Cumple los requisitos del sistema operativo cuando son mayores que los
mencionados aquí.
99 páginas máximo
9 posiciones, intensidad automática (copia AE)
Reducción/ampliación
25 – 400% (unidad de 1%)
Especificaciones de escaneado
Controlador del escáner
TWAIN/WIA (para Windows 7/Windows Vista/Windows XP)
Tamaño máximo de escaneado
A4/Carta, 8,5 x 11,7"/216 x 297 mm
Resolución de escaneado
Resolución óptica (horizontal X vertical) máx: 4800 ppp x 4800 ppp
Resolución interpolada máx: 19 200 ppp x 19 200 ppp
Gradación (Entrada/Salida)
Gris: 16 bits/8 bits
Color: 48 bits/24 bits (RGB cada 16 bits/8 bits)
Sistema operativo/Procesador/RAM
Windows 7
Procesador a 1 GHz o superior de 32
bits (x86) o 64 bits (x64)
1 GB (32 bits)/2 GB (64 bits)
Windows Vista, Vista SP1, Vista SP2
Procesador a 1 GHz
512 MB
Windows XP SP2, SP3
Procesador a 300 MHz
128 MB
Zona de búsqueda
Internet Explorer 6 o posterior
Protocolo de comunicación
LAN alámbrica
Necesario
TCP/IP
Estándares compatibles:
IEEE802.3u (100BASE-TX)/IEEE802.3
(10BASE-T)
Velocidad de transferencia: 10 M/100 Mbps (cambio automático)
LAN inalámbrica
Estándares compatibles: IEEE802.11n/IEEE802.11g/IEEE802.11b
Ancho de banda de frecuencia: 2,4 GHz
Canal: 1-11 o 1-13
*El ancho de banda de frecuencia y los canales disponibles difieren
en función del país o región.
Velocidad de transferencia (valor estándar):
IEEE802.11n: máx. 150 Mbps
IEEE802.11g: máx. 54 Mbps
IEEE802.11b: máx. 11 Mbps
Distancia de las comunicaciones: interior 50 m
*El alcance efectivo varía según el entorno de la instalación y la ubicación.
Seguridad:
WEP (64/128 bits)
WPA-PSK (TKIP/AES)
WPA2-PSK (TKIP/AES)
Configuración:
WCN (WCN-UFD/WCN-NET)
WPS (configuración de pulsador/método de código PIN)
Otras funciones: contraseña de administración
Safari 3
Espacio en el disco duro
1,5 GB
Nota: para instalar el software incluido.
El espacio disponible en el disco duro
puede cambiar sin aviso.
Especificaciones de red
Mac OS X v.10.6
Procesador Intel
1 GB
Mac OS X v.10.5
Procesador Intel, PowerPC G5,
PowerPC G4
(867 MHz o superior)
512 MB
Mac OS X v.10.4.11
Procesador Intel, PowerPC G5,
PowerPC G4, PowerPC G3
256 MB
1,5 GB
Nota: para instalar el software incluido.
El espacio disponible en el disco duro
puede cambiar sin aviso.
Unidad de CD-ROM
Necesario
Pantalla
SVGA 800 x 600
XGA 1024 x 768
• Easy-PhotoPrint Pro es un plug-in de software para Canon Digital Photo
Professional Ver. 2.1 o posterior, Adobe Photoshop CS4, CS3, CS2, CS
y Adobe Photoshop Elements 6, 7* y 8.
* Sólo Windows.
• Windows: sólo se garantiza el funcionamiento en un PC con Windows 7,
Windows Vista o Windows XP preinstalado.
• Windows: desinstale primero el software incluido con la impresora de
inyección de tinta Canon antes de actualizar de Windows Vista a Windows 7
y, a continuación, vuelva a instalar el software incluido.
• Es posible que algunas funciones no estén disponibles con Windows
Media Center.
• Macintosh: el disco duro debe estar formateado como Mac OS Plus
(con registro) o Mac OS Plus.
• Macintosh: después de actualizar de Mac OS X v.10.5 o inferior
a Mac OS X v.10.6, instale el software incluido con la impresora de
inyección de tinta Canon.
• Se necesita Internet Explorer 7 o posterior para instalar Easy-WebPrint EX.
Para uso sólo en Windows.
Peso
9,2 kg (20,2 lb) aprox.
*Con el cabezal de impresión y los depósitos de tinta instalados.
Cabezal de impresión/tinta
Total: 6144 inyectores (PgBK 512 inyectores, Y/DyeBK 512 inyectores
cada uno, C/M/GY 1536 inyectores cada uno)
Especificaciones sujetas a cambios sin previo aviso.
Acerca de los consumibles
Los consumibles (depósitos de tinta/cartuchos FINE (FINE Cartridges)) estarán disponibles durante 5 años después de haber dejado
de fabricar el producto.
57
Getting Help from Canon
Ayuda de Canon
Email Tech Support — www.canontechsupport.com
Soporte técnico por correo electrónico:
www.canontechsupport.com
Please note, from there you will need to select your product, then click on
the “Support by Email” link under Tech Support.
Toll-Free Tech Support — 1-800-OK-CANON
Tenga en cuenta que, desde esa página, tendrá que seleccionar el
producto y a continuación hacer clic en el vínculo “Support by Email”
situado bajo Tech Support.
This option provides live telephone technical support, free of service
charges, Monday-Friday (excluding holidays), during the warranty period. Soporte técnico telefónico gratuito: 1-800-OK-CANON
Telephone Device for the Deaf (TDD) support is available at 1-866-251-3752. Esta opción proporciona soporte técnico telefónico, libre de cargos, de
lunes a viernes (excepto festivos), durante el periodo de garantía.
El soporte mediante dispositivo telefónico para personas con discapacidad
auditiva (TDD) está disponible en 1-866-251-3752.
Ordering Information
Información de pedidos
The following ink tanks are compatible with this machine.
CLI-226M
CLI-226BK
CLI-226GY
PGI-225PGBK
CLI-226C
CLI-226Y
Los depósitos de tinta siguientes son compatibles con este equipo.
N.º de referencia
Order #
4548B001
4546B001
4550B001
4530B001
4547B001
4549B001
CLI-226M
CLI-226BK
CLI-226GY
PGI-225PGBK
CLI-226C
CLI-226Y
Call 1-800-OK-CANON to locate a dealer near you, or visit the Canon
online store at www.shop.usa.canon.com
4548B001
4546B001
4550B001
4530B001
4547B001
4549B001
Llame a 1-800-OK-CANON para localizar un distribuidor cercano o visite
la tienda en línea Canon en www.shop.usa.canon.com
CANON U.S.A. INC.
One Canon Plaza, Lake Success, NY 11042 U.S.A.
www.usa.canon.com
QT5-3036-V01
XXXXXXXX
©CANON INC.2010
PRINTED IN THAILAND