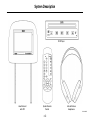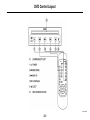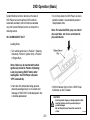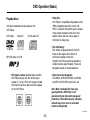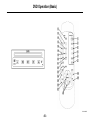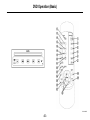
1
BMW DVD Rear Seat Entertainment System
For your driving enjoyment.
CN1013887ID
This page will be blank (inside front cover)
CN1013887ID
!
Important Safety Precautions
This manual provides important information that
will help you safely operate the BMW DVD Rear
Seat Entertainment System. Please read it
completely before using the system. Failure
to follow the cautions or instructions in this
manual could result in a severe personal injury
accident and/or damage to the system.
Maintain audio volume at a level where you can
still hear outside sounds while driving. Failure
to do so may result in an accident, or failure to
hear emergency vehicles.
To avoid draining the vehicle battery, do not
operate the system more than 15 minutes
without starting the engine.
It is always important to operate your vehicle in
a safe manner and to avoid distractions while
driving. Under certain driving conditions, you
may need to turn the Rear Seat Entertainment
System ‘OFF’ to avoid distraction and to focus
all of your attention on the driving task.
Halt use immediately if a problem occurs.
Failure to do so may cause personal injury or
damage to the product. Return to the nearest
BMW Center for repair.
Do not operate any function that diverts your
attention from safely driving your vehicle. Any
function that requires your prolonged attention
should only be performed after coming to a
complete stop in a safe location.
CN1013887ID
–1–
Welcome
Congratulations on your purchase! BMW’s DVD Rear Seat Entertainment System is a sophisticated product designed to
provide many hours of video enjoyment for rear seat passengers.
Thorough review of this owner’s manual prior to operation will provide the best performance and help explain the simple
requirements for proper care.
BMW of North America, LLC
Note: Due to the expertise required to properly install BMW’s DVD Rear Seat Entertainment System, BMW
highly recommends that a BMW Center perform the installation. Proper wiring, component placement,
and adjustment are essential for optimum system performance.
CN1013887ID
–2–
Table of Contents
Important Safety Precautions . . . . . . . . . . . . . . 1
DVD Basic Operation . . . . . . . . . . . . . . . . . . . . 21-33
Welcome . . . . . . . . . . . . . . . . . . . . . . . . . . . . . . 2
DVD Advanced Operation . . . . . . . . . . . . . . . . . 34-41
Table of Contents . . . . . . . . . . . . . . . . . . . . . . . 3
System Remote Control Layout and Operation 42-49
System Description . . . . . . . . . . . . . . . . . . . . . . 4-5
Headphone Control Layout and Operation . . . . 50-53
Quick Reference Guide . . . . . . . . . . . . . . . . . . . 6
Optional Accessories . . . . . . . . . . . . . . . . . . . . . 54
Monitor Control Layout . . . . . . . . . . . . . . . . . . . 8-9
Troubleshooting . . . . . . . . . . . . . . . . . . . . . . . . . 55-58
Monitor Operation . . . . . . . . . . . . . . . . . . . . . . . 10-19
Care and Maintenance . . . . . . . . . . . . . . . . . . . 59
DVD Control Layout . . . . . . . . . . . . . . . . . . . . . 20
Specifications . . . . . . . . . . . . . . . . . . . . . . . . . . 60-61
CN1013887ID
–3–
System Description
DVD Player
Head Restraint
with LCD
System Remote
Control
Infrared Wireless
Headphones
CN1013887ID
–4–
System Description
The BMW DVD Rear Seat Entertainment System
consists of the following:
• Head restraints with wide-screen 7˝ LCD
Monitors (x2)
• DVD Player
• Wireless System Remote Control
• Infrared Wireless Headphones (x2)
• Owner’s manual
CN1013887ID
–5–
Quick Reference Guide
Following these steps will allow quick access to the
functions of BMW’s DVD Rear Seat Entertainment
System.
4. Press POWER button on DVD Player. (Control button backlighting will be illuminated.) DVD Player may
also be switched ‘ON’ using the DVD POWER button
on System Remote Control. (Refer to page 45,
Figure 11, ‘DVD POWER’)
Please refer to complete Owner’s Manual for additional
and more detailed information.
5. Insert DVD into DVD Player in center console if a
disc is not currently loaded. (Refer to page 21,
Figure 10, ‘Loading Discs’)
1. Turn vehicle ignition key to Position 1 (Steering
Unlocked), Position 2 (Ignition ON), or Position 3
(Engine Start).
6. Press PLAY button on System Remote Control to
start DVD play. (Refer to page 45, Figure 14,
‘PLAY/PAUSE’)
Note: System will not function in vehicle
ignition key Position 0 (Steering Lock).
2. Press POWER buttons on Monitors. (Red LEDs
located adjacent to the power buttons will illuminate.)
Monitors may also be switched ‘ON’ using the
Monitor POWER button on System Remote Control.
(Refer to page 43, Figure 1, ‘Monitor POWER’)
7. Press POWER buttons on headphones. Set headphone channel A/B as appropriate. (Refer to page 51
‘Headphones Control Layout and Operation’)
3. Press Audio/Video SOURCE button on Monitors until
‘AV 1’ mode is selected, (Refer to page 9, Figure 2,
‘Audio/Video SOURCE’) The ‘SEL’ button on
System Remote Control may also be used to change
sources. (Refer to page 43, Figure 2, ‘SEL’)
CN1013887ID
–6–
Notes
CN1013887ID
–7–
Monitor Control Layout
CN1013887ID
–8–
Monitor Control Layout
6 INFRARED LED TRANSMITTER
(for wireless headphones)
1 POWER
2 SOURCE (SEL on System Remote Control)
AV 1 (DVD Player)
AV 2 (Monitor AUX Input)
AV 3 (Optional Global AUX Input Jack)
7 AUX Input Jack (AV 2)
8 HEADPHONE JACK
9 INFRARED REMOTE SENSOR
(receives signals from System Remote Control)
3 MENU
• CONTRAST
• BRIGHTNESS
• COLOR
• TINT
• SHARPNESS
• Screen MODE
(ZOOM on System Remote Control)
• WIDE SCREEN
• ZOOM SCREEN
• NORMAL SCREEN
• RESET DEFAULT
4 s (UP)
5 t (DOWN)
CN1013887ID
–9–
Monitor Operation
CN1013887ID
–10–
Monitor Operation
Control function operations for the LCD Monitors are
also controllable from corresponding buttons on the
System Remote Control. Monitor control functions are
displayed on-screen for 3 seconds when operated.
• ‘SCREEN OFF’ – Monitor will default to a
power-off condition as vehicle is restarted.
• ‘SCREEN ON’ – Monitor will default to a poweron condition as vehicle is restarted.
Notes:
• Under cold temperature conditions,
monitors may lose contrast temporarily,
however contrast will return to normal
after a short warm-up period.
• ‘SCREEN AUTO’– Monitor will default to last
power on/off condition that existed when vehicle
was shut down. (SCREEN AUTO is factory-set
power start-up mode.)
2 Audio/Video SOURCE – (Marked SEL on System
Remote Control) Each monitor may be independently
cycled between three audio/video sources:
• It is normal for a very small number of
monitor’s pixels to be off. This is unavoidable even with high precision manufacturing
processes.
AV 1
1 POWER – Switches Monitor ‘ON/OFF’ with vehicle
ignition key in Position 1 (Steering Unlocked),
Position 2 (Ignition ON) or Position 3 (Engine Start).
AV 2
AV 3
Note: Audio/video sources must be
compatible with standard NTSC composite
video outputs
Performance Note:
Monitors may be adjusted by a BMW Center to
default to one of three power start-up modes:
• AV 1 : DVD Player (vehicle mounted)
CN1013887ID
–11–
Monitor Operation
CN1013887ID
–12–
Monitor Operation
3 Monitor MENU – Cycles between basic Monitor
control functions:
• AV 2 : Monitor AUX input jack (Figure 7).
Permits viewing of auxiliary sources such as
portable DVD players, game stations, video
cameras, etc., on each individual monitor.
CONTRAST
Note: Connection requires optional Auxiliary
Input Adapter Cable, Part Number 84 11 0
392 065.
RESET
• AV 3 : Optional Global AUX input jack, (center
console mounted). Permits viewing of auxiliary
sources such as portable DVD players, game
stations, video cameras, etc., on each monitor
individually, or both monitors simultaneously.
BRIGHTNESS
MODE
COLOR
TINT
SHARPNESS
Adjust by pressing the Monitor tDOWN or
s UP buttons:
• CONTRAST: Adjusts picture contrast.
• BRIGHTNESS: Adjusts picture brightness.
Note: Connection requires optional AV 3
Global Auxiliary Input Jack, Part Number
84 11 0 392 068, and Auxiliary Input Adapter
Cable Part Number 84 11 0 392 065.
• COLOR: Adjusts picture color balance.
• TINT: Adjusts picture tint.
• SHARPNESS: Adjusts picture sharpness.
CN1013887ID
–13–
Monitor Operation
CN1013887ID
–14–
Monitor Operation
Note: Thickness of black stripes displayed will vary
according to the aspect ratio the original theatrical
release was recorded in.
• SCREEN – (Monitor ZOOM on System
Remote Control).
o WIDE SCREEN: Expands a ‘Full Frame’
formatted DVD to fit entire monitor.
Proportionally stretches a ‘Widescreen’
formatted DVD to fit the entire width of
monitor, (leaving black stripes at top and
bottom of the monitor).
Performance Note:
To have a ‘Full Frame’ formatted DVD fill the entire
monitor, set SCREEN (Monitor ZOOM on System
Remote Control) to WIDE SCREEN or ZOOM
SCREEN according to preference.
To have most ‘Widescreen’ formatted DVDs fill the
entire monitor, set SCREEN (Monitor ZOOM on System
Remote Control) to ZOOM SCREEN, and DVD ZOOM
(on System Remote Control) to ZOOM 1 level. (Refer
to page 47, Figure 23 ‘DVD ZOOM’).
o ZOOM SCREEN: Expands a ‘Full
Frame’ formatted DVD (4:3) to fit entire
monitor by stretching only left and right
side video information. Similarly stretches
a ‘Widescreen’ formatted DVD, (leaving
black stripes at top and bottom of the
monitor).
RESET DEFAULT – Resets all monitor control
functions to default (center point) settings.
o NORMAL SCREEN: Displays any format
DVD without modification. Playing a ‘Full
Frame’ formatted DVD will show black
stripes at left and right sides of the
monitor. Playing a ‘Widescreen’ formatted DVD will show black stripes on all
sides of the monitor.
CN1013887ID
–15–
Monitor Operation
CN1013887ID
–16–
Monitor Operation
6 Infrared LED WINDOW – Contains infrared light emitting diodes that transmit audio signals to the wireless
headphones.
4 s UP - Two functions are accessible using this button
on Monitor or System Remote Control:
• Increases volume for a universal wired headphone (not supplied with system), plugged into
monitor HEADPHONE JACK (Figure 8).
Performance Note:
IR transmission is a line-of-sight signal;
therefore this window must remain
unobstructed at all times. The LED’s
normally emit a soft red glow.
• When used in conjunction with Monitor MENU
button (Figure 3), s UP button increases the
selected control function.
7 A/V 2 AUX Input Jack - Monitor-mounted auxiliary
input jack permits viewing of auxiliary sources such
as portable DVD units, game stations, video cameras, etc., on each individual monitor. Selectable
using SOURCE buttons on Monitors, or SEL button
on System Remote Control.
5 tDOWN - Two functions are accessible using this
button on Monitor or System Remote Control:
• Decreases volume for a universal wired headphone (not supplied with system), plugged into
the monitor HEADPHONE JACK (Figure 8).
Note: Connection requires optional
Auxiliary Input Adapter Cable, Part
Number 84 11 0 392 065.
• When used in conjunction with Monitor MENU
button (Figure 3), tDOWN button decreases
the selected control function.
CN1013887ID
–17–
Monitor Operation
CN1013887ID
–18–
Monitor Operation
8 Wired HEADPHONE JACK – Permits connection of
a universal wired headphone. Wired headphone
volume is adjusted using s UP and tDOWN
buttons (Figures 4 and 5).
Note: Requires universal wired headphones
with 3.5 mm stereo phone jack (not supplied
with system).
9 INFRARED REMOTE SENSOR – Receives signals
from System Remote Control.
Performance Note:
IR transmission is a line-of-sight signal;
therefore this sensor must remain
unobstructed at all times.
CN1013887ID
–19–
DVD Control Layout
CN1013887ID
–20–
DVD Operation (Basic)
System Remote Control or buttons on the face of
DVD Player can control primary DVD functions.
Advanced secondary control functions accessible
only with System Remote Control are noted in the
following section.
• Do not force discs into DVD Player. As disc is
partially inserted, it is automatically drawn in
and playback starts.
Note: For two-sided DVDs, play one side of
disc, eject disc, turn it over, and reload to
play second side.
10 LOADING/EJECT SLOT
Loading Discs:
• Turn vehicle ignition key to Position 1 (Steering
Unlocked), Position 2 (Ignition ON), or Position
3 (Engine Run).
Note: A disc may be inserted with vehicle
ignition key turned to Position 0 (Steering
Lock), by pressing EJECT button. After
loading disc, the DVD Player will power
‘OFF’ automatically.
• Insert disc with printed side facing upwards,
(towards passenger-seat). An on-screen error
message of “BAD DISC” will be displayed if disc
is inserted upside-down.
• DISC IN indicator light on front of DVD Player
illuminates as disc is loaded.
!
–21–
CAUTIONS:
• Inserting hands, fingers, or foreign objects in Disc
insertion slot may result in personal injury or
product damage.
• Do not attempt to insert more than one disc at
a time.
CN1013887ID
DVD Operation (Basic)
CN1013887ID
–22–
DVD Operation (Basic)
• Video CDs
DVD Player is compatible with playback control
(PBC) compatible video CDs (version 2.0).
‘PBC’ is a function that permits users to access
menu screens recorded on the disc to find
specific scenes and view various types of
information in dialog style.
Playable discs
Only discs listed below can be played on this
DVD Player.
DVD-Video
Video-CD
CD-DA Audio CD
• Disc terminology
Title: If titles are programmed for the DVD,
these are the largest unit of division of
information recorded on the disc.
Chapter: Each Title may also be divided into
smaller divisions called Chapters. These can
be specific scenes or musical selections.
MP3 CD Audio on CD-R
• DVD region number (playable region number)
DVD Player will play any disc whose region
number is 1 (or All). DVDs with a region number
other than those shown below cannot be played
on this DVD Player.
• Discs that cannot be played:DVD-ROMs, DVD-R/DVD-RAMs, CD-ROMs,
non-MP3 CD-R/CD-RWs, photo CDs, etc.
Note: Many new Audio CDs have copy
guard protection. DVD Player is not
guaranteed to play discs with copy guard
protection. If these discs do play, abnormal
behavior may occur, such as some disc
tracks not being listed.
CN1013887ID
–23–
DVD Operation (Basic)
CN1013887ID
–24–
DVD Operation (Basic)
!
CAUTIONS:
• Attempting to play a cracked, warped, irregularly
shaped, or damaged disc could severely damage
DVD Player playback mechanism.
• Make sure discs inserted in DVD Player do not have
irregularities. Outer and inner edges must be round
and smooth. DVD Player automatically ejects discs
with irregular surfaces as a protective measure to
prevent jamming and mechanism damage. If a new
disc inserted is ejected after initial loading; run a
finger around inside of disc’s center hole and outside edge to ensure outer and inner edges are round
and smooth. Small bumps or irregularities could
inhibit proper disc loading. To remove bumps, rub
inside edge of the hole and disc’s outside edge with
the flat, curved, side of a ballpoint pen or other such
instrument before reinserting disc.
• An on-screen error message of “BAD DISC” will be
displayed if disc inserted cannot be read due to
incorrect format, physical damage, or upside-down
insertion.
12 SKIP DOWN - Return to beginning of currently
playing chapter or track during playback or
pause modes.
13 SKIP UP - Advance to beginning of next chapter or
track during playback or pause modes.
14 PLAY/PAUSE - Cycles DVD Player between PLAY
and PAUSE modes. On DVDs and video CDs with
playback control (PBC), menu screens may appear
automatically. It may be necessary to press ENTER
button (Figure 27) on System Remote Control, or
PLAY/PAUSE button again to commence play.
Performance Notes:
• For some discs, disc menu screen may
be displayed by pressing TITLE or MENU
buttons.
11 DVD POWER - Switches DVD Player ‘ON’/’OFF’
with vehicle ignition in Position 1 (Steering
Unlocked), Position 2 (Ignition ‘ON’) or Position 3
(Engine Run).
• Driving on very bumpy roads while playing
discs may result in skips, but will not scratch
discs or damage DVD Player because discs
are read optically.
Note: DVD Player will power itself ‘OFF’ if left
idle for more than 5 minutes to help conserve
system life.
CN1013887ID
–25–
DVD Operation (Basic)
CN1013887ID
–26–
DVD Operation (Basic)
Play Position Memory Feature
• Playback will stop as DVD Player or Vehicle
Ignition is switched ‘OFF’.
!
• When power is restored, DVD Player will
resume playback from the same point it
stopped. (It may take up to 5 seconds before
DVD disc resumes playback.)
CAUTIONS:
• Do not attempt to grip or pull disc out while it is
being pulled back into the player by the automatic
reloading mechanism.
• As a disc is ejected, DISC IN indicator light on
face of DVD Player turns ‘OFF’.
• Play position memory is erased if disc is
removed or reset switch on face of DVD Player
is pressed.
Performance Note: DVD Control button
backlighting can be switched ‘ON/OFF’ by
pressing and holding EJECT button for more
than three seconds.
15 EJECT - Discs may be ejected with vehicle ignition
key in Position 1 (Steering Unlocked), Position 2
(Ignition ON), or Position 3 (Engine Start).
16 DISC IN INDICATOR LED - Illuminates to indicate a
disc is loaded in DVD Player.
Note: Disc can also be ejected with vehicle
ignition key turned to Position 0 (Steering
Lock) by pressing EJECT button. DVD Player
powers ‘OFF’ automatically after unloading
disc.
17 STOP - (Remote function only) Press n STOP button on System Remote Control during playback to
stop playback. Disc position will be automatically
stored in memory.
• Press EJECT button to eject the disc. If you fail
to remove disc within 15 seconds, the DVD
Player will automatically reload disc.
CN1013887ID
–27–
DVD Operation (Basic)
CN1013887ID
–28–
DVD Operation (Basic)
PRE-STOP feature (DVD, Video CD only) - PRESTOP feature permits playback to resume from position
where it was stopped.
19 FAST FORWARD - (Remote function only) Fast
search in forward direction during play or pause.
Plays at 2X, 4X, 8X, or 20X speeds in sequence
with multiple momentary presses. Press
PLAY/PAUSE button to resume normal playback.
• Press n STOP button once during playback.
DVD startup screen is displayed showing n
STOP symbol (symbol disappears after three
seconds). Pressing n STOP button a second
time, or ejecting disc will cancel PRE-STOP
mode and clear disc position memory.
Note: Audio is muted during this operation.
20 SLOW REVERSE - (Remote function only) Review
backwards in slow motion during play or pause
modes. Plays at 1/2, 1/3, 1/4, 1/5, 1/6 or 1/7 of normal speed, with multiple momentary presses. Press
PLAY/PAUSE button twice to resume normal
playback.
• Pressing
PLAY/PAUSE button resumes
playback from position at which it was stopped.
Note: For some discs, position at which
playback restarts may not be accurate.
Note: Audio is muted during this operation.
21 SLOW FORWARD - (Remote function only) Press
to review forward in slow motion during play or
pause modes. Plays at 1/2, 1/3, 1/4, 1/5, 1/6 or 1/7
of normal speed, with multiple momentary presses.
Press
PLAY/PAUSE button twice to resume normal playback.
18 FAST REWIND - (Remote function only) Fast
search in backwards direction during play or pause.
Plays at 2X, 4X, 8X, or 20X speeds in sequence
with multiple momentary presses. Press
PLAY/PAUSE button to resume normal playback.
Note: Audio is muted during this operation.
Note: Audio is muted during this operation.
CN1013887ID
–29–
DVD Operation (Basic)
CN1013887ID
–30–
DVD Operation (Basic)
22 TITLE - (Remote function only) Press with disc
loaded/playing to view disc TITLE mode.
25 REPEAT - (Remote function only) Cycles between
repeat functions during disc playback (Title/Chapter/
Off). Use this function to play the disc’s titles, chapters or tracks repeatedly.
Note: Due to the wide variety of digital media
available, this feature may not work the same
for all discs or may not work at all with
specific discs.
RPT Off – repeat playback is off
RPT TITLE – play entire disc over when finished
RPT CHPT – repeat only current chapter or track
23 DVD ZOOM - (Remote function only) Zoom in on
video images during play or pause modes. Zooms at
Levels 1, 2, 3, or ZOOM OFF, with multiple momentary presses. In zoom modes, DIRECTION ARROW
buttons (Figure 28) can be used to change monitorviewing area.
26 DISPLAY - (Remote function only) Cycles between
display functions during disc playback (elapsed/
remaining time, full information, off). Refer to
Displaying Disc Status section in DVD
Advanced Operation
Note: DVD Player defaults to ZOOM OFF any
time disc play is stopped.
27 ENTER - (Remote function only) Press to enter
selections when navigating menus.
24 SUBTITLE - (Remote function only) Cycles between
default language set on DVD Player, two additional
languages that may be recorded on the disc itself, or
subtitle ‘OFF’.
28 DIRECTION ARROW - (Remote function only) Use
to navigate up, down, or laterally through menus. In
zoom modes DIRECTION ARROW buttons can be
used to change monitor-viewing area.
Note: Most DVD Discs are recorded to include
three languages. Normally Region 1 discs
(North America) are recorded to include
English, Spanish, and French.
CN1013887ID
–31–
DVD Operation (Basic)
CN1013887ID
–32–
DVD Operation (Basic)
29 DVD MENU - (Remote function only) Two functions
are accessible using this button:
Function #1:
disc is playing.
Enter DVD Disc Menu while
Note: Menu offered is disc dependent.
Function #2:
DVD Player Default Setup
(Refer to DVD Advanced Operation Section)
30 RANDOM – (Remote function only) Plays disc’s
titles, chapters or tracks randomly during disc playback. RANDOM feature cycles between ‘ON’ and
‘OFF’ with multiple presses.
CN1013887ID
–33–
DVD Operation (Advanced)
MP3 Playing Order
When selected for play, Folder Selecting, or Track
Selecting, files and folders are accessed in order in
which they were written to the CD. Because of this,
the order in which they are expected to be played may
not match the order in which they are actually played.
For example, a medium with the following folder/file
hierarchy is subject to Folder Selecting, or Track
Selecting as shown in diagram.
PLAYING MP3 DISCS:
MP3 On Screen Display
When playing a MP3 CD, the name of the folder will be
shown on the monitor’s top line. Names of songs will
be shown in columns underneath.
CN1013887ID
–34–
DVD Operation (Advanced)
DISPLAYING DISC STATUS:
Press DISPLAY (Figure 26) on System Remote Control
to show status (title number, chapter number, etc.) of
disc being played. Total elapsed time and current
chapter elapsed time will be displayed. Press
DISPLAY a second time to display playback status:
Press DISPLAY a third time to turn display ‘OFF’.
CN1013887ID
–35–
DVD Operation (Advanced)
DISPLAYING VIDEO CD DISC STATUS:
Press DISPLAY (Figure 26) on System Remote Control
to show status (title number, chapter number, etc.) of
Video CD being played. Total elapsed time and current
track elapsed time will be displayed. Press DISPLAY a
second time to display playback status:
Press DISPLAY a third time to turn display ‘OFF’.
CN1013887ID
–36–
DVD Operation (Advanced)
MODIFYING DVD PLAYER DEFAULT
SETTINGS (SETUP)
Changing DVD Player Default Languages:
OSD (on screen display) language, subtitle language,
audio language, and DVD menu language can be set
according to personal preferences. The OSD can also
be switched ‘ON/OFF’. (Factory default language set
is ‘English’.)
Factory default settings can be modified to suit
personal preferences. With playback stopped, press
DVD MENU button on System Remote Control to
display default SETUP menu:
Language
Video
Audio
Ratings
Use left and right DIRECTION ARROW buttons on
System Remote Control to select LANGUAGE from
SETUP menu, and press ENTER on System Remote
Control (highlight indicates current selection). Use up
and down DIRECTION ARROW buttons to select one
of five choices, and press ENTER to accept setting.
Press DVD MENU button at any time to exit
SETUP menu.
Notes:
• Default settings are overwritten as settings
are changed. Make a note of current
settings before making changes. Settings
are retained even if vehicle’s battery is
disconnected.
• OSD Menu: Set language for DVD Player menus:
OSD Menu
Subtitle
Audio
DVD Menu
OSD
• Some of the menu selections are not
applicable to this system. Only those
items that are explained in these
pages should be changed.
English
Off
English
English
On
English
Chinese
Spanish
CN1013887ID
–37–
DVD Operation (Advanced)
• DVD Menu: Set language of the DVD menus.
• Subtitle: Set language of subtitle text. In “AUTO”
mode, priority language for the disc being played
is used:
OSD Menu
Subtitle
Audio
DVD Menu
OSD
English
Off
English
English
On
OSD Menu
Subtitle
Audio
DVD Menu
OSD
English
Chinese
Spanish
Auto
Off
English
Off
English
English
On
English
Chinese
Spanish
• OSD: Turn OSD ‘ON/OFF’
OSD Menu
Subtitle
Audio
DVD Menu
OSD
• Audio: Set audio language reproduced from
headphones/speakers:
OSD Menu
Subtitle
Audio
DVD Menu
OSD
English
Off
English
English
On
English
Chinese
Spanish
English
Off
English
English
On
Note: If a disc being played has not been
recorded with the default language selected
on DVD Player Default Setup Menu, the
priority language recorded on the disc itself
will determine the language reproduced.
CN1013887ID
–38–
DVD Operation (Advanced)
4:3 LETTERBOX: Select when connected to a
normal 4:3 (conventional TV aspect ratio)
monitor. There may be black stripes visible at
top and bottom of the monitor. The width of
these stripes will vary depending upon original aspect ratio (wide range of variation) of
the theatrical release of the movie.
Changing Video settings:
Picture shape, video format, picture brightness, and
picture sharpness can be set according to personal
preferences.
Use left and right DIRECTION ARROW buttons to
select VIDEO from SETUP menu, and press ENTER
(highlight indicates current selection). Use up and down
DIRECTION ARROW buttons to select one of four
choices, and press ENTER.
• TV Shape: Set picture shape for different types of
monitors. (Factory default TV Shape set is ‘4:3
Letterbox’):
16:9: Select when connected to a wide screen
16:9 aspect ratio monitor.
4:3 PAN-SCAN: Select when connected to a normal 4:3 (conventional TV aspect ratio). The picture will fill the entire monitor, however due to
mismatch in aspect ratio, parts of the movie at
extreme left and right sides will not be visible.
TV Shape
Video
Brightness
Edges
4:3 Pan Scan
Auto
Off
Off
4:3 Pan Scan
4:3 Letter Box
16:9
CN1013887ID
–39–
DVD Operation (Advanced)
• Video: Sets video format used by DVD Player. NTSC
is standard for North America and there is no need to
change this setting. (Factory default Video setting is
‘Auto’)
TV Shape
Video
Brightness
Edges
4:3 Pan Scan
Auto
Off
Off
Changing Audio settings:
The type of audio that is output to speakers for each
type of audio encoding process can be set according to
personal preferences. In ‘2 channel’ mode, the selected
encoding is processed for two channel output. In “Off”
mode, regular stereo output is used. (Factory default
Audio settings are all ‘2 Channel’)
NTSC
PAL
PAL 60
Auto
Performance Note: It is recommended that
Audio settings not be changed to avoid
adversely affecting audio quality!
• Brightness: Set picture brightness output from DVD
Player. (Factory default Brightness setting is ‘Off’)
TV Shape
Video
Brightness
Edges
4:3 Pan Scan
Auto
Off
Off
Off
On
Use left and right DIRECTION ARROW buttons to
select AUDIO from SETUP menu, and press ENTER
(highlight indicates current selection). Use up and down
DIRECTION ARROW buttons to select one of four
choices, and press ENTER to change.
• Edges: Set picture sharpness output from DVD
Player. (Factory default Edges setting is ‘Off’)
TV Shape
Video
Brightness
Edges
4:3 Pan Scan
Auto
Off
Off
DOLBY Digital
DTS
MP3
Other
Off
Sharpen
Soften
Analog Out
2 Channel
2 Channel
2 Channel
2 Channel (Reserved for
future use)
CN1013887ID
–40–
DVD Operation (Advanced)
Notes:
• On un-rated DVDs, playback will not be
restricted even if rating level is set. If you
are unsure about a DVD, play it first to
confirm. Do not leave DVDs you deem
inappropriate accessible to young children.
Changing Rating settings:
Use to restrict movie viewing for children of appropriate
age levels. (Factory default Rating setting is ‘8. Adult’)
Use left and right DIRECTION ARROW buttons to
select RATINGS from SETUP menu, and press ENTER
(highlight indicates current selection). Use the down
DIRECTION ARROW button to select RATING, and
press ENTER to change. Available ratings are:
• Rating level remains in memory until
changed. To enable play of discs of higher
rating levels, this setting must be changed.
1. Kid Safe
2. G
3. PG
4. PG_13
5. PG_R
6. R
7. NC_17
8. Adult
Password_ _ _ _ –
Rating
1. Kid Safe
Note: Password protection is not implemented in
this version.
CN1013887ID
–41–
System Remote Control Layout and Operation
CN1013887ID
–42–
System Remote Control Layout and Operation
3 MENU - Cycles between basic Monitor
control functions:
System Remote Control features glow-in-the-dark buttons, and integrates control of all Monitor and DVD
Player functions.
CONTRAST
BRIGHTNESS
COLOR
TINT
Monitor Control Functions (Figures 1 – 6):
RESET
Note: Detailed description of the functionality
of Monitor controls is available in ‘Monitor
Operation’ section of this manual
4 s UP - Two control functions are accessible using this
button on Monitor or System Remote Control:
2 SEL - Selects audio/video source (Marked SOURCE
on Monitor) Each Monitor may be independently
cycled between three audio/video sources:
AV 2
SHARPNESS
Adjust by pressing tDOWN or s UP buttons
1 MONITOR POWER – Power Monitor ‘ON/OFF’.
AV 1
MODE
• Increases volume for a universal wired headphone (not supplied with system), plugged into
a Monitor HEADPHONE JACK (Figure 8)
AV 3
• When used in conjunction with Monitor MENU
button (Figure 3), s UP button increases the
selected control function
CN1013887ID
–43–
System Remote Control Layout and Operation
CN1013887ID
–44–
System Remote Control Layout and Operation
DVD Control Functions (Figures 11 – 30):
5 tDOWN - Two control functions are accessible using
this button on Monitor or System Remote Control:
Note: Detailed description of the functionality
of DVD controls is available in ‘DVD
Operation Basic/Advanced’ sections of
this manual
• Decreases volume for a universal wired headphone (not supplied with system), plugged into
a Monitor HEADPHONE JACK (Figure 8)
11 DVD POWER - Power DVD ‘ON/OFF’.
• When used in conjunction with Monitor MENU
button (Figure 3), tDOWN button decreases
the selected control function
12 SKIP DOWN - Return to beginning of currently
playing chapter or track.
6 MONITOR ZOOM – A shortcut function to cycle
between screen mode selections available in main
Monitor menu. (Refer to page 13, Figure 3, Monitor
MENU for a detailed explanation of Monitor ZOOM
functionality)
13 SKIP UP - Advance to beginning of next chapter
or track.
14 PLAY/PAUSE – Cycle between PLAY and
PAUSE modes.
• ZOOM SCREEN
• NORMAL SCREEN
• WIDE SCREEN
17 STOP – Stop play.
18 FAST REWIND - Fast search in backwards
direction during play or pause. Plays at 2X, 4X,
8X, & 20X speeds in sequence with multiple
momentary presses.
CN1013887ID
–45–
System Remote Control Layout and Operation
CN1013887ID
–46–
System Remote Control Layout and Operation
19 FAST FORWARD - Fast search in forward direction
during play or pause. Plays at 2X, 4X, 8X, or
20X speeds in sequence with multiple momentary
presses.
24 SUBTITLE - Cycles between default language set
on DVD Player, two additional languages that may
be recorded on DVD disc itself, or subtitle OFF.
25 REPEAT - Cycles between repeat functions
(Title/Chapter/Off).
20 SLOW REVERSE - Review backwards-in slow
motion during play or pause modes. Plays at 1/2,
1/3, 1/4, 1/5, 1/6 or 1/7 of normal speed, with
multiple momentary presses.
26 DISPLAY - Cycles between display functions,
(elapsed/remaining time, full information, off).
27 ENTER - Enter selections when navigating menus.
21 SLOW FORWARD - Press to review forward in
slow motion during play or pause modes. Plays at
1/2, 1/3, 1/4, 1/5, 1/6 or 1/7 of normal speed, with
multiple momentary presses.
28 DIRECTION ARROW buttons - Use to navigate
through menu.
29 DVD MENU - (Remote function only) Two functions
are accessible using this button:
22 TITLE - Enter disc TITLE mode with disc loaded.
Note: TITLE feature is disc-specific, and may
not be available with disc loaded.
Function #1:
Enter DVD Disc Menu while
disc is playing. Note: Menu offered is disc
dependent.
23 DVD ZOOM - Zoom in on video images during play
or pause modes. Zooms at Levels 1, 2, or 3, with
multiple momentary presses. In zoom modes the
DIRECTION ARROW buttons (Figure 28) can be
used to change zoomed monitor-viewing area.
Function #2:
DVD Player Default Setup
(Refer to DVD Advanced Operation Section)
30 RANDOM - Play all chapters or tracks at random.
CN1013887ID
–47–
System Remote Control Layout and Operation
CN1013887ID
–48–
System Remote Control Layout and Operation
Using the System Remote Control:
Inserting batteries:
Insert two, size “AAA” batteries with correct polarity by
matching + and - on batteries per the diagram inside
battery compartment.
• Aim System Remote Control at Infrared
Remote Sensor on the Monitor (Figure 9)
to be controlled at the angle shown by above
illustration.
!
Performance Note: Direct sunlight on Infrared
Remote Sensor may interfere with remote
control operation.
CAUTIONS:
• Do not leave System Remote Control in direct
sunlight to prevent damage.
• Do not mix new batteries with old batteries.
• Rupture or chemical leakage from batteries may
cause fire or personal injury.
• Wash hands after handling batteries.
• Keep batteries out of reach of children. Swallowing
them may result in serious injury. If swallowed,
consult a physician immediately.
CN1013887ID
–49–
Headphones Control Layout and Operation
CN1013887ID
–50–
Headphones Control Layout and Operation
33 CHANNEL SELECTOR SWITCH – Switches audio
reception between Channel A and Channel B.
Since Monitors have capability to reproduce different
sources independently (i.e.: DVD, Game Units,
HandiCam, etc.) through auxiliary inputs, it is
necessary to transmit audio signals on separate
channels (A & B). Driver’s side Monitor is designated Channel A, and passenger’s side Channel B.
Headphone channel selector switch must be set to
the appropriate channel according to the Monitor
being viewed.
Two-channel infrared wireless headphones receive
sound signals via an infrared light beam. They operate
in a line-of-sight orientation with INFRARED LED
TRANSMITTER window on bottom edge of Monitor,
(Refer to Page 7 Figure 6).
31 POWER – Momentary POWER switch permits
headphones to be switched ‘ON/OFF’ manually.
POWER LED (Figure 34) will illuminate as headphones are switched ‘ON’. An Auto-Off Power-Saver
feature automatically switches headphones ‘OFF’
three and one-half minutes after reception of the last
detected infrared transmission signal to help conserve battery power.
34 POWER LED - Illuminates in red to indicate that
headphones are switched ‘ON’, and battery power
is being supplied.
32 VOLUME - Adjusts volume of the audio signal
UP/DOWN.
!
CAUTION:
• Turn headphone volume nearly to minimum before
turning power switch ‘ON’ to avoid damage to
headphones or listener’s ears.
CN1013887ID
–51–
Headphones Control Layout and Operation
CN1013887ID
–52–
Headphones Control Layout and Operation
Inserting batteries:
Insert two, size “AAA” batteries with correct polarity by
matching + and - on batteries per the diagram inside
battery compartment.
!
Performance Notes:
• Direct sunlight on Headphones or Infrared
LED Transmitter on Monitor may interfere
with signal transmission to Headphones.
CAUTIONS:
• Do not leave Headphones in direct sunlight to
prevent damage.
• Do not mix new batteries with old batteries.
• Rupture or chemical leakage from batteries may
cause fire or personal injury.
• Wash hands after handling batteries.
• Keep batteries out of reach of children. Swallowing
them may result in serious injury. If swallowed,
consult a physician immediately.
• Cupped hands covering earpieces may interfere with signal transmission to Headphones.
Note: Headphones have an Auto-Shutoff feature
after 3.5 minutes of system inactivity to conserve
battery life. POWER LED (Figure 34) will turn ‘OFF’.
CN1013887ID
–53–
Optional Accessories
Note: If auxiliary source to be connected is
not equipped with a 3.5 mm Phone Plug
output cable, it will be necessary to
additionally Order Part Number 84 11 0 392
065 - Auxiliary Input Adapter Cable (3.5 mm
Phone Plug to RCA Plug Adapter)
To increase enjoyment and utility of BMW’s Rear Seat
Entertainment System, several accessories are available at a BMW Center:
• AV 3 Global Auxiliary Input Jack:
The BMW Rear Seat Entertainment System is
pre-adapted to permit auxiliary sources to be
connected using AV 3 mode for viewing on
each Monitor separately, or both Monitors
simultaneously. (Refer to page 11, Figure 2
concerning Audio/Video Source switching.) Any
audio/video source compatible with standard
NTSC composite video outputs found on
devices such as video game units, VCRs,
portable DVD Players, or video/still cameras
may be used. AV 3 AUX Input Jack requires a
3.5 mm phone jack be installed on the rear of
the center console by a BMW Center.
Order Part Number 84 11 0 392 068 - 3.5 mm
AUX Input Jack
• Auxiliary Input Adapter Cable:
Permits connection of auxiliary devices such as
video game units, VCRs, portable DVD Players,
or video/still cameras equipped with RCA-type
output jacks to Monitor-mounted AV 2 AUX
Input Jacks (Refer to page 8, Figure 7), or
Optional AV 3 Global Auxiliary Input Jack.
Order Part Number 84 11 0 392 065 Auxiliary Input Adapter Cable (3.5 mm
Phone Plug to RCA Plug)
CN1013887ID
–54–
Troubleshooting
In Case of Difficulty…
DVD Player
• If operation freezes, monitor goes black, or unit should otherwise not function properly, try turning power ‘OFF’
and then back ‘ON’. Alternatively, try the following methods in the order listed until DVD Player returns to normal
playback mode:
1. Change source from DVD to other source then to DVD mode.
2. Turn vehicle's ignition ‘OFF’ and then back ‘ON’ again.
3. Press RESET button on the face of DVD Player.
• If the unit is still at fault, please consult a BMW Center.
(see troubleshooting chart on next page)
CN1013887ID
–55–
Troubleshooting
DVD Player
Symptom
Unit does not operate.
Remedy
• Turn Ignition ‘ON’
• Press Power ‘ON’ from remote
• Fuse blown, replace with a fuse of same capacity
• Turn Monitor's power ‘ON’
• Consult a BMW Center
No picture is produced.
• Switch to the appropriate A/V source.
Playback does not start.
• Check that disc is loaded with label side facing upwards
• Clean disc
• Check for disc compatibility
• Press ‘MENU’ to turn menu off
Picture is unclear or noisy.
• During fast-forward or fast-reverse, picture can be slightly distorted.
This is a normal situation.
• Consult a BMW Center
Image sometimes stumbles or freezes
• Clean or replace disc if it is scratched.
NO DISC
• Load a disc.
• Clean disc.
x (Not Valid)
• For some discs or playing modes, certain operations are not possible.
This is not a malfunction.
REGION ERROR
• Load a disc with correct regional code number.
BAD DISC
• Inserted disc is of unknown format. Load an NTSC disc.
• Inserted disc is Un-Readable
Black and white monitor, blank monitor, or frozen monitor
• Overheating. Turn system power ‘OFF’ and then turn power ‘ON’
again. If display still does not appear normal, leave power ‘OFF’ until
temperature decreases and then turn power ‘ON’ again.
Discs become hot to the touch during playback
• Normal condition of mobile disc playback.
–56–
CN1013887ID
Troubleshooting
Monitor/Sound
Symptom
POWER button on Monitor does not function. No function or display.
Remedy
• Turn ignition ‘ON’.
• Check vehicle's battery voltage.
• Consult a BMW Center.
No picture on Monitor screen during playback.
• Confirm Monitor's power button is ‘ON’
• Confirm Monitor's input is set to appropriate source.
• Adjust monitor brightness.
• Monitor's protective circuit is on because of high temperature.
Wait until temperature inside vehicle comes down to normal
monitor operating temperature.
• Open connection with Monitor, AV Interface unit, or DVD. Consult a
BMW Center.
Picture color is poor.
• Set Brightness/Color/Tint controls to proper settings.
Spots or dotted lines/stripes appear.
• Caused by neon signs, high-voltage power lines, CB transmitter, and
other vehicle's ignition plugs, cell phones, etc. Change location of the
vehicle.
No Remote Control operation or unstable operation.
• Remove any obstacle between System Remote Control and remote.
Sensor on Monitor.
• Replace batteries with new ones. Insert them correctly.
• Ensure System Remote Control is being aimed at correct angle at
remote sensor on Monitor. (See page 49)
• Clean remote sensor or transmitter.
No sound from headphones.
• Turn on POWER to headphone.
• Turn up volume on headphones.
• Replace batteries in headphones.
CN1013887ID
–57–
Troubleshooting
Monitor/Sound (continued)
Symptom
Remedy
Distorted sound from wireless headphones.
• Interference from outside light source, cell phones, etc. Change
location of the vehicle.
• Headphone set to wrong channel. Change channel.
• Replace batteries with new ones. Insert them correctly.
CN1013887ID
–58–
Care and Maintenance
BMW’s Rear Seat Entertainment System is a product of
superior design and craftsmanship and should be treated with care. The suggestions below will help provide
many years of trouble-free enjoyment.
• Do not store components in cold areas.
Condensation moisture that will damage
electronic circuits can form, as components
warm up to normal operating temperatures.
• Cleaning Components and Housings: Clean components by occasional gentle wiping with a soft, lintfree, cotton cloth that has been slightly dampened
with warm water and wrung out completely. Dry the
finish by wiping with a clean dry cotton cloth.
• These units contain precision electronics that
must be protected from dust, dirt, and moisture.
!
• Never spill liquids on any component. Liquids,
humidity, and precipitation contain minerals that
will corrode electronic circuits.
CAUTIONS:
• Use of liquids, abrasives, aerosol cleaners, interior
protectant products or paper cleaning products will
result in permanent damage to the finish and plastic
housings of components! The LCD monitor is made
of a specially coated glass and can be scratched or
damaged by abrasive products, solvents, or ammonia-based window cleaners.
• Take care to avoid the following:
• Rough handling can break internal circuit
boards. Do not drop, knock, or shake
components.
• Do not attempt to paint or refinish components.
Paint can clog moving parts and prevent proper
operation.
• Do not allow volatile substances, such as insecticides, to come into contact with components to
prevent damage to products finish.
• Non-expert handling can damage components.
Attempting to open any of the components may
void the limited warranty.
• Use and Storage:
• Components should never be stored near or
over a heat register or in direct sunlight.
CN1013887ID
–59–
Specifications
MONITOR
Monitor Size . . . . . . . . . . . . . . . . . . . . . . . . . . . . . . . . . . . . . . . . . . . . . . . . . . . . . . . . . . . . . . . . . . . . . . . . . . . . . . . . . . . . . . . . . . . . . . . . . . . . . . 7˝ diagonal
Monitor Aspect Ratio . . . . . . . . . . . . . . . . . . . . . . . . . . . . . . . . . . . . . . . . . . . . . . . . . . . . . . . . . . . . . . . . . . . . . . . . . . . . . . . . . . . . . . . . . . 16:9 Widescreen
Display System . . . . . . . . . . . . . . . . . . . . . . . . . . . . . . . . . . . . . . . . . . . . . . . . . . . . . . . . . . . . . . Low reflection rear projection type TN liquid crystal panel
Drive System . . . . . . . . . . . . . . . . . . . . . . . . . . . . . . . . . . . . . . . . . . . . . . . . . . . . . . . . . . . . . . . . . . . . . . . . TFT Active matrix drive, normally white display
Number of Picture Elements . . . . . . . . . . . . . . . . . . . . . . . . . . . . . . . . . . . . . . . . . . . . . . . . . . . . . . . . . . . . . . . . . . . . 336,960 dots. (W:1440 x H:234 dots)
Light Source . . . . . . . . . . . . . . . . . . . . . . . . . . . . . . . . . . . . . . . . . . . . . . . . . . . . . . . . . . . . . Internal optical system (L-type cold cathode fluorescent tube)
Brightness . . . . . . . . . . . . . . . . . . . . . . . . . . . . . . . . . . . . . . . . . . . . . . . . . . . . . . . . . . . . . . . . . . . . . . . . . . . . . . . . . . . . . . Min. 400 cd/m_, typ. 500 cd/m_
Operating Temperature Range . . . . . . . . . . . . . . . . . . . . . . . . . . . . . . . . . . . . . . . . . . . . . . . . . . . . . . . . . . . . . . . . . . . . . . . . . . . . . . . . . . . . -30°C to +85°C
Dimensions (W x H x D) . . . . . . . . . . . . . . . . . . . . . . . . . . . . . . . . . . . . . . . . . . . . . . . . . . . . . . . . . . . . . . . . . . . . . . . . . . 178.5 x 114 x 27mm (7˝x4.5˝x1˝)
Weight . . . . . . . . . . . . . . . . . . . . . . . . . . . . . . . . . . . . . . . . . . . . . . . . . . . . . . . . . . . . . . . . . . . . . . . . . . . . . . . . . . . . . . . . . . . . . . . . . . . . . . . 383 g (13.5 oz)
AV INTERFACE UNIT
Dimensions (W x H x D) . . . . . . . . . . . . . . . . . . . . . . . . . . . . . . . . . . . . . . . . . . . . . . . . . . . . . . . . . . . . . . . . . . . . . . . . . . . . 99 x 90 x 25 mm (3.9˝x3.5˝x1˝)
Weight . . . . . . . . . . . . . . . . . . . . . . . . . . . . . . . . . . . . . . . . . . . . . . . . . . . . . . . . . . . . . . . . . . . . . . . . . . . . . . . . . . . . . . . . . . . . . . . . . . . . . . . 422 g (14.9 oz)
Video Input . . . . . . . . . . . . . . . . . . . . . . . . . . . . . . . . . . . . . . . . . . . . . . . . . . . . . . . . . . . . . . . . . . . . . . . . . . . . . . . . . . 1.4 V (p-p), 75 Ohm (RCA type jack)
Audio Input . . . . . . . . . . . . . . . . . . . . . . . . . . . . . . . . . . . . . . . . . . . . . . . . . . . . . . . . . . . . . . . . . . . . . . . . . 3.0 V (rms), less than 10 kOhm (RCA type jack)
DVD
Signal system . . . . . . . . . . . . . . . . . . . . . . . . . . . . . . . . . . . . . . . . . . . . . . . . . . . . . . . . . . . . . . . . . . . . . . . . . . . . . . . . . . . . . . . . . . . . . . . . . . . . . NTSC/PAL
Horizontal resolution . . . . . . . . . . . . . . . . . . . . . . . . . . . . . . . . . . . . . . . . . . . . . . . . . . . . . . . . . . . . . . . . . . . . . . . . . . . . . . . . . . . . . . . . 500 lines or greater
Video output level . . . . . . . . . . . . . . . . . . . . . . . . . . . . . . . . . . . . . . . . . . . . . . . . . . . . . . . . . . . . . . . . . . . . . . . . . . . . . . . . . . . . . . . . . . . . 1Vp-p (75 Ohms)
Video S/N ratio . . . . . . . . . . . . . . . . . . . . . . . . . . . . . . . . . . . . . . . . . . . . . . . . . . . . . . . . . . . . . . . . . . . . . . . . . . . . . . . . . . . . . . . . . . . . . . . . . . . . . . . . 65 dB
Audio S/N ratio . . . . . . . . . . . . . . . . . . . . . . . . . . . . . . . . . . . . . . . . . . . . . . . . . . . . . . . . . . . . . . . . . . . . . . . . . . . . . . . . . . . . . . . . . . . . . . . . . . . . . . . . 80 dB
Frequency response . . . . . . . . . . . . . . . . . . . . . . . . . . . . . . . . . . . . . . . . . . . . . . . . . . . . . . . . . . . . . . . . . . . . . . . . . . . . . . . . . . . . .17 Hz to 20 kHz (±1 dB)
Channel balance . . . . . . . . . . . . . . . . . . . . . . . . . . . . . . . . . . . . . . . . . . . . . . . . . . . . . . . . . . . . . . . . . . . . . . . . . . . . . . . . . . . . . . . . . . . . . . . . . . 1 dB max.
Channel separation . . . . . . . . . . . . . . . . . . . . . . . . . . . . . . . . . . . . . . . . . . . . . . . . . . . . . . . . . . . . . . . . . . . . . . . . . . . . . . . . . . . . . . . . . . . . . . . . . . . . 70 dB
Harmonic distortion . . . . . . . . . . . . . . . . . . . . . . . . . . . . . . . . . . . . . . . . . . . . . . . . . . . . . . . . . . . . . . . . . . . . . . . . . . . . . . . . . . . . . . . . . . . . . . . . 0.1% max.
Audio output . . . . . . . . . . . . . . . . . . . . . . . . . . . . . . . . . . . . . . . . . . . . . . . . . . . . . . . . . . . . . . . . . . . . . . . . . . . . . . . . . . . . . . . . . . . . . . . . . . . . . . . . 2 Vrms
Power supply . . . . . . . . . . . . . . . . . . . . . . . . . . . . . . . . . . . . . . . . . . . . . . . . . . . . . . . . . . . . . . . . . . . . . . . . . . . . . . DC 14.4V (operating range: 11 to 16V)
Operating temperature range . . . . . . . . . . . . . . . . . . . . . . . . . . . . . . . . . . . . . . . . . . . . . . . . . . . . . . . . . . . . . . . . . . . . . . . . . . . . . . . . . . . . . -10°C to +60°C
Weight . . . . . . . . . . . . . . . . . . . . . . . . . . . . . . . . . . . . . . . . . . . . . . . . . . . . . . . . . . . . . . . . . . . . . . . . . . . . . . . . . . . . . . . . . . . . . . . . . . . . . 1.3 kg (2.87 lbs.)
External dimensions (W x H x D) . . . . . . . . . . . . . . . . . . . . . . . . . . . . . . . . . . . . . . . . . . . . . . . . . . . . . . . . . . . . . . . . . 162 x 49 x 164 mm (6.4˝ x 2˝ x 6.5˝)
CN1013887ID
–60–
Specifications
HEADPHONES
Receiving Frequency:
Channel A . . . . . . . . . . . . . . . . . . . . . . . . . . . . . . . . . . . . . . . . . . . . . . . . . . . . . . . . . . . . . . . . . . . . . . . . . . . . . . . . . . . . . . . . . . . .2.3/2.8 MHz Left/Right
Channel B . . . . . . . . . . . . . . . . . . . . . . . . . . . . . . . . . . . . . . . . . . . . . . . . . . . . . . . . . . . . . . . . . . . . . . . . . . . . . . . . . . . . . . . . . . . .3.2/3.8 MHz Left/Right
Receiving Sensitivity Max.:
Left/Right Channels . . . . . . . . . . . . . . . . . . . . . . . . . . . . . . . . . . . . . . . . . . . . . . . . . . . . . . . . . . . . . . . . . . . . . . . . . . . . . . . . . . . . . . . . . . . . . . . . . . .6 dB
Sensitivity for 30dB S/N:
Left/Right Channels . . . . . . . . . . . . . . . . . . . . . . . . . . . . . . . . . . . . . . . . . . . . . . . . . . . . . . . . . . . . . . . . . . . . . . . . . . . . . . . . . . . . . . . . . . . . . . . . . .14 dB
S/N at 60dB I/P:
Left/Right Channel . . . . . . . . . . . . . . . . . . . . . . . . . . . . . . . . . . . . . . . . . . . . . . . . . . . . . . . . . . . . . . . . . . . . . . . . . . . . . . . . . . . . . . . . . . . . . . . . . . .60 dB
Normal Output Power . . . . . . . . . . . . . . . . . . . . . . . . . . . . . . . . . . . . . . . . . . . . . . . . . . . . . . . . . . . . . . . . . . . . . . . . . . . . . . . . . . . . . . . . . . . . . . . . . . .2 mW
Audio Frequency Response [-3dB] . . . . . . . . . . . . . . . . . . . . . . . . . . . . . . . . . . . . . . . . . . . . . . . . . . . . . . . . . . . . . . . . . . . . . . . . . . . . . . . . . .40Hz - 18KHz
Distortion at Max O/P (THD) . . . . . . . . . . . . . . . . . . . . . . . . . . . . . . . . . . . . . . . . . . . . . . . . . . . . . . . . . . . . . . . . . . . . . . . . . . . . . . . . . . . . . . . . . . . . . .0.5%
Volume Min. Noise . . . . . . . . . . . . . . . . . . . . . . . . . . . . . . . . . . . . . . . . . . . . . . . . . . . . . . . . . . . . . . . . . . . . . . . . . . . . . . . . . . . . . . . . . . . . . . . . . . . .0.5 mV
Channel Balance . . . . . . . . . . . . . . . . . . . . . . . . . . . . . . . . . . . . . . . . . . . . . . . . . . . . . . . . . . . . . . . . . . . . . . . . . . . . . . . . . . . . . . . . . . . . . . . . . . . . . . .<2 dB
Design and specifications are subject to change without notice.
This product incorporates copyright protection technology that is protected by method claims of certain U.S. patents and other intellectual property
rights owned by Macrovision Corporation and other rights owners. Use of this copyright protection technology must be authorized by Macrovision
Corporation, and is intended for home and other limited viewing uses only unless otherwise authorized by Macrovision Corporation. Reverse engineering or disassembly is prohibited.
Manufactured under license from Dolby Laboratories. "Dolby", "Pro Logic" and the double-D symbol are trademarks of Dolby Laboratories.
Confidential unpublished works. ©1992-1997 Dolby Laboratories. All Rights reserved.
Manufactured under license from Digital Theater Systems, Inc. US Pat. No. 5,451,942, 5,956,674, 5,974,380, 5,978,762 and other worldwide patents
issued and pending. "DTS" and "DTS Digital Out" are trademarks of Digital Theater Systems.
CN1013887ID
–61–
Notes
CN1013887ID
–62–
Notes
CN1013887ID
–63–
Notes
CN1013887ID
–64–
This page will be blank (inside back cover)
CN1013887ID
Copyright © 2004 BMW of North America, LLC
All Rights Reserved
Woodcliff Lake, NJ 07677
All Rights Reserved
This publication is protected and all rights are reserved. No part of it may be reproduced or transmitted by any means or in any form, without prior
written consent from BMW.
The information in this manual has been carefully checked and is believed to be accurate, however, changes are made periodically in subsequent
publication editions. BMW may improve and/or change products described in this publication at any time. Due to continuing system improvements,
BMW is not responsible for inaccurate information that may appear in this manual. In no event will BMW be liable for direct, indirect, special,
exemplary, incidental, or consequential damages resulting from any defect or omission in this manual, even if advised of the possibility of
such damages.
In the interest of continued product improvement, BMW reserves the right to make improvements in this manual and the products it describes at any
time, without notices or obligation.
P/N 84 11 0 306 648
Printed in U.S.A.
CN1013887ID