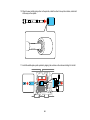
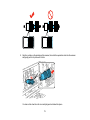
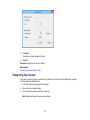
1
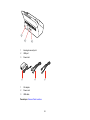
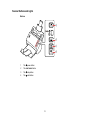
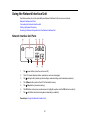
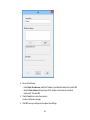
DS-760/DS-860 User's Guide
Contents
DS-760/DS-860 User's Guide ...................................................................................................................... 7
Scanner Basics............................................................................................................................................ 8
Scanner Parts Locations ...................................................................................................................... 8
Scanner Parts.................................................................................................................................. 9
Scanner Buttons and Lights........................................................................................................... 11
Page Separation Lever.................................................................................................................. 12
User Replaceable Epson Scanner Parts ............................................................................................ 13
Changing the Power Off Setting ......................................................................................................... 14
Loading Originals......................................................................................................................................
Loading Originals in the Input Tray.....................................................................................................
Loading Multiple Sizes of Originals in the Input Tray .....................................................................
Original Document Loading Capacity ............................................................................................
Loading Plastic Cards in the Input Tray..............................................................................................
Plastic Card Loading Capacity.......................................................................................................
Loading Special Documents...............................................................................................................
Large or Thick Original Loading Capacity......................................................................................
15
15
19
23
25
29
30
35
Using the Network Interface Unit .............................................................................................................
Network Interface Unit Parts...............................................................................................................
Connecting the Network Interface Unit...............................................................................................
Setting Up Network Scanning ............................................................................................................
Scanning to Network Computers from the Network Interface Unit......................................................
37
37
38
38
40
Scanning ....................................................................................................................................................
Starting a Scan from a Scanner Button ..............................................................................................
Adding and Assigning Scan Jobs ..................................................................................................
Scanning with Document Capture Pro ...............................................................................................
Scanning with Epson Scan.................................................................................................................
Available Image Adjustments ........................................................................................................
Scanning Special Projects..................................................................................................................
Scanning Two Originals onto One Sheet (Stitching Images) .........................................................
Scanning Multi-Page Originals as Separate Files..........................................................................
41
41
42
43
46
48
49
49
52
3
Scanning Using OCR .................................................................................................................... 54
Scanning to a SharePoint Server or Cloud Service ....................................................................... 55
Cleaning and Transporting Your Scanner...............................................................................................
Cleaning Your Scanner ......................................................................................................................
Cleaning Inside Your Scanner............................................................................................................
Checking the Scanner Roller Counter ................................................................................................
Replacing the Scanner Rollers ...........................................................................................................
Replacing the Pickup Rollers.........................................................................................................
Replacing the Separation Rollers ..................................................................................................
Resetting the Scanner Roller Counter ...........................................................................................
Transporting Your Scanner ................................................................................................................
58
58
58
61
62
63
70
74
75
Solving Problems ...................................................................................................................................... 77
Scanner Light Status .......................................................................................................................... 77
Solving Scanning Problems ............................................................................................................... 78
Scanner Does Not Turn On or Turns Off Unexpectedly................................................................. 79
Scanner Button Does Not Work as Expected ................................................................................ 79
Scanning Software Does Not Operate Correctly ........................................................................... 79
Cannot Start Epson Scan .............................................................................................................. 80
Original Feeds Incorrectly in Scanner............................................................................................ 80
Original Jams in Scanner............................................................................................................... 81
Scanning is Slow ........................................................................................................................... 83
Solving Network Interface Unit Problems ........................................................................................... 84
Solving Scanned Image Quality Problems ......................................................................................... 84
Back of Original Image Appears in Scanned Image ...................................................................... 85
Scanned Characters are Blurry ..................................................................................................... 85
Characters are not Recognized During Conversion to Editable Text (OCR) ................................. 85
Ripple Patterns Appear in an Image .............................................................................................. 86
Line of Dots Appears in All Scanned Images................................................................................. 86
Scanned Image Edges are Cropped ............................................................................................. 86
Uninstalling Scanner Software ........................................................................................................... 87
Where to Get Help.............................................................................................................................. 87
Technical Specifications .......................................................................................................................... 89
Windows System Requirements ........................................................................................................ 89
4
General Specifications .......................................................................................................................
Dimension Specifications ...................................................................................................................
Electrical Specifications .....................................................................................................................
Environmental Specifications .............................................................................................................
USB Interface Specifications..............................................................................................................
Safety and Approvals Specifications ..................................................................................................
89
90
90
91
92
92
Notices .......................................................................................................................................................
Important Safety Instructions..............................................................................................................
Restrictions on Copying .....................................................................................................................
Default Delay Times for Power Management for Epson Products......................................................
Trademarks ........................................................................................................................................
Copyright Notice.................................................................................................................................
libTIFF Software Acknowledgment................................................................................................
libjpeg-turbo...................................................................................................................................
A Note Concerning Responsible Use of Copyrighted Materials.....................................................
Copyright Attribution ......................................................................................................................
93
93
95
95
95
96
96
97
98
98
5
DS-760/DS-860 User's Guide
Welcome to the DS-760/DS-860 User's Guide.
For a printable PDF copy of this guide, click here.
7
Scanner Basics
See these sections to learn about the basic features of your scanner.
Scanner Parts Locations
User Replaceable Epson Scanner Parts
Changing the Power Off Setting
Scanner Parts Locations
See these sections to identify the parts on your scanner.
Scanner Parts
Scanner Buttons and Lights
Page Separation Lever
Parent topic: Scanner Basics
8
Scanner Parts
1
Scanner cover
2
Page separation lever
3
Edge guides
4
Input tray extension
5
Input tray
6
Cover open lever
7
Output tray
8
Output tray extension
9
Stopper
9
1
Kensington security slot
2
USB port
3
Power inlet
1
AC adapter
2
Power cord
3
USB cable
Parent topic: Scanner Parts Locations
10
Scanner Buttons and Lights
Buttons
1
The
2
The Job Select button
3
The
stop button
4
The
start button
power button
11
Lights
1
The Ready light
2
The numeric display
3
The ! error light
Parent topic: Scanner Parts Locations
Related references
Scanner Light Status
Page Separation Lever
You can scan plastic cards, folded documents, envelopes, or any document that requires an optional
carrier sheet by adjusting the position of the page separation lever.
12
Move the separation lever to this position only when scanning plastic cards, folded documents,
envelopes, or any document that requires an optional carrier sheet.
Leave the separation lever in this position when scanning standard single- or multiple-page
documents to prevent paper jams.
Parent topic: Scanner Parts Locations
Related tasks
Loading Originals in the Input Tray
Loading Plastic Cards in the Input Tray
Loading Special Documents
User Replaceable Epson Scanner Parts
You can purchase genuine Epson accessories at epson.com (U.S. sales) or epson.ca (Canadian sales).
You can also purchase accessories from an Epson authorized reseller. To find the nearest one, call 800GO-EPSON (800-463-7766).
13
Part
Part number
Network interface unit
B12B808441
Carrier sheet
B12B813431
Roller assembly kit
B12B813581
Parent topic: Scanner Basics
Changing the Power Off Setting
You can use the Epson Scan Settings utility to change the time period before the scanner turns off
automatically.
1. Do one of the following to access the Epson Scan Settings utility:
• Windows 8.x: Navigate to the Apps screen and select EPSON Scan Settings.
• Windows (other versions): Click
or Start, and select All Programs or Programs. Select
Epson, then EPSON Scan, then click EPSON Scan Settings.
2. Click Energy Saving.
3. Enter the time period you want before the scanner turns off automatically as the Power Off Timer
setting. If you enter a value of 0, the scanner will not turn off automatically.
4. Click OK.
Parent topic: Scanner Basics
14
Loading Originals
Follow the instructions here to load your originals into the scanner.
Loading Originals in the Input Tray
Loading Plastic Cards in the Input Tray
Loading Special Documents
Loading Originals in the Input Tray
You can load originals that meet the document specifications in the input tray.
Caution: Do not load photos, or valuable original documents or artwork, directly into the input tray. This
may wrinkle or damage the original. Load these originals using an optional carrier sheet.
1. Pull up the input tray extension, extend the output tray, and flip up the stopper.
15
Note: If you are scanning originals longer than Letter (8.5 × 11 inches [216 × 279 mm]) size, do not
flip up the stopper.
2. Slide the input tray edge guides all the way out.
16
3. Check to make sure that the page separation lever is in the position shown here.
Note: To prevent paper jams, keep the lever in this position for most types of documents.
4. If you are loading a multi-page document, fan your stack of originals and tap them gently on a flat
surface to even the edges.
17
5. Slide your originals into the input tray as shown until they meet resistance. Make sure the printed
side is face down and top edge first.
Note: If you are loading a paper business card, load it horizontally.
18
6. Slide the edge guides against the edges of the original.
Loading Multiple Sizes of Originals in the Input Tray
Original Document Loading Capacity
Parent topic: Loading Originals
Related references
Page Separation Lever
Loading Multiple Sizes of Originals in the Input Tray
You can load a mixture of originals at different sizes that meet the document specifications in the input
tray.
Caution: Do not load photos, or valuable original documents or artwork, directly into the input tray. This
may wrinkle or damage the original. Load these originals using an optional carrier sheet.
19
1. Pull up the input tray extension, extend the output tray, and flip up the stopper.
Note: If you are scanning originals longer than Letter (8.5 × 11 inches [216 × 279 mm]) size, do not
flip up the stopper.
20
2. Slide the input tray edge guides all the way out.
21
3. Check to make sure that the page separation lever is in the position shown here.
Note: To prevent paper jams, keep the lever in this position for most types of documents.
22
4. Load the originals in the input tray in descending order of paper size with the largest at the back and
the smallest at the front.
Note: If you are loading a paper business card, load it horizontally.
5. Slide the edge guides against the edges of the widest document.
Parent topic: Loading Originals in the Input Tray
Original Document Loading Capacity
You can load original documents that meet these specifications in your scanner.
23
Paper size
Paper weight
Paper type
Loading capacity
Letter (8.5 × 11 inches
[216 × 279 mm])
10 to 56 lb (40
to 210 g/m²)
Plain paper
10 lb (40 g/m²): 100 sheets
Fine paper
21 lb (80 g/m²): 80 sheets
Recycled paper
56 lb (210 g/m²): 30 sheets
A4 (8.3 × 11.7 inches
[210 × 297 mm])
Loading capacity may vary
depending on the paper type.
Legal (8.5 × 14 inches
[216 × 357 mm])
A5 (5.8 × 8.2 inches
[148 × 210 mm])
A6 (4.1 × 5.8 inches
[105 × 148 mm])
B5 (7.2 × 10.1 inches
[182 × 257 mm])
Business cards
Up to 56 lb
(210 g/m²)
Paper business
cards
30 cards loaded horizontally
Note: You can load original documents of different sizes, up to this size: Letter (8.5 × 11 inches
[216 × 279 mm]). However, do not load different-sized large or thick originals, or valuable original
documents or artwork.
Caution: Do not load the following types of originals in the scanner, or they may be damaged or may
damage the scanner:
• Thermal paper
• Coated paper
• Originals with uneven surfaces, such as embossed documents
• Photos
• Originals with wet ink
• Ripped, curled, or wrinkled originals
• Originals containing staples or paper clips
• Originals with holes, other than standard hole-punched originals
• Originals that are bound
• Originals with carbon paper backing
24
• Transparencies
• Glossy originals
• Carbon-less paper
• Perforated originals
• Originals with labels or stickers
Parent topic: Loading Originals in the Input Tray
Loading Plastic Cards in the Input Tray
You can load plastic cards that meet the card specifications in the input tray.
1. Pull up the input tray extension, extend the output tray, and flip up the stopper.
Note: If you are scanning originals longer than Letter (8.5 × 11 inches [216 × 279 mm]) size, do not
flip up the stopper.
25
2. Slide the input tray edge guides all the way out.
26
3. Load up to three standard plastic cards horizontally in the input tray as shown, sliding them in until
they meet resistance. Make sure the printed side is face down with the top edge first.
Note: You can load only a single embossed plastic card. Do not load plastic cards vertically.
27
4. Slide the edge guides against the edges of the plastic card.
28
5. Set the page separation lever to the position shown here.
Note: To prevent paper jams, make sure to set the separation lever back to its original position when
scanning standard single- or multi- page documents.
Plastic Card Loading Capacity
Parent topic: Loading Originals
Plastic Card Loading Capacity
You can load original plastic cards that meet these specifications in your scanner.
Type
Plastic cards, including embossed cards (ISO7810 compliant)
Size
2.1 × 3.3 inches (56 × 85.6 mm)
Thickness
Up to 0.06 inch (1.5 mm) thick, including any embossing
Loading capacity
Standard plastic cards: 3
Embossed plastic cards: 1
Loading direction
Horizontal
29
Note: Plastic cards with glossy surfaces may not scan properly.
Parent topic: Loading Plastic Cards in the Input Tray
Loading Special Documents
You can load a single envelope or large, thick, or folded original in the input tray. Make sure the original
meets the specifications for special originals before loading it.
1. Pull up the input tray extension, extend the output tray, and flip up the stopper.
Note: If you are scanning originals longer than Letter (8.5 × 11 inches [216 × 279 mm]) size, do not
flip up the stopper.
30
2. Slide the input tray edge guides all the way out.
3. Do one of the following to load your original:
• Load a large or thick original or an envelope in the input tray as shown. Make sure the printed side
is facedown with the top edge first.
31
• For a folded original, fold and load the original as shown.
Caution: Do not load the document with the open side facing down.
32
• For a photo or an irregularly-shaped original, use an optional carrier sheet to load the document.
Do the following to load the document into the carrier sheet:
• If the original is smaller than the carrier sheet, insert it in the center of the sheet with the printed
side facedown and the top facing the arrow on the sheet.
• If the original is larger than the carrier sheet, fold it in half with the sides to be scanned facing
out. Position the right side of the original at the front of the sheet with the top facing the arrow on
the sheet.
4. Slide the original into the scanner until it meets resistance.
33
5. Slide the edge guides against the edges of the sheet.
34
6. Set the page separation lever to the position shown here.
Note: To prevent paper jams, make sure to set the separation lever back to its original position when
scanning standard single- or multi- page documents.
Large or Thick Original Loading Capacity
Parent topic: Loading Originals
Related references
User Replaceable Epson Scanner Parts
Page Separation Lever
Large or Thick Original Loading Capacity
You can load large, thick, or folded originals, or envelopes, that meet these specifications in your
scanner.
Note: You can load only one large, thick, or folded original, or envelope at a time.
35
Paper type
Paper size
Paper weight
Plain paper, fine paper, or
recycled paper
Width:
10 to 56 lb (40 to 210 g/m²)
2.0 to 8.5 inches (50.8 to 215.9 mm)
Length:
2.0 to 120 inches (50.8 to 3048 mm)
Folded plain paper, fine
paper, or recycled paper
Unfolded minimum size:
13 to 35 lb (50 to 130 g/m²)
A6 (4.1 × 5.8 inches [105 × 148 mm])
Unfolded maximum size:
A3 (11.7 × 16.5 inches [297 × 420 mm])
Envelopes
Up to 0.015 inch (0.38 mm) thick
—
Irregularly shaped originals
Up to this size: A4 (8.3 × 11.7 inches
[210 × 297 mm])
13 to 35 lb (50 to 130 g/m²)
(load only in a carrier sheet)
Parent topic: Loading Special Documents
36
Using the Network Interface Unit
See these sections to use the optional Epson Network Interface Unit to scan over a network.
Network Interface Unit Parts
Connecting the Network Interface Unit
Setting Up Network Scanning
Scanning to Network Computers from the Network Interface Unit
Network Interface Unit Parts
1
The
2
The LCD screen (displays status, operations, and error messages)
3
The
settings button (selects product settings, network settings, and maintenance options)
4
The
Reset button (returns the LCD to the default screen)
5
The
Stop button (cancels scanning)
6
The OK button and arrows (use the arrows to highlight an option and the OK button to select it)
7
The
power button (turns the unit on and off)
start button (starts scanning when networking is enabled)
Parent topic: Using the Network Interface Unit
37
Connecting the Network Interface Unit
See the documentation that came with the optional Epson Network Interface Unit for instructions on
connecting it to your scanner.
Parent topic: Using the Network Interface Unit
Setting Up Network Scanning
You can set up network scanning to your scanner through the optional Epson Network Interface Unit.
First connect the unit to your scanner and verify that they are working properly. Then follow the
instructions here to set up computers for network scanning using the Epson Scan Settings utility.
Note: Make a note of the IP address or host name of the Network Interface Unit so you can enter it in
these steps.
1. Do one of the following to start Epson Scan Settings:
• Windows 8.x: Navigate to the Apps screen and select EPSON Scan Settings.
• Windows (other versions): Click
Scan > EPSON Scan Settings.
or Start > All Programs or Programs > EPSON > EPSON
2. Select your scanner from the Select Scanner list.
3. Select the Network setting and click the Add button.
You see this screen:
38
4. Do one of the following:
• Under Search for addresses, select the IP address of your Network Interface Unit, and click OK.
• Select the Enter address setting and type in the IP address or host name of your Network
Interface Unit. Then click OK.
5. Click the Test button to check the connection.
You see a confirmation message.
6. Click OK to save your settings and close Epson Scan Settings.
39
Parent topic: Using the Network Interface Unit
Scanning to Network Computers from the Network Interface Unit
You can scan to a network computer directly from the Network Interface Unit. You first set up a scan job
in Document Capture Pro and then select the computer you want to send the scanned file to.
1. Start a scan job using Document Capture Pro.
2. Press the OK button on the Network Interface Unit.
3. On the LCD screen of the Network Interface Unit, select the computer you want to send the scanned
file to and press the OK button.
Note: If and your scanner is part of a workgroup, make sure the computer is part of the same
workgroup or it will not show up on the LCD screen.
4. If you set up a password in Document Capture Pro, enter the password at the prompt.
5. Select a scan job and press the OK button.
6. Press the
start button on the scanner.
Your original is scanned and the file is sent to the network computer you selected.
Parent topic: Using the Network Interface Unit
Related tasks
Scanning with Document Capture Pro
40
Scanning
You can scan original documents or photos and save them as digital files.
Starting a Scan from a Scanner Button
Scanning with Document Capture Pro
Scanning with Epson Scan
Scanning Special Projects
Starting a Scan from a Scanner Button
You can scan using a button on your scanner. This automatically starts the scanning program you have
assigned to the button.
Your product automatically selects suitable default scan settings, but you can view or change them as
necessary.
1. Make sure you installed the scanner software and connected the scanner to your computer or
network.
2. Load an original in your scanner.
3. If you have assigned multiple jobs to the start button in Document Capture Pro, press the Job
Select button on the scanner until the numeric display on the scanner shows the number of the
saved job. You can only select jobs 1 to 9 with the Job Select button.
Note: If your scanner is connected through a network, the display shows
Job Select button to select a saved job.
4. Press the
start button.
The image is scanned and saved to the folder you have specified.
Adding and Assigning Scan Jobs
Parent topic: Scanning
Related tasks
Loading Originals in the Input Tray
Loading Plastic Cards in the Input Tray
Loading Special Documents
41
and you cannot use the
Adding and Assigning Scan Jobs
You can view, change, or add available default scan settings when you scan using the
You do this by accessing the scan jobs in the Document Capture Pro program.
start button.
1. Start Document Capture Pro on a computer connected to the product.
2. Click the
Manage Job icon from the toolbar at the top of the window.
You see the Job Management window showing the current scan job list.
3. If you want to add a scan job, click Add, enter a name for the new job, select settings as necessary,
and click OK.
You can now use the new scan job when you scan with Document Capture Pro.
Note: See the Help information in Document Capture Pro for details.
4. If you want to assign scan jobs to the
start button, click Event Settings.
5. Select the jobs that you want to assign to any of the pull-down menus, click OK, then click OK again.
42
You can now use the added scan jobs when you scan from the
jobs 1 to 9 with the Job Select button on the scanner.
start button. You can only select
Note: If your scanner is connected through a network, the numeric display on the scanner shows
and you cannot use the Job Select button to select a saved job.
Parent topic: Starting a Scan from a Scanner Button
Related tasks
Scanning with Document Capture Pro
Scanning with Document Capture Pro
When you scan with Document Capture Pro, the program automatically saves your scanned file on your
computer in the folder you specify. You can select settings, preview, and change the scanned file
settings as necessary.
1. Load your original in the scanner.
2. Do one of the following to start Document Capture Pro:
• Windows 8.x: Navigate to the Apps screen and select Document Capture Pro.
• Windows (other versions): Click
or Start, and select All Programs or Programs. Select
EPSON Software, then select Document Capture Pro.
You see a window like this:
43
3. Click the
Scan icon.
You see a window like this:
44
Note: If you want to use a scan job that you created instead, select it from the Job list in the
Document Capture Pro window, click the
Start Job button, and skip the rest of these steps.
4. Select any scan settings you want to use.
Note: See the Help information in Document Capture Pro for details.
5. If you want to select detailed scan settings, click Detailed Settings. Select any scan settings you
want to use and click OK.
6. Click Scan.
You see a preview of your scan in the Document Capture Pro window.
7. Check the scanned images and edit them as necessary.
45
8. Click one of the Destination icons to choose where to save your scanned file. (If you cannot see all of
the icons below, click the arrow next to the icons.)
Note: To sort the documents into separate files by detecting blank pages or barcodes in your
scanned images, click File Name Settings and select Apply job separation in the Document
Capture Pro Save As or Transfer Settings window.
9. Click OK, Send, or Print to save the scanned file.
Parent topic: Scanning
Related references
Available Image Adjustments
Related tasks
Loading Originals in the Input Tray
Loading Plastic Cards in the Input Tray
Loading Special Documents
Adding and Assigning Scan Jobs
Scanning Multi-Page Originals as Separate Files
Scanning with Epson Scan
Epson Scan automatically saves your scanned file on your computer in the format and folder you
specify. You can select settings, preview, and change the scanned file settings as necessary.
1. Load your original in the scanner.
2. Do one of the following to start Epson Scan:
• Windows 8.x: Navigate to the Apps screen and select EPSON Scan.
• Windows (other versions): Click
EPSON, then select EPSON Scan.
or Start, and select All Programs or Programs. Select
You see a window like this:
46
3. Select options for each of the scan settings on the screen.
4. If necessary, click the Preview button.
Epson Scan previews your original and displays the result in a separate Preview window. The
scanner also ejects the page.
5. Reload the page in the scanner.
6. Click the Image Adjustment tab and select any of the image adjustment settings you want to use.
Before making adjustments, click the image or scan area in the Preview window.
47
7. Click Scan.
You see the File Save Settings window.
8. Change any of the file save settings and click OK.
Epson Scan scans your original, and saves the file in the selected folder or opens it in your scanning
program. If the file was saved directly to your computer, you see the file in Windows Explorer, where you
can view and print the image.
Available Image Adjustments
Parent topic: Scanning
Related tasks
Loading Originals in the Input Tray
Loading Plastic Cards in the Input Tray
Loading Special Documents
Available Image Adjustments
You can select these options from the Image Adjustments tab in Epson Scan.
Note: Not all adjustment settings may be available, depending on the Image Type setting.
Select the Image Option checkbox to access additional settings.
Unsharp Mask
Makes the edges of certain image areas clearer. Turn off this option to leave softer edges.
Descreening
Removes the ripple pattern that might appear in subtly shaded image areas, such as skin tones. This
option improves results when scanning magazines or newspapers. (The results of descreening do not
appear in the preview image, only in your scanned image.)
Text Enhancement
Sharpens the appearance of letters in text documents.
Auto Area Segmentation
Makes grayscale images clearer and text recognition more accurate by separating the text from the
graphics.
Dropout
The scan will not pick up the color you select. This setting is only available if you select an Image
Type of Grayscale or Black & White.
48
Color Enhance
Enhances the red, green, or blue shades in the scanned image.
Brightness
Adjusts the overall lightness and darkness of the scanned image.
Contrast
Adjusts the difference between the light and dark areas of the overall scanned image.
Parent topic: Scanning with Epson Scan
Scanning Special Projects
Your product's scanning software offers various options to help you quickly complete special scan
projects.
Scanning Two Originals onto One Sheet (Stitching Images)
Scanning Multi-Page Originals as Separate Files
Scanning Using OCR
Scanning to a SharePoint Server or Cloud Service
Parent topic: Scanning
Scanning Two Originals onto One Sheet (Stitching Images)
You can scan both sides of a double-sided or folded original with Epson Scan's Stitch Images settings.
1. Load your original in the scanner.
2. Do one of the following to start Document Capture Pro:
• Windows 8.x: Navigate to the Apps screen and select Document Capture Pro.
• Windows (other versions): Click
or Start, and select All Programs or Programs. Select
EPSON Software, then select Document Capture Pro.
You see this window:
49
3. Click the
Scan icon, then click Detailed Settings.
You see an Epson Scan window like this:
50
4. Select Double-Sided as the Document Source setting.
5. Select the original document size as the Size setting.
6. Select one of the following as the Stitch Images setting:
• Top&Bottom: Places the scanned images one above the other.
• Left&Right: Places the scanned images side by side.
7. Click OK.
51
8. Click Scan.
The scanned image is displayed.
Note: If the scanned images are not stitched together correctly, click Configuration on the Epson
Scan window and select the Binding Position (for Double-Sided Scanning) setting on the
Document tab.
Parent topic: Scanning Special Projects
Related tasks
Loading Originals in the Input Tray
Loading Plastic Cards in the Input Tray
Loading Special Documents
Scanning with Document Capture Pro
Scanning Multi-Page Originals as Separate Files
You can use Document Capture Pro to scan multi-page originals as separate scanned files. You indicate
where you want the new scanned files to start by inserting a blank page or barcode between the pages
of your original.
1. Load a multi-page original with blank pages or barcodes inserted where you want to start a new
scanned file.
2. Do one of the following to start Document Capture Pro:
• Windows 8.x: Navigate to the Apps screen and select Document Capture Pro.
• Windows (other versions): Click
or Start, and select All Programs or Programs. Select
EPSON Software, then select Document Capture Pro.
You see this window:
52
3. Click the
Scan icon.
4. Select any displayed scan settings you want to use.
Note: See the Help information in Document Capture Pro for details.
5. Click Scan.
You see a preview of your scan in the Document Capture Pro window.
6. Open the File menu and select Batch Save.
7. Click File Save Settings.
8. Select Apply job separation and click Separation Settings.
9. Select the method you used to separate the originals, select a folder name specification and click
OK.
10. Select any additional settings from the File Name Settings dialog and click OK.
11. Select any additional settings from the Batch Save dialog and click OK.
Your originals are saved into separate files and folders as specified by your settings.
Parent topic: Scanning Special Projects
53
Related tasks
Loading Originals in the Input Tray
Loading Plastic Cards in the Input Tray
Loading Special Documents
Scanning with Document Capture Pro
Scanning Using OCR
You can use the ABBYY FineReader OCR program to convert scanned documents to editable text.
1. Load your original in the scanner.
2. Do one of the following to open ABBYY FineReader:
• Windows 8.x: Navigate to the Apps screen and select ABBYY FineReader 9.0 Sprint.
• Windows (other versions): Click
or Start > All Programs or Programs > ABBYY
FineReader 9.0 Sprint > ABBYY FineReader 9.0 Sprint.
You see a window like this:
54
3. Select the language used in the document you are going to scan as the Document Language
setting.
4. Click either the Scan to Other Formats icon or the icon that corresponds with the program you want
to scan to.
5. If you see the Select Scanner window, select your product and click OK.
Note: Do not select a WIA option for your product; it will not work correctly.
You see the scan settings window.
6. Select your scan settings.
7. Click Preview and adjust the area you want to scan, if necessary.
8. Click Scan.
Note: To scan a multi-page document, select settings in the Multi-Page Scanning section and click
Scan for each page.
9. When you are finished scanning, click Close.
Your document is scanned and processed into editable text, then you see the Save As window.
10. Select a name and a file format for your document and click Save.
The file is saved and then opened in an application associated with the file type you selected, if
available on your system.
Parent topic: Scanning Special Projects
Related tasks
Loading Originals in the Input Tray
Loading Plastic Cards in the Input Tray
Loading Special Documents
Scanning to a SharePoint Server or Cloud Service
You can use Document Capture Pro to upload scanned images to a SharePoint server or a cloud
service.
1. Load your original in the scanner.
2. Do one of the following to start Document Capture Pro :
• Windows 8.x: Navigate to the Apps screen and select Document Capture Pro.
55
• Windows (other versions): Click
or Start, and select All Programs or Programs. Select
EPSON Software, then select Document Capture Pro.
You see a window like this:
3. Click the
Scan icon.
4. Select any displayed scan settings you want to use.
Note: See the Help information in Document Capture Pro for details.
5. Click Scan.
You see a preview of your scan in the Document Capture Pro window.
6. Click one of the cloud service Destination icons to choose where to save your scanned file. (If you
cannot see all of the icons below, click the arrow next to the icons.)
•
Web Folder (WebDAV)
•
Microsoft SharePoint server
56
•
Evernote
•
Google Docs
•
SugarSync
You see the Transfer Settings window.
7. Enter any required information to set up the destination. If you have previously created a saved
setting for the destination, select it from the drop-down list.
8. Adjust any save settings, then click OK, Send, or Print, depending on the destination. .
Your originals are scanned and uploaded to the indicated server.
Parent topic: Scanning Special Projects
Related tasks
Loading Originals in the Input Tray
Loading Plastic Cards in the Input Tray
Loading Special Documents
Scanning with Document Capture Pro
57
Cleaning and Transporting Your Scanner
See these sections if you need to clean or transport your scanner.
Cleaning Your Scanner
Cleaning Inside Your Scanner
Checking the Scanner Roller Counter
Replacing the Scanner Rollers
Transporting Your Scanner
Cleaning Your Scanner
To keep your product working at its best, you should clean it several times a year.
Caution: Do not use a hard brush, alcohol, or paint thinner to clean the product or you may damage it.
Do not use oil or other lubricants inside the product or let water get inside it.
1. Turn off the scanner and unplug the AC adapter.
2. Disconnect any connected cables.
3. Clean the outer case with a soft, dry cloth. Do not use liquid or chemical cleansers.
Note: If the outer case still requires additional cleaning, use a slightly damp cloth to wipe the outer
case. Then wipe the case with a soft, dry cloth.
Parent topic: Cleaning and Transporting Your Scanner
Cleaning Inside Your Scanner
Clean your scanner regularly to make sure that no dust builds up on the glass scanning surfaces. Dust
can cause spots or lines in your scanned images.
Caution: Do not use a hard brush, alcohol, or paint thinner to clean the product or you may damage it.
Do not use oil or other lubricants inside the product or let water get inside it.
1. Turn off the scanner and unplug the AC adapter.
2. Disconnect any connected cables.
58
3. Pull down on the cover open lever and open the scanner cover.
4. Use a soft, dry cloth to wipe off any dust or dirt on the rollers inside the scanner cover.
59
5. Wipe off any dust or dirt on the pickup rollers.
6. Plug in the AC adapter and press the
power button to turn on the scanner.
7. Hold down the start button for at least two seconds, and press the start button several times to
rotate the rollers shown here. Wipe off any dust or dirt on the rollers as they rotate.
8. Turn off the scanner and unplug the AC adapter.
60
9. Wipe off any dust or dirt on the glass scanning surfaces using a soft, dry cloth. If the glass surface is
stained with grease or some other hard-to-remove material, use a small amount of glass cleaner on
a soft cloth to remove it. Wipe off all remaining liquid.
Caution: Do not spray glass cleaner directly on the scanning surfaces. Be careful not to place too
much force on the glass.
10. Close the scanner cover.
11. Plug in the AC adapter.
Parent topic: Cleaning and Transporting Your Scanner
Checking the Scanner Roller Counter
Check the scanner roller counter to determine when your rollers need to be replaced. When you replace
the scanner rollers, reset the scanner roller counter so you know when you may need to replace the
rollers again.
1. Make sure the scanner is turned on and connected to your computer.
2. Do one of the following to open Epson Scan Settings:
• Windows 8.x: Navigate to the Apps screen and select EPSON Scan Settings.
• Windows (other versions): Click
Scan > EPSON Scan Settings.
or Start > All Programs or Programs > EPSON > EPSON
3. Click Maintenance.
61
You see a screen like this:
4. You can check the scanner roller counter by reading the number in the Number of Scans field. If the
number of scans exceeds the Life Cycle of the rollers, it is time to replace the rollers.
5. Click OK.
Parent topic: Cleaning and Transporting Your Scanner
Replacing the Scanner Rollers
See these sections if you need to replace your pickup and separation rollers.
Replacing the Pickup Rollers
Replacing the Separation Rollers
Resetting the Scanner Roller Counter
Parent topic: Cleaning and Transporting Your Scanner
Related tasks
Checking the Scanner Roller Counter
62
Replacing the Pickup Rollers
Replace the scanner rollers after you have scanned 200,000 times. Check the scanner roller counter to
see when you need to replace the rollers.
1. Turn off the scanner and unplug the AC adapter.
2. Disconnect any connected cables.
3. Pull down on the cover open lever and open the scanner cover.
63
4. Squeeze the tab on the right side of the pickup roller cover and open the cover.
Caution: Do not place too much force on the arm inside the cover when replacing the pickup roller.
64
5. Slide the pickup rollers to the right and remove them.
6. Remove the lower pickup roller from the spindle.
65
7. Place the new lower pickup roller on the spindle, rotate the roller, and slide it all the way on the
spindle.
8. Install the lower pickup roller spindle by aligning the notches on the roller and sliding it to the left.
66
9. Remove the middle pickup roller from the spindle.
67
10. Place the new middle pickup roller on the spindle, rotate the roller to line up the notches, and slide it
all the way on the spindle.
11. Install the middle pickup roller spindle by aligning the notches on the roller and sliding it to the left.
68
12. Remove the upper pickup roller from the spindle.
13. Place the new upper pickup roller on the spindle, rotate the roller to line up the notches, and slide it
all the way on the spindle.
14. Install the upper pickup roller spindle by aligning the notches on the roller and sliding it to the left.
69
15. Close the pickup roller cover.
Note: If you are not able to close the cover, the pickup rollers are not installed correctly. Make sure
the rollers are all the way to the left, then try to close the cover. If you still cannot close the cover,
remove the rollers and reinstall them, then try to close the cover again.
16. Replace the separation rollers.
Parent topic: Replacing the Scanner Rollers
Related tasks
Checking the Scanner Roller Counter
Replacing the Separation Rollers
Replace the scanner rollers after you have scanned 200,000 times. Check the scanner roller counter to
see when you need to replace the rollers.
1. Turn off the scanner and unplug the AC adapter.
2. Disconnect any connected cables.
3. Pull down on the cover open lever and open the scanner cover.
70
4. Press down on the separation roller cover latch inside the scanner cover and pull down the cover to
open it.
Caution: Be careful not to apply too much force when opening the cover.
71
5. Press in on the separation roller to release it, then slide the roller to the side and remove it.
6. Remove the separation roller from the spindle.
7. Slide the new separation roller onto the spindle as shown. Make sure that the notches on the roller
and spindle align properly.
Note: Check that there are no gaps between the roller and spindle. You hear a click when the roller
is firmly locked into place.
72
8. Align the notches on the spindle and the scanner, then slide the separation roller into the scanner
and gently push it into place until it clicks.
You hear a click when the roller is correctly aligned and locked into place.
73
9. While applying gentle pressure on the separation roller, close the separation roller cover.
Note: If you are not able to close the cover, the roller is not installed correctly. First, make sure the
roller is all the way to the right. Try to close the cover. If you are still unable to close the cover,
remove the roller and reinstall it, then try to close the cover again.
10. Close the scanner cover.
11. Plug in the AC adapter and turn on the scanner..
12. Reset the roller counter after replacing both sets of rollers.
Parent topic: Replacing the Scanner Rollers
Related tasks
Checking the Scanner Roller Counter
Resetting the Scanner Roller Counter
When you replace the scanner rollers, reset the scanner roller counter so you know when you may need
to replace the rollers again.
1. Make sure the scanner is turned on and connected to your computer.
2. Do one of the following to open Epson Scan Settings:
• Windows 8.x: Navigate to the Apps screen and select EPSON Scan Settings.
• Windows (other versions): Click
Scan > EPSON Scan Settings.
or Start > All Programs or Programs > EPSON > EPSON
3. Click Maintenance.
You see a screen like this:
74
4. Click Reset.
The number of scans changes to 0 (zero).
5. Click OK.
Parent topic: Replacing the Scanner Rollers
Related tasks
Checking the Scanner Roller Counter
Transporting Your Scanner
If you need to ship your product, transport it a long distance, or store it for an extended period, prepare it
for transportation as described here.
1. Turn off the scanner and unplug the AC adapter.
2. Disconnect any connected cables.
3. Close the input tray extension and the output tray.
Note: Make sure the output tray is securely closed.
75
4. Remove the input tray by pulling it towards the scanner cover.
5. Place the scanner in its original packing materials, if possible, or use equivalent materials with
cushioning around the product.
Parent topic: Cleaning and Transporting Your Scanner
76
Solving Problems
Check these sections for solutions to problems you may have using your product.
Scanner Light Status
Solving Scanning Problems
Solving Network Interface Unit Problems
Solving Scanned Image Quality Problems
Uninstalling Scanner Software
Where to Get Help
Scanner Light Status
You can often diagnose problems with your scanner by checking its lights.
Lights
1
The Ready light
2
The numeric display
3
The ! error light
77
Light status
Condition/solution
The Ready light is on
The scanner is turned on and ready to scan.
The Ready light is flashing
The scanner is scanning or initializing. Wait for the Ready light to stop
flashing before turning off the scanner.
The ! error light is on
An error has occurred. Try the following:
• Check the scanner connection to your computer to make sure it is
secure.
• Make sure the scanner cover is closed and there is no jammed paper
inside.
• If the ! error light is still on, turn off the scanner, then turn it on again.
If the error continues, the scanner may be malfunctioning. Contact
Epson for support.
The ! error light and the
Ready light are flashing
alternately
The scanner firmware is updating. Do not turn off the scanner or
disconnect any cables until the status lights have stopped flashing.
The ! error light and the
A scanner error has occurred. Turn the scanner off and then back on
Ready light are flashing at the again. If the error continues, contact Epson for support.
same time
The numeric display shows
The Job Select button is unable to select saved jobs from Document
Capture Pro because the scanner is connected to a network.
Parent topic: Solving Problems
Related references
Scanner Buttons and Lights
Solving Scanning Problems
Check these solutions if you have problems scanning with your product.
Scanner Does Not Turn On or Turns Off Unexpectedly
Scanner Button Does Not Work as Expected
Scanning Software Does Not Operate Correctly
Cannot Start Epson Scan
Original Feeds Incorrectly in Scanner
78
Original Jams in Scanner
Scanning is Slow
Parent topic: Solving Problems
Scanner Does Not Turn On or Turns Off Unexpectedly
If the scanner does not turn on or if it turns off unexpectedly, try these solutions:
• Make sure the AC adapter is securely connected to the scanner and to a working electrical outlet.
• If the scanner turns off unexpectedly, you may need to adjust the Power Off Timer setting.
Parent topic: Solving Scanning Problems
Scanner Button Does Not Work as Expected
If the scanner button does not start the correct program or perform the correct action, try these solutions:
• Make sure Document Capture Pro is installed correctly. If necessary, uninstall and reinstall it.
• Make sure you have assigned the correct job to the scanner button and change it, if necessary.
• If you selected Keep Blocking in a Windows Security Alert window during or after installation of
Document Capture Pro, unblock the EEventManager Application program in the Windows security
settings; see Windows help for details.
Parent topic: Solving Scanning Problems
Scanning Software Does Not Operate Correctly
If your scanning software does not operate correctly, try these solutions:
• Make sure your computer has adequate memory and meets the system requirements for your
operating system.
• Make sure your computer is not running in a power-saving mode, such as sleep or standby. If so,
wake your system and restart your scanning software.
• If you upgraded your operating system but did not reinstall your scanning software, try reinstalling it.
Parent topic: Solving Scanning Problems
Related tasks
Uninstalling Scanner Software
79
Cannot Start Epson Scan
If you cannot start Epson Scan, try these solutions:
• Make sure your scanner is turned on and any interface cables are securely connected at both ends.
• Make sure Epson Scan is selected in your scanning program.
• Make sure your computer is not running in a power-saving mode, such as sleep or standby. If so,
wake your system and restart Epson Scan.
• If you connected the scanner using a USB cable, make sure it is connected directly to your computer
or through only one USB hub.
• Make sure you do not have multiple versions of Epson Scan installed. If you do, uninstall both versions
and install one version.
• If you upgraded your operating system but did not reinstall Epson Scan, try reinstalling it.
Parent topic: Solving Scanning Problems
Original Feeds Incorrectly in Scanner
If you have problems feeding originals in your scanner, try these solutions:
• If multiple pages feed at once, try the following:
• Make sure the paper separation lever is in the lower position.
• Remove the originals, fan the edges to separate the sheets, if necessary, and reload them.
• Load only originals that meets the specifications for your scanner.
• Clean inside the scanner and replace the roller assembly kit, if necessary.
• If you see a double feed error in the Epson Scan window or the Document Capture Pro window
(Windows only), start Epson Scan, select Configuration, select the Detect Double Feed setting, and
select Standard as the Paper Thickness setting. If the error persists, deselect the Detect Double
Feed setting.
Parent topic: Solving Scanning Problems
Related references
Page Separation Lever
Related tasks
Loading Originals in the Input Tray
Loading Plastic Cards in the Input Tray
Loading Special Documents
80
Cleaning Inside Your Scanner
Related topics
Replacing the Scanner Rollers
Original Jams in Scanner
If an original has jammed inside the scanner, follow these steps:
1. Turn off your scanner.
2. Remove all originals from the input tray.
3. Pull down the cover open lever and open the scanner cover.
4. Gently pull out any jammed originals from inside the scanner.
81
5. Gently pull out any jammed originals from the output tray.
82
6. Close the scanner cover.
7. Carefully follow all loading instructions when you reload originals.
Parent topic: Solving Scanning Problems
Related tasks
Loading Originals in the Input Tray
Loading Plastic Cards in the Input Tray
Loading Special Documents
Scanning is Slow
If scanning becomes slow, try these solutions:
• Scan your original at a lower resolution, if possible.
• Make sure your system meets the requirements for your operating system. If you are scanning a highresolution image, you may need more than the minimum requirements, such as a Hi-Speed USB port.
If necessary, increase your system's memory.
83
• If you are running virus protection or other security software, exclude the TWAIN.log files from
monitoring or set the TWAIN.log file as read only. See your virus protection or security software
instructions for details. The TWAIN.log file is saved in the following locations:
• Windows XP: C:\Documents and Settings\(user name)\Local Settings\Temp
• Windows (other versions): C:\Users\(user name)\AppData\Local\Temp
Parent topic: Solving Scanning Problems
Related tasks
Uninstalling Scanner Software
Solving Network Interface Unit Problems
If you have problems scanning using the optional Network Interface Unit, try these solutions:
• Make sure the Network Interface Unit is securely connected to the network or your computer and the
scanner with a working cable.
• Make sure your scanning software is installed correctly and that you have selected the correct settings
for the program you are using.
• Check that the IP address for the scanner is correct in the Epson Scan Settings utility.
• If you are scanning with Document Capture Pro, check the following:
• Make sure the Group settings are the same as the Network Interface Unit settings. See the
Document Capture Pro Help utility, and the Network Interface Unit User's Guide for details.
• With Windows, make sure the program is not being blocked by a network firewall. If so, you can
unblock the EEventManager Application program in the Windows security settings; see Windows
help for details.
• If the scanner is connected to the Network Interface Unit, the numeric display on the scanner shows
and you cannot select a scanning job from the display.
Parent topic: Solving Problems
Solving Scanned Image Quality Problems
Check these sections if a scanned image on your computer screen has a quality problem.
Back of Original Image Appears in Scanned Image
Scanned Characters are Blurry
Characters are not Recognized During Conversion to Editable Text (OCR)
Ripple Patterns Appear in an Image
84
Line of Dots Appears in All Scanned Images
Scanned Image Edges are Cropped
Parent topic: Solving Problems
Back of Original Image Appears in Scanned Image
If an image from the back of a thin original appears in your scanned image, make sure you selected the
correct Image Type setting for your original and select the Text Enhancement setting in Epson Scan.
Parent topic: Solving Scanned Image Quality Problems
Related references
Available Image Adjustments
Scanned Characters are Blurry
If characters in a scanned image appear blurry, adjust these Epson Scan settings (if available) and try
scanning again:
• Select the Text Enhancement setting.
• Adjust the Threshold setting.
• Increase the Resolution setting.
Parent topic: Solving Scanned Image Quality Problems
Related references
Available Image Adjustments
Characters are not Recognized During Conversion to Editable Text (OCR)
If characters in your scanned images are not recognized during OCR conversion, try these solutions:
• Make sure your original is straight.
• Adjust these Epson Scan settings (if available) and try scanning again:
• Select Text Enhancement
• Select the correct Image Type setting
• Adjust the Threshold setting
• Check the manual for your OCR software for any additional adjustments.
• Try using another software program, such as ABBYY FineReader, as the OCR engine. Start Epson
Scan and click File Save Settings. Select PDF as the File Type and click Options. Click the Text
85
tab. Make sure Fine Reader is selected as the OCR Engine setting and click OK twice. Try your scan
again using Epson Scan.
Parent topic: Solving Scanned Image Quality Problems
Related references
Available Image Adjustments
Ripple Patterns Appear in an Image
You may see a ripple pattern (called a moiré) in scanned images of printed documents. This is caused
by interference from differing pitches in the scanner's screen and your original's halftone screen. To
reduce this effect, adjust these Epson Scan settings (if available) and try scanning again:
• Select the Descreening setting.
• Select a lower Resolution setting.
Parent topic: Solving Scanned Image Quality Problems
Related references
Available Image Adjustments
Line of Dots Appears in All Scanned Images
If a line of dots appears in all your scanned images, clean the scanner glass with a soft, dry, lint-free
cloth or use a small amount of glass cleaner on the cloth, if necessary. Paper towels are not
recommended.
Caution: Do not spray glass cleaner directly on the scanner glass.
Parent topic: Solving Scanned Image Quality Problems
Related tasks
Cleaning Inside Your Scanner
Scanned Image Edges are Cropped
If the edges of a scanned image are cropped, try the following solutions:
• Select Auto Detect as the Size setting (Epson Scan) or the Document Size setting (Document
Capture Pro or Document Capture).
• Adjust the cropping area shown in the Crop Margins for Size "Auto" setting in Epson Scan.In
Document Capture Pro, select Detailed Settings from the Scan window. Click Configuration and
86
select the Document tab. Adjust the cropping area shown in the Crop Margins for Size "Auto"
setting.
Parent topic: Solving Scanned Image Quality Problems
Related tasks
Scanning with Document Capture Pro
Scanning with Epson Scan
Uninstalling Scanner Software
You can uninstall and then re-install your scanner software to solve certain problems.
1. Turn off the scanner.
2. Disconnect any interface cables.
3. Do the following to uninstall each of your scanning software programs, then follow any on-screen
instructions:
• Windows 8.x: Navigate to the Apps screen and select Control Panel > Programs > Programs
and Features. Select the scanner software program and click Uninstall/Change.
• Windows 7 or Windows Vista: Open the Windows Control Panel utility. Select Programs and
Features. (In Classic view, select Programs and click Uninstall a program.) Select the scanner
software program and click Uninstall/Change.
• Windows XP: Open the Windows Control Panel utility. Double-click Add or Remove Programs.
Select the scanner software program and click Change/Remove.
4. Restart your computer, then see the Start Here sheet to re-install your software.
Note: If you find that re-installing your scanner software does not solve a problem, contact Epson.
Parent topic: Solving Problems
Where to Get Help
If you need to contact Epson for technical support services, use the following support options.
Internet Support
Visit Epson's support website at epson.com/support (U.S.) or epson.ca/support (Canada) for solutions to
common problems. You can download drivers and documentation, get FAQs and troubleshooting
advice, or email Epson with your questions.
87
Speak to a Support Representative
Before you call Epson for support, please have the following information ready:
• Product name
• Product serial number (located on a label on the product)
• Proof of purchase (such as a store receipt) and date of purchase
• Computer configuration
• Description of the problem
Then call:
• U.S.: (562) 276-4382, 6 AM to 8 PM, Pacific Time, Monday through Friday, and 7 AM to 4 PM, Pacific
Time, Saturday
• Canada: (905) 709-3839, 6 AM to 8 PM, Pacific Time, Monday through Friday, and 7 AM to 4 PM,
Pacific Time, Saturday
Days and hours of support are subject to change without notice. Toll or long distance charges may
apply.
Note: For help using any other software on your system, see the documentation for that software for
technical support.
Purchase Supplies and Accessories
You can purchase genuine Epson accessories at epson.com (U.S. sales) or epson.ca (Canadian sales).
You can also purchase accessories from an Epson authorized reseller. To find the nearest one, call 800GO-EPSON (800-463-7766).
Parent topic: Solving Problems
88
Technical Specifications
These sections list the technical specifications for your scanner.
Note: Epson offers a recycling program for end of life products. Please go to epson.com/recycle for
information on how to return your products for proper disposal.
Windows System Requirements
General Specifications
Dimension Specifications
Electrical Specifications
Environmental Specifications
USB Interface Specifications
Safety and Approvals Specifications
Windows System Requirements
Make sure your system meets these requirements before using it with your scanner.
System
Microsoft Windows 8.x, Windows 7, Windows Vista, Windows XP
Professional Edition, Windows XP Home Edition
Interface
External USB port (Type A)
Display
Color monitor with 800 × 600 resolution or higher, and 24-bit color
(Full Color)
Parent topic: Technical Specifications
General Specifications
Scanner type
Sheet feed, one pass duplex, color
Photoelectric device
1 line CMOS Contact Image Sensor (CIS)
Effective pixels
5100 × 8400 pixels at 600 dpi
Document size
Maximum: 8.5 × 120 inches (215.9 × 3048 mm)
Minimum: 2 × 2 inches (50.8 × 50.8 mm)
89
Paper input
Facedown loading
Paper output
Facedown ejection
Paper capacity
80 sheets of paper at 21 lb (80 g/m2) weight
Scanning resolution
600 dpi (main scan)
600 dpi with Micro Step (sub scan)
Output resolution
50-1200 dpi (in 1 dpi increments)
Image data
16 bits per pixel per color internal
1 to 8 bits per pixel per color external
Interface
One Hi-Speed USB port
Light source
RGB LED
Parent topic: Technical Specifications
Dimension Specifications
Height
8.1 inches (206 mm)
Width
11.8 inches (300 mm)
Depth
8.7 inches (221 mm)
Weight
8.8 lb (4 kg)
Note: Dimensions do not include projecting parts.
Parent topic: Technical Specifications
Electrical Specifications
Scanner
Note: Check the label on the scanner and the AC adapter for voltage information. Power consumption
varies depending on operating conditions or whether an option is installed.
Rated input voltage
DC 24 V
90
Rated input current
2A
Rated input frequency
50 to 60 Hz
Power consumption
Operating: 42 W
Ready mode: 8 W
Sleep mode: 1.6 W
Power off mode: 0.4 W
AC Adapter
AC adapter model
A421H
Rated input voltage
AC 100 to 240 V
Rated input current
AC 1.20 A
Rated input frequency
50 to 60 Hz
Rated output voltage
DC 24 V
Rated output current
2A
Parent topic: Technical Specifications
Environmental Specifications
Temperature
Operating: 41 to 95 °F (5 to 35 °C)
Storage: –13 to 140 °F (–25 to 60 °C)
Humidity
Operating: 10 to 80% RH
(non-condensing)
Storage: 10 to 85% RH
Operating conditions
Ordinary office or home conditions
Note: Avoid operating the scanner in direct sunlight, near a strong light source, or in extremely dusty
conditions.
Parent topic: Technical Specifications
91
USB Interface Specifications
Interface type
Universal Serial Bus Specifications Revision 2.0
Electrical standard
Full Speed mode (12 Mbits per second) and Hi-Speed mode (480
Mbits per second) of Universal Serial Bus Specifications Revision
2.0
Connector type
One Type B port
Parent topic: Technical Specifications
Safety and Approvals Specifications
Scanner
United States
EMC: FCC part 15 Subpart B class B
Canada
EMC: CAN/CSA-CEI/IEC CISPR 22 Class B
AC Adapter
United States
Safety: UL60950-1
EMC: FCC part 15 Subpart B class B
Canada
Safety: CAN/CSA C22.2 No. 60950-1
EMC: CAN/CSA-CEI/IEC CISPR 22 Class B
Parent topic: Technical Specifications
92
Notices
Check these sections for important notices about your scanner.
Note: Epson offers a recycling program for end of life products. Please go to epson.com/recycle for
information on how to return your products for proper disposal.
Important Safety Instructions
Restrictions on Copying
Default Delay Times for Power Management for Epson Products
Trademarks
Copyright Notice
Important Safety Instructions
Follow these safety instructions when setting up and using the scanner:
• Read all these instructions, and follow all warnings and instructions marked on the scanner.
• Place the scanner close enough to the computer for the interface cable to reach it easily.
• Do not place or store the scanner or the AC adapter outdoors, near excessive dirt or dust, water, heat
sources, or in locations subject to shocks, vibrations, high temperature or humidity, direct sunlight,
strong light sources, or rapid changes in temperature or humidity.
• Do not use with wet hands.
• Place the scanner and the AC adapter near an electrical outlet where the adapter can be easily
unplugged.
• The AC power cord should be placed to avoid abrasions, cuts, fraying, crimping, and kinking.
• Do not place objects on top of the AC power cord and do not allow the AC adapter or the power cord
to be stepped on or run over. Be particularly careful to keep the AC power cord straight at the end and
the point where it enters the AC adapter.
• Use only the AC adapter that comes with your scanner. Using any other adapter could cause fire,
electrical shock, or injury.
• The AC adapter is designed for use with the scanner with which it was included. Do not attempt to use
it with other electronic devices unless specified.
93
• Use only the type of power source indicated on the AC adapter's label, and always supply power
directly from a standard domestic electrical outlet with the AC adapter that meets the relevant local
safety standards.
• When connecting this product to a computer or other device with a cable, ensure the correct
orientation of the connectors. Each connector has only one correct orientation. Inserting a connector
in the wrong orientation may damage both devices connected by the cable.
• Avoid using outlets on the same circuit as photocopiers or air control systems that regularly switch on
and off.
• If you use an extension cord with the scanner, make sure the total ampere rating of the devices
plugged into the extension cord does not exceed the cord's ampere rating. Also, make sure the total
ampere rating of all devices plugged into the wall outlet does not exceed the wall outlet's ampere
rating.
• Never disassemble, modify, or attempt to repair the AC adapter, scanner, or scanner option by
yourself except as specifically explained in the scanner's guides.
• Do not insert objects into any opening as they may touch dangerous voltage points or short out parts.
Beware of electrical shock hazards.
• If damage occurs to the plug, replace the cord set or consult a qualified electrician. If there are fuses in
the plug, make sure you replace them with fuses of the correct size and rating.
• Unplug the scanner and the AC adapter, and refer servicing to qualified service personnel under the
following conditions: The AC adapter or plug is damaged; liquid has entered the scanner or the AC
adapter; the scanner or the AC adapter has been dropped or the case has been damaged; the
scanner or the AC adapter does not operate normally or exhibits a distinct change in performance. (Do
not adjust controls that are not covered by the operating instructions.)
• Unplug the scanner and the AC adapter before cleaning. Clean with a damp cloth only. Do not use
liquid or aerosol cleaners.
• If you are not going to use the scanner for a long period, be sure to unplug the AC adapter from the
electrical outlet.
• Place the product on a flat, stable surface that extends beyond the base of the product in all directions.
If you place the product by the wall, leave at least 3.9 inches (10 cm) between the back of the product
and the wall. The product will not operate properly if it is tilted at an angle.
• After replacing consumable parts, dispose of them correctly following the rules of your local authority.
Do not disassemble them.
Parent topic: Notices
94
Restrictions on Copying
Observe the following restrictions to ensure responsible and legal use of your scanner.
Copying of the following items is prohibited by law:
• Bank bills, coins, government-issued marketable securities, government bond securities, and
municipal securities
• Unused postage stamps, pre-stamped postcards, and other official postal items bearing valid postage
• Government-issued revenue stamps, and securities issued according to legal procedure
Exercise caution when copying the following items:
• Private marketable securities (stock certificates, negotiable notes, checks, etc.), monthly passes,
concession tickets, etc.
• Passports, driver's licenses, warrants of fitness, road passes, food stamps, tickets, etc.
Note: Copying these items may also be prohibited by law.
Restriction on disassembling and decompiling
You may not disassemble, decompile or otherwise attempt to derive the source code of any software
included with this product.
Parent topic: Notices
Default Delay Times for Power Management for Epson Products
This product will enter sleep mode after a period of nonuse. The time interval has been set at the factory
to ensure that the product meets Energy Star standards of energy efficiency, and cannot be modified by
the consumer.
Parent topic: Notices
Trademarks
EPSON® is a registered trademark and EPSON Exceed Your Vision is a registered logomark of Seiko
Epson Corporation.
95
General Notice: Other product names used herein are for identification purposes only and may be
trademarks of their respective owners. Epson disclaims any and all rights in those marks.
Parent topic: Notices
Copyright Notice
All rights reserved. No part of this publication may be reproduced, stored in a retrieval system, or
transmitted in any form or by any means, electronic, mechanical, photocopying, recording, or otherwise,
without the prior written permission of Seiko Epson Corporation. The information contained herein is
designed only for use with this Epson product. Epson is not responsible for any use of this information as
applied to other products.
Neither Seiko Epson Corporation nor its affiliates shall be liable to the purchaser of this product or third
parties for damages, losses, costs, or expenses incurred by purchaser or third parties as a result of:
accident, misuse, or abuse of this product or unauthorized modifications, repairs, or alterations to this
product, or (excluding the U.S.) failure to strictly comply with Seiko Epson Corporation's operating and
maintenance instructions.
Seiko Epson Corporation shall not be liable for any damages or problems arising from the use of any
options or any consumable products other than those designated as Original Epson Products or Epson
Approved Products by Seiko Epson Corporation.
Seiko Epson Corporation shall not be held liable for any damage resulting from electromagnetic
interference that occurs from the use of any interface cables other than those designated as Epson
approved Products by Seiko Epson Corporation.
This information is subject to change without notice.
libTIFF Software Acknowledgment
libjpeg-turbo
A Note Concerning Responsible Use of Copyrighted Materials
Copyright Attribution
Parent topic: Notices
libTIFF Software Acknowledgment
Copyright © 1988-1997 Sam Leffler
96
Copyright © 1991-1997 Silicon Graphics, Inc.
Permission to use, copy, modify, distribute, and sell this software and its documentation for any purpose
is hereby granted without fee, provided that (I) the above copyright notices and this permission notice
appear in all copies of the software and related documentation, and (ii) the names of Sam Leffler and
Silicon Graphics may not be used in any advertising or publicity relating to the software without the
specific, prior written permission of Sam Leffler and Silicon Graphics.
THE SOFTWARE IS PROVIDED "AS-IS" AND WITHOUT WARRANTY OF ANY KIND, EXPRESS,
IMPLIED OR OTHERWISE, INCLUDING WITHOUT LIMITATION, ANY WARRANTY OF
MERCHANTABILITY OR FITNESS FOR A PARTICULAR PURPOSE.
IN NO EVENT SHALL SAM LEFFLER OR SILICON GRAPHICS BE LIABLE FOR ANY SPECIAL,
INCIDENTAL, INDIRECT OR CONSEQUENTIAL DAMAGES OF ANY KIND, OR ANY DAMAGES
WHATSOEVER RESULTING FROM LOSS OF USE, DATA OR PROFITS, WHETHER OR NOT
ADVISED OF THE POSSIBILITY OF DAMAGE, AND ON ANY THEORY OF LIABILITY, ARISING OUT
OF OR IN CONNECTION WITH THE USE OR PERFORMANCE OF THIS SOFTWARE.
Parent topic: Copyright Notice
libjpeg-turbo
Copyright (C) 1991-2012 Thomas G. Lane, Guido Vollbeding
Copyright (C) 1999-2006 MIYASAKA Masaru
Copyright (C) 2009 Pierre Ossman for Cendio AB
Copyright (C) 2009-2013 D. R. Commander
Copyright (C) 2009-2011 Nokia Corporation and/or its subsidiary(-ies)
Redistribution and use in source and binary forms, with or without modification, are permitted provided
that the following conditions are met:
• Redistributions of source code must retain the above copyright notice, this list of conditions and the
following disclaimer.
• Redistributions in binary form must reproduce the above copyright notice, this list of conditions and the
following disclaimer in the documentation and/or other materials provided with the distribution.
• Neither the name of the libjpeg-turbo Project nor the names of its contributors may be used to endorse
or promote products derived from this software without specific prior written permission.
THIS SOFTWARE IS PROVIDED BY THE COPYRIGHT HOLDERS AND CONTRIBUTORS "AS IS",
AND ANY EXPRESS OR IMPLIED WARRANTIES, INCLUDING, BUT NOT LIMITED TO, THE IMPLIED
WARRANTIES OF MERCHANTABILITY AND FITNESS FOR A PARTICULAR PURPOSE ARE
DISCLAIMED. IN NO EVENT SHALL THE COPYRIGHT HOLDERS OR CONTRIBUTORS BE LIABLE
97
FOR ANY DIRECT, INDIRECT, INCIDENTAL, SPECIAL, EXEMPLARY, OR CONSEQUENTIAL
DAMAGES (INCLUDING, BUT NOT LIMITED TO, PROCUREMENT OF SUBSTITUTE GOODS OR
SERVICES; LOSS OF USE, DATA, OR PROFITS; OR BUSINESS INTERRUPTION) HOWEVER
CAUSED AND ON ANY THEORY OF LIABILITY, WHETHER IN CONTRACT, STRICT LIABILITY, OR
TORT (INCLUDING NEGLIGENCE OR OTHERWISE) ARISING IN ANY WAY OUT OF THE USE OF
THIS SOFTWARE, EVEN IF ADVISED OF THE POSSIBILITY OF SUCH DAMAGE.
Parent topic: Copyright Notice
A Note Concerning Responsible Use of Copyrighted Materials
Epson encourages each user to be responsible and respectful of the copyright laws when using any
Epson product. While some countries' laws permit limited copying or reuse of copyrighted material in
certain circumstances, those circumstances may not be as broad as some people assume. Contact your
legal advisor for any questions regarding copyright law.
Parent topic: Copyright Notice
Copyright Attribution
© 2014 Epson America, Inc.
2/14
CPD-40184R1
Parent topic: Copyright Notice
98