1
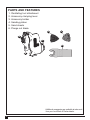
QUICK CONNECT SYSTEM
www.blackanddecker.com.au
Oscillating Tool
Attachment
Australia
BDCMTO-XE
New Zealand
PARTS AND FEATURES
1.
2.
3.
4.
5.
6.
Oscillating tool attachment
Accessory clamping lever
Accessory holder
Sanding platen
Sand sheets
Plunge cut blade
4
5
3
1
6
2
Additional accessories are available at extra cost
from your local Black & Decker dealer.
2
(Original instructions)
ENGLISH
Intended use
Your Black & Decker multi-purpose tool has been designed for a wide range of DIY applications.
Using the oscillating tool head , this tool is intended for DIY applications such as sanding
operations. It is also suitable for cutting wooden materials, plastic, gypsum, non-ferrous metals
and fastening elements (e.g., unhardened nails, staples), working soft wall tiles and scraping of
small surfaces.
This tool is intended for consumer use only.
Safety instructions
:
General power tool safety warnings
WARNING! To reduce the risk of injury, the user must read the instruction manual.
General power tool safety warnings
@
@
WARNING! Read all safety warnings and all instructions. Failure to follow the warnings and
instructions listed below may result in electric
WARNING! Read all safety warnings and all instructions provide with your power unit (BDCDMT108-XE,
BDCDMT180-XE) before using this accessory.
WARNING: Read all safety warnings and all instructions. Failure to follow the
warnings and instructions may result in electric shock, fire and/or serious injury.
SPECIfIC SAfETy RULES
• Disconnect power before using tool near live wires or where there may be hidden wiring.
Cutting accessory contacting a “live” wire may make exposed metal parts of the power tool “live”
and could give the operator an electric shock.” Always check for hidden wiring, gas lines, or
other utilities before performing any material cutting or removal operations with the tool.
• hold power tool by insulated gripping surfaces, when performing an operation where the cutting
accessory may contact hidden wiring or its own cord. Cutting accessory contacting a “live” wire
may make exposed metal parts of the power tool “live” and could give the operator an electric shock.
• Use clamps or another practical way to secure and support the workpiece to a stable platform.
Holding the work by hand or against your body leaves it unstable and may lead to loss of control.
• wait for the cutter to stop before setting the tool down. An exposed cutter may engage
the surface leading to possible loss of control and serious injury.
• Do not operate this tool for long periods of time. Vibration caused by the operating action
of this tool may cause permanent injury to fingers, hands, and arms. Use gloves to provide
extra cushion, take frequent rest periods, and limit daily time of use.
• Always hold the tool firmly with both hands for maximum control. Keep proper footing and
balance at all times. This enables better control of the power tool in unexpected situations.
• Do not restart the cutting operation in the workpiece. Let the tool reach full speed and
carefully re-enter the cut.
• Do not “jam” the cut-off saw blade or apply excessive pressure. Do not attempt to make
an excessive depth of cut.
• keep your hands away from cutting area. Do not reach under the material being cut.
• Do not use dull or damaged blades. Bent blade can break easily or cause kickback.
Exercise extreme caution when handling the accessories. The accessories are very sharp.
Wear protective gloves when changing cutting accessories. Accessories become hot after
prolonged usage.
• Before scraping, check workpiece for nails. If there are nails, either remove them or set
them well below intended finished surface. Striking a nail with accessory edge could cause
the tool to jump.
• Do not wet sand with this tool. Liquids entering the motor housing are an electrical shock hazard.
3
ENGLISH
(Original instructions)
• Never work in area which is soaked with a liquid, such as a solvent or water, or
dampened such as newly applied wallpaper. There is an electrical shock hazard when
working in such conditions with a power tool and heating of the liquid caused by scraping
action may cause harmful vapors to be emitted from workpiece.
• Do not use sandpaper intended for larger sanding pads. Larger sandpaper will extend
beyond the sanding pad causing snagging, tearing of the paper or kick-back. Extra paper
extending beyond the sanding pad can also cause serious lacerations.
wARNING: ALWAYS use safety glasses. Everyday eyeglasses are NOT safety glasses.
Also use face or dust mask. ALWAYS WEAR CERTIFIED SAFETY EQUIPMENT:
•ANSI Z87.1 eye protection (CAN/CPA Z94.3),
•ANSI S12.6 (S3.19) hearing protection,
•NOSH/OSHA respiratory protection.
• Avoid prolonged contact with dust from power sanding, sawing, grinding, drilling, and
other construction activities. wear protective clothing and wash exposed areas with
soap and water. Allowing dust to get into your mouth, eyes, or lay on the skin may promote
absorption of harmful chemicals.
wARNING: Use of this tool can generate and/or disperse dust, which may cause serious
and permanent respiratory or other injury. Always use NOSH/OSHA approved respiratory
protection appropriate for the dust exposure. Direct particles away from face and body.
wARNING: Always wear proper personal hearing protection that conforms to ANSI
S12.6 (S3.19) during use. Under some conditions and duration of use, noise from this
product may contribute to hearing loss.
PRECAUTIONS TO TAkE whEN SANDING PAINT
1. Sanding of lead based paint is NOT RECOMMENDED due to the difficulty of controlling the
contaminated dust. The greatest danger of lead poisoning is to children and pregnant women.
2. Since it is difficult to identify whether or not a paint contains lead without a chemical
analysis, we recommend the following precautions when sanding any paint:
PERSONAL SAfETy
1. No children or pregnant women should enter the work area where the paint sanding is
being done until all clean up is completed.
2. A dust mask or respirator should be worn by all persons entering the work area. The filter
should be replaced daily or whenever the wearer has difficulty breathing. See your local
hardware store for the proper N.I.O.S.H. approved dust mask.
3. NO EATING, DRINKING or SMOKING should be done in the work area to prevent
ingesting contaminated paint particles. Workers should wash and clean up BEFORE
eating, drinking or smoking. Articles of food, drink, or smoking should not be left in the
work area where dust would settle on them.
ENVIRONMENTAL SAfETy
1. Paint should be removed in such a manner as to minimize the amount of dust generated.
2. Areas where paint removal is occurring should be sealed with plastic sheeting of 4 mils thickness.
3. Sanding should be done in a manner to reduce tracking of paint dust outside the work area.
CLEANING AND DISPOSAL
1. All surfaces in the work area should be vacuumed and thoroughly cleaned daily for the
duration of the sanding project. Vacuum filter bags should be changed frequently.
2. Plastic drop cloths should be gathered up and disposed of along with any dust chips or
other removal debris. They should be placed in sealed refuse receptacles and disposed of
through regular trash pick-up procedures. During clean up, children and pregnant women
should be kept away from the immediate work area.
3. All toys, washable furniture and utensils used by children should be washed thoroughly
before being used again.
4
(Original instructions)
ENGLISH
SyMBOLS
The label on your tool may include the following symbols. The symbols and their definitions are as follows:
V ..................volts
A...................amperes
Hz................hertz
W ..................watts
................alternating current
min ..............minutes
no .................no load speed
.............direct current
................Class I Construction
..................earthing terminal
(grounded)
................safety alert symbol
................Class II Construction
opm.............. oscillations per minute
(double insulated)
............Read instruction manual before use
..................Use proper respiratory protection
................Use proper eye protection
..................Use proper hearing protection
SAVE ThESE INSTRUCTIONS
ACCESSORIES
• Accessoryadaptorsoldseparately.Confirmwithmanufacturertoensureaccessoryiscompatible.
• Otheroscillatingtoolaccessoriesareavailableforawidearrangeofapplicationsincluding
scraping, drywall cutting, grout removal, thin set removal, and more. Please visit
www.blackanddecker.com for more details.
INTENDED USE
DETAIL SANDING
Sanding in extremely tight areas otherwise difficult to reach and require hand sanding. Select a
high oscillating frequency. Sand with continuous motion and light pressure. Applying excessive
pressure does not increase material removal; but will prematurely wear sanding sheets.
fLUSh CUTTING
Remove excess wood from door jamb, window sill and/or toe kick. Removing excess copper or PVC pipe.
REMOVAL wORk
Carpets & backing, old tile adhesives, caulking on masonry, wood and other surfaces.
REMOVAL Of ExCESS MATERIALS
Tile grout, plaster, mortar splatters, concrete on tiles, sills.
PREPARATION Of SURfACES
New floors and tiles.
OPERATING INSTRUCTIONS
wARNING: Shock hazard. Under no circumstances should this product be used near water.
wARNING: Risk of lacerations or burns. Do not touch work piece or accessory
immediately after operating the tool. They can become very hot. Handle carefully. Always allow
accessories and work piece to cool before handling.
wARNING: To reduce the risk of injury, turn off and remove battery from tool or disconnect
plug from power source before making any adjustments or removing or installing attachments or
accessories. Remove any accessory from the attachment before removing or installing the attachment.
NOTE: Refer to Power Unit instruction manual before operating this tool for all safety warnings
and details on installing and removing attachments.
OPERATION
• Toswitchthetoolon,pressthevariablespeedswitchonthe
power unit. The tool speed depends on how far you press the
switch.
• Toswitchthetooloff,releasethevariablespeedswitch.
NOTE: This attachment only operates in the forward direction, the
forward/reverse slider of the Power Unit should not be able to be
switched to reverse.
A
5
ENGLISH
(Original instructions)
INSTALLING/REMOVING ACCESSORIES
This tool features a tool-free accessory changing system. This allows
for faster accessory changes without the need for wrenches or hex
keys like other oscillating tool systems.
•Graspthetoolandsqueezetheaccessoryclampingleveras
B
shown in figure A.
• Cleananyresidualdebrisfromthetoolshaftandtheaccessoryholder.
•Slidetheaccessoryintotheaccessoryholdermakingsurethe
accessory engages all eight pins on the holder and is flush with the
surface of the holder.
•Releasetheaccessoryclamplever.
• Someaccessories,suchasscrapersandbladescanbemountedat
an angle if required as shown in figure B.
PLUNGE CUTTING - fIGURE C
wARNING: Hold saw firmly with both hands for all cutting operations.
wARNING: Inspect work area for hidden electrical wiring, gas pipes or water pipes before
making blind or plunge cuts. Failure to do so may result in electrical shock, fire, explosion, or
property damage.
wARNING: ALWAYS use safety glasses. Everyday eyeglasses are NOT safety glasses. Also use
face or dust mask if cutting operation is dusty. ALWAYS WEAR CERTIFIED SAFETY EQUIPMENT.
wARNING: CUT HAZARD. Before cutting any type of material, be sure it is firmly anchored
or clamped to prevent slipping.
wARNING: CUT HAZARD. Let the tool work at its own pace. Do not overload, blade
breakage may occur.
wARNING: CUT HAZARD. This tool has no provision to lock the switch in the ON position,
and should never be locked in the ON position by any other means.
To make a cut:
•Clearlymarkthedesiredcuttingarea.
•Toswitchthetoolon,pullthevariablespeedtriggeronthepower
unit. The tool speed depends on how far you pull the trigger.
•Switchthetoolonbeforeapplyingpressureandslowlyfeedthe
plunge cut blade into the workpiece at the marked location.
C
wARNING: CUT HAZARD. Ensure the blade is not in contact
with cutting surface before starting saw.
•Advancethebladealongthecuttinglineuntilcutiscompleted.
Don’t force the tool; let the blade cut at its own speed.
•Toswitchthetooloff,releasethetrigger.
NOTE: Always use the appropriate type of saw blade for the work piece material and type of cut.
Cut only with sharp blades; they cut cleaner, faster and put less strain on the motor while cutting.
SANDING
wARNING: fire hazard. When working on metal surfaces, do not use a vacuum cleaner
because sparks are generated. Wear safety glasses and a dustmask. Due to the danger of fire, do not
use your sander to sand magnesium surfaces. Do not use for wet sanding.
• Toswitchthetoolon,pullthevariablespeedtriggeronthepowerunit.Thetoolspeeddependson
how far you pull the trigger.
• Toswitchthetooloff,releasethetrigger.
NOTE: Do not rest fingers on platen during use. Move it in long sweeping strokes across the
surface, letting it do the work. Light pressure is all that is required for sanding. Excessive pressure
will slow the tool and produce inferior results. Check your work often, product is capable of removing
material rapidly. Excessive force will reduce the working efficiency and cause motor overload.
Replacing the sanding sheet regularly will maintain optimum working efficiency.
NOTE: Always ensure the workpiece is firmly held or clamped to prevent movement. Any movement
of the material may affect the quality of the sanding finish.
6
(Original instructions)
INSTALLING/REMOVING SANDING ShEETS - fIGURE D
A diamond shaped platen uses a hook and loop adhesion system to
attach the sanding sheets. The platen allows you to use it on large flat
surfaces and tight spots or corners.
•Attachthesandingplatenasdescribedunder“Installing/Removing
Accessories.”
•Aligntheedgesonthesandingsheet,withtheedgeofthesanding
platen and press the sanding sheet onto the platen.
•Firmlypressthebasewiththesandingsheetattachedagainsta
flat surface and briefly switch the tool on. This provides for good
adhesion between the platen and the sanding sheet, and also helps
to prevent premature wear.
•Whenthetipofthesandingsheetbecomesworn,detachthesheetfrom
the platen, rotate and reapply.
ENGLISH
D
hELPfUL hINTS
•Alwaysensuretheworkpieceisfirmlyheldorclampedtopreventmovement.Anymovementof
the material may affect the quality of the cutting or sanding finish.
•Donotstartsandingwithouthavingthesandpaperattachedtosandingplaten.
•Usecoarsegritpapertosandroughsurfaces,mediumgritforsmoothsurfacesandfinegritfor
the finishing surfaces. If necessary, first make a test run on scrap material.
•Excessiveforcewillreducetheworkingefficiencyandcausemotoroverload.Replacingthe
accessory regularly will maintain optimum working efficiency.
•Donotallowthesandpapertowearaway,itwilldamagethesandingplaten.
TROUBLEShOOTING
Problem
•Unitwillnotstart. Possible Cause
•Attachmentisnotsecured. Possible Solution
•Makecertaintheattachmentisfully
pushed into the Power Unit.
MAINTENANCE
Use only mild soap and damp cloth to clean the tool. Never let any liquid get inside the tool;
never immerse any part of the tool into a liquid.
IMPORTANT:ToassureproductSAFETYandRELIABILITY,repairs,maintenanceand
adjustment (other than those listed in this manual) should be performed by authorized service
centers or other qualified service personnel, always using identical replacement parts.
ACCESSORIES
wARNING: Theuseofanyaccessorynotrecommendedforusewiththistoolcouldbehazardous.
Recommendedaccessoriesforusewithyourtoolareavailablefromyourlocaldealerorauthorized
service center. If you need assistance regarding accessories, please call: 1-800-444-224
Technical data
when operate with 18V MATRIX unit
Oscillating Tool
No-load speed
Oscillating angle
Weight
BDMTO-XE
min-1
0-18500 (OPM)
Degrees
2.8
g
545
Vibration total values (triax vector sum) according to EN 60745:
Cutting wood (ah, CW) 5.0 m/s2, uncertainty (K) 1.5 m/s2
Cutting metal (ah, CM) 8.0 m/s2, uncertainty (K) 1.5 m/s2
Sanding (ah,) 10.3 m/s2, uncertainty (K) 1.5 m/s2
Level of sound pressure according to EN 60745:
Sound pressure (LpA) 86.5 dB(A), uncertainty (K) 3 dB(A)
Sound power (LWA) 97.5 dB(A), uncertainty (K) 3 dB(A)
7
Australia & New Zealand
Stanley Black & Decker
82 Taryn Drive, Epping, VIC 3076 Australia
Tel.1800 444 224 (Aust) or Tel. 0800 339 258 (NZ)
90589509 REV-0
07/2012