1
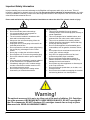
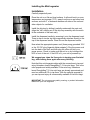
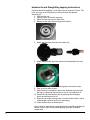
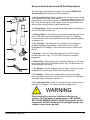
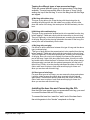
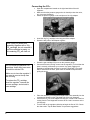
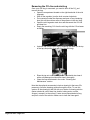
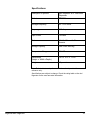
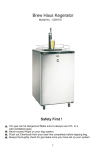
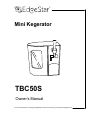
Mini Kegerator TBC50S Owner’s Manual For more information on other great EdgeStar products on the web, go to http://www.edgestar.com Important Safety Information Improper handling can cause serious damage to the EdgeStar mini kegerator and/or injury to the user. This mini kegerator is designed for domestic indoor use only. Do not use the unit for industrial or commercial use. Any other use may invalidate the warranty. Please review the ratings label located on the rear panel of the unit for electrical and other technical data related to this unit. Please read and follow the safety information listed below to reduce the risk of fire, electric shock or injury. Electrical Safety Do not exceed the power outlet ratings. It is recommended the mini kegerator be connected on its own circuit. The unit must be installed in accordance with state and local electrical codes. Always turn the unit off and unplug it from the outlet when cleaning. Unplug the unit if it is not going to be used for an extended period of time. Do not operate the unit with a power plug missing the ground plug, a damaged cord or a loose socket. Never plug or unplug the unit with wet hands. Do not bypass, cut or remove the grounding plug. Do not use extension cords or power strips with this unit. If the power cord is damaged, it must be replaced by the manufacturer or a qualified technician. Immediately unplug the unit if it makes strange sounds, emits smells or smoke comes out of it, and contact customer service. Do not remove any part of the casing unless instructed by an authorized technician. General Safety This unit is not intended for use by persons, including children, with reduced physical, sensory or mental capabilities. This unit is designed to be installed indoors, and protected from rain, sleet, snow, and/or moisture. This unit is not intended to be used by children. Children should be supervised to ensure that they do not play with this product. Do not use this appliance near flammable gas or combustibles, such as gasoline, benzene, thinner, etc. Do not place the unit near heat sources such as ovens, grills, or direct sunlight. Only use in an upright position on a flat, level surface and provide proper ventilation. Do not use solvent-based cleaning agents or abrasive solutions to clean the unit as they may damage the interior and exterior. Do not place any other appliances or allow anyone to sit on top of the unit. Do not turn the unit upside down, on its side, or at an angle off level. Do not move the unit without emptying the contents and securing the door in a closed position. Warning! The optional accessory kit is not a toy. Keep out of the reach of children. CO2 Cartridges are under pressure. ANY MISUSE MAY CAUSE SERIOUS INJURY. DO NOT over-tighten the CO2 components. DO NOT discharge CO2 cartridges towards face or body or place them near heat. READ ALL WARNING LABELS. i Table of Contents IMPORTANT SAFETY INFORMATION ................................................................. I INTRODUCTION ................................................................................................... 1 PARTS IDENTIFICATION ..................................................................................... 2 OPTIONAL ACCESSORY KIT .................................................................................. 2 THREE QUARTER VIEW ........................................................................................ 2 INSTALLING THE MINI KEGERATOR ................................................................ 3 GENERAL INSTRUCTIONS ................................................................................. 4 HEINEKEN BRAND DRAUGHTKEG TAPPING INSTRUCTIONS ...................... 5 NON-PRESSURIZED ACCESSORY KIT PART DESCRIPTIONS ...................... 6 NON-PRESSURIZED MINI KEG TAPPING INSTRUCTIONS ............................. 7 INSTALLING THE BEER LINE AND CONNECTING THE CO2 ......................................... 8 Connecting the CO2: ..................................................................................... 9 REMOVING THE CO2 LINE AND MINI KEG ...................................................... 10 TIPS FOR BEST RESULTS ................................................................................ 11 CLEANING AND MAINTENANCE ...................................................................... 11 CLEANING THE LINES .......................................................................................... 11 CLEANING THE MINI KEGERATOR ........................................................................ 11 IMPORTANT SAFEGUARDS ............................................................................. 12 ADJUSTING THE TEMPERATURE ................................................................... 13 TROUBLESHOOTING ........................................................................................ 13 SPECIFICATIONS ............................................................................................... 14 EDGESTAR LIMITED WARRANTY ................................................................... 15 First Time Operating Instructions Before use, make sure all packaging labels and materials are all removed from the unit. Be sure to keep track of all included parts and pieces before discarding packaging materials. It is advised that you keep the original box and packaging materials in case you are ever to move or ship the unit in the future. The instruction manual should be read before use. This owner’s manual is provided for reference use only. Specifications may change without prior notice. Refer to the product label on the back of your mini kegerator for the latest technical information. EdgeStar Mini Kegerator ii Introduction Thank you for purchasing this EdgeStar mini kegerator. We are glad you chose us. We believe that your purchase of this product opens a relationship between you and EdgeStar. We will provide the customer support needed to nurture that relationship. This manual contains important information regarding the proper installation, use and maintenance of your mini kegerator. Following this manual will ensure that your product will work at its peak performance and efficiency. This mini kegerator is designed to refrigerate and serve most 5 Liter mini kegs. Under optimal conditions, it can refrigerate to the high 30°s Fahrenheit. This product is shipped with a tap designed for a Heineken® brand DraughtKeg™ 5 Liter mini keg. An optional accessory kit is available that fits most other brands of 5 Liter mini keg. A 5 Liter mini keg has about 169 ounces of beer in it, so it should provide about 10 ½ pints of beer or the equivalent of about 14 12 oz cans. Please save the original product packaging in case you need to safely transport your mini kegerator. For Your Records: Please write down the model number and serial number below for future reference. Both numbers are located on the ratings label on the back of your unit and are needed to obtain warranty service. You may also want to staple your receipt to this manual as it is the proof of your purchase, and is also needed for service under your warranty. Model Number: Serial Number: Date of Purchase: To better serve you, please do the following before contacting customer service: 1 If you received a damaged product, immediately contact the retailer or dealer that sold you the product. Read and follow this instruction manual carefully to help you install, use and maintain your mini kegerator. Read the troubleshooting section of this manual as it will help you diagnose and solve common issues. Visit us on the web at http://www.edgestar.com to register your product, download product guides, additional troubleshooting resources and up-to-date information. If you need warranty service, our friendly customer service representatives are available via email at [email protected] or by telephone at 1 (866) 319-5473. Parts Identification Three Quarter View Handle Top Dispenser Handle See-through window Side Access Door Regulator Window Door Digital Controls Drip tray assembly Optional Accessory Kit (Model: TBC50-ACC) (Sold separately) Cleaning Bottle Cartridge Stand Non-Pressurized Tap Rubber Ring Regulator CO2 Releaser CO2 Adapter (Pierces CO2 Cartridge) CO2 Cartridge Cartridge Holder EdgeStar Mini Kegerator 2 Installing the Mini kegerator Installation Carefully unpack all parts. Place the unit on a flat and level surface. It will work best in a room temperature environment (70°F), away from the sun and other heat sources, and with 3” of clearance between all sides of the unit and other objects for ventilation. Install the drip tray by sliding it partially underneath the main unit (align the “tab” sticking out of the drip tray assembly with the notch in the underside of the main unit). Install the dispenser handle by screwing it onto the dispenser head. There is also a circular top that magnetically attaches directly to the top of the dispenser handle. Place this on the dispenser handle. Now select the appropriate power cord (three prong grounded 115V or the 12V DC plug [cigarette lighter adapter]). Plug the power cord into the back of the unit, and then plug the other end into your power source. Check to make sure the unit is on by looking at the LED in front of the unit. If the LED is lit, your unit is powered up. We suggest you clean the lines prior to tapping your first mini keg, and cleaning them again after every mini keg. Note that this mini kegerator ships with the connections to tap and enjoy Heineken® brand DraughtKeg™ 5 Liter mini kegs. This is the most popular and widely-available 5 Liter mini keg. Heineken® brand DraughtKeg™ 5 Liter mini kegs are already pressurized and need no additional CO2 to tap them. With the optional upgrade kit, you can tap and enjoy all commercially available 5 Liter mini kegs. IMPORTANT: Do not remove any safety, warning, or product information labels from your mini kegerator. 3 General instructions Regardless of the brand of 5-liter mini keg, here are the basic steps for tapping it: 1. Chill your keg- although this mini kegerator has a cooling plate that will cool your keg, best results will come from a keg that is already cooled to drinking temperature- this way, the cooling plate only has to keep your keg cool. 2. Follow the instructions on the mini keg to eliminate excess gas or pressure. 3. Connect the beer line to the correct dispenser head and tap the keg (use the included head for Heineken brand DraughtKeg™ 5 Liter mini kegs; use the optional head for all other brands) 4. Connect the gas lines (if using the optional head for nonpressurized 5 Liter mini kegs) 5. Try a test pour to ensure that the beer is flowing freely. If the test pour is good, then you may begin to enjoy! Note that you may experience a lot of foam shortly after tapping the mini keg. If you wait 15-20 minutes after tapping, the foam should lessen. Additionally, pours with the spout fully open should deliver less foam than pours with the spout only partially open. To put the mini keg into the mini kegerator: 1. Open the mini kegerator door by depressing the button located on the upper right-hand side of the door. 2. Gently put the mini keg on the cold plate. You may find it helpful to hook the line(s) up to the mini keg while it is slightly outside the unit. To turn the light on and off: 1. If the light is off press the light button to turn on the light. 2. If the light is on press the light button to turn the light off. EdgeStar Mini Kegerator 4 Heineken brand DraughtKeg tapping instructions Heineken brand DraughtKeg™ mini kegs have an internal CO2 tank. This is the only type of mini keg that you can tap without the optional accessory kit. 1. Chill the mini keg 2. Open the door of the mini kegerator. 3. Place the mini keg near the open door. 4. Make sure the top of the mini keg looks like this: 5. Attach the Heineken-style tap to the beer line: 6. Attach the Heineken-style tap and beer line assembly to the mini keg: 7. Place the mini keg inside the mini kegerator and shut the door. 8. Pour your first glass of beer! 9. When the keg is completed, remove the Heineken-style tap from the keg by squeezing the two tabs on top of it and pulling it off. 10. Detach the tap from the beer line by pressing the white/gray button and pulling the line off. 11. Rinse the tap under running water. You should also clean it with a mild detergent solution and rinse it thoroughly. 12. Clean the beer lines as noted above. Note: Heineken reports that a tapped Heineken brand DraughtKeg will remain fresh for up to 30 days after tapping (provided it remains refrigerated). 5 Non-pressurized Accessory Kit Part Descriptions The following section describes the parts of the optional TBC50-ACC Accessory Kit (sold separately) and their purposes. 1. Non-Pressurized Tap - Using a piercing tube, this tap is to be inserted into a non-pressurized keg. Beer and CO2 lines are located at the top. It is good practice to wet the piercing tube to lubricate before tapping the minikeg. Once the mini-keg has been tapped, secure the tap assembly onto the top of the mini-keg using the spring-loaded catch. 1 3 2 2. Cartridge Stand - Used to elevate the cartridge holder and regulator to fit in the unit's side compartment. 3. Cleaning Bottle - Used with non-pressurized tap assembly and CO2 to flush out the beer lines with cleaning solution (see pg. 11). EdgeStar recommends using the cleaning bottle that came with your mini-kegerator to conserve CO2. 4. CO2 Cartridge - 16g food grade CO2 cartridges. This provides the propellant necessary to pressurize your mini-keg. Do not use BB gun/paintball CO2 cartridges - These often have some oil mixed in with the CO2. 4 5 6 7 5. Regulator - Used to increase/decrease the flow of CO2. Please reference the chart on pg. 11 of your TBC50 manual for pressure suggestions. 6. Rubber Ring - When tapping your non-pressurized keg, you will need to insert the tap into this ring and then into the keg. This will prevent CO2 from escaping the tap set up. 8 9 7. CO2 Releaser - Used to depressurize kegs. (Note: You may not need to depressurize certain kegs. Please follow keg instructions.) 8. CO2 Adapter - Screws into cartridge holder and pierces cartridge. Once the adapter is screwed in, do not unscrew until the CO2 cartridge is completely empty, otherwise it will leak out. 9. CO2 Cartridge Holder - Holds CO2 cartridge in place so that it can be pierced by CO2 adapter. The holder sits in the cartridge stand. WARNING The accessory kit is not a toy. Keep out of the reach of children. CO2 Cartridges are under pressure. ANY MISUSE MAY CAUSE SERIOUS INJURY. DO NOT over-tighten the CO2 components. DO NOT discharge CO2 cartridges towards face or body or place them near heat. EdgeStar Mini Kegerator 6 Non-pressurized Mini Keg Tapping Instructions Note that the following instructions refer to optional accessory kit (sold separately). Visit kegerator.com for more information and/or to place an order for the optional accessories. Most 5 Liter mini kegs are “non-pressurized”- though the kegs are shipped with minimal pressure inside to ensure the freshness of the beer, once they are opened, all the pressure escapes and they must be served with gravity (poured), or by re-pressurizing them (in this case, with CO2). All non-pressurized mini kegs must use the optional accessory kit’s non-pressurized mini keg tap, shown following: CO2 line in connects here (CO2 flows in here) Beer line connects here (beer flows out this connector) Piercing tube (goes into the mini keg) A few notes on usage of the above tap: Before piercing the plug on the top of the keg, you must always follow the instructions marked on the keg to eliminate the excess gas and ensure that the keg has remained still long enough to avoid foaming from the ventilation opening. It’s a good idea to wet the “piercing tube” with a little water prior to tapping a mini keg. This will lubricate the tube. Drive the piercing tube soundly through the rubber ring and into the mini keg when tapping it, and then secure the tap assembly onto the top of the mini keg with the spring-loaded catch. 7 Tapping the different types of non-pressurized kegs: There are several different types of non-pressurized 5 Liter kegs available. The mini kegs mainly differ in the type of “bung” (plug) sealing the top of the mini keg. It is into this bung that the mini kegs are tapped. a) Mini keg with rubber plug: This type of plug allows you to tap the keg with the piercing tube by screwing the piercing tube into the rubber bung- simply drive the tube down the center of the bung- the center piece will fall harmlessly into the beer. b) Mini keg with combined plug: This type of plug requires the pressurized air to be expelled from the keg before tapping it. Read and comply with the instructions on the mini keg. Then pull vigorously on the below-pictured part, revealing the second part of the plug. Next drive the piercing tube down the center of the bung- the center piece will fall harmlessly into the beer. c) Mini keg with vent plug: It is difficult to tell the difference between this type of bung and the above type (combined plug). This type of plug requires the pressurized air to be expelled from the keg before tapping it. Read and comply with the instructions on the mini keg. Then pull vigorously on the below-pictured part, revealing the second part of the plug. Now use a tool (not included) to cut/remove the remaining part of the bung. If part of the bung falls into the beer, this will not cause any health risks or affect the flavor of the beer. Now fit the yellow-orange all-purpose plug (received with the optional spare parts) into the hole in the mini keg. Finally, drive the piercing tube down the center of this plug. (Note: make sure to retrieve, wash, and save this plug for future use when you are done with this mini keg.) d) Other types of mini kegs: For most other types of mini kegs, you can remove the bung and replace it with the yellow-orange all-purpose plug (received with the optional spare parts). Then drive the piercing tube down the center of this plug. (Note: make sure to retrieve, wash, and save this plug for future use when you are done with this mini keg.) Installing the beer line and Connecting the CO2 Now that you have tapped your non-pressurized mini keg, you need to connect the beer line and CO2 supply. To connect the beer line: insert the “male” end of the beer line in the mini kegerator to the “female” receptacle on the tap. EdgeStar Mini Kegerator 8 Connecting the CO2: Open the compartment located on the right-hand side of the mini kegerator. Make sure that the pressure gauge valve is closed (to close the valve, turn it counter-clockwise). Attach the pressure gauge on the end piece of the 16g adapter. Insert the 16g CO2 cartridge in the long part of the adapter. Screw the two parts of the adapter together. Screw the gas cartridge fully home on the pressure gauge. Connect the hose by driving it home into the regulator (To check that the hose is correctly connected, try to remove it by gently tugging on it. Resistance indicates that the hose is correctly connected. If you really want to disconnect the hose, push down the metallic end-piece while pulling the hose). Place the assembly on its support and place the entire assembly into the compartment located on the right-hand side of the mini kegerator. Connect the CO2 line to the tapped mini keg (the “female” end of the line coming from the mini kegerator connects to the “male” connector on the mini keg tap) Turn the dial on the regulator clockwise to begin the flow of CO2. Check the chart under “Tips for Best Results” for pressure suggestions. Note: once you screw this assembly together with a 16g CO2 cartridge, do not unscrew it until the cartridge is empty- or all remaining CO2 will rush out Do not use BB gun/paintball CO2 cartridges- these often have some oil mixed in with the CO2. Make sure to close the regulator if you want to remove the tap from the mini-keg. To replace the CO2 cartridge, close the regulator, unscrew the current cartridge, and reinstall a new cartridge. 9 Removing the CO2 line and mini keg Once your mini keg is consumed, you need to shut off the CO2 and remove the keg. Open the compartment located on the right-hand side of the mini kegerator. Shut off the regulator (turn the knob counter-clockwise). Put a container under the dispenser and pour off any remaining beer (this will also relieve some of the pressure in the mini keg). Open the mini kegerator main door and disconnect the CO2 line and beer line. Empty the remaining CO2 from the mini keg with the CO2 releaser as shown: Undo the tap from the mini keg by releasing the catch (on the top of the tap) and pulling it up and out of the mini keg): Rinse the tap out under running water. You should also clean it with a mild detergent solution and rinse it thoroughly. Clean the lines as directed in the under “Cleaning and Maintenance” section. Note that the optional accessories include a cleaning kit that uses CO2 pressure to force the cleaning solution through the lines. To use this system, fill the cleaning kit half full with your choice of cleaning solution (water mixed with a bit of beer line cleaner, baking soda, or white vinegar), connect it to the unit as if it were a non-pressurized mini keg, and pour out all of the solution. Make sure to rinse the lines again! EdgeStar Mini Kegerator 10 Tips for Best Results 1. For best results, use clean glasses. Rinsing the glasses with cold water prior to pouring can deliver better results (less foam). 2. Hold the glass at an angle under the dispenser. Do not touch the nozzle of the dispenser to the glass. 3. Pull the dispenser handle towards you to start the flow of beer. Open the dispenser up all the way to get the maximum flow rate (this will decrease foam). 4. Slowly tip the glass upright as it fills. 5. Gently ease the dispenser handle back to the “closed” position as the foam nears the lip of the glass. 6. Enjoy your beer! Note: If you are enjoying a non-pressurized mini keg, you may adjust the pressure for maximum enjoyment. Here are our suggestions: Beer type German beers French beers Highly fermented brown ales CO2 content in % +/- 0.5 +/- 0.6 - 0.8 +/- 0.6 - 0.8 Pressure (@ approx. 41°F) +/- 0.4 - 0.5 bars +/- 0.8 bars +/- 0.8 - 1 bars Cleaning and Maintenance You should clean the lines after every mini keg. Cleaning the lines Before tapping your first mini keg, and after each mini keg, clean the lines. 1. Fill the “Squeeze bottle” cleaning kit half full of water. Add a small amount of detergent, baking soda, white vinegar, or beer line cleaner. Mix the mixture thoroughly. 2. Attach the nozzle of the squeeze bottle to the beer line. Place a cup or bowl underneath the beer dispenser. 3. Squeeze the bottle while opening the dispenser all the way, forcing the cleaning mixture through the beer line and into the cup/bowl beneath the nozzle. 4. Once all the mixture has run through the line, rinse out the squeeze bottle. 5. Refill the squeeze bottle with water and repeat the above process with water until the lines are clear of cleaning solution. Cleaning the Mini Kegerator For cleaning the other parts of the unit, a damp cloth with a mild detergent solution is suggested. 11 Important Safeguards EdgeStar Mini Kegerator Do not use the appliance if the power supply cord is damaged. If the power supply cord is damaged, it must be replaced by a qualified technician. This unit is designed to function on 115 Volts/ 60 Hz (110/115/120 Volts acceptable) electrical circuits. This appliance is not designed for children. Never allow unattended children to use this appliance. Unplug the appliance if it will not be used for an extended period of time. Unplug the appliance prior to cleaning. Set the appliance on a flat surface away from direct sunlight and other heat sources. This appliance is designed to function optimally in room temperature environments (low to mid 70°s Fahrenheit). Do not move the unit while it is full. The power supply cord must be grounded. Never pull the power supply cord directly to disconnect the appliance. Always pull the plug out of the socket. Never lift the appliance by the power supply cord or the dispensing tap. Keep the power supply cord away from heating surfaces. Do not try to repair, adjust this appliance or replace its components by yourself. Should it not operate correctly, contact customer support. This appliance is designed for household use only and not for commercial use. Do not use the appliance for uses other than that for which it is designed. Do not immerse the appliance or its power supply cord in water or any other liquid. Do not cover the appliance or place anything on it. Do not insert any objects into the ventilation holes. Only use approved CO2 cartridges Cartridges contain pressurized CO2. Keep them away from heat, in a dry and cool place. Do not dispose of empty CO2 cartridges in a fire. Clean this appliance prior to use, and after every keg. 12 Adjusting the Temperature Note: Whether your mini kegerator can reach the actual set temperature depends on the ambient environmental conditions. This mini kegerator has a temperature range from 38°F to 54°F. Press the button on the control panel to lower the temperature by 1 degree increments. Allow at least 24 hours before storing your keg and to allow the temperature to acclimate. Press the button on the control panel to increase the temperature by 1 degree increments. TROUBLESHOOTING Before Calling for Help If the unit appears to be malfunctioning, read through the manual first. If the problem persists, check the Troubleshooting Guide below. The problem could be something that can easily be solved or explained. Issue The mini kegerator does not turn on. The mini kegerator will not reach the desired temperature The faucet is leaking. While using the optional accessory kit, CO2 is leaking. 13 Possible cause Solution There is a power failure. Ensure the power outlet has power by testing with another appliance. The kegerator is not plugged in. Plug the unit in to a power outlet that has sufficient power. A house fuse has blown or the circuit breaker is tripped. Replace the broken fuse in your fuse box or reset the breaker. The mini kegerator is placed too close to a heat source. Keep the mini kegerator away from direct sun light or other heat sources. The mini kegerator does not have sufficient ventilation. Make sure there is 3” of ventilation room all around the unit. The door is opened too frequently or for a long period of time. Close the door and do not open the door too frequently or for a long period of time. Hose not properly installed. Make sure the dispenser handle is pinching the rubber hose. Remove the side access door to access the hose that leads to the dispenser. Rubber ring is not installed on piercing tube Make sure the rubber ring is installed. Defective CO2 Piercing Adapter or missing gasket Contact customer service. Specifications Description of product Mini Kegerator & 5L Draft Beer Dispenser Model TBC50S Voltage/Frequency AC 115V~60Hz Amperage 0.63 Amps Input Power 70 Watts Color Metallic Silver with Chrome Accents Storage Capacity One 5-liter Mini-keg Temperature Range 38-54ºF Dimensions (Height x Width x Depth ) 14 7/8” x 15” x 13 2/5” Weight 13 pounds Note: Technical data and performance information is provided for reference only. Specifications are subject to change. Check the rating label on the mini kegerator for the most accurate information. EdgeStar Mini Kegerator 14 EdgeStar Limited Warranty One (1) Year Parts & Ninety (90) Days Labor This product is warranted by EdgeStar to be free from defective workmanship and materials, subject to any conditions set forth as follows: WHAT IS COVERED: LABOR: For a period of NINETY (90) DAYS from the date of original purchase, labor will be performed free of charge at an authorized EdgeStar repair facility. At its option, EdgeStar will repair the product with new or remanufactured parts, or exchange the defective product with a new, refurbished, or remanufactured product. If a product is replaced, it will carry the remaining warranty of the original product. After the ninety (90) day period, EdgeStar will no longer be responsible for labor charges incurred. All defective products and parts covered by this warranty will be repaired or replaced on a mail-in basis to an EdgeStar authorized repair facility. PARTS: For a period of ONE (1) YEAR from the date of original purchase, EdgeStar will supply new, rebuilt, or refurbished parts free of charge. EdgeStar may request a defective part be returned in exchange for the replacement part. All replacement parts or products will be new, remanufactured, or refurbished. All products and parts replaced by EdgeStar under warranty service become the property of EdgeStar. This warranty applies to the original purchaser only, and only covers defects in workmanship experienced during operation of the product under normal service, maintenance, and usage conditions. This warranty applies to the purchase and use of this product in residential settings within the United States of America. WHAT IS NOT COVERED: The following limitations apply to the coverage of this warranty. This warranty does not cover: Labor charges for installation, setup or training to use the product. Shipping damage, and any damage caused by improper packaging for shipment to an authorized service center, and any damaged caused by improper voltage or any other misuse, including abnormal service, handling, or usage. Cosmetic damage such as scratches and dents. Normal wear and tear on parts or replacement of parts designed to be replaced, e.g. filters, cartridges, batteries. Service trips to deliver, pick-up, or repair, install the product, or to instruct in proper usage of the product. Damages or operating problems resulting from misuse, abuse, operation outside environmental specifications, uses contrary to instructions provided in the owner’s manual, accidents, acts of God, vermin, fire, flood, improper installation, unauthorized service, maintenance negligence, unauthorized installation or modification, or commercial use. Labor charges incurred 91 days or more after the date of original purchase. The use of EdgeStar products in commercial settings. Optional accessories, attachments, and appearance items. Products that have been modified to perform outside of specifications without the prior written permission of EdgeStar. Products lost in shipment, or theft. Products sold AS IS or from an unauthorized reseller. Products that have had their serial numbers removed or defaced. Products with serial numbers that have been invalidated. OBTAINING WARRANTY SERVICE: If you believe your product is defective, contact EdgeStar Customer Support for troubleshooting assistance and warranty service at 1-866-319-5473. Please have your serial number and proof of purchase available. Once an EdgeStar authorized representative has confirmed that your product is defective and eligible for warranty service, the product must be returned to an EdgeStar repair facility. The purchaser is solely responsible for prepaying all shipping related costs to and from the repair facility. EdgeStar is not responsible for damage resulting from shipper mishandling or improper packaging. Do not return a defective product to the place of purchase. Products received without a return authorization number will be refused. THIS WARRANTY IS IN LIEU OF ANY OTHER WARRANTY, EXPRESS OR IMPLIED, INCLUDING WITHOUT LIMITATION, ANY WARRANTY OF MERCHANTABILITY OR FITNESS FOR A PARTICULAR PURPOSE. TO THE EXTENT ANY IMPLIED WARRANTY IS REQUIRED BY LAW, IT IS LIMITED IN DURATION TO THE EXPRESS WARRANTY PERIOD ABOVE. NEITHER THE MANUFACTURER NOR ITS DISTRIBUTORS SHALL BE LIABLE FOR ANY INCIDENTAL, CONSEQUENTIAL, INDIRECT, SPECIAL, OR PUNITIVE DAMAGES OF ANY NATURE, INCLUDING WITHOUT LIMITATION, LOST REVENUES OR PROFITS, OR ANY OTHER DAMAGE WHETHER BASED IN CONTRACT, TORT, OR OTHERWISE. SOME STATES DO NOT ALLOW THE EXCLUSION OF INCIDENTAL OR CONSEQUENTIAL DAMAGES, SO THE ABOVE EXCLUSION MAY NOT APPLY TO YOU. THIS WARRANTY GIVES YOU SPECIFIC LEGAL RIGHTS. YOU MAY HAVE OTHER RIGHTS THAT VARY FROM STATE TO STATE. 15 EdgeStar Products Box 81336 Austin, TX 78708-1336 Toll Free: 1-866-319-5473 Web: http://www.edgestar.com E-mail: [email protected] Register your product, download owner’s manuals, access additional troubleshooting resources, and obtain more information on other great EdgeStar products on the web at: http://www.edgestar.com Product contents and specifications may change without notice. Copyright © 2010 Living Direct, Inc. All rights reserved.