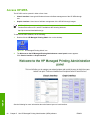
1
HP Universal Print Driver
System Administrator’s Guide
HP Universal Print Driver
System Administrator's Guide
Copyright and license
Trademark credits
©2006 Copyright Hewlett-Packard
Development Company, L.P.
Adobe®, Acrobat®, PostScript®, and the
Acrobat logo® are trademarks of Adobe
Systems Incorporated.
Reproduction, adaptation or translation
without prior written permission is prohibited,
except as allowed under the copyright laws.
Java™ is a trademark of Sun Microsystems,
Incorporated.
The information contained herein is subject
to change without notice.
Linux® is a U.S. registered trademark of
Linus Torvalds.
The only warranties for HP products and
services are set forth in the express warranty
statements accompanying such products
and services. Nothing herein should be
construed as constituting an additional
warranty. HP shall not be liable for technical
or editorial errors or omissions contained
herein.
Microsoft®, Windows®, Windows NT®, and
Windows® XP are U.S. registered
trademarks of Microsoft Corporation.
Edition 4, 2/2007
UNIX® is a registered trademark of The
Open Group.
Pentium® is a trademark or registered
trademark of Intel Corporation or its
subsidiaries in the United States and other
countries.
Table of contents
1 Purpose and Scope
Introduction ........................................................................................................................................... 1
Conventions used in this guide ............................................................................................................ 3
Supported devices ................................................................................................................................ 4
Supported devices by HP MPA and HP UPD ...................................................................... 4
Supported devices with Plug and Play ................................................................................ 6
2 Software description
Introduction ........................................................................................................................................... 9
HP UPD and HP mobile printer drivers for Windows ......................................................................... 10
HP UPD vs product-specific drivers ................................................................................... 10
HP UPD vs HP mobile print driver for Windows 2.0 .......................................................... 11
System requirements ......................................................................................................................... 12
Software availability ............................................................................................................................ 13
Select the best print driver .................................................................................................................. 14
HP PCL 6 driver ................................................................................................................. 14
HP PCL 5 driver ................................................................................................................. 14
PS Emulation driver ........................................................................................................... 15
3 Install and Uninstall of the HP Universal Print Driver (UPD)
Install .................................................................................................................................................. 18
Install using the Add Printer Wizard ................................................................................... 18
Install by using the Install.exe ............................................................................................ 29
Install by using the command prompt ................................................................................ 33
Create custom installations by using command options ................................... 34
Available command options .............................................................................. 34
Install by using point and print ........................................................................................... 37
Install by using the HP Web Jetadmin display plug-in ....................................................... 37
Install on a cluster server ................................................................................................... 37
Install on a Terminal Server/Citrix ...................................................................................... 37
Install by using Novell NDS ............................................................................................... 38
Novell Iprint ....................................................................................................... 38
NDPS ................................................................................................................ 38
Uninstall .............................................................................................................................................. 39
4 Use HP universal print drivers
Introduction ......................................................................................................................................... 41
Use the HP UPD ................................................................................................................................ 42
ENWW
iii
Universal print driver modes .............................................................................................. 42
Dynamic mode .................................................................................................. 42
Traditional mode ............................................................................................... 42
Access Printing Preferences and Properties driver tabs ................................................... 42
Change the general settings for the HP UPD .................................................................... 43
Select destination-printer prompts .................................................................... 43
Modify printer location profiles .......................................................................... 44
Set verification level .......................................................................................... 45
Configure the HP UPD by TCP/IP address ....................................................................... 46
TCP/IP address is known .................................................................................. 46
TCP/IP address is unknown .............................................................................. 46
Define a printer location profile .......................................................................................... 47
Help ................................................................................................................................... 47
Print using the HP UPD ...................................................................................................................... 48
Dynamic mode ................................................................................................................... 48
Change the selected printer .............................................................................. 48
Traditional mode ................................................................................................................ 49
Printing in Traditional mode .............................................................................. 49
Manage the HP UPD .......................................................................................................................... 50
Manage destination printers .............................................................................................. 50
Add a destination printer ................................................................................... 50
Specify the IP address, host name, IPX/SPX address, or UNC
path ................................................................................................... 50
Use the HP Universal Printing Destination Wizard ........................... 51
Search for a destination printer ......................................................................... 51
Create location files ........................................................................................... 51
Cache printer settings ....................................................................................... 52
HP UPD features ............................................................................................................... 52
Status notification pop-ups (SNPs) ................................................................... 52
Configure SNPs ................................................................................ 54
HP Managed Printing Administration (MPA) .................................... 54
HP Driver Preconfiguration ............................................................... 54
Registry settings ............................................................................... 55
5 Use HP Managed Printing Administration (MPA) software
Introduction ......................................................................................................................................... 57
Install and uninstall the HP MPA software ......................................................................................... 58
HP MPA software requirements ........................................................................................ 58
Software availability ........................................................................................................... 58
Install the HP MPA software .............................................................................................. 59
Uninstall the HP MPA software .......................................................................................... 62
Uninstall HP MPA using HP Managed Printing Admin Setup Wizard ............... 62
Uninstall HP MPA using Add/Remove Programs .............................................. 65
Access HP MPA ................................................................................................................................. 66
Classic interface ................................................................................................................ 67
Graphic interface ............................................................................................................... 67
Use Help ............................................................................................................................................. 71
Use Managed Printer Policies (MPPs) ............................................................................................... 72
Create a new MPP ............................................................................................................. 73
UseMode settings ............................................................................................. 75
iv
ENWW
Color Access ..................................................................................................... 79
User Search capabilities ................................................................................... 81
Status and supplies notifications ....................................................................... 83
Job accounting and job delivery ........................................................................ 85
Basic MPP Settings ........................................................................................... 85
Update an MPP ................................................................................................. 86
Edit an existing MPP .......................................................................................................... 87
Associate MPLs with an MPP ............................................................................................ 88
Duplicate an existing MPP ................................................................................................. 89
Associate user groups with an MPP .................................................................................. 90
Remove an existing MPP .................................................................................................. 91
Use Managed Printer Lists (MPLs) .................................................................................................... 93
Create a new MPL ............................................................................................................. 95
Auto printer discovery ....................................................................................... 97
Discover locally connected network printers .................................... 98
Discover printers on a print server (\\serverName) ........................... 99
Import printers from an XML file ..................................................... 101
Manual printer entry ........................................................................................ 103
Edit an existing MPL ........................................................................................................ 108
Associate a MPL with a MPP ........................................................................................... 109
Duplicate an existing MPL ............................................................................................... 110
Manage the MPL view ..................................................................................................... 110
Select a view ................................................................................................... 113
Clickable image map view .............................................................. 113
List with printer graphics view ......................................................... 117
Tabular HTML view ........................................................................ 119
Advanced view settings ................................................................................... 120
Manage virtual printers .................................................................................................... 121
Create a new virtual printer ............................................................................. 122
Edit existing virtual printer ............................................................................... 123
Remove an existing MPL ................................................................................................. 124
Remove printers from an MPL ......................................................................................... 124
Use User Groups .............................................................................................................................. 126
Create a new user group ................................................................................................. 126
Edit an existing user group .............................................................................................. 128
Associate a user group with a MPP ................................................................................. 129
Remove a user group ...................................................................................................... 129
Appendix A HP Universal Print Driver Frequently Asked Questions (FAQs)
Troubleshoot .................................................................................................................................... 132
Mobile Print Driver FAQs .................................................................................................................. 133
What should I use to manage my MPP and MPL content? ............................................. 133
Can I change the address that "HP Managed Printer Lists" uses to look up printers? .... 133
What type of environment should "HP Managed Printer Lists" be used? ........................ 134
How can I get MPLs that are user, domain, or TCP/IP address specific? ....................... 134
How can I allow only a specific user to see a certain custom MPL? ............................... 134
Can custom MPLs contain environment variables directly, or are they only valid inside
the XML file? .................................................................................................................... 135
Can "HP Managed Printer Lists" be used in Hot Spots? ................................................. 135
Does the server where the MPLs reside have to be Windows? ...................................... 135
ENWW
v
Can large corporations or enterprise environments benefit from this technology? .......... 135
How often can I modify the printers that the HP MPL or the custom MPLs point to? ...... 135
Technical FAQs ............................................................................................................... 135
What is a third party application? ..................................................................................................... 136
My environment uses third party applications; should I install the UPD? ......................................... 137
How do I install without using the install.exe? .................................................................................. 138
When a printer is connected locally via USB I can not install an IP printer. ..................................... 139
Why do I see color tabs for a mono LaserJet? ................................................................................. 140
What is the difference between a high, medium, and low Device Verification Level (DVL)? ........... 141
What is the best way to update my queues on my Microsoft print servers when a new version of
the HP UPD becomes available? ..................................................................................................... 142
My HP Color LaserJet 2550 printer does not print in color when using the PCL5 driver. ................ 143
Index ................................................................................................................................................................. 145
vi
ENWW
List of tables
Table 1-1 HP Universal Print Driver System Administrator's Guide overview .................................................... 1
Table 2-1 Driver comparison — HP UPD vs product-specific drivers .............................................................. 10
Table 2-2 Driver comparison — HP UPD vs HP mobile print driver for Windows 2.0 ...................................... 11
Table 3-1 Command options ............................................................................................................................ 35
Table 4-1 SNP settings .................................................................................................................................... 55
Table 5-1 HP MPA classic interface options .................................................................................................... 67
Table 5-2 HP MPA graphic interface options ................................................................................................... 68
Table 5-3 UseMode Settings panel – Template drop-down list options ........................................................... 75
Table 5-4 UseMode Settings — Properties panel options ............................................................................... 76
Table 5-5 Color Access panel – Template drop-down list options ................................................................... 79
Table 5-6 Color-printing user access ............................................................................................................... 80
Table 5-7 User Search Capabilities panel – Template drop-down list options ................................................. 81
Table 5-8 User search capabilities ................................................................................................................... 82
Table 5-9 Supplies Status Notifications panel – Template drop-down list options ........................................... 83
Table 5-10 Status and Supplies Notifications panel — Printer Alert Notification Settings drop-down menu
options ................................................................................................................................................................ 84
Table 5-11 Status and Supplies Notifications panel — Device Query Interval drop-down menu options ........ 84
Table 5-12 Status and supplies notification options ......................................................................................... 84
Table 5-13 Managed Print Policy – Update Policy panel options .................................................................... 86
Table 5-14 Managed Printer Policy — Manage MPL associations panel options ............................................ 88
Table 5-15 Managed Printer Policy — Associate with an MPP panel options ................................................. 89
Table 5-16 Managed Printer Policy — Manage MPL associations panel options ............................................ 90
Table 5-17 Managed Printer Policy — Associate with an MPP panel options ................................................. 91
Table 5-18 MPL printers panel – Options ........................................................................................................ 96
Table 5-19 Discovered printers screen options ................................................................................................ 98
Table 5-20 Discovered printers screen options .............................................................................................. 100
Table 5-21 Discovered printers screen options .............................................................................................. 102
Table 5-22 MPL printers panel – Manual Printer Entry options ..................................................................... 104
Table 5-23 MPL printers – Advanced panel options ...................................................................................... 106
Table 5-24 Select a view type panel — View options .................................................................................... 113
Table 5-25 Printer image panel options ......................................................................................................... 115
Table 5-26 Labels panel options .................................................................................................................... 117
Table 5-27 Graphics view — List format options ............................................................................................ 118
Table 5-28 Printer image panel options ......................................................................................................... 118
Table 5-29 Complete panel options ............................................................................................................... 119
Table 5-30 Select a view panel options ......................................................................................................... 120
Table 5-31 Edit existing virtual printers panel options .................................................................................... 123
ENWW
vii
viii
ENWW
List of figures
Figure 3-1 Add Printer Wizard — Welcome window ........................................................................................ 19
Figure 3-2 Add Printer Wizard — Local or Network Printer window ................................................................. 19
Figure 3-3 Add Printer Wizard — Select a Printer Port window ....................................................................... 20
Figure 3-4 Add Standard TCP/IP Printer Port Wizard — Welcome window .................................................... 21
Figure 3-5 Add Standard TCP/IP Printer Port Wizard — Add Port window ..................................................... 22
Figure 3-6 Add Standard TCP/IP Printer Port Wizard — Additional Port Information Required window ......... 23
Figure 3-7 Add Standard TCP/IP Printer Port Wizard — Completing the Add Standard Port Wizard
window ................................................................................................................................................................ 24
Figure 3-8 Add Printer Wizard — Install Printer Software window ................................................................... 25
Figure 3-9 Add Printer Wizard — Install Printer Software window, driver listed ............................................... 26
Figure 3-10 Add Printer Wizard — Name Your Printer window ....................................................................... 27
Figure 3-11 Add Printer Wizard — Printer Sharing window ............................................................................. 28
Figure 3-12 Add Printer Wizard — Print Test Page window ............................................................................ 29
Figure 3-13 HP Universal Printing Installer Wizard — Welcome and Software License Agreement
window ................................................................................................................................................................ 30
Figure 3-14 HP Universal Printing Installer Wizard — Installation Mode window ............................................ 31
Figure 3-15 HP Universal Printing Installer Wizard — Installing window ......................................................... 32
Figure 3-16 HP Universal Printing Installer Wizard — Finish window .............................................................. 33
Figure 4-1 General tab ..................................................................................................................................... 43
Figure 4-2 Location Profiles tab ....................................................................................................................... 44
Figure 4-3 Device Verification tab .................................................................................................................... 45
Figure 4-4 Status notification pop-up (sample) ................................................................................................ 53
Figure 4-5 Notification Settings dialog box ....................................................................................................... 54
Figure 5-1 HP MPA Setup Wizard — Welcome window .................................................................................. 59
Figure 5-2 HP MPA Setup Wizard — Confirm Installation window .................................................................. 60
Figure 5-3 HP MPA Setup Wizard — Installing HP MPA window .................................................................... 61
Figure 5-4 HP MPA Setup Wizard — Installation Complete window ............................................................... 62
Figure 5-5 HP MPA Setup Wizard – HP MPA Remove or Repair window ....................................................... 63
Figure 5-6 HP MPA Setup Wizard – Removing HP MPA window .................................................................... 64
Figure 5-7 HP Managed Printing Admin icon ................................................................................................... 66
Figure 5-8 HP MPA — Graphic interface view ................................................................................................. 68
Figure 5-9 Create a new MPP screen .............................................................................................................. 73
Figure 5-10 HP MPA — Properties screen ...................................................................................................... 74
Figure 5-11 UseMode Settings panel ............................................................................................................... 75
Figure 5-12 Color Access panel ....................................................................................................................... 79
Figure 5-13 User Search Capabilities panel .................................................................................................... 81
Figure 5-14 Status & Supplies Notifications panel ........................................................................................... 83
Figure 5-15 Basic MPP settings panel ............................................................................................................. 85
Figure 5-16 Update policy panel ...................................................................................................................... 86
ENWW
ix
Figure 5-17
Figure 5-18
Figure 5-19
Figure 5-20
Figure 5-21
Figure 5-22
Figure 5-23
Figure 5-24
Figure 5-25
Figure 5-26
Figure 5-27
Figure 5-28
Figure 5-29
Figure 5-30
Figure 5-31
Figure 5-32
Figure 5-33
Figure 5-34
Figure 5-35
Figure 5-36
Figure 5-37
Figure 5-38
Figure 5-39
Figure 5-40
Figure 5-41
Figure 5-42
Figure 5-43
Figure 5-44
Figure 5-45
Figure 5-46
Figure 5-47
Figure 5-48
Figure 5-49
Figure 5-50
Figure 5-51
Figure 5-52
x
Edit an existing MPP — Select an MPP panel ............................................................................. 87
Associate MPLs with an MPP — Select an MPP screen .............................................................. 88
Duplicate an existing MPP — Select an MPP to duplicate screen ............................................... 89
Associate user groups with an MPP screen ................................................................................. 90
Remove an existing MPP – Select an MPP panel ........................................................................ 91
Remove an existing MPP — Confirmation screen ........................................................................ 92
Create a new MPL screen ............................................................................................................ 95
MPL printers panel ........................................................................................................................ 96
Add automatically screen .............................................................................................................. 97
Discovered printers screen ........................................................................................................... 98
Discovered printers screen ......................................................................................................... 100
Discovered printers screen ......................................................................................................... 102
MPL printers screen — manual printer entry .............................................................................. 104
MPL printers screen – MPL settings panel ................................................................................. 107
Edit an existing MPL — Select an MPL screen .......................................................................... 108
Edit an existing MPL — Printers screen ..................................................................................... 109
Duplicate an existing MPL — Select an MPL to duplicate panel ................................................ 110
Manage MPL view — Select an MPL screen ............................................................................. 111
Select a view type screen ........................................................................................................... 112
Configure image map screen ...................................................................................................... 114
Select a background image screen ............................................................................................ 114
Labels panel ................................................................................................................................ 116
Configure list with printer graphics screen .................................................................................. 118
Tabular HTML view — HP MPL Printer Groups screen (sample) ............................................... 120
Advanced view settings panel .................................................................................................... 121
Create a new virtual printer ......................................................................................................... 122
Edit existing virtual printers panel ............................................................................................... 123
Remove an existing MPL — Select a MPL screen ..................................................................... 124
Remove an existing MPL — confirmation screen (sample) ........................................................ 124
Printers screen ............................................................................................................................ 124
Remove printers — confirmation dialog box ............................................................................... 125
Create a new user group screen ................................................................................................ 126
Users screen ............................................................................................................................... 127
Edit an existing user group screen ............................................................................................. 128
Included users panel ................................................................................................................... 128
Remove an existing user group — Confirm screen .................................................................... 130
ENWW
Purpose and Scope
1
Purpose and Scope
Introduction
This system administrator's guide provides information about and troubleshooting tips for the HP
Universal Print Driver (UPD) software.
This guide is prepared in an electronic format to serve as a quick-reference tool for information
technology (IT) administrators, Customer Care Center (CCC) agents, support engineers, system
administrators, management information systems (MIS) personnel, and printer end-users, as
appropriate.
The following information is included in this guide:
●
Descriptions of the HP Universal Print Driver (UPD), the management available depending on the
installation mode, and the benefits, use, and features of the HP UPD.
●
Descriptions of the HP Managed Print Administration (MPA) software, including Managed Printer
Policies (MPPs) and Managed Printer Lists (MPLs), which are used by administrators to configure
and manage settings for the HP UPD.
●
Procedures for installing and uninstalling software components
The following table describes the structure of this System Administrator's Guide.
Table 1-1 HP Universal Print Driver System Administrator's Guide overview
ENWW
Chapter
Content
Chapter 1, Purpose and scope
This chapter describes the focus and intent of this system administrator's guide,
including the conventions used in this description, and the hardware to which this
guide pertains.
Chapter 2, Software description
This chapter describes the HP UPD software, including software requirements
needed to install the HP UPD and software availability. This chapter also describes
the different driver versions (HP PCL 6, HP PCL 5, and HP PS emulation), their
specific purposes, and the modes in which these HP UPD versions can be
installed.
Chapter 3, Install and uninstall of the HP
UPD
This chapter provides instructions for installing and uninstalling of the HP UPD in
Dynamic and Traditional mode.
Introduction
1
Purpose and Scope
Table 1-1 HP Universal Print Driver System Administrator's Guide overview (continued)
Chapter
Content
Chapter 4, Use HP UPD
This chapter includes information about the following topics:
●
Chapter 5, Use HP MPA
Chapter 6, Use Active Directory
Using the HP UPD:
●
Mode description
●
UPD features
●
Accessing the HP UPD
●
Printing using the HP UPD
●
Managing the HP UPD
This chapter describes the HP MPA features and includes information about the
following topics:
●
Installing and uninstalling the HP MPA
●
Accessing the HP MPA
●
Using Managed Printer Policies (MPPs)
●
Using Managed Printer Lists (MPLs)
●
Using User Groups
This chapter includes information about the following topics:
●
Using Active Directory to manage the HP UPD
●
Using Active Directory with HP MPA to manage the HP UPD
For additional information about the location of information within these chapters, see the table of
contents. An index is provided in the back of this guide.
2
Chapter 1 Purpose and Scope
ENWW
This guide uses the following conventions:
●
Keyboard keys appear in colored typeface. For example: Press the Shift key.
●
Directory paths, file names, and file extensions appear in user-interface (UI)-specific typeface. File
names and file extensions appear in uppercase.
For example: Locate the SAMPLE.TXT file in the C:\Temp directory
●
Menu names, field names, and options to select are shown in bold type.
For example: On the File menu, click New.
●
Windows, screens, and panels are shown in bold type.
For example: The Job Manager window appears.
●
References to other sections in this guide are underlined.
For example: For more information, see Software description on page 9.
ENWW
Conventions used in this guide
3
Purpose and Scope
Conventions used in this guide
Purpose and Scope
Supported devices
For and updated list of supported devices, see the following Web sites:
www.hp.com/go/mpa
www.hp.com/go/upd
Supported devices by HP MPA and HP UPD
Devices supported by HP MPA and HP UPD (HP PCL 6, HP PCL 5, and HP PS emulation)
4
●
HP LaserJet 1150
●
HP LaserJet 1160
●
HP LaserJet 1200
●
HP LaserJet 1300
●
HP LaserJet 1320
●
HP LaserJet P2015
●
HP LaserJet 2100
●
HP LaserJet 2200
●
HP LaserJet 2300
●
HP LaserJet 2420/30/40
●
HP LaserJet 2500
●
HP LaserJet 2550
●
HP LaserJet 2605
●
HP LaserJet 3000
●
HP LaserJet 301x
●
HP LaserJet 3020
●
HP LaserJet 3030
●
HP LaserJet 3050 All-in-One
●
HP LaserJet 3200
●
HP LaserJet 3300
●
HP LaserJet 3300 MFP
●
HP LaserJet 3390 All-in-One
●
HP LaserJet 3392 All-in-One
●
HP LaserJet 3700
●
HP LaserJet 3800
Chapter 1 Purpose and Scope
ENWW
ENWW
HP LaserJet 4000
●
HP LaserJet 4050
●
HP LaserJet 4100
●
HP LaserJet 4100 MFP
●
HP LaserJet 4200
●
HP LaserJet 4240
●
HP LaserJet 4250
●
HP LaserJet 4300
●
HP LaserJet 4345 MFP
●
HP LaserJet 4350
●
HP LaserJet 4500
●
HP LaserJet 4550
●
HP LaserJet 4600
●
HP LaserJet 4610
●
HP LaserJet 4650
●
HP LaserJet 4700
●
HP LaserJet 4730 MFP
●
HP LaserJet 5000
●
HP LaserJet 5100
●
HP LaserJet 5200
●
HP LaserJet 5500
●
HP LaserJet 5550
●
HP LaserJet 8000
●
HP LaserJet 8150
●
HP LaserJet 8150 MFP
●
HP LaserJet 9000
●
HP LaserJet 9000 MFP
●
HP LaserJet 9040
●
HP LaserJet 9040 MFP
●
HP LaserJet 9050
●
HP LaserJet 9050 MFP
Purpose and Scope
●
Supported devices
5
Purpose and Scope
●
HP LaserJet 9055 MFP
●
HP LaserJet 9065 MFP
●
HP LaserJet 9500
●
HP LaserJet 9500 MFP
●
HP Business Inkjet/Officejet 2250
●
HP Business Inkjet/Officejet 2280
●
HP Business Inkjet/Officejet 2300
●
HP Business Inkjet/Officejet 2500CM
●
HP Business Inkjet/Officejet 2600
●
HP Business Inkjet/Officejet 2800
●
HP Business Inkjet/Officejet 3000
●
HP Business Inkjet/Officejet 9100 All-in-One
Devices supported on HP MPA and HP UPD (HP PS emulation only)
●
HP Color LaserJet 2500
●
HP Color LaserJet 2550
●
HP Color LaserJet 2800 All-in-One
●
HP Business Inkjet 2800
Supported devices with Plug and Play
6
●
HP LaserJet AiO
●
HP LaserJet 1320
●
HP Color LaserJet 4700 Series
●
HP Color LaserJet 4730 MFP
●
HP LaserJet 4345
●
HP LaserJet 3050
●
HP LaserJet 3060/3062
●
HP LaserJet 3390/3392
●
HP LaserJet 5200
●
HP LaserJet 5200L
●
HP LaserJet P3005
●
HP LaserJet P3004
Chapter 1 Purpose and Scope
ENWW
ENWW
HP LaserJet M5035 mfp
●
HP LaserJet M5025 mfp
●
HP LaserJet M3035 mfp
●
HP LaserJet M3027 mfp
●
HP LaserJet M4345 mfp
●
HP Color LaserJet CP4005
●
HP Color LaserJet CP3505
Purpose and Scope
●
Supported devices
7
Purpose and Scope
8
Chapter 1 Purpose and Scope
ENWW
Software description
Software description
2
Introduction
Three versions of the HP Universal Print Driver (UPD) are available:
●
HP PCL 6
●
HP PCL 5
●
HP Postscript level 2 and level 3 emulation
Topics:
ENWW
●
HP UPD and HP mobile printer drivers for Windows
●
System requirements
●
Software availability
●
Select the best print driver
Introduction
9
HP UPD and HP mobile printer drivers for Windows
The HP UPD is based on and replaces the HP mobile print driver for Windows.
NOTE: For Windows 98, Me, and NT 4.0 support, use the HP Mobile Printing for Notebooks
driver, available at the following Web site:
http://www.hp.com/go/MP4N_software
HP UPD vs product-specific drivers
Software description
The following tables outline key differences between the HP UPD and the HP mobile print driver for
Windows 2.0.
Table 2-1 Driver comparison — HP UPD vs product-specific drivers
Product
HP Universal Print Driver (UPD)
HP product-specific drivers
User interface (UI)
Consistent UI across all supported
printers on the property pages.
Inconsistent UI across property pages.
Page compatibility
Consistent page layout is ensured
across devices using the HP UPD and is
probable but not ensured for legacy
devices using product-specific drivers.
Consistent page layout with legacy
devices using product-specific drivers.
Device to device page layout
consistency is probable but not ensured.
Driver deployment
Download and install the HP UPD via
Add Printer Wizard, or the Install.exe file
provided with the HP UPD.
Manually locate, download, and install
drivers for each device.
End-user controls
Managed Printer Policies (MPPs) allow
IT to limit end-user access to certain
printers or features (such as, color).
MPPs not supported. Manual devicespecific controls are possible.
Device discovery
Managed Printer Lists (MPLs) allow IT to MPLs not supported. End users may
define and manage lists of devices, from manually discover devices and install
which end users may locate and access drivers.
suggested devices.
Tabs and layout
Features tabs and menu layouts are
consistent with product-specific drivers.
Capabilities are discovered and feature
options are displayed.
PDL support
HP PCL 6, HP PCL 5, and HP postscript HP PCL 6, HP PCL 5, and HP postscript
level 2 and level 3 emulation
level 3 emulation.
Feature support
Comparable with the product-specific
drivers except for device-specific paper
sizes an types. The HP UPD provides an
extensive list of common paper sizes and
types.
Drivers include HP postscript level 3
emulation, which includes advanced
color management features, and
advanced paper handling features, such
as those unique to booklet-making or
hole-punch accessories.
Availability
Available on the HP UPD Web site at the
following:
Available on the product CD and the
product-specific driver download pages
at the following:
Feature tabs and menu layouts are built
into the drivers.
www.hp.com/go/upd
www.hp.com/go/mp4N_software
10
Chapter 2 Software description
ENWW
Product
HP Universal Print Driver (UPD)
HP product-specific drivers
Installation
Via the standalone installer available
with the HP UPD.
Via all available installation methods,
such as CD, standalone installer,
Microsoft Add Printer Wizard, Web, silent
install, Point-and-Print.
Localization
Available in 26 languages. See Software
availability on page 13.
Available in the following languages:
English, French, German, Italian,
Japanese, Korean, Portuguese,
Spanish, Simplified and Traditional
Chinese, Danish, Dutch, Finnish,
Catalan, Czech, Hungarian, Norwegian,
Swedish, Thai, Polish, Russian, Slovak,
Turkish, Arabic, Greek, Hebrew
HP UPD vs HP mobile print driver for Windows 2.0
Table 2-2 Driver comparison — HP UPD vs HP mobile print driver for Windows 2.0
ENWW
Product
HP Universal Print Driver (UPD) for
Windows series
Mobile print driver for Windows 2.0
PDL support
HP PCL 6, HP PCL 5, HP PS emulation
HP postscript emulation, HP PCL5
Management and security
HP MPLs, HP MPPs, Active Directory
templates
HP MPLs
End-user management
Profile support, Active Directory user
group
Profile support
Managed Printer Lists (MPL)
Text, HTML, HTML mapping
Text
Tools
HP MPL and MPP-creation tools
None
Dynamic feature support
Automatic two-sided printing, job
storage, input tray, output bin, stapling,
finishing
Automatic two-sided printing, job storage
Integration
Imports to HP Web Jetadmin, access to
Novell and HP PSA print shares
None
Access
Available on the HP UPD Web site at the
following:
Available on the HP product pages at the
following:
www.hp.com/go/upd
www.hp.com/go/mp4N_software
OS support
Windows XP, 2000, 2003 Server (32/64),
XP Professional x64
Windows NT 9x, XP, 2000, 2003 Server
Languages
See Software availability on page 13.
English, French, German, Italian,
Spanish
Hot-Spot printing
Hot-Spot printing, basic usage tracking
None
HP UPD and HP mobile printer drivers for Windows
11
Software description
Table 2-1 Driver comparison — HP UPD vs product-specific drivers (continued)
System requirements
Minimum system requirements for the HP UPD 3.0 are as follows:
●
One of the following MS Windows operating systems:
Software description
●
MS Windows Vista
●
MS Windows XP
●
MS Windows 2000
●
MS Windows Server 2003
HP UPD can be used independently of the HP MPA software. For network administrators, HP MPA
software is recommended.
Other supported environments and standards are as follows:
12
●
Protocol: TCP/IP protocol for Windows
●
Browsers: Microsoft Internet Explorer 5.5 and Firefox 1.5
Chapter 2 Software description
ENWW
Software availability
ENWW
●
French
●
German
●
Italian
●
Spanish
●
Dutch
●
Finnish
●
Norwegian
●
Swedish
●
Russian
●
Turkish
●
Polish
●
Portuguese
●
Korean
●
Simplified Chinese
●
Traditional Chinese
●
Catalan
●
Czech
●
Hungarian
●
Arabic
●
Greek
●
Hebrew
●
Bahasa Indonesian
●
Thai
●
Japanese
Software description
The HP Universal Print Driver v 3.0 is available in the following languages:
Software availability
13
Select the best print driver
HP UPDs are designed for corporate or IT-managed MS Windows environments. These drivers provide
a single driver for use with multiple printer models.
The HP UPDs are recommended when printing to multiple printer models or from a mobile MS Windows
computer.
Software description
●
Provides a single driver solution for use with multiple printer models; designed for corporate or ITmanaged Windows environments
●
Preferred when printing in an enterprise or managed print server environment to multiple printer
models in either a traditional or dynamic print environment
There are three types of HP UPD. See the following for more information about choosing the best driver
type for your printing needs.
Topics:
●
HP PCL 6 driver
●
HP PCL 5 driver
●
PS Emulation driver
HP PCL 6 driver
Overall, the HP PCL 6 driver provides the best performance, print quality, and printer-feature support
for most users. The driver aligns with MS Windows graphic device interface (GDI) for best performance
in MS Windows environments.
The HP PCL 6 driver may not be fully compatible with third-party and custom solutions that are based
on the HP PCL 5.
NOTE: Third party solutions are integrated products designed, developed, and sold by
companies targeting specific business printing needs. Environments with solutions in place, or
environments where solutions are being considered, should contact their providers for advice
and guidance regarding their driver selection.
For more information on third party solutions, see http://www.hp.com/go/gsc.
HP PCL 5 driver
The HP PCL 5 driver is recommended for general office monochrome printing in MS Windows
environments. The driver is compatible with previous version of PCL and legacy HP LaserJet printers.
The HP PCL 5 driver is the best choice for:
●
14
Any third-party or home-grown custom solutions that use forms, fonts, and SAP programs.
Chapter 2 Software description
ENWW
NOTE: Third party solutions are integrated products designed, developed, and sold by
companies targeting specific business printing needs. Environments with solutions in place,
or environments where solutions are being considered, should contact their providers for
advice and guidance regarding their driver selection.
For more information on third party solutions, see http://www.hp.com/go/gsc.
●
Any environment with mixed operating-systems (such as UNIX, Linux, and mainframe)
The PS Emulation driver is recommended for printing with Adobe or other graphics-rich software
programs. The driver is compatible with postscript level 2 and level 3, and supports postscript font
DIMMs.
Use the PS Emulation driver in primarily postscript-specific software programs such as Adobe and Corel.
NOTE: Third party solutions are integrated products designed, developed, and sold by
companies targeting specific business printing needs. Environments with solutions in place, or
environments where solutions are being considered, should contact their providers for advice
and guidance regarding their driver selection.
For more information on third party solutions, see http://www.hp.com/go/gsc.
ENWW
Select the best print driver
15
Software description
PS Emulation driver
Software description
16
Chapter 2 Software description
ENWW
3
Install and Uninstall of the HP Universal
Print Driver (UPD)
The HP Universal Print Driver (UPD) is supported by Windows XP, Windows Vista, Windows 2000, and
Windows Server 2003.
NOTE: If you are using Windows 98 or Windows NT, you can use HP Mobile Printing for
Notebooks.
For more information, go to the following Web site:
The HP UPD can be installed in one of two modes: Traditional or Dynamic. The mode in which the driver
is installed determines the end-user experience of the HP UPD, and also influence the extent to which
the HP UPD can be managed.
●
Dynamic mode:
An HP UPD installed in Dynamic mode allows the most flexibility. An end user can print within any
network or print environment without downloading a product-specific driver. When printing in a
mobile environment, the end user can print to any printer using the features within the HP UPD
software.
A permanent instance of this driver can be created, and later changed if the end user moves
location.
An HP UPD installed in Dynamic mode also allows for the greatest possible manageability. The
administrator can dictate end-user use and experience of the HP UPD using such management
tools as the HP Managed Print Administration (MPA). (See Use HP Managed Printing
Administration (MPA) software on page 57 for more information.)
●
Traditional mode:
An HP UPD installed in Traditional mode behaves like a discrete driver. During installation, the
driver is associated to a specific printer, creating a permanent instance of the driver. The
administrator has limited ability to manage the driver.
The following information provides detailed instructions for installing the HP UPD in either Traditional
or Dynamic mode, and uninstalling the HP UPD.
Topics:
ENWW
●
Install
●
Uninstall
17
Install HP UPD
www.hp.com/go/upd
Install
Install or modify the HP UPD by using one of the following methods:
●
Install using the Add Printer Wizard
●
Install by using the Install.exe
●
Install by using the command prompt
●
Install by using point and print
●
Install by using the HP Web Jetadmin display plug-in
●
Install on a cluster server
●
Install on a Terminal Server/Citrix
●
Install by using Novell NDS
Install using the Add Printer Wizard
To install the HP UPD in Traditional mode using the Windows Add Printer Wizard, follow these steps:
Install HP UPD
NOTE: The Windows Add Printer Wizard runs through the standard Windows driver installation
and does not provide any customization options. If you install the HP Universal Print Driver by
using this method, the driver is installed so that the end-user has common printing functionality.
1.
Go to the following Web site:
www.hp.com/go/upd
18
2.
Download and save the HP UPD specific to your operating system, and printing needs. (See Select
the best print driver on page 14.)
3.
Navigate to and unzip the HP UPD download file to a folder.
4.
From the Control Panel, click Printers and Other Hardware, and then click Add Printer.
Chapter 3 Install and Uninstall of the HP Universal Print Driver (UPD)
ENWW
The Add Printer Wizard opens. Click Next.
Install HP UPD
5.
Figure 3-1 Add Printer Wizard — Welcome window
6.
Select Local printer attached to this computer, and then click Next.
Figure 3-2 Add Printer Wizard — Local or Network Printer window
ENWW
Install
19
7.
Select Create a new port, and then select HP Standard TCP/IP or Standard TCP/IP. Then,
click Next.
Install HP UPD
Figure 3-3 Add Printer Wizard — Select a Printer Port window
20
Chapter 3 Install and Uninstall of the HP Universal Print Driver (UPD)
ENWW
The Add Standard TCP/IP Printer Port Wizard opens. Click Next.
Install HP UPD
8.
Figure 3-4 Add Standard TCP/IP Printer Port Wizard — Welcome window
ENWW
Install
21
9.
The Add Port window opens. In the Printer Name or IP Address field, type the printer name or
IP Address.
NOTE: To create a permanent instance of the driver, select the Always print to device,
even if its ID address changes checkbox.
Install HP UPD
Figure 3-5 Add Standard TCP/IP Printer Port Wizard — Add Port window
10. Click Next.
22
Chapter 3 Install and Uninstall of the HP Universal Print Driver (UPD)
ENWW
Install HP UPD
11. The Additional Port Information Required window opens. Under Device Type, select
Standard.
Figure 3-6 Add Standard TCP/IP Printer Port Wizard — Additional Port Information
Required window
12. Select Hewlett Packard JetDirect from the drop-down menu. Click Next.
ENWW
Install
23
13. The Completing the Add Standard TCP/IP Port Wizard window opens. Click Finish.
Install HP UPD
Figure 3-7 Add Standard TCP/IP Printer Port Wizard — Completing the Add Standard Port
Wizard window
24
Chapter 3 Install and Uninstall of the HP Universal Print Driver (UPD)
ENWW
Install HP UPD
14. The Install Printer Software window opens. Click Have Disk.
Figure 3-8 Add Printer Wizard — Install Printer Software window
15. Browse to the folder in which the unzipped UPD download file is saved.
16. In the unzipped UPD file, select hpmcpdpd.inf. Then, click Open.
If an HP UPD has been previously installed, select Replace existing driver.
17. Click OK.
ENWW
Install
25
18. The Install Printer Software window lists the driver under the Printers box. Click Next.
Install HP UPD
Figure 3-9 Add Printer Wizard — Install Printer Software window, driver listed
26
Chapter 3 Install and Uninstall of the HP Universal Print Driver (UPD)
ENWW
19. The Name Your Port window opens.
In the Printer name: field, this is the name that will be given to the installed printer and appear in
the Printers and Faxes folder. The default printer name is “HP Universal Printing PCL6” for the
first installation. However, this will increment to “HP Universal Printing PCL6 (copy1)” and so on
for subsequent installs.
Install HP UPD
Rename the printer, as appropriate, to better identify the printer.
Figure 3-10 Add Printer Wizard — Name Your Printer window
20. Under Do you want to use this printer as the default printer?, select Yes or No, as appropriate.
21. Click Next.
ENWW
Install
27
22. The Printer Sharing window opens. Select Do not share this printer, if appropriate. Then,
click Next.
Install HP UPD
Figure 3-11 Add Printer Wizard — Printer Sharing window
28
Chapter 3 Install and Uninstall of the HP Universal Print Driver (UPD)
ENWW
Install HP UPD
23. The Print Test Page window opens. Select No.
Figure 3-12 Add Printer Wizard — Print Test Page window
24. The Completing the Add Printer Wizard opens. Click Finish.
Install by using the Install.exe
NOTE: Installing the HP UPD using the Install.exe allows the driver to be installed in Traditional
or Dynamic mode.
To install the HP UPD using the HP Universal Printing Installer Wizard, follow these steps:
1.
Go to the following Web site:
www.hp.com/go/upd
ENWW
2.
Download and save the HP UPD specific to your operating system, and printing needs. (See Select
the best print driver on page 14 for more information.)
3.
Navigate to and unzip the HP UPD file.
4.
Open the unzipped HP UPD folder.
5.
Double-click Install.exe.
Install
29
6.
The Universal Printing Installer Wizard opens. Read the software license agreement, and then
click Yes to continue.
Install HP UPD
Figure 3-13 HP Universal Printing Installer Wizard — Welcome and Software License
Agreement window
7.
The Installation Mode window opens. Select Dynamic mode or Traditional mode, as
appropriate.
●
Dynamic mode: Creates a flexible instance of the driver, allowing you to specify a printer
each time you print.
If you select Dynamic mode, click Install and continue to the next step.
●
Traditional mode: Creates a permanent instance of the driver that is associated to a specific
printer.
If you select Traditional mode, click Install. The Add Printer Wizard opens. See Install using
the Add Printer Wizard on page 18 to complete installation.
30
Chapter 3 Install and Uninstall of the HP Universal Print Driver (UPD)
ENWW
Install HP UPD
Figure 3-14 HP Universal Printing Installer Wizard — Installation Mode window
ENWW
Install
31
8.
The Installing window opens. Wait for install to complete.
Install HP UPD
Figure 3-15 HP Universal Printing Installer Wizard — Installing window
32
Chapter 3 Install and Uninstall of the HP Universal Print Driver (UPD)
ENWW
The Finish window opens. Click Finish.
Install HP UPD
9.
Figure 3-16 HP Universal Printing Installer Wizard — Finish window
Install by using the command prompt
If you use the INSTALL.EXE file to install the HP Universal Print Driver, you can use the provided
command options to control how the HP UPD is installed or how the HP UPD runs after it is installed.
At the command prompt, type C:\Folder\Install /option, where Folder is the location of the
INSTALL.EXE file, / is a forward slash, and option is the command option. For a list of available command
options, see Available command options on page 34.
NOTE: The UPD can be installed across an enterprise via script initiated by a login script.
See HP Driver Preconfiguration on page 54.
NOTE: To view a complete list of options, when using the installer, type the following at the
command prompt:
c:\folder\install/ ?
For example, if you want the installation to be completely silent by making it available through an .EXEbased administration tool (such as AIM or SMS), type the following syntax:
C:\folder\Install /q /h
Or, if you want to install the driver in Dynamic mode, type the following:
C:\folder\Install /dm
Topics:
ENWW
Install
33
●
Create custom installations by using command options
●
Available command options
Create custom installations by using command options
To create several shortcuts so that you can create several copies of the INSTALL.EXE file, each with
a different configuration, follow these steps:
1.
Create a shortcut to the INSTALL.EXE file.
2.
Right-click the shortcut file, and then click Properties.
3.
In the Target text box, type:
C:\Folder\Install /option
where:
●
Folder is the location of the INSTALL.EXE file
●
/ is a forward slash
●
option is the command option
Install HP UPD
For example, you have an HP LaserJet 4100 printer with the IP address of 192.168.0.0 or UNC
of \\server\printShare that is located in building five and is connected to your network. You
can give this printer a descriptive name to help identify the model and location. To create a
Traditional-mode instance of this printer on your Windows print server, use the appropriate syntax:
With the IP address. For example:
C:\Folder\Install /n"Bldg 5 HP LaserJet 4100" /sm192.168.0.0
With the UNC. For example:
C:\Folder\Install /n"Bldg 5 HP LaserJet 4100" /sm\\server\primetShare
For a list of available command options, see Available command options on page 34.
4.
Click OK.
Available command options
To view the available command options, at the command prompt, type:
C:\Folder\Install /?
where:
●
Folder is the location of the INSTALL.EXE file.
●
/ is a forward slash.
The command options are explained in the following table.
34
Chapter 3 Install and Uninstall of the HP Universal Print Driver (UPD)
ENWW
Command option
Definition
Description
/q
Quiet mode, no prompts
Use this option to install the driver and
present only a single progress dialog box
to the user. All other warnings and
confirmations are hidden, and default
actions occur in cases where user input
would otherwise be expected.
/npf
Do not open the Printers folder on
completion.
The default behavior of the installer is to
open the Printers folder upon
completion. This option disables that
functionality.
/ru
Restricted user mode; display only HP
Managed Printer Lists
Use this option to configure the driver so
that users can only print to the devices
that you specified in the managed printer
lists. The Printer Selection dialog box is
replaced with a dialog box that lists the
printers in the managed printer list. For
more information, see Use Managed
Printer Lists (MPLs) on page 93.
/sc
Simple confirmation
Use this option to install the driver so that
location profiles are disabled in the
Printer Selection dialog box in Dynamic
mode.
/h
Hides the install dialog; must be used
with Quiet mode (/q)
Use this option to hide the primary
installation dialog box and produce a
completely silent installation.
/sm<port>
Traditional mode
Use this option to create a statically
bound printer that points to the specified
port (local, TCP/IP, IPX/SPX, Hostname,
UNC). The printer will operate as a
normal queue.
When it is installed in traditional mode,
the HP Universal Print Driver behaves
like a standard printer driver but can also
be installed from non-Windows servers
as a Point and Print driver.
NOTE: If the HP Universal
Print Driver is installed in
traditional mode, the static
mode printer will not allow the
user to use the universal printing
functionality or change the
destination address of the static
mode printer.
/n”Printer Name”
Printer name
This option uses the specified name as
the name of the printer (for example, HP
LaserJet 8150).
This option is helpful when the traditional
mode (/sm) option is used, but can be
used for common printing as well.
/ni
ENWW
Does not perform the printer install, only
processes other install options
Use this option to process the specified
install options without creating a printer
in the Printers folder.
Install
35
Install HP UPD
Table 3-1 Command options
Table 3-1 Command options (continued)
Command option
Definition
Description
You can then create subsequent
instances of the HP UPD that show only
the configured options that are not
queue-specific.
You can also add managed printer list
locations to or remove them from a target
system without completely updating the
solution.
/aml<Managed List Name, URI>
Add a new managed printer list
Use this option to specify a location
where the target system can look for the
managed printer list.
/rml<Managed List Name
Remove managed printer list
Use this option to delete the specified
managed printer list.
/nd
Does not set the printer as the default.
This option does not change the current
default printer on the client system. By
default, the installer will set the newly
installed or updated common printer as
the default printer.
This option is helpful when the
Traditional mode (/sm) option is used,
but can be used for common printing as
well.
Install HP UPD
36
/dst
Disables the Services tab in the HP UPD
Use this option to completely disable and
hide the Services tab when accessing
the printer property pages.
/dod
Disables the Online Diagnostic Tools
option on the Services tab in the HP
UPD
Use this option to remove the Online
Diagnostic Tools choice from the
Services menu.
/dos
Disables the Online Support option on
the Services tab in the HP UPD
Use this option to remove the Support
and Troubleshooting choice from the
Services tab.
/dpm
Disables the Online Product Manual
option on the Services tab in the HP
UPD
Use this option to remove the Product
Manuals choice from the Services tab.
/ddu
Disables the Online Driver Updates
option on the Services tab in the HP
UPD
Use this option to remove the Check for
Driver Updates choice from the
Services tab.
/dso
Disables the Online Supplies
Ordering option on the Services tab in
the HP UPD
Use this option to remove the Order
Supplies choice from the Services tab.
/dssnp
Disables the Status Notification pop-ups
for the currently selected printer
When used in conjunction with /sm or /
tm, this option will disable the SNPs for
the selected printer.
/gdssnp
Disables the Status Notification pop-ups
for all printers
Use this option to turn off SNPs for all
printers.
/pqmigrate“<driver name>”
Migrates all print queues using the
specified driver <driver name> to use the
HP UPD; for example, /
pqmigrate”HP LaserJet 8100
Series PS”
Use the PQmigrate option to migrate
print queues over to the HP UPD. All
queues currently using the “specified
driver,” will be migrated over to the HP
UPD. In the example, all print queues
Chapter 3 Install and Uninstall of the HP Universal Print Driver (UPD)
ENWW
Table 3-1 Command options (continued)
Command option
Definition
NOTE: The settings an
properties of the printer will be
reset to default after using the
PQmigrate option.
Description
currently using the HP LaserJet 8100
Series PS discrete driver will now be
migrated over to using the HP UPD.
/tm
Installs the printer in Traditional mode
Use this option to force the HP UPD to
install in Traditional mode. This routine
will launch the Add Printer Wizard, and
the user will be prompted to select a
printer port to complete the process.
/dm
Installs the printer in Dynamic mode
Use this option to force the HP UPD to
install in Dynamic mode.
/u
Use the existing printer driver if it is
already installed
Use this option to remove the dialog box
asking the user to “Use existing driver” or
to “Replace existing driver.”
To use the HP UPD and Point and Print, the driver must be installed on a server in Traditional mode
(by using the /sm command). After the driver is installed on the user workstation from a Windows 2000,
Windows Vista, Windows XP, or Windows Server 2003 system, it will behave like any other installed
driver. The end user will print to a statically bound port that is established on the server.
When a client PC connects to a shared printer, the HP UPD is automatically downloaded to the client
PC through point and print.
Install by using the HP Web Jetadmin display plug-in
When you use the HP Web Jetadmin Display Plug-in, the IP address of the printer appears on the printer
control-panel display. The HP Web Jetadmin Display Plug-in is automatically installed with HP Web
Jetadmin 7.2. For more information, go to the following Web site:
www.hp.com/go/webjetadmin
Install on a cluster server
When installing the HP UPD in a Cluster environment, you must first install the HP UPD on each of the
nodes that will make up the virtual server. You can then install the HP UPD onto the virtual server.
For more information, see the white paper “Install UPD in a MS Cluster Environment” available at the
following Web site:
www.hp.com/go/upd
Install on a Terminal Server/Citrix
The HP UPD is supported on both the Terminal Server and Citrix Server environments.
For more information, see the white paper “Install UPD in a Citrix Environment” available at the following
Web site:
www.hp.com/go/upd
ENWW
Install
37
Install HP UPD
Install by using point and print
Install by using Novell NDS
See the white paper “Install UPD in a Novell Environment” available at the following Web site:
www.hp.com/go/upd
Novell Iprint
Novell recently released a newer version of their Iprint client, which allows the HP UPD to communicate
with the printers and gather device specific information. Ensure that the client PCs are using the latest
Iprint clients when using the HP UPD.
NDPS
The HP UPD will function with limited capabilities in the Novell NDPS environment. This is due to the
HP UPD not being able to communicate with the device directly, therefore loosing the ability to gather
device-specific information back from the printers.
Install HP UPD
38
Chapter 3 Install and Uninstall of the HP Universal Print Driver (UPD)
ENWW
Uninstall
To uninstall the HP UPD, do the following:
1.
From the Printers and Faxes or Printers folder, click File, and then Server Properties.
2.
Click the Drivers tab.
3.
Select the driver to uninstall, then click Remove.
4.
A confirmation dialog appears: “Deleting this printer driver will remove it from the system. Are
you sure you want to delete the HP Universal Printing?”
Install HP UPD
Click Yes.
ENWW
Uninstall
39
Install HP UPD
40
Chapter 3 Install and Uninstall of the HP Universal Print Driver (UPD)
ENWW
4
Use HP universal print drivers
Introduction
The HP Universal Print Driver (UPD) combines a general-purpose print driver with software that you
can use to add and print to:
●
Devices on a local port
●
Devices on a network
●
Devices on a managed printer list
The following sections describe the HP UPD features, and the following.
Topics:
Use the HP UPD
●
Print using the HP UPD
●
Manage the HP UPD
Use HP UPD
●
ENWW
Introduction
41
Use the HP UPD
●
Universal print driver modes
●
Access Printing Preferences and Properties driver tabs
●
Change the general settings for the HP UPD
●
Configure the HP UPD by TCP/IP address
●
Define a printer location profile
●
Help
Universal print driver modes
The HP UPD can be installed in one of two modes: Dynamic and Traditional. The mode in which the
driver is installed affects how the driver behaves, and the extent to which the HP UPD can be managed.
For more information about installing the HP UPD in these modes, see Install and Uninstall of the HP
Universal Print Driver (UPD) on page 17.
Dynamic mode
An HP UPD installed in Dynamic mode allows the most flexibility. An end user can print within any
network or print environment without downloading a product-specific driver. When printing in a mobile
environment, the end user can print to any printer using the features within the HP UPD software.
A permanent instance of this driver can be created, and later changed if the end user moves location.
An HP UPD installed in Dynamic mode also allows for the greatest possible manageability. The
administrator can dictate end-user user and experience of the HP UPD using such management tools
as the HP Managed Print Administration (MPA). (See Use HP Managed Printing Administration (MPA)
software on page 57 for more information.)
Dynamic mode requires user intervention as it will present the user with a dialog screen so they can
enter the IP address or host name of the printer they wish to print to. They can also use the built in
search capabilities to find printers located on their local subnet.
Use HP UPD
Traditional mode
An HP UPD installed in Traditional mode behaves like a discrete driver. During installation, the driver
is associated to a specific printer, creating a permanent instance of the driver. The administrator has
limited ability to manage the driver.
Access Printing Preferences and Properties driver tabs
The processes for accessing the Printing Preferences and Properties are similar.
To access the Printing Preferences and Properties, do the following:
42
1.
Click Start, Settings, then Printers and Faxes (in Windows XP and Windows Server 2003) or
Printers.
2.
In the Printers and Faxes or Printers window, right-click the driver.
3.
Click Properties or Printing Preferences, as appropriate.
Chapter 4 Use HP universal print drivers
ENWW
How the Printing Preferences and Properties behave is dependant upon which mode the driver was
installed. For more information about Printing Preferences and Properties behavior and features, see
the mode-specific section below.
Change the general settings for the HP UPD
Use the HP Universal Printing Settings dialog box to perform the following actions:
●
Select destination-printer prompts
●
Modify printer location profiles
●
Set verification level
Select destination-printer prompts
To dictate how you want to be prompted for destination printers when you are printing, follow these
steps:
Click HP Universal Printing Settings.
2.
Click the General tab. A sample General tab is shown in the following figure.
Use HP UPD
1.
Figure 4-1 General tab
ENWW
Use the HP UPD
43
3.
Select one of the following options:
●
Always prompt for the destination when printing a job.
The HP Universal Printing dialog box appears every time HP Universal Printing is selected
as the printer. You can select a destination printer in this dialog box.
●
Only prompt the first time a job is printed from an application.
The HP Universal Printing dialog box appears the first time HP Universal Printing is selected
as the printer from a program. This option is helpful if the subsequent print jobs from that
program will be sent to the same printer.
●
Only prompt if the last known destination is no longer available.
The HP Universal Printing dialog box appears if the printer that was last used is no longer
available.
4.
Click OK.
Modify printer location profiles
To modify or delete location profiles and specify the maximum number of printers, follow these steps:
1.
Click HP Universal Printing Settings.
2.
Click the Location Profiles tab. A sample Location Profiles tab is shown in the following figure.
Use HP UPD
Figure 4-2 Location Profiles tab
44
3.
Select the Enable Location Profiles check box to allow location profiles to be added, modified,
or deleted. You can use location profiles to organize destination printers.
4.
Add, modify, or delete location profiles.
5.
Specify the maximum number of printers that you want HP Universal Printing to maintain in the
Printers list. The default number is 10 printers, but the number can range from 5 to 100.
Chapter 4 Use HP universal print drivers
ENWW
If the number of printers in the Printers list exceeds the maximum number of printers that you
specify, HP Universal Printing deletes printers from the Printers list, beginning with the printer that
has not been used for the longest period of time.
Set verification level
To set the level of verification required to allow printing, follow these steps:
1.
Click HP Universal Printing Settings.
2.
Click the Device Verification tab. A sample Device Verification tab is shown in the following
figure.
Figure 4-3 Device Verification tab
Select one of the following options:
●
Verify bidirectional communication with device and language compatibility with driver
(High).
Blocks printing if bidirectional communication and language compatibility cannot be verified.
●
Verify device ID and Model Name can be obtained from port (Medium).
Blocks printing if the device ID and Model Name cannot be verified.
●
Verify port can be opened for printing (Low).
Allows printing (but issue a warning message) if the port can be opened for printing.
4.
ENWW
Click OK.
Use the HP UPD
45
Use HP UPD
3.
Configure the HP UPD by TCP/IP address
To configure the HP UPD by TCP/IP address, follow these steps:
1.
With the document open in a Windows-based software program, select File and then click Print.
2.
Select HP Universal Printing from the Printer Name drop-down menu and then click OK or
Print.
Depending on whether the TCP/IP address is known or unknown, continue with one of the following
procedures:
●
TCP/IP address is known
●
TCP/IP address is unknown
TCP/IP address is known
If the IP address, Host, or UNC path name is known, when the HP Universal Printing dialogue box
appears, type the IP address or network path of the HP UPD-enabled printer.
TCP/IP address is unknown
This option allows the user to search for shared printers on the network. Here you can enter the network
printer address of the print server followed by the share name of the printer, or browse the network for
print servers. An example of the network printer address would be \\PrintServer\hplj900mfp.
If the TCP/IP address is unknown, do the following:
1.
When the HP Universal Printing dialog box appears, click Search... to launch the Welcome to the
HP Universal Printing Destination Wizard.
The HP UPD performs a network (mDNS) local query to discover available printers.
2.
Select the type of printer from the Search... pull-down menu. Select one of the following options
for connecting with a printer.
Local Ports
Use HP UPD
a.
Open the Local Ports window.
b.
In the Local Ports option window, select the HP postscript emulation or PCL-enabled printer
you want for your destination printer by port type, DOT4 or USB, and press Finish to return
to the HP Universal Printing window.
Network Print Shares
46
a.
Open the Network Print Shares window.
b.
Click Browse. The Browse for Printer window appears.
c.
Navigate through the directory tree to locate the desired print servers.
d.
Select the printer and click OK to return to the Network Print Shares window. The selected
printer appears in the Destination Printer field.
e.
Click Finish to return to the HP Universal Printing window.
Chapter 4 Use HP universal print drivers
ENWW
Network Printers
●
When searching for network printers, the HP UPD will perform an mDNS broadcast on the
local subnet only. Only printers on the local subnet, and those with the mDNS protocol enabled
will respond and be listed in the Printers box.
●
When the list is updated, select the printer that you want for your destination printer and
click Finish to return to the HP Universal Printing window.
HP Managed Printer List
a.
If your administrator has created printer lists, the names of each of the printer lists will appear
in the Search drop-down window, along with the options for local ports, Network Print Shares,
and Network Printers. Click the appropriate printer list and select the printer you wish to print
to.
b.
Select the printer that you want for your destination printer and click Finish to return to the
HP Universal Printing window.
NOTE: For more information, see Use HP Managed Printing Administration (MPA)
software on page 57.
3.
Click OK to exit the HP Universal Printing software and return to the main Print window.
Define a printer location profile
If you travel between work sites, you can use the definable printer location profile to group printers at
each site. At multiple building sites, you can group the printer by building names.
1.
With the document open in a Windows-based software program, select File and then click Print.
2.
Select HP Universal Printing from the Printer Name drop-down menu and then click OK or
Print.
3.
Select the HP Universal Printing Settings link. The HP UPD search dialog box appears.
4.
At the Location Profile, click New to create a new printer location profile
5.
Type the name of the new location profile and click OK.
6.
Select the new profile in the Location Profile options box.
7.
The printer you choose or search for now will be entered in the location profile you just created.
NOTE: Add printers can only be done in the HP Universal Printing dialog box.
Help
Click the Help button in the HP Universal Print Driver software to open the HP Universal Print Driver for
Windows User Guide.
To find information about a specific dialog box option, right-click the dialog box option, and then click
What's This?.
ENWW
Use the HP UPD
47
Use HP UPD
To define a printer location profile, follow these steps:
Print using the HP UPD
How one prints using the HP UPD depends upon the mode in which the HP UPD was installed.
An HP UPD installed in Dynamic mode will function within the constraints the administrator establishes
to manage the printer. Thus, if a feature does not behave normally, the administrator may have limited
the functionality.
An HP UPD installed in Traditional mode will function like a discrete driver. The HP UPD will behave
according to the driver features available for the device to which the driver is tied.
See the following sections for more information. This section has been divided according to the
installation method, as the installation method dictates how the HP UPD behaves.
●
Dynamic mode
●
Traditional mode
Dynamic mode
To print a document by using the HP Universal Print Driver in Dynamic mode, perform the following
steps:
1.
Open the file that is to be printed.
2.
On the File menu, click Print.
3.
In the Print dialog box, select HP Universal Printing from the printer list.
4.
Click OK or Print, or click Properties or Setup. (The options vary from one software program to
another.) The HP Universal Printing dialog box appears.
5.
Depending on how your administrator configured the driver, perform one of the following steps:
●
Select the location profile and destination printer to which you want to print.
●
Select the printer to which you want to print from a managed printer list dialog or an interface
set up by your administrator.
Use HP UPD
NOTE:
6.
To add a destination printer, see Add a destination printer on page 50.
Modify print settings as necessary, and then click OK.
NOTE: These steps only occur on the first use of the driver after installing. All subsequent
printing will automatically go to the last selected printer.
Change the selected printer
Once the print driver is setup, all printing using that driver automatically goes to the selected printer. To
change this selected printer, follow these steps:
48
1.
In the Printers and Faxes or Printers window, right-click the driver.
2.
Click Properties or Printing Preferences, as appropriate.
Chapter 4 Use HP universal print drivers
ENWW
3.
On the Print Properties page, select another printer either through the drop down menu, or by
searching.
4.
Click OK. All subsequent printing will now be directed to the new printer.
Traditional mode
An HP UPD installed in Traditional mode will function like a product-specific driver.
See the product-specific documentation for more product-specific driver information.
Printing in Traditional mode
To print in using an HP UPD in Traditional mode, do the following:
1.
In the application, click File, and then click Print.
2.
The Print dialogue will open. Select the from the list of available printers.
3.
Click Properties and modify the driver features, as appropriate. (For example, select the
Finishing tab, and select Print on both sides.)
Then, click OK when complete.
Click Print.
Use HP UPD
4.
ENWW
Print using the HP UPD
49
Manage the HP UPD
●
Manage destination printers
●
HP UPD features
Manage destination printers
Your administrator may have installed the HP Universal Print Driver (UPD) so that it behaves like a
regular printer driver (Traditional mode). In this case, the HP UPD is bound to a single printer, therefore
you will not have the ability to change the destination address.
In Dynamic mode, depending on how your administrator set up the HP UPD, you can either search for
printers over the network or select from a defined list of printers. Your administrator may also have
defined a managed print policy (MPP) that determines which search options are available and how the
printer selection window works.
If you do not know the IP address, host name, or UNC path you can search for the destination printer
(if it is connected via a supported connection type, such as Bluetooth technology).
Add a destination printer
Two procedures are available to add destination printers:
●
Adding a destination printer by specifying the IP address, host name, IPX/SPX address, or UNC
path.
●
Adding a destination printer using the Destination Wizard.
Specify the IP address, host name, IPX/SPX address, or UNC path
Use HP UPD
50
1.
Select the location profile to which you want to add a destination printer. To create a new location
profile, see Creating a category for destination printers.
2.
In the HP Universal Printing dialog box, type the IP address (for example, 192.168.0.0), host name
(for example, NPIEBB9E.mycorp.com), IPX/SPX address (NetworkNumber.Hardware Address; for
example, 006420.00IAEA0090), or Universal Naming Convention (UNC) path (for example, \
\servername\sharename) of a printer.
3.
Type a nickname for the printer so that when you need to select a destination printer from the list,
you do not have to remember the IP address, host name, IPX/SPX address, or UNC path that is
associated with the printer.
4.
Select the Make a permanent instance of this printer in my Printers folder check box to have the
selected destination printer listed in both the Printers folder and the Print dialog box of the program
that you are using.
Chapter 4 Use HP universal print drivers
ENWW
Use the HP Universal Printing Destination Wizard
If you do not know the IP address, host name, IPX/SPX address, or UNC path of a printer, you can use
the HP Universal Printing Destination Wizard to search for a printer. You can search for the following
types of printers:
●
Local transmission control protocol/Internet protocol (TCP/IP) printers that are connected to the
network. When this option is selected, the HP Universal Printing Destination Wizard searches for
DNS-compliant products, and depending on how the network is setup, this search could cover a
subnetwork (for example, all of the computers in one geographic location, such as a building) or
an entire network.
●
Printers that are shared on a network.
●
Printers that your administrator has added to a managed printer list.
●
Printers that are connected to a local port, such as LPT1 or USB.
Search for a destination printer
1.
Select the location profile to which you want to add a destination printer. To create a new location
profile, see Define a printer location profile on page 47.
2.
Click the Search button to open the HP Universal Printing Destination Wizard. You can use this
wizard to search for a printer.
3.
Select the type of printer that you want to search for, and then click Next.
4.
Do one of the following:
●
If you selected Local Ports, select one of the printers in the Ports list.
●
If you selected Network Print Shares, browse to a printer on the network.
●
If you selected HP Managed Printer Lists, select a printer from the managed printer list.
●
If you selected Network Printers, follow the instructions in the Wizard.
5.
Click Finish.
6.
Type a nickname for the printer so that when you need to select a destination printer from the list,
you do not have to remember the IP address, host name, IPX/SPX address, or UNC path that is
associated with the printer.
7.
If available, select the Make a permanent instance of this printer in my Printers folder check
box to have the selected destination printer listed in both the Printers folder and the Print dialog
box of the program that you are using.
8.
Click OK. The destination printer is added to the location profile.
Create location files
You can group destination printers into categories or location profiles. For example, if you work in two
different offices, then you can name one location profile "NewYork" and the other location profile
"London." Then, you can add the applicable destination printers to each location profile.
ENWW
Manage the HP UPD
51
Use HP UPD
To search for a destination printer
To add a location profile
1.
In the HP Universal Printing dialog box, click New.
2.
Type the name of the profile location in the Name box, and then click OK.
3.
To add a printer to the new location profile, type the IP address (for example, 192.168.0.0), host
name (for example, NPIEBB9E.mycorp.com), IPX/SPX address (NetworkNumber.Hardware
Address; for example, 006420.00IAEA0090), or Universal Naming Convention (UNC) path (for
example, \\servername\sharename) of a printer. If you do not know the IP address, host name,
IPX/SPX address, or UNC path of a printer, click the Search button to search for a printer or ask
an administrator.
Cache printer settings
Printer settings can be cached to allow switching of physical devices while maintaining the same TCP/
IP address.
This element (<Policy>node member) can be used to control how often the current MPP is to be
refreshed. What this means is that MPP content that is downloaded will be cached for the specified (or
default) amount of time, and any future requests for retrieval of the MPP will result in using the cached
content.
HP UPD features
Status notification pop-ups (SNPs)
For more information describing management of the SNPs for the HP UPD, see the White paper titled,
“HP Universal Print Driver Series for Windows — Managing the Status Notification Pop-ups (SNP).”
NOTE:
To access the White paper, do the following:
1. Go to the following: www.hp.com/go/upd
2. Click Technical Support, then click Manuals.
3. Then, click the desired White paper.
Use HP UPD
The status notification pop-up (SNP) feature provides immediate job and printer status information to
the client computer.
●
Printer status and error messages.
Provides users with printer status information so they can respond to and resolve many minor
printer problems such as an open cover or paper jams reducing the number of Help Desk calls.
●
Dashboard view of supply levels.
This allows users to plan ahead and ensure that there are sufficient supplies in the printer prior to
printing large print jobs. It also provides current information about printer consumables such as
toner and paper levels.
●
52
Links to the HP SureSupply ordering system.
Chapter 4 Use HP universal print drivers
ENWW
This makes it convenient to order genuine HP supplies. Click on the SNP Windows option “Shop
for Supplies” to access the HP SureSupply ordering system.
●
Links to HP Support pages.
Get instant support for many printer problems by clicking on “HP Support” to get detailed
information on printer status and error messages.
The Status Notification Pop-ups (SNP) feature, which appears during the submittal of a print job, can
be configured through several tools that are available to administrators.
When the UPD is selected for printing, it attempts to communicate directly with the printer to gather
status and job information during printing. By querying the printer through SNMP get commands,
network traffic is kept to a minimum because it occurs only during printing. If the UPD is unable to
communicate with the printer, possibly because of security settings or because of the SNMP community
names that are set on the printing devices, then the pop-ups will not appear on the client machines.
Normal printing will not be affected. The following figure shows a sample SNP.
Figure 4-4 Status notification pop-up (sample)
The following links appear at the bottom of the pop-up:
●
Notification Settings
Click this link to open the Notification Settings dialog box. The following settings are available:
●
Enabled. When this option is selected, you must select on of the following settings: Whenever
I print to the printer; When there is a warning or error; and When there is an error (printer
has stopped).
●
Disabled. Select this option to disable pop-up messages for any printer condition.
NOTE: When disabled, the pop-ups cannot easily be re-enabled. It will be necessary
to reinstall the UPD printer or change the Windows registry.
ENWW
Manage the HP UPD
53
Use HP UPD
NOTE: The Notification Settings link appears in the pop-up only in environments where
no managed print policies have been configured for the network. For more information, see
your administrator.
Figure 4-5 Notification Settings dialog box
●
HP Support
●
Shop for Supplies
●
Supplies Details
NOTE: In enterprise environments where the domain name does not end in .local, the HP UPD
will programmatically disable the HP Support and Shop for Supplies links. In most of these
environments, the ordering of supplies is handled by internal centralized ordering personnel, and
internal Help Desks exist to assist end users with day to day problem resolution.
●
Configure SNPs
●
HP Managed Printing Administration (MPA)
●
HP Driver Preconfiguration
●
Registry settings
Configure SNPs
Use HP UPD
SNPs can be configured and managed in several ways, depending on your environment and deployment
strategy. If you wish to configure the HP UPD prior to deployment. HP recommends the following
methods:
HP Managed Printing Administration (MPA)
Unlike any other print driver, the HP UPD can be controlled by a Managed Printer Policy (MPP). A MPP
is an XML document that controls the driver operation mode in a particular printing environment. In
addition, the MPPs can also manage the behavior of the SNPs each printer user will experience. The
new HP Managed Print Administration tool (MPA) allows print administrators to create MPP to attain
the desired SNP experience. The HP MPA tool is available at: www.hp.com/go/mpa.
See Use HP Managed Printing Administration (MPA) software on page 57 for more information.
HP Driver Preconfiguration
HP’s Driver Pre-configuration utility is a software application that Information Technology (IT)
administrators can use to pre-configure the HP UPD before deploying and installing it in 4 an operating
54
Chapter 4 Use HP universal print drivers
ENWW
environment. It is most beneficial when configuring the HP UPD for multiple workstations or print servers
for print queues that share the same configuration.
Follow these steps to pre-configure the SNP behavior of the HP UPD.
1.
Download and launch the DMC driver Pre-configuration utility (www.hp.com/go/hpdriverpreconfig).
You will see a message indicating that depending on how the HP UPD driver is installed, changes
made to the HP UPD may invalidate the digital signature and Microsoft may display a warning
message. This is normal behavior. Click OK to continue.
2.
Click File, then Open and browse to the directory where the HP UPD resides.
3.
Select the HP UPD’s .inf file and click the Open button. The following screen will appear.
4.
Click Device settings and expand the SSNP_Level listing by clicking the Plus sign (+). Select
the SNP characteristics you desire.
5.
When finished, click File and Save to complete.
A file will be created in the same folder as the HP UPD file named hpmcpd25.cfg. This configuration file
will follow all installations of the HP UPD and control the SNP behavior for each installation. For
additional information on the HP Driver Pre-configuration utility, please refer to the PDF manual that is
included in the download image of the HP Pre-configuration utility.
The HP Driver Pre-configuration utility is also available as a plug-in for HP’s Web Jetadmin application.
Refer to the WJA documentation for instructions on using the Driver Preconfiguration within WJA.
Download the HP Driver Pre-configuration plug-ins via: http://www.hp.com/go/wja_components
Registry settings
All of the previous methods for changing the behavior of SNP make changes to the specific registry
settings. It is also possible to directly change the SNP settings by editing the registry directly. Editing
the registry to modify SNP behavior is beyond the scope of this document.
The registry location below contains the entries that modify the SNP behavior for each installed printer
on the client PC or server. Modify the SNP behavior by making changes to each of the installed printers.
HKEY_LOCAL_MACHINE\SYSTEM\CurrentControlSet\Control\Print\Printers
\<PrinterName>\PrinterDriverData
Use HP UPD
Where <PrinterName> represents the names of each of your installed printers.
Table 4-1 SNP settings
Setting
Type
Value
SSNPDeviceUpdateInterval
REG_DWORD
0x00000000 (0)
0 = Normal, 1 = Minimize
SSNPNotifyEventSetting
REG_DWORD
0x00000001 (1)
0 = Disabled, 1 = When Printing, 2 = On
Warnings or Errors 3 = On Errors only
SSNPShowAlertLink
REG_DWORD
0x00000001 (1)
0 = Hide, 1 = Show
SSNPShowShopLink
REG_DWORD
0x00000000 (0)
0 = Hide, 1 = Show
ENWW
Manage the HP UPD
55
Table 4-1 SNP settings (continued)
Setting
Type
Value
SSNPShowSSNSettings
REG_DWORD
0x00000000 (0)
0 = Hide, 1 = Show
SSNPShowSupportLink
REG_DWORD
0x00000000 (0)
0 = Hide, 1 = Show
Use HP UPD
56
Chapter 4 Use HP universal print drivers
ENWW
5
Use HP Managed Printing
Administration (MPA) software
Introduction
The HP Managed Print Administration (MPA) software provides a method to create controlled and
customized print environment using an HP Universal Print Driver (UPD).
The HP MPA software consists of three main components:
●
Managed Printer Policies (MPPs)
●
Managed Printer Lists (MPLs)
●
User Groups
For more information, see the HP MPA Web site: www.hp.com/go/mpa
Topics:
Install and uninstall the HP MPA software
●
Access HP MPA
●
Use Help
●
Use Managed Printer Policies (MPPs)
●
Use Managed Printer Lists (MPLs)
●
Use User Groups
HP MPA
●
ENWW
Introduction
57
Install and uninstall the HP MPA software
By default, the HP UPD assumes that the HP MPA will be installed on a server named managedprint. As a result, the HP UPD will search the network for http://managed-print for Managed Printer
Policies or Managed Printer Lists. If you plan on installing the HP MPA on a computer with a name other
than managed-print, you will have to change the HP UPD default settings. To change the HP UPD
default behavior, use the following switch options when installing the HP UPD.
Install /Policy”<computername>” or Install /Policy”<IPaddress>” where the
computername or IP address represents the name of the computer with HP MPA installed.
For example, if you plan on installing the HP MPA on a server named mgmt-srvr, you would use the
following install command for the HP UPD:
Install /Policy”mgmt-srvr”
●
HP MPA software requirements
●
Software availability
●
Install the HP MPA software
●
Uninstall the HP MPA software
HP MPA software requirements
System requirements for the HP MPA software are as follows:
●
One of the following MS Windows operating systems:
●
MS Windows Vista
●
MS Windows 2000
●
MS Windows XP
●
MS Windows Server 2003
●
Microsoft Internet Information Services (IIS)
●
HP PCL 6, HP PCL 5, or HP PS emulation printers (HP LaserJet 4000 or higher)
Other supported environments and standards are as follows:
●
Protocol: TCP/IP protocol for Windows
●
Browsers: Microsoft Internet Explorer 5.5 and Firefox 1.5
The graphic interface of the HP MPA software also requires Java Plug-in 1.4 or later (Java Plug-in
V1.1.1). This plug-in is available at the following Web site:
http://java.com/en/download/index.jsp
Software availability
HP MPA
The HP MPA is currently available in the following languages:
●
58
English
Chapter 5 Use HP Managed Printing Administration (MPA) software
ENWW
Install the HP MPA software
To install the HP MPA software, follow these steps:
1.
Go to the following Web site:
www.hp.com/go/mpa
2.
Download the HP MPA software and save the file (HPMPAInstall.msi) to a location of your choice.
3.
Navigate to the HPMPAInstall.msi file on your computer.
4.
Double-click HPMPAInstall.msi.
5.
The HP Managed Printing Admin Setup Wizard opens. Click Next.
HP MPA
Figure 5-1 HP MPA Setup Wizard — Welcome window
ENWW
Install and uninstall the HP MPA software
59
6.
The Confirm Installation window opens. Click Next.
Figure 5-2 HP MPA Setup Wizard — Confirm Installation window
HP MPA
60
Chapter 5 Use HP Managed Printing Administration (MPA) software
ENWW
7.
The Installing HP Managed Printing Admin window opens. A progress bar indicates the
progression of the install. Wait until the next window opens.
HP MPA
Figure 5-3 HP MPA Setup Wizard — Installing HP MPA window
ENWW
Install and uninstall the HP MPA software
61
8.
The Installation Complete window opens. Click Close.
Figure 5-4 HP MPA Setup Wizard — Installation Complete window
Uninstall the HP MPA software
When uninstalling, the HP MPA does not remove the hpmpa.mdb database file that was created. An
older version of the HP MPA must be uninstalled before the newer version can be installed, so this file
is left behind to accommodate the updating of HP MPA versions without losing any data.
There are two ways to uninstall the HP MPA software from the computer:
●
HP Managed Printing Admin Setup Wizard
●
Add/Remove Programs
Uninstall HP MPA using HP Managed Printing Admin Setup Wizard
1.
Double-click the HPMPAInstall.msi file used to install HP MPA. The HP Managed Printing Admin
Setup Wizard opens.
2.
Two options are available in the HP Managed Printing Admin Setup Wizard window:
●
Repair HP Managed Printing Admin.
●
Remove HP Managed Printing Admin.
HP MPA
Select Remove HP Managed Printing Admin.
62
Chapter 5 Use HP Managed Printing Administration (MPA) software
ENWW
HP MPA
Figure 5-5 HP MPA Setup Wizard – HP MPA Remove or Repair window
ENWW
Install and uninstall the HP MPA software
63
3.
Click Finish. The Removing HP Managed Printing Admin window opens.
Figure 5-6 HP MPA Setup Wizard – Removing HP MPA window
HP MPA
64
Chapter 5 Use HP Managed Printing Administration (MPA) software
ENWW
4.
The Installation Complete window opens indicating the HP MPA has been successfully removed.
Click Close to exit.
Uninstall HP MPA using Add/Remove Programs
1.
Click Start, Settings, Control Panel, and then Add or Remove Programs.
2.
Select HP Managed Printing Admin.
3.
Click Remove.
4.
A confirmation dialog box appears: Are you sure you want to remove HP Managed Printing
Admin from your computer? Click Yes.
HP MPA
The software is removed from the computer.
ENWW
Install and uninstall the HP MPA software
65
Access HP MPA
The HP MPA can be opened in either of two views:
●
Classic interface: Uses typical Windows format to facilitate management of the HP MPA through
text.
●
Graphic interface: Uses Java to facilitate management of the HP MPA through images.
NOTE: Before you can use the graphic interface, you must download and install the Java™
Runtime Environment V5.0, which is available at the following Web site:
http://java.com/en/download/index.jsp
To start the HP MPA software, do the following:
1.
Double-click the HP Managed Printing Admin icon on the desktop.
Figure 5-7 HP Managed Printing Admin icon
2.
The Welcome to the HP Managed Printing Administrator control panel screen appears.
Click Classic interface or Graph interface.
HP MPA
See the following for more information about the feature layout of each interface.
66
Chapter 5 Use HP Managed Printing Administration (MPA) software
ENWW
●
Classic interface
●
Graphic interface
Classic interface
The classic interface screen briefly describes the main components of the application and shows the
relationship between Users, Groups, Policies, and Printer Lists.
In the classic interface, a navigation bar in the top left of the main screen provides links to all features
and tasks within the HP MPA software to manage printer use.
The following table lists the options provided in the left-hand navigation bar. The left-side of the table
lists the main headings, and the right-side of the table lists the corresponding task-oriented sub-headings
available.
Table 5-1 HP MPA classic interface options
Option
Item
Managed Printer Lists
Create a new list
Edit an existing list
Associate with a policy
Duplicate an existing list
Manage the MPL view
Manage virtual printers
Remove an existing list
Managed Printer Policies
Create a new policy
Edit an existing policy
Duplicate an existing policy
Associate printer lists
Associate user groups
Remove an existing policy
User Groups
Create a new user group
Edit an existing user group
Associate with a policy
Remove a user group
Help
Service Administration Guide
The graphic interface screen shows a mapping of Users, Groups, Policies, and Printer Lists in real time.
The following figure shows the main screen of the graphic interface.
ENWW
Access HP MPA
67
HP MPA
Graphic interface
Figure 5-8 HP MPA — Graphic interface view
The navigation bar in the top of the screen provides links to all features and tasks within the HP MPA
software to manage printer use.
Do the following to navigate through the possible settings and features you can use in the HP MPA
software:
1.
Use the drop-down menus on the toolbar at the top of the screen to customize any of the following
options:
●
Graph Size
●
Color Scheme
●
Show associations
●
Font Size
Settings for each of these options are shown in the following table.
2.
Right-click an entry that you want to modify in the Users, Groups, Policies (MPPs), or Printer Lists
(MPLs) column and select one of the options shown in the following table.
Table 5-2 HP MPA graphic interface options
Column
Option
Users
Remove 'user name'
Rename 'user name'
Show policy XML for 'user name': The user name policy
appears in XML format.
Change association to: Select a group name.
HP MPA
68
Chapter 5 Use HP Managed Printing Administration (MPA) software
ENWW
Table 5-2 HP MPA graphic interface options (continued)
Column
Option
Groups
Remove 'group name': Opens the Confirm Object
Removal dialog box. Click Yes to confirm the removal.
Remove all users from this group
Edit 'group name': See Edit an existing user group
on page 128 for more information.
Rename 'group name': Opens the Edit Groups Name dialog
box. Type a new name and click OK.
Show policy XML for 'group name': The group-name policy
appears in XML format.
Change association to: Select a group name.
Remove association from: Select the MPP from which to
remove the association.
Add a user to this group: Type a new user name in the New
user dialog box.
Create a new user group: Type a new user-group name in
the Add new user to group dialog box.
Policies (MPPs)
Remove policy 'policy name': The Confirm Removal dialog
box appears. Click Yes to confirm the removal.
Edit 'policy name': For more information, see Edit an existing
MPP on page 87.
Rename 'policy name': Opens Edit Policies (MPPs) name
dialog box. Type a new name and click OK.
Show policy 'policy name': The policy appears in XML
format.
Export policy 'policy name' to XML file: The policy appears
in XML format. You can save this file as an XML file and edit it
later.
Add user group association: For more information, see
Associate user groups with an MPP on page 90.
Edit user group associations: For more information, see
Associate user groups with an MPP on page 90.
Add printer list association: For more information, see
Associate MPLs with an MPP on page 88.
Edit printer list association: Select a policy name. For more
information, see Associate MPLs with an MPP on page 88.
Remove user group association from: Select a user-group
name from which to remove the association.
Create a new policy (MPP): The Add a new Managed
Printer Policy (MPP) dialog box appears. Type a new name
and click OK.
ENWW
Access HP MPA
69
HP MPA
Remove printer list association from: Select a printer-list
name from which to remove the association.
Table 5-2 HP MPA graphic interface options (continued)
Column
Option
Printer Lists (MPLs)
Remove 'printer list name'
Edit 'printer list name': For more information, see Edit an
existing MPL on page 108.
Rename 'printer list name' settings...: The Edit Printer Lists
(MPL) Name dialog box appears. Modify the name and click
OK.
Show XML for 'printer list name'...: The printer lists name
appears in XML format.
Manage MPL view: The Manage MPL view dialog box
appears. For more information, see Manage the MPL view
on page 110.
Show MPL Preview: Shows information according to the
option that is selected in the Manage MPL view dialog box.
Export printer list 'printer list name' to XML file...: Displays
the printer list in XML format. You can save this file as an .XML
file for later editing.
Add association to: Select a policy name to which you want
to add the association.
Remove association from: Select a policy name from which
you want to remove the association.
Create a new printer list (MPL): The Add a new Managed
Printer List (MPL) dialog box appears. Type a new name and
click OK.
HP MPA
70
Chapter 5 Use HP Managed Printing Administration (MPA) software
ENWW
Use Help
The HP MPA software provides links to online help. Online help is launched when you select the Service
Administration Guide link listed under the Help menu heading.
HP MPA
When you select items on the menu at the left of the screen, a How to... heading appears. This is a
help link to information about the currently selected task. For example, when you select the Create a
new policy link listed under the Managed Print Policies heading, the Create a new MPP help link
appears.
ENWW
Use Help
71
Use Managed Printer Policies (MPPs)
Use Managed Printer Policies (MPPs) to control the driver operation mode and customize the print
environment for the end-user, and to limit end-user network access to certain printers or features. When
enabled, MPPs prevent users from overriding or circumventing settings by downloading a new version
of the driver.
A Managed Printer Policy (MPP) is an XML document that controls the driver operation mode in a
particular printing environment. For example, users in one environment could search or discover printers
using any available search option, while the same user, using the same driver, in another environment
could be limited to printing to only a select few devices as defined by the restricted mode use settings.
One benefit of an MPP is that it extends the control of IT administrators over the printer environment,
ultimately reducing support costs, supplies costs, and productivity costs in the company. Another benefit
is that the IT Administrator can define, by using a policy ticket, how the HP UPD behaves when operated
in a given environment and any and every user printing through the HP UPD is limited or controlled by
that definition, whether they download the driver from an IT specified location or from the HP Web site,
the first time or the 100th time. That control extends even to laptop computers with the HP UPD installed
that are being used at a site which defines an MPP—the printing is controlled by the defined policy.
The MPP contains the following features:
●
UseMode settings. Controls the mode end-users use to access the printing environment; and,
controls printing attributes, detection of HP printers, device-verification level, and availability of
services. (See UseMode settings on page 75 for detailed instructions.)
●
Color access. Controls the end-users access to printing color on a color-capable device. (See
Color Access on page 79 for detailed instructions.)
●
User search capabilities. Controls user searches based on local ports, network print shares, and
network printers (in Dynamic mode). (See User Search capabilities on page 81 capabilities for
detailed instructions.)
●
Status and supplies notifications. Controls what status and supplies notifications (if any) appear
when the end-user opens the HP UPD dialog box. (See Status and supplies notifications
on page 83 for detailed instructions.)
●
Job accounting. Controls what job accounting information to submit to an external application or
post to a Web server. (See Job accounting and job delivery on page 85 for detailed instructions.)
●
Job delivery. Controls what print-job data to submit to an external application. For example, the
job data can be used in a pay-for-print environment. (See Job accounting and job delivery
on page 85 for detailed instructions.)
●
Basic MPP settings. Controls basic features such as refresh rate, name, and default MPP for endusers who are not currently associated to a specific MPP.
This section contains more information on the following.
Topics:
HP MPA
72
●
Create a new MPP
●
Edit an existing MPP
●
Associate MPLs with an MPP
●
Duplicate an existing MPP
Chapter 5 Use HP Managed Printing Administration (MPA) software
ENWW
●
Associate user groups with an MPP
●
Remove an existing MPP
Create a new MPP
To create a new MPP, follow these steps:
1.
On the Managed Print Policies menu, select Create a new policy. The Create a new MPP screen
appears.
Figure 5-9 Create a new MPP screen
In the Name field, type a unique name for the new MPP.
HP MPA
2.
ENWW
Use Managed Printer Policies (MPPs)
73
3.
Click Next. The Properties screen appears.
Figure 5-10 HP MPA — Properties screen
4.
Modify the settings as necessary.
5.
In the Update Policy group box, click Apply (to apply selected options and leave the
Properties screen open) or Done (to apply selected options and close the screen). Until you have
clicked Apply or Done, any settings that have changed are not saved in the MPP.
See the following topics for information about configuring specific settings for a new MPP:
HP MPA
Topics:
74
●
UseMode settings
●
Color Access
Chapter 5 Use HP Managed Printing Administration (MPA) software
ENWW
●
User Search capabilities
●
Status and supplies notifications
●
Job accounting and job delivery
●
Basic MPP Settings
●
Update an MPP
UseMode settings
1.
In the UseMode Settings section of the Properties screen, click Configure.
The UseMode Settings panel appears.
Figure 5-11 UseMode Settings panel
2.
From the Template drop-down menu, select one of the following options:
Options
Description
(None)
Select this option to remove all UseMode setting from the selected MPP.
HP MPA
Table 5-3 UseMode Settings panel – Template drop-down list options
NOTE: Selecting this option prevents the modification of any
additional settings.
ENWW
Use Managed Printer Policies (MPPs)
75
Table 5-3 UseMode Settings panel – Template drop-down list options (continued)
(Create a new template)
Select this option to create a new UseMode template. When you select this
option, all fields can be modified. The new template name should be meaningful
to your organization. You might also determine whether a naming convention
has been established for your organization.
HP Default
When this option is selected, HP defaultUseMode values are applied to this
MPP.
Existing template name
Select a previously defined UseMode template to apply to the selected MPP.
3.
In the New template field, type a name for the new template of UseMode settings.
4.
Then, select options to apply to all users who are assigned to this policy, based on the descriptions
in the following table.
Table 5-4 UseMode Settings — Properties panel options
Option
Description
Show device address
Select this option to provide the device address to users who are associated
with this MPP. (Selected by default.)
Restricted mode
Select this option to restrict the selection of destination printers not selected
through a defined MPL or normal mode. In Restricted mode, only those printers
that are defined in the MPL are available for printing. When this box is not
selected (clear), the default is to operate in Normal mode. (Not selected by
default.)
When this option is not selected (clear), the following additional options can be
selected:
●
Show UPD dialog settings window.
Select this option to display the link to the HP UPD dialog settings window.
If this option is enabled, a note at the bottom of the HP Universal Printing
dialog box displays the HP Universal Printer Setting link.
●
Allow user to group printers by location.
Select this option to allow users to include the selected printer in a local
group with a custom name. When this option is enabled, add a new
customized name by clicking the New button next to the Location file dropdown menu. You can also add a printer to the list by searching for the
printer while the location is selected. Create and edit Custom Managed
Printer Lists by using the Create a new MPL, and Edit an existing
MPL features in the HP MPA.
●
Allow user to add printers to OS Printers folder.
Select this option to allow users to create a permanent instance of the
selected printer in the OS printers folder. If this option is disabled, the Make
a permanent instance of this printer in my Printers folder check box
does not appear in the HP Universal Printing dialog box. To add a printer,
use the Add Printer Wizard. (See Install using the Add Printer Wizard
on page 18.)
Device verify level
The device verify level controls the HP UPD behavior when the HP UPD is
unable to get model name and PDLs information from the printer. The device
verification level determines if the user is allowed to use the device and how
HP MPA
76
Chapter 5 Use HP Managed Printing Administration (MPA) software
ENWW
Table 5-4 UseMode Settings — Properties panel options (continued)
Option
Description
strict compatibility checking should be. Select one of the following options from
the drop-down list to determine the device-verification level:
●
Verify communication and compatibility with driver (High).
Select this option to check for the highest level of positive identification.
This option validates that the user has access to the printer and there is
PDL support from a network-connected device or direct-connected device.
If verification fails, you cannot use the address or device. An error message
conveys that the device is not supported.
●
Verify device ID and Model Name can be obtained (Medium).
Select this option to validate the printer model name, device ID, and PDL
support from a network-connected device or direct-connected device. If
verification fails because the device can not be verified, but the model is
recognized, you are prompted that a driver incompatibility might exist. At
this point, you can cancel out, or continue using the device at your own
risk.
●
Verify port can be opened for printing (Low).
Select this option to verify that the port can be opened before the device
is available for printing. The model name and PDL are verified, but not
validated. This setting assumes that the printer is available and there are
no driver compatibility problems. Use this option in the following situations:
The device is directly connected, but bidirectional communication is
not configured for the local port connection (USB, LPT, COM).
●
A network print queue exists where the network printer server is nonWindows based and the HP UPD cannot communicate directly with
the device.
HP MPA
●
ENWW
Use Managed Printer Policies (MPPs)
77
Table 5-4 UseMode Settings — Properties panel options (continued)
Option
Description
When printing
This drop-down list controls how the HP UPD prompts users who are associated
to this MPP when they select a destination printer based on the selection of one
of the following options:
NOTE: Selecting one of these options (with the exception of (Do not
specify)) overrides the local configuration.
●
(Do not specify).
Select this option to maintain local configuration.
●
Always prompt for the destination when printing a job.
Select this option to prompt users to select a destination printer each time
a job is sent.
●
Only prompt the first time a job is printed from an application.
Select this option to prompt users to select a destination printer only the
first time a job is printed from an application.
●
Only prompt if the last known destination is no longer available.
Select this option to prompt users to select a destination printer only if the
last known destination is no longer available.
Enable services tab
5.
Select this option to enable the Services tab for users who are associated to this
MPP. When this option is selected, the following check boxes are automatically
selected and can be cleared, as appropriate. (Selected by default.)
●
Enable online diagnostics
●
Enable online support
●
Enable product manuals
●
Enable driver updates
●
Enable supply ordering
Click Apply to save your changes, or click Hide to close the UseMode settings panel without
saving your the changes.
NOTE: You are prompted with an error message at the top of the screen if you click
Apply without providing sufficient information in the UseMode settings panel.
The following is an example of such an error message: Please review the following errors:
You specified creation of a new template for use mode settings, but did not give a
name.
6.
Optionally, if no additional properties have to be applied to the selected MPP, select one of the
options in the Update policy panel. For more information, see Update an MPP on page 86.
HP MPA
78
Chapter 5 Use HP Managed Printing Administration (MPA) software
ENWW
Color Access
Color printing can be controlled by setting up templates which define specifically how and when color
can be used. This can be very useful in restricting color printing to a specific time of day (for example
only during work hours) or a specific application (for example only photo application software).
1.
In the Color Access panel of the Properties screen, click Configure.
The Color Access panel expands.
Figure 5-12 Color Access panel
2.
From the Template: drop-down list, select one of the following:
Table 5-5 Color Access panel – Template drop-down list options
Options
Description
(None)
Select this option to remove all color access restrictions from the selected MPP.
(Create a new template)
ENWW
Select this option to create a new color access template. When you select this
option, all fields can be modified. The new template name should be meaningful
to your organization. You might also determine whether a naming convention
has been established for your organization.
Use Managed Printer Policies (MPPs)
79
HP MPA
NOTE: Selecting this option prevents the modification of any
additional settings.
Table 5-5 Color Access panel – Template drop-down list options (continued)
HP Default
When this option is selected, HP default color access values are applied to this
MPP.
Existing template name
Select a previously defined color access template to apply to the selected MPP.
3.
In the New Template: field, type a new name for the new template.
4.
Then, select the settings appropriate for the end users assigned to this policy.
See the following table for more information.
Table 5-6 Color-printing user access
Setting
Description
Allow color printing controls
●
If this setting is unchecked, no color printing is allowed.
●
If this setting is checked, color printing is allowed, and can be further
controlled by more specific settings of Day/Time and Application.
NOTE: Times ranges specified must be in military time. For
example, 9am to 5pm would be noted as the following:
From: 09:00 To: 17:00
The following Day controls are available:
Applications controls
●
Allow color printing on Sunday
●
Allow color printing on Monday
●
Allow color printing on Tuesday
●
Allow color printing on Wednesday
●
Allow color printing on Thursday
●
Allow color printing on Friday
●
Allow color printing on Saturday
The following controls are available:
●
Do not control color printing by application.
●
Allow color printing for only the applications listed below.
Color printing can be limited to a specified set of applications. Specify to
which applications this applies by typing the appropriate applications in
the Applications filenames: field.
●
Allow color printing for all applications except those listed below.
Color printing can also be allowed for all applications except a specified
set. Specify to which applications this applies by typing the appropriate
applications in the Applications filenames: field.
5.
Click Apply to save your changes, or click Hide to close the Color Access panel without saving
changes.
HP MPA
80
Chapter 5 Use HP Managed Printing Administration (MPA) software
ENWW
NOTE: An error message will appear at the top of the screen if you click Apply without
providing sufficient information in the Color Access panel.
The following is an example of such an error message: Please review the following errors:
You specified creation of a new template for Color Access, but did not give a name.
6.
Optionally, if no additional properties have to be applied to the selected MPP, select one of the
options in the Update policy panel. For more information, see Update an MPP on page 86.
User Search capabilities
1.
In the User Search Capabilities section of the Properties screen, click Configure.
The User Search Capabilities panel appears.
Figure 5-13 User Search Capabilities panel
2.
In the Template drop-down list, select one of the following options:
Table 5-7 User Search Capabilities panel – Template drop-down list options
Options
Description
(None)
Select this option to remove all user search restrictions from the selected MPP.
ENWW
(Create a new template)
Select this option to create a new user search template. When you select this
option, all fields can be modified. The new template name should be meaningful
to your organization. You might also determine whether a naming convention
has been established for your organization.
HP Default
When this option is selected, HP default user search values are applied to this
MPP.
Existing template name
Select a previously defined user search template to apply to the selected MPP.
Use Managed Printer Policies (MPPs)
81
HP MPA
NOTE: Selecting this option prevents the modification of any
additional settings.
3.
Modify the user search settings for all users who are associated with this MPP, using the options
described in the following table.
NOTE: Clearing the settings provided in the following table prevents users from printing
to an address of the search type that you cleared. For example, if the Network printers
option is cleared, users cannot locate printers with an address type of TCP/IP or hostname.
Table 5-8 User search capabilities
Options
Description
Local ports
Select this option to allow users to select and use printers connected directly to
their client computer. (Selected by default.)
Network print shares
Select this option to allow users to browse for and use printer shares on the
network. (Selected by default.)
Network printers
Select this option to allow users to search for and use TCP/IP printers that are
connected to the network. (Selected by default.)
Bluetooth
Select this option to allow users to search for and use Bluetooth-connected
printers. (Selected by default.)
4.
In the New template field, type a name for the new user-search template.
5.
Click Apply to save your changes, or click Hide to close the User search capabilities panel
without saving your the changes.
NOTE: An error message will appear at the top of the screen if you click Apply without
providing sufficient information in the User search capabilities panel.
The following is an example of such an error message: Please review the following errors:
You specified creation of a new template for user search capabilities, but did not give
a name.
6.
Optionally, if no additional properties have to be applied to the selected MPP, select one of the
options in the Update policy panel. For more information, see Update an MPP on page 86.
HP MPA
82
Chapter 5 Use HP Managed Printing Administration (MPA) software
ENWW
Status and supplies notifications
This section provides instructions to configure status and supplies notifications settings. The settings
on the Status & Supplies Notification panel control the information that appears in the pop-up window
when an end user opens the HP Universal Print Driver dialog box.
1.
In the Status & Supplies Notifications section of the Properties screen, click Configure.
The Status & Supplies Notifications panel expands.
Figure 5-14 Status & Supplies Notifications panel
2.
From the Template drop-down list, select one of the following options:
Table 5-9 Supplies Status Notifications panel – Template drop-down list options
Options
Description
(None)
Select this option to remove all status and supplies notifications restrictions from
the selected MPP.
3.
ENWW
(Create a new template)
Select this option to create a new status-and-supplies notification template.
When you select this option, all status-and-supplies notification options can be
modified. The new template name should be meaningful to your organization.
You might also determine whether a naming convention has been established
for your organization.
HP Default
When this option is selected, HP default status-and-supplies notification values
are applied to this MPP.
Existing template name
Select a previously defined supplies status notifications template to apply to the
selected MPP.
In the New template field, type a name for the new status-and-supplies notifications template.
Use Managed Printer Policies (MPPs)
83
HP MPA
NOTE: Selecting this option prevents the modification of any
additional settings.
4.
In the Printer Alert Notification Settings drop-down menu, select one of the following options:
Table 5-10 Status and Supplies Notifications panel — Printer Alert Notification Settings drop-down
menu options
5.
Options
Descriptions
(Do not specify)
No policy applies. The client or end-user policy determines these settings.
Disabled
Select this option to disable the Status and Supplies Notifications pop-up
window so that it does not appear in the HP Universal Print Driver dialog box.
Show for Every Print job
Opens the Status and Supplies Notifications pop-up window in the HP
Universal Print Driver dialog box for every printed job or when the device
detects a warning or error. This option shows the print-job status. Show for
every print job is the default value unless another setting has been previously
specified.
Show for Device Errors and
Warnings
Opens the Status and Status and Supplies Notifications pop-up window only
when a warning or error is detected on the device. This setting does not show
print-job status.
Show for Device Errors (printing
stops)
Displays the Status and Supplies Notifications pop-up window only when an
error is active that prevents the device from printing. This setting does not show
print-job status.
In the Device Query Interval drop-down menu, select one of the following options:
Table 5-11 Status and Supplies Notifications panel — Device Query Interval drop-down menu options
6.
Options
Description
(Do not specify)
No policy applies. The client or end-user policy determines these settings.
Normal
The client computer sends out queries to the device approximately every 10
seconds. This is the default value unless another setting has been previously
specified.
Minimize Network Traffic
The client computer sends out queries to the device approximately every 20
seconds.
Modify the user search settings for all users who are associated with this MPP, using the options
described in the following table.
Table 5-12 Status and supplies notification options
HP MPA
7.
84
Option
Description
Supplies Details
Select this option to allow users to click the Supplies Details link in the Status
& Supplies Notifications pop-up window. (Selected by default.)
Shop for Supplies
Select this option to allow users to click the Shop for Supplies link in the Status
& Supplies Notifications pop-up window. (Selected by default.)
Access HP Online Product Support
Select this option to allow users to click an HP Online Product Support link that
appears on the Status & Supplies Notifications pop-up window. (Selected by
default.)
Alternate Online HP Support URL
Type a URL to show an alternative HP Online Product Support link that is
specified by the system administrator instead of the HP default URL. This link
appears on the Status & Supplies Notifications pop-up window. The alternate
URL should be meaningful and valid. (Not selected by default.)
Click Apply to apply the changes, or click Hide to close the Status & Supplies Notifications panel
without saving your the changes.
Chapter 5 Use HP Managed Printing Administration (MPA) software
ENWW
NOTE: If you click Apply without providing required information, an error message will
appear at the top of the screen in the Status & Supplies Notification window.
The following is an example of such an error message: You specified creation of a new
template for status & supplies notification, but did not give a name.
Job accounting and job delivery
CAUTION: Job accounting and job delivery options are intended for third party solutions.
Improper settings can adversely affect the UPD installation, and may render the driver unable to
print as desired. Please leave these settings undisturbed; your solution provider will provide the
proper settings.
Third party solutions are integrated products designed, developed, and sold by companies
targeting specific business printing needs. Environments with solutions in place, or environments
where solutions are being considered, should contact their providers for advice and guidance
regarding their driver selection. For more information on third party solutions, see
http://www.hp.com/go/gsc.
Basic MPP Settings
The Basic MPP settings panel is shown in the following figure.
Figure 5-15 Basic MPP settings panel
In the Basic MPP settings panel of the Properties screen, select the following settings to apply for all
users who are assigned to this MPP:
ENWW
Options
Description
Save as XML
This field is automatically populated with the path to save the XML file for the selected
MPP. This path is an active link that opens the File Download dialog box. Click
Save to save the XML file to a local directory, or click Open to view the XML file in
a browser window.
Refresh rate
Select one of the following values from the Refresh rate drop-down list in order to
determine how often the MPL is refreshed:
Once per week
●
Once per 24 hours
●
Once per 18 hours
●
Once per 12 hours (HP default value)
●
Once per 6 hours
●
Once per hour
●
Once per 30 minutes
●
Once per minute
●
Once per 30 seconds
HP MPA
●
Use Managed Printer Policies (MPPs)
85
●
Once per second
●
Every UPD Query
Select this option to refresh the MPL every time the HP UPD executes a query
for printer devices.
NOTE: The Refresh rate setting should be determined by how
frequently MPP and MPL content changes will be made. For example,
during initial setup and testing/validation, this value should be Every
UPD query or Once per minute. If an administrator plans to change
MPP and MPL content settings multiple times each day, set the
Refresh rate to be more frequent so the new settings are applied to
each client computer. A typical setting might be Once per 24 hours so
that new settings are applied daily.
Info link name
Type a name for the selected MPP to display as an active link in the HP UPD dialog.
This link allows administrators to provide policy-specific printing information to users.
An example might be a link to a Printing Help and FAQs. This link appears in orange
on the lower-left corner of the HP Universal Printing dialog box.
Info link URL
Type the Internet address of the Web server for the location of the file to include
policy-specific printing information to users.
MPP name
This field is optional. Type a new name to save the modified MPP.
Make this the default policy for
unassociated users
Select this option to apply the selected MPP to user groups that are not currently
associated with an MPP.
NOTE: This option is followed by a parenthetical message indicating the
current MPP association for unassociated users. For example,
“MPP_Demo” is currently the default policy or There is currently no
default policy specified.
Optionally, if no additional properties have to be applied to the selected MPP, select one of the options
in the Update policy panel. For more information, see Update an MPP on page 86.
Update an MPP
The Update policy panel is shown in the following figure.
Figure 5-16 Update policy panel
In the Update policy section located at the bottom of the Properties screen, select one of the following
options:
Table 5-13 Managed Print Policy – Update Policy panel options
HP MPA
86
Option
Description
Back
Select this option to return to the Select an MPP screen without saving any changes.
Apply
Select this option to apply the changes to the selected MPP. Use this option to remain
in the Properties screen and make additional changes.
Chapter 5 Use HP Managed Printing Administration (MPA) software
ENWW
Table 5-13 Managed Print Policy – Update Policy panel options (continued)
Associate MPL(s)
Select this option to save your changes to the selected MPP, and then navigate to
the Associate MPLs with an MPP screen to establish an association with existing
MPLs. For more information, see Associate MPLs with an MPP on page 88.
Associate User Group(s)
Select this option to save your changes to the selected MPP, and then navigate to
the Associate User Groups with an MPP screen to establish an association with
existing user groups. For more information, see Associate a user group with a
MPP on page 129.
Done
Select this option to apply your changes to the MPP. The Done screen appears,
providing a confirmation that the MPP has been successfully modified and a list of
possible next steps.
Edit an existing MPP
1.
On the Managed Printer Policies menu, select Edit an existing policy. The Select an MPP
screen appears.
Figure 5-17 Edit an existing MPP — Select an MPP panel
In the Name drop-down menu, select the MPP to edit.
3.
Click Next. The Properties screen appears.
4.
Modify the settings for the selected MPP, as necessary. For more information, see Create a new
MPP on page 73.
HP MPA
2.
ENWW
Use Managed Printer Policies (MPPs)
87
Associate MPLs with an MPP
1.
On the Managed Printer Policies menu, select Associate printer lists.
The Associate MPLs with an MPP screen appears.
Figure 5-18 Associate MPLs with an MPP — Select an MPP screen
2.
From the Name drop-down menu, select the name of an existing MPP with which to associate the
MPLs.
3.
Click Refresh. The Manage MPL associations window is automatically populated with the names
of all existing MPLs and their current associations.
4.
Select the check box next to any MPL that appears in the following two panels:
Table 5-14 Managed Printer Policy — Manage MPL associations panel options
HP MPA
Option
88
Descriptions
Chapter 5 Use HP Managed Printing Administration (MPA) software
ENWW
Table 5-14 Managed Printer Policy — Manage MPL associations panel options (continued)
5.
Associated with other MPP(s)
To establish an association with the selected MPP, select the check box next
to any MPL that is listed in this panel, as necessary.
Not associated with any MPP
To establish an association with the selected MPP, select the check box next
to any MPL that is listed in this panel, as necessary.
Select one of the following options:
Table 5-15 Managed Printer Policy — Associate with an MPP panel options
Option
Descriptions
Apply
Click this button to apply the associations and remain in the Associate MPLs
with an MPL screen to make any additional changes. The Associated with
this MPP panel is automatically populated with any MPLs selected for
association with the MPP.
View/edit policy settings
Click this link to modify the settings for the selected MPP. For more information,
see Create a new MPP on page 73.
Done
Click this button to apply the associations and close the screen.
Duplicate an existing MPP
1.
On the Managed Print Policies menu, select Duplicate an existing policy.
The Select an MPP to duplicate screen appears.
Figure 5-19 Duplicate an existing MPP — Select an MPP to duplicate screen
From the Copy from drop-down list, select the name of an existing MPP.
3.
In the New name field, type a name for the new MPP.
4.
Click Next. The Properties screen appears.
5.
Modify the settings for the selected MPP, as necessary. For more information, see Create a new
MPP on page 73.
HP MPA
2.
ENWW
Use Managed Printer Policies (MPPs)
89
Associate user groups with an MPP
1.
On the Managed Printer Policies menu, select Associate User Groups.
The Associate User Groups with an MPP screen appears.
Figure 5-20 Associate user groups with an MPP screen
2.
From the Name drop-down list, select the name of the MPP with which you want to establish an
association with existing user groups.
3.
Click Refresh. The Manage user group associations panel is automatically populated with all
the existing user groups and their current associations.
4.
Select the check box next to user groups that appear in the following two panels:
Table 5-16 Managed Printer Policy — Manage MPL associations panel options
HP MPA
Option
90
Descriptions
Chapter 5 Use HP Managed Printing Administration (MPA) software
ENWW
Table 5-16 Managed Printer Policy — Manage MPL associations panel options (continued)
5.
Associated with other MPP(s)
To establish an association with the selected MPP, select the check box next
to user groups that are listed in this panel, as necessary.
Not associated with any MPP
To establish an association with the selected MPP, select the check box next
to the user groups that are listed in this panel, as necessary.
Select one of the following options:
Table 5-17 Managed Printer Policy — Associate with an MPP panel options
Option
Descriptions
Apply
Click this button to apply the associations and remain in the Associate MPLs
with an MPL screen to make any additional changes. The Associated with
this MPP panel is automatically populated with any MPLs selected for
association with the MPP.
View/edit policy settings
Click this link to modify the settings for the selected MPP. For more information,
see Create a new MPP on page 73.
Done
Click this button to apply the associations and close the screen.
Remove an existing MPP
1.
On the Managed Print Policies menu, select Remove an existing policy.
Figure 5-21 Remove an existing MPP – Select an MPP panel
From the Name drop-down list, select the name of the MPP to be removed.
HP MPA
2.
ENWW
Use Managed Printer Policies (MPPs)
91
3.
Click Next. The Confirm screen is automatically populated with the MPLs and user groups that
are associated with the MPP that is selected for removal.
Figure 5-22 Remove an existing MPP — Confirmation screen
4.
Click Remove to proceed with the removal of the selected MPP, or click Back to return to the
Select an MPP screen without removing the MPP.
The confirmation screen provides confirmation that the MPP has been successfully removed and
provides a list of possible next steps (for example, create a new MPP, edit an existing MPP, and
so on).
HP MPA
92
Chapter 5 Use HP Managed Printing Administration (MPA) software
ENWW
Use Managed Printer Lists (MPLs)
Use the HP MPA software to create Managed Printer Lists (MPLs), add printers to existing MPLs, and
establish associations with MPPs and User Groups. The MPLs provide a simple method for users to
locate and use HP printing devices. The MPL defines groupings of printers based on various attributes,
and controls features at both the group and individual-printer levels. Administrators can also use the
HP MPA software to customize HTML views of MPLs to assist end users in locating available printers
in their environment.
Through the HP MPA tool you can create, edit, and manage all of the content that is made available to
the HP UPD without having to worry about the XML syntax and contents for each document type. This
tool stores all of the settings in a database running on the centrally managed server, and when the HP
UPD queries for the MPP or MPL content, scripts convert the settings stored in the database into the
properly formatted XML content to be consumed by the HP UPD. The HP MPA tool should be used to
manage the MPP and MPL contents as well as the associations between them.
What is an MPL?
MPLs are XML documents that provide the information required for a print job to use a printing device.
The details of a printer are contained in this centrally managed XML document in an easy-to-read and
modify text file format. The administrator defines printer details in the XML file to assist users in finding
supported printers that they can print to using the HP UPD for Windows (HP UPD MPLs provide
administrators with the ability to specify which products users can print to).
MPLs create a reliable and seamless way of discovering and connecting to devices in the office, or
public printing venues.
MPLs allow users to select a printer with a descriptive name from a pre-defined list. Users do not need
to know about network print shares, TCP/IP addresses, printer host names, user access permissions,
or other printer connection details. Instead they simply select a printer from the list dialog box and print.
Printing does not get any easier than using MPLs.
Create and Edit MPLs
The MPLs can be created and edited through the graphical based tool called HP MPA. This tool will
manage all of the details of the printers such as the addresses, friendly name displayed by the HP UPD,
comments, and other printer settings so that you do not have to be concerned with the formatting and
maintaining an XML file.
Through the HP MPA tool, you can also customize the view of each MPL such that users can select
printers by clicking an image map or a picture of the printer to help the user locate and identify the desired
destination printer.
Who should use MPLs?
HP MPA
MPLs can vastly simplify printing for end users and/or improve control over the environment by
administrators. Costs savings in productivity, security, support, and supplies frequently justify the effort
of implementing MPLs.
ENWW
Use Managed Printer Lists (MPLs)
93
Any business with a Microsoft Windows printing environment can benefit from the flexibility and ease of
use that MPLs provide. For example:
●
Hotels that offer printing to their guests who log on to their private network can use the HP UPD
with MPLs to quickly connect to in-room and/or centrally located printers.
●
Restaurants, Coffee Shops, and other printing Hot Spots that provide Internet access can also
define HP MPLs to allow guests to quickly connect to printers on the premises.
●
Enterprise environments with large campuses or offices spread across geographic regions can
greatly benefit from MPLs, especially the mobile users who travel from site to site or building to
building.
MPLs were also designed to support administrative personnel who are responsible for managing printers
and printing within their environment. Depending on the configuration of the HP UPD on the client
machine, MPLs can be used either to simplify printer discovery for end users, or to restrict printing to a
defined set of printers within the environment.
Use the HP MPA software to create, edit, and remove MPLs. MPLs are defined lists of printers that
administrators can use to manage printer attributes. The view of MPLs can also be managed through
the HP MPA software.
For more information, see the following topics:
●
Create a new MPL
●
Edit an existing MPL
●
Associate a MPL with a MPP
●
Duplicate an existing MPL
●
Manage the MPL view
●
Manage virtual printers
●
Remove an existing MPL
●
Remove printers from an MPL
HP MPA
94
Chapter 5 Use HP Managed Printing Administration (MPA) software
ENWW
Create a new MPL
To create a new MPL, follow these steps:
1.
On the Managed Printer Lists menu, select Create a new list.
The Create a new MPL screen appears.
Figure 5-23 Create a new MPL screen
In the Name field, type a unique name for the new MPL.
HP MPA
2.
ENWW
Use Managed Printer Lists (MPLs)
95
3.
Click Next. The MPL printers panel appears.
Figure 5-24 MPL printers panel
4.
Select one of the following options in order to proceed:
Table 5-18 MPL printers panel – Options
Option
Description
Auto printer discovery
Select this option to add printers to the selected MPL through auto-discovery
methods.
Manual printer entry
Select this option to add printers to the selected MPL manually.
Remove printer(s)
Select this option to remove existing printers from the selected MPL.
HP MPA
See the following topics for information about configuring specific settings for a new MPL:
●
96
Auto printer discovery
Chapter 5 Use HP Managed Printing Administration (MPA) software
ENWW
●
Manual printer entry
Auto printer discovery
In the MPL printers screen, click Auto printer discovery to open the Add Automatically screen, as
shown in the following figure.
Figure 5-25 Add automatically screen
●
Discover locally connected network printers
●
Discover printers on a print server (\\serverName)
●
Import printers from an XML file
After printers have been discovered by using each of these method, all fields can be modified manually,
as necessary. For more information, see Manual printer entry on page 103.
ENWW
Use Managed Printer Lists (MPLs)
97
HP MPA
Auto printer discovery can be used to create a new MPL or to add printers to an existing MPL. Three
methods of auto-printer discovery are available:
Discover locally connected network printers
To discover locally connected network printers and add them to an existing MPL, follow these steps:
1.
In the MPL printers window, click Auto printer discovery. The Add automatically screen
appears.
2.
On the Discover locally connected network printers panel, click Discover.
During discovery, the HP MPA performs a local mDNS discovery on the local subnet. Printing
devices that have the mDNS protocol enabled, and are on the same subnet as the HP MPA
software will show up in the printer list.
The Discovered printers screen appears, and locally connected printers that were discovered
automatically populate the Printer group box, as shown in the following figure.
Figure 5-26 Discovered printers screen
3.
In the Printer group box, select the check box next to printers that you want to add to the MPL.
(All printers are selected by default.)
4.
Modify the following settings as necessary:
HP MPA
Table 5-19 Discovered printers screen options
Option
98
Description
Chapter 5 Use HP Managed Printing Administration (MPA) software
ENWW
Table 5-19 Discovered printers screen options (continued)
Select/deselect all printers
Select this check box to toggle between selecting all or none of the printers in
the Printer window to be included in the selected MPL. (Selected by default.)
Query device configuration
Select this check box to query the printing device in order to determine the
following information. (Selected by default.)
●
Presence of printer features such as hard disk, duplexer, and color
●
Printer model name
●
Address of the printer (for example, IP address, UNC path, IPX/SPX
protocol, or hostname)
Use resolved hostname in place of IP Select this check box to replace the printer IP address in the Address field with
address
the resolved hostname. (Not selected by default.)
Set printer's IP address in the
comments field
5.
Select this check box to include the printer IP address in the Comments field.
(Not selected by default.)
Click Add checked printers to add the selected printers to the MPL. The information that is
associated with the selected printer automatically populates the MPL Printers screen.
Alternatively, click Back to return to the Add automatically screen without saving the changes.
6.
Modify any additional fields as necessary. For more information, see Manual printer entry
on page 103.
Discover printers on a print server (\\serverName)
To add any number of printers that are already installed on a known print server, follow these steps:
1.
In the MPL printers screen, click Auto printer discovery. The Add automatically screen
appears.
2.
In the Discover printers on a print server (\\serverName) section, specify a name in the Print
server field. For example:
●
\\printserver
●
\\winprintserver
●
\\novellServer.tree1
●
\\novellServer.context1.context2
Optionally, in the Connect as user field, type the username for the server that you provided in
the Print server field, and type the associated password in the Password field.
4.
Select the Print server is a non-Windows machine check box if the print server is a non-Windows
computer.
HP MPA
3.
ENWW
Use Managed Printer Lists (MPLs)
99
5.
Click Discover.
The Discovered printers screen appears. The printers that were discovered on the specified
server automatically populate the Printers group box, as shown in the following figure.
Figure 5-27 Discovered printers screen
6.
In the Printers panel, select the check box next to the printers that you want to add to the MPL.
(All printers are selected by default.)
7.
Modify the following settings as necessary:
Table 5-20 Discovered printers screen options
Option
Description
Select/deselect all printers
Select this check box to toggle between selecting all or none of the printers in
the Printer window to be included in the selected MPL. (Selected by default.)
Query device configuration
Select this check box to query the printing device in order to determine the
following information. (Selected by default.)
HP MPA
●
Presence of printer features such as hard disk, duplexer, and color
●
Printer model name
●
Address of the printer (for example, IP address, UNC path, IPX/SPX
protocol, or hostname)
100 Chapter 5 Use HP Managed Printing Administration (MPA) software
ENWW
Table 5-20 Discovered printers screen options (continued)
Use resolved hostname in place of IP Select this check box to replace the printer IP address in the Address field with
address
the resolved hostname. (Not selected by default.)
Set printer's IP address in the
comments field
8.
Select this check box to include the printer IP address in the Comments field.
(Not selected by default.)
Click Add checked printers to add the selected printers to the MPL. The information that is
associated with the selected printer automatically populates the MPL Printers screen.
Alternatively, click Back to return to the Add automatically screen without saving the changes.
9.
Modify any additional fields as necessary. For more information, see Manual printer entry
on page 103.
Import printers from an XML file
Administrators can use this method to add static printer information from an XML file; for example, an
XML file from a previous MPL or a Web Jetadmin file. When the XML file is imported the data will remain
the same; only its format is converted when it is added to the MPL.
To add static printer information from an XML file, follow these steps:
On the MPL printers screen, click Auto printer discovery. The Add automatically screen
appears.
2.
In the Import printers from XML file panel, you must provide the URL of the XML file or UNC path
in order to proceed. In the XML URL or UNC field, type the Internet address that corresponds to
the location of the XML file on a Web server or the Universal Naming Convention (UNC) that
corresponds to the location of the XML file on a local-area network.
HP MPA
1.
ENWW
Use Managed Printer Lists (MPLs) 101
3.
Click Next.
The Discovered printers screen appears. The printers that were discovered from the imported
information automatically populate the Printers panel group box, as shown in the following figure.
Figure 5-28 Discovered printers screen
4.
In the Printer group box, select the check box next to the printers that you want to add to the MPL.
(All printers are selected by default.)
5.
Modify the following settings as necessary:
Table 5-21 Discovered printers screen options
Option
Description
Select/deselect all printers
Select this check box to toggle between selecting all or none of the printers in
the Printer window to be included in the selected MPL. (Selected by default.)
Query device configuration
Select this check box to query the printing device in order to determine the
following information. (Selected by default.)
HP MPA
●
Presence of printer features such as hard disk, duplexer, and color
●
Printer model name
●
Address of the printer (for example, IP address, UNC path, IPX/SPX
protocol, or hostname)
102 Chapter 5 Use HP Managed Printing Administration (MPA) software
ENWW
Table 5-21 Discovered printers screen options (continued)
Use resolved hostname in place of IP Select this check box to replace the printer IP address in the Address field with
address
the resolved hostname. (Not selected by default.)
Set printer's IP address in the
comments field
6.
Select this check box to include the printer IP address in the Comments field.
(Not selected by default.)
Click Add checked printers to add the selected printers to the MPL. The information that is
associated with the selected printer automatically populates the MPL Printers screen.
Alternatively, click Back to return to the Add automatically screen without saving changes.
7.
Modify additional printer attributes as necessary. For more information, see Manual printer entry
on page 103.
Manual printer entry
This section provides instructions to add printers to an MPL manually or edit printers previously added.
If you have performed one of the auto printer discovery methods, many of the fields described here may
be automatically populated. For more information, see Auto printer discovery on page 97.
HP MPA
NOTE: Changes that you make in this section apply only to printers that are selected in the
Printers window. To select multiple printers, hold down the CTRL key and then select printers.
ENWW
Use Managed Printer Lists (MPLs) 103
To add printers to an MPL manually, or to modify printer attributes manually, follow these steps:
1.
Click Manual printer entry. The MPL printers screen appears with all fields available for
modification.
Figure 5-29 MPL printers screen — manual printer entry
2.
Modify the following fields as necessary:
Table 5-22 MPL printers panel – Manual Printer Entry options
HP MPA
Option
Description
Printers
This panel is automatically populated with printer information that was
previously retrieved. Click a specific printer to modify the fields.
Printer name
Type the name of the printer to be added to the MPL, replacing the text “Default:
Unnamed printer (current date and time).”
104 Chapter 5 Use HP Managed Printing Administration (MPA) software
ENWW
Table 5-22 MPL printers panel – Manual Printer Entry options (continued)
Address
Provide one of the following addresses to define the type of connection and the
printer address for end users to connect to the printer:
●
IP address:
The IP address of the printer can be retrieved from the configuration page
(for example, 115.22.112.151).
●
UNC path:
The UNC path tag includes any Windows printer share (also known as a
Network print queue) or non-Windows print queues such as a PSA or
Novell (for example, \\serverName\printerName, \\printServer\hplj4000, \
\NovellTree1\Context1 \Context2\OU3.hplj5500, or \\LabTree
\Bldg7.SEMeetingRoom.Printers.hp4100).
●
Hostname:
The hostname of a device can be retrieved from the configuration page (for
example, NPIBB99EE, testlab.hou.com).
●
IPX/SPX:
The IPX/SPX protocol includes the “NetworkNumber.NodeNumber”
format.
NOTE: To use an IPX/SPX protocol, the IPX/SPX client
networking software must be installed on the computer . Also, the
HP IPX port monitor must be installed, which is supported only in
Windows 2000.
Replace address with resolved
hostname on query
After the Address field is populated with a valid printer address, select this
option to query the printing device in order to determine the following
information:
●
Presence of printer features such as hard disk, duplexer, and color
●
Printer model name
●
Address of the printer (for example, IP address, UNC path, IPX/SPX
protocol, or hostname)
Model name
Type the model name of the printer (for example, HP LaserJet 4100 MFP).
Physical location
Type the physical location of the printer to be added to the MPL (for example,
HP LaserJet 4100 in Room 1002).
Comments
Type in any comments (for example, tray 2 contains color paper).
Check boxes
The following two check boxes are available. Select as appropriate.
Duplex unit installed
●
Hard disk installed
HP MPA
●
ENWW
Use Managed Printer Lists (MPLs) 105
Table 5-22 MPL printers panel – Manual Printer Entry options (continued)
Printer group
The following two options are available.
●
(None).
Select this option if this MPL is not associated with a specific printer group.
●
(Create new group).
Select this option to define a new printer group. Type the name of this group
in the New Printer Group field.
Cost per page
3.
Provide a cost value to appear in a pay-for-print environment where print jobs
are assigned a cost (for example, $1.09).
Optionally, click Advanced to open the Advanced panel. Select one of the following options, as
necessary:
Table 5-23 MPL printers – Advanced panel options
Option
Description
Disable color printing
Select this check box to disable color printing for the selected printer.
Validate when printing
Select this check box to require communication with the printer before it is
available for printing. If the printer is on a print server (for example, Novell) that
does not allow bidirectional communication, this check box should be clear.
Select for job delivery
Select this check box to apply the job delivery settings for all the print jobs that
are submitted to the selected printer.
NOTE: This option is applicable only when the job-delivery settings
are configured in the MPP.
Secure print path
Select this check box to indicate to users that the selected printer is on a secure
print path.
Configuration
Select the appropriate configuration option:
●
Use the configuration from the address specified:
The configuration will be queried directly from the printer at this address.
●
Use the device from an alternate address:
The configuration will be queried from the printer at this alternate address.
●
Use the device from a virtual printer:
The configuration will be queried from a virtual printer. See Manage virtual
printers on page 121 for more information on setting up a virtual printer.
4.
Click Hide to save the settings to the selected printer and close the Advanced panel.
5.
In the MPL settings panel, select the following options as necessary:
HP MPA
106 Chapter 5 Use HP Managed Printing Administration (MPA) software
ENWW
Figure 5-30 MPL printers screen – MPL settings panel
Option
Description
Direct URL
This field is automatically populated with the local path to the selected MPL. The
URL provided is an active link to provide direct access to the selected MPL. For
more information, see Auto printer discovery on page 97.
Save as XML
This field is automatically populated with the path to the XML file for the selected
MPL. This path is an active link that initiates the File Download dialog box.
Click one of the following options:
MPL name
6.
ENWW
Save to save the XML file to a local directory.
●
Open to view the XML file in a browser window.
●
Cancel to close the File Download dialog box without downloading the
file.
Select the refresh rate from the drop-down list to determine how often the MPL
is refreshed. The selected refresh rate is applied only to this MPL. The available
controls are as follows:
●
Once per week
●
Once per 24 hours
●
Once per 18 hours
●
Once per 12 hours
●
Once per 6 hours
●
Once per hour
●
Once per 30 minutes
●
Once per minute
●
Once per 30 seconds
●
Once per second
●
Once per UPD query
Optionally, type a modified name in the MPL name field to save the MPL with
additional printers included.
In the MPL settings panel, click Apply (to apply selected options and leave the MPL printers
screen open) or Done (to apply selected options and close the screen). Until you have clicked
Apply or Done, any settings that have changed are not saved in the MPL.
Use Managed Printer Lists (MPLs) 107
HP MPA
Refresh rate
●
A message appears, indicating that the MPL has been successfully modified and, listing further
steps.
Edit an existing MPL
1.
On the Managed Printer Lists menu, select Edit an existing list. The Select an MPL screen
appears.
Figure 5-31 Edit an existing MPL — Select an MPL screen
2.
In the Name drop-down list, select the MPL to modify
HP MPA
108 Chapter 5 Use HP Managed Printing Administration (MPA) software
ENWW
3.
Click Next. The MPL printers screen appears, automatically populated with the values that are
currently assigned to the selected MPL.
Figure 5-32 Edit an existing MPL — Printers screen
Modify the settings for the selected MPL as necessary. For more information, see Auto printer
discovery on page 97 or Manual printer entry on page 103.
Associate a MPL with a MPP
For more information, see Associate MPLs with an MPP on page 88.
ENWW
Use Managed Printer Lists (MPLs) 109
HP MPA
4.
Duplicate an existing MPL
To duplicate an existing MPL, follow these steps:
1.
In the Managed Printer List menu, select Duplicate an existing list.
The Select an MPL to duplicate screen appears.
Figure 5-33 Duplicate an existing MPL — Select an MPL to duplicate panel
2.
In the Copy from: drop-down menu, select the MPL to be duplicated.
3.
In the New name: field, type the name for the new MPL.
4.
Click Next. The MPL printer screen appears and automatically populates with the values assigned
to the duplicated MPL.
5.
Modify the settings for the selected MPL, as necessary. For more information, see Auto printer
discovery on page 97 or Manual printer entry on page 103.
6.
Click Apply (to apply selected options and leave the MPL printers screen open) or Done (to apply
selected options and close the screen). Until you have clicked Apply or Done, any settings that
have changed are not saved in the MPL.
A message appears, indicating that the MPL has been successfully modified and, listing further
steps.
Manage the MPL view
MPL views can be modified to assist users in selecting printers.
HP MPA
110 Chapter 5 Use HP Managed Printing Administration (MPA) software
ENWW
To modify views, follow these steps:
1.
On the Managed Printer Lists menu, click Manage MPL view.
The Select an MPL screen appears.
Figure 5-34 Manage MPL view — Select an MPL screen
From the Name drop-down list, select the name of an existing MPL.
HP MPA
2.
ENWW
Use Managed Printer Lists (MPLs) 111
3.
Click Next. The Select a view type screen appears.
HP MPA
Figure 5-35 Select a view type screen
112 Chapter 5 Use HP Managed Printing Administration (MPA) software
ENWW
Modify views from one or both of the following panels:
●
Select a view
●
Advanced view settings
Select a view
1.
On the Select a view type panel, click one of the following options to select a view type:
NOTE: The Don’t require user to confirm printer after selection from view check box
is located below the MPL view-type options. This box must be selected after you create a
view if you want to allow users to select printers from a view without providing an additional
confirmation. This box is selected by default.
Table 5-24 Select a view type panel — View options
Option
Description
Default UPD view
Select this option to show a specified MPL in the HP UPD dialog box.
Clickable image map
Select this option to create a clickable image map for the selected MPL.
List with printer graphics
Select this option to create a list of printers that contains an associated graphic
for the selected MPL.
Tabular HTML view
Select this option to create a table of printers for the selected MPL.
2.
Optionally, to view the result in a new window, click the Preview button below the selection.
3.
Click Configure to apply the selections.
See the following topics for more information about each view type:
●
Clickable image map view
●
List with printer graphics view
●
Tabular HTML view
Clickable image map view
The clickable image map view is an interactive image-based map that shows printers that can be
selected by end users who are associated with the specified MPL. The clickable image map allows end
users to drill down from a large-scale image to a local image that provides links to local printers.
From the Select a view type screen, select Clickable image map.
HP MPA
1.
ENWW
Use Managed Printer Lists (MPLs) 113
2.
Click Configure. The Image map screen appears.
Figure 5-36 Configure image map screen
3.
On the View settings panel, click Select background image from library to select a background
image.
The Select a background image screen appears.
Figure 5-37 Select a background image screen
4.
HP MPA
Select the radio button above the image to apply to image-map background, and then click one of
the following options:
Option
Description
114 Chapter 5 Use HP Managed Printing Administration (MPA) software
ENWW
Back
Select this option to return to the Configure image map screen without applying
a new image.
Delete selected image
Select this option to remove the selected image from the HP MPA software.
Upload new image
Select this option to upload a new image from an external source. The Upload
a new background image screen appears.
When the Upload new image option is selected, you must perform the following
steps:
Select image
1.
Click Browse to the right of the File field. The Choose file window
appears.
2.
Select the file to upload and click Open. The File field is automatically
populated with the filename and path.
3.
Optionally, in the Description field, type a description for the selected
background image.
4.
Click Upload Image. The image becomes available for selection on the
Select a background image screen.
The selected image appears in the Image map panel with graphics for added
printers on the left-hand side.
5.
Select Show legend to include a legend at the bottom of the image map. (This option is not selected
by default.)
6.
In the Printer select panel, select a printer to which you want to assign an image.
7.
Click Auto match images for all printers to automatically match all the printers with their
corresponding image. The printer image that is currently selected in the Printer select drop-down
menu appears in the Printer image panel.
Other automatically matched images appear as icons in the Image map panel
8.
In the Printer image panel, select one of the following options:
Table 5-25 Printer image panel options
Option
Description
Replace image
Select this option to replace the image that is automatically assigned to the
selected printer with an image from the library. When you select this option, you
must perform the following steps:
Click Browse images to view the list of available images to match with the
selected printer. The Select an image for [ Printer Name ] screen
appears.
2.
Click the option button above the image that you want to assign to the
selected printer.
3.
Click Select image. The selected printer image appears in the Printer
image section.
Click this option to place the image on the image map.
HP MPA
Add to map
1.
ENWW
Use Managed Printer Lists (MPLs) 115
Table 5-25 Printer image panel options (continued)
Refresh
Reduce to
9.
Optionally, select the check box to modify the size of the image selected on the
image map. When this option is selected, the following options are available:
●
(original size)
●
35 pixels
●
50 pixels
●
75 pixels
●
100 pixels
●
150 pixels
●
200 pixels
Drag the images in the Image map panel to the location that you want by clicking the image, holding
down the left-mouse button, and then dragging to the appropriate location.
10. In the Labels panel, click Show. The Labels panel appears.
A label can be created for an image already added to the Image map panel, or can be used instead
of an image.
●
To add a label to an existing image in the Image map panel, select the image and continue
with the following steps.
●
To add a label to the Image map panel that is not associated with an image, continue with
the following steps.
HP MPA
Figure 5-38 Labels panel
11. From the Labels drop-down menu, select the name of an existing label, or select (Create a new
text label).
116 Chapter 5 Use HP Managed Printing Administration (MPA) software
ENWW
12. Modify the following settings, as necessary:
NOTE: These settings will be automatically reflected on the Image map panel.
Table 5-26 Labels panel options
Option
Description
Text
Type the text to appear on the label.
Size
Select one of the following to apply the appropriate font size. (Medium is the
default.)
Weight
Color
Width
●
Large
●
Medium
●
Small
Select one of the following to apply the appropriate font weight. (Normal is the
default.)
●
Normal
●
Bold
Select one of the following color options from the drop-down list to apply the
appropriate color to the label text. (Black is the default.)
●
Black
●
Red
●
Blue
●
Green
Select one of the following options to set the appropriate width of the label text
box. (The 200 pixels option is the default.)
●
100 pixels
●
200 pixels
●
300 pixels
13. Click Add to map. The new label is automatically added to the image map.
14. To move the label to an appropriate location on the image map, click the label text box on the image
map and drag to the appropriate location.
15. Click a new printer on the image map to add additional labels as necessary, or click Hide to close
the label panel.
List with printer graphics view
ENWW
1.
Click the option button next to List with printer graphics.
2.
Optionally, select the Show device address check box to display the device address in the list
with the printer graphics view. (This box is not selected by default.)
Use Managed Printer Lists (MPLs) 117
HP MPA
NOTE: To remove a label, select the label in the Image map panel or in the Labels drop-down
menu. Then, click Remove label in the Labels panel.
3.
Click one of the following options to specify the list format:
Table 5-27 Graphics view — List format options
Option
Description
All printer groups on one page
Click this option to format the table with all printer groups on one page.
Each printer group in its own frame
Click this option to format the table with one printer group per frame.
4.
Click Preview to view the list with the selected options. A new browser window appears that
contains the list output.
5.
Click Configure to make additional modification to the list.
The Configure list with printer graphics screen appears.
Figure 5-39 Configure list with printer graphics screen
6.
On the Printer select drop-down list, select a printer to include in the list.
7.
Click Auto match images for all printers.
8.
Optionally, on the Printer image panel, click Replace image to replace the auto-match image.
The Printer image panel changes to show the following options. Select one:
Table 5-28 Printer image panel options
Option
Description
Auto match image
Browse images
Click this button to select an image from a library of printer images.
HP MPA
118 Chapter 5 Use HP Managed Printing Administration (MPA) software
ENWW
Table 5-28 Printer image panel options (continued)
In the select image screen, three options are available:
●
Back.
Select this option to return to the Configure image map screen without
applying a new image.
●
Delete selected image.
Select this option to remove the selected image from the HP MPA software.
●
Upload new image.
Select this option to upload a new image from an external source. The
Upload a new background image screen appears. See the following form
more instructions for uploading a new image.
When the Upload new image option is selected, you must perform the following
steps:
Select image
9.
1.
Click Browse to the right of the File field. The Choose file window
appears.
2.
Select the file to upload and click Open. The File field is automatically
populated with the filename and path.
3.
Optionally, in the Description field, type a description for the selected
background image.
4.
Click Upload Image. The image becomes available for selection on the
Select a background image screen.
The selected image appears in the Image map panel with graphics for added
printers on the left-hand side.
In the Complete panel, select one of the following options:
Table 5-29 Complete panel options
Option
Description
Back
Click Back to return to the Select an MPL screen without saving the changes.
Apply
Click Apply to apply your changes to the MPL view and remain in the Configure
list with graphics view screen to make any additional modifications.
Preview
Click Preview to view the applied changes. A new browser window appears with
the list output.
Done
Click Done to apply the changes to the MPL view. A confirmation screen
appears and provides a list of suggested next steps.
Tabular HTML view
ENWW
1.
Click the radio button next to Tabular HTML view.
2.
Optionally, select the Hide empty columns check box to hide any columns that have no values.
3.
Optionally, select the Show device address check box to show the device address in the tabular
HTML view.
4.
Click one of the following option buttons to select the list format:
Use Managed Printer Lists (MPLs) 119
HP MPA
To create a table of all available printers in the specified MPL, follow these steps:
5.
Option
Description
All printer groups on one page
Click this option to format the table with all the printer groups on one page.
Each printer group in its own frame
Click this option to format the table with one printer on each frame.
Click Preview to preview the tabular HTML output. A new browser window appears that contains
the HTML output.
Figure 5-40 Tabular HTML view — HP MPL Printer Groups screen (sample)
6.
In the Select a view type panel, click one of the following options :
Table 5-30 Select a view panel options
Option
Description
Back
Click Back to return to the Select an MPL screen without saving the changes.
Apply
Click Apply to apply your changes to the MPL view and remain in the Select a
view type panel to make any additional modifications.
Done
Click Done to apply the changes to the MPL view. A confirmation screen
appears and provides a list of suggested next steps.
Advanced view settings
Use the advanced view settings to design a custom MPL view to assist users in selecting printing devices
from an image map. The URL in this section links directly to the Final URL field that appears. With this
method, you can allow users to select a printer by drilling down from a high-level image map to the low-
HP MPA
120 Chapter 5 Use HP Managed Printing Administration (MPA) software
ENWW
level view within the clickable image map. For more information, see Clickable image map view
on page 113.
1.
In the Advanced view settings section of the Select a view screen, click Show. The Advanced
view settings panel appears.
NOTE: The Final URL field is automatically populated with the Internet address for the
background image that you selected when you designed the clickable image map. For more
information, see Clickable image map view on page 113.
Figure 5-41 Advanced view settings panel
2.
In the Starting URL field, type the Internet address of the image that will provide a starting point
for the clickable image map.
3.
Perform one of the following options:
Option
Description
Back
Click Back to return to the Select an MPL screen without saving the changes.
Apply
Click Apply to apply your changes to the MPL view and remain in the Advanced
view settings panel to make any additional modifications.
Done
Click Done to apply the changes to the MPL view and return to the Select an
MPL screen.
Hide
Click Hide to close the Advanced view settings panel.
Manage virtual printers
In some environments, it is not possible for the HP UPD to communicate with the destination printer.
This might occur because the HP UPD and the printer might not be on the same network, there is a
firewall, or there is some other means by which communication has been disabled. In these
environments, the HP UPD has no way of determining the physical capabilities of the device. Therefore,
the end user is provided only basic printing options.
ENWW
●
Create a new virtual printer
●
Edit existing virtual printer
HP MPA
By using the Use the device configuration from a virtual printer option and then selecting one of the
previously defined HP MPA virtual printers, the administrator can enable the HP UPD to act as though
it communicated with the target device, and can setup the driver features as though specific hardware
features were detected through the device. Once a virtual printer is selected, the capabilities of the virtual
printer will be displayed for the administrator to the capabilities the virtual printer will offer.
Use Managed Printer Lists (MPLs) 121
Create a new virtual printer
To setup up a virtual printer, follow these steps:
1.
On the Managed Printer Lists menu, select Manage Virtual Printers.
The Create a new virtual printer screen appears.
Figure 5-42 Create a new virtual printer
2.
Enter the address of the printer in TCP/IP or hostname format.
3.
Click Add. See Edit existing virtual printer on page 123 for more information.
HP MPA
122 Chapter 5 Use HP Managed Printing Administration (MPA) software
ENWW
Edit existing virtual printer
To edit an existing virtual printer, follow these steps:
1.
On the Managed Printer List menu, select Manage Virtual Printers.
The Edit existing virtual printers panel opens.
Figure 5-43 Edit existing virtual printers panel
2.
In the Edit existing virtual printers panel, modify the following settings as necessary.
3.
Option
Description
Name
Edit the name, as appropriate.
Re-query this device to update its
capabilities
Select this check box to query the printing device in order to update the printer's
features (such as hard disk or duplexer).
Select/deselect all printers for
requerying
Select this check box to toggle between selecting all or none of the printers for
requery.
Select/deselect all printers for
removal
Select this check box to toggle between selecting all or none of the printers for
removal.
Click Apply (to apply selected options and leave the Edit virtual printers screen open) or Done
(to apply selected options and close the screen). Until you have clicked Apply or Done, any setting
that have changed are not saved in the MPL.
A message appears, stating that the virtual printer has been successfully modified and, listing
further steps.
ENWW
Use Managed Printer Lists (MPLs) 123
HP MPA
Table 5-31 Edit existing virtual printers panel options
Remove an existing MPL
To remove an existing MPL, follow these steps:
1.
On the Managed Printer Lists menu, select Remove an existing list.
The Select an MPL screen appears.
Figure 5-44 Remove an existing MPL — Select a MPL screen
2.
From the Name drop-down list, select the name of an existing MPL.
3.
Click Next. A confirmation screen appears, as shown in the following figure. It is automatically
populated with the list of all printers that are currently assigned to the selected MPL.
Figure 5-45 Remove an existing MPL — confirmation screen (sample)
4.
Click Remove to confirm the removal of the selected MPL, or click Back to return to the Select a
MPL screen without saving the changes.
Remove printers from an MPL
To remove printers from an MPL, follow these steps:
1.
On the Managed Printer Lists menu, click Edit an existing list. The Select an MPL screen
appears.
2.
Select the MPL from which a printer or printers are to be removed and click Next. The Printers
screen appears.
HP MPA
Figure 5-46 Printers screen
3.
On the MPL printers screen, select the printers to remove by clicking them in the Printers panel.
(Hold down the CTRL key to select more than one printer.)
124 Chapter 5 Use HP Managed Printing Administration (MPA) software
ENWW
4.
Click Remove printer(s). A confirmation dialog box appears that contains the list of the printers
that you selected for deletion.
Figure 5-47 Remove printers — confirmation dialog box
Click OK to confirm, or click Cancel to return to the Confirm screen to view printer details.
HP MPA
5.
ENWW
Use Managed Printer Lists (MPLs) 125
Use User Groups
Use the HP MPA software to create, import, and modify groups of users. The HP MPA software is also
used to establish associations for existing user groups with available MPPs to manage user-group
access to available printers and to control features. Users who are added to these groups are likely to
be domain users, although users can be added with their local login name.
Use the HP MPA software to create user groups and modify permissions for HP UPD users.
For more information about creating user groups, see the following topics:
●
Create a new user group
●
Edit an existing user group
●
Associate a user group with a MPP
●
Remove a user group
Create a new user group
1.
On the User Groups menu, select Create a new user group.
The Create a new user group screen appears.
Figure 5-48 Create a new user group screen
2.
In the Name field, type a name for the new user group.
HP MPA
126 Chapter 5 Use HP Managed Printing Administration (MPA) software
ENWW
3.
Click Next. The Users screen appears, as shown in the following figure.
Figure 5-49 Users screen
4.
In the Users field on the Included Users panel, type the user entries in the format that is specified
on the screen.
Alternatively, you can paste user entries from an external, semicolon-delimited list.
5.
Optionally, in the User group name field on the User Group Settings panel, type a name for the
new user group.
6.
Perform one of the following options:
Description
Back
Click Back to return to the main menu without saving the changes.
Apply
Click Apply to update the user entries and remain in the Included users screen
to make additional modifications.
Done
Click Done to update user entries and return to the main menu.
HP MPA
Option
ENWW
Use User Groups 127
Edit an existing user group
1.
On the User Groups menu, select Edit an existing user group.
The Edit an existing user group screen appears.
Figure 5-50 Edit an existing user group screen
2.
From the Name drop-down list, select the name of an existing user group.
3.
Click Next. The Included users screen that appears is automatically populated with all users
included in the selected user group.
HP MPA
Figure 5-51 Included users panel
128 Chapter 5 Use HP Managed Printing Administration (MPA) software
ENWW
4.
In the Users: field, type the user entries in the format that is specified on the screen.
Alternatively, you can paste user entries from an external, semicolon-delimited list.
5.
Optionally, in the User group name: field, type a name for the new user group.
6.
Perform one of the following options:
Option
Description
Back
Click Back to return to the main menu without saving the changes.
Apply
Click Apply to update the user entries and remain in the Included users screen
to make additional modifications.
Done
Click Done to update user entries and return to the main menu.
Associate a user group with a MPP
See Associate user groups with an MPP on page 90 for detailed instructions.
Remove a user group
To remove a user group, follow these steps:
1.
On the User Groups menu, select Remove a user group.
The Remove an existing user group screen appears.
From the Name drop-down list, select the name of the user group to be removed.
HP MPA
2.
ENWW
Use User Groups 129
3.
Click Next. A Warning screen appears. The Included users panel is automatically populated with
users that are currently included in the selected user group.
Figure 5-52 Remove an existing user group — Confirm screen
4.
Click Remove to proceed with the removal of the selected user group, or click Back to return to
the Select a user group screen without removing the user group.
HP MPA
130 Chapter 5 Use HP Managed Printing Administration (MPA) software
ENWW
HP Universal Print Driver Frequently
Asked Questions (FAQs)
HP UPD FAQs
A
See the following topics:
ENWW
●
Troubleshoot
●
Mobile Print Driver FAQs
●
What is a third party application?
●
My environment uses third party applications; should I install the UPD?
●
How do I install without using the install.exe?
●
When a printer is connected locally via USB I can not install an IP printer.
●
Why do I see color tabs for a mono LaserJet?
●
What is the difference between a high, medium, and low Device Verification Level (DVL)?
●
What is the best way to update my queues on my Microsoft print servers when a new version of
the HP UPD becomes available?
●
My HP Color LaserJet 2550 printer does not print in color when using the PCL5 driver.
131
HP UPD FAQs
Troubleshoot
For troubleshooting information, first contact your administrator.
For more information, go to the following HP Web site:
www.hp.com/go/mpa
The following resources are available at the Web site:
●
HP Universal Print Driver for Windows User Guide
●
Troubleshooting information
●
Minimum system requirements
●
Specifications
132 Appendix A HP Universal Print Driver Frequently Asked Questions (FAQs)
ENWW
This section covers a list of questions and answers that you might have or that may be related to your
environment and the operation of MPLs. See the document "HP Managed Printing and the HP Universal
Print Driver" for more examples.
Topics:
●
What should I use to manage my MPP and MPL content?
●
Can I change the address that "HP Managed Printer Lists" uses to look up printers?
●
What type of environment should "HP Managed Printer Lists" be used?
●
How can I get MPLs that are user, domain, or TCP/IP address specific?
●
How can I allow only a specific user to see a certain custom MPL?
●
Can custom MPLs contain environment variables directly, or are they only valid inside the XML
file?
●
Can "HP Managed Printer Lists" be used in Hot Spots?
●
Does the server where the MPLs reside have to be Windows?
●
Can large corporations or enterprise environments benefit from this technology?
●
How often can I modify the printers that the HP MPL or the custom MPLs point to?
●
Technical FAQs
What should I use to manage my MPP and MPL content?
The HP Managed Printing Administration tool should be used to manage the MPP and MPL content to
centrally manage and control the UPD printing experience for your users.
This tool provides a graphical interface for managing the content of the MPPs and MPLs as well as
managing the associations of them. It requires a Windows computer (Windows 2000 or later) running
Microsoft Internet Information Services (IIS) to serve up the content to the UPD on request.
Can I change the address that "HP Managed Printer Lists" uses to look up
printers?
No, not specifically. The address that "HP Managed Printer Lists" uses internally should be the same
generic address, so that mobile users, those who travel from one location to another can resolve "HP
Managed Printer lists" independent of their location. You can however, implement your Web server
technology to take some different action (like say run a CGI or ASP script) when the HTTP request for
"HP Managed Printer Lists" occurs.
The benefit of the internal "HP Managed Printer Lists" is that a mobile user can use this search option
no matter where you are connected to look up the list of available printers that are specific to your locale.
If the mobile user searches "HP Managed Printer Lists" on Tuesday from his office to print, and then on
Wednesday searches the "HP Managed Printer Lists" for a printer in the coffee shop, he will be
successful in finding printers as long as the network he is connected to resolves one of the MPL public
names.
ENWW
Mobile Print Driver FAQs 133
HP UPD FAQs
Mobile Print Driver FAQs
HP UPD FAQs
What type of environment should "HP Managed Printer Lists" be used?
Any environment where the list of printers available to users, can be managed from a central location
should define the "HP Managed Printers Lists". This includes Hot Spots (such as coffee shops or air
ports), hotels, businesses that have mobile users, businesses that frequently have customers or visitors
who meet on their site, small offices, or even home networks. Just about any location where computer
users have a need to print, and the person managing the printing environment doesn’t want to manage
multiple drivers for multiple printers.
How can I get MPLs that are user, domain, or TCP/IP address specific?
The best approach to solving this problem is to use the HP Managed Printing Administration tool as it
lets you associate users and groups, and even multiple groups to one or more MPLs. See the HP
Managed Printing Administration Guide for more details.
You can create custom MPLs that take as arguments the current user name, computer name, or domain
name and pass that into the HTTP query. Using the environment variables you can pass anything you
want into the HTTP query.
For example, say you want to provide the list of available printers based on the domain name of the
computer making the request. You can use the <ManagedList> XML tag to include the user specific
information in the query.
In the above example, the %USERDOMAIN% is replaced at runtime by the Universal Print Driver with
the actual environment variable value and then the HTTP request is made with the real value. The
userlist.cgi script would need some logic to parse the query string and take the appropriate action
based on the value of "domain".
If you open a command prompt and type in the command set you will see a listing of all of the
environment variables defined for the current user. Any of these environment variables may be used,
including any that you may define in your login script, when calling into the custom MPLs.
How can I allow only a specific user to see a certain custom MPL?
The best approach to solving this problem is to use the HP Managed Printing Administration tool as it
lets you associate users and groups, and even multiple groups to one or more MPLs. See the HP
Managed Printing Administration Guide for more details.
Using the same approach listed in the previous question, you can create a custom MPL query that
checks the current user making the request and only includes additional printers if that username is
specified in the MPL. This can be useful for private printers or printers that you only want certain
individuals to have access to.
An example would be to only allow the user "jdoe" to see the private printer lists in addition to the public
lists, while everyone else sees just the public list.
In the above example, %USERNAME% would be replaced with the name of the user logged into the
computer. Inside privatelist.cgi, the script would need to compare the "user" query string variable
to "jdoe", and if they are identical, then it also returns XML for private printers that only user "jdoe" can
see in addition to all of the public printers that everyone else can see.
Another way solve this problem is to get the user name from the MPP, and then provide a
<CustomMPL> that is only present for the specified user. When the MPP is queried, the query made
looks like:
http://managed-print/policy?userName=%USERNAME%
134 Appendix A HP Universal Print Driver Frequently Asked Questions (FAQs)
ENWW
Can custom MPLs contain environment variables directly, or are they only
valid inside the XML file?
Yes, you can define custom MPLs to be defined at install time by using the Install.exe /aml command
line option. When you use environment variables in the command line to the Install.exe be sure to use
two % signs for each variable. Otherwise the values will be substituted for the current user information
when the Install occurs.
For example, if you want to create an MPL entry for the current user, the install command line might
look like:
Install.exe /aml"User Specific List",http://printserver/cgi-bin/
userlist.cgi?user=%% USERNAME%%
Can "HP Managed Printer Lists" be used in Hot Spots?
Yes. Defining an "HP Managed Printer Lists" in certain Hot Spots will allow users with the Universal
Print Driver installed to quickly and easily find printers they can use when connected to your private
network. In this type of environment a MPP is suggested to control the printing experience and limit the
printers that a user could print to.
Does the server where the MPLs reside have to be Windows?
No. The server can be any platform, it only needs to support either UNC paths for file sharing, or it needs
to be able to run an HTTP server.
However, HP recommends that you use the HP Managed Printing Administration tool, as it lets you
manage the MPLs in a graphical user interface that is easy to use and allows for greater flexibility in
how you present the MPL content to your users.
Can large corporations or enterprise environments benefit from this
technology?
Yes. If you are an administrator looking to reduce the effort involved in managing printers and printer
lists, you can define one central list of printers that everyone accesses from a single HP driver. The MPL
functionality reduces the number of drivers you have to support and the messaging and communication
for providing access to these printers to your users is controlled through the contents of the MPL and
the MPP.
How often can I modify the printers that the HP MPL or the custom MPLs
point to?
The MPL content and the number of MPLs can be modified as often as needed. As you add printers,
remove printers, or change the way users will connect to certain printers, you can modify the MPL XML
file when ever you need to, and it will be available to the users as soon as their next request to print.
Technical FAQs
For more technical FAQs see the document named HP Universal Print Driver - Technical FAQ.doc.
ENWW
Mobile Print Driver FAQs 135
HP UPD FAQs
The %USERNAME% portion of the query will be specific to the user who is logged into the computer
making the request. This userName can then be used by the script processing the http request to return
a user specific policy ticket that contains MPLs or printers that only a certain user can see.
HP UPD FAQs
What is a third party application?
A third party application is an integrated product designed, developed, and sold by companies targeting
specific business printing needs. Environments with a third party application in place, or environments
where such applications are being considered, should contact their providers for advice and guidance
regarding their driver selection.
For more information on third party solutions, see http://www.hp.com/go/gsc.
136 Appendix A HP Universal Print Driver Frequently Asked Questions (FAQs)
ENWW
Contact your provider for advice and guidance regarding your driver selection.
For more information on third party solutions, see http://www.hp.com/go/gsc.
ENWW
My environment uses third party applications; should I install the UPD? 137
HP UPD FAQs
My environment uses third party applications; should I
install the UPD?
HP UPD FAQs
How do I install without using the install.exe?
If you do not want the driver to include the install.exe, you can still install the driver by removing the
install.exe and install.dll files from the package and use the Add Printer Wizard to perform the printer
installation.
The UPD Install.exe is nothing more than a wrapper to the AddPrinterWizard's PRINTUI.DLL function
"PrintUIEntry". The Install.exe calls this function to perform automated installation of the APW without
prompting the user.
For information about how Install.exe works, see the following Web site:
http://support.microsoft.com/default.aspx?scid=KB;en-us;q189105
NOTE: The link is not part of the Hewlett-Packard Web site. HP does not control and is not
responsible for information outside of the HP Web site.
138 Appendix A HP Universal Print Driver Frequently Asked Questions (FAQs)
ENWW
This may be the result of plug and play software hanging the UPD. If so, complete USB installation or
disconnect it the USB connection and then complete the UPD printer installation.
ENWW
When a printer is connected locally via USB I can not install an IP printer. 139
HP UPD FAQs
When a printer is connected locally via USB I can not install
an IP printer.
HP UPD FAQs
Why do I see color tabs for a mono LaserJet?
The HP UPD advertises itself as a color printer driver and will render the jobs correctly when printing to
a black and white printing device. The color tab will become ineffective in this scenario.
140 Appendix A HP Universal Print Driver Frequently Asked Questions (FAQs)
ENWW
The IP query is much the same for each level. The DVL helps determine how strict the device compliance
checking should be:
ENWW
●
High. If we can communicate with the device and determine it does not support the PDL this driver
will generate, the UPD will display a message box indicating it will not allow printing to the device.
●
Medium. If we communicate with the device but cannot confirm if it supports the current PDL this
driver generates, we will display a message box indicating the device does no appear to support
this driver, however the user can try it (sort of buyer beware).
●
Low. If we cannot communicate with the device, but can still open a connection to the device, this
setting will still allow the job to go through but no warning is a displayed (as in medium), and no
prevention occurs (as in high).
What is the difference between a high, medium, and low Device Verification Level (DVL)? 141
HP UPD FAQs
What is the difference between a high, medium, and low
Device Verification Level (DVL)?
HP UPD FAQs
What is the best way to update my queues on my Microsoft
print servers when a new version of the HP UPD becomes
available?
Replace a single instance of the HP UPD on a printer through the driver Properties. Do the following:
1.
On the Properties window, click the Advanced tab.
2.
Click the New Driver button.
OR
1.
In the Server Properties, click Drivers.
2.
Then, click Add to add the new version of the HP UPD.
3.
All of the print queues using the HP UPD will be automatically upgraded.
Similarly, for the client PC connected to the shares on the print servers, the new version of the HP UPD
will automatically be pushed down to the clients the next time they send a print job through the print
server.
This is a function of point and print capabilities within the Microsoft printing environment.
142 Appendix A HP Universal Print Driver Frequently Asked Questions (FAQs)
ENWW
The HP Color LaserJet 2550 printer does not support a color path in any HP PCL 5 driver. A color path
is supported only in PCL 6 and PS emulation drivers.
ENWW
My HP Color LaserJet 2550 printer does not print in color when using the PCL5 driver. 143
HP UPD FAQs
My HP Color LaserJet 2550 printer does not print in color
when using the PCL5 driver.
HP UPD FAQs
144 Appendix A HP Universal Print Driver Frequently Asked Questions (FAQs)
ENWW
Index
A
Add Printer Wizard
Add Standard TCP/IP Printer
Port Wizard 21
Traditional mode, install 18
Add Standard TCP/IP Printer Port
Wizard
Add Printer Wizard 21
UPD, install 21
Add/Remove Programs
HP MPA, uninstall 65
Uninstall HP MPA, using 65
Advanced View settings
Configure 120
Availability
HP Managed Print Administrator
(MPA) 58
UPD 13
B
Basic MPP settings
Configure 85
C
Classic interface
Options 67
Clickable image map view
Configure 113
Cluster server
Install UPD on 37
UPD, install 37
Color Access settings
Configure 79
Command prompt
Command options 34
Custom install 34
Custom install of UPD,
using 33
Custom installation 34
Install, custom 34
ENWW
Install, UPD 33
UPD, custom install of 33
D
Destination printer
Add within HP UPD 50
Managing within HP UPD 50
Search within HP UPD 51
Driver comparison
HP mobile printer drivers 10
HP UPD 10
Product-specific drivers 10
Driver comparison table
HP mobile print driver 11
Product-specific drivers 10
UPD 10, 11
Dynamic mode
about 17
Change the selected printer
when printing 48
Description of 42
Printing in 48
G
Graphic interface
Options 67
H
Help
HP MPA, Service Administration
Guide 71
HP Universal Print Driver
(UPD) 47
Service Administration Guide,
HP MPA 71
HP Managed Print Administration
(MPA)
Install, software
requirements 58
Software requirements for
install 58
HP Managed Print Administrator
(MPA)
Availability 58
HP MPA Setup Wizard 59
Install 59
Languages available in 58
Software availability 58
HP Managed Printing Admin Setup
Wizard
HP MPA, uninstall 62
Uninstalling HP MPA 62
HP mobile print driver
Compare with UPD 11
HP MPA
Access of 66
Classic interface 67
Graphic interface 67
Help 71
HP Managed Printing Admin
Setup Wizard, uninstall
using 62
HP Managed Printing
Administration control
panel 66
HP PCL6, PCL5, PS emulation,
devices supported in 4
HP PS emulation only, devices
supported in 6
Managed Printer Lists (MPLs),
overview 93
Plug and Play, supported
devices with 6
Supported devices 4
Index 145
Uninstall 62
User Groups 126
HP MPA Setup Wizard
Install, MPA 59
MPA, install 59
HP Universal Print Driver (UPD)
Add destination printer 50
Add location files 51
Cache printer settings 52
Configure SNPs 54
Configure using TCP/IP
address 46
Configure using TCP/IP
address, TCP/IP address
unknown 46
Create location files 51
Destination printer, add 50
Destination printer, search
for 51
Destination printers,
manage 50
Destination-printer prompts,
select 43
Dynamic mode, printing in 48
Features 52
General settings, modify 43
Help 47
Location files, add 51
Location files, create 51
Manage destination
printers 50
Manage using properties 50
Print, using 48
Printer location profile,
define 47
Printer location profiles,
modify 44
Printing in Dynamic mode 48
Search for a destination
printer 51
SNPs 52
SNPs, configure 54
Status notification pop-ups
(SNPs) 52
Traditional mode, printing 49
Verification level, set 45
HP Universal Print Driver System
Administrator Guide. See HP UPD
SAG
146 Index
HP Universal Printing Installer
Wizard
Dynamic mode 29
Install, UPD 29
Traditional mode 29
UPD, default installation 29
HP UPD
HP PCL6, PCL5, PS emulation,
devices supported in 4
HP PS emulation only, devices
supported in 6
Plug and Play, supported
devices with 6
Supported devices 4
HP UPD SAG
Conventions used in 3
Overview of 1
HP Web Jetadmin display plug-in
Install UPD, using 37
I
Install
Add Printer Wizard 18
Cluster server, install UPD
on 37
Command prompt, using 33,
34
Custom 34
Dynamic mode 17, 29
HP Managed Print Administrator
(MPA) 59
HP MPA Setup Wizard 59
HP Universal Printing Installer
Wizard 29
Novell NDS, install UPD
using 38
Terminal Server/Citrix, install on
UPD 37
Traditional mode 17, 18, 29
UPD 17, 18
UPD, custom 33
UPD, default installation 29
UPD, on a cluster server 37
UPD, on a Terminal Server/
Citrix 37
UPD, using HPD Web Jetadmin
display plug-in 37
UPD, using Novell NDS 38
UPD, using point and print 37
Installation
UPD 17
Installation mode, UPD
Dynamic mode 17
Traditional mode 17
Installation of UPD. See Install
L
Linux operating systems
drivers 15
M
Manage virtual printers
Create a new virtual
printers 122
Edit existing virtual printer 123
Overview 121
Managed Print Policies (MPPs)
Associate printer lists 88
Associate user groups 90
Basic MPP settings,
configure 85
Color Access settings,
configure 79
Create a new MPP 73
Duplicate an existing
policy 89
Edit an existing MPP 87
Job Accounting setting,
overview 85
Job Delivery, overview 85
Remove an existing policy 91
Status and Supplies
notifications, configure 83
Update an MPP 86
UseMode settings,
configure 75
User Search capabilities,
configure 81
Managed Printer Lists (MPLs)
Advanced View settings 120
Associate an existing list 109
Auto printer discover 97
Clickable image map
view 113
Create a new list 95
Create a new virtual
printer 122
Create an existing virtual
printer 123
ENWW
Duplicate an existing list 110
Edit an existing list 108
Manage MPL view 110
Manage virtual printers 121
Manage virtual printers, create
new 122
Manage virtual printers, edit
existing 123
Manual printer entry 103
Overview 93
Printer graphics view 117
Remove an existing list 124
Remove printers from list 124
Select a MPL view 113
Tabular HTML view 119
Use of 93
View 110
View, Clickable image
map 113
View, options 113
View, Tabular HTML 119
Virtual printer, create new 122
Virtual printer, edit
existing 123
Managed Printer Policies (MPPs)
Overview 72
Use of 72
MPA. See HP Managed Print
Administration (MPA)
MPL. See Managed Printer Lists
(MPLs)
MPP. See Managed Printer Policies
(MPPs)
N
Novell NDS
Install UPD, using 38
UPD, install using 38
P
PCL 5 driver
about 14
PCL 6 driver
about 14
Point and print
Install UPD, using 37
ENWW
Print driver mode
Dynamic mode, description
of 42
Traditional mode, description
of 42
Print driver modes
Description of 42
Printer graphics view
Configure 117
Printing Preferences
Access to 42
Product-specific drivers
Compare with UPD 10
Properties
Access to 42
PS emulation driver
about 15
S
SNPs. See Status notification popups (SNPs)
Software availability
UPD 13
Status and Supplies Notifications
(SNPs)
Configure, using HP MPA 83
Status notification pop-ups (SNPs)
Configure using HP MPA 54
Configure using HP UPD 52,
54
Description 52
HP Driver Preconfiguration 54
Registry settings 55
System requirements
UPD 12
T
Tabular HTML view
Configure 119
Terminal Server/Citrix
Install UPD on 37
UPD, install 37
Traditional mode
about 17
Add Printer Wizard 18
Description of 42
Install 18
Printing in 49
U
Uninstall
Add/Remove Programs, of HP
MPA using 65
HP Managed Printing Admin
Setup Wizard, using 62
HP MPA 62
HP MPA, using Add/Remove
Programs 65
hpmpa.mdb 62
MPA 62
UPD 39
UNIX operating systems
drivers 15
UPD
Access to, driver tabs 42
Availability 13
Cluster server, install on 37
Command prompt, install
using 34
Compare with HP mobile printer
driver 11
Compare with product-specific
drivers 10
Custom install of 34
Description of software 9
Driver tabs, access to 42
Driver tabs, Printing
Preferences 42
Driver tabs, Properties 42
Driver versions, selection
of 14
Dynamic mode, about 17
Dynamic mode, description
of 42
HP Universal Printing Installer
Wizard 29
Install 17
Install of, using HP Web
Jetadmin display plug-in 37
Install on a cluster server 37
Install on a Terminal Server/
Citrix 37
Install, custom 34
Install, default 29
Install, point and print 37
Install, using Novell NDS 38
Installation 17
Installation mode, Dynamic 17
Index 147
Installation mode,
Traditional 17
Novell NDS, install using 38
PCL 5, about 14
Point and print, install 37
Postscript-specific driver 15
Print driver modes 42
Printing Preferences, driver
tabs 42
Properties, driver tabs 42
PS emulation driver, about 15
System requirements 12
Terminal Server/Citrix, install
on 37
Traditional mode, about 17
Traditional mode, description
of 42
Uninstall 39
UseMode settings
Configure 75
User Groups
Associate with a policy 129
Create a new user group 126
Edit an existing user
group 128
Overview 126
User Search capabilities
Configure 81
148 Index
ENWW
© 2007 Hewlett-Packard Development Company, L.P.
www.hp.com