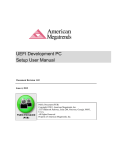
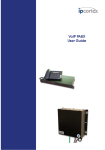
1
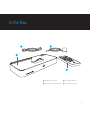
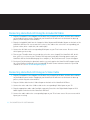
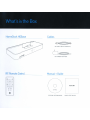
® USER MANUAL © 2008 Digital Lifestyle Outfitters The DLO logo, Digital Lifestyle Outfitters and HomeDock are trademarks of Digital Lifestyle Outfitters. iPod is a trademark of Apple Inc., registered in the U.S. and other countries. All Rights Reserved Printed in China M-99901-080804-B 2 | DLO HOMEDOCK HD USER MANUAL Contents Getting Started 4 In the Box 5 Setting Up HomeDock HD HomeDock HD Connections Connecting HomeDock HD Using an HDMI Cable Connecting HomeDock HD Using the Included AV Cable Connecting HomeDock HD Using an S-Video Cable Viewing the Video Content of Your iPod touch 6 6 7 8 8 9 On-Screen Navigation Basic On-Screen Navigation of Your Music and Videos Album Art and Your HomeDock HD HomeDock HD Menus 10 11 12 14 Enjoying Photos + Slideshows 15 Settings + Features Languages Resolution Cataloging Album Art Screen Savers 16 16 16 16 17 Additional Usage Using HomeDock HD with External Speakers Using HomeDock HD with Other Audio Devices Using HomeDock HD with Standard-Definition Televisions 18 18 18 18 Frequently Asked Questions 19 Tech Specs 22 Service + Support 23 Warranty/FCC Statement/Safety Instructions 24-26 | 3 Getting Started Congratulations on your purchase of the DLO HomeDock HD, bringing the music, videos, podcasts and more from your iPod to life on your high-definition TV. Connecting HomeDock HD to your home entertainment center is a snap. We will get you started in three easy steps: STEP 1 - Set up your HomeDock HD Properly connect the power, audio and video cables to your home entertainment center and remove the plastic strip from your HomeDock HD Remote Control. STEP 2 - Power up Turn on your TV and select the correct input for HomeDock HD. Plugging in your HomeDock HD will turn it on and start the boot-up process, which may take a few minutes. STEP 3 – Dock your iPod, browse and enjoy Dock your iPod, allowing it to pivot back and rest securely against the HomeDock HD support stand. Once your iPod has initialized, use the included RF Remote Control to browse and select your iPod content on TV. NOTE: For detailed information on setting up your HomeDock HD, see Setting Up HomeDock HD [pg.6]. IMPORTANT: On your iPod, ensure that “TV Out” under iPod Video Settings is set to either Ask or On in order to enjoy the video content of your iPod using HomeDock HD. For iPod touch in particular, see Viewing the Video Content of Your iPod touch [pg.9]. 4 | DLO HOMEDOCK HD USER MANUAL In the Box 2 3 1 4 1 HOMEDOCK HD BASE 3 AC POWER ADAPTER 2 AV CABLE (RCA COMPOSITE) 4 RF REMOTE CONTROL | 5 Setting Up HomeDock HD Your HomeDock HD is ready to use right out of the box with the included AV Cables. For the best high-definition performance, we recommend you connect HomeDock HD to your TV using an HDMI cable (available separately). If you do not have an HDMI-capable television or Home Entertainment Center, there are several optional ways you can connect HomeDock HD: Connect to your TV using S-Video or RCA connections (AV Cable included). Connect to an AV receiver using S-Video, RCA, or HDMI connections. Connect to your home stereo or powered speakers without using a TV. See Using HomeDock HD with External Speakers [pg.18] NOTE: Remove the thin plastic strip on the back of the included RF Remote Control to engage the battery. IMPORTANT: On your iPod, ensure that “TV Out” under iPod Video Settings is set to either Ask or On in order to enjoy the video content of your iPod using HomeDock HD. For iPod touch in particular, see Viewing the Video Content of Your iPod touch [pg.9]. HomeDock HD Connections 1 2 3 4 5 6 7 8 1 DIGITAL AUDIO OUTPUT [OPTICAL] 4 S-VIDEO OUTPUT 7 AUXILIARY AUDIO INPUT 2 USB CONNECTION 5 COMPOSITE VIDEO OUTPUT 8 AC POWER INPUT 3 HDMI OUTPUT 6 RCA AUDIO OUTPUTS 6 | DLO HOMEDOCK HD USER MANUAL Connecting HomeDock HD Using an HDMI Cable 1. Plug the included AC Power Adapter into the back of the HomeDock HD Base, and the other end into any available AC power outlet. Plugging in your HomeDock HD will turn it on and start the boot-up process, which may take a few minutes. 2. Plug an HDMI cable (available separately) into the back of the HomeDock HD base. 3. Either connect the HDMI cable to any available HDMI input on your TV, or connect the HDMI cable to your HDMI-compatible stereo receiver. NOTE: Connecting HomeDock HD via HDMI directly to your TV will route both video and audio through the TV. In order to enjoy the audio over your home stereo system, connect HomeDock HD to your HDMI-compatible stereo receiver, then connect your receiver to your TV via HDMI. You may also choose to connect HomeDock HD to your TV via HDMI, then to your stereo receiver via the Digital Audio Output (appropriate cables available separately). 4. Turn on your TV and/or home stereo and select the correct input(s) for HomeDock HD. At this time, you’ll see a screen on your TV with a DLO logo and a small box of moving squares until your HomeDock HD has finished booting up. Once complete, a “No iPod Connected” screen will appear. 5. Dock your iPod, allowing it to pivot back and rest securely against the HomeDock HD support stand. Once your iPod has initialized, use the included RF Remote Control to browse and select your iPod content on TV. See On-Screen Navigation [pg.10]. IMPORTANT: In order to maximize the performance of your HomeDock HD when using an HDMI cable, you must first change the video resolution of HomeDock HD from Standard Definition to High Definition. To do so, please follow these steps: 1. With your iPod docked, select Settings in the HomeDock HD Main Menu. 2. In the Settings Menu, select Resolution. 3. Change the selection from Standard Definition (PAL or NTSC) to High Definition (720p or 1080i). | 7 Connecting HomeDock HD Using the Included AV Cable 1. Plug the included AC Power Adapter into the back of the HomeDock HD Base, and the other end into any available AC power outlet. Plugging in your HomeDock HD will turn it on and start the boot-up process, which may take a few minutes. 2. Plug the included AV Cable into the Composite Video Output and RCA Audio Outputs on the back of the HomeDock HD Base. Be sure to match the colors of the cable to the color of the corresponding jack (yellow = video, white = audio left, red = audio right). 3. Connect the AV Cable to the corresponding RCA inputs on your TV or home stereo. Be sure to note which inputs you are using. 4. Turn on your TV and/or home stereo and then select the correct input(s) for HomeDock HD. At this time, you’ll see a screen on your TV with a DLO logo and a small box of moving squares until your HomeDock HD has finished booting up. Once complete, a “No iPod Connected” screen will appear. 5. Dock your iPod, allowing it to pivot back and rest securely against the HomeDock HD support stand. Once your iPod has initialized, use the included RF Remote Control to browse and select your iPod content on TV. See On-Screen Navigation [pg.10]. Connecting HomeDock HD Using an S-Video Cable 1. Plug the included AC Power Adapter into the back of the HomeDock HD Base, and the other end into any available AC power outlet. Plugging in your HomeDock HD will turn it on and start the boot-up process, which may take a few minutes. 2. Plug an S-Video cable into the S-Video Output on the back of the HomeDock HD Base. 3. Connect the other end of the S-Video cable to the corresponding S-Video input on your TV. 4. Plug the appropriate audio cable (available separately) into either the Digital Audio Output or RCA Audio Outputs on the back of the HomeDock HD Base. 5. Connect the audio cable to the corresponding input on your TV or home stereo. Be sure to note which inputs you are using. 8 | DLO HOMEDOCK HD USER MANUAL 6. Turn on your TV and/or home stereo and then select the correct input(s) for HomeDock HD. At this time, you’ll see a screen on your TV with a DLO logo and a small box of moving squares until your HomeDock HD has finished booting up. Once complete, a “No iPod Connected” screen will appear. 7. Dock your iPod, allowing it to pivot back and rest securely against the HomeDock HD support stand. Once your iPod has initialized, use the included RF Remote Control to browse and select your iPod content on TV. See On-Screen Navigation [pg.10]. Viewing the Video Content of your iPod touch If you have not yet updated your iPod touch firmware to version 2.1 or later, you will need to change the Auto-Lock setting to Never in order to enjoy video content from your iPod touch on your HomeDock HD. To do so, please follow these steps: 1. Before docking your iPod to your HomeDock HD, enter the Settings Menu on your iPod touch. 2. In the Settings Menu, select General. 3. In the General Menu, select Auto-Lock. 4. Set Auto-Lock to Never, then dock your iPod touch to enjoy video with your HomeDock HD. NOTE: If you have updated your iPod touch firmware to version 2.1 or later, unlocking is not required. Unlocking is only necessary for iPod touch with versions prior to 2.1. | 9 On-Screen Navigation HomeDock HD lets you navigate and select your music, videos and more via the intuitive graphical interface. The included Remote Control uses radio frequency (RF) so you can navigate your iPod and control playback from the comfort of your couch without a direct line of sight to the HomeDock HD Base. NOTE: Remove the thin plastic strip on the back of the included RF Remote Control to engage the battery. MODE POWER OMNIDIRECTIONAL NAV ARROWS ENTER / SELECT HOME / PREV. MENU INFO PREVIOUS / REWIND NEXT / FAST-FORWARD PLAY / PAUSE VOLUME DOWN SHUFFLE TOGGLE VOLUME UP MUTE NOTE: Volume controls are not available while using an HDMI cable. You must control volume with your TV or home stereo remote control. NOTE: When first connecting your iPod, the initialization process may take up to a minute. 10 | DLO HOMEDOCK HD USER MANUAL Basic On-Screen Navigation of Your Music and Videos To navigate through the music and video menus on your iPod: 1. Select Music or Videos from the Main Menu using the Left and Right Nav Arrow Buttons, and press Enter. 2. Select the Category within Music or Video you would like to view using the Left, Right, Up, and Down Nav Arrow Buttons, and press Enter. 3. To select a song or video, scroll up or down using the Up and Down Nav Arrow Buttons. Then, with the song or video highlighted, press Enter to begin playing. 4. Pressing the Home / Prev. Menu Button will take you to the previous menu. IMPORTANT: On your iPod, ensure that “TV Out” under iPod Video Settings is set to either Ask or On in order to enjoy the video content of your iPod using HomeDock HD. For iPod touch in particular, see Viewing the Video Content of Your iPod touch [pg.9]. On-Screen Navigation Tips and Tricks To begin playing songs immediately, you can choose Shuffle Songs from the Main Menu. HomeDock HD will begin playing songs randomly from your entire iPod library. “Now Playing” information will be displayed, alternating with a “Next Track” notice. Any time a track is playing from your iPod while connected to HomeDock HD, the current track info can be displayed by choosing Now Playing from the Main Menu. The current track information includes song title, artist name, album name, time elapsed, time remaining, as well as Album Art (when available). To increase the scrolling speed when scrolling through a long list, hold down the Up or Down Nav Arrow Buttons for at least 3 seconds. To fast-forward or rewind through a song, press and hold the Next/Fast-Forward Button or the Previous/Rewind Button. Press the Shuffle Button to toggle between Off and Song Shuffle. | 11 Album Art and Your HomeDock HD HomeDock HD can display Album Art for the track currently playing (if available) or while browsing by album. Up to 250 Album Art images can be held in memory by your HomeDock HD. Once that limit is reached, your HomeDock HD will delete the least-used image in order to store a new one. NOTE: The 4th Generation iPod does not currently support external display of Album Art. Album Art is displayed in several places throughout the user interface: Whenever a selection is playing, the Album Art is displayed in the Now Playing Banner near the bottom of the screen. When browsing by album, the Album Art for the selected album is shown (if available) as well as the Album Art for the song currently playing. NOTE: Larger artwork may take a few moments to download. Several Screen Savers have the ability to display the Album Art of the song currently playing. 12 | DLO HOMEDOCK HD USER MANUAL HomeDock HD does not download Album Art until a song is played in order to save time during initialization. It can take several seconds to load the artwork from your iPod; while the larger artwork is loading, your HomeDock HD will display smaller artwork (if available). NOTE: HomeDock HD will be unresponsive if you attempt to use the Remote during this process. You will see a “Please Wait” notice while the artwork is loading. Once displayed, the artwork is cached in HomeDock HD’s memory for faster retrieval later. If you’d like HomeDock HD to retrieve Album Art even faster during use, choose the Cataloging option from the Settings Menu. See Cataloging Album Art [pg.16]. If your current selection does not have any Album Art, or if the Album Art is unavailable, HomeDock HD will display one of seven placeholder images: | 13 HomeDock HD Menus MUSIC VIDEOS SHUFFLE SONGS Playlists Movies Artists TV Shows Albums Music Videos Songs Video Podcasts Genres Rentals Composers Podcasts Audio Books SETTINGS EXTRAS Language Screen Savers Resolution Timeout Setup Cataloging About 14 | DLO HOMEDOCK HD USER MANUAL NOW PLAYING Enjoying Photos + Slideshows To view photos and slideshows from your photo-compatible iPod on your TV using HomeDock HD: 1. Select iPod Mode by pressing the Mode Button on the top left of the included RF Remote Control (see Remote Control diagram below). 2. Ensure that “TV Out” under your iPod Photo Settings is set to either Ask or On. You can use the Remote Control’s Nav Arrow Buttons to make this selection. Then, you can navigate your iPod Photo Library on your iPod screen using the Remote Control. 3. Control functions such as Play/Pause, Next Slide, Previous Slide and more from the comfort of your couch with the Remote Control. NOTE: iPod touch does not support use of the Remote Control when HomeDock HD is in iPod Mode. In order to enjoy your photos on your TV screen, start and navigate from the iPod touch screen itself. MODE Switch to iPod mode to view pictures POWER IPOD MENU UP IPOD MENU DOWN HOME / PREV. MENU PREVIOUS PHOTO NEXT PHOTO PLAY / PAUSE SLIDESHOW VOLUME DOWN VOLUME UP MUTE SLIDESHOW MUSIC | 15 Settings + Features Languages HomeDock HD has 19 available languages. Choose yours from the Settings > Languages Menu. Available Languages: English, Spanish, French, German, Italian, Dutch, Simplified & Traditional Chinese, Japanese, Korean, Czech, Polish, Greek, Hungarian, Portuguese, Finnish, Swedish, Turkish, Russian Resolution You can change the video resolution of HomeDock HD to match your TV. Simply choose the correct resolution from the Settings > Resolution Menu. Available Resolutions: Standard Def (PAL) Standard Def (NTSC) High Def (720p) High Def (1080i) Cataloging Album Art Cataloging Album Art will allow HomeDock HD to retrieve Album Art faster during use. Due to the nature of iPod artwork, it may take several seconds for the Album Art to display during playback. By choosing the Cataloging option, HomeDock HD will download and store all the album artwork from your iPod library, allowing it to be displayed much faster during playback. You may choose this option from the Settings > Cataloging Menu. NOTE: Cataloging may take up to 45 minutes depending on the size of your library. During the cataloging process, HomeDock HD will be unresponsive to other commands. If you want to listen to music or watch videos, you may cancel the Cataloging process before it finishes. 16 | DLO HOMEDOCK HD USER MANUAL Screen Savers HomeDock HD has several Screen Saver options listed in the Extras > Screen Savers Menu. In addition to a blank Screen Saver, the following Screen Savers are also available: NOW PLAYING Displays the current song information, Album Art (when available) and song progress. FLOATING ALBUM ART Displays the floating Album Art of the song currently playing. NOTE: If artwork is unavailable, Screen Saver displays album artwork placeholder. FLYING ALBUM ART Displays all available album artwork from your iPod library as if flying out from the center of your screen. Screen Saver Timeout The default timeout setting before the Screen Saver is turned on is 2 minutes. You can change this setting in the Extras > Timeout Setup Menu. Available Timeout Settings: 10 secs, 2 mins, 5 mins, 10 mins, Never | 17 Additional Usage Using HomeDock HD with External Speakers You may also use HomeDock HD with just your home stereo or powered speakers to control your iPod with the included RF Remote Control, and to select and play music through external speakers without having a TV connected. 1. Plug the included AC Power Adapter into the back of the HomeDock HD Base, and the other end into any available AC power outlet. 2. Plug in either RCA audio cables (available separately) to the Left and Right RCA Audio Outputs, or an 1/8” mini-to-mini cable (available separately) to the Aux Input on the back of the HomeDock HD Base. 3. Connect HomeDock HD to the appropriate inputs on your home stereo or powered speakers. 4. Turn on your external speakers and select the correct input if necessary. 5. Select iPod Mode by pressing the Mode Button on the included HomeDock HD Remote Control. See Remote Control Diagram [pg.10] 6. Navigate and control your iPod with the included Remote Control. Using HomeDock HD with Other Audio Devices HomeDock HD will also play the audio from other MP3 players, laptops or other digital devices through your TV or home stereo via HomeDock HD’s Auxiliary Audio Input (labeled Aux Input). NOTE: HomeDock HD does not support on-screen navigation when using the Aux-In Jack to play audio. Using HomeDock HD with Standard-Definition Televisions While HomeDock HD is designed to give you the best viewing experience on high-definition televisions, you can still use it with your standard-definition television set. Just choose the appropriate standard-definition format for your region from the Settings > Resolution menu. Standard-Definition Settings: Standard Def (PAL) Standard Def (NTSC) 18 | DLO HOMEDOCK HD USER MANUAL Frequently Asked Questions DO I HAVE TO USE HOMEDOCK HD WITH A HIGH-DEFINITION TELEVISION? No. While HomeDock HD was designed to give you the best viewing experience with a high-definition TV, you can still use HomeDock HD with a standard-definition TV and the included AV Cables or your own S-Video cable. See Setting Up HomeDock HD [pg. 6]. MY HOMEDOCK HD DOESN’T SEEM TO BE SETTING UP PROPERLY. WHAT’S WRONG? First, ensure that you have selected the correct input source on your TV for the HomeDock HD. If your setup is correct but HomeDock HD still does not recognize your iPod, undock your iPod. Then unplug the AC Power Adapter from the HomeDock HD Base and wait 30 seconds before reconnecting. As usual, once plugged in, you will need to allow a few minutes for the HomeDock HD to boot up. Next, try disconnecting your AV or HDMI cable from the HomeDock HD Base, then reconnecting. Make note of which input your are using on your TV. Remember, depending on the type of cables you are using, the HomeDock HD boot-up process can take a few minutes. At this time, you’ll see a screen on your TV with a DLO logo and a small box of moving squares until your HomeDock HD has finished booting up. You may dock your iPod when boot-up is complete and a “No iPod Connected” screen appears. I’VE CHECKED MY CONNECTIONS, BUT HOMEDOCK HD STILL WON’T RECOGNIZE MY IPOD. WHY? Undock your iPod and reboot it by simultaneously holding down the Center and Menu Buttons until the iPod shuts off and restarts with an Apple logo screen. Refer to your iPod manual for more detailed instructions. Make sure that you are in the desired mode: On-Screen Navigation Mode or iPod Mode. If your HomeDock HD is in On-TV Navigation Mode, the iPod will display an “Accessory Attached” notice. If HomeDock HD is in iPod Mode, the iPod menu screen will be displayed on the iPod. To change modes, simply push the Mode Button on the included RF Remote Control. See Remote Control Diagram [pg.10] Finally, you may need to update your HomeDock HD firmware. You can check which firmware version you are currently running under the Settings > About menu. HomeDock HD features a USB input on the back of the base to support firmware updates available from DLO. Simply visit http://www.dlo.com/support to find the most current version for download. Save the update to a USB flash drive and connect the drive to your HomeDock HD to initiate the update. | 19 MY MUSIC OR VIDEO SOUNDS A LITTLE DISTORTED AND FUZZY. WHAT CAN I DO? First, adjust volume for the best sound quality. If listening to your music through your HomeDock HD sounds unusually low or noisy, be sure that your HomeDock HD’s volume is set at an adequate level. The balance of volume between your HomeDock HD and stereo/TV can affect the audio quality significantly. This is only necessary with an AV connection. When using an HDMI connection, volume is not managed with your HomeDock HD. Also, it is a good idea to adjust your iPod EQ settings. We recommend setting your iPod EQ to Off and adjusting your TV or home stereo’s bass and treble controls to 0. Then you can experiment with iPod EQ settings, and adding bass and treble to your desired level. NOTE: The sound quality on HomeDock HD is only as good as the quality of the source file. WHY DOES MY HOMEDOCK HD SOMETIMES SEEM TO HAVE A LAG TIME BEFORE IT DISPLAYS MY IPOD CONTENT, LIKE ALBUM ART OR SONG INFORMATION? The response delay time is usually HomeDock HD waiting for information from the iPod. Hard-drive based iPods like the iPod classic or 5G iPod with video take longer than flash-based iPods like the iPod nano and iPod touch. How long it takes depends on how much content is on the iPod and what information is being requested. For instance, when you’ve selected a Screen Saver that displays “large” Album Art (if available), it can take up to 10 seconds for the iPod to access that artwork. See Album Art and Your HomeDock HD [pg.12]. Once displayed, the artwork is cached in HomeDock HD’s memory for faster retrieval later. If you’d like HomeDock HD to retrieve Album Art even faster during use, choose the Cataloging option from the Settings Menu. See Cataloging Album Art [pg.16]. NOTE: The 4th Generation iPod does not currently support external display of album artwork. THE HOMEDOCK HD INTERFACE IS FLICKERING AND SEEMS TO BE FROZEN. WHAT’S WRONG? This is occasionally caused by the HDMI cable you are using. Simply disconnect and reconnect the HDMI cable from the HomeDock HD Base to eliminate the flicker and un-freeze your HomeDock HD. MY HOMEDOCK HD REMOTE CONTROL SEEMS TO BE FROZEN. WHAT DO I DO? Check the Remote Control’s battery by pushing the small tab towards the battery tray while pulling the tray away from the Remote. Then reinsert the battery. If this does not work, the battery may need to be replaced. 20 | DLO HOMEDOCK HD USER MANUAL WHY DO MY VIDEOS APPEAR STRETCHED OR CROPPED ON MY TV SCREEN? First, ensure that your TV is set to the appropriate viewing format. Then, depending on which iPod you are using, either set your “Widescreen” iPod Video Settings to On, or set your “Fit To Screen” or “Fullscreen” setting to Off in order to view the digital video content in your preferred format. WHY ARE MY VIDEOS OR SLIDESHOWS ONLY PLAYING ON MY IPOD SCREEN INSTEAD OF ON MY TV? On your iPod, check to see that your TV Out setting under Video/Photo Settings is set to either Ask or On. Your iPod arrives in the Ask setting, so unless you change your iPod Settings to On, you will have to select TV On each time you start up a video or slideshow. For iPod touch in particular, see Viewing the Video Content of Your iPod touch [pg.9]. DOES MY HOMEDOCK HD HAVE A POWER-SAVER MODE? Yes, it does. If no iPod is docked on your HomeDock HD for 30 minutes, HomeDock HD will go into Standby Mode. To exit Standby Mode, dock your iPod or press any button on the Remote Control. If your iPod is still docked and you press the Power button on the Remote Control to turn off your HomeDock HD, it will go into Standby Mode as it continues to charge your iPod. To exit Standby Mode when your iPod is docked, press the Power button on the Remote Control. Also, if you do not dock your iPod within 5 minutes of the initial boot-up of your HomeDock HD, your HomeDock HD will go into Standby Mode. MY TV SCREEN IS BLANK, OR SHOWS JUST GRAY AND BLACK STATIC. WHAT’S WRONG? If your HomeDock HD is connected to your TV using S-Video or RCA cables, your HomeDock HD may be set up for HDMI resolution. If possible, plug your HomeDock HD in using HDMI cables and change the resolution to standard-definition format in the Settings > Resolution menu. Then disconnect the HDMI cable and reconnect HomeDock HD to your TV with S-Video or RCA cables. To change the resolution setting without being able to see the HomeDock HD interface on your TV screen, enter the key sequence on your HomeDock HD Remote Control: UP, UP, DOWN, DOWN, LEFT, RIGHT, and then press the Up or Down buttons to cycle through the four different resolutions. Give each setting a few seconds to register with your TV before pushing the Up or Down button again. When the correct resolution setting is selected, you will once again be able to see the HomeDock HD interface on your TV screen. | 21 Tech Specs Inputs / Outputs iPod Models Supported Audio Outputs Analog L/R MUSIC COMPATIBILITY: Optical Digital Video Outputs HDMI Composite S-Video All dockable iPods (excluding 3G iPod) iPod touch 2nd generation (8GB, 16GB, 32GB) iPod touch (8GB, 16GB, 32GB) iPod classic (80GB, 120GB, 160GB) iPod nano 4th generation (8GB, 16GB) iPod nano 3rd generation (4GB, 8GB) 5G iPod with video (30GB, 60GB, 80GB) iPod nano 2nd generation (2GB, 4GB, 8GB) Auxiliary Audio Input: 3.5mm stereo mini-jack iPod nano 1st generation (1GB, 2GB, 4GB) Power Adapter Input: 100-240VAC, 47-63 Hz iPod mini (4GB, 6GB) Power Adapter Output: 10VDC, 1.5 amps max USB-A: standard universal serial bus, USB 2.1 4G iPod with click wheel (20GB, 40GB, U2) 4G iPod with color display (20GB, 30GB, 40GB, 60GB, U2) VIDEO COMPATIBILITY: Remote Control Battery: 3V, type CR2032 or equivalent RF Range: Approximately 50ft Television Video Format All iPods with video capability iPod touch 2nd generation (8GB, 16GB, 32GB) iPod touch (8GB, 16GB, 32GB) iPod classic (80GB, 120GB, 160GB) iPod nano 4th generation (8GB, 16GB) iPod nano 3rd generation (4GB, 8GB) 5G iPod with video (30GB, 60GB, 80GB) Standard Def: NTSC/PAL High Def: 720p/1080i 22 | DLO HOMEDOCK HD USER MANUAL NOTE: Apple iPod models listed as of October 2008 Service + Support For more information, software updates and tips, please visit our website at www.dlo.com and click Support. | 23 Warranty DIGITAL LIFESTYLE OUTFITTERS LIMITED MANUFACTURER’S WARRANTY WHAT THIS WARRANTY COVERS. DLO (Digital Lifestyle Outfitters) warrants this product against defects in materials and workmanship. This limited warranty applies only to products manufactured by or for DLO. WHAT THIS WARRANTY DOES NOT COVER. This warranty does not apply to damage caused by: (a) accident, abuse, misuse, misapplication, ordinary wear, improper maintenance, failure to follow instructions, or products not manufactured by or for DLO; and (b) aftermarket services (including upgrades and expansions). HOW LONG THIS WARRANTY LASTS. This warranty lasts for a period of ninety (90) days from the date of original retail purchase. WHAT DLO WILL DO. If a defect exists, DLO will exchange the product, at its option, with a product that is new or has been manufactured from new or serviceable used parts and that is at least functionally equivalent to the original product. DLO will warrant a replacement product against defects in materials and workmanship for a period of ninety (90) days from the date of replacement. HOW TO GET SERVICE. In order to be eligible for this warranty, you MUST register your purchase at www.dlo. com/register within thirty (30) days of purchasing this product. If you believe that this product is defective in materials or workmanship, please e-mail [email protected] with a brief description of the problem, for further instructions. NO CHANGE TO WARRANTY. No DLO reseller, agent or employee is authorized to make any modification, extension, or addition to this warranty. HOW STATE LAW APPLIES. This warranty gives you specific legal rights, and you also may have other rights that vary from state to state, or country. RESTRICTIONS ON IMPLIED WARRANTIES. All implied warranties, including, without limitation, warranties of merchant- ability and fitness for a particular purpose, are limited in duration to the duration of this warranty. Some states do not allow limitations on how long an implied warranty lasts, so the above limitation may not apply to you. RESTRICTIONS ON DAMAGES. DLO is not responsible for direct, special, incidental or consequential damages re- sulting from any breach of warranty or condition or under any other legal theory (including, without limitation, lost profits; downtime; goodwill; damage to or replacement of equipment and property; failure to maintain the confidentiality of data stored on the product; and any costs of recovering, reprogramming or reproducing any program or data stored in or used with products manufactured by or for DLO). Some states and countries do not allow the exclusion or limitation of incidental or consequential damages, so the above limitation or exclusion may not apply to you W1000-050803-B. 24 | DLO HOMEDOCK HD USER MANUAL FCC Statement Federal Communications Commission Interference Statement This device complies with Part 15 of the FCC rules. Operation is subject to the following two conditions: (1) This device may not cause harmful interference, and (2) this device must accept any interference received, including interference that may cause undesired operation. CAUTION: Changes or modifications not expressly approved by the party responsible for compliance could void the user’s authority to operate the equipment | 25 Safety Instructions IMPORTANT SAFETY INSTRUCTIONS READ BEFORE OPERATING EQUIPMENT 1. Please be sure to read these instructions. 2. Please heed all warnings. 3. Do not use this apparatus near water. 4. Clean only with dry cloth. 5. Install in accordance with the manual’s instructions. 6. Do not install near any heat sources such as radiators, heat registers, stoves, or other apparatus (including amplifiers) that produce heat. 7. Protect the power cord from being pinched particularly at plugs, convenience receptacles, and the point where they exit from the apparatus. 8. Only use attachments, accessories or cables specified by the manufacturer. 9. Refer all servicing to DLO customer service personnel. WARNING: To reduce the risk of fire or electric shock, this apparatus should not be exposed to rain or moisture and objects filled with liquids, such as vases, should not be placed on or near this device. Batteries (battery pack or batteries installed) shall not be exposed to excessive heat such as sunshine, fire or the like. Attention should be drawn to the environmental aspects of battery disposal. The apparatus shall not be exposed to dripping or splashing. The mains plug of adaptor is used as the disconnect device, the disconnect device shall remain readily operable. 26 | DLO HOMEDOCK HD USER MANUAL | 27 ™ THANKS FOR PURCHASING HOMEDOCK HD 9><>I6AA>;:HINA:DJI;>II:GHK>H>IJH6ILLL#9AD#8DB'%%-9><>I6AA>;:HINA:DJI;>II:GH HomeDock HD Base Cables AV CABLE IRCA COMPOSITEI AC POWER ADAPTER RF Remote Control Manual + Guide @ .@. @ @ . CD HomeDockHD 888 CD-ROM USER MANUAL QUICK START GUIDE o G) Power and boot-up HomeDock HD Plug the included AC Power Adapter into the back of the HomeDock HD Base, and the other end into any available wall outlet. This will turn on your HomeDock HD and start the boot-up process, which may take a few minutes. HOMEDOCK HO (BACKI HOMEDOCK HD [BACKI ~==~ ~ AC POWER ADAPTER o Connect HomeDock HD to your TV Connect your HomeDock HD to your TV using the included RCA Composite Cable. Turn on your TV and select the correct input for HomeDock HD. @@0 AV CABLE [RCA COMPOSITEI Dock iPod, navigate and enjoy Dock your iPod, allowing it to pivot back and rest securely against the support stand. Remove the thin plastic strip on the back of your HomeOock HD Remote Control to engage the battery. After allowing your iPod to initialize, use the Remote to browse and select your iPod content on TV. , D@ , o· ~ I IMPORTANT: On your iPod, ensure that TV Out under iPod video settings is set to either "Ask" or "On" to enjoy the video content of your iPod using HomeOock HO. For iPod touch in particular, see Viewing the Video Content of Your iPod touch in your User Manual. NOTE: These instructions are for connecting HomeOock HO with the included AV Cable IRCA Composite!. For the best high-definition performance, you must use an HOM I cable lavailable separately) to enable high-definition video output. Also, you must change the video resolution of HomeOock HO from Standard to High Definition in the Settings> Resolution menu. For further instruction and other connection options, refer to Setting Up HomeDock HD in your User Manual.