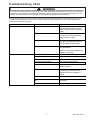
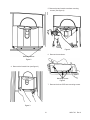
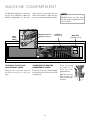
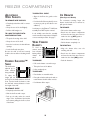
1
This Base Manual covers Integrated Side-by-Side Refrigerators Refer to individual Technical Sheet for information on specific models. Service Integrated Side-by-Side Refrigerators Service Manual for Jenn-Air® models This manual is to be used by qualified appliance technicians only. Maytag does not assume any responsibility for property damage or personal injury for improper service procedures done by an unqualified person. 16021730 July 2002 Important Information Pride and workmanship go into every product to provide our customers with quality products. It is possible, however, that during its lifetime a product may require service. Products should be serviced only by a qualified service technician who is familiar with the safety procedures required in the repair and who is equipped with the proper tools, parts, testing instruments and the appropriate service manual. REVIEW ALL SERVICE INFORMATION IN THE APPROPRIATE SERVICE MANUAL BEFORE BEGINNING REPAIRS. Important Notices for Consumers and Servicers ! WARNING To avoid risk of serious injury or death, repairs should not be attempted by unauthorized personnel, dangerous conditions (such as exposure to electrical shock) may result. ! CAUTION Maytag will not be responsible for any injury or property damage from improper service procedures. If performing service on your own product, assume responsibility for any personal injury or property damage which may result. To locate an authorized servicer, please consult your telephone book or the dealer from whom you purchased this product. For further assistance, please contact: MAYTAG APPLIANCES SALES COMPANY ATTN:Jenn-Air CAIR ® Center P.O. Box 2370 Cleveland, TN 37320-2370 OR CALL U.S. and Canada 1-800-Jenn-Air U.S. customers using TTY for deaf, hearing impaired, call 1-800-688-2080 If outside the United States contact: MAYTAG APPLIANCES SALES COMPANY ATTN: Jenn-Air CAIR® Center P.O. Box 2370 Cleveland, TN 37320-2370 Telephone: 1-800-Jenn-Air (1-800-536-6247) Recognize Safety Symbols, Words, and Labels ! DANGER DANGERImmediate hazards which WILL result in severe personal injury or death. ! WARNING WARNINGHazards or unsafe practices which COULD result in severe personal injury or death. ! CAUTION CAUTIONHazards or unsafe practices which COULD result in minor personal injury or product or property damage. 16021730 Rev. 0 2 Table of Contents Important Information .................................................... 2 Component Testing ....................................................... 4 Service Procedures ....................................................... 7 Service Equipment ........................................................ 7 Drier Replacement ........................................................ 7 Refrigerant Precautions ................................................. 7 Line Piercing Valves ...................................................... 7 Open Lines ................................................................... 8 Dehydrating Sealed Refrigeration System ..................... 8 Leak Testing .................................................................. 8 Testing Systems Containing a Refrigerant Charge ................................................... 8 Testing Systems Containing No Refrigerant Charge ............................................. 8 Restrictions ................................................................... 8 Symptoms .............................................................. 8 Testing for Restrictions ........................................... 9 Evacuation and Charging ............................................... 9 Evacuation .............................................................. 9 Charging ................................................................ 10 Refrigerant Charge ................................................. 10 HFC134a Service Information ....................................... 11 Health, Safety, and Handling .................................. 11 Comparison of CFC12 and HFC134a Properties ..... 11 Replacement Service Compressor ................................ 12 Brazing ........................................................................ 12 Refrigerant Flow ........................................................... 13 Cabinet Air Flow ........................................................... 14 Ice and Water Flow Diagram ........................................ 15 Water Valves Diagram .................................................. 16 Troubleshooting Chart................................................17 System Diagnosis ........................................................ 20 Disassembly Procedures Compressor Replacement ...................................... 23 Condenser Replacement ........................................ 24 Evaporator Replacement ........................................ 25 Heat Exchanger Replacement ............................... 27 Condenser Fan ...................................................... 28 Freezer Fan ........................................................... 28 Fresh Food Fan ..................................................... 28 Defrost Heater ....................................................... 29 Drain Pan and Drain Tube Heater ........................... 30 Defrost Thermistor ................................................. 30 Auto Damper Stepper ............................................ 30 Ice & Water Fountain PC Board ............................. 30 Touch Fountain Board ............................................ 32 Fountain Bracket ................................................... 32 Ice Crusher Bin & Shelf .......................................... 33 Climate Zone Technolgy (CZT) ............................... 35 Climate Zone Bulb Upper ....................................... 36 Climate Zone Bulb Lower ....................................... 36 Cimate Zone Test ................................................... 37 Diagnostic Mode Procedures ................................. 38 Power Supply Diagnostics ..................................... 39 Diagnostic Control Mode ........................................ 40 Appendix A Owners Manual ........ ........................................A-2 Appendix B Installation Guide ................................................. B-2 3 16021730 Rev. 0 Component Testing ! WARNING To avoid risk of electrical shock, personal injury, or death, disconnect electrical power source to unit, unless test procedures require power to be connected. Discharge capacitor through a resistor before attempting to service. Ensure all ground wires are connected before certifying unit as repaired and/or operational. Component Description Variable Capacity When compressor electrical circuit is Compressor energized the DC powered compressor is started at high speed or 4500 RPM down to 1600 RPM. For low speed from the compressor PCB board. Test Procedures Resistance test 1. Disconnect power to unit. 2. Remove leads from compressor terminals. 3. Set ohmmeter to lowest scale. 4. Check for resistance between any two terminals. Resistance should be equal between any two terminals. 5. If either compressor winding reads open (infinite or very high resistance) or dead short (0 ohms), replace compressor. Ground test 1. Disconnect power to refrigerator. 2. Remove compressor leads and use an ohmmeter set on highest scale. 3. Touch one lead to compressor body (clean point of contact) and other probe to each compressor terminal. • If reading is obtained, compressor is grounded and must be replaced. Operation test If voltage and motor winding tests do not show cause for failure, perform the following test: 1. Activate the Diagnostic test mode (See Diagnostic test mode section) 2. Activate Test mode #16 (which is High Speed for compressor) 3. Check the A/C voltage between pins 1 and 2 of JP10 (Voltage should be approximately 2.3VAC) 4. Verify that line voltage is available to Compressor PCB at CNO1 between pins 2 and 5 If AC voltage is there. 5. Check voltage at CNO5 at pins 1 and 6 voltage should read approximately 230VAC 6. Check Voltage at CNO5 at pins 1 and 3 voltage should read approximately 230VAC 7. Check Voltage at CNO5 at pins 3 and 6 voltage should read approximately 230VAC 8. The readings at all three above readings should be the same if not bad PCB board 9. If voltage is the same suspect a failed compressor. 16021730 Rev. 0 4 Component Testing ! WARNING To avoid risk of electrical shock, personal injury, or death, disconnect electrical power source to unit, unless test procedures require power to be connected. Discharge capacitor through a resistor before attempting to service. Ensure all ground wires are connected before certifying unit as repaired and/or operational. Component Condenser Description Test Procedures Condenser is a tube and fin construction Leaks in condenser can usually be detected by using an electronic leak detector or soap solution. Look for signs of compressor oil when checking for leaks. A located in machine compartment. certain amount of compressor oil is circulated with refrigerant. Condenser is on high-pressure discharge side of compressor. Condenser function Leaks in post condenser loop are rare because loop is a one-piece copper tube. is to transfer heat absorbed by refrigerant For minute leaks to ambient. 1. Separate condenser from rest of refrigeration system and pressurize condenser up to a maximum of 235 PSI with a refrigerant and dry nitrogen Higher-pressure gas is routed to combination. condenser where, as gas temperature is 2. Recheck for leaks. reduced, gas condenses into a highpressure liquid state. Heat transfer takes place because discharged gas is at a higher temperature than air that is passing over condenser. It is very important that adequate airflow over To avoid severe personal injury or death from sudden eruption of high condenser is maintained. pressures gases, observe the following: Protect against a sudden eruption if high pressures are required for leak Condenser is air cooled by condenser checking. fan motor. If efficiency of heat transfer Do not use high-pressure compressed gases in refrigeration systems from condenser to surrounding air is without a reliable pressure regulator and pressure relief valve in the impaired, condensing temperature lines. becomes higher. High liquid temperature means liquid will not remove as much heat during boiling in evaporator as under normal conditions. This would be indicated by high than normal head pressures, long run time, and high wattage. Remove any lint or other accumulation that would restrict normal air movement through condenser. ! WARNING From condenser the refrigerant flows into a post condenser loop which helps control exterior condensation on flange, center mullion, and around freezer door. Refrigerant the flows through the drier to evaporator and into compressor through suction line. Refrigerator light switch Single pole, single throw switch completes circuit for light when door is open. Check resistant across terminals. Switch arm depressed “NO” terminals Switch arm up “NO” terminals Thermostat Thermostat is in a series circuit with terminal 2 of defrost timer, and defrost heater. Circuit is complete if evaporator fan motor operates when cold. Open Closed Test continuity across terminals. With power off and evaporator coil below freezing, thermostat should show continuity when checked with ohmmeter. See “Heater, evaporator (defrost)” section for additional tests. Controls the circuit from freezer thermostat through defrost terminator to defrost heater. Opens and breaks circuit After defrost thermostat opens, thermostat remains open until end of defrost when thermostat senses preset high cycle and refrigerator starts cooling again. Defrost thermostat senses a preset temperature. low temperature and resets (closes). 5 16021730 Rev. 0 Component Testing ! WARNING To avoid risk of electrical shock, personal injury, or death, disconnect electrical power source to unit, unless test procedures require power to be connected. Discharge capacitor through a resistor before attempting to service. Ensure all ground wires are connected before certifying unit as repaired and/or operational. Drier Drier is placed at post condenser loop Drier must be changed every time the system is opened for testing or outlet and passes liquefied refrigerant to compressor replacement. capillary. NOTE: Drier used in R12 sealed system is not interchangeable with drier used in R134a sealed system. Always replace drier in R134a Desiccant (20) 8 x 12 4AXH - 7 M>S> system. Grams Before opening refrigeration system, recover HFC134a refrigerant for safe disposal. 1. 2. 3. 4. 5. 6. 7. Cut drier out of system using the following procedure. Do not unbraze drier. Applying heat to remove drier will drive moisture into the system. Score capillary tube close to drier and break. Reform inlet tube to drier allowing enough space for large tube cutter. Cut circumference of drier 1 ¼" below condenser inlet tube joint to drier. Remove drier. Apply heat trap paste on post condenser tubes to protect grommets from high heat. 8. Unbraze remaining part of drier. Remove drier from system. 9. Discard drier in safe place. Do not leave drier with customer. If refrigerator is under warranty, old drier must accompany warranty claim. ! WARNING To avoid death or severe personal injury, cut drier at correct location. Cutting drier at incorrect location will allow desiccant beads to scatter. If spilled, completely clean area of beads. Evaporator Inner volume of evaporator allows liquid refrigerant discharged from capillary to expand into refrigerant gas. Test for leaks in evaporator with electronic leak detector or with soap solution. Compressor oil is circulated with refrigerant; check for oil when checking for leaks. Expansion cools evaporator tube and fin For minute leaks 1. Separate evaporator from rest of refrigeration system and pressurize temperature to approximately -20°F evaporator up to a maximum of 140 PSI with a refrigerant and dry nitrogen transferring heat from freezer section to combination. refrigerant. 2. Recheck for leaks. Passing through suction line to compressor, the refrigerant picks up superheat (a relationship between pressure and temperature that assures To avoid severe personal injury or death from sudden erruption of complete vaporization of liquid high pressurres gases, observe the following: refrigerant) as the result of capillary tube • Protect against a sudden eruption if high pressures are required soldered to suction line. for leak checking. • Do not use high pressure compressed gases in refrigeration Refrigerant gas is pulled through suction systems without a reliable pressure regulator and pressure relief line by compressor, completing valve in the lines. refrigeration cycle. ! WARNING Check resistance across heaters. Evaporator defrost Activated when Main control board heater activates defrost mode or when forced in If resistance heater is open and should be replaced. In diagnostic mode test # 11 Energize heater (the defrost system should draw Diagnostic mode. about 3 amps). 16021730 Rev. 0 6 Service Procedures ! WARNING To avoid risk of electrical shock, personal injury, or death, disconnect electrical power source to unit, unless test procedures require power to be connected. Discharge capacitor through a 10,000 ohm resistor before attempting to service. Ensure all ground wires are connected before certifying unit as repaired and/or operational. Service Equipment Every time sealed HFC134a system is repaired, drier filter must be replaced. Listed below is equipment needed for proper servicing of HFC134a systems. Verify equipment is confirmed by manufacturer as being compatible with HFC134a and ester oil system. Cut drier out of system by completing the following steps. Do not unbraze drier filter. Applying heat to remove drier will drive moisture into system. Equipment must be exclusively used for HFC134a. Exclusive use of equipment only applies to italic items. 1. Score capillary tube close to drier and break. 2. Reform inlet tube to drier allowing enough space for large tube cutter. Evacuation pump Check with vacuum pump supplier to verify equipment is compatible for HFC134a. Robinair, Model 15600 2 stage, 6 cubic feet per minute pump is recommended. Four-way manifold gauge set, with low loss hoses Leak detector Charging cylinder Line piercing saddle valve (Schroeder valves). Seals must be HFC134a and ester oil compatible. Line piercing valves may be used for diagnosis but are not suitable for evacuation or charging, due to minute holes pierced in tubing. Do not leave mechanical access valves on system. Valves eventually will leak. Molecules of HFC134a are smaller than other refrigerants and will leak where other refrigerants would not. Swagging tools Flaring tools Tubing cutter Flux Sil-Fos Silver solder Oil for swagging and flaring Use only part # R0157532 Copper tubing Use only part # R0174075 and # R0174076 Dry nitrogen 99.5% minimum purity, with -40°F or lower dew point Crimp tool Tube bender Micron vacuum gauge Process tube adaptor kit Heat trap paste ICI appliance grade HFC134a 3. Cut circumference of drier at 1-1/4", below condenser inlet tube joint to drier. 4. Remove drier. 5. Apply heat trap paste on post condenser tubes to protect grommets from high heat. 6. Unbraze remaining part of drier. Remove drier from system. 7. Discard drier in safe place. Do not leave drier with customer. If refrigerator is under warranty, old drier must accompany warranty claim. Refrigerant Precautions ! WARNING To avoid risk of personal injury, do not allow refrigerant to contact eyes or skin. ! CAUTION To avoid risk of property damage, do not use refrigerant other than that shown on unit serial number identification plate. NOTE: All precautionary measures recommended by refrigerant manufacturers and suppliers apply and should be observed. Line Piercing Valves Line piercing valves can be used for diagnosis, but are not suitable for evacuating or charging due to holes pierced in tubing by valves. Drier Replacement NOTE: Do not leave line piercing valves on system. Connection between valve and tubing is not hermetically sealed. Leaks will occur. Before opening refrigeration system, recover HFC134a refrigerant for safe disposal. 7 16021730 Rev. 0 Service Procedures ! WARNING To avoid risk of electrical shock, personal injury, or death, disconnect electrical power source to unit, unless test procedures require power to be connected. Discharge capacitor through a 10,000 ohm resistor before attempting to service. Ensure all ground wires are connected before certifying unit as repaired and/or operational. Testing Systems Containing No Refrigerant Charge 1. Connect cylinder of nitrogen, through gauge manifold, to process tube of compressor and liquid line strainer. Open Lines During any processing of refrigeration system, never leave lines open to atmosphere. Open lines allow water vapor to enter system, making proper evacuation more difficult. 2. Open valves on nitrogen cylinder and gauge manifold. Allow pressure to build within sealed system. 3. Check for leaks using soap suds. If a leak is detected in a joint, do not to attempt to repair by applying additional brazing material. Joint must be disassembled, cleaned and rebrazed. Capture refrigerant charge (if system is charged), unbraze joint, clean allparts, then rebraze. Dehydrating Sealed Refrigeration System Moisture in a refrigerator sealed system exposed to heat generated by the compressor and motor reacts chemically with refrigerant and oil in the system and forms corrosive hydrochloric and hydrofluoric acids. These acids contribute to breakdown of motor winding insulation and corrosion of compressor working parts, causing compressor failure. If leak is detected in tubing, replace tubing. If leak is detected in either coil, replace faulty coil. Restrictions In addition, sludge, a residue of the chemical reaction, coats all surfaces of sealed system, and will eventually restrict refrigerant flow through capillary tube. Symptoms Restrictions in sealed system most often occur at capillary tube or filter drier, but can exist anywhere on liquid side of system. To dehydrate sealed system, evacuate system (see paragraph Evacuation). Restrictions reduce refrigerant flow rate and heat removal rate. Wattage drops because compressor is not circulating normal amount of refrigerants. Leak Testing ! Common causes of total restrictions are moisture, poorly soldered joints, or solid contaminants. Moisture freezes at evaporator inlet end of capillary tube. Solid contaminants collect in filter drier. DANGER To avoid risk of serious injury or death from violent explosions, NEVER use oxygen or acetylene for pressure testing or clean out of refrigeration systems. Free oxygen will explode on contact with oil. Acetylene will explode spontaneously when put under pressure. If restriction is on low side, suction pressure will be in a vacuum and head pressure will be near normal. If restriction is on high side, suction pressure will be in a vacuum and head pressure will be higher than normal during pump out cycle. Refrigeration occurs on low pressure side of partial restriction. There will be a temperature difference at the point of restriction. Frost and/or condensation will be present in most case at the point of restriction. Also, system requires longer to equalize. It is important to check sealed system for refrigerant leaks. Undetected leaks can lead to repeated service calls and eventually result in system contamination, restrictions, and premature compressor failure. Refrigerant leaks are best detected with halide or electronic leak detectors. Slight or partial restriction can give the same symptoms as refrigerant shortage including lower than normal back pressure, head pressure, wattage, and warmer temperatures. Testing Systems Containing a Refrigerant Charge 1. Stop unit operation (turn refrigerator off). Total restriction on the discharge side of compressor, when restriction is between compressor and first half of condenser, results in higher than normal head pressure and wattage while low side is being pumped out. 2. Holding leak detector exploring tube as close to system tubing as possible, check all piping, joints, and fittings. NOTE: Use soap suds on areas leak detector cannot reach or reliably test. 16021730 Rev. 0 8 Service Procedures ! WARNING To avoid risk of electrical shock, personal injury, or death, disconnect electrical power source to unit, unless test procedures require power to be connected. Discharge capacitor through a 10,000 ohm resistor before attempting to service. Ensure all ground wires are connected before certifying unit as repaired and/or operational. Testing for Restrictions To determine if a restriction exists: NOTE: Charge system with exact amount of refrigerant. Refer to unit nameplate for correct refrigerant charge. Inaccurately charged system will cause future problems. 1. Attach gauge and manifold between suction and discharge sides of sealed system. 2. Turn unit on and allow pressure on each side to stabilize. Inspect condenser side of system. Tubing on condenser should be warm and temperature should be equal throughout (no sudden drops at any point along tubing). Evacuation and Charging ! CAUTION To avoid risk of fire, sealed refrigeration system must be air free. To avoid risk of air contamination, follow evacuation procedures exactly. If temperature of condenser tubing is consistent throughout, go to step 4. If temperature of condenser tubing drops suddenly at any point, tubing is restricted at point of temperature drop (if restriction is severe, frost may form at point of restriction and extend down in direction of refrigerant flow in system). Go to step 5. NOTE: Before opening any refrigeration system, EPA regulations require refrigerant in system to be captured for safe disposal. Proper evacuation of sealed refrigeration system is an important service procedure. Usable life and operational efficiency greatly depends upon how completely air, moisture and other non-condensables are evacuated from sealed system. 3. Visually check system for kinks in refrigeration line which is causing restriction. Correct kink and repeat step 2. 4. Turn unit off and time how long it takes high and low pressure gauges to equalize: Air in sealed system causes high condensing temperature and pressure, resulting in increased power requirements and reduced performance. If pressure equalization takes longer than 10 minutes, a restriction exists in the capillary tube or drier filter. Go to step 5. Moisture in sealed system chemically reacts with refrigerant and oil to form corrosive hydrofluoric and hydrochloric acids. These acids attack motor windings and parts, causing premature breakdown. If pressure equalization takes less than 10 minutes, system is not restricted. Check for other possible causes of malfunction. Before opening system, evaporator coil must be at ambient temperature to minimize moisture infiltration into system. 5. Recover refrigerant in sealed system. NOTE: Before opening any refrigeration system, capture refrigerant in system for safe disposal. Evacuation To evacuate sealed refrigeration system: 6. Remove power from unit. 1. Connect vacuum pump, vacuum tight manifold set with high vacuum hoses, thermocouple vacuum gauge and charging cylinder as shown in illustration. ! CAUTION Evacuation should be done through I.D. opening of tubes not through line piercing valve. To avoid risk of personal injury or property damage, take necessary precautions against high temperatures required for brazing. 2. Connect low side line to compressor process tube. 3. Connect high side line to drier/process tube. 7. Remove and replace restricted device. 4. Evacuate both simultaneously. With valve C and F closed, open all other valves and start vacuum pump. 8. Evacuate sealed system. 9. Charge system to specification. NOTE: Do not use captured or recycled refrigerant in Maytag units. Captured or recycled refrigerant voids any Maytag and/or compressor manufacturer's warranty. 9 16021730 Rev. 0 Service Procedures ! WARNING To avoid risk of electrical shock, personal injury, or death, disconnect electrical power source to unit, unless test procedures require power to be connected. Discharge capacitor through a 10,000 ohm resistor before attempting to service. Ensure all ground wires are connected before certifying unit as repaired and/or operational. Thermistor Vacuum Gauge Low Side Gauge E Valve High Side Gauge D Valve C Compressor Charging Hose Compressor Process Tube Charging NOTE: Do not use captured or recycled refrigerant in Maytag units. Captured or recycled refrigerant voids any warranty. Drier/Process Tube NOTE: Charge system with exact amount of refrigerant. Refer to unit serial plate for correct refrigerant charge. Inaccurately charged system will cause future problems. Charging Hose B A To charge system: .6 cm Copper Tubing 1. Close valves A to vacuum pump and C to vacuum gauge and E to low side manifold gauge. F Valve Vacuum Pump 2. Set scale on dial-a-charge cylinder for corresponding HFC134a pressure reading. Charging Cylinder 3. Open valve F to charging cylinder and let exact amount of refrigerant flow from cylinder into system. Close valve. Equipment Setup For Evacuation And Charging Low side gauge pressure should rise shortly after opening charging cylinder valve as system pressure equalizes through capillary tube. 5. After compound gauge (low side) drops to approximately 29 inches gauge, open valve C to vacuum thermocouple gauge and take micron reading. If pressure does not equalize, a restriction typically exists at capillary/drier braze joint. NOTE: A high vacuum pump can only produce a good vacuum if oil in pump is not contaminated. 6. Continue evacuating system until vacuum gauge registers 600 microns. 4. If pressure equalizes, open valve E to low side manifold gauge and pinch off high side drier process tube. 7. At 600 microns, close valve A to vacuum pump and allow micron reading in system to balance. Micron level will rise. 5. Start compressor and draw remaining refrigerant from charging hoses and manifold into compressor through compressor process tube. If in 2 minutes, micron level stabilizes at 1000 microns or below, system is ready to be charged. 6. To check high side pinch-off drier process tube. Close valve D to high side gauge. If high side pressure rises, repeat high side pinch-off and open valve D. Repeat until high side pinch-off does not leak. If micron level rises above 1000 microns and stabilizes, open valve A and continue evacuating. If micron reading rises rapidly and does not stabilize, a leak still exists in system. Close valve A to vacuum pump and valve C to vacuum gauge. Invert charging cylinder and open 8. Disconnect power. Remove charging hose and braze high side drier process tube closed. charging cylinder valve F to add partial charge for leak checking. With leak detector, check manifold connections and system for leaks. After locating leak, capture refrigerant, repair leak, and begin at step 1. 16021730 Rev. 0 7. Pinch-off compressor process tube and remove charging hose. Braze stub closed while compressor is operating. 9. Recheck for refrigerant leaks. Refrigerant Charge Refrigerant charge in all capillary tube systems is critical and exact amount is required for proper performance. Factory charges are shown on serial plate. NOTE: Do not use refrigerant other than shown on serial plate. 10 Service Procedures ! WARNING To avoid risk of electrical shock, personal injury, or death, disconnect electrical power source to unit, unless test procedures require power to be connected. Discharge capacitor through a 10,000 ohm resistor before attempting to service. Ensure all ground wires are connected before certifying unit as repaired and/or operational. HFC134a Service Information HFC134a is alternative refrigerant for CFC12. HFC134a has an ozone depletion potential (ODP) factor of 0.0 and a global warming potential (GWP) factor of 0.27. HFC134a is not flammable and has acceptable toxicity levels. HFC134a is not interchangeable with CFC12. There are significant differences between HFC134a and CFC12 which must be considered when handling and processing refrigeration system. Properties/Characteristics Ozone Depletion Potential (ODP) Global Warming Potential (GPW) Molecular weight Boiling point at 1 atmosphere Vapor pressure at 77°F (25°C) Liquid density at 77°F (25°C) Flammability High-side system operating Pressure at 65°F (18°C) Low-side system operating Pressure at 65°F (18°C) Health, Safety, and Handling Health, safety and handling considerations for HFC134A are virtually no different than those for CFC12. Health, Safety, and Handling Allowable overall exposure limit Vapor exposure to skin Liquid exposure to skin Vapor exposure to eye Liquid exposure to eye Above minimum exposure limit Safety and handling Spill management Fire explosion hazards Disposal procedures CFC12 Same No effect Can cause frostbite Very slight eye irritant Can cause frostbite Can cause Asphyxiation, Tachycardia, and Cardia Arrhythmias Wear appropriate skin and eye protection. Use with adequate ventilation. Remove or extinguish ignition or combustion sources. Evacuate or ventilate area. May decompose if contact with flames and heating elements. Container may explode if heated due to resulting pressure rise. Combustion products are toxic. Recycle or reclaim. Same Same Same Same Same HFC134a 0.0* 3.2* 0.27* 121 -22°F (-30°C) 80 psig 102 -15°F (126°C) 82 psig 3 3 82 lb/ft 75 lb/ft No No HFC134a approximately 3 psig higher than CFC12 HFC134a approximately 2 psig lower than CFC12 Comparison of CFC12 and HFC134a Properties To minimize contamination, exercise extreme care when servicing HFC134A sealed systems. HFC134a 1,000 ppm CFC12 1.0* No trace of other refrigerants is allowed in HFC134a systems. Chlorinated molecules in other refrigerants such as CFC12, etc. will lead to capillary tube plugging. Ester oil is used in HFC134a systems. Do not use mineral oil. HFC134a and mineral oils cannot be mixed. If mineral oils were used in HFC134a systems, lubricant would not return to compressor and would cause early compressor failure. If significant amount of oil has been lost from compressor, replace oil rather than adding oil. Ester oils used in HFC134a systems are so hydroscopic that by the time an inadequate system performance is detected, oil will be saturated with moisture. CFC12 has much higher tolerance to system processing materials, such as drawing compounds, rust inhibitors, and cleaning compounds, than HFC134a. Such materials are not soluble in HFC134a systems. If materials were to be washed from system surfaces by ester oils, they could accumulate and eventually plug capillary tube. Care must be taken to minimize moisture entering HFC134a system. Do not leave compressor or system open to atmosphere for more than 10 minutes. Excessive moisture in HFC134a system will react with compressor oil and generate acid. Compressor must be replaced when performing low side leak repair. Drier filter must always be replaced. Same Same Same Same 11 16021730 Rev. 0 Service Procedures ! WARNING To avoid risk of electrical shock, personal injury, or death, disconnect electrical power source to unit, unless test procedures require power to be connected. Discharge capacitor through a 10,000 ohm resistor before attempting to service. Ensure all ground wires are connected before certifying unit as repaired and/or operational. Refrigerator must operate minimum of 20 minutes after thermocouples are installed. Turn control to colder to obtain required on time. Wattage reading must be recorded in conjunction with temperature test to confirm proper operation. Suction and head pressures are listed on Temperature and Relationship Chart. Normally these are not required for diagnosis but used for confirmation on systems which have been opened. Important: Unbrazing drier filter from tubing will drive moisture from desiccant and into system, causing acids to form. Do not unbraze filter drier from tubing. If CFC12 service drier was installed in HFC134A system, drier could overload due to excessive moisture. HFC134a compatible copper tubing, part #R0174075 (1/ 4" O.D. X 18" length) and part #R0174076 (5/16" O.D. X 24" length) must be used when replacing tubing. Avoid system contamination by using Towerdraw E610 evaporating oil, part # R0157532, when flaring, swagging, or cutting refrigeration tubing. Brazing ! CAUTION To avoid risk of personal injury or property damage, take necessary precautions against high temperatures required for brazing. Replacement Service Compressor HFC134a service compressors will be charged with ester oil and pressurized with dry nitrogen. Before replacement compressor is installed, pull out 1 rubber plug. A pop from pressure release should be heard. If a pop sound is not heard, do not use compressor. Positive pressure in compressor is vital to keep moisture out of ester oil. Do not leave compressor open to atmosphere for more than 10 minutes. Satisfactory results require cleanliness, experience, and use of proper materials and equipment. Connections to be brazed must be properly sized, free of rough edges, and clean. Generally accepted brazing materials are: Copper to copper joints: SIL-FOS (alloy of 15 percent silver, 80 percent copper, and 5 percent phosphorous). Use without flux. Recommended brazing temperature is approximately 1400°F. Do not use for copper to steel connection. Copper to steel joints: SILVER SOLDER (alloy of 30 percent silver, 38 percent copper, 32 percent zinc). Use with fluoride based flux. Recommended brazing temperature is approximately 1200°F. Steel to steel joints: SILVER SOLDER (see copper to steel joints). Brass to copper joints: SILVER SOLDER (see copper to steel joints). Brass to steel joints: SILVER SOLDER (see copper to steel joints). Compressor Testing Procedures ! WARNING To avoid death or severe personal injury, never use oxygen, air or acetylene for pressure testing or clean out of refrigeration system. Use of oxygen, air, or acetylene may result in violent explosion. Oxygen may explode on contact with oil and acetylene will spontaneously explode when under pressure. Refer to Technical Data Sheet Temperature Relationship Chart for operating watts, test points, and temperature relationship test for unit being tested. Temperature testing is accomplished by using 3 lead thermocouple temperature tester in specific locations. Test point T-1 is outlet on evaporator coil and T-2 is inlet. Test point T-3 is suction tube temperature midway between where armaflex ends and suction port of compressor (approximately 12 inches from compressor). Thermocouple tips should be attached securely to specified locations. Do not test during initial pull down. Allow one off cycle or balanced temperature condition to occur before proceeding with testing. 16021730 Rev. 0 12 Refrigerant Flow Side by Side Refrigerant Flow Diagram 13 16021730 Rev. 0 Cabinet Air Flow Side by Side Cabinet Air Flow Diagram 16021730 Rev. 0 14 Ice and Water Dispenser Diagram Ice Maker 5/16" Water line to Dispenser 1/4" Water Line Water Coil Secondary Water Valve Primary Water Valve Side by Side Ice and Water Flow Diagram 15 Water Filter 16021730 Rev. 0 Water Valves Diagram Primary Valve Secondary Valve Bottom View Bypass Filter Head Back View 16021730 Rev. 0 16 Troubleshooting Chart ! WARNING To avoid risk of electrical shock, personal injury, or death, disconnect electrical power source to unit, unless test procedures require power to be connected. Discharge capacitor through a resistor before attempting to service. Ensure all ground wires are connected before certifying unit as repaired and/or operational. Troubleshooting chart on following pages contains symptoms that may be seen in malfunctioning units. Each symptom is accompanied by one or more possible causes and by a possible remedy or test to determine if components are working properly. Symptom Possible Causes Corrective Action Unit does not run No power to unit Check for power at outlet. Check fuse box/circuit breaker for blown fuse or tripped breaker. Replace or reset. Faulty power cord Check with test light at unit; if no circuit and current is indicated at outlet, replace or repair. Low voltage Check input voltage for proper voltage. Take appropriate action to correct voltage supply problem. Faulty compressor Check compressor motor windings for opens/shorts. Perform compressor diagnostic test Replace if necessary. Excessive door opening Consumer education Overloading of shelves Consumer education Warm or hot foods placed in cabinet Consumer education Cold control set too warm Set control to colder setting. Poor door seal Level cabinet. Adjust hinges. Replace gasket. Refrigerator airflow Check auto damper is opening by removing grille. With door open, damper should open. Replace if faulty. Interior light remains on Check switch. Replace if necessary. Faulty condenser fan or evaporator fan Check fan and wiring. Replace if necessary. Faulty compressor Replace compressor. Refrigerator section too warm 17 16021730 Rev. 0 Troubleshooting Chart ! WARNING To avoid risk of electrical shock, personal injury, or death, disconnect electrical power source to unit, unless test procedures require power to be connected. Discharge capacitor through a resistor before attempting to service. Ensure all ground wires are connected before certifying unit as repaired and/or operational. Symptom Possible Causes Corrective Action Refrigerator section too cold Refrigerator temperature control set too cold Adjust refrigerator temperature control. Refrigerator airflow not properly adjusted Temperature controls set too warm Check air flow. Poor door seal Level cabinet. Adjust hinges. Replace gasket. Dirty condenser or obstructed grille Check condenser and grille. Clean. Freezer and refrigerator sections too warm Reset temperature controls. Faulty control Test control. Replace if failed. Refrigerant shortage or restriction Check for leak or restriction. Repair, evacuate and recharge system. Freezer section too cold Freezer temp control set too cold Faulty control Adjust freezer temperature control. Test control. Replace if failed. Unit runs continuously Temperature control set too cold Adjust temperature control. Dirty condenser or obstructed grille Check condenser and grille. Clean. Poor door seal Level cabinet. Adjust hinges. Replace gasket. Interior light remains on Check switch. Replace if necessary. Faulty condenser fan or evaporator fan Check fan and wiring. Replace if necessary. Faulty control Test control. Replace if failed. Refrigerant shortage or restriction Check for leak or restriction. Repair, evacuate and recharge system. Refrigerant overcharge Check for overcharge. Evacuate and recharge system. Air in system Check for low side leak. Repair, evacuate and recharge system. Loose flooring or floor not firm Repair floor or brace floor. Cabinet not level Level cabinet. Tubing in contact with cabinet, other tubing, or other metal Adjust tubing. Drip pan vibrating Adjust drain pan. Fan hitting another part Ensure fan properly aligned and all attaching hardware and brackets are tight and not worn. Tighten or replace. Worn fan motor bearings Check motor for loss of lubricant or worn bearings. Replace if necessary. Compressor mounting grommets worn or missing. Mounting hardware loose or missing Free or loose parts causing or allowing noise during operation Tighten hardware. Replace grommets if necessary. Noisy operation 16021730 Rev. 0 18 Inspect unit for parts that may have worked free or loose or missing screws. Repair as required. Troubleshooting Chart ! WARNING To avoid risk of electrical shock, personal injury, or death, disconnect electrical power source to unit, unless test procedures require power to be connected. Discharge capacitor through a resistor before attempting to service. Ensure all ground wires are connected before certifying unit as repaired and/or operational. Symptom Possible Causes Corrective Action Frost or ice on evaporator Defrost thermostat faulty Check defrost thermostat. Replace if failed. Evaporator fan faulty Check fan motor. Replace if failed. Defrost heater remains open Check defrost heater continuity. Replace if failed. Defrost control faulty Check control and replace if failed. Open wire or connector Check wiring and connections. Repair as necessary. Refrigerant shortage or restriction Check for leak or restriction. Repair, evacuate and recharge system. Check input voltage. Correct any supply problems. Supply voltage out of specification Faulty fan motor Check fan motor. Replace if failed. Restricted air flow Check condenser and grille for dirt. Clean. Refrigerant shortage or restriction Check for leak or restriction. Repair, evacuate and recharge system. 19 16021730 Rev. 0 System Diagnosis CONDITION SUCTION PRESSURE VARIATION FROM NORMAL HEAD PRESSURE VARIATION FROM NORMAL Refrigerant Overcharge Increase Increase Warmer Warmer Colder Increase Shortage of Refrigerant Decrease Decrease or Increase See Text Colder Warmer Warmer Decrease Partial Restriction Decrease Decrease or Increase See Text Note 2 Colder Warmer Warmer Decrease Air in System Near Normal Increase Warmer Warmer Warmer Increase Low Ambient Installations (High Ambients the Reverse) Decrease Decrease Colder Warmer Warmer Decrease Additional Heat Load Increase Increase Warmer Warmer Warmer Increase Inefficient Compressor Increase Normal or Decrease Warmer or Colder Warmer Warmer Decrease T1 INLET T2 OUTLET T3 SUCTION TEMPERATURE TEMPERATURE TEMPERATURE VARIATION VARIATION VARIATION FROM NORMAL FROM NORMAL FROM NORMAL Symptoms of an Overcharge Above normal freezer temperatures. Longer than normal or continuous run. Freezing in refrigerator. Higher than normal suction and head pressure. Higher than normal wattage. Evaporator inlet and outlet temperatures warmer than normal. Suction tube temperature below ambient. Always check for separated heat exchanger when suction temperature is colder than ambient. Various conditons could indicate an overcharge. For example, if the cooling coil is not defrosted at regular intervals, due to a failure of the defrost system, the refrigerant will "flood out" and cause the suction line to frost or sweat. The cause of this problem should be corrected rather than to purge refrigerant from the sytem. Running the freezer section colder than necessary (-2 to -1 F. is considered normal package temperatures) or continuous running of the compressor for a variety of reasons, or the freezer fan motor not running, may give the indication of an overcharge. 16021730 Rev. 0 20 WATTAGE VARIATION FROM NORMAL Symptoms of Refrigeration Shortage Rise in food product temperature in both compartments. (See Note 1 below.) Long or continuous run time. Look for obvious traces of oil that would occur due to a leak or cracked refrigerant line. Lower than normal wattage. Compressor will be hot to touch because of the heat generated by the motor windings from long continuous running. It will not be as hot as it would be with a full charge and long run times for some other reason such as a dirty condenser. Depending on the amount of the shortage, the condenser will not be hot, but closer to room temperature. The capillary tube will be warmer than normal from a slight shortage. If the leak is on the high side of the system, both gauges will show lower than normal readings and will show progressively lower readings as this charge becomes less. The suction pressure guage will probably indicate a vacuum. If the leak is on the low side of the system the suction pressure guage will be lower than normal - probably in a vacuum - and the head pressure gauge will be higher than normal. It will probably continue to become higher because air drawn in through the leak is compressed by the compressor and accumulates in System Diagnosis the high side (condenser) of the system. Only partial frosting of evaporator instead of even frosting of entire coil. NOTE 1: Usually the first thing that is noticed by the user is a rise in temperature foods. Although temperatures will rise in both the freezer section and the food compartment, the frozen meats and vegetables will not thaw immediately. The customer doesn't associate the problem with the freezer section and will first notice that milk and other food beverages are not cold enough. Under some circumstances, such as in the case of forced air meatkeeper model with a slight shortage of refrigerant, freezing in the food compartment may be experienced due to the additional running time. With a refrigerant leak, however, it always gets worse and as the refrigerant charge decreases the temperature will continue to rise. With a shortage of refrigerant the capillary line will not have a full column of liquid. As a result, there is a noticeable hissing sound in the evaporator. This should not be mistaken for the regular refrigerant boiling sounds that would be considered normal. Symptoms of a Restriction Always remember refrigeration (cooling) occurs on the low pressure side of a partial restriction (obviously a total restriction will completely stop the circulation of refrigerant and no cooling will take place). Physically feel the refrigeration lines when a restriction is suspected. The most common place for a restriction is at the drier-filter or at the capillary tube inlet or outlet. If the restriction is not total there will be a temperature difference at the point of restriction, the area on the evaporator side will be cooler. In many cases frost and/ or condensation will be present. A longer time is required for the system to equalize. Any kinked line will cause a restriction so the entire system should be visually checked. A slight restriction will give the same indications as a refrigerant shortage with lower than normal back pressure, head pressure, and wattage, warmer product temperatures. NOTE 2: If a total restriction is on the discharge side of the compressor, higher than normal head pressures and wattages would result. This is true only while the low side is being pumped out and if the restriction was between the compressor and the first half of the condenser. 21 To diagnose for a restriction versus a refrigerant shortage, discharge the system, replace the drier-filter, evacuate and recharge with the specified refrigerant charge. If the unit performs normally three possibilities exist: 1) refrigerant loss, 2) partially restricted drierfilter, and 3) moisture in system. If the unit performs as it previously did you may have a restricted capillary line or condenser or kinked line. Find the point of restriction and correct it. A restriction reduces the flow rate of the refrigerant and consequently reduces the rate of heat removal. Complete restriction may be caused by moisture, solid contaminants in the system, or a poorly soldered joint. Moisture freezes at the evaporator inlet end of the capillary tube or solid contaminants collect in the drierfilter. The wattage drops because the compressor is not circulating the usual amount of refrigerant. As far as pressure readings are concerned, if the restriction, such as a kinked line or a joint soldered shut is anywhere on the low side, the suction pressure would probably be in a vacuum while the head pressure will be near normal. If the restriction is on the high side, the suction pressure, again, will probably be in a vacuum while the head pressure will be higher than normal during the pump out period described earlier. In either case, it will take longer than the normal ten minutes or so for the head pressure to equalize with the low side after the compressor stops. Symptoms of Air in System This can result from a low side leak or improper servicing. If a leak should occur on the low side, the temperature control would not be satisfied; thus, continuous running of the compressor would result. The compressor would eventually pump the low side into a vacuum drawing air and moisture into the system. Air and R134A do not mix so the air pressure would be added to the normal head pressure, resulting in higher than normal head pressures. One way to determine if air is in the system is to read the head pressure gauge with the product off and evaporator and condenser at the same temperature and then take the temperature on the condenser outlet tube. This temperature should be within 3° or 4° F. of what the Pressure-Temperature Relation chart shows for the given idle head pressure. If the temperature of the condenser outlet is considerably lower than the idle head pressure of the gauge this would indicate there is air in the system. Thorough leak checking is necessary. Correct the source of the leak. Do not attempt to purge off the air because this could result in the system being undercharged. It is best to discharge, replace drier, evacuate and recharge with the specified refrigerant charge. 16021730 Rev. 0 System Diagnosis Symptoms of Low or High Ambient Temperature Installation Lower ambient air temperature reduces the condensing temperature and therefore reduces the temperature of the liquid entering the evaporator. The increase in refrigeration effect due to operation in a lower ambient results in a decrease in power consumption and run time. At lower ambients there is a reduction in cabinet heat leak which is partially responsibile for lower power consumption and run time. An increase in refrigeration effect cannot be expected below a certain minimum ambient temperature. This temperature varies with the type and design of the product. Generally speaking, ambient temperatures cannot be lower than 60° F. without affecting operating efficiency. Conversely, the higher the ambient temperature the higher the head pressure must be to raise the high side refrigerant temperature above that of the condensing medium. Therefore, head pressure will be higher as the ambient temperature raises. Refrigerators installed in ambient temperatures lower than 60° F. will not perform as well because the pressures within the system are generally reduced and unbalanced. This means that the lower head pressure forces less liquid refrigerant through the capillary line. The result is the symptoms of a refrigerant shortage. The lower the ambient temperature the more pronounced this condition becomes. When a point where the ambient temperature is below the cut-in of the Temperature Control is reached, the compressor won't run. The drain traps will freeze in ambient temperatures of 32° F. Heat Load A greater heat load can result from the addition of more than normal supply of foods, such as after doing the weekly shopping. Other items contributing to an additional heat load would be excessive door openings, poor door sealing, interior light remaining on, etc. An increase in heat being absorbed by the refrigerant in the evaporator will affect the temperature and pressure of the gas returning to the compressor. Compartment temperatures, power consumption, discharge, and suction pressures are all affected by heat load. Pressures will be higher than normal under heavy heat load. 16021730 Rev. 0 22 COMPRESSOR REPLACEMENT Cut Here 1. Turn the main power switch in the machine compartment to the off position Evacuate the sealed system. Cut Here Slide Rail Mounting Screw 5. Disconnect lead wires from compressor terminals. 6. Remove the bolts from the compressor mounts. Remove defective compressor from cabinet and install rubber grommets on replacement compressor. 7. Clean the compressor stubs with an abrasive cloth such as grit cloth No. 23. Do not open the compressor stubs. 8. Install the replacement compressor using the mounting bolts previously removed. 9. Connect the compressor leads. 10.Transfer the process tube from the old compressor. Connect the refrigerant tubing to the compressor stubs using silfos on copper to copper joints and silver solder and flux on steel to copper joints. 11. Locate and remove old drier. Install new drier. The new driver is installed in the following manner: a. Carefully bend the old drier and tubing away from electrical parts. b. Use steel wool or fine emery paper to clean the capillary tube 3 inches from the original joint. Also, clean the input tubing to the drier of 3 inches from the original joint. c. Use steel wool or fine emery paper to clean both ends of the new drier. Use a knife or file to score the capillary tube 1 inch from the original joint. Use your finger to break the connection. d. Make an offset 1/2" from the end of the cap tube to prevent it from penetrating too far into the drier. e. Cut the inlet tube of the replacement drier and use pliers to snap off the scored end. Transfer the process line to the new drier. f. Install the new drier using silfos yoder tube and the drier to compressor. 2. Remove the high side slide rail mounting screw. 3. Slide the high side foward into the service position. 4. Clean and cut the refrigerant lines as close as possible to the compressor stubs, leaving enough length to install the replacement compressor. NOTE: A new drier must be installed each time any component of the system is opened or replaced. NOTE: The holding charge is your assurance that the new compressor is dry and ready to install. If you receive a replacement compressor that shows no evidence of holding charge when you remove the plugs, return it. 23 16021730 Rev. 0 Main Power Switch Wicks Centigrade / Fahrenheit Switch Figure 1 Defrost Water Drain Pan 3. Filter Drier Remove the high side slide rail mounting screw. (See figure 2). 12.Evacuate, recharge and leak test the system. 13.Test run the unit to check operation 14.Replace the machine compartment cover. CONDENSER REPLACEMENT The following general information explains how to successfully replace the condenser for any model covered in this manual. 1. 2. Remove the Machine compartment access door. Turn the main power switch in the machine compartment to the off position. (See figure 1) Figure 2 4. 16021730 Rev. 0 24 Slide the highside assembly forward into the service position. (See figure 3). 10.Remove the shroud/condenser screws which secure the fan motor shroud to the condenser. 11. Transfer all clips to the replacement condenser. Install the mounting screws. 12.Set the replacement condenser on the compressor mounting pan and install both front and rear condenser mounting screws. 13.Clean then connect the discharge line to the inner tubing. Clean and connect the Yoder loop to the outer tubing of the condenser. 14.Solder all joints. Silver solder and proper flux should be used on copper to steel or steel to steel joints. Excess flux should be wiped off all tubing. 15.Remove and replace the old drier. Do not allow more than 1/2" of the cap tube to penetrate the drier. 16.Install the new drier using silver solder with the proper flux. 17.Visually check the joints for leaks. 18.Connect the fan motor wire connector. 19.Evacuate and recharge the system. Figure 3 5. Disconnect the fan motor wire lead connector. (See figure 4) EVAPORATOR REPLACEMENT 1. Remove the Machine compartment access door. 2. Turn the main power switch in the machine compartment to the off position. 3. Remove the high side slide rail mounting screw. 4. Slide the highside assembly forward into the service position. 5. Evacuate the sealed system. High Side Process Line to the Drier Low Side Process Line Wire Lead Connector Figure 4 6. Evacuate the sealed system. 7. Use steel wool or fine emery paper to clean and then cut the inlet and the outlet tube of the old condenser. 8. Clean both the inlet and outlet end of the new condenser. 9. Remove the condenser assembly from the compressor mounting pan and place it on a workable surface. 6. Open the freezer door and push back on the light shield retaining tabs then lower the shield. (See figure 1) 25 16021730 Rev. 0 Tab Tab Figure 1 7. While lowering the light shield pull forward to remove the shield from the rear mounting screws. 8. Remove the rear light shield mounting screws. 9. To remove the air diffuser, remove the four mounting screws shown. 10.Disconnect the auto damper stepper motor electrical quick disconnect. Figure 3 12.Remove the evaporator cover mounting screws. (See figure 3). 13.Disconnect the evaporator fan motor remove the evaporator cover assembly. Mounting Screw Disconnect Drain Tube Heater Hose Clamp Mounting Screw Figure 4 14.Remove the drain tube hose clamp. Disconnect the plastic drain tube hose from the drip pan elbow. Disconnect the drain tube heater. (See figure 4) 15. Disconnect the drain tube and drip pan heater wire harness quick disconnects. Figure 2 11. Remove the auto damper stepper motor bracket mounting screws. (See figure 2). 16021730 Rev. 0 26 16.Remove the drip pan assembly. order of removal and all other parts that were previously removed. 18.Cut the suction line and the cap tube in the machine compartment. (See figure 6). 19.Remove the evaporator mounting screw. 20.Remove the evaporator assembly transfer the heaters to the new assembly. 21.Install the new evaporator assembly in reverse order of removal and all other parts that were previously removed. 22. Change the drier. Evacuate and recharge and test the system. HEAT EXCHANGER REPLACEMENT Figure 5 17. Carefully lower the drain pan assembly. (See figure 5). Cut Line 1. Follow steps one thru three on compressor replacement. 2. Unsolder the suction line from the suction stub of the compressor. 3. Unsolder the other end of the suction line from the evaporator. 4. Unsolder the capillary tube at the muffler. 5. Remove and replace the old drier from the yoder loop. 6. Remove the old heat exchanger. 7. Make an offset 1/2" from the end of the capillary tube and insert it into the new drier. 8. Install the new heat exchanger assembly in reverse order of removal. 9. Sweep and recharge the unit. 10. Test for leaks. 11. Install the machine compartment cover. 12. Test run the refrigerator to make sure it is operating properly. ELECTRICAL SYSTEM The wiring diagram is located in the machine compartment area. All electrical components are grounded to the cabinet. The green/yellow center conductor in the power cord is attached to the cabinet to provide a ground circuit when the cord is plugged into a properly grounded outlet. After replacing an electrical component, always reconnect the ground wire. The electrical outlet should be checked to make sure it is properly wired. Check the outlet with a circuit tester. The Compressor Cut Line Figure 6 The compressor is a variable speed compressor. The starting and run speeds are controlled by the compressor PC board. The compressor terminals resistance are of equal value. Placing ohm meter probes on any two terminals of the compressor should read the same. Note: There are no overload protector or starting relay on the terminals of the compressor every thing is controlled on the PC board. 27 16021730 Rev. 0 Condenser Fan Motor Replacement 1. Remove the machince compartment access door 2. Shut the main power switch off. 3. Remove the high slide pan mounting screw. Slide the highside assembly forward into the service posistion. 4. Disconnect the condenser fan motor lead connector on the motor terminals. 5. Remove the screws that mount the fan motor to the brackets. 6. Transfer the fan blade to the replacement motor making sure it is installed in the same manner as the original. 7. Install the fan motor leads. 8. Install those parts previously removed. Test run the unit. Fan Bracket Mounting Screws Freezer Fan Motor The freezer fan motor is a variable speed DC voltage fan motor it is control by the main PC board. It circulates the cooled air throughout the freezer and fresh food compartment. It runs in tandem with the stirrer fan motor in the fresh food compartment. The fan blade is made of polyethylene and is pushed onto the shaft. It is important when replacing the fan blade that the hub of the fan blade faces out, toward the of the evaporator cover. If the fan fails or operates erratically, the reduced air circulation will result in poor cooling characteristics. Wire Lead Connector Fresh Food Fan Motor Assembly The fresh food fan motor is variable speed DC voltage fan motor it draws air into the fresh food compartment from the freezer via the auto damper. The damper opens and the stirring fan pulls in cold air from the freezer it mixes with the existing fresh food air. Air blows down the back wall and returns up the front of the fresh food compartment via fresh food return air duct. The fan blade is made of polyethylene and is pushed onto the shaft. It is important when replacing the fan blade that the hub of the fan blade faces out, toward the of the evaporator cover. If the fan fails or operates erratically, the reduced air circulation will result in poor cooling characteristics. Freezer Fan Motor Replacement 1. Shut the main power switch off. 2. Do steps 5 through 11 on evaporator replacement. 3. Disconnect the evaporator fan motor lead connector on the motor terminals. 4. Remove the screws that secure the motor bracket assembly to the fan shroud. 5. Remove the fan blade by pulling if off the shaft. 6. Remove the screws that secure the rear bracket to the front bracket. Remove the motor from the rear mounting bracket. 7. Install the replacement feezer fan motor in reverse order of removal. Fresh Food Fan Motor Replacement. 1. Shut the main power switch off. 2. Open the fresh door and push back on the light shield retaining tabs then lower the sheild. 3. Remove the three fan/light housing assembly mounting screws. 4. Lower the housing. 16021730 Rev. 0 28 5. Remove the wiring harness quick disconnect connector. 6. Remove the two fan backet assembly mounting screws. 7. Remove the fan blade by pulling it off the shaft. Mounting Screws Figure 3 8. Remove the screws that secure the rear bracket to the front bracket. Remove the motor from the rear mounting bracket. 9. Install the new motor to the rear mounting bracket. Mount the rear bracket to the front mounting bracket. 10.Install the fan blade on the replacement motor. The fan blade is provided with a stop on the face of the hub. It is properly installed when the blade is positioned so the stop rests against the end of the shaft. 11. Replace the fan motor assembly in reverse order of removal. Figure 1 Defrost Heaters Two radiant defrost heaters are used to remove the accumulated frost from the freezer evaporator during a defrost cycle. These heaters are wired in series, thus comprising the defrost heater system. REPLACING THE DEFROST HEATERS 1. Shut the main power switch off. 2. Perform steps 6 through 17 of Evaporator Replacement. 3. Using long nose pliers remove the two front and back wire retainer clips. (One on the right side and one on the left. Carefully lower the radiant defrost heaters. (See figure 1). Mounting Screw Mounting Screw Figure 2 29 16021730 Rev. 0 REPLACING THE AUTO DAMPER STEPPER MOTOR ASSEMBLY 1. Shut the main power switch off. 2. Perform steps 1 through 11 of Evaporator Replacement. Radiant Heaters Clips Figure 1 REPLACING THE DRIP PAN AND DRAIN TUBE HEATERS 1. Shut the main power switch off. 2. Perform steps 1 through 4 and 6 through 17 of Evaporator Replacement. 3. Replace the drip pan heater assembly or drain tube heater coil if open or shorted. 4. Install new parts in reverse order of removal. Fountain Assembly Ice & Water Fountain PC Board/Frame Removal 1. Shut the main power switch off. 2. To remove the grill from the fountain sump pull straight out. (See figure 1). Foil Drain Pan Heater Drain Tube Heater REPLACING THE DEFROST THERMISTOR AND SAFETY THERMOSTATS 1. Shut the main power switch off. 2. Perform steps 1 through 4 and 6 through 17 of Evaporator Replacement. 3. Install new parts in reverse order of removal. 16021730 Rev. 0 Figure 1 3. Remove the two fountain liner screws. 30 5. Remove the two fountain escutheon mouning screws. (See figure 4). Figure 4 6. Remove the escutheon. Mounting Screws Figure 2 4. Remove the fountain liner (see figure 3). Mounting Screws Figure 5 7. Remove the three PC/Frame mounting screws. Figure 3 31 16021730 Rev. 0 3.Remove the two touch fountain assembly mounting screws (figure 1). 4. Remove the old assembly and install the new assembly in reverse order of removal. Fountain Bracket Assembly Removal 1. Shut the main power switch off. 2. Perform steps 1 through 7 of the PC Board Frame Removal. F ig u re 6 Fountain Bracket Mounting Screws 8. Disconnect the electrical lead from the fountain PC board/frame assembly. 9. Install the new PC board/frame assembly in reverse order of removal. Touch Fountain Assembly Removal 1. Shut the main power switch off. 2. Perform steps 1 through 7 of the PC Board/ Frame Removal. Mounting Screws Figure 1 3. Remove the three fountain bracket mounting screws. 4. Carefully pull the assembly out of the fountain housing. You now have full access to the solenoid, dispenser mechanism, light socket and the actuator switch. 5. To repair the assembly , disconnect the electrical quick disconnect. Checking and Replacing the Actuator Switch: 1. Disconnect the unit from the power Source. 2. Perform steps 1 through 5 of Fountain Bracket Assembly Removal. 3. Continuity check the actuator switch shown in figure 1. Figure 1 16021730 Rev. 0 32 Ice Door Solenoid Bin Front Bin Front Mounting Screws Bin Front Mounting Screws Crusher Housing Mounting Screws Fountain Light Socket Actuator Switch 4. 5. 6. 7. 3. Remove the bin front. 4. Place the bin assembly on the crusher housing. Remove the mounting screw. Remove the switch. Remove the wire leads. Install new switch in reverse order of removal. Checking and Replacing the Ice Door Solenoid 1. Disconnect the unit from the power source. 2. Perform steps 1 through 5 of Fountain Bracket Assembly Removal. 3. Remove the wire leads from the solenoid. Continuity check the solenoid shown in figure 1. If defective, go to step 4. 4. Remove the mounting screws. 5. Remove the solenoid. 6. Install the new solenoid in reverse order of removal. Inside of Bin Crusher Housing Mounting Screws ICE CRUSHER BIN AND SHELF ASSEMBLY 1. To service the ice/crusher related components, turn the ice maker off by lifting the shut off arm. Remove the bin assembly. 2. Remove the four bin front mounting screws. 5. When removing the control rod bracket, hold the clip; this will prevent if from being thrown off. 33 16021730 Rev. 0 8. To remove the auger nut turn it clockwise. 9. Replace the parts required. The number on the blades should face the back of the auger nut. Blade number 4 should be nearest to the auger nut. 10. Reinstall all other components in the reverse order of removal. Control Rod ICE/CRUSHER BIN SHELF ENCLOSURE ASSEMBLY Yoke / Solenoid Mounting Auger Motor Mounting Control Rod 6. When removing the crusher housing, position the snap ring (1) as shown in the drawing below, then remove it and the retainer washer (2). 7. Push the auger assembly away from the crusher housing using your thumb (3). Crusher Blades Fixed Blades The auger motor and solenoid are located behind the storage bin. The yoke, fastened to the motor, engages the drive ring and turns auger in a clockwise direction. Both the yoke and drive ring are designed to prevent a loosening of the yoke by exerting counter pressure while in operation. 1. Disconnect the unit from the power source. 2. Remove the ice/crusher bin assembly. 3. Remove the retainer screw at the bottom left side of the ice/crusher bin shelf enclosure. 4. Pull the shelf forward and disconnect the quick disconnect. Auger Nut Auger 16021730 Rev. 0 34 Yoke / Solenoid 5. Remove the assembly from the freezer and place on a flat work surface. 6. To check the auger motor, attach an ohmmeter probe to the auger motor terminals. The meter should show resistance. If the meter does not show resistance, the motor should be replaced. 7. To replace the motor, hold the auger motor armature and turn the yoke clockwise, releasing yoke from the motor shaft. Remove the yoke and washer. 8. Remove the four mounting screws that fasten the motor enclosure. Remove the motor from the enclosure. 9. Install the replacement part in reverse order of removal. 10.To check the solenoid yoke assembly, attach an ohmmeter to the solenoid terminals. The meter should show resistance. If it does not show resistance, replace the solenoid yoke assembly. 11. Remove the four screws that fasten the solenoid yoke assembly to the enclosure. Remove the assembly from the enclosure. 12.Install the replacement part in reverse order of removal. S el ecti on Nor mal T emper atur e T emper atur e S et Poi nt Di s pl ay R ange None T he di s pl ay wi l l be bl ank Ci tr us 38” F / 3”C 37-39” F / 3-4”C Pr oduce 34” F / 1 C 33-35” F / 1-2”C Meats 31” F / -1 C 30-32” F / -1 - 0”C Varying factors such as environment, drawer openings, refrigerator control settings, etc. may cause the temperature display on the drawer to fluctuate outside the range of temperature listed above. This is normal. For best results, set the fresh food compartment to 37°F (3°C) and the freezer compartment to 0°F (18°C). Note: The normal Cold setting turns the ClimateZoneTM Technology off and the drawer then operates as a standard crisper. CLIMATE ZONE TECHNOLOGY (CZT) Shape Memory Outer Enclosure Wall Polymer (S.M.P.) Inner Enclosure Wall Permeable Fabric (Air Jacket) Thermistor Guide Vanes Warm Air Exhaust Heater Cold Air Intake Circulation Fan Storage Drawer Bulk Head Electronic Control Housing CLIMATEZONETM STORAGE DRAWERS The two lower drawers in the fresh food compartment are equipped with ClimateZoneTM Technology. This technology allows the temperature within each drawer to be precisely controlled at optimal levels for storing meats, fresh produce and fruit, or citrus fruits. The electronic temperature control within these drawers provides preset temperatures based on the food group that is selected. The actual temperature within each ClimateZoneTM drawer is displayed electronically. Each setting provides temperatures in the range outlined in the chart below. ClimateZoneTM Drawer Settings The MEATS setting is recommended whenever storing fresh meat, poultry and fish. Store meats in airtight containers or sealed bags to contain any juices. Clean up spills immediately, then disinfect. Select the PRODUCE setting when storing a mixed load of fresh fruits and vegetables, such as: 35 16021730 Rev. 0 Apples Green Onions Nectarines Radishes Cabbage Romaine Carrots Herbs Strawberries Cauliflower Peaches Broccoli Asparagus Kiwi fruit Spinach Celery Leeks Cherries Lettuce Bagged, Pre-cut salads and Vegetables Select the CITRUS settings when storing fruits such as oranges, grapefruits, lemons, limes,pineapple, cranberriies, watermelons and tangerines. Fruits and vegtables can be stored loosely wrapped or unwrapped. Fruits with skins such as apples and grapes should not be stored in airtight bags or containers. Note: Note: Note: The ClimateZoneTM drawers, power must be turned off at the main power switch before changing the bulb. TO REPLACE THE BULB BEHIND THE UPPER CLIMATEZONETM DRAWER: Turn the power off to the refrigerator at the Main Power Switch in the upper machine compartment. Unload and remove both ClimateZoneTM drawers. Remove the ClimateZoneTM air diverter located at the rear of the fresh food compartment, on top of the upper ClimateZoneTM compartment. After prolonged or repeated drawer openings and/or loading the drawers the display may indicate a higher temperature. This is normal. The temperature will recover in a short period of time. Do not remove the foam piece between the ClimateZoneTM drawers. After the diverter is removed, 2 mounting screws are visible behind the drawer. Using a 1/4 hex head screw driver, remove these screws. Frozen meats will thaw very slowly if stored on the Meats setting. Thawing should be done on a refrigerator shelf. Slide the compartment assembly forward. Under heavy usage conditions, the exterior surface of the ClimateZoneTM drawers may fog. This is normal. The condensation will clear once the door is closed for a period of time. Unscrew the bulb and replace with a new T840 watt bulb. Slide the assembly back into its original position. Align the screw holes, making sure air ducts are in alignment. Replace the two screws, and replace the diverter strip. Reinsert the drawer into the compartment. Due to the accuracy and the location of the ClimateZone temperature sensor system, drawer temperatures measured with household thermometers may vary from the digital display. This is normal. Turn the power switch to the refrigerator back on. TO REPLACE THE BULB BEHIND THE LOWER CLIMATEZONETM DRAWER: Turn the power off to the refrigerator at the Main Power switch in the upper machine compartment. To Remove CZT Drawers: Pull drawer out until it stops Lift the front edge and pull all the way out. To Replace the CZT Drawers: Set the drawer on the slide tracks. Slide the drawer in until the bar rest in slot on underside of drawer front. Close the drawer. Unload and remove both ClimateZone drawers. Remove the ClimateZoneTM air diverter located at the rear of the fresh food compartment, on top of the upper ClimateZoneTM compartment. ClimateZoneTM Bulb Replacement There is a T8-40 watt bulb located behind each ClimateZone drawer. Replacement bulbs are available from your dealer (MCS part number 61008236) 16021730 Rev. 0 36 After the diverter is removed, 2 mounting screws are visible behind the drawer. Using a 1/4 hex head screw driver, remove these screws. · · · · 4. · The damper should open. The LCD should be blank and illuminated. The Citrus Keypad should be illuminated. Wait 7 seconds. Touch the Produce Keypad. The control will test for the proper installation of the temperature thermistor. ( If a Open Circuit is sensed an OC will be displayed. If a Short is sensed, a CC for Closed Circuit will be displayed.) · The LCD should be blank and illuminated. · The Product Keypad should be illuminated. 5. Touch the Meat Keypad. · The Meat keypad should be illuminated. · (SKIP THIS STEP ON 3 BUTTON CZTs) 6. Touch the Normal Off Keypad. · This will end the test mode. · The control will appear to be in the normal door closed state. · The test mode will also be terminated if the refrigerator door switch is opened, or 5 minutes passes after the beginning of test mode. Slide the compartment assembly forward. Disconnect the power cords to free the assembly, then pull it completely out and set it aside. Remove the hex head screws behind the lower compartment. Slide the lower compartment assembly forward. Unscrew the bulb and replace with a new T840 watt bulb. Slide the assembly back into its original position and align the screw holes. Replace the two screws. Lift the upper assembly back into its orginal position leaving enough space to reach the power cords. Reconnect the upper assembly power cords. Push the assembly back into its original position and align the screw holes. Replace the two screws and replace the diverter. Replace the drawers. Turn the power back on to the refrigerator. CZT TEST MODE 1. Open the refrigerator door and tape the door switch closed. · The CZT control display should be off. 2. Touch and hold the Citrus and Produce keypads simultaneously for 5 seconds. · The LCD should display 88 and be illuminated. · All keypads should be illuminated. · The fan should stop. · The damper should close. · Wait 7 seconds. 3. Touch the Citrus Keypad. · The fan should begin turning. (If the control cannot monitor the fans performance for proper function an F will be displayed on the LCD) · The control will test for the heater installation. (If the heater cannot be properly sensed an H will be displayed.) 37 16021730 Rev. 0 TROUBLESHOOTING DIAGNOSTIC PROCEDURES WATER FILTER UNIT DOOR ON ON POWER 16021730 Rev. 0 FREEZER CLEAN CONDENSER -88 -88 SERVICE ALARM REFRIGERATOR WORKING POWER REPLACE RESET SERVICE 38 INTERRUPT POWER SUPPLY DIAGNOSTICS Check for line voltage inputs and outputs per label on top of the power supply. 1. LINE INPUT With main power switch ON check for line input on input terminal. 2. DC OUTPUT Check for +12VDC and +26VDC output on output terminal. Check for +12VDC on main control terminals JP11-3,2 Check for +26VDC on main control terminals JP11-3,1 If voltage is Pulsing in a repetitious manner there is probably an overload condition on the output side of the power supply. Remove JP7 If Pulsing persists test JP7 harness for short circuits (JP7-15, & JP7-15,16) If Pulsing stops remove JP11. If Pulsing persusts replace power supply. If Pulsing stops replace main control. 39 16021730 Rev. 0 * Diagnostic Control Mode Software Revision Unit always start in normal operation or showroom mode. To get into mode selection with fresh food door open and the fresh food door switch taped in the closed position, press Power Interrupt 3 times. Display will show Current Mode. Use the FZ up & down selector to change mode selection. MODE NO NORMAL OPERATION MODE SH SHOW ROOM MODE MODE SE MANUAL Unit Performs in normal operating mode according to the product specifications Disables the refrigeration systems and fans. Customer interface keypads and displays continue in normal operation Service Test 00 Enter / Exit Service Test 01 Software Revision Note: You can move through the service modes by 10 modes at a time using the Fresh Food Up & Down Keypads Service Test 02 High Ambient Override Service Test 03 Fresh Food Thermistor Note: If the unit is turned off and both doors are closed the unit will turn back on. PI-Start and Stop Test Used to enter and leave the manual service test mode. The unit will stop all normal functions and only operate the loads or sensors for each individual test period manually initiated. PI-Start and Stop Test Will display the software release version (As found at top of page) PI- Set & Un-Set override Some performance characteristics of the unit are altered in high abient temperatures. These performance characteristic changes can be overridden by setting this override flag. When the flag is set, the Filter Status Indicator will illuminate the WORKING lamp. PI-Start & Stop Test Display PA - TESTED PASSED SH - SHORTED THERMISTOR OP - OPEN THERMISTOR INPUT Measure thermistor ohms at connector JP2-3,4 with JP2 removed. If open or short circuit check thermistor part at terminals in FF compartment. If part is good, debug wire harness. OUT 16021730 Rev. 0 PI - POWER Interrupt FU - Freezer Up FD - Freezer Down 40 * See Diagnostic supplied with the product for the latest revision. Diagnostic Control Mode IN SERVICE TEST 04 FREEZER THERMISTOR PI - START & STOP TEST DISPLAY PA - TEST PASSED SH - SHORTED THERMISTOR INPUT OP - OPEN THERMISTOR INPUT Measure thermistor ohms at connector JP2-1,2. If open or short circuit check thermistor part at terminals in Freezer compartment. If part is good, debug wire harness. SERVICE TEST 05 EVAPORATOR THERMISTOR PI - START & STOP TEST DISPLAY PA - TEST PASSED SH - SHORTED THERMISTOR INPUT OP - OPEN THERMISTOR INPUT Measure thermistor ohms at connector JP7-18,19. If open or short circuit check thermistor part at terminals in evaporator compartment. If part is good, debug wire harness. PI - START & STOP TEST SERVICE TEST 06 AMBIENT THERMISTOR DISPLAY PA - TEST PASSED SH - SHORTED THERMISTOR INPUT OP - OPEN THERMISTOR INPUT Measure thermistor ohms at connector JP1-7,8. If open or short circuit check thermistor part at terminals in machine compartment. If part is good, debug wire harness. PI - START & STOP TEST SERVICE TEST 07 FRESH FOOD FAN DISPLAY PA - TEST PASSED Hi - FAN TOO FAST Lo - FAN TOO SLOW If test fails check for plus 12 VDC JP7-7,5 and plus 8 to 14 VDC JP7-7,6. If voltages exist at control check harness at fan terminals. PI - START & STOP TEST SERVICE TEST 08 FREEZER/EVAP FAN DISPLAY PA - TEST PASSED Hi - FAN TOO FAST Lo - FAN TOO SLOW If test fails check for plus 12 VDC JP7-3,1 and plus 8 to 14 VDC JP7-3,2. If voltages exist at control check harness at fan terminals. SERVICE TEST 09 DAMPER OPEN PI - Initiate Damper Movement Upon initiation of this test the damper will immediately begin closing. This takes 7 - 10 seconds and will have to be observed by the service technician. During 7 to 10 second damper operation 11 VAC can be measured at terminals JP7-9,10 and JP7-11,12. SERVICE TEST 10 DAMPER CLOSE PI - Initiate Damper Movement Upon initiation of this test the damper will immediately begin opening. This takes 7 - 10 seconds and will have to be observed by the service technician. During 7 to 10 second damper operation 11 VAC can be measured at terminals JP7-9,10 and JP7-11,12. OUT 41 16021730 Rev. 0 IN PI - START & STOP TEST SERVICE TEST 11 DEFROST HEATERS Display will show current evaporator thermistor temperature on right side of display. If defrost terminator is closed, heaters should energize and evaporator temperature will rise. Approx. 3 amps AC current can be measured on heater lead at main control JP8-1. During test line voltage can be measured at JP8-1,1. Heater resistance can be measured by measuring JP8-1,14 with JP8 removed. Approx. 30 ohms with terminator closed or 240k with terminator open. SERVICE TEST 12 CONDENSER FAN PI - START & STOP TEST DISPLAY ON - FAN SHOULD BE OPERATING During test line voltage can be measured at JP8-1,JP13-1. SERVICE TEST 13 FRESH FOOD LIGHTS PI - START & STOP TEST DISPLAY ON - FRESH FOOD LIGHTS SHOULD BE OPERATING During test line voltage can be measured at JP8-1, JP12-2. SERVICE TEST 14 FREEZER LIGHTS PI - START & STOP TEST DISPLAY ON - FREEZER LIGHTS SHOULD BE OPERATING During test line voltage can be measured at JP8-1, JP12-3. SERVICE TEST 15 FOUNTAIN LAMP PI - START & STOP TEST DISPLAY ON - FOUNTAIN LAMP SHOULD BE OPERATING During test line voltage can be measured at JP8-1, 9. PI - START & STOP TEST SERVICE TEST 16 COMPRESSOR MAX SPEED SERVICE TEST 17 COMPRESSOR MIN SPEED OUT 16021730 Rev. 0 Display will show current evaporator temperature on the last 2 digits of main display. Evaporator temperature should drop as compressor pulls down. During test approx. 2 VAC can be measured at JP10-1,2. If pump is still not running observe line voltage at compressor inverter input CN 02-1,5 and 230 VAC output at compressor inverter CN 02-1,6. Pump should draw approx. 2 amps AC on line input to inverter. (Compressor must be off for 5 min. prior to initial test.) PI - START & STOP TEST Display will show current evaporator temperature. Evaporator temperature should drop as compressor pulls down. During test approx. 2 VAC can be measured at JP10-1,2. If pump is still not running observe line voltage at compressor inverter input CN 02-1,5 and 230 VAC output at compressor inverter CN 02-1,6. Pump should draw approx. 2 amps AC on line input to inverter. (Compressor must be off for 5 min. prior to initial test.) 42 IN PI - START & STOP TEST SERVICE TEST 18 FORCE DEFROST SERVICE TEST 19 FRESH FOOD FAN SPEED Display will not show test results. Unit will initiate a defrost, exit service mode, and resume normal operation mode. PI - START & STOP TEST DISPLAY SPEED - FAN SHOULD BE OPERATING Display is in revolutions per second. Range 36 - 42 average. PI - START & STOP TEST SERVICE TEST 20 FREEZER FAN SPEED SERVICE TEST 21 FRESH FOOD Thermistor VALUE DISPLAY SPEED - FAN SHOULD BE OPERATING Display is in revolutions per second. Range 42 - 50 average. PI - START & STOP TEST DISPLAY Will display fresh food thermistor temperature. (e.g. 13 72 is 137.2 degrees.) Ensure that temperature is in appropriate range. SERVICE TEST 22 FREEZER Thermistor VALUE PI - START & STOP TEST DISPLAY Will display fresh food thermistor temperature. (e.g. 13 72 is 137.2 degrees.) Ensure that temperature is in appropriate range. SERVICE TEST 23 AMBIENT Thermistor VALUE PI - START & STOP TEST DISPLAY Will display fresh food thermistor temperature. (e.g. 13 72 is 137.2 degrees.) Ensure that temperature is in appropriate range. PI - START & STOP TEST SERVICE TEST 24 EVAPORATOR Thermistor VALUE DISPLAY Will display fresh food thermistor temperature. (e.g. 13 72 is 137.2 degrees.) Ensure that temperature is in appropriate range. OUT 43 16021730 Rev. 0 IN SERVICE TEST 25 DELETED PI - START & STOP TEST SERVICE TEST 26 DISPLAY TEMPERATURE SELECT SERVICE TEST 27 FOUNTAIN STATE DISPLAY °F = Fahrenheit °C = Centigrade Temperature select switch in °C check for 5 V on JP6-1,2. °F check for 0 V on JP6- 1,2. PI - START & STOP TEST DISPLAY Ho = Water cu = Cube cs = Crush Lo = Lock If display does not change. Verify communications by removing tape from FF door switch. HPSCs should light. SERVICE TEST 28 BY-PASS VALVE SWITCH PI - START & STOP TEST DISPLAY in = By Pass in ou = By Pass out Verify 26 V on JP13-1 remove By Pass. Verify 0 V on JP13-1 SERVICE TEST 29 FILTER VALVE SWITCH PI - START & STOP TEST DISPLAY in = Filter in ou = Filter out Filter in 26 V on JP13-2 remove filter. 0 V on JP13-2 SERVICE TEST 30 ACTUATOR TEST PI - START & STOP TEST DISPLAY on = Pushed of = Released Measure line voltage at JP8-1,3 when actuator pushed SERVICE TEST 31 CUBE SOLENOID OUT 16021730 Rev. 0 PI - START & STOP TEST DISPLAY ON - PRESS ACTUATOR TO ENERGIZE CUBE SOLENOID. Measure line voltage at JP8-1,7 when actuator pushed 44 IN SERVICE TEST 32 AUGER MOTOR PI - START & STOP TEST DISPLAY ON - PRESS ACTUATOR TO ENERGIZE AUGER MOTOR. Measure line voltage at JP8-1, JP12-4 when actuator pushed SERVICE TEST 33 CHUTE SOLENOID PI - START & STOP TEST DISPLAY ON - CHUTE SOLENOID ENERGIZES PRESS. PI TO DE-ENERGIZE. Measure line voltage at JP8-1,8 when actuator pushed SERVICE TEST 34 WATER VALVE PI - START & STOP TEST DISPLAY ON - PRESS ACTUATOR TO ENERGIZE WATER VALVE. Measure line voltage at JP8-1,6 when actuator pushed OUT 45 16021730 Rev. 0 A-1 U S E R Form No. A/05/02 Part No. 111405-1 MCS p/n 61005583 G U I D E Litho U.S.A. ©2002 Maytag Appliances Sales Co. TABLE W ELCOME Welcome and congratulations on your purchase of a Jenn-Air® Luxury™ Series Built-In refrigerator! Your complete satisfaction is very important to us. For best results, we suggest reading this material to help acquaint you with proper operating and maintenance procedures. Should you need assistance in the future, it is helpful to: 1. Have complete model and serial number recorded in the spaces below. These numbers are found on a data plate inside the refrigerator compartment on the upper trim surface. LISTED HOUSEHOLD REFRIGERATIOR ® MODEL NO. SERIAL NO. REV. NO. MAX. AMPS ELEC. RATING 361A U R C UL SA9I5 OZ. ® UL 115V 60HZ ALSO VERIFIED IN ACCORDANCE WITH ENERGY STANDARD CAN/CSA-C300-M91 Date of Purchase _________________ Model Number __________________ Serial Number ___________________ 2. IMPORTANT: Keep this guide and the sales receipt in a safe place for future reference. Proof of original purchase date is needed for warranty service. If you have questions, call: Jenn-Air Customer Assistance 1-866-459-6298 (USA and Canada) (Mon.–Fri., 8am–8pm Eastern Time) Internet: http://www.jennair.com For service and warranty information, see page 25. In our continuing effort to improve the quality of our appliances, it may be necessary to make changes to the appliance without revising this guide. OF C ONTENTS Welcome ..........................................................................................1 Safety Instructions..........................................................................2 Installation........................................................................................3 Machine Compartment.................................................................4 Electronic Control Center.......................................................5-6 Fresh Food Compartment ...........................................................7 ClimateZone™ Storage Drawers ..........................................8-9 Door Storage ..................................................................................9 Freezer Compartment................................................................10 Automatic Icemaker ....................................................................11 Automatic Ice & Water Dispenser ..........................................12 Water Filter.............................................................................13-14 Food Purchasing, Storage & Handling Guidelines.................15 Vegetable Selection and Storage Chart ..................................16 Fruit Selection and Storage Chart.....................................17-18 Maintenance ............................................................................19-20 Normal Operating Sounds ........................................................21 Care & Cleaning ...........................................................................22 Before You Call For Service.......................................................23 Accessories....................................................................................24 Warranty........................................................................................25 Guide de l’utilisateur...................................................................26 Guía del Usuario ..........................................................................52 W HAT Y OU N EED TO K NOW A BOUT S AFETY I NSTRUCTIONS Warning and Important Safety Instructions appearing in this manual are not meant to cover all possible conditions and situations that may occur. Common sense, caution and care must be exercised when installing, maintaining or operating the appliance. Always contact your dealer, distributor, service agent or manufacturer about problems or conditions you do not understand. R ECOGNIZE S AFETY S YMBOLS , W ORDS , L ABELS WARNING: Hazards or unsafe practices which COULD result in severe personal injury or death. CAUTION: Hazards or unsafe practices which COULD result in minor personal injury. SAVE THESE INSTRUCTIONS 1 IMPORTANT SAFETY INSTRUCTIONS WARNING: When using your appliance, always follow basic precautions, including the following: • Use the refrigerator only for its intended purpose. • To prevent possibility of hazard due to electrical shock, never plug the refrigerator into a receptacle which has not been grounded adequately and in accordance with the local and national electrical codes. See the warning and grounding instructions. • This refrigerator must be properly installed in accordance with its installation instructions. • Turn the power to your refrigerator off before cleaning or replacing light bulbs. • In case of power failure, minimize door openings. If the power failure is of a long duration, protect the food by placing blocks of dry ice on top of the packages or check with a local frozen foods locker about temporary storage. Frozen foods which have thawed completely should not be refrozen and should be discarded. • Any electrical service cord that becomes frayed or damaged should be immediately repaired or replaced. Never unplug your appliance by pulling on the power cord. • Your refrigerator should not be operated in the presence of explosive fumes. • Children should not climb, hang or stand on the shelves of this refrigerator. • To prevent the unit from tipping forward and to provide a stable installation, the unit must be secured in place with the anti-tip device (See separate installation instructions provided with this refrigerator). NOTE: The power pad in the fresh food compartment stops cooling and turns off the lights. It does not shut power to the unit off. Prior to changing light bulbs or other servicing, the Main Power switch in the upper machine compartment must be switched to OFF or “O”. WARNING: This appliance is designed to operate on a normal 115 volt, 15 amp, 60 cycle line.There should be a separate, grounded circuit serving this appliance only. Do not use an extension cord. Do not use any device that will alter the electrical performance of this appliance. This appliance is equipped with a threepronged grounding plug for your protection against possible electrical shock hazards. It must be plugged into a grounded receptacle. Where a standard two-prong wall receptacle is encountered, it is the personal responsibility and obligation of the customer to have it replaced with a properly grounded three-prong wall receptacle. Do not, under any circumstances, cut or remove the third (ground) prong from the power cord. Do not use an adapter plug. Do not use an extension cord. Do not use a Ground Fault Circuit Interrupter. Power supply cord with 3-prong grounding plug IMPORTANT: Child entrapment and suffocation are not problems of the past. Junked or abandoned refrigerators are still dangerous…even if they will sit for “just a few days.” If you are getting rid of your old refrigerator, please follow the instructions below to help prevent accidents. • Take off the doors. • Leave the shelves in place so that children may not easily climb inside. SAVE THESE INSTRUCTIONS 2 Grounded type wall receptacle (ground fault circuit not allowed) INSTALLATION For complete directions on proper installation of this refrigerator, please refer to the separate installation instructions provided. NOTE: Install the fresh food and freezer light shields according to the following instructions. IMPORTANT: • Make sure the floor under the refrigerator is level with the surrounding finished floor. • Protect a finished floor with plywood, cardboard or other suitable material before moving the refrigerator across it. • Once installed, this built-in refrigerator is not designed to be moved. For information on moving, refer to installation instructions or call toll free 1-866-459-6298. L IGHT S HIELD The Light Shield and ClimateZone™ Air Diverter come packaged on the lowest refrigerator shelf. Light Shield TO INSTALL THE LIGHT SHIELDS: 1. Place the plastic hooks in the rear corners of the shield over the screws located in the sidewalls. 2. While depressing the front catches, raise the shield up to the bottom of the control panel. 3. Release the catches so they rest above the back edge of the control panel bottom. C LIMATE Z ONE ™ A IR D IVERTER IMPORTANT: The Air Diverter must be installed correctly to ensure efficient operation of the ClimateZone™ storage drawers. TO INSTALL: Place the tabs on each end of the diverter in front of the shelf support rails and lower into place. C LIMATE Z ONE ™ D RAWERS Remove the shipping foam piece packed in the top of the ClimateZone™ drawer before operating the refrigerator. TO REMOVE: 1. Depress the catches at the front of the shield. 2. Swing the shield downward. 3. Lift the plastic hooks from the screws and pull the shield straight out. Air Diverter R EMOVE S HIPPING C LIPS Your new refrigerator was packed carefully for shipment. The shelf packing clips, located in the frame above each shelf, must be removed prior to rearranging the shelves in the refrigerator. To remove: Depress the upper part of the clip, wiggle the clip sideways and pull straight out. 3 MACHINE COMPARTMENT The Machine Compartment is located at the top of the refrigerator. Within the Machine Compartment are the main Main Power Switch power switch, the water filter, the condenser and a switch to change the electronic control from Fahrenheit to Celsius. Fahrenheit /Celsius Switch (see page 6) DO NOT remove the foam pieces from the machine compartment cover or the condenser. Condenser (see page 19) TO REMOVE THE MACHINE COMPARTMENT COVER: TO REPLACE THE MACHINE COMPARTMENT COVER: Grasp the cover on the outer edges and lift up, then out and off. Set the cover aside. Tilt the top of the cover forward slightly and insert the top set of hooks into their matching slots. 4 NOTE: Water Filter (see pages 13-14) Follow by inserting the bottom set of hooks into their appropriate slots. When the hooks are fully inserted, the cover securely settles into place. ELECTRONIC CONTROL CENTER The electronic control center is located at the top of the fresh food compartment. NOTE: Allow the refrigerator to run for 8-12 hours before loading. This ensures appropriate temperatures for food storage. U NIT P OWER Touch this pad to start or stop cooling and turn off the lights in both the fresh food and freezer compartments. This pad DOES NOT shut off power to the refrigerator. To turn off all power to the refrigerator, turn the Main Power switch OFF or “O” (see page 4). IMPORTANT: Turn off all power to the refrigerator at the main power switch whenever changing light bulbs, cleaning or servicing this refrigerator. I NITIAL T EMPERATURE S ETTINGS Temperatures are preset at 37° F (3° C) in the fresh food compartment and 0° (-18° C) in the freezer compartment. The display will show the average compartment temperatures, based on several measurement points within the compartment. NOTE: Temperatures displayed may vary from set point due to door openings or during defrost. • Press the Door Alarm pad again to deactivate. NOTE: Thermometers placed in the refrigerator may record a temperature slightly above or below the displayed temperature. This is normal as the displayed temperature is an average. T EMPERATURE A DJUSTMENTS • Allow the temperature to stabilize for 24 hours after loading the refrigerator before making any temperature adjustments. • The first touch of the up or down arrow shows the current temperature setpoint. • Subsequent touches of the pad raise the temperature set point or the pad lowers the temperature set point. • The display will show the new setpoint for approximately three seconds, then return to the actual temperature currently within that compartment. • Limit temperature changes to one degree at a time. Allow the new temperatures to stabilize for 24 hours before making a new temperature adjustment. D OOR A LARM The Door Alarm will alert you when one of the doors has been left open for 10 continuous minutes. When this happens, the compartment light will go out and a chime will sound every few seconds until the door is closed or the Door Alarm pad is pressed to deactivate the function. • Press the Door Alarm pad to activate. A chime will sound and ON will illuminate. 5 • When the alarm has sounded, close door to reset. OR • Press the Door Alarm pad to deactivate. Press again to reactivate, if desired. WATER F ILTER • WORKING is illuminated when a water filter has been installed. It will not illuminate when the filter bypass is in place (see page 13 for information on installation of the water filter or bypass). • ORDER will illuminate when 90 percent of the volume of water for which the filter is rated has passed through the filter. OR Eleven months have elapsed since the filter has been installed. • REPLACE illuminates when the rated volume of water has passed through the filter or 12 months have elapsed since the filter was installed. A new filter should be installed immediately when REPLACE is illuminated. When the new filter is installed, the WORKING light will reilluminate. See page 13. NOTE: Power to the refrigerator must be ON when the filter is changed for the water filter monitoring system to reset and change back to the “WORKING” indicator. • Set the switch to the desired mode - °C or °F. P OWER I NTERRUPT NOTE: When enabled, Power Interrupt will record and display the highest temperature reached in the fresh food and freezer compartments during a power outage. If an outage has occurred, the display will alternately show the current compartment temperatures and the highest compartment temperatures reached when the power was out. Frozen foods which have thawed completely should not be refrozen. Discard these items. Fresh, perishable items stored above 40° for two hours or longer should also be discarded. • Touch the RESET pad to enable this feature.The RESET pad will illuminate. • After a power outage or interruption, touch the RESET pad once to resume displaying the current compartment temperature. FAHRENHEIT /C ELSIUS D ISPLAY The control can be changed to display temperatures in either degrees Fahrenheit or degrees Celsius. • Open the machine compartment at the top of the refrigerator (see page 4). • The RESET pad will continue to be illuminated and enabled. • Touching the RESET pad a second time will turn off this function and the pad will not be illuminated. 6 All temperature displays will change to the selected mode, including the ClimateZone™ drawer displays. FRESH FOOD COMPARTMENT S HELVES The Fresh Food Compartment is equipped with Standard Adjustable Shelves and/or Elevator™ Shelves (features may vary by model). Both shelf styles feature a spill retainer edge.They also slide out for easier access to items stored at the rear of the shelf. To slide out, grasp the front of the shelf and pull. Gently push in to return the shelf back to its original position. • Push up the tabs under the outside edges of the shelf behind the front bracket and continue pulling the shelf out, until it clears frame. TO REINSTALL: • Align the shelf into the guides on the frame. • Push the shelf all the way back. (It is not necessary to push up the tabs for reinstallation). TO REMOVE: • Pull the drawer out until it stops. • Tilt the drawer up and pull it out. TO REINSTALL: • Slide the empty drawer bracket back on the track until the bracket tab slips under the track “catch.” In ordinary use, the Elevator™ shelf frame assembly does NOT require removal. S TANDARD A DJUSTABLE S HELVES In the unlikely event that the assembly needs to be removed, it is important to follow the correct removal procedure. TO REMOVE OR ADJUST: TO REMOVE THE FRAME ASSEMBLY: • Completely unload the shelf. A LA C ARTE S TORAGE D RAWER • Hold on to the lower bar support. • Lift up the rear of the shelf slightly. • Pull the shelf straight out. TO LOCK SHELF INTO ANOTHER POSITION: • Tilt up the front edge of the shelf. • Lift up the rear of the shelf. • Insert the hooks into the desired frame openings. • Let the shelf settle into place. • Be sure the shelf is level and securely locked at the rear before reloading it. E LEVATOR ™ S HELF The Elevator™ shelf can be adjusted up or down without being unloaded. To adjust the height,pull out the knob on the handle built into the shelf front. Turn the handle clockwise to raise the shelf and counterclockwise to lower the height of the shelf. TO REMOVE SHELF FOR OCCASIONAL CLEANING: • Completely unload the shelf. • Partially slide the shelf out. • Unload the shelf completely. • Slide the shelf forward about two inches (6 cm). Manually move the two rear latches toward the shelf center. • While supporting the entire shelf and frame from underneath, lift slightly and rotate the assembly approximately 30° to allow the rear mechanism to clear the rear rails. The entire assembly can then be moved forward and clear of the refrigerator compartment. To reinstall, reverse the removal procedure. Be sure the shelf is in a level position. When the sliding shelf is pushed to the rear, the rear latches will reposition to their correct operating position. NOTE: To remove the entire compartment assembly surrounding the ClimateZone™ drawers, refer to page 19. 7 • Tilt the drawer front up, slide the drawer back into place (until the bar rests in the slot at the bottom front of the drawer). • Close the drawer. TO REMOVE THE STORAGE DRAWER FRAME: • Remove drawer. • Lift up the rear of the frame slightly. • Pull the frame straight out. TO MOVE THE DRAWER FRAME TO ANOTHER POSITION: • Insert the rear hooks into the desired openings. • Let the frame settle into place. • Be sure the frame is level and securely locked at the rear before putting the drawer back in. CLIMATEZONE™ STORAGE DRAWERS The two lower drawers in the fresh food compartment are equipped with ClimateZone™ Technology. This technology allows the temperature within each drawer to be tightly controlled for storing meats, fresh produce or citrus. The electronic temperature control within these drawers provides preset temperatures, based on the food group that is selected. The actual temperature within each ClimateZone™ drawer is displayed electronically. Each setting provides temperatures in the range outlined in the chart below. Temperature Selection Set Point Temperature Display Range* Normal None The display is blank Citrus 38° F (3° C) 37 - 39° F (3 - 4° C) Produce 34° F (1° C) 33 - 35° F (1 - 2° C) Meats 31° F (-1° C) 30 - 32° F (-1 - 0°C) * Varying factors such as environment, drawer openings, refrigerator control settings, etc. may cause the temperature display on the drawer to fluctuate outside the range of temperatures listed above. This is normal. For best results, set the fresh food compartment to 37 ° F (3° C) and the freezer compartment to 0° F (-18° C). NOTE: The Normal Cold setting turns off the ClimateZone™ Technology, The drawer then operates as a standard crisper. NOTES: NORMAL COLD NORMAL COLD CITRUS CITRUS PRODUCE PRODUCE MEATS ClimateZone™ Drawer Settings The MEATS setting is recommended whenever storing fresh meat, poultry and fish. Store meats in airtight containers or sealed bags to contain any juices. Clean up spills immediately, then disinfect. Select the PRODUCE setting when storing a mixed load of fresh fruits and vegetables, such as: Apples Green onions Nectarines Radishes Cabbage Romaine Carrots Herbs Strawberries Cauliflower Peaches Broccoli Asparagus Kiwi fruit Spinach Celery Leeks Cherries Lettuce bagged, pre-cut salads and vegetables Select the CITRUS setting when storing fruits such as oranges, grapefruit, lemons, limes, pineapple, cranberries, watermelons and tangerines. Fruits and vegetables can be stored loosely wrapped or unwrapped. Fruits with skins such as apples and grapes should not be stored in airtight bags or containers. 8 • After prolonged or repeated drawer openings and/or loading the drawers, the displayed temperature may rise. This is normal.The temperature will recover in a short period of time. • When meat is being refrigerated for the purpose of thawing, it should be stored in a pan with sides or a sealed bag or container, on a refrigerator shelf. Frozen meats will thaw very slowly when stored in the ClimateZone™ drawer on the “Meats” setting. • Under heavy usage conditions, the exterior surfaces of the ClimateZone™ drawers may fog. This is normal. The condensation will clear once the door is closed for a period of time. • Due to the accuracy and the location of the ClimateZone™ temperature sensor system, drawer temperatures measured with household thermometers may vary slightly from the digital display.This is normal. TO REMOVE CLIMATEZONE™ STORAGE DRAWERS: • Pull drawer out until it stops. • Lift front edge and pull all the way out. TO REPLACE CLIMATEZONE™ STORAGE DRAWERS: • Set drawer on side tracks. • Slide drawer in until the bar rests in slot on underside of drawer front. • Close the drawer. CLIMATEZONE™ STORAGE DRAWERS, CONT. A UTOMATIC H UMIDITY C ONTROL The ClimateZone™ drawers are equipped with Automatic Humidity Control, eliminating the need for manual humidity slide controls. A fabric-like material* covers small air vents in the drawer housing above the crispers.This material controls the flow of moisture vapor out of the crisper. If a food spill should occur on the air vent or fabric-like material, wipe with a clean, damp cloth. * The Automatic Humidity Control system features a unique, patented material called Shape Memory Polymer (SMP) that when laminated to fabric, becomes DIAPLEX. DIAPLEX is manufactured by Mitsubishi. DOOR STORAGE A DJUSTABLE D OOR B INS D AIRY C OMPARTMENT (Fresh Food Compartment) (Fresh Food and Freezer) The door bins can be moved to best suit your storage needs. TO REMOVE: • Lift the bin up until it clears the retainers on the door liner. • Pull the bin straight out. • Reverse this procedure to secure the bin into another position on the door. CAUTION: D ROP D OWN D OOR B ASKETS (Freezer Compartment) The dairy compartment, designed for storing spreadables such as butter or margarine, can be moved to other locations on the fresh food door. TO MOVE: • Lift the compartment up until it clears the retainers on the door liner. • Pull the compartment straight out. • Reverse this procedure to secure the compartment into another position on the door. DO NOT remove the pick-off door bins or the dairy compartment by grasping the chrome trim. Drop down door baskets provide convenient storage for items that tend to shift or slide, such as bagged vegetables or coffee. These baskets are also adjustable in the same manner as the door bins. 9 FREEZER COMPARTMENT A DJUSTABLE W IRE S HELVES TO REMOVE WIRE SHELVES: • Completely unload the shelf or remove basket. • Lift up the rear of the shelf slightly. • Pull the shelf straight out. TO LOCK THE SHELF INTO ANOTHER POSITION: • Tilt up the front edge of the shelf. • Lift up the rear of the shelf. • Insert the hooks into the desired frame openings. TO REINSTALL SHELF: • Align the shelf into the guides on the frame. • Push the shelf all the way back. (It is not necessary to push up the tabs for reinstallation). In ordinary use, the Elevator™ shelf frame assembly does NOT require removal. In the unlikely event that the assembly needs removal, it is important to follow the correct removal procedure. See page 7. I CE D RAWER (Non-dispenser Models) The automatic icemaker keeps this drawer stocked with ice. To retrieve ice, pull open the drawer. TO REMOVE: • Pull out the drawer until it stops. • Reach into the drawer compartment and move the wire lever arm on the icemaker into the up (OFF) position. • Lift the front of the drawer up. W IRE F REEZER B ASKETS • Pull the drawer completely out. TO REINSTALL: To load or retrieve items from a freezer basket, pull the drawer forward. • Align the drawer sides onto the matching side rails. F REEZER E LEVATOR ™ S HELF TO REMOVE: • Push the drawer in. This shelf can be adjusted up or down without being unloaded. • Tilt up the front of the basket. To adjust the height, pull out the knob on the handle built into the shelf front. Turn the handle clockwise to raise the shelf and counterclockwise to lower the height of the shelf. • Place basket on extended tracks. • Let the shelf settle into place. Be sure the shelf is level and securely locked at the rear before reloading it with food. • Reach into the drawer compartment and move the wire lever arm on the icemaker into the down (ON) position. • Pull out the drawer out until it stops. • Lift it completely out. TO REPLACE: • Place tabs on basket sides under tabs on track. Drawers should sit flat on track. • Push drawer all the way in. TO REMOVE SHELF: • Completely unload the shelf. • Slide the shelf out until it stops. • Push up the tabs under the outside edges of the shelf behind the bracket and continue pulling the shelf out, clear of the frame. 10 AUTOMATIC ICEMAKER After the refrigerator has been connected to the water supply, move the wire lever arm on the icemaker into the down (ON) position to start its operation.The icemaker will fill with water when the freezer reaches the proper temperature. It may be 8 to 12 hours before the icemaker furnishes any usable ice cubes. Discard all the cubes from the first two or three batches made.These initial ice cubes may be irregularly shaped, discolored, or contain impurities from the new water supply piping. When the ice cubes are ejected it is normal for several cubes to be joined together at the ends. They can easily be broken apart. The icemaker will continue to make ice until the supply of ice cubes raises the wire lever arm, shutting the icemaker off. I CE B IN CAUTION: To check the ice level or gain access to the ice bin, lift the door on the bin. TO REMOVE THE BIN: • Turn off the icemaker by moving the icemaker wire lever arm up to the OFF position. • While holding the top edge of the ice bin, grasp the lower edge of the ice bin and pull down to release the latch, then pull ice bin out. • Reverse procedure to replace the ice bin. • Turn the icemaker on by lowering the wire lever arm. To manually stop the operation of the icemaker, move the wire lever arm into the up (OFF) position. • Do not place fingers or hands on the automatic ice making mechanism while the refrigerator is plugged in. • Under certain rare circumstances, ice cubes may be discolored, usually appearing with a green-bluish hue. The cause of this unusual discoloration is a combination of factors such as certain characteristics of local water, household plumbing and the accumulation of copper salts in an inactive water supply line which feeds the icemaker. Continued consumption of such discolored ice cubes may be injurious to health. If such discoloration is observed, discard the ice cubes and contact your local water utility or water treatment company. NOTE: Certain sounds may accompany the various cycles of the icemaker. Beverages and foods should NOT be placed in the ice storage bin for quick chilling.These items can block the wire lever arm, causing the icemaker to malfunction. • buzzing of the water valve • running of the water as the tray fills • rattling of the ice cubes falling into an empty ice bin. If the ice is not used frequently, the ice cubes will become cloudy, shrink, stick together and taste stale. Empty the ice storage bin periodically and wash it in lukewarm water. Rinse and dry thoroughly. 11 AUTOMATIC ICE AND WATER DISPENSER (SELECT MODELS) D ISPENSING WATER AND I CE NOTES: • When using the ice dispenser for the first time, discard the first two or three dozen cubes. • When using the water dispenser for the first time, press the actuator pad for ten minutes to bleed the air from the water line. Discard the first five to six glasses of water dispensed. This will ensure pure and fresh water for drinking. To dispense ice or water, position a glass against the top portion of the actuator pad and press. Hold the glass up to the ice opening to avoid spills. To stop dispensing, release the pressure on the actuator pad and hold the container in position momentarily to catch the last pieces of ice or the last drops of water. The ice delivery door will remain open for a short time. When it closes, a closing sound can be heard. D ISPENSER L IGHT When the actuator pad is touched, the dispenser light automatically illuminates. To manually turn the light on, touch the pad. To turn the light off, touch the pad again. D ISPENSER L OCK To interrupt power to the water and ice dispenser so it cannot be used, touch the pad 3 times within 10 seconds. The lock pad is illuminated when the dispenser is locked. Touch the pad 3 times within 10 seconds again to unlock the ice and water service. S PILL T RAY DO NOT pour water into the Spill Tray grille at the bottom of the dispenser area. This is a spill area, NOT a drain. Normal, small spills will evaporate. Larger spills should be wiped up with a soft cloth or sponge. The grille slides out for clean up. It is recommended to clean the spill area occasionally to prevent mineral deposits. C RUSH , C UBE , WATER PADS The control pads are located on the dispenser control panel.To select the desired function, touch the appropriate pad. When ice cubes, crushed ice or water pads are touched the selection is illuminated. 12 ICE AND WATER DISPENSING TIPS • Some crushed ice may be dispensed even though cubed ice was selected. This happens occasionally when a few cubes are accidentally channeled into the crusher. • Likewise, when changing from crushed ice to cubes, some crushed ice may be dispensed. This may also happen if irregular-sized cubes or ice chips are in the storage bin. • If the “crushed” option is used frequently or exclusively, select the “cube” option occasionally to clear any crushed ice that may have built up in the chute. • A slight pause may be noticed when dispensing crushed ice.This is normal because the ice is being channeled to the crusher. Crushed ice pieces will vary in size and shape. • If the ice dispenser is not used frequently, ice cubes may clump together and may need to be broken apart or discarded. • Do not add ice to the storage bin which was not produced by the icemaker. It may not crush and/or dispense properly. • Avoid operating the ice dispenser continuously for more than five minutes. Remove large quantities from the bin by hand. • Avoid dispensing ice directly into fine china or delicate crystal. The pressure of pressing against the actuator pad and the ice dropping into the container can cause cracking or chipping of delicate items. • Water from the dispenser is not as cold as ice water.The first glass or two of water dispensed each time may be warmer than subsequent glasses. • To avoid splashing, fill the glass with ice before adding water. WATER FILTER I NITIAL F ILTER C ARTRIDGE I NSTALLATION The water filter mounts in the machine compartment above the refrigerator. Your refrigerator was delivered from the factory with a filter bypass in place. If the filter was not installed for you when the refrigerator was installed, the filter cartridge can be found packaged inside of the refrigerator. It can be easily installed without using any additional parts, screws or fasteners. If the home is equipped with a Reverse Osmosis water treatment system, this additional water filter is not necessary. The filter bypass should remain installed. IMPORTANT: • In order for the water filter monitor system to be set, power to the unit must be ON when a new filter is installed. Filter Bypass 3. Carefully remove the filter from its packaging. 4. Remove the red cap from the filter. 5. Lubricate the O-ring with food-grade vegetable oil. 6. Line up the cartridge ears so it can be inserted into the filter head. Rotate the cartridge into the head. Twist the cartridge 1⁄4 turn clockwise to lock it into place.You will feel a stop. 7. Dispense water through the dispenser for 10 minutes to flush away any loose particles. 8. Carefully check for leaks. R EPLACING C ARTRIDGE THE F ILTER 1. Twist the filter cartridge 1⁄4 turn counterclockwise to disengage from the head. Twist gently until the cartridge is free from the head, but DO NOT pull. 2. Carefully remove the replacement filter from its packaging. 3. Follow steps 4 through 8 under Initial Filter Cartridge Installation. 1. Remove the machine compartment cover (see page 4). 2. Twist the filter bypass cap 1⁄4 turn counter-clockwise to disengage. Remove the filter bypass from the filter head apparatus. NOTE: Filter life may be affected by abnormal feed water conditions or unusual incidents such as hydrant flushes, reservoir turnover or varying local water conditions. NOTES: • The filter bypass or water filter must be in place or no water or ice will be dispensed. • DO NOT dispose of the filter bypass. It should be stored for future use, in the event that you choose to use the water and ice dispenser without a filter. 13 P ERIODS OF N ON -U SE If the refrigerator has been out of use or ice and water have not been dispensed for more than 2 weeks, the filter should be replaced when the refrigerator is put back into service. S PECIAL N OTICES It is essential that operation, maintenance and filter replacement requirements be carried out as scheduled. This product is for cold-water use only. Do not use with water that is microbiologically unsafe, or of unknown quality without adequate disinfection before or after the system. Systems certified for cyst reduction may be used on disinfected water that may contain filterable cysts. For your own knowledge and safety, it is recommended that your water quality be periodically tested. The contaminants or other substances removed or reduced by this water treatment system are not necessarily in your water. The feed water connection must conform to applicable plumbing codes. NOTE: A newly installed water filter cartridge may cause water to temporarily spurt from the dispenser. R EPLACEMENT F ILTER C ARTRIDGES For replacement filter cartridges or for service, contact your local dealer or Maytag Appliance Sales Company, Jenn-Air Customer Assistance, 1-866-459-6298 (USA and Canada) State of California Department of Health Services Water Treatment Device Certificate Number 99 - 1408 Date Issued: December 14, 1999 Replacement Filter Model Number: UKF7002AXX - Taste, odor, chlorine, cysts and lead The PuriClean™ water filter is manufactured for Maytag Appliances by: Cuno Incorporated 400 Research Parkway Meriden, CT 06450 Rated Flow: Min. Op.Temp: Max. Op.Temp: Min. Op. Press: Max. Op. Press: .5 gpm (1.9 L) 33° F (.6° C) 100° F (38° C) 30 psi (207 Kpa) 125 psi (862 Kpa) The filter listed below has been tested and certified to NSF International under ANSI/NSF Standards 42 and 53 for the reduction of impurities as indicated: NSF Taste/Odor Trademark/Model Designation Maytag PuriClean UKF 7002 AXX Replacement Elements UKF 7002 AXX Manufacturer: Cuno, Inc. The water treatment device(s) listed on this certificate have met the testing requirements pursuant to Section 116830 of the Health and Safety Code for the following health related contaminants: Microbiological Contaminants and Turbidity Cysts (protozoan) Turbidity Inoganic/Radiological Contaminants Lead Organic Contaminants None UKF7002AXX Yes Chlorine Class 1 Std.42 Yes Turbidity Std. 53 Yes Particulate Std. 42 Yes (Class I) Cyst Std. 53 Yes Lead Std. 53 Yes Capacity 416 gal. (1574 L) Function Chemical/ Mechanical Rated Service Capacity: 416 gallons Rated Service Flow: 0.5 gpm Do not use where water is microbiologically unsafe or with water of unknown quality, except that systems claiming cyst reduction may be used on water containing cysts. See accompanying Product Data Sheet for further information on filters. 14 FOOD PURCHASING, STORAGE & HANDLING GUIDELINES T EMPERATURE The fresh food compartment should be set in the range of 34° F (1° C) - 38° F (3° C), based on your preference. The freezer compartment should be set at 0° F (-18° C) or below. The best cooling occurs when the air is allowed to circulate freely around the food items. Do not over crowd the refrigerator shelves. E GGS AND D AIRY Store eggs on the refrigerator shelf in their original carton. Refrigerate eggs in the shell until you are ready to use them, do not allow them to warm up to room temperature prior to cooking. Do not use cracked eggs. Do not purchase eggs if they are being sold from the aisle, rather than a cooler. Follow the freshness dates printed on the packaging when using dairy foods. Refrigerate dairy foods immediately after purchase and after each use. Close cartons tightly after use to keep out air and other food odors. Occasionally mold will develop on the surface of hard cheeses (Swiss, Cheddar, Parmesan, etc). Cut off at least an inch around and below the moldy area, keeping the knife out of the mold itself. If soft cheese, cottage cheese, cheese slices or other cheese foods develop mold, do not save. F RESH M EATS P OULTRY AND F RESH F RUITS V EGETABLES AND Leave meat and poultry in original store wrap before use (repeated handling can introduce bacteria into the product). Store in a ClimateZone™ storage drawer set on the appropriate setting (Produce or Citrus, see page 8). Store raw meats in sealed packages to prevent leaks and possible contamination of other foods and surfaces. Sort fresh produce items before storage and use bruised or soft items first. Discard those showing signs of decay. If not freezing fresh meats or poultry, store in the ClimateZone™ drawer set on the Meats setting. Handle fresh produce with care. Even a minor bruise can promote decay and result in premature quality loss. Observe and follow all expiration dates for perishable items that are precooked or ready to eat. Wrap odorous foods such as onions and cabbage. L EFTOVERS Refrigerate or freeze leftovers immediately. Perishable food should never be allowed to be out at room temperature for greater than 2 hours total. Store leftovers in clean, shallow, tightly covered containers. The core of dense, large pieces of meat and poultry or deep pots of soup and stew take longer to reach a safe storage temperature. Shallow containers allow food to cool thoroughly more quickly. Cut large cuts of meat into slices of 3 inches (7.62 cm) or less and remove poultry from the bone before refrigerating. Divide soups and stews into smaller containers. When reusing leftovers, reheat thoroughly. Heat up leftover sauces, soups, and gravy quickly and boil for at least one minute. Heat other leftovers to 165° F (74° C). 15 Wait to wash and cut up fresh fruits and vegetables until right before use. Washing can strip away natural protection while cutting initiates enzyme activity. Both factors can have a negative effect upon shelf life. Wash all fresh fruits and vegetables at the time of use, even those with a peel or rind that will not be eaten. This helps prevent bacteria from the outside being transferred to the edible inside during cutting. F ROZEN F OOD S TORAGE Do not refreeze items that have completely thawed. The freezer section will operate more efficiently when it is loaded. If there are not enough food items to fill the freezer at least 2⁄3 full, use bags of ice or milk cartons filled with water to fill the freezer up to this level. VEGETABLE SELECTION AND STORAGE CHART FRESH VEGETABLES SELECTION STORAGE Artichokes Choose tight, compact heads that feel heavy for their size. Avoid if wilted, moldy or woody. Store in the ClimateZone™ drawer on the “Produce” setting. Asparagus Choose firm, straight stalks with compact tips. Wrap stem ends in a wet paper towel. Store in the ClimateZone™ drawer on the “Produce” setting. Beets Choose small to medium-size beets with skin that is firm and smooth.Tops should be tender and fresh. Remove tops for storing. Store in the ClimateZone™ drawer on the “Produce” setting. Bok Choy Look for clean, crisp stalks with fresh-looking leaves. Avoid product that is wilted or yellowing. Store in the ClimateZone™ drawer on the “Produce” setting. Broccoli Buds should be a rich green, firm and be packed closely together. Leaves should be bright and unwilted. Store in the ClimateZone™ drawer on the “Produce” setting. Brussels Sprouts Choose small round heads with dark green, compact leaves. Avoid those that are puffy, wilted or yellow. Keep handling to a minimum and use as soon as possible. Store in the ClimateZone™ drawer on the “Produce” setting. Carrots Well shaped, smooth, firm carrots. Avoid if pliable or shriveled. Trim tops closely. Store on the “Produce” setting. Cauliflower Choose cauliflower that is creamy white with compact florets.The jacket leaves should be bright green and firmly attached. Store in the ClimateZone™ drawer on the “Produce” setting. Corn Look for bright green, moist husks that when pulled back reveal well filled, even rows of plump kernels. When pricked, the kernels should give a squirt of juice. Store in the husks in the ClimateZone™ drawer on the “Produce” setting. Use as soon as possible. Fresh Cut Vegetables and Salad Mixes Vegetables should be brightly colored. Avoid product that is wilted or slimy. Avoid punctured containers. Follow “use by,” “sell by” and expiration dates. Keep cold in the ClimateZone™ drawer on the “Produce” setting. Leeks Choose smaller size leeks with fairly straight (not bulbed) bases. Store away from foods that absorb odors. Store in the ClimateZone™ drawer on the “Produce” setting. Lettuce: Boston/Bibb, Iceberg, Romaine Avoid if leaves appear wilted, discolored, dried or translucent. Avoid heads with dark butts (some minor browning is normal due to natural processes that occur after harvest). Store in the ClimateZone™ drawer on the “Produce” setting Mushrooms Mushrooms should be plump, firm and free of spots. Store in the original container, do not store in a plastic bag. Store in the ClimateZone™ drawer on the “Produce” setting. Radicchio Choose well-shaped, compact heads. Leaves should be dark maroon-red with white veins. Store in the ClimateZone™ drawer on the “Produce” setting. Radishes Look for bright color, with well-formed roots and crisp, white flesh.Tops should be green and fresh. Remove tops for storing. Store in the ClimateZone™ drawer on the “Produce” setting. Spinach Look for deep green coloring. Avoid spinach that is yellowing, wilted or has long stems. Store in the ClimateZone™ drawer on the “Produce” setting. Sprouts Good quality sprouts should be brightly colored with a crisp texture. Avoid if slimy or discolored. Store in the ClimateZone™ drawer on the “Produce” setting. 16 FRUIT SELECTION AND STORAGE CHART FRESH FRUITS SELECTION STORAGE Apples Look for apples with firm, smooth skin and good color.The presence of scald, which is a dry brown patch on the skin does not affect taste. Handle with care to avoid bruising and skin damage. Store in the ClimateZone™ drawer on the “Produce” setting. Apricots Select plump, fairly firm apricots that are golden or burnt orange in color. Avoid if there are soft or mushy spots or the apricot is pale yellow to greenish-yellow. Ripen at room temperature. When ripe, store in the ClimateZone™ drawer on the “Produce” setting. Berries: Blackberries Blueberries Raspberries Strawberries Good quality berries should be dry, clean, plump and wellcolored. Blackberries: The caps should not be still attached. Blueberries: Should have a silvery sheen or “bloom.” Strawberries: Caps should be fresh, green and intact. Store in the ClimateZone™ drawer on the “Produce” setting. Store in original, vented carton. Cantaloupe Cantaloupe will not ripen after harvest. Select those that are heavy for their size, symmetrical and have a sweet fragrance. The “netting” should be thick with a golden background color, not green.The stem end should give slightly. When uncut, store on countertop. After cutting, store in the ClimateZone™ drawer on the “Produce” setting. Cherries Cherries should be plump with firm, brightly colored skins and green stems. Store in the ClimateZone™ drawer on the “Produce” setting. Cranberries Choose cranberries that are firm and well-colored. Avoid if they are shriveled or soft. Store in the ClimateZone™ drawer on the “Citrus” setting. Grapefruit Choose a grapefruit that is heavy for its size and flat on both ends. Store in the ClimateZone™ drawer on the “Citrus” setting. Grapes Choose grapes that are plump and firmly attached to green pliable stems. Store in the ClimateZone™ drawer on the “Produce” setting. Do not store in airtight packaging. Kiwifruit Good quality kiwifruit is plump without wrinkles or signs of exterior damage. Store in the ClimateZone™ drawer on the “Produce” setting. Lemons and Limes Choose fruit that is firm and heavy for its size. Store in the ClimateZone™ drawer on the “Citrus” setting. Mango Choose pieces that are free of bruises and blemishes. Mangoes that are ripe will give to gentle pressure. Store at room temperature. Nectarines Look for fruit that is orange-yellow between areas of red, without any green. Skin should be smooth and unblemished. Ripen at room temperature, then store in the ClimateZone™ drawer on the “Produce” setting. Oranges Choose firm fruit that is heavy for its size. Avoid any with soft spots or white mold at the ends. It is normal for ripe oranges to have a slight greening. Keep oranges separated from foods that absorb odors such as, cheese or butter. Store in the ClimateZone™ drawer on the “Citrus” setting. Papaya A papaya should be firm with unblemished skin, regardless of the degree of ripeness. Store at room temperature. A papaya is ready to eat when the peel is approximately 3⁄4 yellow to yellow-orange in color and it yields to gentle palm pressure. continued… 17 FRESH FRUITS SELECTION STORAGE Peaches Avoid peaches that show signs of green, are very hard or have wrinkled skin. The skin should have a background color that is creamy or yellowish. Ripen at room temperature, then store in the ClimateZone™ drawer on the “Produce” setting. Pears Select pears that are firm and unblemished. Ripen at room temperature, then store in the ClimateZone™ drawer set on the “Produce” setting. Pineapple Pineapple needs to be picked when it is ripe as it will not ripen off of the plant. Look for green leaves and sweet aroma.Avoid those with soft spots or fermented odor. Store in the ClimateZone™ drawer on the “Citrus” setting. Plums Choose the fruit that is full colored, smooth, plump and fairly firm. Avoid plums that have broken skin or are shriveled. Ripen at room temperature, then store in the ClimateZone™ drawer set on the “Produce” setting. Tangerines,Tangelos Look for fruit that is heavy for its size. Avoid if there are soft spots, water-soaked spots or mold. Store in the ClimateZone™ drawer set on the “Citrus” setting. Tomatoes Tomatoes should have bright, shiny skins and firm flesh. Avoid those that are soft, mushy, lacking in color or have blemishes or growth cracks. Store at room temperature. Refrigerated temperatures degrade a tomato’s taste and texture. Watermelon Watermelon should be ripe upon purchase, they do not ripen after harvest. Indicators that it was picked after it ripened include a dull rind, dried stem and a yellowish underside where the melon touched the ground. A ripe watermelon will also produce a distinct hollow sound when thumped. If the rind is shiny and is white, pale green or light yellow underneath, it is immature. When uncut, store on the countertop. Refrigerate in the ClimateZone™ drawer set on “Citrus” after it has been cut. 18 MAINTENANCE C ONDENSER Cleaning of the condenser is recommended every 3-6 months. TO CLEAN: • Remove Machine Compartment cover (see page 4). • Turn the power to the unit off using the Main Power switch. NOTE: Turning the power off on the electronic control panel inside the refrigerator stops cooling only in both compartments. It DOES NOT turn off power to the unit. • Use the soft brush vacuum attachment to loosen dust and lint on the condenser fins. Vacuum to remove the soil. • After cleaning, turn the Main Power switch back on. • Replace the machine compartment cover. L IGHT B ULB R EPLACEMENT U PPER F RESH F OOD AND F REEZER C OMPARTMENTS There are light bulbs at the top of each compartment. WARNING: Always remember to turn off (“O”) the power to the refrigerator at the main power switch and to wear gloves when replacing light bulbs. TO ACCESS THE UPPER LIGHT BULB AREA IN EITHER COMPARTMENT: • Remove the ClimateZone™ Air Diverter located at the rear of the fresh food compartment. • Push in on the fingertabs located behind the electronic control panel at the top of the compartment. • Lift up and remove the glass shelf. Air Diverter Strip • Lower the light shield. • Replace the burned out bulb(s) with standard A15-40 watt appliance bulb(s). Available from your dealer (part number 31956). • After replacing the bulb(s), push the light shield up into its original position. Shelf L OWER F RESH F OOD C OMPARTMENT There is a T8-40 watt bulb located behind each ClimateZone™ drawer. Replacement bulbs are available from your dealer (MCS part number 61008236). IMPORTANT: • To avoid damage to the ClimateZone™ drawers, power must be turned off at the Main Power switch (see page 3) before changing the bulb. TO REPLACE THE BULB BEHIND THE UPPER CLIMATEZONE™ DRAWER: • After the shelf is removed, 2 mounting screws are visible behind the drawer. Using a 1⁄4" hex head screw driver, remove these screws. • Slide the compartment assembly forward. • Unscrew the bulb and replace with a new T8-40 watt bulb. • Turn the power off to the refrigerator at the Main Power switch in the upper machine compartment (see page 4). • Slide the assembly back into its original position. Align the screw holes, making sure air ducts are in alignment. Replace the two screws. Replace the shelf and the air diverter strip. Reinsert the drawer into the compartment. • Unload and remove ClimateZone™ drawer. • Turn the power to the refrigerator back on. the upper IMPORTANT: • Do not remove the foam piece between the ClimateZone™ drawers. 19 TO REPLACE THE BULB BEHIND THE LOWER CLIMATEZONE™ DRAWER: • Turn the power off (“O”) to the refrigerator at the Main Power switch in the upper machine compartment (see page 4). • Unload and remove both ClimateZone™ drawers. • Remove the air diverter located at the rear of the fresh food compartment, on top of the upper ClimateZone™ compartment. • Lift up and remove the glass shelf. • After the shelf is removed, 2 mounting screws are visible behind the upper drawer. Using a 1⁄4" hex head screw driver, remove these screws. • Slide the upper compartment assembly forward. • Disconnect the power cords at the plug by pushing in the tabs and gently pulling apart. Pull the assembly completely out and set aside. • Remove the hex head screws behind the lower compartment. • Slide the lower compartment assembly forward. • Unscrew the bulb and replace with a new T8-40 watt bulb. • Slide the assembly back into its original position and align the screw holes. Replace the two screws. • Lift the upper assembly back into its original position leaving enough space to reach the power cords.To reconnect the upper assembly power cords, align the properly matching terminals and snap the power cords back together. • Push the assembly back into its original position and align the screw holes. Replace the two screws and then replace the glass shelf. Replace the air diverter strip. • Replace the drawers. • Turn the power back on to the refrigerator. IMPORTANT: • Do not remove the foam piece between the ClimateZone™ drawers. L OWER F REEZER C OMPARTMENT • Turn the power off (“O”) to the refrigerator at the Main Power switch in the upper machine compartment (see page 4). • Remove the freezer basket or ice drawer that is located in front of the light (select models). • Using a phillips screwdriver, remove the mounting screw on the light shield. • Unscrew the bulb and replace with a T8-40 watt appliance bulb. • Reinstall the light shield. • Reinsert the freezer basket or ice drawer. • Turn the power back on to the refrigerator. I CE AND WATER D ISPENSER L IGHT TO REPLACE: • Turn the power off (“O”) to the refrigerator at the Main Power switch in the upper machine compartment (see page 4). • Locate the light bulb in the dispenser area to the left of the actuator pad. • Remove bulb. • Replace the bulb, using a 120V, 7 watt bulb. • Turn the power back on to the refrigerator. 20 NORMAL OPERATING SOUNDS Recent improvements in refrigeration design may introduce sounds in your new refrigerator that were not noticed in earlier models. These improvements were made to create a refrigerator that will preserve food better, run more energy efficiently, and perform quieter overall. Because new refrigerator designs run quieter than past models you may start to detect sounds that were actually present in your older model but were typically masked by the refrigerator’s higher sound levels. Many of these sounds are normal. The following are some of the normal sounds your new refrigerator may make: REFRIGERANT FLOW: The flow of the cooling fluid in your freezer area may cause gurgling or quiet knocking sounds when the refrigerator cycles on or off. COMPRESSOR: The compressor on this unit has a variable speed motor. This variability allows the system to adjust to different usage needs. This will introduce speed change sounds and some higher pitched humming sounds that are normal for the operation of this type of compressor. CONTROL SWITCHES: In the electronics control area there are numerous control switches that make a quiet clicking sound when you use your refrigerator or during some of the normal system operations. ICE MAKER: The cabinet will occasionally generate a rattling sound when ice cubes are ejected into the freezer ice bin. You may also detect the motor that is ejecting that ice. These are normal sounds necessary for ice making. AIRFLOW SOUNDS: There are a number of fans in the refrigerator that make airflow sounds when in operation. The freezer fan circulates cool air throughout the refrigerator. The refrigerator circulating fan helps keep that compartment's temperature more uniform. The condenser fan on top of your refrigerator is utilized to remove the heat generated by the refrigeration system. Lastly, the Climate Zone compartments circulate air to maintain optimum temperatures. WATER VALVES: You may detect a slight buzzing sound under the refrigerator when water is requested from the ice dispenser or when the ice maker needs water to make ice. CABINET LEVELING: An unlevel cabinet may cause rattles and vibration noises. 21 CARE AND CLEANING CLEANING PROCEDURE Condenser Clean with a soft bristle brush or vacuum cleaner every 3-6 months. For additional information, see page 19. Door Handles Clean with detergent and water and mild liquid sprays. Do not use abrasive cleaners. Doors - Painted Clean with detergent and water and mild liquid sprays. Dry with a clean, soft cloth. Do not use a soiled cloth. Do not use scouring pads, powdered cleansers, bleach or cleaners containing bleach. Stainless Steel * DO NOT USE ANY CLEANING PRODUCT CONTAINING CHLORINE BLEACH. * ALWAYS WIPE WITH THE GRAIN WHEN CLEANING. EXTERIOR PARTS Daily Cleaning/Light Soil – Wipe with one of the following – Soapy water, white vinegar/water solution, Formula 409* Glass and Surface Cleaner or similar glass cleaner – using a sponge or soft cloth. Rinse and dry.To polish and help prevent fingerprints, follow with Stainless Steel Magic Spray, Part no. 20000008**. Moderate/Heavy Soil – Wipe with one of the following – Bon Ami, Smart Cleanser or Soft Scrub* – using a damp sponge or soft cloth. Rinse and dry. Stubborn soils may be removed with a damp Scotch-Brite* pad; rub evenly with the grain. Rinse and dry.To restore luster and remove streaks, follow with Stainless Steel Magic Spray. INTERIOR Discoloration – using a damp sponge or soft cloth, wipe with Cameo Stainless Steel Cleaner*. Rinse immediately and dry.To remove streaks and restore luster, follow with Stainless Steel Magic Spray. Control Panel * Wipe with a damp cloth. Dry thoroughly. * Glass cleaners may be used if sprayed on a cloth first. Do not use excessive amounts of cleaners or spray directly on the panel. * Do not use other cleaning sprays, abrasive cleaners or large amounts of water on the panel. Door Gasket Detergent and water or baking soda and water. Use 1-2 tablespoons baking soda per quart of water. Wring out excessive water from sponge or cloth when cleaning around controls, lights or electrical parts. Interior and Door Liners Detergent and water or baking soda and water (see Door Gasket above). DO NOT use abrasive cleaners, concentrated detergents, bleaches, cleaning waxes, solvents or polish cleaners to clean the refrigerator interior. Glass * Shelves * Bin fronts * Ice drawer front and top (select models) WARNING: To avoid breakage, allow glass shelves to warm up to room temperature before immersing in warm water. NEVER use hot water to clean glass shelves. Plastic * Drawers * Drawer Cavity * Bins * Dispenser Drip Tray Clean with detergent and water. Rinse and dry. Chrome Clean with detergent and water. Rinse and dry. DO NOT wash in an automatic dishwasher. Automatic Humidity Control mesh/vent area Use water only.Wipe with a clean, damp cloth. ClimateZone™ Technology Storage Drawers Remove drawers from compartments. Clean with detergent and water, rinse thoroughly and dry. ClimateZone™ Technology Compartment Assemblies Wipe with a clean, damp cloth. DO NOT use abrasive cleaners, concentrated detergents, bleaches, cleaning waxes, solvents or polish cleaners. Wash with detergent and water, glass cleaner or mild liquid sprays. Rinse and dry. DO NOT wash in an automatic dishwasher. ** Brand names are the registered trademarks of the respective manufacturer. ** To order directly, call 1-866-459-6298. 22 BEFORE YOU CALL FOR SERVICE F RESH FOOD OR FREEZER DOOR DIFFICULT TO OPEN . WARM AIR FROM MACHINE COMPARTMENT. R EFRIGERATOR TOO COLD . • Due to air flow between the compartments, it may be difficult to open the doors for several seconds after one of them is closed. • Normal air flow for condenser circulation. • Refrigerator temperature set too cold. D ISPENSER • Cabinet not level. • Weak floor. • Improper installation. WILL NOT DISPENSE WATER OR ICE ( SELECT MODELS ). • A water filter, or the filter bypass plug must be in place (see page 13). • Door is open. W ILL NOT RUN . • Power cord not plugged in. • No power at the electrical outlet. • Circuit breaker tripped or house fuse blown. • Main power turned off (“O”) (see page 4). • Touch the ON/OFF pad. TOO LONG / TOO FREQUENTLY. R UNS • Today’s energy efficient refrigerators are larger and require more running time to maintain stable temperatures. • Prolonged door openings. • Too many door openings. • Condenser needs cleaning (see page 19). • The door not sealing (due to a package or a container holding door open). • Warm room temperature. N OISY OPERATION . • Cabinet not level. • Weak floor. • See Normal Operating Sounds (page 21). O DOR IN CABINET. • Odor producing foods should be covered or wrapped. • Interior needs cleaning. C ABINET VIBRATES . M OISTURE ON INSIDE CABINET WALLS . • Can occur during hot, humid weather with frequent or prolonged door openings. • Door not closed properly. E XCESSIVE MOISTURE IN OR AROUND C LIMATE Z ONE ™ DRAWERS . • Food not wrapped properly. • Hot, humid weather. NO TEMPERATURE READOUT IN THE C LIMATE Z ONE ™ DRAWER DISPLAY. • The Normal Cold setting has been chosen. COMPARTMENT F REEZER NOT FREEZING PROPERLY. • Products with high sugar content may not harden completely when frozen (ice cream, concentrated juice, etc.) Do not store in door. • Adjust freezer temperature to a colder setting. I CE CUBES EVAPORATE . • Cold air moving over the ice cubes causes shrinkage, especially with limited usage. This is normal. A UTOMATIC OPERATING . • • • • • ICE MAKER NOT Wire lever arm in up (OFF) position. Water supply turned off. Water pressure too low. Freezer too warm. Install filter or filter bypass. F RONT CABINET SURFACE WARM TO THE TOUCH . C LIMATE Z ONE ™ • Special design to limit condensation during periods of high humidity. TEMPERATURE READOUT IS NOT WITHIN TARGET RANGE . I CE • For best results, refrigerator and freezer controls should be left at the factory settings (see page 5). • After drawer openings, the addition of a new load or changing settings, the readout may vary.The temperature will recover in a short period of time. R EFRIGERATOR OR FREEZER COMPARTMENT TOO WARM . • Refrigerator or freezer temperature set too warm. • Prolonged door openings. 23 DISPENSER NOT OPERATING . • Ice jam in the dispenser. • Icemaker not operating. • Lock switch on (see page 12). WATER DISPENSER NOT OPERATING . • • • • Water supply turned off. Water pressure too low. Lock switch on (see page 12). Install filter or filter bypass. ACCESSORIES A DDITIONAL ACCESSORIES ARE AVAILABLE FROM YOUR DEALER , ONLINE AT THE ACCESSORY STORE AT WWW. JENNAIR . COM OR BY CALLING 1-866-459-6298: Width/Models Placement Accessory Model 48" (121.9 cm) Width Models: Refrigerator Compartment Shelving System Refrigerator Sealed Glass Shelf CJS483SSWA Refrigerator Elevator Shelf CJS483ESWA Refrigerator A la Carte Storage Drawer CJS483STWA Full-width Dairy Compartment CJS484PDSA Refrigerator Adjustable Door Bin CJS484POSA Freezer Adjustable Storage Shelf CJS482SSWA Freezer Elevator Shelf CJS482ESWA A la Carte Freezer Basket CJS482BKWA Freezer Adjustable Door Bin CJS481POSA Tilt and Store Freezer Door Basket CJS481TOSA Refrigerator Sealed Glass Shelf CJS423SSWA Refrigerator Elevator Shelf CJS423ESWA Refrigerator A la Carte Storage Drawer CJS423STWA Full-width Dairy Compartment CJS424PDSA Refrigerator Adjustable Door Bin CJS424POSA Freezer Adjustable Storage Shelf CJS422SSWA Freezer Elevator Shelf CJS422ESWA A la Carte Freezer Basket CJS422BKWA Freezer Adjustable Door Bin CJS421POSA Tilt and Store Freezer Door Basket CJS421TOSA Interior Door System 48" (121.9 cm) Width Models: Freezer Compartment Shelving System Interior Door System 42" (106.7 cm) Width Models: Refrigerator Compartment Shelving System Interior Door System 42" (106.7 cm) Width Models: Freezer Compartment Shelving System Interior Door System All Models Filter Puri-Clean Water Filter Cartridge UKF7002AXX 42" (121.9 cm) and 48" (106.7 cm) Width Models: Exterior Door Extended Handles* Silver Etched Extended Handle CJSF15EHSA White Extended Handle CJSF15EHWA Black Extended Handle CJSF15EHBA *Framed models come with full-length handles. Extended handle kits are available to allow additional hand clearance when installed panels are thicker than 1⁄4" (6 mm). 24 Appendix B B-1 Installation Instructions Tool Requirements: Installation Checklist: Tape measure Level Stud finder Drill with various bits Socket set Utility knife Magnetic extended screwdriver Phillips screwdriver Torx Bit Cardboard, carpet remnant or other protective material for flooring Steel Hanger Strap INSTALLER Doors Handles are solidly attached to doors. Doors seal completely to refrigerator cabinet. Assure correct door handle alignment. Frame models. Assure door seals are not pinched. Do not drive screws / sharp objects into the doors. Leveling L Brackets are secure to 2x4 wood block. Stabilizing legs are against floor. Cabinet is secure. Toe kickplate is properly attached to refrigerator and aligned with floor. Icemaker Water supply to refrigerator is turned on and lines flushed. Water leaks are not present at connection between household water supply and refrigerator. Icemaker arm is down for ice production. PuriClean® Ice and Water Filtration System is installed correctly, if applicable. Purge water from the fountain on dispenser models. Preparing the Space: Front View (48"/121.9) 47 1/2"/120.7 (42"/106.7) 41 1/2"/105.4 Make sure the opening where the unit will be installed, is properly prepared for "Cut Out" dimension. Check placement for electrical outlet and water line. (Fig. 1) NOTE: For the door to open properly, it must be able to open at least 90 degrees. For installation in a corner, a 2" filler strip is required to ensure the 90 degree opening. The floor under the refrigerator is to be level with the surrounding floor. To protect the floor when moving the refrigerator, place cardboard, or preferably a carpet remnant (backing up) on the floor. Side View Electrical supply needs to be located in this area. 7" 17.78 4" 10.16 2" 5.08 WARNING: Electrical Connection: (48"/121.9 42"/106.7) 83 3/4" 212.7 Front Refer to User Guide for voltage requirements. There should be a separate, grounded circuit serving this appliance only. Do not use an extension cord. Do not use any device that will alter the electrical performance of this appliance. For the placement of the electrical outlet refer to Fig. 1. *Do not use a ground fault circuit interupter. Rear 75 1/2" 191.8 Plumbing Connection: 3 1/2" 8.89 6" 15.24 3"/7.62 3"/7.62 24" 60.96 Water supply needs to be located in the shaded area. Rough in the water line for the location (Fig. 1). Connect a 1/4" copper line to the house supply. Use a shut off valve between the refrigerator and supply. The shut off should be a drilled saddle valve. Do not use a self-tapping valve. The icemaker operates on 30 to 120 PSI. Route the water line within a 1/2" of the wall and no higher than 3" from the floor. Allow at least 3' of excess copper tubing outside the wall or floor for easy connection to the water valve. * Prior to connection assure that the water supply and the copper tubes have been flushed until the water runs clear. Reverse Osmosis: Remove the water inlet connector from the 'Yellow' valve and attach to the 'Blue' valve. Assure that the water filter bypass plug is in place (See Fig. 3). Disconnect wires from Yellow Valve. Fig. 1 1 Uncrating the Unit: Uncrate the unit. Remove the lower shipping bolts and brackets. Slide the unit off of the crate base. Remove and save the lower kick plate, anti-tipping brackets and mounting hardware. (Fig. 2a) Remove the grille, this will help when moving the unit. (Fig. 2b) GRILLE PANEL TOOLS NEEDED MAIN POWER SWITCH 3/8" OR REMOVE KICKPLATE REMOVE SCREWS Fig. 2a Fig. 2b Water Line Installation: Connect the water supply to the water valve. Turn the water on and check for leaks. Plug the unit in. (Fig. 3) Blue Valve Copper Water Line Yellow Valve Water Valves Fig. 3 Leveling: Slide the unit in place and raise the front and rear levelers 3/8" until the unit touches the brackets. Use a 3/8" socket for raising and lowering the unit. On each wheel housing there are two 3/8" hex bolts. On the left side, the outside bolt will move the rear leveler and the inside bolt will move the front leveler. On the right side, the outside bolt adjusts the front leveler and the inside bolt will move the rear leveler (Fig. 4). The front levelers must be in contact with the floor. To raise the leveling legs, turn the hex screw in the counter clockwise direction. Place a level on lower ledge of the machine compartment. Level the unit front to back and side to side. This is to prevent tipping of the unit (See Fig. 7). Install the kickplate. Locate the main power switch in the machine compartment and toggle the switch "On". Install the grille panel. Front Leveler Rear Leveler Kickplate 3 Phillips Screws Fig. 4 90° Door Stop Both doors are designed to open 135°. To restrict one or both doors to a 90° opening use the door stops supplied in this kit. With the doors closed, screw a door stop into the underside of the lower hinge plate (Fig. 5). Door Panel Lower Hinge Plate 90° Door Stop 2 Door Stop Mounting Hole Fig. 5 Blocking the Unit: More than 1" clearance: If there is a solid soffit above the unit and the clearance is 1" or less you will not need to block the unit. For installations with clearances of more than 1", you must use the anti-tipping 2x4 and brackets provided (Fig. 6). Use the anti-tipping kit provided with the shipping crate. Locate and mark the 2 wall studs behind the unit. Mark where the "L" brackets and 2x4 will be located and drill 2 pilot holes 1/8". Locate the proper height to clear the unit. The space between the top of the unit and bottom of the wood block must not exceed 1/4". Secure the "L" brackets, using the provided screws, into the wall studs (À). Make sure the screws will extend 7/8" into the wall studs. Align the pilot holes with the "L" brackets and secure the 2x4 with the screws provided(Á,Â). Soffit More than an 1" Wall Studs Fig. 6 Fig. 7 Installing Backer Panels: Remove the door handle or trim piece on overlay models. A magnetic backed molding hides the handle or overlay trim screws. Use the adhesive side of the packaging tape on the magnetic backed molding to pull it away from door (Fig. 8a). Remove the screws with a phillips screwdriver (Fig. 8b). Slide the backer panel into position. The backer panel needs to be under the trim. Install the handle. Replace the molding in the channel, and reset the magnetic backed molding. To install the backer panel on the grille remove the screws on the top and bottom of the upper cover (Fig 8c). DO NOT REMOVE the foam. Slide the backer panel into place and replace screws (Fig 8d). If the thickness of the backer panel is less than a 1/4", back it up with a sheet of shim material to obtain a 1/4" thickness. Cardboard is recommended for Stainless Steel application. For panel size refer to Fig. 10. CAUTION: Do not drive screws or sharp objects into the doors. Do not pinch door seal when reinstalling handle. Grille Panel Phillips Screwdriver Fig. 8d Fig. 8c Use Tape to Pull Magnetic Molding Away from Door Approximate Position For Screws CAUTION: Fig. 8a When attaching a raised wood panel of 1/2" or thicker secure the raised panel to the back of the grille cover frame. Use 4 #8 or similar screws. See illustration for approximate locations. Fig. 8b 3 Panel Installation for Dispenser Models: See section "Installing Backer Panels" for handle / trim piece removal. With handle / trim piece removed slide upper and lower panels in postion. To replace dispenser panels, slide out Spill Tray grille and remove 2 Torx screws (see inset). Insert replacement panel. Reinsert Torx screw and reinstall handle / trim piece. To replace second dispenser panel, open freezer door until 4 phillips screws that hold the door trim in place are accessible. Remove screws and slide out door trim. Close door and insert replacement panel. Reinsert Torx screw and reinstall door trim. 8 3/4" Grille Panel 46 1/4" 40 1/4" 20 15/16" Upper Freezer Door Panel (48)2 9/16" (42)2 7/16" (48)3 7/16" (42)1 5/16" 13 13/16" 34" 69 1/8" Refrigerator Door Panel 82 13/16" Lower Freezer Door Panel 1 3/8" (48)17 5/16" (42)15 1/16" Spill Tray Grille 26 1/16" 22 5/16" 2 7/16" Fig. 9 Side Panel (Dimensions Typ.) 3/8" 2 1/2" 24" Fig. 10 One-piece Overlay/Frame Panel Installation: See Owner Manual for switching "OFF / O" the unit. Reference Fig. 9 for door panel removal and installation. With panels removed reattach hinge trim. Lift slide out Spill Tray grille and remove 2 Torx screws , . Remove stainless steel liner . Remove 2 Torx screws from the control panel . Slide control panel down to remove. Disconnect terminals on back of control panel . Tuck dispenser terminal inside to avoid interfering with one-piece panel . Open door and slide one-piece panel into position. Reconnect control panel to dispenser terminal. Reattach control panel with 2 Torx screws. Reposition stainless steel liner into track and secure with 2 Torx screws. Reinstall the Spill Tray grille and door trim. Turn unit on. 4 Dispenser One-Piece Freezer Framed Panel (C) (D) (A) 42” Wide Cabinet 48” Wide Cabinet Inches Cm Inches Cm (A) Panel Height 69 1/8 175.6 69 1/8 175.6 (B) Panel Width 15 1/16 38.26 17 5/16 43.97 (C) Top of dispenser cutout to top of panel 20 5/8 52.39 20 5/8 52.39 (D) Bottom of dispenser cutout to top of panel 35 7/16 90.01 35 7/16 90.01 (E) Left of dispenser cutout width 2 7/16 6.19 2 9/16 6.51 (F) Right of dispenser cutout width 1 5/16 3.33 3 3/8 8.57 (F) (E) (B) Dispenser One-Piece Freezer Overlay Panel (C) (D) (A) 42” Wide Cabinet Inches Cm Inches Cm (A) Panel Height 69 1/8 175.6 69 1/8 175.6 (B) Panel Width 16 7/16 41.75 18 11/16 47.47 (C) Top of dispenser cutout to top of panel 21 3/16 53.82 21 3/16 53.82 (D) Bottom of dispenser cutout to top of panel 34 13/16 88.42 34 13/16 88.42 (E) Left of dispenser cutout width 2 1/16 5.24 2 3/16 5.56 (F) Right of dispenser cutout width 2 1/4 5.72 4 3/8 11.11 (F) (E) (B) 48” Wide Cabinet 5 Installing Side Panels: Optional side panels need to be 1/4-inch thick. Slide panel into position and secure with screws indicated by the shaded area (Fig. 11a). A 3/16-inch batten is required between the cabinet and side panel (Fig. 11b). A 1/2-inch thick by 10 1/4-inch tall batten is required if the side panel extends up into the machine compartment area on the refrigerator side (Fig. 11c). 1/4" side panel fitted up to the cabinet trim (top view) on Freezer side. 1/4" side panel fitted up to the cabinet trim (top view) on Refrigerator side. Backside of Unit Backside of Unit #8-32 1/2" Screw #8-32 1/2" Screw 3/16"/.48 Battens 1/4"/.64 Side Panel Freezer Side of Unit Door Fig. 11b 1/2"/ 1.27 Battens on side of machine compartment (3/16"/.48 below the machine compartment) 1/4"/.64 Side Panel Refrigerator Side of Unit Door Fig. 11c Fig. 11a Anchor the Unit (Optional): If you are attaching the unit to cabinetry, drill three 3/16" holes through both outer trims. Drill 1/8" pilot holes into the cabinetry. Install screws. Additionally: If the depth/height of opening is excessive use steel hanger strap. Double over strap at the achor points to secure cabinet. Drill 3 holes through vertical frame into cabinetry. Where applicable. (approx. location) Adjust door hinges: Check to make sure the doors are properly adjusted. If not, adjust the top hinges. The hinges are slotted for side to side movement. Remove and discard the small phillips screw on the door hinge, which is located on the hinge. Adjust the top hinges by loosing the 3 large Torx screws. Tighten the screws after the doors are adjusted. Extruded door handles can be adjusted for alignment by loosening the screws under the magnetic backed molding (See fig. 8a). 111406-1 6 (061402)