1
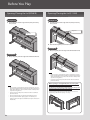
Owner’s Manual Contents Panel Descriptions. . . . . . . . . . . . . . . . . . . . . . . . . . . . . . . . . . . . . . . . . . . . . . 8 Front Panel. . . . . . . . . . . . . . . . . . . . . . . . . . . . . . . . . . . . . . . . . . . . . . . . . . . 8 Rear Panel Connections . . . . . . . . . . . . . . . . . . . . . . . . . . . . . . . . . . . . . . . 9 Bottom Panel (Connecting Headphones or Memory). . . . . . . . . . . . 9 Opening/Closing the Lid (RP401R) . . . . . . . . . . . . . . . . . . . . . . . . . . . Opening/Closing the Lid (F-130R). . . . . . . . . . . . . . . . . . . . . . . . . . . . Turning the Power On/Off. . . . . . . . . . . . . . . . . . . . . . . . . . . . . . . . . . . Setting the Reference Pitch. . . . . . . . . . . . . . . . . . . . . . . . . . . . . . . . . . 10 10 11 11 Various Settings (Function Mode). . . . . . . . . . . . . . . . . . . . . . . . . . . . . 12 About the Wireless LAN Function . . . . . . . . . . . . . . . . . . . . . . . . . . . . . 15 Basic Connection Method (Connect by WPS). . . . . . . . . . . . . . . . . . 15 Connecting in Ad-Hoc Mode . . . . . . . . . . . . . . . . . . . . . . . . . . . . . . . . 15 Troubleshooting . . . . . . . . . . . . . . . . . . . . . . . . . . . . . . . . . . . . . . . . . . . . . . 16 When Using the Wireless LAN Function. . . . . . . . . . . . . . . . . . . . . . . 16 Message List . . . . . . . . . . . . . . . . . . . . . . . . . . . . . . . . . . . . . . . . . . . . . . . . . . 17 USING THE UNIT SAFELY . . . . . . . . . . . . . . . . . . . . . . . . . . . . . . . . . . . . . . 18 IMPORTANT NOTES . . . . . . . . . . . . . . . . . . . . . . . . . . . . . . . . . . . . . . . . . . . 18 Português Keyboard Specifying the Maximum Volume (Volume Limit). . . . . . . . . . . . . 14 Español Main Specifications Restoring the Factory Settings (Factory Reset). . . . . . . . . . . . . . . . 14 Roland RP401R: Digital Piano Roland F-130R: Digital Piano 88 keys (PHA-4 Standard Keyboard: with Escapement and Ivory Feel) Piano Sound: SuperNATURAL Piano Sound MIDI Format: Conforms to GM2/GS/XGlite Power Supply AC adaptor 9 W (3 W–22 W) 9 W: Average power consumption while piano is played with volume at center position Power Consumption 3 W:Power consumption immediately after power-up; nothing being played 22 W: Rated power consumption Dimensions RP401R (with music rest): F-130R (with lid closed): 1,378 (W) x 423 (D) x 992 (H) mm 54-1/4(W) x 16-11/16 (D) x 39-1/16 (H) inches 1,361 (W) x 305 (D) x 778 (H) mm 53-5/8 (W) x 12-1/16 (D) x 30-11/16 (H) inches Weight RP401R: F-130R: 40.0 kg / 8 lbs 14 oz 34.5kg / 76 lbs 1 oz Accessories Owner’s manual, Leaflet “USING THE UNIT SAFELY,” AC adaptor, Power cord (for connecting AC adaptor) Options (Sold Separately) USB Flash Memory (*1), Wireless USB Adapter (WNA1100-RL) (*1) *1: Use USB flash drive and Wireless USB Adapter sold by Roland. We cannot guarantee operation if other products are used. * In the interest of product improvement, the specifications and/or appearance of this unit are subject to change without prior notice. Before using this unit, carefully read the sections entitled “USING THE UNIT SAFELY” and “IMPORTANT NOTES” (leaflet “USING THE UNIT SAFELY” and Owner’s Manual p. 18). These sections provide important information concerning the proper operation of the unit. Additionally, in order to feel assured that you have gained a good grasp of every feature of your new unit, read Owner’s Manual in its entirety. This manual should be saved and kept on hand as a convenient reference. Copyright © 2014 ROLAND CORPORATION All rights reserved. No part of this publication may be reproduced in any form without the written permission of ROLAND CORPORATION. Nederlands Sound Generator Italiano Basic Operation in Function Mode . . . . . . . . . . . . . . . . . . . . . . . . . . . 12 Adjusting the Keyboard Sensitivity (Key Touch) . . . . . . . . . . . 12 Changing the Way in Which the Sound Is Heard (Twin Piano Mode). . . . . . . . . . . . . . . . . . . . . . . . . . . . . . . . . . . . . . 12 Dividing the Keyboard for Two-Person Performance (Twin Piano). . . . . . . . . . . . . . . . . . . . . . . . . . . . . . . . . . . . . . . . . . . . 12 Specifying What the Transpose Will Affect (Transpose Mode). . . . . . . . . . . . . . . . . . . . . . . . . . . . . . . . . . . . . . . 12 Transposing the Keyboard or Song (Transpose) . . . . . . . . . . . 12 Applying a Headphones 3D Ambience Effect to the Piano Sound (Headphones 3D Ambience) . . . . . . . . . . . . . . . . . . . . . . 12 Matching the Pitch with Other Instruments (Master Tuning).12 Changing the Tuning Method (Stretch Tuning). . . . . . . . . . . . 13 14 14 Français Before You Play . . . . . . . . . . . . . . . . . . . . . . . . . . . . . . . . . . . . . . . . . . . . . . . 10 13 13 13 13 13 Deutsch Performing. . . . . . . . . . . . . . . . . . . . . . . . . . . . . . . . . . . . . . . . . . . . . . . . . . . 2 Playing Back Songs . . . . . . . . . . . . . . . . . . . . . . . . . . . . . . . . . . . . . . . . . . . 4 Using Automatic Accompaniment (Rhythm) That Matches Your Chords . . . . . . . . . . . . . . . . . . . . . . . . . . . . . . . . . . . . . . . . . . . . . . . . . . 5 Recording Performances . . . . . . . . . . . . . . . . . . . . . . . . . . . . . . . . . . . . . . 6 Playing Songs from a USB Flash Drive (Sold Separately). . . . . . . . . . 7 13 13 13 English Changing How the Pedals Work. . . . . . . . . . . . . . . . . . . . . . . . . . Specifying How the Bass Part Behaves (Leading Bass). . . . . . Chord Recognition When Split Is On. . . . . . . . . . . . . . . . . . . . . . Preventing Doubled Notes When Connected to a Sequencer (Local Control) . . . . . . . . . . . . . . . . . . . . . . . . . . . . . . . Copying a Song (Copy Song). . . . . . . . . . . . . . . . . . . . . . . . . . . . . Connecting to a Wireless LAN (WPS Connection). . . . . . . . . . Connecting to a Wireless LAN (Ad-Hoc Connection) . . . . . . . Viewing the Ad-Hoc Key. . . . . . . . . . . . . . . . . . . . . . . . . . . . . . . . . Making the Power Automatically Turn Off After a Time (Auto Off ). . . . . . . . . . . . . . . . . . . . . . . . . . . . . . . . . . . . . . . . . . . . . . Saving the Settings (Memory Backup). . . . . . . . . . . . . . . . . . . . Operation Guide. . . . . . . . . . . . . . . . . . . . . . . . . . . . . . . . . . . . . . . . . . . . . . . . 2 Operation Guide Settings for items with this icon are saved by Memory Backup (p. 12). Performing Selecting Tones ([Piano] [Other] Buttons) This digital piano lets you enjoy playing a variety of piano tones (sounds) and other types of tones. Display You can select a tone and adjust the way that it sounds. 2 Selecting a piano tone Press the [Piano] button. Selecting other tones Press the [Other] button. Selecting various tones Press the [Piano] or [Other] button, and then press the [-] [+] buttons. 4 Hold down the [Piano] button and press the [-] [+] buttons. 5 * If you’re using headphones and the Headphones 3D Ambience effect (p. 12) is set to “On,“ this lets you adjust the depth of the Headphones 3D Ambience effect. 6 Adjusting the spaciousness of the sound (Ambience) Adjusting the brightness of the sound (Brilliance) 3 7 Hold down the [Other] button and press the [-] [+] buttons. 8 [Piano] button Display 1 g Explanation 10 Concert Piano The sound of a splendid concert grand piano. This piano sound has our highest recommendation, and can be used for any style of music. Playing Different Tones with the Right and Left Hands ([Split] Button) You can play different tones in the left and right sides of the keyboard, divided at a certain key. This feature is called “Split Play,“ and the key at which the keyboard is divided is called the “Split Point.” 11 Explanation Ballade Piano A mellow grand piano sound, recommended for quiet songs. Bright Piano A brilliant grand piano sound, recommended when you want the piano to stand out in an ensemble. Magical Piano A charming sound that layers synth bells with Concert. Piano+Strings Strings layered with Concert Piano. Piano+Pad A pad layered with Concert Piano. Piano+Choir A choir layered with Concert Piano. Rock Piano A robust piano sound, recommended for boogie-woogie playing. Ragtime Piano A honky-tonk piano sound, recommended for ragtime playing. Harpsichord A type of keyboard instrument widely used in Baroque music, producing a delicate sound. Coupled 8+4 The sound of a harpsichord layered with sound an higher octave. Layering Two Tones (Dual Play) You can play two tones simultaneously from each note of the keyboard. This feature is called “Dual Play.” Turning Dual on Hold down the [Piano] button and press the [Other] button. Turning the split feature on Press the [Split] button so it’s lit. Turning Dual off Press the [Piano] or the [Other] button. Changing the keyboard’s split point Hold down the [Split] button and press the key at the desired split point. Selecting tones Select tones for the [Piano] button and [Other] button before you turn Dual on. Changing the Right-Hand Tone Same as “Selecting Tones.” Changing the Left-Hand Tone Hold down the [Split] button and use the steps described in “Selecting Tones.” B1 Range in which you can specify the split point Left-Hand Tone B6 Right-Hand Tone 1. 2. 3. Press the [Piano] button, and then use the [-] [+] buttons to select a tone. Press the [Other] button, and then use the [-] [+] buttons to select a tone. Hold down the [Piano] button and press the [Other] button to turn Dual on. Tone 1 and tone 2 are heard together. To turn Dual off, press the [Piano] button or the [Other] button. Split point when the power is turned on: F#3 * The split point is the highest note of the left-hand tone. Display (example) 2 Pitch F 3 F3 A 4 A4 C 4 C4 MEMO Separate, independent settings for Split can be made for the Song mode (p. 4) and the Rhythm mode (p. 5). Changing the Key (Transpose) The Transpose function lets you shift the pitch of the keyboard in semitone steps. You can use this to play the song in a different key. For details, refer to “Transposing the Keyboard or Song (Transpose)” (p. 12). Using the Metronome ([Metronome] Button) You can perform while the metronome sounds. You can adjust the tempo or beat of the metronome. If a song is playing, the metronome will sound at the tempo and beat of that song. Changing the Tempo Press the [Metronome] button so it blinks. Turn on the [Metronome] button to display the tempo, and then use the [-] [+] buttons. 108 Changing the Beat Beat Display Beat 2.2 2/2 6.4 6/4 0.4 Only weak beats will be sounded. 7.4 7/4 2.4 2/4 3.8 3/8 3.4 3/4 6.8 6/8 4.4 4/4 (default) g.8 9/8 5.4 5/4 12.8 Deutsch Hold down the [Metronome] button and press the [-] [+] buttons. Display English Using the Metronome List of Time Signatures 12/8 4.4 For details on the available time signatures, refer to “List of Time Signatures.” Turn on the metronome, and then press the [s (Start/Stop)] button. Français Adding a count-in Italiano Dividing the Keyboard in Two (Twin Piano) Here’s how to change the way in which the sound responds to your keyboard dynamics. You can adjust the response as appropriate for your playing strength. You can divide the keyboard into left and right sections so that two people can play the same pitch ranges. 1. 1. 3. Explanation F (Fixed) The sound plays at one set volume, regardless of the force used to play the keys. L2 (Super Light) An even lighter setting than L1 (Light). L1 (Light) Sets the keyboard to a light touch. You can achieve fortissimo (ff ) play with a less forceful touch than “N (medium),” so the keyboard feels lighter. This setting makes it easy to play, even for children. N (Medium) Sets the keyboard to the standard touch. This sets the standard keyboard touch. You can play with the most natural touch. This is the closest to the touch of an acoustic piano. H1 (Heavy) Sets the keyboard to a heavy touch. You have to finger the keyboard more forcefully than “N (medium)” in order to play fortissimo (ff ), so the keyboard touch feels heavier. Dynamic fingering adds even more feeling to what you play. H2 (Super Heavy) 4. An even heavier setting than H1 (Heavy). 4. Hold down the [Metronome] button and press the [Split] button to exit Function mode. Nederlands Value Hold down the [Metronome] button and press the [Split] button. 2. Use the [-] [+] buttons to choose “F03” and press the [s] button. 3. Choose the “On” setting. * Concert Piano is selected. Português 2. Hold down the [Metronome] button and press the [Split] button. Use the [-] [+] buttons to choose “F01” and press the [s] button. Use the [-] [+] buttons to change the settings. Español Adjusting the Keyboard Sensitivity (Key Touch) In function mode, select “F02” and choose “1” or “2.” 1 "Notes in the right section are louder in the right speaker; notes in the left section are louder in the left speaker. 2 "Notes in the right section are heard only from the right speaker; notes in the left section are heard only from the left speaker. Changing how Twin Piano sounds Conventional keyboard C1 C2 C3 C3 C4 C5 C4 C5 C6 C7 C3 C4 C5 C8 Twin Piano The damper pedal for the left area C6 Divide point C6 The damper pedal for the right area Hold down the [Metronome] button and press the [Split] button to exit Function mode. 3 Operation Guide Playing Back Songs How to Use Song Mode ([Song] Button) Press the [Song] button to select Song mode. Press the [Song] button, and then use the [-] [+] buttons. In the middle of a song, pressing the [-] button will return you to the beginning of the song. Recorded songs N.01 – Changing the Tempo Press the [Metronome] button. Use the [-] [+] buttons to change the tempo. 108 Internal songs U.10 a.01 – c.20 Hold down the [Song] button and use the Volume buttons to adjust the volume of the song. Song volume – Manual performance volume Changing the Volume of the Song Selecting a Song g 1 g g – (Song is louder) (Same loudness) • Songs indicated by “a, b, c” are internal songs. For details, refer to “Internal Song List” at the end of this manual. • Songs indicated by “U” are songs that were recorded in internal Playing all songs memory. • Songs indicated by “N” are songs that were recorded on a USB flash drive. – 1 g (Manual performance is louder) Hold down the [Song] button and press the [s] button (All Song Play). * To switch between categories “a, b, c, U, N,” hold down the [Song] button and press the [-][+] buttons. Changing the number of measures in a song Use the [x] [y] buttons to specify the number of measures. 1. Functions of the [x] [y] [s] Buttons Starting/Stopping Song Playback Press the [s] button. When the song has finished playing to the end, it will stop. Fast-Forward Press the [y] button. By holding down the [y] button and pressing the [x] button, you can fast-forward more quickly. Rewind Press the [x] button. By holding down the [x] button and pressing the [y] button, you can rewind more quickly. Selecting Parts to Play 1. Hold down the [s] button and use the [-] [+] buttons to select the parts to be played. Through successive presses of these buttons, you can turn on or off the accompaniment part, left-hand part, and right-hand part to achieve the desired arrangement of played/muted parts. Playback part play/mute status indication Left-hand part Accompaniment part oo Right-hand part o " Sound will be heard (played) " Sound will not be heard (muted) * When using Twin Piano, what you play in the left section is recorded to the left-hand part, and what you play in the right section is recorded to the right-hand part. * When using Split, the left-hand tone is recorded to the left-hand part, and the right-hand tone is recorded to the right-hand part. * When using Dual, tone 1 is recorded to the right-hand part and tone 2 is recorded to the accompaniment part. * When playing anything other than Twin Piano, Split, or Dual, everything is recorded on the right-hand part. 4 Using Automatic Accompaniment (Rhythm) That Matches Your Chords How to Use Rhythm Mode ([Rhythm] Button) Press the [Rhythm] button to select Rhythm mode. Split is turned on. Rhythms include not only drum sounds, but also accompaniments featuring instruments such as piano, guitar, bass, and strings. While the rhythm is playing, the left-hand part will not sound, since that section is dedicated to the recognition of chords. You can also add intros and endings to your rhythms, and insert fill-ins These features make it easy to develop effective and expressive rhythmic accompaniment. Selecting a Rhythm 1-1 – g-6 Intro For details, refer to “Rhythm List” at the end of this manual. Accompaniment English Rhythm Flow Press the [Rhythm] button, and then use the [-] [+] buttons. Ending * To switch the genre of rhythm, hold down the [Rhythm] button and press the [-] [+] buttons. There are two types of rhythms: original accompaniment patterns, and variation accompaniment patterns, which embellish the original patterns. It can be effective to use the quieter original patterns in the first half of the song, and then use the variation patterns in the latter half, when you want to build excitement. 108 Tempo range 20 – 250 Hold down the [Rhythm] button and use the Volume buttons to adjust the volume of the rhythm. Rhythm volume – Manual performance volume g 1 (Rhythm is louder) – g g – (Same volume) 1 g (Manual performance is louder) About the rhythm function This unit contains many built-in rhythms in various musical styles, such as jazz and rock. C How to play chords When a chord is played on the keyboard, a rhythm based on the chord that was played is sounded. (When the keys marked with “ ” in the illustration are played, the result is recognized as “C.”) CM7 C#M7 Note that it is not necessary to press all of the constituent notes of the chord; chords can be specified using simple fingering. (When the key marked with “ ” in the illustration is played, it is recognized as “C.”) For details, refer to “Chord Recognition When Split Is On” (p. 13), and the “Chord Fingering List” at the rear of this manual. C7 Adding an Ending While the rhythm is playing, turn on the [y(Intro/Ending)] button. An ending is played, and then playback stops. Press the [x (Variation)] button. Adding Variation to the Off "A simple accompaniment pattern is played. Rhythm On "A more flamboyant accompaniment pattern is played. Inserting a Fill-in When You Switch Variations (Auto Fill) A short improvisational phrase inserted at the transition is called a “Fill-In.” C#m7 CmM7 C#mM7 Playing Only the Drums or Another Specific Part 1. Cdim While holding down the [s (Start/Stop)] buttons, use the [-] C#dim [+] buttons to select the mute setting. Through successive presses of these buttons, you can turn on or off the drums, bass, and other instruments to achieve the desired arrangement of played/muted parts. Play/mute status indication for the rhythm parts Cm7 ( 5 ) C#m7 ( 5 ) Bass Drums While holding down the [x (Variation)] button, use the [-] [+] buttons to select “On,” and then switch variations. What’s a “Fill-In?” Cm7 oo Other instruments o " Sound will be heard (played) Caug " Sound will not be heard (muted) C#aug NOTE Csus4 For some rhythms, you’ll hear other instruments even in the bass part. C#sus4 Press the [Rhythm] button. Starting the Rhythm by The rhythm starts playing when you play the keyboard. Playing a Key (Sync) Snc C7sus4 C#7sus4 C7/13 C#7/13 5 Nederlands Turn on the [y(Intro/Ending)] button, and then play the rhythm. C#m Português Adding an Intro Cm Español Press the [s (Start/Stop)] button. C#7 Italiano What the [x (Variation)] [y(Intro/Ending)] [s (Start/Stop)] Buttons Do Starting/Stopping the Rhythm C# Français Changing the Volume of the Rhythm Deutsch Changing the Tempo Press the [Metronome] button. Use the [-] [+] buttons to set the tempo. Operation Guide Recording Performances You can record your performance, including accompaniment. You can play back a recorded performance to check your playing, or to play along with it. Stopping Recording 6. By pressing the [s] button once again, you can hear the song that you just recorded. Getting Ready to Record 1. 2. Select the tone that you want to play on the keyboard (p. 2). Start the metronome if desired. Press the [Metronome] button. While the metronome is sounding, specify the tempo and time signature of the song (p. 3). If you want rhythm to play 3. If you want a rhythm accompaniment to be heard while you perform, press the [Rhythm] button. Press the [s] button. Selecting the Destination of the Save 7. Use the [-] [+] buttons to select the destination at which to save, and then press the [Metronome] button. U (User) U.01–U.10 N (USB) N.01–N.gg v01 Specify the rhythm and tempo settings (p. 5). A song with no recorded data (empty song) • Song number shown with lowercase “v” (User memory) • Song number shown with lowercase “n” (USB flash drive) • No dot shown If you don't want rhythm to play 3. Press the [Song] button so the button is lit. U.01 Entering Recording-standby Mode 4. Hold down the [Song] button and press the [Rhythm] button. The [Song] button and the [Rhythm] button will light; the unit will enter recording-standby mode. MEMO If you decide not to record (i.e., if you want to exit recording-standby mode), hold down the [Song] button once again and press the [Rhythm] button. Starting Recording 5. Press the [s] button. A two-measure count will sound, and then recording will start. During the count, measure numbers “-2” and then “-1” will appear in the display. A song with recorded data • Song number shown with uppercase “U” (User memory) • Song number shown with uppercase “N” (USB flash drive) • Dot shown MEMO If you decide not to carry out the save, hold down the [Song] button and press the [Rhythm] button to cancel it. NOTE If you select a song that already contains data (song number with an uppercase “U” or “N”) and save, the previously recorded data will be lost. * While the song is being saved, an animation of a rotating “o” symbol will appear in the display for several seconds. Do not turn off the power during this time. Doing so might cause the saved song to be lost. MEMO Recording will start automatically if you play the keyboard while in recording-standby mode. If you want to erase the recorded song You can erase a song by recording an empty song as follows. 1. Press the [Song] button. 2. Hold down the [Song] button and press the [Rhythm] button. 3. Press the [s] button to hear the two-measure count, and then press the [s] button without playing the keyboard. 4. Select the song number that you want to erase, and press the [Metronome] button. A song containing no notes will be recorded; the song has been erased. 6 Playing Songs from a USB Flash Drive (Sold Separately) Connecting a USB Flash Drive NOTE • If the USB flash drive contains a large number of song files, it may take some time for the data to be read. Playing Songs 1. 2. Press the [Song] button. Use the [-] [+] buttons to select a song. N.01 • Use only single-byte alphanumeric characters in the file names. Using your computer, copy your favorite songs onto your USB flash drive (sold separately). MEMO • If you’ve selected an audio file (WAV file), a dot is displayed following the last digit. This digital piano is able to play back SMFs (Standard MIDI Files) or audio files (WAV) from a USB flash drive. N.02. Playable formats Explanation SMF Standard MIDI files (format 0, 1) WAV WAV format, 44.1 kHz, 16-bit linear Connect your USB flash drive to the USB MEMORY port of the digital piano. The files on the USB flash drive are shown. “N” indicates a USB flash drive. The numbers are assigned automatically. If you later add or delete a file, the numbers will be automatically reassigned. Deutsch 2. Type English 1. • All files on the USB flash drive begin with “N.” • If you use the [-] [+] buttons to make the display indicate “U” or “a,” files in the digital piano's internal memory are displayed. 3. Press the [s] button to play the selected song. Français The display shows the measure number of the currently playing SMF. If a WAV file is playing, the elapsed playback time is shown. 1.01 (Example: 1 minute 1 second has elapsed) Lower the Level of an Audio File’s Central Sound 1. Italiano This feature lets you reduce the loudness of the central sound of the audio (Center Cancel). When a song is selected, hold down the [s] button and use the [-] [+] buttons to turn this feature “On.” NOTE Bottom panel of digital piano Português About USB Flash Drives Español This feature does not work perfectly with every song In some cases it may be unable to fully eliminate the central sound, or may alter the recording’s tone quality. If you’re using a newly purchased USB flash drive, you must first format it on the digital piano. NOTE • Never insert or remove a USB flash drive while this unit is turned on. Doing so may corrupt the unit’s data or the data on the USB flash drives. • Carefully insert the USB flash drives all the way in—until it is firmly in place. Nederlands • Use USB Flash memory sold by Roland. We cannot guarantee operation if other products are used. Formatting a USB Flash Drive Here’s how to initialize (format) the entire contents saved on a USB flash drive. NOTE • Formatting will erase everything that has been saved on the USB flash drive. • Before using a new USB flash drive with this digital piano for the first time, you must format the USB flash drive. 1. 2. 3. 4. Connect the USB flash drive that you want to format to the USB MEMORY port. While holding down the [Song] button, turn the power on. Keep holding down the [Song] button until it indicates as “Svr” on the display. To cancel, press the [y] button. To execute the format, press the [s] button. When all the LEDs on the buttons are lit, the operation is complete. Turn the power off, then on again. 7 Panel Descriptions Settings for items with this icon are saved by Memory Backup (p. 12). Front Panel Adjusting the Volume and Balance (Volume Buttons) About the Display This indicates the tone number, song number, measure number, tempo, selected function, or value. Overall Volume Use the Volume buttons to adjust the volume. Tone number Volume Balance Between Song/Rhythm and the Keyboard (Song Balance) While holding down the [Song] button or [Rhythm] button, use the Volume buttons to adjust the balance. Volume of the song – Volume of the manual performance g 1 – g g – 1 g (Manual performance is louder) (Song is louder) (Same volume) Piano 1 Other 1 Tempo Measure number a.01 Internal song 108 Song number 1. c.01 User U.01 USB flash Drive N.01 1-1 Rhythm Relative Balance of Dual Tones (Dual Balance) This is available if Dual is on. While holding down the [Piano] button and [Other] button, use the Volume buttons to adjust the balance. Volume of the piano sound – Volume of the other sound g 1 – g g – 1 g (Other is louder) (Piano is louder) (Same volume) Relative Balance of Split Tones (Split Balance) This is available if Split is on. Hold down the [Split] button and use the Volume buttons to adjust the balance. Left-hand volume – Right-hand volume g 1 (Left-hand is louder) – g g (Same volume) – 1 g (Right-hand is louder) * For details on how to use the other buttons, refer to “Operation Guide” (p. 2)–(p. 7). Music Holders (RP401R) RP401R Rear You can use the holders to hold pages in place. When not using the holders, leave them folded down. Bottom F-130R [L] Switch Headphone Hook This turns the power on/off (p. 11). With the factory settings, the unit’s power will automatically be switched off 30 minutes after you stop playing or operating the unit. If the unit’s power has been turned off automatically, you can use the [L] switch to turn the unit back on again. If you don’t want the power to turn off automatically, change the “Auto Off” setting to “OFF” as described on “Making the Power Automatically Turn Off After a Time (Auto Off )” (p. 14). Whenever you are not using the headphones, you can hang them on the headphone hook. Damper pedal Use this pedal to sustain the sound. While this pedal is held down, notes will be sustained for an extended time even if you release your fingers from the keyboard. The length of the sustain will change subtly depending on how deeply you press the pedal. On an acoustic piano, holding down the damper pedal will cause the strings for notes other than the ones you actually play to vibrate in sympathy with what you’ve played, producing a rich resonance. This unit simulates this sympathetic vibration (damper resonance). Adjuster (RP401R) Sostenuto pedal This pedal sustains only the notes of the keys that were already pressed when you pressed the pedal. Soft pedal Turn the adjuster to lower it until the adjuster is in firm contact with the floor. In particular, when you’ve placed the piano on carpet, you must turn the adjuster until it is pressing firmly against the floor. 8 This pedal is used to make the sound softer. Playing with the soft pedal depressed produces a sound that is not as strong as when otherwise played with the equivalent strength. This is the same function as the left pedal of an acoustic piano. The softness of the tone can be varied subtly by the depth to which you press the pedal. Disabling the Buttons ( Panel Lock) Adjusting a Value ([-] [+] Buttons) When you activate Panel Lock, all buttons will be disabled. This prevents the tones or settings from being changed if you inadvertently press a button. Use the [-] [+] buttons to adjust a value. Changing a value continuously Hold down the [+] button or [−] button. Changing a value rapidly While holding down the [+] button, press the [-] button to rapidly increase the value. While holding down the [-] button, press the [+] button to rapidly decrease the value. Restoring the default value Press the [+] button and [-] button simultaneously. Press the [Other] button for a longer than usual amount of time. Cancelling Panel Lock English Once again, press the [Other] button for a longer than usual amount of time. Deutsch Français Rear Panel Connections Input Jack If you connect this jack to amplified speakers, the sound of this unit will be heard through them. If you use a cord with a stereo mini-plug to connect a audio player or similar device, the sound of the connected device will be heard through this unit. Use the controls of the connected device (audio player) to adjust the volume. USB Computer Port Pedal Connector Place the AC adaptor so the side with the indicator (see illustration) faces upwards and the side with textual information faces downwards. The indicator will light when you plug the AC adaptor into an AC outlet. Connect the pedal cord of the dedicated stand here. Español By using a commercially available USB cable to connect the USB Computer port of this digital piano to a USB port on your computer, you can produce and edit music using MIDI-compatible software on your computer. DC In Jack Italiano Output Jack To AC outlet Português Power cord Nederlands * To prevent malfunction and equipment failure, always turn down the volume, and turn off all the units before making any connections. Bottom Panel (Connecting Headphones or Memory) USB MEMORY Port PHONES Jacks Since this unit has two headphone jacks, two people can also use headphones simultaneously. Stereo phone plug A Headphones 3D Ambience effect will be applied, producing the sensation that the sound is emanating from the piano itself even when using headphones (p. 12). A separately sold USB flash drive or wireless USB adaptor can be connected here (p. 7, p. 15). Use a USB flash drive or wireless USB adapter sold by Roland. Stereo-mini plug 9 Before You Play Opening/Closing the Lid (RP401R) Opening/Closing the Lid (F-130R) You must use both hands to open or close the lid. You must use both hands to open or close the lid. Opening the Lid 1. Opening the Lid Use both hands to lift the edge of the lid, and push it away from yourself. 1. Use both hands to lift the edge of the lid, and push it away from yourself. Edge of lid Edge of lid 2. Push the lid away from yourself until it stops. Closing the Lid 1. Grasp and gently lower the edge of the lid with both hands. Closing the Lid 1. Grasp and gently lower the edge of the lid with both hands. NOTE • When opening or closing the lid, please be careful not to get your fingers pinched between the movable part and the panel. In places where small children are present, make sure that an adult provides supervision and guidance. • If you need to move the piano, make sure the lid is closed first to prevent accidents. NOTE • When opening or closing the lid, please be careful not to get your fingers pinched between the movable part and the panel. In places where small children are present, make sure that an adult provides supervision and guidance. • If you need to move the piano, make sure the lid is closed first to prevent accidents. • Do not apply undue force to the music stand while it is in use. • Do not open the lid while objects (papers or metal items) are resting on the lid. The objects could fall into the piano and become irretrievable. 10 When opening or closing the lid, take care not to pinch your fingers between the folding sections. It is dangerous to close the lid by pressing it from above, since you risk pinching your fingers between the sections of the lid. Opening the lid by pushing it may cause this unit to fall over. You must grasp the edge of the lid when opening or closing it. Turning the Power On/Off Once everything is properly connected (p. 9), be sure to follow the procedure below to turn on their power. If you turn on equipment in the wrong order, you risk causing malfunction or equipment failure. Turning the Power On 1. Turn the [L] switch ON. Setting the Reference Pitch When playing ensemble with other instruments and in other such instances, you can match the standard pitch to another instrument (Master Tuning). 1. 2. In “Various Settings (Function Mode)” (p. 12), choose “F07” and then press the [s] button. Use the [-] [+] buttons to set the reference pitch. Reference pitch Use the Volume buttons to adjust the volume. 4. 440.0 Hz (default) 40.0 442.0 Hz 42.0 Press the [s] button to return to the previous screen. If you want to save the setting, carry out the Memory Backup procedure (p. 12). Hold down the [Metronome] button and press the [Split] button to exit Function mode. Français The volume increases when you press the Volume [+] button, and decreases when you press the Volume [-] button. This will adjust the volume of the speakers if you’re using the speakers of the unit, or the volume of the headphones if headphones are connected. Each volume setting (for speaker or headphone) is saved automatically. 3. Display Deutsch 2. After a brief interval, you’ll be able to produce sounds by playing the keyboard. * T his unit is equipped with a protection circuit. A brief interval (a few seconds) after turning the unit on is required before it will operate normally. English Examples: MEMO The unit is designed so that nuances in the dynamics of your playing will be clearly heard even at low volume, and that the sound will remain clear even at high volume. Italiano Turning the Power Off 1. Turn the [L] switch OFF. Español Português Nederlands 11 °Various Settings (Function Mode) Basic Operation in Function Mode 1. Hold down the [Metronome] button and press the [Split] button. Memory backup Function mode is selected. 2. Use the [-] [+] buttons to select the function that you want to set, and press the [s] button to display the setting screen. 3. Use the [-] [+] buttons to adjust the setting. Press the [s] button to return to the previous screen. The settings of this digital piano will return to their default state when you turn off the power. However, you can save the settings so they will remain unchanged even after the power has been turned off, then on again. The settings of items marked with the “ ” symbol in this operating manual can be saved by using the Memory Backup function. 1. In Function mode, choose “F1g” (Memory Backup) and press the [s] button. 4. Hold down the [Metronome] button and press the [Split] button to exit Function mode. Function settings Display Value F01 F (Fixed), L2 (Super Light), L1 (Light), N (Medium), H1 (Heavy), H2 (Super Heavy) F02 1 (Pair), 2 (Separate) F03 Off, On Explanation Adjusting the Keyboard Sensitivity (Key Touch) Here’s how to change the way in which the sound responds to your keyboard dynamics. You can adjust the response as appropriate for your playing strength. Changing the Way in Which the Sound Is Heard (Twin Piano Mode) This setting specifies how the sound will be heard when Twin Piano is on. Dividing the Keyboard for Two-Person Performance (Twin Piano) This setting turns Twin Piano on/off. F04 1 (Keyboard & Song), 2 (Keyboard), 3 (Song) page 3 page 3 Specifying What the Transpose Will Affect (Transpose Mode) This setting specifies what the transpose will affect. You can use the transpose to change the pitch of both the song and the keyboard, only the pitch of the song, or only the pitch of the keyboard. Transposing the Keyboard or Song (Transpose) Here you can specify the transposition value. For example, if the song is written in E major but you want to play it using the fingering of the key of C major, you would set Transpose to “4.” F05 -6–0–5 [semitone] If you play C E G " It will sound E G B * If this is set to “0,” the Transpose function will be off. Applying a Headphones 3D Ambience Effect to the Piano Sound F06 (Headphones 3D Ambience) Off, On You can apply a Headphones 3D Ambience effect which produces the sensation that the sound is emanating from the piano itself even when using headphones. * The Headphones 3D Ambience effect applies only to piano tones; it does not apply to other tones. On " Headphones 3D Ambience is on. Off " Headphones 3D Ambience is off . F07 12 15.3 (415.3)– 40.0 (440.0)– 66.2 (466.2) [Hz] Matching the Pitch with Other Instruments (Master Tuning) This setting specifies the reference pitch for this piano (the pitch of middle A). page 11 Various Settings (Function Mode) Display F08 F0g Explanation Changing the Tuning Method (Stretch Tuning) 1, 2 1 (Sostenuto, Soft), 2 (Start/Stop), 3 (Intro/Ending), 4 (Variation), 5 (Fill-in), 6 (Leading Bass) This setting changes the type of stretch tuning, a tuning method that is used specifically for pianos, in which the high notes are tuned slightly sharper and the low notes are tuned slightly flatter. Normally, you should use the “1” setting (standard tuning curve). Changing How the Pedals Work Here you can assign the functions of the center pedal (F0g) and left pedal (F10). 1 " Sostenuto pedal (F0g), soft pedal (F10) 2 " Same function as the [s (Start/Stop)] button 3 " Intro/Ending function on/off (same function as the [y(Intro/Ending)] button) 4 " Variation on/off (same function as the [x (Variation)] button) 5 " Fill-in 6 " Leading Bass function on/off English F10 Value F11 Off, On F12 1 (Intelligent), 2 (Standard) The function that sounds the lowest note of a fingered chord as the bass tone is called “Leading Bass.” Off " The bass part of the rhythm plays the root of the chord. For example, if you play the chord E-G-C (C major), the note C is sounded as the bass. On " The bass part plays the lowest note of the chord you play. If you play the chord E-G-C (C major), the note E is sounded as the bass. The Leading Bass feature is always on while Split is off. Français Chord Recognition When Split Is On Sets how the unit recognizes rhythm chords while Split function (p. 2) is on. Intelligent " Plays chords even when basic chord tones are missing, allowing you to generate chords with very simple keyboard playing. For details on how to play chords, refer to “Chord Fingering List” at the end of this manual. Standard " Normal chord recognition. Italiano Preventing Doubled Notes When Connected to a Sequencer (Local Control) F13 Off, On Local Control Sound Generator USB MIDI In Software Synthesizer Español If a software synthesizer is connected to USB MIDI, turn this item “OFF.” Since most software synthesizer have their Thru function turned on, notes you play on the keyboard may be sounded in duplicate, or get dropped. To prevent this, you can enable the “Local Off” setting so that the keyboard and internal sound generator will be disconnected. USB MIDI Out Computer N.01–N.gg (USB 01–99) None A song that you recorded on this unit can be copied to a USB flash drive. The copy-source song number is displayed; use the [-] [+] buttons to select the desired number, and press the [s] button to confirm it. The copy-destination song number is displayed; use the [-] [+] buttons to select the desired number, and press the [s] button to confirm it. Connecting to a Wireless LAN (WPS Connection) This lets you establish a WPS connection. The display indicates “Svr”; press the [y] (cancel) button or the [s] (execute) button to cancel or connect. F16 None 000–ggg page 15 Connecting to a Wireless LAN (Ad-Hoc Connection) This lets you establish an ad-hoc connection. The display indicates “Svr”; press the [y] (cancel) button or the [s] (execute) button to cancel or connect. F17 Nederlands F15 Copying a Song (Copy Song) page 15 Viewing the Ad-Hoc Key Of the five-digit ad-hoc key, the lower three digits are shown (the upper two digits are 00). Português F14 U.01–U.10 (USER 01–10) Deutsch Specifying How the Bass Part Behaves (Leading Bass) page 15 13 Restoring the Factory Settings (Factory Reset) Display F18 Value Explanation Making the Power Automatically Turn Off After a Time (Auto Off ) OFF, 10, 30, 240 [min.] This specifies the auto-off setting. The remaining time blinks before the power turns off. When there is less than one minute remaining, the countdown will be in seconds. * This setting is saved automatically when you change it. F1g Saving the Settings (Memory Backup) None The settings of this digital piano will return to their default state when you turn off the power. However, you can save the settings so they will remain unchanged even after the power has been turned off, then on again. The display indicates “Svr”; press the [y] (cancel) button or the [s] (execute) button to cancel or execute. page 12 °Restoring the Factory Settings (Factory Reset) The settings you’ve changed in Function mode can be restored to their factory-set condition. This operation is called “Factory Reset.” NOTE The “Factory Reset” operation will erase all settings stored by the Memory Backup function, as well as all songs you’ve recorded in internal memory. 1. While holding down the [Metronome] button and the [Split] button, turn on the power. Keep holding down the buttons until it indicates as “Svr” on the display. To cancel, press the [y] button. 2. To execute the Factory Reset, press the [s] button. When the Factory Reset has been completed, the display will indicate “End.” * Never turn off the power before the display indicates “End.” 3. Press the [L] switch to turn the power off , then on again. °Specifying the Maximum Volume (Volume Limit) You can specify the maximum Volume setting. This will prevent undesirably high volumes even if the volume buttons are operated unintentionally. 1. Hold down the Volume [-] button and the Volume [+] button, and press the [-] [+] buttons to adjust the value. Value 20, 40, 60, 80, 100 MEMO This setting is saved automatically when you change it. 14 °About the Wireless LAN Function By inserting the wireless USB Adapter (WNA1100-RL; sold separately) into this unit’s USB MEMORY port, you’ll be able to use wireless-compatible applications (iOS apps such as the “Piano Partner”). iPad, etc Wireless LAN access point (e.g., wireless LAN router) This unit NOTE The device (e.g., iPad) running the app must be connected to the same network. MEMO • The connection data is stored in memory when you perform the WPS procedure; the device will automatically connect to the wireless network from the next time. • All connection data will be erased if you perform a factory reset. Wireless USB Adapter (WNA1100-RL; sold separately) Wireless LAN Connecting in Ad-Hoc Mode English Wireless LAN What is Ad-Hoc mode? Items required to use the wireless LAN function ** Wireless LAN access point (e.g., wireless LAN router) *1 *2 ** iPad, etc Deutsch ** Wireless USB Adapter (sold separately: WNA1100-RL) *3 Ad-Hoc mode lets you connect this unit directly to an iPad or other wireless device without using a wireless LAN access point This is a convenient way to use this unit with an iPad or other wireless device if you’re in a location where the wireless LAN access point you normally use is unavailable, such as when you’re away from home. Limitations *2 T he ability to connect with all kinds of wireless LAN access points is not guaranteed. The first time you connect this unit to a new wireless network, you’ll need to perform the following procedure (WPS) to join the wireless network. This procedure is required only the first time. (Once you’ve joined the network, this procedure will no longer be necessary.) This is a standard that makes it easy to make security settings when connecting to a wireless LAN access point. We recommend that you use WPS when connecting to a wireless LAN access point. 1. In Function mode ([Metronome]+[Split] button), choose 2. Press the [s] button once again to execute. If you decide to cancel, press the [y] button. 3. Perform the WPS operation on your wireless LAN access If you decide to cancel, press the [y] button. 3. In Function mode ([Metronome]+[Split] button), choose “F17” and press the [s] button (p. 12). Of the five-digit ad-hoc key, the lower three digits are shown. 555 If the display were to show the indication depicted in this illustration, you would add “00” as the upper two digits, and enter “00555” as the ad-hoc key. 4. On the iPad or other wireless device to which you’re connecting, select the ad-hoc SSID shown in the screen above to establish the connection. Example: On an iPad, use [Settings] " [Wi-Fi] " [Choose Network] and select the ad-hoc SSID (RP401R or F-130R). A password entry screen appears; enter the ad-hoc key listed above. For details on how to connect to a wireless LAN from an iPad or other device, refer to the owner’s manual of that device. Nederlands “F15” and press the [s] button (p. 12). 2. Press the [s] button once again to execute. Português What is WPS? “F16” and press the [s] button (p. 12). Español Basic Connection Method (Connect by WPS) 1. In Function mode ([Metronome]+[Split] button), choose Italiano *3 In some countries, the Wireless USB Adapter is not sold due to regulations concerning radio-frequency equipment. For information on whether the Wireless USB Adapter can be used in your country, please contact the nearest Roland Service Center, or an authorized Roland distributor, as listed on the “Information” page. The iPad or other wireless device connected in Ad-Hoc mode will be unable to communicate with the Internet or with another wireless device. However, an iPad or other wireless device that has cellular capability will be able to connect to the Internet via the cellular connection. Please be aware that if you use a cellular connection for Internet connectivity, you may incur costs depending on your rate plan. Français *1 T he wireless LAN access point you use must support WPS. If you’re unable to connect to the wireless LAN access point, try connecting using Ad-Hoc mode. 5. When you want to end the Ad-Hoc mode connection, restore the iPad settings in [Settings] " [Wi-Fi] " [Choose a Network] to their previous state. point (e.g., press the WPS button on your wireless LAN access point). For details on WPS operation of your wireless LAN access point, refer to the owner’s manual for your wireless LAN access point. You can use the wireless connection from an iOS app such as “Piano Partner.” Choose “RP401R or F-130R” in the instrument select screen of your iOS app. 15 °Troubleshooting Problem Cause/Action This unit uses a hammer action keyboard in order to simulate an Even though acoustic piano’s playing touch as realistically as possible. For this you’re using reason, you’ll hear the hammers thump when you play the keyboard, headphones just as you would when playing an acoustic piano. Since this unit and the sound allows you to adjust its volume, you might notice the sound of the is muted, a hammers in certain situations, but this does not indicate a malfuncthumping sound tion. If vibration transmitted to the floor or walls is a concern, you may is heard when be able to minimize the vibration by moving the piano away from the you play the wall, or by laying down a commercially available anti-vibration mat keyboard designed for use with pianos. Power turns off on its own When 30 minutes have elapsed since you last played or operated this unit, the power will turn off automatically. (This is the factory setting.) If you don’t need the power to turn off automatically, turn the “Auto Off” setting off (p. 14). Power does not turn on Is the AC adaptor connected correctly? (p. 9) Is the pedal connected correctly? Plug the cord firmly into the pedal connector (p. 9). Pedal does not work, or is “stuck” If you disconnect the pedal cord from the unit while the power is on, the pedal effect may remain “stuck” in the On condition. You must power-off the unit before connecting or disconnecting the pedal cord. Could Twin Piano be turned on? If Twin Piano is on, the right pedal will affect only the right-hand keyboard zone and the left pedal will affect only the left-hand keyboard zone (p. 3). Insufficient volume Could the volume limit setting have lowered the maximum volume? The volume can’t be louder than the specified volume limit. Change the volume limit setting (p. 14). The volume level of the instrument connected to Input jack is too low Could you be using a connection cable that contains a resistor? Use a connection cable that does not contain a resistor. Could the unit’s volume or the volume of the connected equipment be turned down? No sound/No sound when you play back a song Problem Cause/Action High-pitched ringing is heard If you hear this in headphones: Piano sounds that have a brilliant and crisp character contain substantial high-frequency components that may sound as though a metallic ringing has been added. This is because the characteristics of an actual piano are being faithfully reproduced, and is not a malfunction. This ringing is more obtrusive if the ambience effect is applied heavily, so you may be able to minimize it by decreasing the ambience. If you don’t hear this in headphones: It is likely that there is some other reason (such as resonances within the unit). Please contact your dealer, the nearest Roland Service Center, or an authorized Roland distributor, as listed on the “Information.” If you set the volume to the maximum setting, the sound may be distorted depending on how you perform. If this occurs, turn down the volume. If you don’t hear this in headphones: Performing at high volumes may cause the speakers or objects near the unit to resonate. Fluorescent lights or glass doors may also resonate sympathetically. In particular, this is more likely to occur for lower notes and higher volumes. You can take the following measures Sound wrong, or to minimize resonances. are buzzy • Locate this unit 10–15 cm (4–6 inch) away from walls or other surfaces. • Keep the volume down. • Move away from the objects that are resonating. If you hear this in headphones: It is likely that there is some other reason. Please contact your dealer, the nearest Roland Service Center, or an authorized Roland distributor, as listed on the “Information.” When Using the Wireless LAN Function Problem Could headphones be connected? Could there be a plug inserted in a headphone jack? The speakers will not produce sound if headphones or plug are connected to the headphone jacks (p. 9). Make sure that your wireless LAN access point supports WPS. If your wireless LAN access point does not support WPS, you can connect using the procedure described in “Connecting in Ad-Hoc Mode” (p. 15). The 802.11a/b wireless standard is not supported. Please use the 802.11g/n (2.4 GHz) wireless standard. Has Local Control been set to “Off”? When Local Control is set to Off, no sound is produced on the keyboard. Set Local Control to On (p. 13). The maximum simultaneous polyphony is 128 voices. If you’re using Not all the notes the Dual tone (p. 2), if you’re playing along with a song, or if you’re you play are making extensive use of the damper pedal, the performance data may sounded exceed the available polyphony, possibly causing some of the notes you play to drop out. Could you have made Transpose settings? (p. 12) The WEP authentication method is not supported. Please use the WPA or WPA2 authentication method. Can’t connect to Make sure that DHCP is enabled for your wireless LAN access point. a wireless LAN The connection might not occur successfully due to the state of the access point radio signal. If so, use the procedure described in “Basic Connection Method (Connect by WPS)” (p. 15), and reconnect your wireless LAN access point. There is a limit to the connection data that can be remembered. Making a new connection may cause older connection data to be deleted. All connection data will be deleted if you execute a factory reset. If the connection data has been deleted, please re-connect to the wireless LAN access point. Is the Master Tune setting appropriate? (p. 11) Pitch of the The notes of a piano are tuned using a unique method keyboard or (stretched tuning), which makes upper-range notes slightly higher in song is incorrect pitch, and lower-range notes slightly lower in pitch. For this reason, you might perceive the pitch as being incorrect, but this is the way an acoustic piano should sound. Sounds are heard twice (doubled) when the keyboard is played Could you have selected a dual tone? (p. 2) When this unit is connected to an external sequencer, set the Local Control to off. Alternatively, the sequencer could be set so its Soft Thru feature is Off (p. 13). Reverberation remains even though you’ve turned off the Ambience effect The piano sounds of this digital piano faithfully simulate the sense of depth and resonance of an acoustic piano. For this reason, it may seem as though there is some reverberation even when the Ambience effect is turned off. The sound of the higher notes suddenly changes from a certain key On an acoustic piano, the approximately one and a half octaves of notes at the upper end of the keyboard will continue sounding regardless of the damper pedal. These notes also have a somewhat different tonal character. This unit faithfully simulate this characteristic of acoustic pianos. On this unit, the range that is unaffected by the damper pedal will change according to the transpose setting. 16 Cause/Action Communication is unstable Communication may be unstable depending on the usage of the radio frequency spectrum. If communication is unstable, the response may be sluggish, or if using audio communication, there may be dropouts in the audio. The following actions may improve the situation. • Move the wireless LAN access point and this unit closer to each other. • Change the channel setting of the wireless LAN access point. Is the unit turned on? The unit is not found in the instrument connections of the iOS app (such as “Piano Partner”) Is the wireless USB adapter (WNA1100-RL) inserted to the unit? Is the unit connected to the wireless LAN? Are the unit and the iPad connected to the same network (the same wireless LAN access point)? Is the wireless LAN access point set to allow communication between wireless LAN devices? For details on settings, refer to the owner’s manual of your wireless LAN access point. °Message List Indication Meaning E.10 No USB flash drive connected. Connect a USB flash drive and try the operation again. E.11 There is insufficient free space at the save destination. Either connect a different USB flash drive, or delete unwanted data (song data) and try the operation again. E.14 An error occurred while reading. The USB flash drive may be damaged. Connect a different USB flash drive and try the operation again. You may also format the USB flash drive (p. 7). E.15 The file could not be read. The data format is not compatible with the unit. E.16 The data could not be read fast enough during song playback. After waiting several seconds, you may be able to play back the song by pressing the [s] button once again. E.18 This audio format is not supported. Please use WAV format, 44.1 kHz, 16-bit linear audio files. E.30 The unit’s internal memory is full. E.40 The unit cannot deal with the excessive MIDI data sent from the external USB MIDI. Reduce the amount of MIDI data sent to the unit. E.46 The access point is not supported. Please use WPA or WPA2 authentication. E.51 There may be a problem with the system. Repeat the procedure from the beginning. If it is not solved after you have tried a number of times, contact the Roland service center. E.65 The USB flash drive connector was subjected to excessive current. Make sure that there is no problem with the external media, then turn the power off, then on again. --- The Panel Lock function is on (p. 9). PU Blinking number Italiano An error occurred while writing. It may be that the protect tab of the external media is in the “Protect (write prohibit)” position, or that the external media has not been formatted. Français E.02 Deutsch The music file you attempted to save is read-only. It cannot be saved. English E.01 When playing back a song, this is shown if the song starts on an upbeat. When the Auto Off function is activated, the remaining time blinks before the power turns off. Español Português Nederlands 17 °USING THE UNIT SAFELY WARNING To completely turn off power to the unit, pull out the plug from the outlet Even with the power switch turned off, this unit is not completely separated from its main source of power. When the power needs to be completely turned off, turn off the power switch on the unit, then pull out the plug from the outlet. For this reason, the outlet into which you choose to connect the power cord’s plug should be one that is within easy reach and readily accessible. Concerning the Auto Off function The power to this unit will be turned off automatically after a predetermined amount of time has passed since it was last used for playing music, or its buttons or controls were operated (Auto Off function). If you do not want the power to be turned off automatically, disengage the Auto Off function (p. 14). CAUTION WARNING Use only the supplied AC adaptor and the correct voltage Be sure to use only the AC adaptor supplied with the unit. Also, make sure the line voltage at the installation matches the input voltage specified on the AC adaptor’s body. Other AC adaptors may use a different polarity, or be designed for a different voltage, so their use could result in damage, malfunction, or electric shock. Use only the supplied power cord Use only the attached power cord. Also, the supplied power cord must not be used with any other device. Cautions when moving this unit If you need to move the instrument, take note of the precautions listed below. At least two persons are required to safely lift and move the unit. It should be handled carefully, all the while keeping it level. Make sure to have a firm grip, to protect yourself from injury and the instrument from damage. • Check to make sure the screws securing the unit to the stand (RP401R) or the side boards (F-130R) have not become loose. Fasten them again securely whenever you notice any loosening. • Disconnect the power cord. • Disconnect all cords coming from external devices. • Raise the adjusters on the stand (RP401R). CAUTION Disconnect the power plug whenever the unit will not be used for an extended period of time Take care so as not to get fingers pinched When handling the following moving parts, take care so as not to get fingers, toes, etc., pinched. Whenever a child uses the unit, an adult should be on hand to provide supervision and guidance. • Pedals (p. 8) °IMPORTANT NOTES • Do not allow objects to remain on top of the keyboard. This can be the cause of malfunction, such as keys ceasing to produce sound. • Depending on the material and temperature of the surface on which you place the unit, its rubber feet may discolor or mar the surface. You can place a piece of felt or cloth under the rubber feet to prevent this from happening. If you do so, please make sure that the unit will not slip or move accidentally (F-130R). Maintenance • To clean the unit, use a dry, soft cloth; or one that is slightly dampened. Try to wipe the entire surface using an equal amount of strength, moving the cloth along with the grain of the wood. Rubbing too hard in the same area can damage the finish. Repairs and Data • Before sending the unit away for repairs, be sure to make a backup of the data stored within it; or you may prefer to write down the needed information. Although we will do our utmost to preserve the data stored in your unit when we carry out repairs, in some cases, such as when the memory section is physically damaged, restoration of the stored content may be impossible. Roland assumes no liability concerning the restoration of any stored content that has been lost. 18 To prevent accidental ingestion of the parts listed below, always keep them out of the reach of small children. • Included Parts/Removable Parts Screws Take care not to get burned The area shown in the illustration may become hot, so take care to avoid burns. RP401R • Remove the music stand (RP401R). • Lid cover (p. 10) Placement Keep small items out of the reach of children • Close the lid. Fire may result in the unlikely event that a breakdown occurs. • Do not expose the unit to direct sunlight, place it near devices that radiate heat, leave it inside an enclosed vehicle, or otherwise subject it to temperature extremes. Also, do not allow lighting devices that normally are used while their light source is very close to the unit (such as a piano light), or powerful spotlights to shine upon the same area of the unit for extended periods of time. Excessive heat can deform or discolor the unit. CAUTION Additional Precautions • Any data stored within the unit can be lost as the result of equipment failure, incorrect operation, etc. To protect yourself against the irretrievable loss of data, try to make a habit of creating regular backups of the data you’ve stored in the unit. • Roland assumes no liability concerning the restoration of any stored content that has been lost. • Never strike or apply strong pressure to the display. • The sound of keys being struck and vibrations produced by playing an instrument can be transmitted through a floor or wall to an unexpected extent. Please take care not to cause annoyance to others nearby. • Do not apply undue force to the music stand while it is in use (RP401R). • When opening or closing the lid, please be careful not to get your fingers pinched between the movable part and the panel. In places where small children are present, make sure that an adult provides supervision and guidance. • Do not hang anything other than headphones on the headphone hook. Do not apply undue force to the hook. Otherwise, you risk damaging the hook. Using External Memories • Please observe the following precautions when handling external memory devices. Also, make sure to carefully observe all the precautions that were supplied with the external memory device. • Do not remove the device while reading/writing is in progress. • To prevent damage from static electricity, discharge all static electricity from your person before handling the device. Intellectual Property Right • It is forbidden by law to make an audio recording, video recording, copy or revision of a third party's copyrighted work (musical work, video work, broadcast, live performance, or other work), whether in whole or in part, and distribute, sell, lease, perform, or broadcast it without the permission of the copyright owner. • Do not use this product for purposes that could infringe on a copyright held by a third party. We assume no responsibility whatsoever with regard to any infringements of third-party copyrights arising through your use of this product. • The copyright of content in this product (the sound waveform data, style data, accompaniment patterns, phrase data, audio loops and image data) is reserved by Roland Corporation. • Purchasers of this product are permitted to utilize said content (except song data such as Demo Songs) for the creating, performing, recording and distributing original musical works. • Purchasers of this product are NOT permitted to extract said content in original or modified form, for the purpose of distributing recorded medium of said content or making them available on a computer network. • XGlite ( ) is a registered trademark or a trademark of Yamaha Corporation. • Roland, SuperNATURAL and GS are either registered trademarks or trademarks of Roland Corporation in the United States and/or other countries. • Apple, iPad are either registered trademarks or trademarks of Apple Inc. F-130R °Tone List [Piano] button No. Name No. Name No. Name No. Name 1 Concert Piano 4 Magical Piano 7 Piano + Choir 10 Harpsichord 2 Ballade Piano 5 Piano + Strings 8 Rock Piano 11 Coupled Harpsichord 3 Bright Piano 6 Piano + Pad g Ragtime Piano [Other] button No. Name No. Name No. Name No. Name 1 Trem. TineEP 12 Mallet Isle 23 Ballad Organ 34 Dcy ChoirPad 2 Pop E.Piano 13 Morning Lite 24 Full Stops 35 Nylon-str.Gt 3 Tine EP 14 SymphonicStr 25 Mellow Bars 36 Steel-str.Gt 4 FM E.Piano 15 Rich Strings 26 Accordion 37 Jazz Guitar 5 Bright FM EP 16 OrchestraStr 27 Aerial Choir 38 AcousticBass 6 Vib. ReedEP 17 DecayStrings 28 Jazz Scat 3g A.Bass+Cymbl 7 Clav. 18 Harp 2g Female Aahs 40 FingeredBass 8 PhaserTineEP 1g PizzicatoStr 30 Male Aahs 41 g Vibraphone 20 ChurchOrgan1 31 Decay Choir 10 Marimba 21 ChurchOrgan2 32 Thum Voice 11 Celesta 22 Combo Jz.Org 33 Soft Pad : GM2 tones 305 °Rhythm List Genre Pop Ballad Rock No. Name Genre No. Name 1-1 Gold Medium Beat 1-2 Frank's Way 1-3 Gold Slow Beat 1-4 Gold Beat 1-5 Jessie Beat 1-6 US Shuffle 1-7 Strummin' Pop 1-8 Unplugged Pop 1-g Amazing Gospel 4-2 Midnight Slow Swing 2-1 Easy Ballad 4-3 Big Band Medium 2-2 Acoustic Ballad 4-4 Slow Jazz Waltz 4-5 Cool Soul 4-6 Cool Blues 4-7 Go! Rock'N 4-8 Blue Boogie 4-g Rock'N Slow 5-1 It Valzer 5-2 Gold Wien Waltz 2-3 Love Slow Rock 2-4 Unplugged Ballad 2-5 Spring Rock 2-6 Joe's Rock 2-7 Breaky Rock 3-1 Seventies 3-2 Jamiro Dance Disco Disco Jazz Blues Ball Room Genre No. Name Genre No. Name 3-3 Gold Disco 5-3 Gold Slow Waltz 7-5 German Polka 3-4 Survive Disco 5-4 Polka Disco 7-6 German Waltz 3-5 Hitmix 5-5 Gold Tango 7-7 6_8 March 3-6 Club House 5-6 Gold Foxtrot 7-8 US March 3-7 Baby Beat 5-7 Quick Step 7-g Orchestral Waltz 3-8 Breath Rap 5-8 Go! Twist 8-1 Country Rock 3-g Now Hip Hop 6-1 Gold Rhumba 8-2 Country Flyer 4-1 Gold Swing 6-2 Beguine 8-3 Southern Twang Ball Room Tradit World Country Latin 6-3 Gold Cha Cha 8-4 Country Ballad 6-4 That's Mambo 8-5 Country Beat 6-5 Cuba Salsa 8-6 Country Pop 6-6 Acoustic Samba g-1 P. Arpeggio 6-7 Jazz Bossa g-2 P. Pop 6-8 Fast Bossa g-3 P. Classic Polka Pianist Tradit World 6-g Samba g-4 P. Waltz 7-1 Pop Reggae g-5 P. Boogie 7-2 Love Reggae g-6 P. Ragtime 7-3 Gospel Shuffle 7-4 Ska °Chord Fingering List C C# D E E F CM7 C#M7 DM7 E M7 EM7 FM7 C7 C#7 D7 E 7 E7 F7 Cm C#m Dm E m Em Fm Cm7 C#m7 Dm7 E m7 Em7 Fm7 CmM7 C#mM7 DmM7 E mM7 EmM7 FmM7 Cdim C#dim Ddim E dim Edim Fdim Cm7 ( 5 ) C#m7 ( 5 ) Dm7 ( 5 ) E m7 ( 5 ) Em7 ( 5 ) Fm7 ( 5 ) Caug C#aug Daug E aug Eaug Faug Csus4 C#sus4 Dsus4 E sus4 Esus4 Fsus4 C7sus4 C#7sus4 D7sus4 E 7sus4 E7sus4 F7sus4 C7/13 C#7/13 D7/13 E 7/13 E7/13 F7/13 F# G A A B B F#M7 GM7 A M7 AM7 B M7 BM7 F#7 G7 A 7 A7 B 7 B7 F#m Gm A m Am B m Bm F#m7 Gm7 A m7 Am7 B m7 Bm7 F#mM7 GmM7 A mM7 AmM7 B mM7 BmM7 F#dim Gdim A dim Adim B dim Bdim F#m7 ( 5 ) Gm7 ( 5 ) A m7 ( 5 ) Am7 ( 5 ) B m7 ( 5 ) Bm7 ( 5 ) F#aug Gaug A aug Aaug B aug Baug F#sus4 Gsus4 A sus4 Asus4 B sus4 Bsus4 F#7sus4 G7sus4 A 7sus4 A7sus4 B 7sus4 B7sus4 F#7/13 G7/13 A 7/13 A7/13 B 7/13 B7/13 °Internal Song List No. a.01 a.02 a.03 a.04 a.05 a.06 a.07 a.08 a.0g a.10 a.11 a.12 a.13 a.14 a.15 a.16 a.17 a.18 a.1g a.20 a.21 a.22 a.23 a.24 a.25 a.26 a.27 a.28 a.2g a.30 a.31 a.32 a.33 a.34 a.35 a.36 a.37 a.38 a.3g a.40 a.41 a.42 a.43 a.44 a.45 a.46 a.47 a.48 a.4g a.50 a.51 a.52 a.53 a.54 a.55 a.56 a.57 a.58 a.5g a.60 Song Name Composer Valse, op.34-1 Fryderyk Franciszek Chopin Polonaise op.53 Fryderyk Franciszek Chopin Nocturne No.20 Fryderyk Franciszek Chopin Die Forelle Franz Peter Schubert, Arranged by Franz Liszt Reflets dans l'Eau Claude Achille Debussy La Fille aux Cheveux de Lin Claude Achille Debussy La Campanella Franz Liszt Scherzo No.2 Fryderyk Franciszek Chopin Étude, op.10-12 Fryderyk Franciszek Chopin Sonate No.15 Wolfgang Amadeus Mozart Liebesträume 3 Franz Liszt Étude, op.10-3 Fryderyk Franciszek Chopin Je te veux Erik Satie Valse, op.64-1 Fryderyk Franciszek Chopin Golliwog's Cakewalk Claude Achille Debussy Fantaisie-Impromptu Fryderyk Franciszek Chopin Arabesque 1 Claude Achille Debussy An der schönen, blauen Donau Johann Strauss, Sohn Auf Flügeln des Gesanges Felix Mendelssohn Mazurka No.5 Fryderyk Franciszek Chopin Gymnopédie 1 Erik Satie Étude, op.25-1 Fryderyk Franciszek Chopin Clair de Lune Claude Achille Debussy Étude, op.10-5 Fryderyk Franciszek Chopin Dr. Gradus ad Parnassum Claude Achille Debussy Grande Valse Brillante Fryderyk Franciszek Chopin La prière d'une Vierge Tekla Badarzewska Course en Troïka Peter Ilyich Tchaikovsky To The Spring Edvard Hagerup Grieg Valse, op.64-2 Fryderyk Franciszek Chopin Radetzky Marsch Johann Baptist Strauss Träumerei Robert Alexander Schumann Moments Musicaux 3 Franz Peter Schubert Prélude, op.28-15 Fryderyk Franciszek Chopin Harmonious Blacksmith Georg Friedrich Händel Ungarische Tänze 5 Johannes Brahms Türkischer Marsch Ludwig van Beethoven Nocturne No.2 Fryderyk Franciszek Chopin Frühlingslied Felix Mendelssohn Präludium Johann Sebastian Bach Jägerlied Felix Mendelssohn Passepied Claude Achille Debussy Für Elise Ludwig van Beethoven Türkischer Marsch Wolfgang Amadeus Mozart Ständchen Franz Peter Schubert Humoreske Antonín Dvořák Blumenlied Gustav Lange Alpenglöckchen Theodor Oesten Menuett G dur Ludwig van Beethoven Venezianisches Gondellied Felix Mendelssohn Alpenabendröte Theodor Oesten Farewell to the Piano Ludwig van Beethoven Brautchor Wilhelm Richard Wagner Forget-Me-Not Heinrich Lichner Wiener Marsch Carl Czerny Le Coucou Louis Claude Daquin Menuett G dur Johann Sebastian Bach Spinnerlied Albert Ellmenreich Gavotte François Joseph Gossec Heidenröslein Gustav Lange No. a.61 a.62 a.63 a.64 a.65 a.66 a.67 a.68 a.6g b.01 : Song Name Composer Zigeuner Tanz Heinrich Lichner La Cinquantaine Gabriel Marie Csikos Post Hermann Necke Dolly's Dreaming Awakening Theodor Oesten La Violette Louis Streabbog Fröhlicher Landmann Robert Alexander Schumann Sonatine op.36-1 Muzio Clementi Sonatine op.20-1 Friedrich Kuhlau Sonatine No.5 Ludwig van Beethoven Czerny 100-1–99 Carl Czerny Czerny 100-100 Carl Czerny Hanon 1–20 Charles Hanon b.gg b. 0 c.01 : c.20 * All rights reserved. Unauthorized use of this material for purposes other than private, personal enjoyment is a violation of applicable laws. * Musical scores are not included with this unit. You can purchase musical scores from their respective publishers. * No data for the music that is played will be output from USB Computer port. For EU Countries For China For the U.K. IMPORTANT: THE WIRES IN THIS MAINS LEAD ARE COLOURED IN ACCORDANCE WITH THE FOLLOWING CODE. BLUE: NEUTRAL BROWN: LIVE As the colours of the wires in the mains lead of this apparatus may not correspond with the coloured markings identifying the terminals in your plug, proceed as follows: The wire which is coloured BLUE must be connected to the terminal which is marked with the letter N or coloured BLACK. The wire which is coloured BROWN must be connected to the terminal which is marked with the letter L or coloured RED. Under no circumstances must either of the above wires be connected to the earth terminal of a three pin plug. For the USA Model Name : Type of Equipment : Responsible Party : Address : Telephone : DECLARATION OF CONFORMITY Compliance Information Statement RP401R, F-130R Digital Piano Roland Corporation U.S. 5100 S. Eastern Avenue Los Angeles, CA 90040-2938 (323) 890-3700 FEDERAL COMMUNICATIONS COMMISSION RADIO FREQUENCY INTERFERENCE STATEMENT For the USA Model Name : Type of Equipment : This equipment has been tested and found to comply with the limits for a Class B digital device, pursuant to Part 15 of the Responsible Party limits : FCC Rules. These are designed to provide reasonable protection against harmful interference in a residential Address : installation. This equipment generates, uses, and can radiate radio frequency energy and, if not installed and used in Telephone : accordance with the instructions, may cause harmful interference to radio communications. However, there is no guarantee that interference will not occur in a particular installation. If this equipment does cause harmful interference to radio or television reception, can be determined by turning the equipment off and on, the user is encouraged to try to correct the Model Namewhich : FP-80 interference by one or: more of Piano the following measures: Type of Equipment Digital – Reorient or relocate the antenna. Corporation U.S. Responsible Party : Roland receiving – Increase the separation equipment and receiver. Eastern the Avenue Los Angeles, CA 90040-2938 Address : 5100 S.between – Connect the equipment into an outlet on a circuit different from that to which the receiver is connected. Telephone : (323) 890-3700 – Consult the dealer or an experienced radio/TV technician for help. This device complies with Part 15 of the FCC Rules. Operation is subject to the following two conditions: (1) this device may not cause harmful interference, and (2) this device must accept any interference received, including interference that may cause undesired operation. This equipment requires shielded interface cables in order to meet FCC class B limit. Any unauthorized changes or modifications not expressly approved by the party responsible for compliance could void the user’s authority to operate the equipment. For Canada CAN ICES-3 (B)/NMB-3 (B) For Korea WARNING For C.A. US (Proposition 65) This product contains chemicals known to cause cancer, birth defects and other reproductive harm, including lead. * 5 1 0 0 0 3 7 5 9 2 - 0 2 *