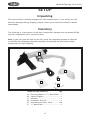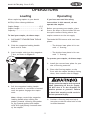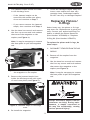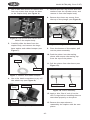
1
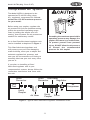
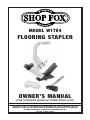
MODEL W1784
FLOORING STAPLER
OWNER'S MANUAL
(FOR STAPLERS MANUFACTURED SINCE 2/07)
Phone: (360) 734-3482 • Online Technical Support: [email protected]
COPYRIGHT © JUNE, 2007 BY WOODSTOCK INTERNATIONAL, INC., REVISED OCTOBER, 2009 (TS)
WARNING: NO PORTION OF THIS MANUAL MAY BE REPRODUCED IN ANY SHAPE OR FORM WITHOUT
THE WRITTEN APPROVAL OF WOODSTOCK INTERNATIONAL, INC.
#9628TS Printed in China
This manual provides critical safety instructions on the proper setup,
operation, maintenance and service of this machine/equipment.
Failure to read, understand and follow the instructions given in this
manual may result in serious personal injury, including amputation,
electrocution or death.
The owner of this machine/equipment is solely responsible for its safe
use. This responsibility includes but is not limited to proper installation in a safe environment, personnel training and usage authorization, proper inspection and maintenance, manual availability and
comprehension, application of safety devices, blade/cutter integrity,
and the usage of personal protective equipment.
The manufacturer will not be held liable for injury or property
damage from negligence, improper training, machine modifications or
misuse.
Some dust created by power sanding, sawing, grinding, drilling, and
other construction activities contains chemicals known to the State of
California to cause cancer, birth defects or other reproductive harm.
Some examples of these chemicals are:
• Lead from lead-based paints.
• Crystalline silica from bricks, cement and other masonry products.
• Arsenic and chromium from chemically-treated lumber.
Your risk from these exposures varies, depending on how often you
do this type of work. To reduce your exposure to these chemicals:
Work in a well ventilated area, and work with approved safety equipment, such as those dust masks that are specially designed to filter
out microscopic particles.
Model W1784 (Mfg. Since 2/07)
SAFETY
For Your Own Safety Read Instruction Manual
Before Operating This Equipment
The purpose of safety symbols is to attract your attention to possible hazardous
conditions. This manual uses a series of symbols and signal words which are intended
to convey the level of importance of the safety messages. The progression of
symbols is described below. Remember that safety messages by themselves do not
eliminate danger and are not a substitute for proper accident prevention measures.
Indicates an imminently hazardous situation which, if
not avoided, WILL result in death or serious injury.
Indicates a potentially hazardous situation which, if
not avoided, COULD result in death or serious injury.
Indicates a potentially hazardous situation which, if
not avoided, MAY result in minor or moderate injury.
It may also be used to alert against unsafe practices.
NOTICE
This symbol is used to alert the user to useful
information about proper operation of the
equipment.
Safety Instructions for Pneumatic Tools
5. KEEP CHILDREN AND VISITORS
AWAY. All children and visitors
should be kept at a safe distance
from work area.
1. KEEP ALL SAFETY DEVICES IN
PLACE and in working order.
2. REMOVE ADJUSTING KEYS AND
WRENCHES. Form habit of checking
to see that keys and adjusting
wrenches are removed from tool
before operation.
6. MAKE WORKSHOP CHILD PROOF by
locking your shop and shutting off
air valves.
7. DO NOT FORCE TOOL. It will do
the job better and safer at the rate
for which it was designed.
3. KEEP WORK AREA CLEAN. Cluttered
areas and benches invite accidents.
4. DO NOT USE IN DANGEROUS
ENVIRONMENT. Do not use
pneumatic tools in damp or wet
locations, or where any flammable
or noxious fumes may exist. Keep
work area well lighted.
8. USE THE RIGHT TOOL. Do not
force tool or attachment to do a
job for which it was not designed.
9. DO NOT USE UNDER THE
INFLUENCE OF DRUGS OR
ALCOHOL.
-1-
Model W1784 (Mfg. Since 2/07)
Safety Instructions for Pneumatic Tools
10.USE PROPER AIR HOSE for the
tool. Make sure your air hose is in
good condition and is long enough
to reach your work without
stretching.
17.DISCONNECT TOOLS before
servicing, changing accessories, or
moving to another location.
11.WEAR PROPER APPAREL. Do
not wear loose clothing, gloves,
neckties, rings, bracelets, or
other jewelry which may get
caught in moving parts. Non-slip
footwear is recommended. Wear a
protective hair covering to contain
long hair.
19.USE THE RECOMMENDED
ACCESSORIES. Consult owner’s
manual for recommended
accessories. The use of improper
accessories may cause risk of
injury.
18.DO NOT OVERREACH. Keep proper
footing/balance at all times.
20.CHECK FOR DAMAGED PARTS
BEFORE USING. Check for binding
and alignment of parts, broken
parts, part mounting, loose bolts,
and any other conditions that may
affect machine operation. Repair
or replace damaged parts.
12.ALWAYS USE SAFETY GLASSES.
Also use a face or dust mask
if cutting operation is dusty.
Everyday eyeglasses only have
impact resistant lenses, they are
NOT safety glasses.
21.NEVER LEAVE UNATTENDED TOOL
CONNECTED TO AIR. Disconnect
the air hose and do not leave tool
until it is relieved of any built up
pressure.
13.WEAR APPROVED HEARING
PROTECTION. Air escaping from
pneumatic tools can exceed safe
exposure limits and may cause
hearing damage with prolonged
exposure.
22.NEVER ALLOW UNTRAINED
USERS TO USE THIS TOOL WHILE
UNSUPERVISED.
14.SECURE WORK. Use clamps or a
vise to hold work when practical.
It is safer than using your hand
and frees both hands to operate
tool.
23.IF YOU ARE UNSURE OF THE
INTENDED OPERATION, STOP
USING TOOL. Seek formal training
or research books or magazines
that specialize in pneumatic tools.
15.MAINTAIN TOOLS WITH CARE.
Keep tools lubricated and clean
for best and safest performance.
Follow instructions for lubricating
and changing accessories.
24.BE AWARE OF HOSE LOCATION
WHEN USING PNEUMATIC TOOLS.
Hoses can easily become a tripping
hazard when laid across the floor
or spread out in a disorganized
fashion.
16.REDUCE THE RISK OF
UNINTENTIONAL FIRING. Do not
carry tool with hand on trigger
and always disconnect from air
when not in use.
-2-
Model W1784 (Mfg. Since 2/07)
Additional Safety for Staplers
1. HAND INJURIES: Do not place
your hands near the staple point
of entry. A staple can deflect and
tear through the surface of the
workpiece, puncturing your hand or
fingers.
5. HOSE USAGE: Make sure your air
hose is designed for the tool in
use, is in good condition, and is
long enough to reach your work
without stretching. However, an
overly long air hose in the work
area may be a tripping hazard.
2. COMBUSTIBLE GASES: Never
connect the stapler to pressurized
oxygen or other combustible
gases as a power source. Only use
filtered, lubricated, and regulated
compressed air.
6. OPERATING QUESTIONS: If you
are not sure about the intended
operation, stop using the stapler.
Seek formal training.
7. MAINTENANCE: Always disconnect
air from the stapler when servicing
or installing staples. During
maintenance, a stapler connected
to air may fire accidentally,
causing serious personal injury.
3. SAFE HANDLING: Never point the
stapler at others! Do not keep
the trigger pulled when loading
fasteners, carrying, or holding
tool. Carry the stapler only by the
handle, never by any other part.
Do not carry the stapler by the air
hose. Disconnect the stapler from
the air hose when going up and
down ladders.
8. COMPRESSED AIR RATING: Do not
connect the stapler to compressed
air that exceeds 120 PSI.
9. CHECK VALVE: Do not use a check
valve or any other fitting that
allows air to remain in the tool.
4. CLEANING: Never use gasoline or
other flammable liquids to clean
the stapler; vapors in the stapler
will ignite by a spark and cause it
to explode.
10.MODIFICATIONS: DO NOT
modify this tool or bypass safety
mechanisms.
Never point this stapler at yourself
or another person! Always pay
attention to the direction this stapler
is pointed. Use this tool with respect
and caution to lessen the possibility
of operator or bystander injury.
Ignoring this warning may result in
serious personal injury.
Stapler accidents routinely happen
while moving the gun to another
location, such as up ladders, to
another room, or even another job
site. Always disconnect the gun
immediately after use and never
transport the gun while connected to
the air—even if the air compressor is
disconnected from its power source!
-3-
Model W1784 (Mfg. Since 2/07)
INTRODUCTION
Woodstock Technical
Support
Tool Data
Staple Gauge............................. 15 1⁄2
Staple Crown................................1⁄2"
Staple Length..............................1 "–2"
Magazine Capacity................. 60 Staples
Air Inlet................................. 1⁄4" NPT
Stapler Weight....................... 11 1⁄4 lbs.
Hammer Weight.......................2 1⁄2 lbs.
Operating Pressure................ 70-100 PSI
The Model W1784 Flooring Stapler has
been specially designed to provide many
years of trouble-free service. Close attention to detail, ruggedly built parts and a
rigid quality control program assure safe
and reliable operation.
Woodstock International, Inc. is committed to customer satisfaction. Our intent
with this manual is to include the basic
information for safety, setup, operation,
maintenance, and service of this product.
We stand behind our tools! In the
event that questions arise about
your tool, please contact Woodstock
International Technical Support at
(360) 734-3482 or send e-mail to:
[email protected]. Our knowledgeable staff will help you troubleshoot
problems and process warranty claims.
Read the manual before operation.
Become familiar with this stapler, its
safety instructions, and its operation
before beginning any work. Serious
personal injury may result if safety
or operational information is not
understood or followed.
If you need the latest edition of this
manual, you can download it from
http://www.shopfox.biz.
If you have comments about this
manual, please contact us at:
Woodstock International, Inc.
Attn: Technical Documentation
Manager
P.O. Box 2309
Bellingham, WA 98227
Email: [email protected]
No list of safety guidelines can be
complete. Every shop environment
is different. Always consider safety
first, as it applies to your individual
working conditions. Use this and
other tools with caution and respect.
Failure to do so could result in serious
personal injury, damage to equipment
or poor work results.
-4-
Model W1784 (Mfg. Since 2/07)
Compressed Air System
The Model W1784 is designed to be
operated at 70-100 PSI using clean,
dry, regulated, compressed air. Do not
exceed the 120 PSI maximum pressure
for your model.
Before using your stapler, regulate the
air pressure to find the optimum setting
within the specified operating range.
Start by testing the stapler at a low
setting, then increase the air pressure as
needed for satisfactory results.
Exceeding the maximum permissible
operating pressure may damage the
stapler and cause it to malfunction.
To protect yourself from personal
injury, DO NOT allow the air pressure
to exceed the recommended
pressure for this stapler!
An in-line filter/lubricator/regulator unit
can be installed as depicted in Figure 1.
This filter/lubricator/regulator unit
will protect your tool from damaging
water build-up, allow you to adjust and
maintain regulated air pressure, and
save you the inconvenience of having to
manually lubricate your tool every time
you use it.
If you plan on installing a filter/
lubricator/regulator unit in your
compressed air system, always follow the
connection instructions that come with
the unit.
Quick
Connector
Quick
Lubricator
Regulator
Connector
Your
Tool
Air
Compressor
Quick
Coupler
Air Hose
Quick
Coupler Filter
Figure 1. Typical filter/lubricator/regulator installation order.
-5-
Model W1784 (Mfg. Since 2/07)
SETUP
Unpacking
This tool has been carefully packaged for safe transportation. If you notice the tool
has been damaged during shipping, please contact your authorized Shop Fox dealer
immediately.
Inventory
The following is a description of the main components shipped with the Model W1784.
Lay the components out to inventory them.
Note: If you can't find an item on this list, check the mounting location on the tool
or examine the packaging materials carefully. Occasionally we pre-install certain
components for safer shipping.
A
B
C
D
F
E
Model W1784 Inventory
Qty
A. Flooring Stapler w/ 1⁄2" Base Plate.... 1
B. Safety Goggles............................ 1
C. Hammer................................... 1
D. Pneumatic Tool Oil....................... 1
E. Hex Wrenches 4mm, 5mm.......... 1 Ea
F. 3⁄4" Base Plate............................ 1
-6-
Model W1784 (Mfg. Since 2/07)
OPERATIONS
Loading
Operating
If you have not read the safety
instructions in this manual, do not
operate the stapler.
When replacing staples in your Model
W1784, follow these guidelines:
Staple Gauge.............................. 15.5
Staple Length.............................. 1"–2"
Capacity:......................................60
To load your stapler, do these steps:
Before you operate your stapler, place
five to six drops of the included oil into
the quick connect fitting where the
stapler connects to the air supply.
1. DISCONNECT STAPLER FROM THE AIR
SUPPLY!
The Model W1784 comes with two base
plates:
2. Slide the magazine loading handle
back until it locks.
— The thinner base plate is for use
with 3⁄4" flooring.
3. Load a staple stick into the magazine
T-slot, as shown in Figure 2.
— The thicker base plate is for use
with 1⁄2" flooring.
To operate your stapler, do these steps:
1. Install the correct base plate for your
size of flooring material.
2. Place the flooring stapler on the
floor with the staple discharge facing
down, then connect the air supply.
Figure 2. Loading staples into stapler.
Always point the stapler at the ground
when connecting to the air supply.
DO NOT aim it in the direction of
another person or yourself. Failure
to heed this warning could result in
serious personal injury.
4. Pull the magazine loading handle
back to unlock it, and slide it forward
until the pusher engages the staple
stick.
Note: Always control the magazine
loading handle when sliding the
pusher forward. Allowing the pusher
to fly forward against the stapler
stick will significantly increase wear
of the stapler.
3. Position a flooring strip and tap it
into place with the metal side of the
included hammer.
-7-
Model W1784 (Mfg. Since 2/07)
NOTICE
DO NOT use the stapler to position
the flooring strip. Doing so will
damage the stapler and possibly the
flooring strip.
Never hit the whack cap of the
stapler multiple times to drive the
staple into the wood. If necessary,
use a hammer to drive the staple in.
Failure to heed this warning could
cause a staple jam or a ricochet, and
serious personal injury.
Note: If you are using pre-finished
flooring material, test the stapler
on a sample strip. If the stapler base
plate is damaging or marring the
flooring surface, replace it with a
new one.
7. Check the staple for satisfactory
penetration.
— If the staple depth is satisfactory,
proceed with your project.
4. Place the stapler on the flooring
strip, as shown in Figure 3.
— If the staple depth is too shallow,
slightly increase the air pressure.
— If the staple depth is too deep,
slightly decrease the air pressure.
Figure 3. Positioning and operating
stapler on flooring strip.
Note: Staple penetration is not
always consistent due to variations in
the flooring material. If necessary,
use a hammer to finish seating the
staple.
Clearing Jammed
Staples
A jammed staple must be cleared before
using the stapler again.
DO NOT place your hands near the
staple point of entry. A staple can
deflect and tear through the surface
of the workpiece, puncturing your
hand or fingers.
To clear a jammed staple from the discharge area, do these steps:
1. DISCONNECT STAPLER FROM THE AIR
SUPPLY!
2. Pull the magazine loader handle all
the way back and remove the staple
stick.
5. Make sure the cleat on the stapler
base plate is lined up with the edge
of the groove on the flooring strip.
6. Using the rubber end of the included
hammer, hit the whack cap of the
stapler ONCE with a light to medium
force to shoot a staple into the wood.
-8-
Model W1784 (Mfg. Since 2/07)
3. The jammed staple should be visible
in the discharge area.
7. Throw the damaged staple away and
insert a new staple stick that only
contains clean, undamaged staples.
DO NOT use dirty or damaged staples!
— If the jammed staple can be
removed with needle nose pliers,
do so and continue to Step 7.
Replacing Pistons/
O-Rings
— If you cannot remove the jammed
staple, then continue with Step 4.
Under heavy use, the piston or O-rings
may wear out. Replacement is quick and
easy. Contact your authorized Shop Fox
dealer to obtain the Piston Repair Kit
(Part Number X1784068) or Complete
O-Ring Kit (Part Number X1784071).
4. Use the 4mm hex wrench and remove
the four cap screws and lock washers
that secure the magazine to the
stapler (see Figure 4).
Note: It may be necessary to remove
the base plate to pull the magazine
out.
To replace the piston and O-rings, do
these steps:
1. DISCONNECT STAPLER FROM THE AIR
SUPPLY!
2. Remove all the staples from the
magazine.
3. Use the 4mm hex wrench and remove
the four cap screws and lock washers
that secure the magazine to the
stapler (see Figure 4).
Figure 4. Location of cap screws securing
the magazine to the stapler.
5. Remove the jammed staple from
inside the discharge area with a pair
of need nose pliers (see Figure 5).
Note: It may be necessary to remove
the base plate to pull the magazine
out.
Always disconnect stapler from air
whenever servicing! During maintenance, a stapler connected to
air may fire accidentally, causing
serious personal injury!
Figure 5. Jammed staple in discharge
area.
6. Re-install the magazine.
-9-
Model W1784 (Mfg. Since 2/07)
4. Use a 5mm hex wrench to remove the
four cap screws that secure the base
to the stapler body (see Figure 6).
7. Remove the four cap screws and lock
washers from the cylinder cover, and
remove it from the stapler body.
8. Remove the three cap screws from
the top of the plunger (see Figure 9).
Plunger
Figure 6. Cap screws that secure the
base to the stapler body.
Cap Screw
5. Carefully slide the base from the
stapler body, and remove the large
base washer and rubber bumper (see
Figure 7).
Figure 9. Plunger and cap screws.
9. From the bottom of the stapler, pull
out the piston assembly.
10.Push the piston into the sealing
sleeve and remove the sealing cap
from the top of the piston.
Washer
11.Pull the piston from the sleeve (see
Figure 10).
Bumper
Figure 7. Washer and rubber bumper.
6. Use a flat head screwdriver to pry off
the whack cap (see Figure 8).
Cylinder
Cover
Sealing Sleeve
Whack Cap
Piston
Figure 10. Piston assembly.
12.Apply a thin film of tool oil to the
new O-rings before installing them to
seat them properly on the parts.
Exhaust
Port
13.Reverse the steps above to
reassembly the stapler with the new
piston.
Figure 8. Whack cap and cylinder cover.
-10-
Model W1784 (Mfg. Since 2/07)
CLEANING & LUBRICATION
Cleaning
Lubricating
Use a good solvent to clean the nose
assembly of the stapler. Always be sure
that the stapler is dry before using it
again.
Standard pneumatic tool oil has been
included with your new Shop Fox stapler
to help maintain its useful life. Place two
to six drops of oil in the stapler air inlet
(as shown in Figure 11) before every use,
or after 2 hours of continuous use.
Do not allow dust, chips, sand, etc.
into the air connectors or into the body
of the stapler; this may result in leaks
and damage to the stapler and the air
couplings.
Wipe off any excess oil near the stapler
exhaust to avoid dust build-up. When the
oil that was included with the stapler has
been completely used, replace with a
quality pneumatic tool oil.
Another option to manual oiling would
be to install a lubricator in your air
compressor line. If your air compressor
line already has a lubricator, then regular
lubrication of your stapler will not be
necessary. Just make sure there is always
oil in the lubricator.
Never clean this tool with gasoline
or other flammable liquids. Vapors
in the tool may ignite, causing
the tool to explode. Ignoring
this warning may lead to serious
personal injury or even death!
Figure 11. Lubricating stapler via air
inlet.
-11-
Model W1784 (Mfg. Since 2/07)
PARTS BREAKDOWN
35
65
33
32
37
38
30
29
31
28
26
25
27
24
39
66
23
22
19
18
17
16 45
15
14
13
11
10
5
9
4
8
40
34
3
1
52
56 55
47 49
44
7
51
48
57
60
63
58
6
71
46
42
41
12
72
38
50
37
43
59 61
62
70
64
67
69
-12-
68
53
54
Model W1784 (Mfg. Since 2/07)
PARTS LIST
REF PART #
DESCRIPTION
REF PART #
DESCRIPTION
1
3
4
5
6
7
8
9
10
11
12
13
14
15
16
17
18
19
22
23
24
25
26
27
28
29
30
31
32
33
34
35
37
38
CYLINDER
BUMPER
O-RING 49.7 X 3.5 P50
DRIVER
ROLL PIN 6 X 20
SET SCREW M5-.8 X 8
PISTON
PISTON HEAD
O-RING 12.3 X 2.4 P12.5
O-RING 32 X 4.5
SEALING SLEEVE
O-RING 12.8 X 1.8
SEALING CAP
O-RING 15.6 X 1.8
GUN BODY
GASKET
END CAP
CAP SCREW M4-.7 X 20
CYLINDER GASKET
SLEEVE GASKET
O-RING 45.7 X 3.5 P46
PLUNGER
LOCK WASHER 4MM
CAP SCREW M4-.7 X 16
PHLP HD SCR M4-.7 X 16
EXHAUST PORT
CYLINDER COVER
CAP SCREW M5-.8 X 17
O-RING 24.7 X 3.5 P25
WHACK CAP
FLAT WASHER 5MM
BRACE
LOCK NUT M8-1.25
FLAT WASHER 8MM
39
40
41
42
43
44
45
46
47
48
49
50
51
52
53
54
55
56
57
58
59
60
61
62
63
64
65
66
67
68
69
70
71
72
L-BOLT
CYLINDER HEAD SEAT
STAPLE HEAD COVER
STAPLE HEAD
MAGAZINE
STAPLE HEAD SCREW
LOADER
RIVET 4 X 8
IDLER WHEEL
LOADING SPRING
KEEPER
O-RING 2.5 X 1.5 S3
SPRING LEVER
COMPRESSION SPRING
LEVER PIN
STUD M8-1.25 X 10
MAGAZINE PIN
ROLL PIN 5 X 30
LOADING HANDLE
CAP SCREW M5-.8 X 30
RUBBER BUTTON
BASE
LOCK WASHER 6MM
CAP SCREW M6-1 X 40
BASE PLATE 1/2 IN FLOORING
FLAT HD SCR M6-1 X 12
HAMMER
AIR PLUG 1/4 NPT
BASE PLATE 3/4 IN FLOORING
PISTON REPAIR KIT
HEX WRENCH 4MM
HEX WRENCH 3MM
COMPLETE O-RING KIT
SAFETY GOGGLES
X1784001
X1784003
XPORP050
X1784005
XPRP07M
XPSS31M
X1784008
X1784009
XPORP012-5
X1783011
X1784012
X1783013
X1784014
X1783015
X1784016
X1784017
X1784018
XPCAP39M
X1784022
X1784023
XPORP046
X1784025
XPLW02M
XPCAP16M
XPS56M
X1784029
X1784030
XPCAP09M
XPORP025
X1783033
XPW02M
X1784035
XPLN04M
XPW01M
-13-
X1784039
X1784040
X1784041
X1784042
X1784043
X1784044
X1784045
X1784046
X1784047
X1784048
X1784049
XPORS003
X1784051
X1784052
X1784053
X1784054
X1784055
XPRP05M
X1784057
XPCAP95M
X1784059
X1784060
XPLW03M
XPCAP29M
X1784063
XPFH02M
X1783063
X1784066
X1784067
X1784068
XPAW04M
XPAW03M
X1784071
X1784072
Model W1784 (Mfg. Since 2/07)
Troubleshooting
Symptom
Possible Cause
Possible Solution
Air leaking at
whack cap area.
1.O-rings in plunger/cylinder
housing are damaged.
1.O-rings must be replaced &
operation checked.
Air leaking between 1.Loose screws in housing.
housing and hose
2.Damaged O-ring.
3.Loose air fitting.
1.Tighten screws.
2.Replace O-ring
3.Tighten air fitting & use
teflon tape.
Air leaking between 1.Damaged seal.
housing and cap.
1.Replace damaged seals.
Tool skips staples
while discharging.
1.Reduce air pressure to tool.
2.Tighten screws and fittings.
3.Clean nose.
4.Clean magazine and
inspect/repair damage.
5.Check fittings, hose,
compressor, and air
pressure.
6.Replace O-ring and
lubricate.
7.Replace plunger/cylinder
O-rings.
8.Replace bumper.
9.Replace cap seal.
1.Excessive air pressure.
2.Air leaks.
3. Dirt in nose.
4.Dirt or damage prevents
staples from moving freely.
5.Inadequate air flow to tool.
6.Worn piston O-ring or lack of
lubrication.
7.Damaged plunger/cylinder Orings.
8.Worn bumper.
9.Cap seal leaking.
Tool runs slowly or 1.Undersized air hose.
has a loss of power. 2.Stapler is not lubricated.
3.Broken spring in cap assembly.
4.Exhaust ports on cylinder cap
are blocked.
1.Use a larger hose.
2.Lubricate stapler.
3.Replace spring.
4.Clean or replace damaged
internal parts.
Fasteners
frequently jam the
stapler.
1.Use correct staples.
2.Use undamaged, clean
staples.
3.Tighten magazine.
1.Staples are the wrong size.
2.Staples are bent or dirty.
3.Magazine or nose screws are
loose.
4.Driver or driver guide are
worn or damaged.
5.Staples are wrong angle.
4.Replace worn or damaged
parts.
5.Use correct angle staples.
Stapler does not
fire.
1.Stapler is not lubricated.
Air blows out
of exhaust cap;
stapler will not
fire.
1.O-ring slipped out of groove or 1.Reinstall/replace suspect
damaged inside stapler.
O-ring; turn down air
pressure.
2.Staple is jammed in magazine
or discharge area.
3.Piston shaft is damaged.
4.Air pressure too low.
-14-
1.Follow lubricating
instructions.
2.Clear stapler magazine or
discharge area.
3.Replace piston shaft.
4.Check/increase air
pressure.
Warranty Registration
Name____________________________________________________________________________________
Street___________________________________________________________________________________
City__________________________ State____________________________Zip_________________________
Phone #_______________________ Email___________________________Invoice #____________________
Model #_________Serial #______________Dealer Name__________________Purchase Date___________
The following information is given on a voluntary basis. It will be used for marketing purposes to help us
develop better products and services. Of course, all information is strictly confidential.
CUT ALONG DOTTED LINE
1. How did you learn about us?
Advertisement
Mail Order Catalog
______ Friend
______ Website
_ ____ Local Store
_ ____ Other:
2. How long have you been a woodworker/metalworker?
0-2 Years
______ 2-8 Years
_____ 8-20 Years ______ 20+ Years
3. How many of your machines or tools are Shop Fox?
0-2
______ 3-5
_____ 6-9
______ 10+
4. Do you think your machine represents a good value?
______ Yes
_ ____ No
5. Would you recommend Shop Fox products to a friend?
______ Yes
_ ____ No
6. What is your age group?
20-29
50-59
______ 30-39
______ 60-69
7. What is your annual household income?
$20,000-$29,000
______ $30,000-$39,000
$50,000-$59,000
______ $60,000-$69,000
_ ____ 40-49
_ ____ 70+
_ ____ $40,000-$49,000
_ ____ $70,000+
8. Which of the following magazines do you subscribe to?
____
____
____
____
____
____
____
____
____
____
Cabinet Maker
Family Handyman
Hand Loader
Handy
Home Shop Machinist
Journal of Light Cont.
Live Steam
Model Airplane News
Modeltec
Old House Journal
____
____
____
____
____
____
____
____
____
____
Popular Mechanics
Popular Science
Popular Woodworking
Practical Homeowner
Precision Shooter
Projects in Metal
RC Modeler
Rifle
Shop Notes
Shotgun News
____
____
____
____
____
____
____
____
____
Today’s Homeowner
Wood
Wooden Boat
Woodshop News
Woodsmith
Woodwork
Woodworker West
Woodworker’s Journal
Other:
9. Comments:___________________________________________________________________
_ _____________________________________________________________________________
_ _____________________________________________________________________________
_ _____________________________________________________________________________
_ ___________________________________________________________________
_ ___________________________________________________________________
FOLD ALONG DOTTED LINE
Place
Stamp
Here
Woodstock international inc.
p.o. box 2309
bellingham, wa 98227-2309
FOLD ALONG DOTTED LINE
tape along edges--please do not staple
WARRANTY AND RETURNS
Woodstock International, Inc. warrants all Shop Fox machinery to be free of defects
from workmanship and materials for a period of two years from the date of original
purchase by the original owner. This warranty does not apply to defects due directly
or indirectly to misuse, abuse, negligence or accidents, lack of maintenance, or
reimbursement of third party expenses incurred.
Woodstock International, Inc. will repair or replace, at its expense and at its option,
the Shop Fox machine or machine part which in normal use has proven to be defective,
provided that the original owner returns the product prepaid to a Shop Fox factory
service center with proof of their purchase of the product within two years, and
provides Woodstock International, Inc. reasonable opportunity to verify the alleged
defect through inspection. If it is determined there is no defect, or that the defect
resulted from causes not within the scope of Woodstock International Inc.'s warranty,
then the original owner must bear the cost of storing and returning the product.
This is Woodstock International, Inc.'s sole written warranty and any and all warranties
that may be implied by law, including any merchantability or fitness, for any particular
purpose, are hereby limited to the duration of this written warranty. We do not
warrant that Shop Fox machinery complies with the provisions of any law or acts. In
no event shall Woodstock International, Inc.'s liability under this warranty exceed the
purchase price paid for the product, and any legal actions brought against Woodstock
International, Inc. shall be tried in the State of Washington, County of Whatcom. We
shall in no event be liable for death, injuries to persons or property or for incidental,
contingent, special or consequential damages arising from the use of our products.
Every effort has been made to ensure that all Shop Fox machinery meets high quality
and durability standards. We reserve the right to change specifications at any time
because of our commitment to continuously improve the quality of our products.