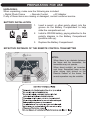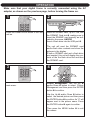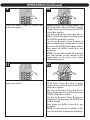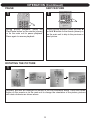
1
B-View TM Digital Photo Frame
with Remote Control
OWNER'S MANUAL
BAR598
Barbie and associated trademarks and trade dress are owned by, and used
under license from, Mattel, Inc. ©2007 Mattel, Inc. All Rights Reserved.
SAFETY PRECAUTIONS
CAUTION
RISK OF ELECTRIC SHOCK
DO NOT OPEN
CAUTION: TO REDUCE THE RISK OF ELECTRIC SHOCK, DO NOT
REMOVE COVER (OR BACK). NO USER-SERVICEABLE PARTS INSIDE.
REFER SERVICING TO QUALIFIED SERVICE PERSONNEL.
DANGEROUS VOLTAGE:
The lightning flash with arrowhead symbol within an equilateral triangle is intended
to alert the user to the presence of uninsulated dangerous voltage within the product’s enclosure that may be of sufficient magnitude to constitute a risk of electric
shock to persons.
ATTENTION:
The exclamation point within an equilateral triangle is intended to alert the user to
the presence of important operating and maintenance (servicing) instructions in the
literature accompanying the appliance.
CAUTION–ELECTRICALLY
OPERATED PRODUCT:
TO PREVENT FIRE OR SHOCK HAZARD,
DO NOT USE THIS AC ADAPTER WITH AN
EXTENSION CORD, RECEPTACLE OR
OTHER OUTLET UNLESS THE BLADES
CAN BE FULLY INSERTED TO PREVENT
BLADE EXPOSURE. TO PREVENT FIRE
OR SHOCK HAZARD, DO NOT EXPOSE
THIS APPLIANCE TO RAIN OR MOISTURE.
Not recommended for children under 5 years
of age. As with all electric products, precautions should be observed during handling
and use to prevent electric shock.
1.
2.
3.
4.
5.
6.
7.
8.
Read and understand all instructions.
Follow all warnings and instructions marked on this product.
Keep this product out of strong sunlight; direct sunlight may damage this product.
Unplug the AC adapter from the outlet and from this product if you are not using this product for a long period of time.
Unplug the AC adapter from the outlet and from this product before cleaning. Use a dry,
soft cloth for cleaning. If necessary, mild soap and water may be used. Do not use liquid
cleaners or aerosol cleaners.
Only touch the screen gently. The screen of this digital photo frame is made of glass and
can be easily scratched or broken.
Do not use this product near water–for example: near a bathtub, washbowl, kitchen sink
or laundry tub; in a wet basement; or near a swimming pool.
Do not place this product on an unstable cart, stand, tripod, bracket or table. The product
may fall, causing serious injury and serious damage to the product.
1
9.
10.
11.
12.
13.
14.
15.
16.
17.
SAFETY PRECAUTIONS
Slots and openings in the cabinet and in the back or bottom are provided for ventilation
and to ensure reliable operation of this product and to protect it from overheating. These
openings must not be blocked or covered. The openings should never be blocked by
placing this product on a bed, sofa, rug or other similar surface. This product should never
be placed near or over a radiator or heat source. This product should not be placed in an
enclosed environment unless proper ventilation is provided.
This product should be operated only from the type of power source indicated on the
marking label. If you are not sure of the type of power supply to your home, consult your
dealer or local power company.
Do not allow anything to rest on the power cord. Do not locate this product where the cord
will be abused by persons walking on it. Do not attach power cord to building surfaces.
Do not overload wall outlets and extension cords as this can result in the risk of fire or
electric shock.
Never push objects of any kind into this product through openings as they may touch dangerous voltage points or short out parts that could result in fire or electric shock. Never
spill or spray any type of liquid on this product.
To reduce the risk of electric shock, do not disassemble this product, but take it to a qualified service person when some service or repair work is required. Opening or removing
covers may expose you to dangerous voltages or other risks. Incorrect reassembly can
cause electric shock when the appliance is subsequently used.
Unplug this product from the wall outlet and refer servicing to qualified service personnel
under the following conditions:
a. When the power-supply cord or plug is damaged or frayed.
b. If this product has been exposed to rain or water.
c. If this product does not operate normally by following the operating instructions. Adjust
only those controls that are covered by the operating instructions, as an adjustment of
other controls may result in damage and will often require extensive work by a qualified
technician to restore the product to its normal operation.
d. If this product has been dropped or the cabinet has been damaged.
e. If the product exhibits a distinct change in performance.
Use only the AC adapter and batteries indicated in this manual. Do not dispose of batteries in a fire. They may explode. Check with local codes for possible special
disposal instructions.
CAUTION: RISK OF EXPLOSION IF BATTERY IS REPLACED BY AN INCORRECT
TYPE. DISPOSE OF USED BATTERIES ACCORDING TO THE INSTRUCTIONS.
2
SAFETY PRECAUTIONS
FCC INFORMATION:
This equipment has been tested and found to comply with the limits for a Class
B digital device, pursuant to Part 15 of the FCC Rules. These limits are
designed to provide reasonable protection against harmful interference in a
residential installation. This equipment generates, uses and can radiate radio
frequency energy and, if not installed and used in accordance with the
instructions, may cause harmful interference to radio communications. However,
there is no guarantee that interference will not occur in a particular installation. If
this equipment does cause harmful interference to radio or television reception,
which can be determined by turning the equipment off and on, the user is
encouraged to try to correct the interference by one or more of the
following measures:
• Reorient or relocate the receiving antenna.
• Increase the separation between the equipment and receiver.
• Connect the equipment into an outlet on a circuit different from that to which
the receiver is connected.
• Consult the dealer or an experienced radio/TV technician for help.
FCC WARNING:
This equipment may generate or use radio frequency energy. Changes or
modifications to this equipment may cause harmful interference unless the
modifications are expressly approved in the instruction manual. The user could
lose the authority to operate this equipment if an unauthorized change or
modification is made.
3
WELCOME
Emerson Radio Corp. has produced this product under license from Mattel. We
have taken great care to make sure your unit was in perfect working order when it
left our factory.
It has been designed to give you many years of enjoyment and trouble-free operation. Read this manual before operating this unit to become familiar with its features. In the event you require technical assistance, please contact the Emerson
Radio Customer Service hotline at 1-800-898-9020. Retain this manual for
future reference.
0-5
WARNING
Choking Hazard–Small Parts and Packaging Materials. Not for children
under 5 years.
• All materials for fastening or packing purposes are not part of the unit and
should be discarded for children’s safety.
• Please keep all information for future reference.
• This is not a toy.
NOTES:
• Please avoid using this unit in places of high temperature or humidity over prolonged periods of time as damage may occur.
• Exposure to direct sunlight in places such as car interiors may cause the unit to
become warped and/or lead to malfunctioning.
• Avoid using or storing this unit in dusty or sandy locations.
4
MAIN UNIT
LOCATION OF CONTROLS
1
2
3
9
10
11
12
13
14
4
5
6
7
8
Remote Control Sensor
Display
DC 5V IN Jack (Bottom of Unit)
Prev Button: Press to play the previous picture or to move down.
5. Next Button: Press to play the next
picture or to move up.
6. Play/Pause Button: Press to start or
pause playback.
7. Power On/Off Button: Press to turn
this unit on or off.
8. Stand
9. Menu Button: Press to enter display
mode menu.
10. Rotate Button: Press to rotate the
picture.
11. Speed Button: Press to choose Slow,
Normal or Fast picture playback speed.
12. USB/Card Button: Press to choose
USB or Card.
13. USB Port
14. SD/MMC Card Slot: Insert the card
along the arrow’s direction.*
1.
2.
3.
4.
* IMPORTANT NOTE:
Make sure to insert the SD/MMC card correctly as indicated by the arrow.
5
LOCATION OF CONTROLS (CONTINUED)
REMOTE
9
10
11
12
13
14
15
16
17
18
1
2
3
4
5
6
7
8
TM
19
Enter Button: Press to confirm a
selection.
2. Up Button: Press to move up.
3. Normal Button: Press to select
Normal picture playback speed.
4. Fast Button: Press to select Fast picture playback speed.
5. Bright + Button: Press to increase
the brightness.
6. Bright - Button: Press to decrease
the brightness.
7. 4:3/16:9 Button: Press to choose
between 4:3 (standard)/16:9 (wide)
mode.
8. Rotate Button: Press to rotate the
picture.
9. Remote Transmitter (Top of Unit)
10. Power On/Off Button: Press to turn
this unit on or off.
11. Down Button: Press to move down.
12. Menu Button: Press to enter display
mode menu.
13. Slow Button: Press to select Slow picture playback speed.
14. Play/Pause Button: Press to start or
pause playback.
15. Prev Button: Press to play the
previous picture.
16. Next Button: Press to play the next
picture.
17. USB Button: Press to choose USB.
18. Card Button: Press to choose Card.
19. 3V (CR2025) Lithium Battery
Compartment (Rear of Unit)
1.
6
PREPARATION FOR USE
UNPACKING:
When unpacking, make sure the following are included:
• Digital Photo Frame
• Remote Control
• AC Adapter
If any of these items are missing or damaged, contact customer service.
BATTERY INSTALLATION
1.
2.
3.
Insert a pencil, or other pointy object, into the
groove on the Battery Compartment to help
slide the compartment out.
Install a CR2025 battery, paying attention to the
polarity diagram in the Battery Compartment
(positive side up).
Replace the Battery Compartment.
EFFECTIVE DISTANCE OF THE REMOTE CONTROL TRANSMITTER
NOTES:
• When there is an obstacle between
the frame and the transmitter, the
transmitter may not operate.
6.5 ft
20
• When direct sunlight, an incandescent lamp, fluorescent lamp or any
other strong light shines on the
Remote Sensor of the frame, the
remote operation may be unstable.
20
TM
TM
TM
7
PREPARATION FOR USE (CONTINUED)
AC CONNECTION
Insert the small end of the AC adapter
into the DC 5V IN jack on the bottom
of the unit. Insert the other end (with
the 2 blades) into a conveniently located AC outlet having 120V AC, 60Hz.
AC ADAPTER SPECIFICATIONS:
DC 5V Z
NOTES:
• To disconnect the AC adapter,
remove it from the DC 5V IN jack
on the bottom of the unit as well as
from the AC outlet.
• Use the enclosed AC adapter for
this product only.
8
To
IN Jack
ToDC
DC 5V
5V IN
OPERATION
Make sure that your digital frame is correctly connected using the AC
adapter, as shown on the previous page, before turning the frame on.
1
2
1
Press the Power On/Off button to turn the
unit on.
Insert an SD/MMC card, up to 2 GB, into
the SD/MMC Card slot 1, making sure to
insert the SD/MMC card correctly as indicated by the arrow. AND/OR
Insert a flash drive into the USB port 2.
TM
1
2
The unit will read the SD/MMC card
and/or flash drive contents and show the
pictures in the display.
If both a SD/MMC card and a flash drive
are inserted, this unit will display the contents of the the flash drive first and then
the SD/MMC card.
1
4
3
3
1
4
2
TM
Press the MENU button to access the
main menu.
1
Picture Management: Use the Up 1
and/or Down 2 button to select Picture
Management and then press the ENTER
button 3 to confirm.
TM
Use the Up 1 and/or Down 2 button to
select the desired picture and then press
the ENTER button 3 to confirm. An “X” will
appear next to the picture name. Press
the ENTER button 3 again to confirm.
1
Then press the MENU button 4 to exit
the menus.
9
OPERATION (Continued)
6
3
5
1
4
2
Press the MENU button to access the
main menu again.
Equipment Select: Use the Up 1 and/or
Down 2 button to select Equipment Select
and then press the ENTER button 3
to confirm.
Use the Up 1 and/or Down 2 button to
select between USB and SD/MMC and
then press the ENTER button 3 to confirm.
Then press the MENU button 4 to exit
the menus.
NOTE: You can also use the USB and/or
Card button on the remote, or the
USB/Card button on the main unit to select
between the two options.
TM
TM
1
1
8
3
7
1
4
2
System Setup, Picture Display Mode:
Use the Up 1 and/or Down 2 button to
select System Setup and then press the
ENTER button 3 to confirm.
Use the Up 1 and/or Down 2 button to
select Picture Display Mode and then
press the ENTER button 3 to confirm.
Use the Up 1 and/or Down 2 button to
select between 16:9 (wide) and 4:3 (standard) and then press the ENTER button 3
to confirm.
Then press the MENU button 4 to exit
the menus.
NOTE: You can also use the 4:3/16:9 button on the remote to select between the
two options.
Press the MENU button to access the
main menu again.
TM
TM
1
1
10
OPERATION (Continued)
10
3
9
1
4
2
System Setup, Picture Play Speed: Use
the Up 1 and/or Down 2 button to select
System Setup and then press the ENTER
button 3 to confirm.
Use the Up 1 and/or Down 2 button to
select Picture Play Speed and then press
the ENTER button 3 to confirm.
Use the Up 1 and/or Down 2 button to
select between Slow, Normal and Fast and
then press the ENTER button 3 to confirm.
Then press the MENU button 4 to exit
the menus.
NOTE: You can also use the Slow, Normal
and Fast buttons on the remote or the
Speed button on the main unit to select
between the options.
Press the MENU button to access the
main menu again.
TM
TM
1
1
12
3
11
1
4
2
System Setup, Brightness: Use the
Up 1 and/or Down 2 button to select
System Setup and then press the ENTER
button 3 to confirm.
Use the Up 1 and/or Down 2 button to
select Brightness Set and then press the
ENTER button 3 to confirm.
Use the Up 1 and/or Down 2 button to
select from 0-10 then press the ENTER button 3 to confirm.
Then press the MENU button 4 to exit
the menus.
NOTE: You can also use the Bright +/- buttons on the remote to adjust the brightness.
Press the MENU button to access the
main menu again.
TM
TM
1
1
11
OPERATION (Continued)
PAUSE
SKIP FEATURE
1
1
1
2
TM
During picture playback, press the
Play/Pause button on the remote (shown)
or on the main unit to pause playback.
Press again to resume playback.
During picture playback, press the Prev 1
or Next 2 button on the remote (shown) or
on the main unit to skip to the previous or
next picture.
TM
ROTATING THE PICTURE
1
Normally, pictures are displayed as shown in the first illustration above. Press the Rotate
button on the remote or on the main unit to change the orientation of the picture; pictures
will rotate clockwise as shown above.
12
TROUBLESHOOTING GUIDE
PROBLEM
POSSIBLE SOLUTION
No power.
Make sure that the AC adapter is connected
correctly as shown on page 8.
Disconnect the AC adapter and reconnect as
shown on page 8.
Ensure that the power is on and that a flash
drive and/or SD/MMC card are inserted.
Press the Power On/Off button to turn the unit
off and then back on. If that does not work, with
the unit off, disconnect the AC adapter and
reconnect as shown on page 8.
The picture may be distorted while using the
Prev/Next buttons. This is normal and not a
malfunction of the unit.
Make sure that a fresh battery is inserted as
shown on page 7. Also, refer to the effective
distance of the remote control transmitter and
the notes regarding remote operation on that
page.
The unit is automatically in Standby mode.
No picture.
The controls on the main unit and/or the
remote do not work.
Picture is distorted.
The remote control does not work.
CARE AND MAINTENANCE
1. Clean this unit with a damp (never wet) cloth. Solvent or
detergent should never be used.
2. Avoid operating this unit under direct sunlight or in hot,
humid or dusty places.
3. Keep this unit away from heating appliances.
13
EMERSON RADIO CORP.
LIMITED WARRANTY (Valid in the United States)
Emerson Radio Corp. warrants manufacturing defects in original material, including original parts
and workmanship, under normal use and conditions, for a period of ninety (90) days from the date
of original purchase in the U.S. With your dated proof of purchase, we will provide repair service
at no charge for labor and parts at an authorized Depot Repair Facility, or replace the product in
our discretion. For repair or replacement, pack your unit in a padded box, enclose your check or
money order payable to Emerson Radio Corp. in the amount of $9.00 (not required by California
residents) to cover shipping and handling costs, and enclose a copy of your proof of purchase.
Send your unit to:
Emerson Radio Corp.
5101 Statesman Drive
Irving, TX 75063
This warranty does not cover damage from negligence, misuse, abuse, accident, failure to follow
operating instructions, commercial use, rental, repairs by an unauthorized facility, or products purchased, used, serviced or damaged outside of the United States.
THIS WARRANTY GIVES YOU SPECIFIC LEGAL RIGHTS, AND YOU MAY ALSO HAVE
OTHER RIGHTS WHICH VARY FROM STATE TO STATE.
AU898M
The serial number of your system is located on a label on the bottom cabinet. Please take a
moment now to locate the serial number and write the number in the space provided below. You
may be asked to provide this number when calling for product service.
Model Number:
Serial Number:
BAR598
__________________________________________
14
®
EMERSON WARRANTY (Valid in Canada)
Consumer Electronics, Home Appliances and Home Office Products
®
Thank you for choosing EMERSON !
SYNNEX Canada Limited gives the following express warranty to the original consumer purchaser or gift recipient for this
EMERSON product, when shipped in its original container and sold or distributed in Canada by SYNNEX Canada Limited
or by an Authorized EMERSON Dealer:
SYNNEX Canada Limited warrants that this product is free, under normal use and maintenance, from any defects in
material and workmanship. If any such defects should be found in this product within the applicable warranty period,
SYNNEX Canada Limited shall, at its option, repair or replace the product as specified herein. Replacement parts
furnished in connection with this warranty shall be warranted for a period equal to the unexpired portion of the original
equipment warranty.
This warranty shall not apply to:
a. Any defects caused or repairs required as a result of abusive operation, negligence, accident, improper
installation or inappropriate use as outlined in the owner’s manual.
b. Any EMERSON product tampered with, modified, adjusted or repaired by any party other than SYNNEX Canada
Limited or EMERSON’s Authorized Service Centres.
c. Damage caused or repairs required as a result of the use with items not specified or approved by SYNNEX
Canada Limited, including but not limited to head cleaning tapes and chemical cleaning agents.
d. Any replacement of accessories, glassware, consumable or peripheral items required through normal use of the
product including but not limited to earphones, remote controls, AC adapters, batteries, temperature probe, stylus,
trays, filters, cables, paper, cabinet, cabinet parts, knobs, buttons, baskets, stands, shelves, cookware and
cooking utensils.
e. Any cosmetic damage to the surface or exterior that has been defaced or caused by normal wear and tear.
f. Any damage caused by external or environmental conditions, including but not limited to transmission line/power
line voltage or liquid spillage.
g. Any product received without appropriate model, serial number and CSA /cUL /cULus /cETL /cETLus markings.
h. Any products used for rental or commercial purposes.
i. Any installation, setup and/or programming charges.
Should this EMERSON product fail to operate during the warranty period, warranty service may be obtained upon delivery
of the EMERSON product together with proof of purchase and a copy of this LIMITED WARRANTY statement to an
Authorized EMERSON Service Centre. This warranty constitutes the entire express warranty granted by SYNNEX
Canada Limited and no other dealer, service centre or their agent or employee is authorized to extend, enlarge or transfer
this warranty on behalf of SYNNEX Canada Limited. To the extent the law permits, SYNNEX Canada Limited disclaims
any and all liability for direct or indirect damages or losses or for any incidental, special or consequential damages or loss
of profits resulting from a defect in material or workmanship relating to the product, including damages for the loss of time
or use of this EMERSON product or the loss of information. The purchaser will be responsible for any removal,
reinstallation, transportation and insurance costs incurred. Correction of defects, in the manner and period of time
described herein, constitute complete fulfillment of all obligations and responsibilities of SYNNEX Canada Limited to the
purchaser with respect to the product and shall constitute full satisfaction of all claims, whether based on contract,
negligence, strict liability or otherwise.
CARRY-IN PARTS & LABOUR WARRANTY PERIODS:
• Audio Products: 1 Year (Remote Control, if applicable – 90 Days)
• Home Appliances: 1 Year
o Microwave Magnetron parts only additional 3 Years
o Refrigerator / Freezer Compressor parts only, additional 4 years
• Home Office Products: 1 Year
To obtain the name and address of the nearest Authorized EMERSON Service Centre or for more information on this warranty
visit www.emersonelectronics.ca
mail your inquiry to:
SYNNEX Canada Limited, EMERSON Customer Service
200 Ronson Drive, Toronto, ON M9W 5Z9; or
call toll free 1-800-663-5954, Monday to Friday 9:00am – 5:00pm Eastern Standard Time.
08.2007
15
®
BAR598-081207-02A
Printed in China