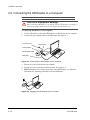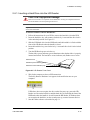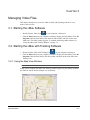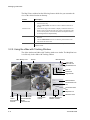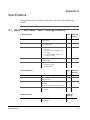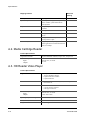
1
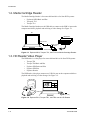
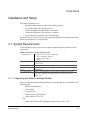
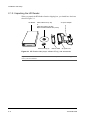
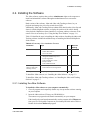
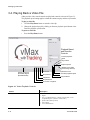
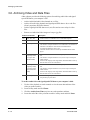
vMax Video Management
Software
vMax™
vMax™ with Tracking
User Guide
*700-0036*
Document Part Number 700-0036 R005
Who This Guide is For
The vMax Video Management Software User Guide provides information for
installing the software, connecting the Media Cartridge Reader or HD Reader to a
computer, playing back, searching, archiving files, and troubleshooting the Media
Cartridge Reader or HD Reader.
Conventions Used
CAUTION
Cautions identify conditions or practices that could result in damage to the unit or
other equipment.
Important: These notes describe things which are important for you to know, but are not
as serious as a Caution.
Recommendation: These notes provide tips for optimum performance of the DVR system.
Abbreviations and Acronyms
700-0036 R005
Acronym
Definition
AVI
Audio Video Interleave file is a common file format for saving video files.
ARV
Archive file
AVR
Archive file for Explorer MX4, Trooper TL2, and TL4
.bin
binary file
.eds
proprietary file format for Trooper TR1 and TR4
.edr
proprietary file format for Explorer EX4, EX8 Plus, and Premier
.txt
text file
BMP
Bit mapped graphics format
DVR
Digital Video Recorder
GPS
Global Positioning System
HD
Hard drive
JPEG
Joint Photographic Experts Group
MPEG
Moving Picture Experts Group
NTSC
National Television System(s) Committee is the analog television system
used in Canada, the U.S., Japan, South Korea, the Philippines and other
parts of the Americas.
iii
Who This Guide is For
Acronym
Definition
PAL
Phase-alternating line system used in broadcast television systems
PC
Personal computer
USB
Universal Serial Bus
Finding Information Online
You can find more information about Seon Design Inc. as well as its products and
services at www.seon.com.
iv
700-0036 R005
Contents
Chapter 1
Introduction
1.1. vMax Software Product Features - - - - - - - - - - - - - - - - - - - - - - - - - - - - - - - - - - - - - - - - - - - 1–1
1.2. Media Cartridge Reader - - - - - - - - - - - - - - - - - - - - - - - - - - - - - - - - - - - - - - - - - - - - - - - - - 1–2
1.3. HD Reader Video Player - - - - - - - - - - - - - - - - - - - - - - - - - - - - - - - - - - - - - - - - - - - - - - - - - 1–2
Chapter 2
Installation and Setup
2.1. System Requirements- - - - - - - - - - - - - - - - - - - - - - - - - - - - - - - - - - - - - - - - - - - - - - - - - - - 2–1
2.2. Installing the Software- - - - - - - - - - - - - - - - - - - - - - - - - - - - - - - - - - - - - - - - - - - - - - - - - - - 2–3
2.3. Activating the vMax with Tracking Software - - - - - - - - - - - - - - - - - - - - - - - - - - - - - - - - - - 2–12
2.4. Viewing the vMax Software Version - - - - - - - - - - - - - - - - - - - - - - - - - - - - - - - - - - - - - - - - 2–14
2.5. Connecting the Media Cartridge Reader to a Computer - - - - - - - - - - - - - - - - - - - - - - - - - - 2–15
2.6. Connecting the HD Reader to a Computer - - - - - - - - - - - - - - - - - - - - - - - - - - - - - - - - - - - 2–16
Chapter 3
Managing Video Files
3.1. Starting the vMax Software - - - - - - - - - - - - - - - - - - - - - - - - - - - - - - - - - - - - - - - - - - - - - - - 3–1
3.2. Starting the vMax with Tracking Software - - - - - - - - - - - - - - - - - - - - - - - - - - - - - - - - - - - - - 3–1
3.3. Viewing Video Files - - - - - - - - - - - - - - - - - - - - - - - - - - - - - - - - - - - - - - - - - - - - - - - - - - - - 3–4
3.4. Playing Back a Video File - - - - - - - - - - - - - - - - - - - - - - - - - - - - - - - - - - - - - - - - - - - - - - - - 3–8
3.5. Searching a Video File - - - - - - - - - - - - - - - - - - - - - - - - - - - - - - - - - - - - - - - - - - - - - - - - - - 3–9
3.6. Archiving Video and Data Files - - - - - - - - - - - - - - - - - - - - - - - - - - - - - - - - - - - - - - - - - - - 3–10
3.7. Saving a Still Image - - - - - - - - - - - - - - - - - - - - - - - - - - - - - - - - - - - - - - - - - - - - - - - - - - - 3–12
Chapter 4
Troubleshooting
4.1. Troubleshooting - - - - - - - - - - - - - - - - - - - - - - - - - - - - - - - - - - - - - - - - - - - - - - - - - - - - - - - 4–1
Appendix A
Specifications
A.1. vMax™ and vMax™ with Tracking Software - - - - - - - - - - - - - - - - - - - - - - - - - - - - - - - - - - - A–1
A.2. Media Cartridge Reader - - - - - - - - - - - - - - - - - - - - - - - - - - - - - - - - - - - - - - - - - - - - - - - - - A–2
A.3. HD Reader Video Player- - - - - - - - - - - - - - - - - - - - - - - - - - - - - - - - - - - - - - - - - - - - - - - - - A–2
Legal Notice
Seon Design® Inc. - - - - - - - - - - - - - - - - - - - - - - - - - - - - - - - - - - - - - - - - - - - - - - - - - - - - - - - - L–1
Contact Information- - - - - - - - - - - - - - - - - - - - - - - - - - - - - - - - - - - - - - - - - - - - - - - - - - - - - - - - L–1
SEON DESIGN® INC. PRODUCT WARRANTY
DISCLAIMER - - - - - - - - - - - - - - - - - - - - - - - - - - - - - - - - - - - - - - - - - - - - - - - - - - - - - - - - - - - W–1
700-0036 R005
v
vi
700-0036 R005
CHAPTER 1
Introduction
This chapter introduces the features of the vMax Video Management Software.
1.1. vMax Software Product Features
Two versions of vMax video management software are available:
•
•
vMax software.
vMax with Tracking software includes MapPoint® 2009 software to display the
location of a GPS-enabled vehicle on a street map with date and time. (Activation is
required.)
1.1.1. vMax™ and vMax™ with Tracking Software
Software Features
vMax
vMax with Tracking
Multiple views—1, 4, or 9 video channels—for video playback and
monitoring.
•
•
•
•
Playback at normal speed or from 0.10 × to 16× normal speed
Playback video forward or backward
•
•
Search for video from a Segment or Events list, or by Time and date.
•
•
Archiving options—each individual channel can be archived as a AVI file
and individual images to bmp or .jpg files.
•
•
Single license of Microsoft® MapPoint 2009 software
•
Map Viewer window synchronizes with the video playback and displays
the precise location of the vehicle on a street map.
•
Complete, updated U.S. and Canadian maps.
•
Install the software from the CD (s) before connecting the Media Cartridge Reader or
HD Reader to the computer for video playback.
700-0036 R005
1–1
Introduction
1.2. Media Cartridge Reader
The Media Cartridge Reader is for removable hard drives for Seon DVR systems:
•
•
•
Explorer® MX4 Basic and Plus
Trooper® TL2
Trooper TL4
The Media Cartridge Reader uses the USB cable to connect to the USB 2.0 port on the
computer and allows playback and archiving of video footage. See Figure 1-1.
PC
MX4 DVR
USB connector
Media Cartridge
Reader
Media cartridge
Figure 1-1 Explorer MX4, Trooper TL2, and TL4 use Media Cartridge Reader
1.3. HD Reader Video Player
The HD Reader is a video player for removable hard drives for Seon DVR systems:
•
•
•
•
•
Trooper TR1
Trooper TR4 Basic and Plus
Explorer EX4 Basic and Plus
Explorer EX8 Plus
Explorer Premier
The HD Reader video player connects to a USB 2.0 port on the computer and allows
playback and archiving of video footage. See Figure 1-2.
vMax with Tracking
Figure 1-2 Explorer EX4, Trooper TR1, and TR4 use the HD Reader
1–2
700-0036 R005
CHAPTER 2
Installation and Setup
This chapter describes how to:
•
•
•
•
•
Install the vMax software or vMax with Tracking software.
Activate the vMax with Tracking software.
Connect the Media Cartridge Reader to a computer.
Connect the HD Reader video player to a computer.
Insert and remove a hard drive from the HD Reader.
Install the software from the CD (s) before connecting the Media Cartridge Reader or HD
Reader to the computer for video playback.
2.1. System Requirements
To use the vMax software, you’ll need a computer with the following minimum system
requirements:
Table 2-1 Minimum System Requirements
Computer/Processor
•
•
•
•
Dual Core CPU or higher recommended
1024 × 768 monitor resolution
Sound card and speakers
USB 2.0
Operating Systems
Windows® XP Service Pack 3, Windows Vista™, or Windows 7 (32-bit and
64-bit versions)
Memory
1GB RAM or higher recommended
Disk Space
10MB of available hard-disk space
Drive
CD-ROM drive
Other Requirements
Adobe® Acrobat® Reader to view the vMax Video Management Software
User Guide (available on the vMax software CD or vMax with Tracking
software CD)
2.1.1. Unpacking the Media Cartridge Reader
When you unpack the Media Cartridge Reader from the shipping box, you should have the
following items:
• Media Cartridge Reader
• Power supply
• AC power cord
• USB extension cable (optional)
• vMax software CD (1 CD)
OR
• vMax with Tracking CD with MapPoint 2009 software CDs (3 CDs)
700-0036 R005
2–1
Installation and Setup
2.1.2. Unpacking the HD Reader
When you unpack the HD Reader from the shipping box, you should have the items
shown in Figure 2-1.
HD Reader
vMax software CD (1 CD)
or
vMax with Tracking CD with
MapPoint 2009 software CDs (3 CDs)
Hard drive keys (2)
USB 2.0 cable
AC power adapter
AC power cord
Figure 2-1 HD Reader video player, software CD (s), and accessories
Important: The HD Reader does not include a hard drive. If any of these items are missing, please
contact your Seon distributor.
2–2
700-0036 R005
Installation and Setup
2.2. Installing the Software
The vMax software requires that you have Administrator rights to the computer to
install and uninstall the software although non-administrator users can run the
software.
Both versions of the software, vMax and vMax with Tracking software, let you
playback and manage the video clips recorded on a DVR.
Additionally, vMax with Tracking software obtains GPS data from the video clips and
shares it with the MapPoint software to display the position of the vehicle during
video playback. MapPoint software launches in a separate window so that one of the
camera views is not used up. (See “Using the Map View Window” on page 3–1.)
Table 2-2 identifies the steps in installing the vMax software. Installing the vMax with
Tracking software includes the additional step of installing the Microsoft MapPoint
2009 software.
Table 2-2 Summary of the Installation Process
Installation
Steps
vMax vMax with
Tracking
1. Welcome screen
•
•
•
Install MPEG-4 Codec.
Install vMax Software.
View User Guide.
•
•
•
•
•
•
•
•
Welcome: vMax Setup wizard guides you
through the installation process.
License Agreement.
Select Destination Location.
Ready to Install.
Select Additional Tasks.
3. Install MapPoint
2009 (for vMax with
Tracking version)
•
•
Install MapPoint 2009 software (two CDs).
Seon Software License Agreement.
4. Complete installation
Completing the Setup wizard.
2. Install vMax software •
•
•
•
To install the vMax software, see “Installing the vMax Software” on page 2–3.
To install the vMax with Tracking software, see “Installing the vMax with Tracking
Software” on page 2–7.
2.2.1. Installing the vMax Software
To install the vMax software on your computer automatically:
1. Close all programs and temporarily disable any virus protection software running
on your computer.
2. Insert the vMax software CD into your CD-ROM drive.
The autorun.exe program should launch automatically on your computer.
If the installer does not launch automatically, run the program called CDAuto.exe
from your CD. Click on My Computer on your desktop and click on the CD drive.
Double click on the CDAuto.exe program.
700-0036 R005
2–3
Installation and Setup
2.2.1.1. Installing MPEG-4 Codec
1. Click on Install MPEG-4 Codecs to install the MPEG-4 converters for optimal
video clip storage.
The Hardware Installation window appears.
2. Click Continue Anyway.
The main menu appears. Another message may appear that some Windows Files
have changed and it asks if you want to repair. Click Cancel and then click Yes.
If you have any questions, contact Customer Service (see back cover).
2–4
700-0036 R005
Installation and Setup
2.2.1.2. Installing the vMax Software
1. Click on Install vMax Software to install the main software.
Welcome to the Seon vMax Setup Wizard appears as shown.
2. Click Next.
The License Agreement window appears.
3. Click on I accept the agreement to continue.
700-0036 R005
2–5
Installation and Setup
4. Click Next.
The Setup Destination Location window appears. Seon recommends allowing
installation in the default directory.
5. Click Next.
The Select Additional Task window appears with the Create a desktop icon check
box selected (recommended).
6. Click Next.
The Ready to Install window appears.
2–6
700-0036 R005
Installation and Setup
7. Verify the settings and click Install.
vMax installs on your computer.
8. Click Finish to exit Setup.
2.2.2. Installing the vMax with Tracking Software
1. Close all programs and temporarily disable any virus protection software running
on your computer.
Software activation is required after installing the vMax with Tracking and
MapPoint software.
2. Insert the vMax software CD into your CD-ROM drive.
The autorun.exe program should launch automatically on your computer.
If the installer does not launch automatically, run the program called CDAuto.exe
from your CD. Click on My Computer on your desktop and click on the CD drive.
Double click on the CDAuto.exe program.
700-0036 R005
2–7
Installation and Setup
2.2.2.1. Installing MPEG-4 Codec
1. Click on Install MPEG-4 Codecs to install the MPEG-4 converters for optimal
video clip storage.
The Hardware Installation window appears.
2. Click Continue Anyway.
The main menu appears. Another message may appear that some Windows Files
have changed and it asks if you want to repair. Click Cancel and then click Yes.
If you have any questions, contact Customer Service.
2–8
700-0036 R005
Installation and Setup
2.2.2.2. Installing the vMax with Tracking Software
1. Click on Install vMax Software to install the main software.
Welcome to the Seon vMax Setup Wizard appears as shown.
2. Click Next.
The License Agreement window appears.
3. Click on I accept the agreement to continue.
700-0036 R005
2–9
Installation and Setup
4. Click Next.
The Setup Destination Location window appears.
5. Click Next.
The Select Additional Task window appears with the Create a desktop icon check
box selected (recommended).
6. Click Next.
The Ready to Install window appears.
7. Verify the settings and click Install.
2–10
700-0036 R005
Installation and Setup
2.2.2.3. Installing the MapPoint 2009 Software
If you are installing vMax with Tracking software, follow the on-screen directions to
install MapPoint 2009. vMax requires Microsoft MapPoint 2009 to be installed to run
the Tracking portion of the software. vMax with Tracking software obtains GPS data
from the video clips and shares it with the MapPoint software to display the position
of the vehicle during video playback.
Install MapPoint using the disks provided after the vMax installation has finished.
1. Insert the MapPoint software CD into your CD-ROM drive.
The autorun.exe program should launch automatically on your computer.
2. Click Next.
Completing the Seon vMax Setup Wizard appears.
3. When installation is complete, click on Finish.
4. Re-enable the virus protection software running on your computer.
700-0036 R005
2–11
Installation and Setup
2.2.3. Viewing the User Guide
Click on the View User Guide link to view the vMax Video Management Software
User Guide, which is available as a PDF document. In order to view or print the User
Guide, you’ll need to have Adobe Reader software installed on your computer. Adobe
Reader is available for download from www.adobe.com.
If you are finished, click Exit.
This completes the installation of the vMax software.
2.3. Activating the vMax with Tracking Software
When running vMax with Tracking software for the first time, the software detects
MapPoint 2009 is installed. An activation window appears, asking if you want to
activate the software with MapPoint. The activation process involves the following
steps.
Activation Process
Steps
1. Activation window asks if you
want to request an activation key.
•
•
•
2–12
Click Yes to begin the activation process.
Click No to run vMax software only. Access a menu item
on the vMax window title bar to activate.
Click Cancel to run without vMax for the current
session. You’ll be prompted for activation the next time
you run the software.
2. Authorization Request code
dialog box appears.
Contact Seon Customer Service with the Activation Request
Code during business hours. Customer Service will verify
the code and provide a a 16-character input activation code.
3. Input Activation code dialog box
appears.
Enter the input activation code.
4. Map Viewer window and vMax
with Tracking window launch.
The activation process is successful.
700-0036 R005
Installation and Setup
1. Click Yes to begin the activation process.
Clicking No or Cancel will not run the tracking software. The software can be
activated later by right clicking on the title bar of the vMax window and selecting
Activate vMax software.
The Authorization Request Code dialog box appears.
2. Contact Customer Service for a 16-character Activation Code.
•
•
Toll free telephone: 1-877-630-7366 Monday to Friday,
6:30 am to 4:00 pm Pacific Standard Time
Email: [email protected]
3. Click Next.
The Input Activation Code dialog box appears.
4. Enter the Input Activation Code. Click OK.
700-0036 R005
2–13
Installation and Setup
2.3.1. Deactivating the vMax with Tracking Software
In order to install the single license of the vMax with Tracking software on a different
computer, the software must first be deactivated.
To deactivate the vMax with Tracking software:
1. Right-click on the title bar in the vMax with Tracking window.
2. Select Deactivate vMax with Tracking.
The following message appears.
3. Click OK to continue.
2.3.2. Reactivating the vMax with Tracking Software
In order to reinstall the single license of the vMax with Tracking software on a
different computer, the software must be reactivated.
To Activate the vMax with Tracking software:
1. Right-click on the title bar of the vMax with Tracking window.
2. Select Activate vMax with Tracking.
3. Click Yes to continue.
The Authorization Request Code window appears. The Input Activation Code
window appears.
4. Continue with the procedure described on “Activating the vMax with Tracking
Software” on page 2–12.
2.4. Viewing the vMax Software Version
The vMax software version of the HD Reader is displayed in the HD Reader window.
When contacting Customer Service, please have the software version available.
2–14
700-0036 R005
Installation and Setup
To display the software version:
1. If the program is open, right click on the title bar or right click on the taskbar
button.
2. Click on About Seon vMax.
2.4.1. Upgrading the vMax Software
To upgrade the vMax software, go to www.seon.com and click on Online Support to
download the latest software.
To upgrade the vMax with Tracking software or to upgrade to vMax with Tracking
software, contact your Seon Design sales representative or dealer.
2.5. Connecting the Media Cartridge Reader to a Computer
CAUTION: Equipment damage
Before connecting the Media Cartridge Reader to your computer, make sure the Media Cartridge
Reader is not plugged into an electrical outlet.
Recommendation: Where AC power is available, use the AC power cord.
To connect the Media Cartridge Reader to your computer:
1. Connect the Media Cartridge Reader to the media cartridge.
2. Connect the USB connector to a USB 2.0 port on your computer. See Figure 2-2.
PC
MX4 DVR
USB connector
Media Cartridge
Reader
Media cartridge
Figure 2-2 Media Cartridge Reader connecting to PC via USB Connector
700-0036 R005
2–15
Installation and Setup
2.6. Connecting the HD Reader to a Computer
Important: Install the vMax software before connecting the HD Reader to your computer.
CAUTION: Equipment damage
Before connecting the HD Reader to your computer, make sure the HD Reader is not plugged
into an electrical outlet and the power switch on the back of the HD Reader is OFF.
To connect the HD Reader to your computer:
1. Use the USB cable to connect the HD Reader to a USB 2.0 port on your computer.
2. Connect the power adapter cable to the HD Reader. See Figure 2-3.
AC power cord
Power switch
Power adapter
Power adapter cable
HD Reader
USB cable
Figure 2-3 Connecting the HD Reader to your computer
3. Plug the AC power cord into the power adapter.
4. Plug the AC power cord into an electrical outlet. See Figure 2-4.
5. Before turning the power switch on the back of the HD Reader to ON, follow the
instructions for “Inserting a Hard Drive into the HD Reader”.
Figure 2-4 Plugging the HD Reader to an AC Outlet
2–16
700-0036 R005
Installation and Setup
2.6.1. Inserting a Hard Drive into the HD Reader
CAUTION: Equipment damage
Make sure the hard drive is compatible with the HD Reader. Inserting an incompatible hard drive
into the HD Reader can seriously damage both devices.
Important: Make sure the power switch on the back of the HD Reader is OFF before inserting a hard
drive into the HD Reader.
To insert a hard drive into the HD Reader:
1. Follow the instructions for your DVR to remove the hard drive from the DVR.
2. Insert the hard drive key, turn counter clockwise by ¼ turn until the drive lock is
in the unlocked position. See Figure 2-5.
3. Slide the DVR hard drive into the HD Reader until the hard drive is flush with the
front of the HD Reader when the handle is closed.
4. Insert the hard drive key, turn clockwise by ¼ turn until drive lock is in the locked
position.
5. Turn the HD Reader power switch to ON.
The hard drive power indicator (green) illuminates when the hard drive is properly
inserted and locked. The hard drive access indicator (red) flashes once or twice.
Hard drive lock
Hard drive power indicator (green)
Hard drive access indicator (red)
Figure 2-5 HD Reader Front Panel
6. Wait for the computer to detect a USB connection.
The Safely Remove Hardware icon appears in the notification area on your
computer.
If Windows does not recognize the drive on the first power up, power the HD
Reader OFF. Reseat the hard drive until the hard drive is flush with the front of the
HD Reader when the handle is closed. Restart the HD Reader. If Windows does
not recognize the hard drive on the second power up, contact Customer Service.
7. Start the vMax software as described in page 3–1.
700-0036 R005
2–17
Installation and Setup
2.6.2. Removing a Hard Drive from the HD Reader
Important: Make sure the power switch on the back of the HD Reader is OFF before removing a hard
drive from the HD Reader.
To remove a hard drive from the HD Reader:
1. Close the vMax software and turn the power switch the HD Reader to OFF.
2. Insert the hard drive key, turn counter clockwise by ¼ turn until the drive lock is
in the unlocked position.
3. Lift the hard drive handle and pull the hard drive out of the HD Reader.
2–18
700-0036 R005
CHAPTER 3
Managing Video Files
This chapter describes how to use the vMax or vMax with Tracking software to view,
archive, and save files.
3.1. Starting the vMax Software
•
•
Double click the vMax icon
on your computer’s desktop or
Click the Start button on your computer’s taskbar to display the Start Menu. Click All
Programs, click the Seon folder, click the Seon vMax folder, and click on the SEON
vMax icon. The vMax window appears. To continue with using vMax software, see
“Using the vMax with Tracking Window” on page 3–2.
3.2. Starting the vMax with Tracking Software
•
•
Double click the vMax with Tracking icon
on your computer’s desktop or
Click the Start button on your computer’s taskbar to display the Start Menu. Click All
Programs, click the Seon folder, click Seon vMax, and click on the Seon vMax with
Tracking icon.
3.2.1. Using the Map View Window
Important: To see the map location of the vehicle, GPS data is required on the video file.
A Map Viewer window and vMax with Tracking window appear on your desktop. Position
the windows into the desired location on your desktop.
700-0036 R005
3–1
Managing Video Files
The Map Viewer window has the following features which lets you customize the
view of the vehicle location on the map.
Feature
Description
Auto Center/Scroll
•
•
Direction arrow
•
Show Route
•
•
Clear button
Select the Auto Center check box to keep the vehicle position
centered on the map.
Clear the Auto Center check box to scroll to a different location on
the map.
Click near the edge of the window to display a white direction arrow.
If Auto Center is selected, the map view returns to the location of the
current vehicle position. For more information on MapPoint features,
see Getting Started in MapPoint Help.
Select the Show Route check box to indicate the vehicle route and
direction.
Clear the Show Route check box to show the position of the arrow
only and not the entire route.
Press the Clear button to clear the route from the map. The vehicle icon
remains visible.
3.2.2. Using the vMax with Tracking Window
The vMax window and vMax with Tracking window are similar. The MapPoint icon
is visible only in the vMax with Tracking window.
Video Display Area
Minimize button
Title bar
Close button
Open File icon
File Selection box
Time tab
Events tab
Segments tab
DVR Model box
Archive Start Time
icon
Archive End Time
icon
MapPoint icon
Windows corner
Slider
control
Recorded date
and time
3–2
Show/hide Signal/
Speed/GPS data
Media
information bar
Video Search
controls
Playback Speed and
Direction controls
700-0036 R005
Managing Video Files
The vMax with Tracking window has the following features which lets you customize
the view of the vehicle location on the map.
Feature
Description
Video Display Area
Right click on the video display area when a file is open to show the various
menus. (See “Using the Video Display Area Menus” on page 3–6.)
Title bar
Right click on the title bar to display a pop up window to move, minimize,
close the window, display the software version in About Seon HD Reader, or
activate/deactivate vMax with Tracking.
Minimize button
Click Minimize to minimize the program.
Close button
Click Close to end the program.
Open File icon
Click Open File to open a file on the local disk or hard drive.
File Selection box
Click the arrow in the File Selection box to access the Local File on the local
disk or hard drive.
Time tab
Select the Time tab to search the video by date and time.
Events tab
Select the Events tab to search the video by Event.
Segments tab
Select the Segments tab to search the video by segment date and time.
DVR Model box
Select the DVR model that recorded the video file.
Archive Start Time icon Click Archive Start Time to set the start date and time of the archive video
clip.
Archive End Time icon
Click Archive End Time to set the end date and time of the archive video
clip.
MapPoint icon
If the Map Viewer window is closed, click on the MapPoint icon to open the
map screen. To close the Map Viewer window, click on the Close window
button.
Playback Speed and
Direction controls
See “Playing Back a Video File” on page 3–8.
Meta Data check box
(not shown)
Displayed in Explorer version 2.x software only.
Slider control
The slider control only applies to the currently selected video segment. Use
the Segment tab to move to another video segment.
Video Search controls
For more information on these features, see “Playing Back a Video File” on
page 3–8.
Overlay
Recorded date and time
Windows corner
700-0036 R005
3–3
Managing Video Files
3.3. Viewing Video Files
The vMax software lets you view
•
•
.eds file formats from the Trooper TR1 or TR4 hard drive or
.edr file formats from the Explorer EX4, EX8 Plus, or Premier hard drive.
The files are stored on a DVR hard drive or archived on your computer’s local disk.
3.3.1. Opening a Video File from the HD Reader Disk
To open a video file from the HD Reader disk:
1. In the vMax with Tracking window, click the arrow in the File Selection box or on
the Open File icon to select a file.
Video Display area
File Selection box
Open File icon
2. Select the hard drive and click the Open Folder icon (click Open).
The progress bar moves as the contents of the hard drive are read.
3. Click the Play/Pause button.
3–4
700-0036 R005
Managing Video Files
The selected vMax with Tracking video file opens and plays back video footage
with the location of the vehicle visible in the Map Viewer window.
4. Click the arrow button in the DVR Model box to select the DVR model which
recorded the video file.
Tip: Double click on a video channel to switch from single camera view to multi camera view and
back again. Set up display mode for 4 camera or 9 camera view. See Display Mode on page 3–7.
700-0036 R005
3–5
Managing Video Files
3.3.2. Opening a Local File
A local file is any previously archived clip in the computer.
To open a Local File:
1. Select Local File, which is your computer’s local disk.
2. Click the Open Folder icon to browse through your computer’s local disk to open
an EDR disk image (*.edr), EDSR disk image (*.eds) or Archive files (*.arv or
.avr).
3. Click on the Look in arrow to navigate through the folders on your computer’s
hard drive, or type the File name.
4. Click Open.
5. Click Play/Pause button to start playback.
3.3.3. Using the Video Display Area Menus
To display a list of different available menus, right-click anywhere in the video
display area of the vMax with Tracking window.
3–6
700-0036 R005
Managing Video Files
700-0036 R005
Menu
Description
Set Channel
Depending on your DVR, select from 1 to 9 to set the video channel.
Display Mode
•
•
•
•
Select 1 to show one video channel.
Select 4 to show four video channels. For TR1, select 1 or 4.
Select 9 to show nine video channels.
If no camera was attached to the video channel, the screen appears blue.
Audio
•
•
•
to turn the audio off.
to turn the audio on.
Select 1, 2, 3, or 4 for audio on that audio channel, depending on the
media source.
OFF
ON
Archive
To archive all video channels and Signal/Speed/GPS data to an .eds file on
your computer’s disk, see page 3–10.
Save Image
To save the video image on your computer’s hard drive, see page 3–12.
Print Image
To print the video image, select your print location from the print menu.
Save Log File
Save .log file to your computer’s hard drive.
Signal Filters
Click on Signal Filters to display the Configure Signal Filters dialog box. If
you select a signal, for example Signal 01, it appears in the Events list as a
signal event, S01, for example.
3–7
Managing Video Files
3.4. Playing Back a Video File
vMax provides video search controls and playback controls as shown in Figure 3-1.
The playback speed setting applies to both the continuous play and the step controls.
To play a video file:
1. Click the Play/Pause button to start the video clip.
2. Change the playback speed by clicking on Increase playback speed button or the
Decrease playback speed button.
To pause a video file:
• Press the Play/Pause button.
Playback Speed
and Direction
Controls
Increase playback
speed
Play forward
Playback speed
MapPoint icon (vMax
with Tracking software)
Overlay check box
(Show/hide Signal/
Speed/GPS data)
Go to end
Step forward
Play/Pause
Windows corner
Decrease playback speed
Play backward
Step backward
Go to start of segment
Figure 3-1 Video Playback Controls
Feature
Description
Overlay check box
Select or clear this check box to show/hide:
• Signal
• GPS LAT (Latitude degrees °, minutes ' and seconds ") LONG
(Longitude degrees °, minutes ' and seconds ")
• Speed in MPH (miles per hour)
• MAIN voltage
• TITLE (date and time)
3–8
700-0036 R005
Managing Video Files
Feature
Description
Video Search controls
(Applies only to the
currently selected video
segment. Use the Segment
tab to move to another
segment of video.)
Playback Speed and
Direction controls
Go to end
Click this button to take you to the end of the video segment and to
the start of the next segment.
Step forward
Click this button to step forward one frame at a time when the video is
paused.
Play/Pause
Click this button to play or pause the video clip.
Step backward
Click this button to step back one frame at a time when the video is
paused.
Go to start
Click this button to take you to the start of the video clip.
Increase playback speed
Click this button to increase the playback speed.
Play forward
Click this button to play back video.
Playback speed
Adjust the playback speed of the video 0.10x, 0.25x, 0.5x, 1x, 2x, 4x,
8x, and16x.
Decrease playback speed
Click this button to decrease the playback speed.
Play backward
Click this button to play back the video in reverse.
Meta Data check box
(Eight Meta data fields
displayed in Explorer
version 2.x software only)
3.5. Searching a Video File
•
To search a video file by segment, select a segment date and time from the
Segment tab list, and press Play.
•
To search a video file by event, select an event date and time from the Events tab
list, and press Play.
To search a video file by date/time, stop video playback by pressing the Pause
button. Enter a date and time in the Time tab and click Seek.
•
700-0036 R005
3–9
Managing Video Files
3.6. Archiving Video and Data Files
vMax software provides the following options for archiving audio/video and signal/
speed/GPS data to your computer’s disk.
•
•
Archive individual audio/video channels to AVI files.
Archive all audio/video channels and signal/speed/GPS data to .eds or .edr files
(Seon’s proprietary DVR file formats).
Archive signal/speed/GPS data to text (.txt) files and as text overlays in video
files.
Print or save individual video images to .bmp or .jpg files.
•
•
Archive File Format
Description
AVR
MX4, TL2, TL4
•
Archives data to a a USB drive or to a networked computer.
ARV
EX4, EX8, Premier
•
Archives data to a USB drive or to a networked computer.
AVI
Video Clip
•
•
Archives one audio/video channel.
This format is compact and fast to save if Full Size is not checked. If
Full Size is checked, the video must be stretched and then
recompressed, making it slow to save.
The archived files can be viewed in any standard Windows media
player.
•
.eds
Disk Image (Seonproprietary format
for Trooper TR1
and TR4 DVRs)
•
•
•
.edr
.txt
Disk Image (Seonproprietary format
for Explorer EX4,
EX8, and Premier
DVRs)
•
Data Only–Text
•
•
•
Archives all audio/video channels and signal/speed/GPS data in one
file.
This format is compact and fast to save, but can only be read by the
vMax software.
Preserves the integrity of the original data. Recommended to back up
data for future use or law enforcement.
Archives all audio/video channels and signal/speed/GPS data in one
file.
This format is compact and fast to save, but can only be read by the
vMax software.
Preserves the integrity of the original data. Recommended to back up
data for future use or law enforcement.
Archives the signal/speed/GPS data in a text file which can be read
and parsed by any text editor.
To archive audio/video and signal/speed/GPS data to your computer’s disk:
1. Use the video playback or search controls to view the start date and time of the
video you want to archive.
2. Locate in Play mode and click Pause.
3. Click the Archive Start Time (top) icon to set the start date and time.
4. Locate the end of the video you want to archive in Play mode and click Pause.
3–10
700-0036 R005
Managing Video Files
5. Click Archive End Time.
6. Right-click on the video display channel you want to archive and select Archive.
7. Choose a directory where you want to save the archive file.
8. Name the archive file.
9. Select the Video Archive file format (AVI) from the Save As Type menu.
10. Select the options related to the archive file format.
11. For optimum performance, clear the Select Archiving Encoder and Full size check
boxes. The default encoder is used. If an Archiving Encoder is selected, the
Archiving Encoder Selection menu appears (example only). Your window items
may vary.
12. Select the desired codec and click OK.
700-0036 R005
3–11
Managing Video Files
13. Repeat the archiving steps for other cameras or other time periods. The archived
files can be viewed in any standard media player.
Important: If the progress indicator stops for more than 30 seconds, the computer’s disk may be full
or the video conversion may have failed. Click Cancel to stop archiving.
3.7. Saving a Still Image
To save individual video images to .bmp or .jpg files:
1. Right-click on the video channel in the video display area.
2. Select Save Image...
The Save As window appears with the File name identified by the video channel
and date.
3. Click on the Save as type arrow and select either JPEG (*.jpg) or BMP (*.bmp)
file format.
JPEG files are commonly used for storing and sending photographs on the
Internet. Bitmap files are usually not compressed and generally are not well suited
for transferring images on the Internet.
3–12
700-0036 R005
CHAPTER 4
Troubleshooting
This chapter provides information and procedures for troubleshooting the Media Cartridge
Reader, the HD Reader video player, and the vMax or vMax with Tracking software.
4.1. Troubleshooting
Symptom
Possible Cause
Solution
The vMax or vMax with Tracking
software program will not start.
MPEG-4 Codecs and the vMax
software may not be installed.
Check that you also have a valid
sound driver.
If the problem continues, install the latest vMax or
vMax with Tracking software program. Install the
MPEG-4 Codecs programs that are provided on the
CD. See “Installing the Software” on page 2–3.
HD Reader indicators are not
illuminated.
The hard drive may not be properly
inserted in the HD Reader.
Check that the hard drive is locked into place and
the power adapter cable and USB cable are securely
connected to the HD Reader and the computer.
Close the vMax or vMax with Tracking software
program on your computer.
Power the HD Reader OFF and insert the hard drive
in the HD Reader. See “Inserting a Hard Drive into
the HD Reader” on page 2–17.
Error message is displayed “Invalid
EDSR media”.
The hard drive is blank.
Check that the hard drive has been recording. Take
the HD Reader to the vehicle, and use an LCD
monitor to see if there are any segments listed when
you search by segment. See “Searching a Video
File” on page 3–9.
If there are no images recorded on the hard drive,
make sure the hard drive is locked into the DVR in
the future. Otherwise, the unit will turn ON but will
not record.
Clips play back choppy or stop
during playback.
Check if other programs are
running in the background, for
example, Microsoft Outlook.
If you have other programs running, close these
programs and play back the clips.
Run the Disk Defragmenter application on your
computer to free up extra hard drive space to play
back clips. Click on Start, click on All Programs,
click on Accessories, click on System Tools, and
then click on Disk Defragmenter.
700-0036 R005
4–1
Troubleshooting
Symptom
Possible Cause
Solution
Not all of the cameras are being
displayed in the HD Reader
program.
The incorrect DVR type is selected
in the DVR model box or single
channel is selected.
Check if the other cameras display when you press
the PLAY button on the DVR front panel. Right click
on the Video Display area and select Display Mode.
Click on the correct option (1, 4, or 9) for your DVR
model. See “Using the Video Display Area Menus”
on page 3–6.
Cannot set the archive times.
The video clips are too big.
To set the archive start and stop times, see
“Archiving Video and Data Files” on page 3–10.
Depending on the DVR settings,
the video clips can be very big. For
example, if there are a lot of
alarms, the file size can get quite
big.
Seon recommends a maximum file size of 15
minutes for archive video clips. For video clips
longer than 15 minutes, consider archiving as
separate clips.
Refer to your DVR UserGuide for the approximate
sizes of the images at the different rates of
recording. If you are running a previous version of
the vMax or vMax with Tracking software, (earlier
than v.2.0.0) contact Seon for the newest version of
the software with the MPEG-4 codecs to reduce the
size of the archived clips.
The sound on the video clip is
choppy.
4–2
The video standard has defaulted
to PAL.
Change the video standard default to NTSC.
See “Using the Video Display Area Menus” on
page 3–6.
700-0036 R005
Appendix A
Specifications
This appendix provides the product specifications for the vMax Video Management
Software.
Note:
Specifications are subject to change without notice.
A.1. vMax™ and vMax™ with Tracking Software
Playback Features
vMax with
Tracking
Channels
View 1, 4, or 9 video channels
simultaneously.
•
•
Playback speed
Change the playback speed from 0.10 × to
16× normal speed.
•
•
Forward or backward
•
Play video segments forward or
backward.
Step forward or backward by one or
more images.
Use a slider control to quickly move
forward or backward.
•
•
Display text
Show/hide video text displaying signal/
speed/GPS data.
•
•
Search options
•
•
•
•
•
vMax
vMax with
Tracking
•
•
From a Segment list
From an Events list
By date and time
Archiving Features
Video Format
Individual audio/video channels to AVI files
•
•
Text Format in Video Files
Signal/speed/GPS data to text (.txt) files and
as text overlays
•
•
Proprietary Formats
All audio/video channels and signal/speed/
GPS data t
eds or .edr files (Seon proprietary format)
•
•
Images
Individual video images to .bmp or .jpg files
or to printer
•
•
Mapping Features
Mapping software
700-0036 R005
vMax
vMax with
Tracking
Single license of Microsoft® MapPoint
2009 software
•
A–1
Specifications
Mapping Features
vMax with
Tracking
Vehicle position
Displays position of vehicle on street map.
•
Synchronicity
Vehicle position displayed in a separate Map
Viewer window, synchronized with the
video playback
•
Maps
Complete maps of the US and Canada are
provided.
•
Zoom
User adjustable zoom level
•
Auto Center/Scroll
Configurable auto center/scroll (white
arrow)
•
Views
Configurable to show only the vehicle’s
current position or path.
•
Transferability
Copy and paste the map display to Microsoft
Office applications such as Word and Power
Point, for example.
•
A.2. Media Cartridge Reader
Product Specifications
Supported Seon DVRs
Explorer MX4 Basic and Plus, Trooper TL2, Trooper TL4
AC Power Adapter
Input
Output
100–240 VAC, 50–60 Hz
12 VDC
A.3. HD Reader Video Player
Product Specifications
Supported Seon DVRs
•
•
•
•
Trooper TR1
Trooper TR4 Basic and Plus
Explorer EX4 Basic and Plus
Explorer EX8 Plus
Front Panel
•
•
Power (green) and disk activity (red) indicator lights
Hard drive lock
Back Panel
•
•
•
Power ON/OFF switch
6-pin 5V/12VDC connector
USB Type B connector
AC Power Adapter
Input
Output
A–2
100–240 VAC, 50–60 Hz
5 VDC and 12 VDC
Operating Temperature Range
32°F to 122°F (0°C to 50°C)
Size (H×W×D)
1.8 × 6.1 × 10.9 in (47 × 155 × 277 mm)
Weight
3 lb (1.35 kg)
700-0036 R005
Legal Notice
Seon Design® Inc.
Seon Design Inc. is a specialist in the design and manufacture of video surveillance systems for mobile applications.
Seon has been the preferred solutions provider for the pupil transportation industry since 1999. Today, we are proud that
our success in this area has made us the leading manufacturer of mobile video surveillance systems in North America.
Contact Information
Seon Design Inc., Unit 111, 3B Burbidge Street, Coquitlam, BC Canada V3K 7B2
Telephone
Fax
Email
604.941.0880
604.941.0870
[email protected]
Toll Free Telephone 1.877.630.7366
Toll Free Fax
1.866.664.3677
Web site
www.seon.com
Seon Design Inc. Trademarks
Seon Design Inc. holds the following trademarks:
vMax™ and vMax™ with Tracking are registered trademarks of Seon Design Inc.
Rogue™, Rogue™ Plus, Explorer™, and Trooper® are registered trademarks of Seon Design Inc.
“Seon Design” is a registered trademark of Seon Design Inc. The Seon logo (
) is a registered trademark of Seon
Design Inc.
In this User Manual there are references to trademarks, registered trademarks, and product names not owned by Seon
Design Inc. that are the property of their respective owners. They are used in this User Manual for identification
purposes only.
User Manual Revision
This is the February 2010 revision for this User Manual and is copyright, February 2010 of Seon Design Inc. All rights
reserved.
Exclusion of Liability
SEON DESIGN INC.:
(a) MAKES NO REPRESENTATION, WARRANTY, GUARANTEE OR COVENANT, EXPRESS OR IMPLIED, AS TO THE ACCURACY,
SUFFICIENCY OR SUITABILITY OF ANY TECHNICAL OR OTHER INFORMATION PROVIDED IN THIS USER MANUAL OR ANY
OTHER USER OR OTHER MANUAL OR OTHER DOCUMENTATION PROVIDED BY SEON DESIGN INC. WITH RESPECT TO THE
PRODUCT(S) DESCRIBED HEREIN, INCLUDING WITHOUT LIMITATION ANY DESCRIPTION OF GOODS OR SERVICES,
SPECIFICATIONS, MODELS, DRAWINGS, OR DIAGRAMS.
(b) DOES NOT ASSUME AND SHALL NOT BE SUBJECT TO AND DISCLAIMS ANY AND ALL RESPONSIBILITY AND/OR LIABILITY
FOR LOSSES, DAMAGES, COSTS OR EXPENSES ARISING OUT OF BREACH OF CONTRACT OR OF WARRANTY, TORT
(INCLUDING NEGLIGENCE AND STRICT LIABILITY) OR OTHERWISE, WHETHER SPECIAL, DIRECT, INDIRECT,
CONSEQUENTIAL, INCIDENTAL, SPECIAL OR CONTINGENT, WHICH MIGHT ARISE OUT OF THE USE OF SUCH INFORMATION.
THE USE OF ANY SUCH INFORMATION WILL BE ENTIRELY AT THE USER ’S RISK; AND
(c) EXPRESSLY DISCLOSES THAT IF THIS MANUAL IS WRITTEN IN ANY LANGUAGE OTHER THAN ENGLISH, THAT
ALTHOUGH SEON DESIGN INC. HAS USED REASONABLE CARE TO MAINTAIN THE ACCURACY OF THE TRANSLATION FROM
THE ENGLISH LANGUAGE, THE ACCURACY OF SUCH TRANSLATION IS NOT GUARANTEED OR WARRANTED BY SEON DESIGN
INC. PLEASE REFER TO THE ENGLISH LANGUAGE VERSION OF THIS USER MANUAL FOR APPROVED SEON CONTENT. THE
ENGLISH LANGUAGE VERSION IS AVAILABLE UPON REQUEST FROM THE SEON CUSTOMER SERVICE DEPARTMENT.
Please refer to the Seon Design Inc. Product Warranty applicable to the Product(s) described in this User Manual which
exclusively sets forth Seon Design Inc.’s entire liability arising from or in connection with such product(s) and their use
and the exclusive remedies available for purchasers and users thereof.
Document Part Number
This User Manual is valid for Seon Design Inc. Document Part Number 700-0036.
Printed in Canada
L–2
SEON DESIGN® INC. PRODUCT WARRANTY
Seon Design Inc. (Seon) warrants the cameras and components listed below against defects in workmanship and materials provided that such defects
appear or are discovered within the respective periods specified below and provided further that the purchaser of such products notifies Seon of such
defects within thirty (30) days of the appearance of discovery of such defects:
•
Five (5) years from date of purchase parts and labor on the SA Wedge Camera Series
•
One (1) year from date of purchase parts and labor on the SA-IR Illuminator
•
Three (3) years from date of purchase parts and labor on all other Cameras
•
One (1) year from date of purchase parts and labor on the Rogue™ Mobile DVR Systems
•
Three (3) years from date of purchase parts and labor on the Explorer® MX4 Mobile DVR Systems
•
Three (3) years from date of purchase parts and labor on the Trooper® TL2 Mobile DVR Systems
•
Three (3) years from date of purchase parts and labor on the Trooper® TL4 Mobile DVR Systems
•
One (1) year from date of purchase parts and labor on all other products and accessories
All service/replacement parts and repairs are warranted for a period of 90 days.
Subject to the terms and conditions listed below, during the relevant warranty period, Seon will repair, replace, or refund the purchase price for the
defective product, whichever Seon considers to be appropriate in the circumstances, in Seon’s sole and arbitrary opinion, free of charge, any defective
products returned prepaid. In the event purchaser has a problem with any Seon product, please call and request a RETURN AUTHORIZATION (RA)
NUMBER from the Service Department.
Please call 877-630-7366 or (604) 941-0880 and ask for the Service Department. Be sure to have the model number, serial number and the nature of the
problem available for the customer service representative. Prior authorization MUST be obtained for all returns, exchanges, or credits. ITEMS SHIPPED
TO SEON WITHOUT A CLEARLY IDENTIFIED RA NUMBER MAY BE REFUSED.
Products returned will be tested to verify the defect. Upon verification of the defect, the product will be repaired or exchanged, or the purchase price
will be refunded or credited to the customer’s account, at the sole option of Seon. In the event of replacement, the returned product will be credited to
the customer’s account and a new invoice issued for the replacement item. Seon reserves the right to refund the purchase price or to issue a credit only
in lieu of replacement.
Seon may use new or refurbished replacement parts for repairing its products, at its sole and arbitrary discretion. Seon may replace an entire unit with
an equivalent model, at its sole and arbitrary discretion. If a unit is exchanged, the returned product shall become the property of Seon and the
exchange product becomes the property of the purchaser, and the remainder of the warranty that applied to the original unit purchased shall apply to the
exchanged product. Exchange units may be new units or units that have been repaired to full factory specifications at Seon’s discretion.
If the product is found to be in good working order or its inability to function properly is not covered by this warranty, the product will be returned in
the same condition as received unless repair is possible and requested by the customer. Repairs of such nature will incur a charge for parts and labor
and will proceed only by agreement with the customer to accept the charge.
This warranty shall not apply:
(a)
to equipment not supplied by Seon;
(b)
to equipment, including, any components, which shall have been operated in excess of rated capacity, subject to negligence, accident, or
damage by circumstances beyond Seon’s control, or to improper installation, operation, maintenance, servicing, alterations or storage,
modification without Seon’s written authorization, misuse, vandalism, fire, floods or acts of nature so as, in Seon’s exclusive and arbitrary
judgment, to affect the same adversely; or
(c)
if the serial number for the product has been altered in any way.
(d)
if the product has been operated outside of the specified Operating Environment specified in the Seon Users Manual for such product.
DISCLAIMER
THIS WARRANTY IS EXCLUSIVE AND IN LIEU OF ALL OTHER REPRESENTATIONS, WARRANTIES, GUARANTEES AND CONDITIONS, EXPRESS OR
IMPLIED, STATUTORY OR OTHERWISE AND WITHOUT LIMITING THE GENERALITY OF THE FOREGOING, SEON EXPRESSLY DISCLAIMS AND
EXCLUDES ANY IMPLIED WARRANTY OF MERCHANTABILITY, DURABILITY OR FITNESS FOR PURPOSE AND ANY WARRANTIES OR MODIFIED
WARRANTIES ARISING FROM USAGE OF TRADE OR COURSE OF DEALING.
Any description of the goods or services, whether in writing or made orally by Seon or Seon’s agents, specifications, samples, models, bulletins,
drawings, diagrams, engineering sheets or similar materials used in connection with customer’s order are for the sole purpose of identifying the goods
and/or services and shall not be construed as an express warranty. Any suggestions by Seon or Seon’s agents regarding use, applications or suitability
of the goods and/or services shall not be construed as an express warranty unless confirmed to be such in writing by Seon. Purchaser assumes full
responsibility for selecting products to achieve purchaser’s intended purposes, for properly installing and using those products, and for verifying the
results obtained therefrom.
PURCHASER ’S EXCLUSIVE REMEDY AND SEON’S ENTIRE LIABILITY ARISING FROM OR IN CONNECTION WITH PURCHASER ’S USE OF THE PRODUCTS
AND/OR THIS AGREEMENT SHALL BE REPAIR OR REPLACEMENT OF DEFECTIVE PRODUCTS, OR REFUND OR CREDIT OF THE PURCHASE PRICE OF
THE PRODUCTS AS SET FORTH ABOVE. SEON SHALL NOT BE SUBJECT TO AND DISCLAIMS: (A) ANY OTHER OBLIGATIONS OR LIABILITIES ARISING
OUT OF BREACH OF CONTRACT OR OF WARRANTY, (B) ANY OBLIGATIONS WHATSOEVER ARISING FROM TORT CLAIMS (INCLUDING NEGLIGENCE,
SEON DESIGN® INC. PRODUCT WARRANTY
AND STRICT LIABILITY) OR ARISING UNDER OTHER THEORIES OF LAW WITH RESPECT TO GOODS SOLD OR SERVICES RENDERED BY SEON, OR
ANY UNDERTAKINGS, ACTS OR OMISSIONS RELATING THERETO, AND (C) ALL CONSEQUENTIAL, INCIDENTAL, SPECIAL AND CONTINGENT
DAMAGES WHATSOEVER, EVEN IF SEON HAS BEEN SPECIFICALLY ADVISED OF THE POSSIBILITY OF SUCH DAMAGES.
Without limiting the generality of the foregoing, Seon specifically disclaims any liability for property or personal injury damages, penalties,
special or punitive damages, damages for lost profits or revenues, loss of use of goods or any associated equipment, cost of capital, cost of
substitute goods, facilities or services, down-time, shut-down or slow-down costs, or for any other types of economic loss, and for claims of
customer’s customers or any third party for any such damages. Some jurisdictions do not allow limitation or exclusion of incidental or
consequential damages, so this limitation or exclusion may not apply to purchaser. In no event shall Seon’s total liability for any damages to
purchaser or any other person in connection with the products or this agreement exceed the lower of the suggested list price or the actual price paid
for the products, regardless of whether such liability arises from contract, tort, warranty or any other form of claim.
If any provision of this agreement is found to be void, invalid, or unenforceable, that finding shall not affect the remaining provisions, all of which
shall be enforced to the full extent permitted by law. If any remedy hereunder is determined to have failed of its essential purpose, the limitations of
liability and exclusion of damages set forth above shall remain in full force and effect. This agreement may be modified only in writing signed by
a duly authorized representative of Seon.
Provisions Applicable to American Customers
For those customers whose mailing address is in the United States, Seon’s offer and any agreement of sale resulting therefrom shall be governed by
and construed in accordance with the internal and domestic laws of the State of WASHINGTON without giving effect to the conflict of laws rules
thereof. The Superior Court of Washington for Whatcom County and U.S. District Court for the Western District of Washington (“the U.S. Closed
Courts”) shall have exclusive jurisdiction to entertain and determine all disputes and claims, whether for specific performance, injunction,
declaration or otherwise arising out of or in any way connected with the construction, breach, or alleged, threatened or anticipated breach of the
contract resulting from this offer and shall have jurisdiction to hear and determine all questions as to the validity, existence or enforceability
thereof. Customer specifically consents to such Court’s exercise of jurisdiction over it. The purchaser attorns to the exclusive jurisdictions of the
jurisdiction of the U.S. Closed Courts, waives any obligation to venue in any action or proceeding regarding Seon Products and waives any
objection that the U.S. Closed Courts are an inconvenient forum or do not have jurisdiction over the purchaser of Seon. The United Nations
Convention On Contracts For The International Sale Of Goods shall not apply.
Provisions Applicable to Canadian Customers
For those customers whose mailing address is in Canada, Seon’s offer and any agreement of sale resulting therefrom shall be governed by and
construed in accordance with the internal and domestic laws of the Province of BRITISH COLUMBIA and the laws of Canada applicable therein
without giving effect to the conflict of laws rules thereof. The courts of British Columbia (the “Canadian Closed Courts”) shall have exclusive
jurisdiction to entertain and determine all disputes and claims, whether for specific performance, injunction, declaration or otherwise arising out of
or in any way connected with the construction, breach, or alleged, threatened or anticipated breach of the contract resulting from this offer and shall
have jurisdiction to hear and determine all questions as to the validity, existence or enforceability thereof. The purchaser attorns to the exclusive
jurisdictions of the jurisdiction of the Canadian Closed Courts, waives any obligation to venue in any action or proceeding regarding Seon Products
and waives any objection that the Canadian Closed Courts are an inconvenient forum or do not have jurisdiction over the purchaser of Seon. The
United Nations Convention On Contracts For The International Sale Of Goods shall not apply.
W-2
700-0036 R005
Seon Design Inc.
Unit 111, 3B Burbidge Street
Coquitlam, BC
Canada V3K 7B2
Telephone
Toll Free Telephone
Fax
Toll Free Fax
Email
Web site
700-0036 R005
604.941.0880
1.877.630.7366
604.941.0870
1.866.664.3677
[email protected]
www.seon.com
Printed in Canada