1
GT-I9100M
P O R T A B L E
M O B I L E
Q u a d - B A N D
P H O N E
User Manual
Please read this manual before operating your
phone, and keep it for future reference.
BMC_I9100M_UG_EN_07052011_D3
Intellectual Property
All Intellectual Property, as defined below, owned by or which is otherwise the property of Samsung or its
respective suppliers relating to the SAMSUNG Phone, including but not limited to, accessories, parts, or
software relating thereto (the “Phone System”), is proprietary to Samsung and protected under federal
laws, provincial laws, and international treaty provisions. Intellectual Property includes, but is not limited to,
inventions (patentable or unpatentable), patents, trade secrets, copyrights, software, computer programs,
and related documentation and other works of authorship. You may not infringe or otherwise violate the
rights secured by the Intellectual Property. Moreover, you agree that you will not (and will not attempt to)
modify, prepare derivative works of, reverse engineer, decompile, disassemble, or otherwise attempt to
create source code from the software. No title to or ownership in the Intellectual Property is transferred to
you. All applicable rights of the Intellectual Property shall remain with SAMSUNG and its suppliers.
Copyright
© 2011 Samsung Electronics Canada, Inc. SAMSUNG is a registered trademark of Samsung Electronics
Co., Ltd. and its related entities.
Openwave® is a registered Trademark of Openwave, Inc.
RSA® is a registered Trademark of RSA Security, Inc.
Post-it® is a registered Trademark of Minnesota Mining and Manufacturing Company aka 3M
CORPORATION DELAWARE.
The Bluetooth® word mark and logos are owned by the Bluetooth SIG, Inc. and any use of such marks by
Samsung Electronics Canada, Inc. is under license. Other trademarks and trade names are those of their
respective owners.
This product has an Android platform based on Linux, which can be expanded by a variety of JavaScriptbased software.
GoogleTM, Android MarketTM, Google TalkTM, Google MailTM, Google MapsTM, and YouTubeTM are
trademarks of Google, Inc.
JavaTM is a trademark of Sun Microsystems, Inc.
Windows Media Player® is a registered trademark of Microsoft Corporation.
and
are trademarks of SRS Labs, Inc. CS Headphone and WOW HD technologies are
incorporated under licence from SRS Labs, Inc.
Wi-Fi, the Wi-Fi CERTIFIED logo, and the Wi-Fi logo are registered trademarks of the Wi-Fi Alliance.
DivX®, DivX Certified® and associated logos are trademarks of DivX, Inc. and are used under license.
Covered by one or more of the following U.S. patents:
7,295,673; 7,460,668; 7,515,710; 7,519,274
About DivX Video
DivX® is a digital video format created by DivX, Inc. This is an official DivX Certified® device that plays
DivX video. Visit www.divx.com for more information and software tools to convert your files into DivX
video.
About DivX Video-On-Demand
This DivX Certified® device must be registered in order to play purchased DivX Video-On-Demand (VOD)
movies. To obtain your registration code, locate the DivX VOD section in the device setup menu. Go to
vod.divx.com with this code to complete the registration process and learn more about DivX VOD.
To obtain your registration code, go to Settings → About phone → Legal information → License
settings → DivX® VOD → Register. Go to vod.divx.com for more information on how to complete your
registration.
“DivX Certified® to play DivX® video up to HD 720p, including premium content.” (LCD resolution:
800x480.)
Disclaimer of Warranties; Exclusion of Liability
Except as set forth in the express warranty contained on the warranty page enclosed with the product, the
purchaser takes the product "as is", and Samsung makes no express or implied warranty of any kind
whatsoever with respect to the product, including but not limited to the merchantability of the product or its
fitness for any particular purpose or use; the design, condition or quality of the product; the performance of
the product; the workmanship of the product or the components contained therein; or compliance of the
product with the requirements of any law, rule, specification or contract pertaining thereto. Nothing
contained in the instruction manual shall be construed to create an express or implied warranty of any kind
whatsoever with respect to the product. In addition, Samsung shall not be liable for any damages of any
kind resulting from the purchase or use of the product or arising from the breach of the express warranty,
including incidental, special or consequential damages, or loss of anticipated profits or benefits.
Privacy
The privacy and copyright laws of Canada govern the disclosure, reproduction and distribution of data,
media and other content, including music and video content. Certain activities, including downloads or
transfer by any means (including, via cable, Bluetooth® or otherwise) of such content may be an
infringement of privacy or copyright law. Neither Samsung Electronics Canada Inc. nor any of its affiliates
shall be liable or responsible for any data or content disclosed, reproduced, downloaded or distributed by
the user of this equipment.
Warning
Depending on the user interface used in the handset, you may experience slow keypad response when
performing tasks in the background. This can impact making phone calls. When there is no activity or
change in the icons at the top of the main LCD display, the handset will resume normal operations.
introducing your phone ..........................................3
contents
Unpack ......................................................................3
Phone Layout ............................................................4
Keys ..........................................................................5
Indicator Icons ...........................................................5
Install the SIM Card and Battery ...............................7
Charge the Battery ....................................................9
Insert a Memory Card (optional) ..............................11
Attach a Hand Strap (optional) ................................13
getting started with your phone ..........................14
Turn Your Phone On and Off ..................................14
Use the Touch Screen .............................................15
Get to Know the Idle Screen ...................................16
Access Applications ................................................18
Customize Your Phone ...........................................20
Enter Text ................................................................25
Android Market ........................................................28
i
Download Files from the Web ................................. 29
Synchronize Data .................................................... 30
communication .....................................................32
personal information ............................................67
contents
Calls ........................................................................ 32
Text and Multimedia Messages .............................. 38
Google Mail™ ......................................................... 40
Email ....................................................................... 42
Google Talk™ ......................................................... 44
Social Hub ............................................................... 44
IM ............................................................................ 45
Music ....................................................................... 60
Music Hub ............................................................... 63
FM Radio ................................................................. 63
Game Hub ............................................................... 66
Contacts .................................................................. 67
Calendar .................................................................. 70
Task ........................................................................ 71
Memo ...................................................................... 72
Voice Recorder ....................................................... 73
entertainment ........................................................46
web .........................................................................74
Camera ................................................................... 46
Video Player ............................................................ 55
Gallery ..................................................................... 56
Photo Editor ............................................................ 58
Video Maker ............................................................ 59
Internet .................................................................... 74
Google Maps™ ....................................................... 78
Google Search ........................................................ 80
YouTube™ .............................................................. 80
Samsung Apps ........................................................ 81
ii
Market ..................................................................... 82
Readers Hub ........................................................... 82
News & Weather ..................................................... 83
Zoom Pass .............................................................. 84
contents
connectivity ...........................................................85
Bluetooth ................................................................. 85
Wi-Fi ........................................................................ 87
Wi-Fi Direct ............................................................. 89
AllShare .................................................................. 90
Mobile Network Sharing .......................................... 91
GPS ........................................................................ 92
PC Connections ...................................................... 93
tools .......................................................................97
Clock ....................................................................... 97
Calculator ................................................................ 99
Downloads ............................................................ 100
iii
Kies air .................................................................. 100
Mini Diary .............................................................. 101
My Files ................................................................. 102
Polaris Office ......................................................... 102
Task Manager ....................................................... 103
Voice Commands .................................................. 103
Voice Search ......................................................... 104
Voice Talk ............................................................. 104
Self serve .............................................................. 104
settings ................................................................105
Settings ................................................................. 105
Wireless and Network ........................................... 105
Call ........................................................................ 107
Sound .................................................................... 109
Display .................................................................. 110
Power Saving Mode .............................................. 111
Location and Security ............................................ 111
Acknowledging Special Precautions and Industry Canada
Notice .................................................................... 131
Specific Absorption Rates (SAR) for Wireless Phones
132
Owner’s Record .................................................... 133
contents
Applications ........................................................... 113
Accounts and Sync ............................................... 114
Motion ................................................................... 114
Privacy .................................................................. 114
Storage ................................................................. 115
Language and keyboard ....................................... 115
Voice Input and Output ......................................... 117
Accessibility .......................................................... 119
Docking Settings ................................................... 119
Date and Time ...................................................... 119
About Phone ......................................................... 119
warranty information ..........................................134
Standard Limited Warranty ................................... 134
index ....................................................................140
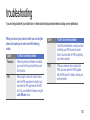
troubleshooting ...................................................120
health and safety information ............................125
Getting the Most Out of Your Reception ............... 125
Maintaining Safe Use of and Access to Your Phone 127
Caring for the Battery ............................................ 130
iv
using this
manual
Instructional Icons
Before you start, familiarize yourself with the icons that are
used in this manual:
Warning: Situations that could cause injury to
yourself or others.
Caution: Situations that could cause damage to
your phone or to other equipment.
This user manual has been designed
to guide you through the functions
and features of your mobile phone.
1
Note: Notes, usage tips, or additional information.
Refer to: Pages with related information. For
example:p. 12 (represents “see page 12”).
→
Followed by: The order in which options or
menus must be selected to perform a step. For
example: Select Messaging → New message
represents: select Messaging followed by New
message.
[]
Square brackets: Device keys. For example:
[
] (represents the Home key).
using this manual
2
introducing your
phone
Unpack
Check your product box for the following items:
•
•
•
•
•
Mobile phone
Battery
Travel adapter (charger)
Stereo Headset
Quick Start Guide and Safety and Warranty Guide
Only use Samsung-approved software. Pirated or
illegal software might cause damage or malfunctions
that are not covered by your manufacturer’s warranty.
The items supplied with your phone might vary
depending on the software and accessories available
in your region or offered by your service provider. You
can obtain additional accessories from your local
Samsung dealer. The supplied accessories provide
the best performance with your phone.
3
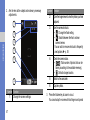
Phone Layout
Back of phone
Front of phone
Light Sensor
Proximity Sensor
Volume Key
Earpiece
Touch Screen
Home Key
Back Key
Menu Key
Mouthpiece
Multifunction Jack
Rear Camera Lens
Flashbulb
introducing your phone
Front Camera Lens
Headset Jack
Mouthpiece
Power/Lock Key
Back Cover
Speaker
4
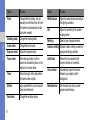
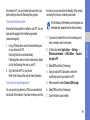
Keys
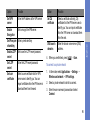
Indicator Icons
Key
Function
Power/
Lock
Turn on the phone (press and hold) or
access the quick menus (press and
hold). Lock the touch screen.
introducing your phone
Menu
Open a list of options available on the
current screen. Open the quick search
bar (press and hold).
Home
Return to the idle screen. Open the
Home screen or open the list of recent
programs (press and hold).
Back
Return to the previous screen.
Volume
Adjust the phone’s volume.
Icons shown on the display might vary depending on your
region or service provider.
Icon
Definition
No signal
Signal strength
GPRS network connected
EDGE network connected
UMTS network connected
HSPA+ network connected
Open WLANs available
WLAN connected
WLAN Direct connected
Bluetooth activated
5
Icon
Definition
Icon
Definition
New text or multimedia message
GPS activated
New email message
Call in progress
New voicemail message
Call on hold
Alarm activated
Speakerphone activated
Event notification
Missed call
Roaming (outside of normal service area)
Synchronized with the web
Silent mode activated
Uploading data
Vibration mode activated
Downloading data
Flight mode activated
Call diverting activated
Music playback in progress
Connected to PC
Music playback paused
USB tethering activated
FM radio turned on in background
WLAN hotspot activated
Error occurred or caution required
No SIM card
Battery power level
introducing your phone
Bluetooth headset connected
6
Icon
7:36 PM
Definition
Current time
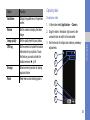
Install the SIM Card and Battery
introducing your phone
When you subscribe to a cellular service, you will receive a
Subscriber Identity Module (SIM) card with subscription
details, such as your personal identification number (PIN)
and optional services.
To install the SIM card and battery:
1. If the phone is on, press and hold the Power/Lock key
and select Power Off → OK to turn it off.
7
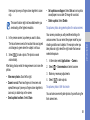
2. Remove the back cover.
Be careful not to damage your fingernails when you
remove the back cover.
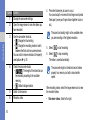
4. Insert the battery.
3. Insert the SIM card.
introducing your phone
5. Replace the back cover.
• Place the SIM card in the phone with the goldcolored contacts facing down.
• If you do not insert a SIM card, you can only use
your phone’s non-network services and some
menus.
• Do not insert a memory card into the SIM card slot.
8
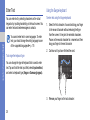
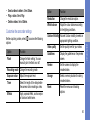
Charge the Battery
Before using the phone for the first time, you must charge
the battery. You can charge the phone with the provided
travel adapter or by connecting the phone to a PC with a PC
data cable.
introducing your phone
Only use Samsung-approved chargers and cables.
Unauthorized chargers or cables can cause batteries
to explode or damage your phone.
When your battery is low, the phone will emit a
warning tone and display a low battery message. The
battery icon
will also be empty and turn red. If the
battery level becomes too low, the phone will
automatically power off. Recharge the battery to
continue using the phone.
9
If the battery is completely discharged, you cannot
turn the phone on, even with the travel adaptor
connected. Allow a depleted battery to charge for a
few minutes before you try to turn on the device.
To charge the battery using the travel adapter:
1. Open the cover to the multifunction jack at the bottom of
the phone.
2. Plug the small end of the travel adapter into the
multifunction jack.
Improperly connecting the travel adapter can cause
serious damage to the phone. Any damage caused by
misuse is not covered by the warranty.
3. Plug the large end of the travel adapter into a power
outlet.
Do not remove the battery before removing the travel
adapter. Doing so might cause damage to the phone.
To save energy, unplug the travel adapter when it is
not in use. The travel adapter does not have a power
switch, so you must unplug the travel adapter from the
outlet to interrupt the power supply. The travel adapter
should remain close to the socket when in use.
5. Close the cover to the multifunction jack.
To charge the battery using the PC data cable:
Before charging, ensure that your PC is turned on.
1. Open the cover to the multifunction jack at the bottom of
the phone.
10
introducing your phone
• You can use the phone while it is charging, but it
might take longer to fully charge the battery.
• While the phone is charging, the touch screen might
not function due to an unstable power supply. If this
happens, unplug the travel adapter from the phone.
• While charging, the battery might heat up. This is
normal and should not affect the phone’s lifespan or
performance.
• If your phone is not charging properly, bring the
phone and the charger to a Samsung Service
Center.
4. When the battery is fully charged (the battery icon
is
no longer moving), unplug the travel adapter from the
power outlet and then from the phone.
2. Plug the micro USB end of the PC data cable into the
multifunction jack.
3. Plug the other end of the PC data cable into a USB port
on a PC.
Depending on the type of PC data cable you are
using, it might take some time before charging begins.
introducing your phone
4. When the battery is fully charged (the battery icon
is
no longer moving), unplug the PC data cable from the
phone and then from the PC.
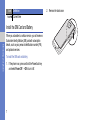
Insert a Memory Card (optional)
To store additional multimedia files, you must insert a
memory card. Your phone accepts microSD™ or
microSDHC™ memory cards up to 32 GB (depending on
the memory card manufacturer and type).
Samsung uses approved industry standards for
memory cards but some brands might not be fully
compatible with your phone. Using an incompatible
memory card might damage your phone or the
memory card and can corrupt data stored on the card.
• Your phone only supports the FAT file structure for
memory cards. If you insert a card formatted with a
different file structure, your phone will prompt you to
reformat the memory card.
• Frequent writing and erasing of data will shorten the
lifespan of memory cards.
• When you insert a memory card into your phone,
the file directory of the memory card will appear in
the /sdcard/external_sd folder under the internal
memory (moviNAND™).
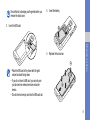
To insert a memory card:
1. Remove the back cover and battery.
11
2. Insert a memory card with the gold-coloured contacts
facing down.
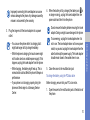
Do not remove the memory card while the phone is
transferring or accessing information, as this might
result in the loss of data or damage to the memory
card or phone.
1. In Idle mode, select Applications → Settings →
Storage → Unmount SD card → OK.
introducing your phone
2. Remove the back cover and battery.
3. Push the memory card gently until it disengages from
the phone.
3. Push the memory card into the memory card slot until it
locks into place.
4. Pull the memory card out of the memory card slot.
4. Replace the battery and back cover.
6. Replace the battery and back cover.
To remove a memory card:
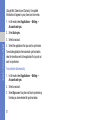
To format a memory card:
Before removing the memory card, unmount it for safe
removal.
Formatting your memory card on a PC might cause
incompatibilities with your phone. Only format the memory
card on the phone.
5. Remove the memory card.
12
• In Idle mode, select Applications → Settings →
Storage → Unmount SD card → OK → Format SD
card → Format SD card → Erase everything.
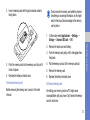
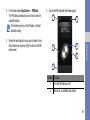
2. Slide the hand strap through the slot and hook it over
the small projection.
introducing your phone
Before formatting the memory card, remember to
make backup copies of all important data stored on
your phone. The manufacturer’s warranty does not
cover the loss of data resulting from user actions.
Attach a Hand Strap (optional)
To attach a hand strap to your phone:
1. Remove the back cover.
13
3. Replace the back cover.
getting started
with your phone
Turn Your Phone On and Off
To turn your phone on, press and hold the Power/Lock key.
Your phone will automatically connect to the network. When
you turn on your phone for the first time, tap the Android
image on the screen and follow the on-screen instructions to
set up your phone for its first use.
You might be charged for the data connection
because the connection to the Google web server is
always active by default.
To turn your phone off:
1. Press and hold the Power/Lock key.
2. Select Power off → OK.
• Follow all posted warnings and directions when in
an area where the use of wireless devices is
restricted, such as air planes and hospitals.
14
• To only use your phone’s non-network services,
switch to Flight mode. Press and hold the Power/
Lock key and select Flight mode.
Use the Touch Screen
getting started with your phone
Your phone’s touch screen lets you easily select items or
perform functions.
• To avoid scratching the touch screen, do not use
sharp tools.
• Do not allow the touch screen to come into contact
with other electrical devices. Electrostatic
discharges can cause it to malfunction.
• Do not allow the touch screen to come into contact
with water. The touch screen might malfunction in
humid conditions or when exposed to water.
15
• For optimal use of the touch screen, remove the
screen protection film before using your phone.
• Your touch screen has a layer that detects small
electrical charges emitted by the human body. For
best performance, tap the touch screen with your
fingertip. The touch screen will not react to the
touches of sharp tools, such as a stylus or pen.
To control the touch screen:
• Tap: Tap once with your finger to select or launch a
menu, option, or application.
• Tap and hold: Tap an item and hold it for more than 2
seconds to open a pop-up option list.
• Drag: Tap and drag your finger up, down, left, or right to
move to items on the list.
• Drag and drop: Tap and hold your finger on an item and
then drag your finger to move the item.
• Double-tap: Tap twice quickly with your finger to zoom in
or out while viewing photos or web pages.
To lock or unlock the touch screen and keys:
You can lock the touch screen and keys to prevent any
unwanted phone operations.
• To lock, press the Power/Lock key.
• To unlock, turn on the touch screen by pressing the
Power/Lock key or [
], and then flick the window with
your finger.
When your phone turns on or is in Idle mode, the Idle screen
is displayed. From this screen, you can access various
applications and your phone’s status information.
The Idle screen has multiple panels. Scroll left or right to a
panel on the Idle screen. You can also select a dot on the
top of the screen to move to the corresponding panel of the
Idle screen.
Add items to the Idle screen:
You can customize the Idle screen by adding shortcuts to
applications or items in applications, widgets, or folders.
To add items to the Idle screen:
1. Press [
] → Add.
2. Select the item category and then select an item:
• Widgets: Add widgets to the Idle screen.
16
getting started with your phone
• Your phone turns off the touch screen when you do
not use the phone for a specified amount of time. To
turn on the touch screen, press the Power/Lock key
or [
].
• You can also adjust the backlight time. In Idle mode,
select Applications → Settings → Display →
Screen time-out.
Get to Know the Idle Screen
• Shortcuts: Add shortcuts to items, such as
applications, bookmark, and contacts.
• Folders: Create a new folder or add folders for your
contacts.
• Wallpapers: Set a background image.
getting started with your phone
Available items vary depending on the current Idle
screen mode.
To move items on the Idle screen:
1. Touch and hold the item that you want to move.
2. Drag the item to a new location.
To remove items from the Idle screen:
1. Touch and hold the item that you want to remove.
The item is magnified and the
icon appears,
indicating that the application tab has switched to the
trash tab.
17
2. Drag the item to the trash tab.
3. When the item and the trash tab turn red, release the
item.
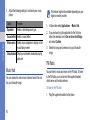
Use the shortcuts panel
In Idle mode or while using an application, tap the indicator
icons area and drag your finger down to open the shortcuts
panel. You can activate or deactivate wireless connection
features and access a list of a notifications, such as
messages, calls, events, or processing status.
• To hide the shortcuts panel, drag the bottom of the list
up.
• To clear the notification list, select Clear.
In the shortcuts panel, you can access the following options:
• Wi-Fi: Activate or deactivate the WLAN connection
feature. ► p. 87
• Bluetooth: Activate or deactivate the Bluetooth wireless
connection feature. ► p. 85
• GPS: Activate or deactivate GPS mode.
• Sound/Vibration: Activate or deactivate Vibration mode.
• Auto rotation: Activate or deactivate the auto rotation.
Add or remove panels from the Idle screen
You can add or remove panels from the Idle screen to
organise widgets according to your preferences and needs.
1. In Idle mode, press [
] → Edit.
You can also place two fingers on the touch screen and
pinch to switch to Edit mode.
3. When you are finished, press [
].
Access Applications
getting started with your phone
Available options might vary depending on your
region and service provider.
• To add a new panel, select
.
• To change the order of the panels, tap and hold the
thumbnail of a panel and drag it to a new location.
To access your phone’s applications:
1. In Idle mode, select Applications to access the
application list.
2. Scroll left or right to display the application screens.
You can also select a dot at the top of the screen to
move to the corresponding main menu screen.
3. Select an application.
2. To add or remove panels using the following features:
• To remove a panel, tap and hold the thumbnail of a
panel and drag it to
at the bottom of the screen.
18
• When you use applications provided by Google,
you must have a Google account. If you do not
have a Google account, you will need to create one.
• You can add a shortcut to an application by tapping
and holding an application icon in the application
list. You can then move the icon to a new location
on the Idle screen as needed.
getting started with your phone
4. Press [ ] to return to the previous screen or press
] to return to the Idle screen.
[
• If you rotate the phone while using some features,
the interface automatically rotates. To prevent the
interface from rotating, open the shortcuts panel
and select Auto rotation.
• While using the phone, you can capture an image of
a screen by pressing and holding
and the
Power/Lock key at the same time. The image is
saved in Applications → My files →
ScreenCapture.
To organize applications:
You can reorganise the applications in the application list by
changing their order or grouping them into categories to suit
your needs.
1. In the application list, press [
] → Edit.
2. Tap and hold an application.
3. Drag the application icon to a Add Folder or Add Page
at the bottom of the screen.
4. Repeat Steps 2 and 3 to add more applications.
19
5. Drag Add Folder or Add Page to the menu screen. A
new folder or panel containing the applications is added
to the menu screen.
6. If you added a folder, enter a name and select Yes.
7. Press [
] → Save.
To change the order of the main menu screens:
To use the task manager:
Your phone is a multitasking device and can run more than
one application at a time. However, multitasking might
cause hang-ups, freezing, memory problems, or additional
power consumption. To avoid these problems, close
unnecessary programs using the task manager.
1. In Idle mode, select Applications → Task manager →
Active applications. A list of all of the applications that
are currently running on your phone appears.
2. Tap and hold the thumbnail of a screen and drag it to a
new location.
2. To close an application, select Exit. To close all of the
active applications, select Exit all.
To access recent applications:
] to open a list of applications that
1. Press and hold [
you have recently accessed.
2. Select the application that you want to access.
Customize Your Phone
Get more from your phone by customizing it to suit your
needs.
20
getting started with your phone
1. In the application list, place two fingers on the screen
and pinch.
To set the current date and time:
1. In Idle mode, select Applications → Settings → Date
and time.
2. Set the date and time and change the other options as
needed.
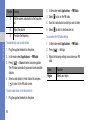
To turn the touch tone on or off:
getting started with your phone
• In Idle mode, select Applications → Settings → Sound
→ Audible selection.
• In Idle mode, press and hold the Power/Lock key and
select Silent mode.
You can set the phone to alert you to various events in
Silent mode. In Idle mode, open the application list
and select Applications → Settings → Sound →
Vibration → Always, Never, Only in Silent mode,
or Only when not in Silent mode. When you switch
will appear instead of
.
to Silent mode,
To adjust the volume of the ringtones:
To change your ringtone:
• Press the Volume key up or down to adjust the ringtone
volume.
1. In Idle mode, select Applications → Settings →
Sound → Phone ringtone.
To switch to or from Silent mode:
To mute or unmute your phone, do one of the following:
• In Idle mode, select Phone → Keypad and tap and hold
#.
21
2. Select a ringtone in the list and select OK.
To activate animation for switching windows:
• In Idle mode, select Applications → Settings →
Display → Animation → No animations, Some
animations or All animations.
To select wallpaper for the Idle screen:
1. In the Idle mode, press [
] → Wallpaper and select
Gallery, Wallpaper gallery, or Live wallpapers.
2. Select an image.
3. Select Save or Set wallpaper.
To adjust the brightness of the display:
You can quickly adjust the brightness of the display by
dragging the slider bar left or right.
1. In Idle mode, select Applications → Settings →
Display → Brightness.
To set an unlock pattern:
You can set an unlock pattern to prevent unauthorized
people from using your phone without your permission.
1. In Idle mode, select Applications → Settings →
Location and security → Set up screen lock →
Pattern.
2. Follow the on-screen instructions and example patterns
and select Next (if needed).
3. Draw a pattern by dragging your finger to connect at
least 4 dots.
4. Select Continue.
2. Clear the checkbox next to Automatic brightness.
5. Draw the pattern again to confirm.
3. Drag the slider to adjust the level of brightness.
6.
Select Confirm.
4. Select OK.
22
getting started with your phone
Samsung is not responsible for any use of default
images or wallpapers provided on your phone.
The brightness level of the display will affect how
quickly the phone uses battery power.
getting started with your phone
• When you have set an unlock pattern, you have to
use the pattern each time you turn on the phone. If
you do not want the phone to require a pattern,
Applications → Settings → Location and
security → Change screen lock, confirm the
saved pattern and select None.
• If you forget the unlock pattern, take your phone to
a Samsung Service Centre to be unlocked.
• Samsung is not responsible for the loss of
passwords or private information or other damages
caused by illegal software.
To set an unlock PIN code:
1. In Idle mode, select Applications → Settings →
Location and security → Set up screen lock → PIN.
2. Enter a new PIN (numeric) and select Continue.
3. Enter the PIN again and select OK.
23
To set an unlock password:
1. In Idle mode, select Applications → Settings →
Location and security → Set up screen lock →
Password.
2. Enter a new password (alphanumeric) and select
Continue.
3. Enter the password again and select OK.
To lock your SIM card:
You can lock your phone by activating the PIN supplied with
your SIM card.
1. In Idle mode, select Applications → Settings →
Location and security → Set up SIM card lock →
Lock SIM card.
2. Enter your PIN and select OK.
Once the PIN lock is enabled, you must enter the PIN each
time you turn on the phone.
• If you enter an incorrect PIN too many times, your
SIM card will be blocked. You must enter a PIN
unlock key (PUK) to unblock the SIM card.
• If you block your SIM card by entering an incorrect
PUK, bring the card to your service provider to be
unblocked.
When someone inserts a new SIM card into your phone, the
mobile tracker feature will automatically send the contact
number to specified recipients to help you locate and
recover your phone.
To use this feature, you need a Samsung account for
controlling the phone from the web remotely.
1. In Idle mode, select Applications → Settings →
Location and security → SIM Change Alert.
3. Read the terms and conditions and select Accept.
4. Select Alert message recipients.
5. Enter the password for your Samsung account again
and select OK.
6. Enter a phone number, including a country code
(with +).
7. Enter the text message to be sent to the recipients.
8. Select Done.
If you activate Remote Functions, you can control a
lost phone via the web.
Visit http://www.samsungdive.com to see detailed
information for this feature.
24
getting started with your phone
To activate the mobile tracker:
2. Enter the email address and password for your
Samsung account and select Sign in. (To create a
Samsung account, select Sign up.
Enter Text
Using the Swype keyboard
You can enter text by selecting characters on the virtual
keypad or by inputting handwriting on the touch screen. You
can enter text and create messages or contacts.
To enter text using the Swype keyboard:
getting started with your phone
You cannot enter text in some languages. To enter
text, you should change the writing language to one
of the supported languages. ► p. 115
1. Select the first character of a word and drag your finger
to the second character without releasing the finger
from the screen. A line joins the selected characters.
Pause on the second character for a moment and then
drag your finger to the next character.
2. Continue until you have finished the word.
To change the keyboard type:
You can change the type of keyboard that is used to enter
text. Tap and hold the text input field, select Input method,
and select a keyboard type (Swype or Samsung keypad).
3. Release your finger on the last character.
25
4. When the word displays correctly, select
to insert a
space. If the correct word does not display, select an
alternative word from the list that appears.
6. You can also use the following keys:
5. Repeat Steps 1 to 4 to complete your text.
1
5
2
6
3
7
4
8
Number Function
1
Change case.
2
Access the swype tip screen. Show the alternative
word list for the selected characters. Change the text
input method. Launch Help (tap and hold).
3
Switch between Symbol/Number mode and ABC
mode.
4
Change the input language.
26
getting started with your phone
• You can also tap the keys to enter text.
• You can tap and hold a key to enter characters on
the upper half of the key. When you tap and hold a
key until the character list appears, you can enter
special characters and symbols.
Number Function
getting started with your phone
5
Clear your input.
6
Start a new line.
7
Enter text by voice. (This feature might not be
available, depending on the selected input
language.)
8
Insert a space.
You can select one of key input methods (QWERTY or
traditional keypad) or the handwriting input methods.
2. Enter text by selecting alphanumeric keys or by writing
on the touch screen.
You can also use the following keys:
Using the Samsung keypad
To enter text using the Samsung keypad:
1. Select
→ Portrait keypad types and select a text
input method.
27
4
1
• To hide the Swype keyboard, press [ ].
• To view the Help information about using the Swype
keyboard, tap and hold .
5
2
6
3
7
Number Function
1
Change case.
2
Switch between Symbol/Number mode and ABC
mode.
Number Function
3
Enter text by voice. This icon is only available when
you activate the voice input feature for the Samsung
keypad. (This feature might not be available,
depending on the selected input language.)
Clear your input.
5
Start a new line.
6
Access the keypad settings. Change the text input
method (tap and hold).
7
Insert a space. Insert a full stop (double-tap).
Change the input language (tap and hold and then
scroll left or right). (The functions of this key might
vary depending on your service provider.)
1. Place the cursor on the text that you want to copy.
2. Select
.
3. Select Select word or Select all to select part or all of
the text.
4. Drag
or
to select the text.
5. Select Copy to copy, or Cut to cut the text onto the
clipboard.
6. In another application, place the cursor where you want
to paste the text.
7. Select → Paste to insert the text from the clipboard
into the text field.
Copy and paste text
Android Market
While you are entering text, you can use the copy and paste
features to use the same text in other applications.
Android Market provides you with an easy way to shop for
games and mobile applications. Based on the Android
28
getting started with your phone
4
To copy and paste text:
platform, your phone’s functionality can be extended by
installing additional applications.
getting started with your phone
• This feature might not be available in your region.
• Your phone will save user files from downloaded
applications to the internal moviNANDTM memory.
To save the files in the memory card, connect your
phone to a PC and copy them from moviNAND to
the memory card.
To install applications:
1. In Idle mode, select Applications → Market.
2. Select Accept in the terms and conditions page.
3. Search for a file or application and download it.
To uninstall applications:
1. In the Android Market home screen, press My apps.
2. Select the item that you want to delete.
29
3. Select Uninstall → OK.
Download Files from the Web
When you download files or web applications from the web,
your phone stores them on a memory card.
Files that you download from the web might include
viruses that will damage your phone. To lessen your
risk, only download from sources that you trust.
Some media files include Digital Rights Management
to protect copyrights. This protection might prevent
you from downloading, copying, modifying, or
transferring some files.
To download files from the web:
1. In Idle mode, select Applications → Internet.
2. Search for a file or application and download it.
To install applications downloaded from websites other than
Android Market, you must select Settings → Applications
→ Unknown sources → OK.
Synchronize Data
When the synchronization is complete, your phone stays
connected to the web. If any change is made on the web,
the updated information will appear on your phone and
automatically will begin synchronization, and vice-versa.
To set up a server account:
getting started with your phone
You can synchronize data (Google messages, calendar, and
contacts) with the Google web server and back up or restore
your data.
• This feature might not be available in your region.
• To synchronize with the Google web server, you
must have a Google account. If you do not have a
Google account, sign up for a Google account by
selecting Create on the first setup screen.
1. In Idle mode, select Applications → Settings →
Accounts and sync.
2. Select Add account and select an account type.
3. Follow the on-screen instructions to complete the
account setup.
For online community services, such as Facebook or
MySpace, enter your user name and password and
select Log in.
To activate automatic sync:
If you add or edit data in any of the applications on the web
30
(Google Mail, Calendar, and Contacts), the updated
information will appear on your phone, and vice-versa.
1. In Idle mode, select Applications → Settings →
Accounts and sync.
2. Select Auto-sync.
3. Select an account.
getting started with your phone
4. Select the applications that you want to synchronise.
To exclude applications from automatic synchronisation,
clear the checkbox next to the application that you do not
want to synchronise.
To synchronise data manually:
1. In Idle mode, select Applications → Settings →
Accounts and sync.
2. Select an account.
3. Select Sync now. Your phone will start synchronising
the data you have selected for synchronisation.
31
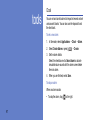
communication
Calls
You can use your phone to make and answer calls, use
options during calls, and to customize and use call-related
features.
Make and answer calls
You can use the buttons or touch screen when you make,
accept, end, or reject calls.
• When you turn on the proximity sensor, your phone
automatically turns off and locks the touch screen to
prevent accidental inputs when you hold the phone
near your face. ► p. 108
• Static electricity discharged from your body or
clothing might interfere with the proximity sensor
during a call.
32
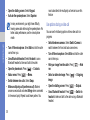
To make a call:
2. To end the call, select End call.
1. In Idle mode, select Phone → Keypad.
To reject a call:
2. Enter an area code and phone number.
When a call comes in, drag
hear a busy tone.
3. Select
to make a voice call.
For a video call, select
.
communication
4. To end the call, select End call.
• Use the phonebook to save the numbers that you
dial frequently. ► p. 67
• To quickly access the call log to redial numbers that
you have dialed recently, select Phone → Logs.
to the right.
When the phone is ringing, press the Volume key to
mute the ringtone.
33
To send a message when you reject incoming calls, select
Reject call with message .
First set a text message to be sent to callers. In Idle
mode, select Applications → Settings → Call →
Set reject messages. Select a preset message or
select Create to create a custom message.
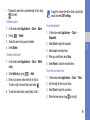
To call an international number:
To answer a call:
1. When a call comes in, drag
to the left. The caller will
1. In Idle mode, select Phone → Keypad, and tap and
hold 0 to insert the + character.
2. Enter the complete number that you want to dial
(country code, area code and phone number), and then
select
to dial the number.
To call a contact from Contacts:
You can call numbers directly from Contacts using stored
contacts. X p. 67
The supplied headset is only designed to be used with
with your phone and might not be compatible with
other phones and MP3 players.
Use options during a voice call
2. Select a contact’s name.
You can use the following options while a voice call is in
progress:
3. Select the number that you want to dial.
To use the headset:
By plugging the supplied headset into the phone, you can
make and answer calls hands-free:
• Answer a call: Press the headset button.
• Reject a call: Press and hold the headset button and
then release it to reject the call.
• Place a call on hold or retrieve a held call during a
call: Press and hold the headset button.
• End a call: Press the headset button.
• Adjust voice volume: Press the Volume key up or
down.
.
• Place a call on hold: Select
• Retrieve a held call: Select
.
• Dial a second number: Select Add call and dial the
new number.
• Answer a second call: Drag
to the right when the
call waiting tone sounds. The phone prompts you to end
or hold the first call. You must subscribe to a call waiting
service to use this feature.
34
communication
1. In Idle mode, select Phone → Contacts.
• Open the dialling screen: Select Keypad.
• Activate the speakerphone: Select Speaker.
In noisy environments, you might have difficulty
hearing some calls while using the speakerphone. For
better audio performance, use the normal phone
mode.
communication
• Turn off the microphone: Select Mute so that the caller
cannot hear you.
• Use a Bluetooth headset: Select Headset to use a
Bluetooth headset to listen and talk to the caller.
• Open the phonebook: Press [
] → Contacts.
• Add a memo: Press [
] → Memo.
• Switch between two calls: Select Swap.
• Make a multiparty call (conference call): Make or
answer a second call and select Merge when connected
to the second party. Repeat to add more parties. You
35
must subscribe to the multiparty call service to use this
feature.
Use options during a video call
You can use the following options while a video call is in
progress:
• Switch between cameras: Select Switch Camera to
switch between the front and back camera lens.
• Turn off the microphone: Select Mute so that the caller
cannot hear you.
• Hide your image from the caller: Press [
] → Hide
me.
] → Outgoing
• Select an alternate image: Press [
image.
• Open the dialling screen: Press [
] → Dialpad.
• Use a Bluetooth headset: Press [
] → Switch to
headset to listen and talk to the caller using a Bluetooth
headset.
• Use the speakerphone: Press [
] → Speaker On/
Off.
• Use the other party's image: Tap and hold the caller’s
image. You can capture an image of the screen or record
the video call.
To set auto rejection and set up the reject list:
View and dial missed calls
2. Select Auto reject mode and select an option.
You can use auto rejection to automatically reject calls from
specific numbers.
1. In Idle mode, select Applications → Settings → Call
→ Call rejection.
Option
Function
To dial the number of a missed call:
All numbers
Reject all calls.
1. Open the shortcuts panel.
Only black list
Reject calls from phone numbers on the black
list.
2. Select the missed call.
Use additional features
3. Select Black list.
You can use various other call-related features, such as
auto rejection, call diverting, or call barring.
5. Select an option under Match criteria (if necessary).
4. Select Add.
6. Enter a phone number and select Save.
7. To add more numbers, repeat Steps 4 to 6.
36
communication
Your phone will display calls that you have missed.
To set call forwarding:
Call diverting is a network feature that allows you to send
incoming calls to another number that you specify. You can
set this feature separately for several conditions when you
are not able to answer calls, such as when you are already
on the phone or when you are outside of the service area.
communication
1. In Idle mode, select Applications → Settings → Call
→ Call forwarding and select Voice Call or Video
Call.
2. Select a condition.
3. Enter a number to which calls will be forwarded and
select Enable.
Your setting will be sent to the network.
To set call barring:
Call barring is a network feature that restricts specific types
of calling or prevents others from making calls with your
phone.
37
1. In Idle mode, select Applications → Settings → Call
→ Additional settings → Call barring and select
Voice Call or Video Call.
2. Select a call barring option.
3. Enter a call barring password and select OK.
Your setting will be sent to the network.
To set call waiting:
Call waiting is a network feature that alerts you of an
incoming call when you are on a call. This feature is only
available for voice calls.
1. In Idle mode, select Applications → Settings → Call
→ Additional settings → Call waiting.
2. Your setting will be sent to the network.
To view call logs:
You can view logs of your calls and filter them by their types.
1. In Idle mode, select Phone → Logs.
2. Press [
] → View by and select an option for
sorting the call logs.
From the call logs, you can make a call or send a
message directly to a contact by quickly flicking the
contact to the left or right
From the detail view, you can dial the number, send a
message to the number or add the number to the
phonebook or reject list.
Text and Multimedia Messages
You can create and send text (SMS), multimedia (MMS), or
email messages, and view or manage messages that you
You might incur additional charges for sending and
receiving messages while outside your home service
area. For details, contact your service provider.
To send a text message:
1. In Idle mode, select Messaging and select
communication
3. Select a log to view its details.
have sent or received. For instructions on entering text, see
X p. 25.
.
2. Add the recipients of your message.
• Enter phone numbers manually, separating them
with a semicolon or comma.
• Select phone numbers from the lists by selecting
.
3. Select Tap to enter message and enter your message
text.
To insert emoticons, press [
] → Insert smiley.
4. Select Send to send the message.
38
To send a multimedia message:
1. In Idle mode, select Messaging and select
.
communication
2. Add the recipients of your message.
• Enter phone numbers or email addresses manually,
separating them with a semicolon or comma.
• Select phone numbers or email addresses from the
lists by selecting
.
When you enter an email address, the phone will
convert the message as a multimedia message.
3. Press [
] → Add subject and add a subject for the
message.
4. Select Tap to enter message and enter your message
text.
To insert emoticons, press [
] → Insert smiley.
and add an item.
5. Select
You can select a file from the file list or create a new
photo, video, or sound.
6. Select Send to send the message.
To view text or multimedia messages:
1. In Idle mode, select Messaging.
Your messages are grouped into message threads by
contact.
2. Select a contact.
39
3. For a multimedia message, select a message to view its
details.
Listen to voicemail messages
If you have set missed calls to be diverted to voicemail,
callers can leave a voice message when you do not answer
incoming calls.
1. In Idle mode, select Phone → Keypad, and tap and
hold 1.
2. Follow the instructions on the voicemail server.
You must save the voicemail server number before
accessing the server. Your service provider can give
you the number.
You can retrieve new email messages from Google MailTM
to your Inbox. When you access this application, the Inbox
screen appears. The total number of unread messages
displays in the title bar and the unread messages display in
bold. If you have labelled a message, its label appears in a
coloured rectangle on the message.
• This feature might not be available in your region.
• This Google Mail menu might be labelled differently
depending on your service provider.
To send an email message:
1. In Idle mode, select Applications → Gmail.
2. If you are launching this application for the first time,
select OK.
3. Press [
] → Compose.
4. Enter a name or address in the recipient field.
40
communication
To access your voicemail inbox and listen to voicemail
messages:
Google Mail™
5. Enter a subject and message.
6. To attach an image file, press [
select a file.
7. Select
] → Attach and
to send the message.
To view email messages:
communication
1. In Idle mode, select Applications → Gmail.
2. Select an email message.
In the message view, use the following options:
• Reply: Select
to reply to the message.
• Reply to all: Select → Reply all to reply to the
message including all recipients.
• Forward: Select → Forward to forward the message
to other recipients.
• Preview: Select Preview next to the attachment item to
view the attachment.
41
• Download: Select Download to save the attachment on
your phone.
• Archive: Select Archive to archive the message.
• Delete: Select Delete to delete the message.
• Move to previous or next message: Select
or
to view an older message.
Organize email by labels
You can organize your email by labelling your messages or
adding stars to mark important messages. You can then sort
messages by label filter.
To add a label to a message:
1. In the Inbox screen, tap and hold a message.
2. Select Change labels.
3. Select a label to add and select OK.
To add a star to a message:
1. In the Inbox screen, tap and hold a message.
2. Select Add star. The star icon next to the message is
activated.
To filter messages:
] → Go to labels.
Email
You can send or view email messages using your personal
or company email account.
To set up an email account:
1. In Idle mode, select Applications → Email.
2. Enter your email address and password.
4. Follow the on-screen instructions.
When you have finished setting up the email account, the
email messages are downloaded to your phone. If you have
created more than two accounts, you can switch between
email accounts. Select an account name at the top left of the
screen and select the one from which you want to retrieve
messages.
To send an email message:
1. In Idle mode, select Applications → Email, select an
email account and select
.
2. Add the recipients of your message.
• Enter email addresses manually, separating them
with a semicolon or comma.
• Select
and select email addresses from a list.
42
communication
1. In the Inbox screen, press [
2. Select the label of the messages that you want to view.
3. Select Next (for general email accounts, such as
Google Mail and Yahoo) or Manual setup (for other
company email accounts).
• To add more recipients, press [
Bcc.
] → Add Cc/
3. Select the subject field to enter a subject.
4. Select the text input field to enter your email text.
5. Select Attach and attach a file.
You can select an image, video, or sound clip.
communication
You cannot attach Digital Rights Management (DRM)
protected files.
6. Select Send to send the message.
If you are offline or outside your service area, the
message will be held in the message thread list until
you are online and in your service area.
To view email messages:
When you open an email account, you can view previously
retrieved emails offline or connect to the email server to
43
view new messages. After you retrieve email messages,
you can view them offline.
1. In Idle mode, select Applications → Email and select
an email account.
2. Press [
] → Refresh to update the message list.
3. Select an email message.
In the message view, use the following options:
or
• Move to previous or next message: Select
.
• Move message to another folder: Select
.
• Delete the message: Select
.
• Reply to the message: Select
→ Reply.
• Forward the message: Select
→ Forward.
• View an attachment: Select
and select the
attachment. To save it on your phone, select
.
Google Talk™
To start a chat:
You can send instant messages to your friends or family
using Google TalkTM.
1. In Idle mode, select Applications → Talk
This feature might not be available in your region or
with your service provider.
1. In Idle mode, select Applications → Talk
The friend list shows all of your Google Talk contacts at
a glance.
2. Press [
] → Add friend.
3. Enter the email address of the friend and select Send
invitation.
When your friend accepts the invitation, they are added to
your friend list.
3. Enter your message and select Send.
To insert emoticons, press [
] → More → Insert
smiley.
4. To switch between active chats, press [
chats.
5. To end the chat, press [
] → Switch
] → End chat.
Social Hub
You can access Social HubTM, the integrated
communication application for email, messages, instant
messages, contacts, or calendar information. Visit http://
socialhub.samsungmobile.com for more details.
44
communication
To add friends to your Friends list:
2. Select a friend from the Friends list. The chat screen
opens.
To access Social Hub:
1. In Idle mode, select Applications → Social Hub.
2. Check and use the contents delivered from the Social
Hub.
IM
communication
You can use IM to chat with friends and family using any of
the universal instant messengers.
To use IM:
1. In Idle mode, select Applications → IM.
2. If you are launching this application for the first time,
select the checkbox next to I accept all the terms
above and select Agree.
3. Select Add account and select an instant messenger.
4. Enter your user name and password to sign in.
5. Chat with your friends and family instantly.
45
entertainment
Camera
You can capture and view photos and videos. You can take
photos at resolutions of up to 3264 x 2448 pixels (8 mega
pixels) and videos at resolutions of up to 1920 x 1080 pixels.
• The camera automatically turns off if you do not use
it for a specific amount of time.
• The memory capacity might differ depending on the
shooting scene or shooting conditions.
Capturing photos
To capture a photo:
1. In Idle mode, select Applications → Camera.
46
2. Aim the lens at the subject and make any necessary
adjustments.
Number Function
2
Open the image viewer to view the photos you have
captured.
3
Use the camera shortcuts.
•
: Change the flash setting.
•
: Switch between the front and rear
camera lenses.
You can add or remove shortcuts to frequently
used options. ► p. 55
6
4
Check the camera status.
•
: Total number of photos that can be
taken (according to the available memory).
•
: Default storage location.
2
5
Switch to the camcorder.
6
Capture a photo.
1
3
entertainment
4
5
Number Function
1
47
Change the camera settings.
3. Press the Volume key to zoom in or out.
You can also tap the screen with two fingers and spread
them apart (move your fingers closer together to zoom
out).
The zoom function might not be available when you
are shooting at the highest resolution.
to take a photo. The photo is saved
5. Select
automatically.
After taking photos, select the image viewer icon to view the
photos.
• View more photos: Scroll left or right.
• Zoom in or out: Place two fingers on the screen and
spread them apart (move your fingers closer together to
zoom out) or double-tap on the screen.
• Send a photo to others: Select Share.
To capture a photo using preset options for various scenes:
Your camera provides you with predefined settings for
various scenes. You can select the proper mode for your
shooting condition and subjects. For example, when you
take photos at night, select the night mode that uses an
extended exposure.
entertainment
4. In the preview screen, tap where you want to focus.
The focus frame moves to the location that was tapped
and changes to green when the subject is in focus.
• Set a photo as wallpaper: Select Set as to set a photo
as wallpaper or as a caller ID image for a contact.
• Delete a photo: Select Delete.
1. In Idle mode, select Applications → Camera.
2. Select
→ Scene mode and select a scene.
3. Make any necessary adjustments.
4. Select
to take a photo.
To capture a photo in Self shot mode:
You can take conveniently take photos of yourself using the
front camera lens.
48
1. In Idle mode, select Applications → Camera.
2. Select
→ Self shot.
3. Make any necessary adjustments.
4. Select
to take a photo.
To capture a beauty photo:
You can hide facial imperfections using Beauty mode.
1. In Idle mode, select Applications → Camera.
2. Select
→ Shooting mode → Beauty.
entertainment
To capture a photo in Smile shot mode:
3. Make any necessary adjustments.
Your camera can recognise people’s faces and help you to
take photos of their smiling faces.
4. Select
1. In Idle mode, select Applications → Camera.
to take a photo.
To capture a panoramic photo:
3. Make any necessary adjustments.
You can take wide panoramic photos using Panorama
shooting mode. This mode is convenient for photographing
landscapes.
4. Select
1. In Idle mode, select Applications → Camera.
2. Select
→ Shooting mode → Smile shot.
.
5. Aim the camera lens at your subject.
Your phone recognizes people in an image and detects
their smiles. When the subject smiles, the phone
automatically takes a photo.
49
2.
→ Shooting mode → Panorama.
3. Make any necessary adjustments.
4. Select
to take the first photo.
5. Slowly move the phone in any direction and align the
green frame with the viewfinder.
When you have aligned the green frame and viewfinder,
the camera will automatically take the next photo.
6. Repeat Step 5 to complete the panoramic photo.
To capture a series of photos of action:
1. In Idle mode, select Applications → Camera.
2. Select
→ Shooting mode → Action shot.
3. Make any necessary adjustments.
4. Select
to capture the first photo.
5. Move the device to follow the moving subject. The
phone automatically captures the next photos.
To capture a photo in Cartoon mode:
You can take photos with cartoon effects.
1. In Idle mode, select Applications → Camera.
2. Select
→ Shooting mode → Cartoon.
entertainment
You can easily take a series of photos of moving subjects
and then combine them into a single photo that shows the
action. This is useful when you are photographing a sporting
event or children at play.
6. Continue to follow the subject until the phone has
captured all of the necessary shots for the action photo.
3. Make any necessary adjustments.
4. Select
to take a photo.
Customise the camera settings
Before taking a photo, select
options:
to access the following
Option
Function
Self shot
Switch between the front and rear
camera lenses.
50
entertainment
Option
Function
Option
Function
Flash
Change the flash setting. You can
manually turn the flash on or off or set
the camera to automatically use the
flash when needed.
White balance
Adjust the colour balance according to
the lighting conditions.
ISO
Shooting mode
Change the shooting mode.
Adjust the sensitivity of the camera
imaging sensor.
Scene mode
Change the scene mode.
Metering
Select a type of exposure metre.
Exposure value
Adjust the exposure value.
Focus mode
Take close-up photos or set the
camera to automatically focus on the
subject or on human faces.
Timer
Select the length of the delay before
the camera takes a photo.
Effects
Apply special effects, such as sepia or
black and white tones.
Resolution
Change the resolution option.
51
Outdoor visibility Activate Outdoor visibility to select the
appropriate lighting condition.
Anti-Shake
Reduce the blur caused by the
phone’s vibration or movement.
Auto contrast
Automatically adjust the contrast
between your subject and the
background.
Blink detection
Set the camera to alert you when
people close their eyes.
Option
Function
Capturing video
Guidelines
Display the guidelines on the preview
screen.
To capture a video:
Review
Set the camera to display the taken
image.
Image quality
Set the quality level for your photos.
2. Drag the slider in the bottom right corner to the
camcorder icon to switch to the camcorder.
GPS tag
Set the camera to include the location
information for your photos. To use
this feature, you must activate the
location services. ► p. 93
Select a memory location for storing
captured photos.
Reset
Reset menus and shooting options.
3. Aim the lens at the subject and make any necessary
adjustments.
entertainment
Storage
1. In Idle mode, select Applications → Camera.
1
3
4
5
6
2
52
Number Function
Change the camcorder settings.
2
Open the image viewer to view the videos you
have recorded.
3
Use the camcorder shortcuts.
• : Change the flash setting.
• : Change the recording mode or switch
between the front and rear camera lenses.
You can add or remove shortcuts to frequently
used options. ► p. 55
entertainment
1
53
4. Press the Volume key to zoom in or out.
You can also tap the screen with two fingers and spread
them apart (move your fingers closer together to zoom
out).
The zoom functionality might not be available when
you are recording at the highest resolution.
5. Select
to start recording.
to stop recording.
6. Select
The video is saved automatically.
4
Check the camcorder status.
•
: The length of the video that can
be recorded (according to the available
memory).
•
: Default storage location.
5
Switch to the camera.
After recording videos, select the image viewer icon to view
the recorded videos.
6
Record a video.
• View more videos: Scroll left or right.
The camcorder might not be able to record videos
properly to a memory card with a slow transfer
speed.
• Send a video to others: Select Share.
• Play a video: Select Play.
• Delete a video: Select Delete.
Customise the camcorder settings
to access the following
Function
Resolution
Change the resolution option.
White balance
Adjust the colour balance according
to the lighting conditions.
Outdoor Visibility Activate Outdoor visibility to select an
appropriate lighting condition.
Video quality
Set the quality level for your videos.
Guidelines
Display the guidelines on the preview
screen.
Review
Set the camera to display the
recorded video.
Adjust the exposure level.
Storage
Select the length of the delay before
the camera starts recording a video.
Select a memory location for storing
recorded videos.
Reset
Reset the menus and shooting
options.
Option
Function
Flash
Change the flash setting. You can
manually turn the flash on or off.
Recording mode
Change the recording mode.
Exposure value
Timer
Effects
Apply a special effect, such as sepia
or black and white tones.
54
entertainment
Before capturing a video, select
options:
Option
To edit the shortcut icons:
You can add or remove shortcuts to frequently used options.
1. From the preview screen, press [
] → Edit
shortcuts or tap and hold the shortcut area.
• Some file formats are not supported depending on
the software of the phone.
• If the file size exceeds the available memory, an
error can occur when you open files.
entertainment
2. Tap and hold an icon in the option list and drag it to the
shortcut area.
To remove shortcuts, tap and hold an icon and drag it to
the option list.
To play a video:
3. Press [
3. Rotate the phone counter-clockwise to switch to the
landscape view.
] to return to the preview screen.
Video Player
You can use the video player to play various kinds of videos.
The video player supports the following file formats: 3gp,
mp4, avi, wmv, flv, mkv (Codec: MP4, G4, H.263, H.263
Sorenson, H.264, VC-1, and DivX, XviD).
55
1. In Idle mode, select Applications → Videos.
2. Select the video that you want to play.
4. Control the playback with the following icons:
Icon
Function
Change a ratio of the video screen.
Skip backward. Scan backward in a file (tap and
hold).
Icon
If your phone indicates that the memory is full when
you access Gallery, delete some of the files using
My Files or other file management applications and
try again.
Function
Pause playback or select
playback.
to resume
Skip forward. Scan forward in a file (tap and
hold).
Supported File Formats
Your phone supports the following file formats:
entertainment
Activate the 5.1 channel surround sound system
when a headset is connected.
Adjust the volume.
Type
Format
Stop the playback and return to the playlist.
Image
bmp, gif, jpg, and png
Video
3gp, mp4, avi, wmv, flv, mkv (Codec: MP4, G4,
H.263, H.263 Sorenson, H.264, VC-1, and
DivX, XviD).
Gallery
You can view photos and play videos saved in your phone’s
memory or on a memory card.
56
entertainment
• Avoid locking the phone’s screen while playing a
DivX Video-On-Demand. Each time you lock the
screen while playing a DivX Video-On-Demand,
one of your available rental counts will be
decremented.
• Some file formats are not supported depending on
the software of the phone.
• If the file size exceeds the available memory, an
error can occur when you open files.
To view a photo in Gallery:
1. In Idle mode, select Applications → Gallery.
2. Select a folder.
3. To change the view mode, select
right of the screen.
or
4. Select a photo (without an icon) to view.
57
at the top
While viewing a photo, use the following options:
• View more photos: Scroll left or right.
• Zoom in or out: Tap the screen with two fingers and
spread them apart to zoom in (move your fingers closer
together to zoom out).
If you activated the tilting motions, you can zoom in or
out by tapping and holding two points with your
fingers and then tilting the phone back and forth.
• Send a photo to others: Select Send via.
• Set a photo as wallpaper: Select Set as to set a photo
as wallpaper or as a caller ID image for a contact.
• Delete a photo: Press [
] → Delete.
• Start a slideshow in the selected folder: Press [
]
→ More → Slideshow. Tap the screen to stop the
slideshow.
To play a video in Gallery:
1. In Idle mode, select Applications → Gallery.
2. Select a video (with the
icon) to play.
3. Rotate the phone counter-clockwise to switch to the
landscape view.
• To reverse the selection, select
→ Inverse
selection.
• To change the selection size, select
.
• To rotate or flip the image, select .
• To crop the image, select .
• To undo or redo your last action, select
or .
4. Drag your finger over the area that you want to select.
Photo Editor
to apply a colour effect or select
5. Select
a filter effect.
You can edit photos and apply various effects.
6. Select a variation of the effect to apply.
1. In Idle mode, select Applications → Photo editor.
7. Adjust the image as needed (if necessary) and select
Done.
2. Select Select picture and select an image.
3. Select
→ New selection → OK.
• To add to or subtract from the selection border,
select
→ Add to selection or Remove from
selection.
8. When you are finished, press [
to apply
] → Save.
58
entertainment
4. Control the playback with the virtual keys. ► p. 55
Video Maker
4. Select a frame theme and select Apply.
You can edit videos and apply various effects. The video
editor supports the following video resolutions and codecs.
5. Select an appropriate icon in the left pane of the screen
to add media files.
Type
Format
entertainment
Resolutions 176 x 144, 320 x 240, 640 x 480, 720 x
480, 1280 x 720
Codecs
H.264, H.263, MPEG4
Some video files in the Gallery might not be viewable
depending on the video resolutions and codecs.
To create a video:
1. In Idle mode, select Applications → Video maker.
2. Rotate the phone counter-clockwise to switch to the
landscape view.
3. Select New.
59
6. Tap and hold a file and then drag it to the bottom pane
of the screen and select Done.
• To add more files, repeat Step 6.
• To select the duration that an image displays, drag
the image to the red line and select the Duration icon
on the preview screen.
• To delete images or videos, tap and hold an item and
then drag it to the trash bin.
• To rearrange the images or videos, tap and hold an
item and drag it to a new location.
7. Select
and add a transition effect between the
images or videos.
8. When you are finished, press [
] → Save.
To trim a segment of a video:
5. Save the edited video.
1. Launch the video editor and add media files.
To apply an effect to a video:
2. Select
1. Launch the video editor and add media files.
.
3. Drag an image or video to the red line.
2. Select
4. Move the start bracket to the point at which you want
the file to begin.
3. Drag an image or video to the red line.
5. Move the end bracket to the point at which you want the
file to end.
5. Save the edited video.
To split a video:
1. Launch the video editor and add media files.
2. Select
.
3. Drag an image or video to the red line.
4. Select an effect option.
entertainment
6. Save the edited video.
.
Music
You can listen to music using the music player. The music
player supports the following file formats: MP3, MP4, 3GP,
WMA, OGG, WAV, AAC, AAC+, eAAC+, AMR, MIDI, SPMIDI and i-melody.
4. Move to the point at which you want to divide the file into
two clips and select .
60
• Some file formats are not supported depending on
the software of the phone.
• If the file size exceeds the available memory, an
error might occur when you open files.
To add music files to your phone:
entertainment
Start by transferring files to your phone or memory card:
•
•
•
•
Download from the web. X p. 29
Download from a PC with Samsung Kies. X p. 94
Receive using Bluetooth. X p. 85
Copy to your memory card. X p. 94
To play music files:
1. In Idle mode, select Applications → Music.
2. Select a music category.
3. Select a music file.
61
4. Control playback with the following icons:
Icon
Function
Adjust the volume.
Activate the 5.1 channel surround sound system
when a headset is connected.
Activate Shuffle mode. (Displays when you tap
the player screen.)
Change the repeat mode (off, repeating a file, or
repeating all files). (Displays when you tap the
player screen.)
Skip backward or scan backward in a file (tap
and hold).
Pause playback or select
playback.
to resume
Skip forward or scan forward in a file (tap and
hold).
To create a playlist:
1. In Idle mode, select Applications → Music.
2. Select Playlists.
3. Press [
] → Create.
During playback, you can add files to a playlist by pressing
] → Add to playlist.
[
To add songs to the quick list:
You can add songs to the quick list and save them as a
playlist. During playback, press [
] → Add to quick list
to add the current song to the quick list.
To go to the quick list, from the music player main screen,
select Playlists → Quick list. To save the quick list as a
] → Save as playlist.
playlist, press [
entertainment
• SRS CS Headphone™ delivers a 5.1 surround
sound experience over standard headphones or
earbuds when listening to multichannel content,
such as DVD movies.
• WOW HD™ significantly improves the playback
quality of audio, delivering a dynamic 3D
entertainment experience with deep, rich bass and
high frequency clarity for crisp detail.
To customise the music player settings:
1. In Idle mode, select Applications → Music.
2. Press [
] → Settings.
4. Enter a title for the new playlist and select Save.
5. Select Add music.
6. Select the files that you want to include and select Add.
62
3. Adjust the following settings to customise your music
player:
Option
Function
Equalizer
Select a default equaliser type.
Sound effect Select a sound effect.
entertainment
Music menu
Select music categories to display on the
music library screen.
Visualisation Display an animated visualisation during
playback.
Music Hub
You can access the online music store and search for and
buy your favourite songs.
This feature might not be available depending on your
region or service provider.
1. In Idle mode, select Applications → Music Hub.
2. If you are launching this application for the first time,
select the checkbox next to Do not show for 90 days
and select Confirm.
3. Search for songs and preview or buy your favourite
songs.
FM Radio
You can listen to music and news on the FM radio. To listen
to the FM radio, you must connect the supplied headset,
which serves as the radio antenna.
To listen to the FM radio:
1. Plug the supplied headset into the phone.
63
2. In Idle mode, select Applications → FM Radio.
The FM radio automatically scans for and saves the
available stations.
The first time you turn on the FM radio, it will start
automatic tuning.
4. Control the FM radio with the following keys:
4
2
5
entertainment
3. Select the radio station that you want to listen to from
the all station list and press [ ] to return to the FM
radio screen.
1
2
3
5.
Number Function
1
Turn the FM radio on or off.
2
Search for an available radio station.
64
Number Function
2. In Idle mode, select Applications → FM Radio.
3. Select
to turn on the FM radio.
3
Add the current radio station to the favourites
list.
4
Adjust the volume.
5. Select
5
Fine-tune the frequency.
To customise the FM radio settings:
4. Scroll to a radio station to which you want to listen.
to add it to the favourites list.
entertainment
To automatically save a radio station:
1. In Idle mode, select Applications → FM Radio.
1. Plug the supplied headset into the phone.
2. Press [
2. In Idle mode, select Applications → FM Radio.
3. Adjust the following settings to customise your FM
radio:
3. Press [
] → Scan and select a scanning option.
The FM radio automatically scans and saves available
stations.
4. Select a radio station in the all station list and press
[ ] to return to the FM radio screen.
To add a radio station to the favourites list:
1. Plug the supplied headset into the phone.
65
] → Settings.
Option
Function
Region
Select your region.
Option
Function
Background Set whether or not to run the FM radio in
playing
the background while using other
applications. If this feature is on, you can
control the FM radio from the shortcuts
panel.
Set whether or not to show the station ID
on the FM radio screen. Station IDs are
only available from radio stations that
provide this information.
Alternative
frequency
Set whether or not the FM radio attempts
to retune a radio station when the signal is
weak.
FM auto off
Set the FM radio to automatically turn off
after a specified amount of time.
You can play social and premium games.
1. In Idle mode, select Applications → Game Hub.
2. If you are launching this application for the first time,
select the checkbox next to Do not show for 90 days
and select Confirm.
3. Select and install a game.
4. Follow the on-screen instructions.
• Available games might vary depending on your
region or service provider.
• Controls and options in games might vary.
66
entertainment
Show
Station ID
Game Hub
personal
information
Contacts
You can use contact cards and groups to store personal
information in the phone’s memory or on a SIM card. You
can save names, mobile phone numbers, home phone
numbers, email addresses, birthdays, and more for your
contacts.
To create a contact from the contact list:
1. In Idle mode, select Contacts.
2. Select
.
3. Select a memory location. If you have more than one
account, select the account to which you want to add
the contact.
4. Enter the contact information.
5. Select Save to add the contact card to memory.
To create a contact from the dialer screen:
1. in Idle mode, select Phone → Keypad.
67
2. Enter a phone number.
3. Select Add to Contacts → Create contact.
4. Select a memory location. If you have more than one
account, select the account to which you want to add
the contact.
5. Enter the contact information.
To find a contact:
1. In Idle mode, select Contacts.
2. Scroll up or down in the contact list. You can also drag
your finger along the index on the right side to quickly
scroll through the list.
1. In Idle mode, select Contacts.
2. Press [
] → More → Speed dial setting.
3. Select a location number and then select a contact.
4. Select a phone number (if necessary).
You can quickly dial this number by tapping and
holding the location number in the dialling screen.
To create your namecard:
1. In Idle mode, select Contacts.
3. Select a contact’s name.
Once you have found a contact, you can use the following
options:
2. Press [
] → My profile.
3. Press [
] → Edit.
• Call the contact: Select
4. Enter your personal details.
or
.
] → Edit.
To set a speed dial number:
personal information
6. Select Save to add the contact to memory.
• Send a message: Select
.
• Edit the contact information: Press [
68
5. Select Save.
You can send your namecard by attaching it to a
message or email or by transferring it using
Bluetooth.
To retrieve contacts from your community accounts:
personal information
You can view the list of community website accounts and
select an account to add a contact from the website to your
phone contacts.
1. In Idle mode, select Contacts.
2. Press [
] → More → View friends.
3. Select an account.
4. Select contacts and select Add.
You can add comments to messages uploaded by your
contacts and view their shared photos. In Idle mode, open
the application list and select Contacts, select a contact,
and select Activities or Media.
69
To create a group of contacts:
By creating groups of contacts, you can manage multiple
contacts and send messages or email to an entire group.
Start by creating a group.
1. In Idle mode, select Contacts.
2. Scroll left or right to Groups.
3. Press [
] → Create.
4. Enter a name and select a ringtone for the group.
5. Select Add member, select the contacts that you want
to add to the group, and select Add.
6. Select Save.
To copy contacts:
You can copy contacts from the SIM card to your phone.
1. In Idle mode, select Contacts.
2. Press [
card.
] → Import/Export → Import from SIM
3. Select a memory location. If you have more than one
account, select the account to which you want to add
the contact.
To import contacts:
You can import contact files (in vcf format) from a memory
card to your phone.
1. In Idle mode, select Contacts.
2. Press [
card.
] → Import/Export → Import from SD
3. Select a memory location. If you have more than one
account, select the account to which you want to add
the contact.
5. Select the contact files that you want to import and
select OK.
To export contacts:
1. In Idle mode, select Contacts.
2. Press [
card.
personal information
4. Select the contacts that you want to copy and select
Import → OK.
4. Select an option for importing a single contact file,
multiple contact files, or all contact files, and select OK.
] → Import/Export → Export from SD
3. Select OK to confirm.
Calendar
You can create and manage daily, weekly, or monthly
events, and set alarms to remind yourself of important
events.
To create an event:
1. In Idle mode, select Applications → Calendar.
70
2. Select Tap to create event or press [
] → Create.
3. Select an event to view its details.
3. Enter the details of the event as required.
You can send the event to others by pressing [
→ Send via and selecting an option.
4. Select Save.
To change the calendar view:
1. In Idle mode, select Applications → Calendar.
]
To stop an event alarm:
personal information
2. Select a view mode at the top of the calendar.
If you set an alarm for a calendar event, the event alarm
icon will appear at the specified time.
To view events on a specific date:
1. Open the shortcuts panel from the top of the screen.
1. In Idle mode, select Applications → Calendar.
2. Select a reminder to view more details about the event.
2. Select a date on the calendar. In the month view, days
with scheduled events are indicated by a small square.
To move to a specific day by entering a date manually,
press [
] → Go to, enter the date by selecting +
or -, and select Set.
To select today's date, press [
] → Today.
3. To snooze or dismiss the reminder, select Snooze all or
Dismiss all.
71
Task
You can record important information to save and view it at a
later date.
To create a task:
To create a memo:
1. In Idle mode, select Applications → Task.
1. In Idle mode, select Applications → Memo.
2. Select Create task or press [
a task.
2. If a memo has been saved, select Create memo or
] → Create to create a memo.
press [
] → Create to create
3. Enter your memo text.
4. Select Save.
4. Select Save.
To view a task:
To view memos:
1. In Idle mode, select Applications → Task.
2. Press [
tasks.
] → List by and select an option to sort the
3. Select a task to view its details.
For completed tasks with an expired deadline, you can
set their status to completed by selecting the checkbox.
Memo
personal information
3. Enter the details of the task.
1. In Idle mode, select Applications → Memo.
] → Search or press and hold [
2. Press [
search for a memo (if necessary).
] to
3. Select a memo to view its details.
To edit the memo, select
.
You can send the memo to others by tapping and
holding the memo and selecting Send.
You can record important information to save and view later.
72
Voice Recorder
You can use your phone’s voice recorder to record and play
voice memos.
To record a voice memo:
1. In Idle mode, select Applications → Voice recorder.
personal information
2. Select Record to start recording.
3. Speak into the microphone.
4. When you are finished, select Stop. Your memo is
saved automatically.
5. To record more voice memos, select Record again.
To play a voice memo:
1. In Idle mode, select Applications → Voice recorder.
2. Select List.
3. Select the voice memo that you want to play.
73
You can send the voice memo to others by pressing
[
] → Share.
web
Internet
You can access and bookmark your favourite web pages.
• You might incur additional charges for accessing
the web and downloading media. For details,
contact your service provider.
• Available icons can vary depending on your region.
To browse web pages:
1. In Idle mode, select Applications → Internet. The
preset homepage opens.
To access a specific web page, select the URL input
field, enter the web address (URL) of the web page and
select .
74
2. Navigate web pages using the following keys:
1
2
Number Function
1
Enter the web address of the web page that you
want to access.
2
Open a list of saved bookmarks, frequently visited
pages, and recent internet history.
web
While browsing web pages, you can use the following
options:
• Zoom in or out: Tap on the screen with two fingers and
spread them apart (move your fingers closer together to
spread them out).
The screen above might be different on your phone,
depending on your region and service provider.
If you activated the tilting motions, you can zoom in or
out by tapping and holding two points with your
fingers and then tilting the phone back and forth.
• Open a new window: Press [
75
] → New Window.
• Send web address (URL) of web page to others:
] → More → Share page.
Press [
• View download history: Press [
] → More →
Downloads.
• Customize browser settings: Press [
] → More →
Settings.
• Print current web page or screen: Press [
]→
More → Print to print the current web page or screen
using a connected printer. Your phone is only compatible
with Samsung printers.
To search for information by voice:
This feature might not be available depending on your
region or service provider.
1. In Idle mode, select Applications → Internet.
2. Select the URL input field.
76
web
• View currently active windows: Press [
]→
Windows. You can open multiple pages and switch back
and forth between them.
• Adjust screen brightness: Press [
] → Browser
Brightness. This feature might not be available,
depending on your region.
]→
• Reload the current web page: Press [
Refresh.
] → Forward.
• Go to next page in history: Press [
• Bookmark the current web page: Press [
]→
More → Add bookmark.
• Add shortcut to current web page to the Idle screen:
Press [
] → More → Add shortcut to Home.
• Search for text on web page: Press [
] → More →
Find on page.
• View web page details: Press [
] → More → Page
info.
3. Select
and say a keyword into your phone’s
microphone. The phone searches for information and
web pages related to the keyword.
To bookmark your favourite web pages:
If you know the web address of the web page, you can
manually add a bookmark.
web
1. In Idle mode, select Applications → Internet.
2. Select
→ Bookmarks.
3. Select Add or press [
page.
] → Bookmark last-viewed
4. Enter a page title and a web address (URL).
5. Select OK.
In the bookmark list, tap and hold a bookmark and use the
following options:
• Open web page in current window: Select Open.
77
• Open web page in new window: Select Open in new
window.
• Edit bookmark details: Select Edit bookmark.
• Add bookmark shortcut to Idle screen: Select Add
shortcut to Home.
• Send web address (URL) to others: Select Share link.
• Copy web address URL: Select Copy link URL.
• Delete bookmark: Select Delete bookmark.
• Use web page as browser homepage: Select Set as
homepage.
To access frequently visited pages or recent history:
1. In Idle mode, select Applications → Internet.
2. Select
→ Most visited or History.
3. Select a web page to access.
You can add a web page to the bookmark list by
selecting .
Google Maps™
You can use Google Maps to find your location, search the
online map for streets, cities, or countries, and get
directions.
To search for a specific location:
1. In Idle mode, select Applications → Maps.
2. If you are launching this application for the first time,
select OK. The map will display your current location.
3. Press [
To get directions to a specific destination:
1. In Idle mode, select Applications → Maps.
2. Press [
] → Directions.
3. Enter the addresses of the starting location and the
ending location.
To enter an address from your contact list or to point to a
location on the map, select → Contacts or Point on
map.
4. Select a travel method (car, bus, or walk) and select Go.
] → Search.
4. Enter a keyword for the location and select
View a list of all search results: Select .
Search for location by voice: Select .
Zoom in or out: Select
or
.
Search for places around you: Select .
Add layers to map: Select .
View current location: Select .
web
• This feature might not be available in your region.
• To use Google Maps, you must select
Applications → Settings → Location and
security → Use wireless networks or Use GPS
satellites.
•
•
•
•
•
•
.
5. Select a travel route to view the details of your trip (if
necessary).
78
6. Select . The route is indicated on the map. To view
or
.
only a single part of the route, select
7. When you are finished, press [
] → Clear Map.
Latitude
To share your location using Google LatitudeTM:
web
You can share your location with your friends and view your
friend’s locations using Google LatitudeTM.
1. In Idle mode, select Applications → Latitude. The
phone automatically joins Latitude.
2. Select
→ Select from contacts or Add via email
address.
3. Select the friends that you want to add or enter an email
address and select Add friends.
4. Select Yes. When your friend accepts your invitation,
you can share locations.
79
5. Press [
] → See map. Your friends’ locations are
indicated by their photos on the map.
Places
You can search for a place around you.
This feature might not be available depending on your
region or service provider.
1. In Idle mode, select Applications → Places.
2. Select a category. Your phone searches for places
around your current location that are related to the
selected category.
3. Select a place name to view its details.
4. To view the place on the map, select
To view the route to the place, select
.
.
Navigation
You can use the GPS navigation system to find and show
your destination with voice guidance.
This feature might not be available depending on your
region or service provider.
Google Search
You can search for information on you phone or on websites
using the Google Search service. The Google Search bar is
added to your Idle screen by default.
2. If you are launching this application for the first time,
select Accept.
1. In Idle mode, select Applications → Google Search.
3. Enter your destination using one of the following
methods:
• Speak Destination: Speak your destination (e.g.,
“Navigate to destination”).
• Type Destination: Enter your destination using the
virtual keypad.
• Contacts: Select your destination from the
addresses of your contacts.
3. Select the item’s name in the results list.
2. Enter a keyword to search for.
YouTube™
YouTube is a free online video streaming service. You can
view and share videos using YouTube.
This feature might not be available depending on
your region or service provider.
80
web
1. In Idle mode, select Applications → Navigation.
• Starred Places: Select your destination from your
list of starred places.
To watch videos on YouTube:
1. In Idle mode, select Applications → YouTube.
2. If you are launching this application for the first time,
select Accept.
3. Select a video in the list.
web
4. Rotate the phone counter-clockwise to switch to the
landscape view.
5. Control playback using the icons on the screen.
To share videos on YouTube:
1. In Idle mode, select Applications → YouTube.
2. Select a video.
2. Press [
] → Upload and select a video. Skip to
Step 8.
If you want to upload new videos, select
to turn on
the camera.
3. Aim the lens at the subject and make any adjustments.
4. Select
to start recording.
5. Select
to stop recording.
6. Select Save to upload the video that you have recorded.
7. Enter your user name and password and select Sign in
(if necessary).
8. Enter the details of the upload and select Upload.
3. Select More → Share and select an option.
Samsung Apps
To upload videos to YouTube:
Samsung Apps allows you to simply and easily download an
abundance of applications directly to your phone. Featuring
a wealth of games, news, references, social networking,
1. In Idle mode, select Applications → YouTube.
81
navigation, health related applications, etc. Samsung Apps
gives you instant access to a huge choice of mobile
experience.
Your phone gets smarted with fully optimised applications
from Samsung Apps. Explore amazing applications and
make your mobile life even better.
1. In Idle mode, select Applications → Samsung Apps.
2. Search for an download applications as required.
Market
You can download games, ringtones, or other applications
from the Android Market.
1. In Idle mode, select Applications → Market.
2. Search for a file and download it to the phone. ► p. 28
Readers Hub
You can use the integrated Readers Hub to access various
reading materials.
This feature might not be available depending on
your region and service provider.
1. In Idle mode, select Applications → Readers Hub.
2. If you are launching this application for the first time,
select the checkbox next to Skip this screen for 90
days and select Confirm.
82
web
• This feature might not be available depending on
your region and service provider.
• For details, please visit www.samsungapps.com.
This feature might not be available depending on
your region and service provider.
3. Select an image of reading material.
4. Search for and download reading material from the
online store.
News & Weather
You can change the location to view the weather
information for another region. Press [
]→
Settings → Weather settings and clear the
checkbox next to Use my location. Then select a
location in Set location.
web
You can view weather information and read top news and
other stories.
To read news articles:
To view the weather information:
2. Scroll left to a news topic at the top of the screen.
1. In Idle mode, select Applications → News & Weather.
2. Select Weather at the top of the screen. Your phone
searches for your current location and displays the
current weather information.
83
1. In Idle mode, select Applications → News & Weather.
3. Select an article to open it.
To add news topics, press [
] → Settings →
News settings → Select news topics.
Zoom Pass
You can securely send and receive money using your
phone.
1. In Idle mode, select Applications → Zoom Pass.
2. Follow the instructions on the screen.
web
84
connectivity
Bluetooth
Bluetooth is a short-range wireless communications
technology capable of exchanging information over a
distance of about 10 metres without requiring a physical
connection.
You do not need to line up the phones to beam information
with Bluetooth. If the phones are within range of one
another, you can exchange information between them even
if they are located in different rooms.
• Samsung is not responsible for the loss,
interception, or misuse of data sent or received
using the Bluetooth wireless feature.
• Always ensure that you share and receive data with
phones that are trusted and properly secured. If
there are obstacles between the phones, the
operating distance might be reduced.
85
• Some devices, especially those that are not tested
or approved by Bluetooth SIG, might not be
compatible with your phone.
To turn on the Bluetooth wireless feature:
2. Select Bluetooth to turn on the Bluetooth wireless
feature.
Some devices, especially headsets or hands-free car
kits, might have a fixed Bluetooth PIN, such as 0000.
If the other device has a PIN, you must enter it.
To find and pair with other Bluetooth-enabled phones:
To send data using the Bluetooth wireless feature:
1. In Idle mode, select Applications → Settings →
Wireless and network → Bluetooth settings →
Search for devices.
1. Select a file or item, such as a contact, calendar event,
memo, or media file, from an appropriate application or
from My files.
2. Select a device.
3. Enter a PIN for the Bluetooth wireless feature or the
other device’s Bluetooth PIN (if it has one), and select
2. Select an option for sending data via Bluetooth.
The method of selecting an option might vary by data
type.
86
connectivity
1. In Idle mode, select Applications → Settings →
Wireless and network → Bluetooth settings.
OK. Alternatively, select Accept to match the PIN
between your phone and the device.
When the owner of the other device enters the same
PIN or accepts the connection, pairing is complete. If
the pairing is successful, the device will automatically
search for available services.
3. Search for and pair with a Bluetooth-enabled device.
Wi-Fi
To receive data using the Bluetooth wireless feature:
You can use your phone’s wireless networking capabilities
to activate and connect to any wireless local area network
(WLAN) compatible with the IEEE 802.11 b/g/n standards.
You can connect to the internet or other network devices
anywhere an access point or wireless hotspot is available.
connectivity
1. In Idle mode, select Applications → Settings →
Wireless and network → Bluetooth settings →
Visible.
Your phone is visible to other Bluetooth phones for 120
seconds.
2. When prompted, enter the PIN for the Bluetooth
wireless feature and select OK (if necessary).
3. Select Accept to confirm that you are willing to receive
data from the device.
Received data is saved to the Bluetooth folder. If you
receive a contact, it is automatically saved to the
phonebook.
87
Your phone uses non-harmonised frequency and
therefore some countries might restrict the use of a
WLAN.
To activate the WLAN feature:
1. In Idle mode, select Applications → Settings →
Wireless and network → Wi-Fi settings → Wi-Fi.
An active WLAN running in the background will
consume battery power. To preserve battery power,
only activate the WLAN when needed.
To find and connect to a WLAN:
4. Select Save.
• In Idle mode, select Applications → Settings →
Wireless and network → Wi-Fi settings.
The phone will automatically search for available
WLANs.
To connect to a WLAN using a Wi-Fi Protected Setup
(WPS):
2. Select a network under Wi-Fi networks.
4. Select Connect.
To add a WLAN manually:
1. In Idle mode, select Applications → Settings →
Wireless and network → Wi-Fi settings.
connectivity
3. Enter a password for the network (if necessary).
Using WPS, you can connect to a secured network.
2. Select WPS button connection.
3. Press a WPS button on the access point within 2
minutes.
1. In Idle mode, select Applications → Settings →
Wireless and network → Wi-Fi settings → Add Wi-Fi
network.
To connect to a WLAN with a WPS PIN:
2. Enter the SSID for the network and select the security
type.
2. Select a network indicated by the WPS icon and select
WPS PIN.
3. Set the security settings depending on the selected
security type.
1. In Idle mode, select Applications → Settings →
Wireless and network → Wi-Fi settings.
3. At the access point, enter the PIN and press the start
button.
88
Wi-Fi Direct
To send data via a WLAN:
You can use the WLAN Direct feature to connect to devices
via a WLAN without requiring an access point.
1. Select a file or item, such as a memo, media file, or web
address, from an appropriate application or from My
files.
To connect your phone to another WLAN device:
connectivity
1. In Idle mode, select Applications → Settings →
Wireless and network → Wi-Fi Direct settings → OK
→ Wi-Fi Direct.
2. Press [
] → Scan.
3. Select a phone and select Connect. When the owner of
the other phone accepts the connection, pairing is
complete.
4. To deactivate the WLAN Direct feature, select
Disconnect Wi-Fi Direct.
89
2. Select an option for sending data via a WLAN.
The method of selecting an option might vary by data
type.
3. Search for and select a WLAN device.
To receive data via a WLAN:
When prompted, select OK to confirm that you are willing to
receive data. Received data is saved to the ShareViaWiFi
folder.
AllShare
You can use the Digital Living Network Alliance (DLNA)
service to share media files between DLNA-enabled phones
in your home over a WLAN.
You must first activate the WLAN feature and add a WLAN
profile. ► p. 87
3. Adjust the following settings to customise the DLNA
feature:
Function
Device name
Enter a name for your phone as a media
server.
Share video
Turn on video sharing with other DLNAenabled phones.
To customise DLNA settings for sharing media files:
To allow other DLNA-enabled phones to access media files
on your phone, you must activate media sharing.
Some files might not play on the DLNA-enabled
phones depending on the phones.
1. In Idle mode, select Applications → AllShare.
2. Press [
] → Settings.
Share picture Turn on image sharing with other DLNAenabled devices.
Share audio
Turn on music sharing with other DLNAenabled devices.
Upload from
other device
Set whether or not to accept the upload
from other device.
Default
memory
Select the default memory location for
saving downloaded media files.
Subtitles
Set to display subtitles.
90
connectivity
Option
To play your files on another DLNA-enabled phone:
1. In Idle mode, select Applications → AllShare.
2. Select My device.
3. Select a media category and a file.
connectivity
4. Select a player (the one that will play the media file).
Playback begins on the selected player.
5. Control playback using the icons on your phone.
Playback might be buffered, depending on the
network connection and the connected server.
To play files from one phone on another phone:
1. In Idle mode, select Applications → AllShare.
2. Select Remote device.
Your phone automatically searches for DLNA-enabled
phones.
91
3. Select a phone as the media server (the one that
contains media files).
4. Select a media category and a file.
5. Select a player (the one that will play the media file).
Playback begins on the selected player.
6. Control playback using the icons on your phone.
Mobile Network Sharing
You can use your phone as a wireless modem or wireless
access point for PCs or other devices and share your
phone’s mobile network connection.
To share your phone’s mobile network via WLAN:
1. In Idle mode, select Applications → Settings →
Wireless and network → Tethering and portable
hotspot.
2. Select Portable Wi-Fi hotspot settings → OK.
3. Select Portable Wi-Fi hotspot to activate the WLAN
hotspot.
4. Select Configure portable Wi-Fi hotspot to customise
the WLAN hotspot.
Option
Function
Security
Select the security type.
3. Select USB tethering to activate the USB tethering
feature.
Your phone shares the mobile network connection on
your PC.
To stop sharing the network connection, clear the
checkbox next to USB tethering.
The sharing method for the network connection might
differ depending on your PC’s operating system.
5. When you are finished, select Save.
6. From another phone, locate your phone’s name in the
available connection list and connect to the network.
Your phone shares the mobile network connection on
the other phone.
To share your phone’s mobile network via USB:
1. Using a PC data cable, connect the multifunction jack
on your phone to a PC.
GPS
Your phone is equipped with a global positioning system
(GPS) receiver. You need to activate the location services to
use the GPS.
92
connectivity
Network SSID View and edit the phone name that will be
shown to external devices.
2. In Idle mode, select Applications → Settings →
Wireless and network → Tethering and portable
hotspot.
To receive better GPS signals, avoid using your phone in the
following conditions:
• Between buildings, in tunnels or underground passages,
or inside buildings.
• In poor weather.
• Around high voltage or electromagnetic fields.
connectivity
Do not touch the internal antenna area or cover this
area with your hands or other objects while using
GPS functions.
This feature might not be available depending on your
region or service provider.
To activate location services:
You must activate the location services to receive location
information and search the map.
1. In Idle mode, select Applications → Settings →
Location and security.
93
2. Adjust the following settings to activate the location
services:
Option
Function
Use wireless
networks
Set to use WLAN and/or mobile networks
to find your location.
Use GPS
satellites
Set to use the GPS satellite to find your
location.
Use sensor
aiding
Use sensors to enhance pedestrian
positioning when the GPS signal is
obstructed. There might be variations
between the sensor estimates and your
actual location.
PC Connections
You can connect your phone to a PC with an optional PC
data cable in various USB connection modes. By connecting
the phone to a PC, you can transfer data to and from your
phone directly and use the Samsung Kies program.
To connect with Samsung Kies:
Ensure that Samsung Kies is installed on your PC. You can
download the program from the Samsung website
(www.samsung.com).
The file directory of the memory card will appear as a
removable disk, separate from the internal memory.
1. If you want to transfer files to or from a memory card,
insert a memory card into the phone.
connectivity
1. Using a PC data cable, connect the multifunction jack
on your phone to the PC.
Samsung Kies will launch automatically.
If Samsung Kies does not launch automatically, doubleclick on the Samsung Kies icon on your PC.
the phone, you can access the file directory of the memory
card using the phone as a memory card reader.
2. In Idle mode, select Applications → Settings →
Wireless and network → USB utilities → Connect
storage to PC.
3. Select OK to confirm (if necessary).
2. Copy files from the PC to your phone.
Refer to the Samsung Kies help for more information.
4. Using an optional PC data cable, connect the
multifunction jack on your phone to a PC.
To connect as a mass storage phone:
5. When connected, select Connect USB storage.
You can connect your phone to a PC as a removable disk
and access its file directory. If you insert a memory card into
6. Select OK to confirm (if necessary).
7. Open the folder to view the files.
94
8. Copy files from the PC to the memory card.
9. When you are finished, select Disconnect storage
from PC.
connectivity
To disconnect the phone from the PC, click the USB
phone icon in the Windows task bar and select the
option to safely remove the mass storage phone.
Then remove the PC data cable from the PC.
Otherwise, you might lose data stored on the
memory card or damage the memory card.
Your phone should already be configured with
internet access. If you have trouble accessing the
internet, you need to edit the connections. If you are
not sure about what connection information to enter,
ask your service provider.
To set up VPN connections:
1. In Idle mode, select Applications → Settings →
Wireless and network → VPN settings → Add VPN.
2. Select a VPN type.
VPN connections
You can create virtual private networks (VPN) and connect
to your private network securely through a public network,
such as the internet.
95
3. Customise the connection information.
Available options might vary depending on the VPN
type.
Option
Function
VPN name
Enter the name of the VPN server.
Function
Option
Function
Set VPN
server
Enter the IP address of the VPN server.
Set CA
certificate
Enable
Encryption
Set to encrypt the VPN server.
Select a certificate authority (CA)
certificate that the VPN server uses to
identify you. You can import certificates
from the VPN server or download them
from the web.
DNS search
domains
Enter the domain name server (DNS)
address.
Set IPsec pre- Enter a pre-shared key.
shared key
Enable L2TP
secret
Set to use the L2TP secret password.
Set L2TP
secret
Enter the L2TP secret password.
Set user
certificate
Select a user certificate that the VPN
server uses to identify you. You can
import certificates from the VPN server or
download them from the web.
4. When you are finished, press [
connectivity
Option
] → Save.
To connect to a private network:
1. In Idle mode, select Applications → Settings →
Wireless and network → VPN settings.
2. Select a private network to which to connect.
3. Enter the user name and password and select
Connect.
96
tools
Clock
You can set and control alarms for important events and set
various world clocks. You can also use the stopwatch and
the desk clock.
To set a new alarm:
1. In Idle mode, select Applications → Clock → Alarm.
2. Select Create Alarm or press [
] → Create.
3. Set the alarm details.
Select the checkbox next to Smart alarm to activate
simulated nature sounds with the alarm screen before
the main alarm.
4. When you are finished, select Save.
To stop an alarm:
When an alarm sounds:
• To stop the alarm, drag
97
to the right.
• To repeat the alarm after a specified length of time, drag
to the left.
To delete an alarm:
1. In Idle mode, select Applications → Clock → Alarm.
2. Press [
] → Delete.
1. In Idle mode, select Applications → Clock →
Stopwatch.
2. Select Start to begin the stopwatch.
3. Select Lap to record lap times.
To create a world clock:
4. When you are finished, select Stop.
1. In Idle mode, select Applications → Clock → World
clock.
2. Select Add city or press [
To use the stopwatch:
tools
3. Select the alarms that you want to delete.
4. Select Delete.
To apply the summer time to the clocks, tap and hold
a clock and select DST settings.
] → Add.
3. Enter a city name or select one from the city list.
To select a city in the world map view, select
.
4. To add more world clocks, repeat Steps 2 and 3.
5. Select Reset to clear the recorded times.
To use the count-down timer:
1. In Idle mode, select Applications → Clock → Timer.
2. Set the length of time to count down.
3. Select Start to begin the countdown.
4. When the timer expires, drag
to the right.
98
To use the desk clock
Option
Function
The desk clock displays the current time and date and the
weather.
Reset to
default
Reset the desk clock settings to the
factory default values.
1. In Idle mode, select Applications → Clock → Desk
clock.
Dock settings
Set to use the connected dock’s speaker
when your phone is connected to a car
of desktop dock.
2. Press [
] → Settings.
tools
3. Change the following options:
Option
Function
Time/Calendar Set to display the clock or calendar.
display
AccuWeather
99
Set to display the weather for your
current location. You can also set the
desk clock to be automatically updated
with the latest information and select a
temperature unit.
Calculator
You can perform mathematical operations directly on your
phone, similar to using a hand-held or desktop calculator.
To perform a calculation
1. In Idle mode, select Applications → Calculator.
2. Use the keys that correspond to the calculator display to
perform basic mathematical operations.
Rotate the phone counter-clockwise to the landscape
view to use the scientific calculator. If you deactivated
auto rotation, press [
] → Scientific calculator.
3. To open a file, select the file.
To delete a file, select the checkbox and then select
Delete.
Kies air
1. In Idle mode, select Applications → Calculator.
Kies air allows you to connect a PC to your phone via a
WLAN. From the PC browser, you can view and control
media files, contacts, messages, and any other data saved
on your phone.
2. Perform the calculation.
to close the calculator keypad. The
3. Select
calculation history appears.
4. To clear the history, press [
] → Clear history.
Downloads
To customise the Kies air settings:
1. In Idle mode, select Applications → Kies air.
2. Press [
] → Settings.
You can open and manage files that you have downloaded
from the web and email.
1. In Idle mode, select Applications → Downloads.
2. Select a download folder.
100
tools
To view the calculation history
3. Change the following options:
tools
Option
Function
Access
request
Set to receive authorization requests
from other devices while your device is
connected to a PC.
Enable
visibility
Set the device to be visible on a PC.
Time-out
Select the length of time that the phone
waits before ending the connection.
2. Enter the web address displayed by Kies air in the
browser on your PC.
When connected, you will see your phone’s data on the
PC’s web browser.
3. To end the connection, select Stop.
Mini Diary
You can keep a photo diary on your phone.
To create a Mini Diary:
Lock contents Select the types of date that should not
display on the PC browser.
1. In Idle mode, select Applications → Mini Diary.
Reset settings Reset your settings to the factory default
values.
3. Change the date and set the weather (if necessary).
2. Select Create diary to create a new entry.
To connect a PC to your phone via a WLAN:
4. Select Tap to add photo and add an image or use the
camera to capture a photo.
1. In Idle mode, select Applications → Kies air → Start.
5. Select Tap to add text, enter the text, and select Done.
6. Select Save.
101
To view a Mini diary:
1. In Idle mode, select Applications → Mini Diary.
2. Select a diary.
To upload a mini diary to your community website,
press [
] → Publish.
•
•
•
•
Delete files or folders: Select Delete.
Change view mode: Select View by.
Sort files or folders: Select List by.
Use additional features using a file: Select More to
use additional features, such as moving, copying, or
renaming files.
tools
My Files
Polaris Office
You can quickly and easily access all of your images,
videos, music, sound clips, and other types of files stored in
your phone and on a memory card.
You can view and edit document files on your phone and on
a memory card.
1. In Idle mode, select Applications → My Files.
1. In Idle mode, select Applications → Polaris Office.
2. Select a folder and then select a file.
In a folder, press [
] to use the following options:
• Send a file to others: Select Share.
• Create a new folder: Select Create folder.
To create a document:
2. Select
and select a document type.
3. Enter the contents of the document.
4. When you are finished, press [
] → Save.
102
5. Enter a name for the document and select the saving
location.
6. Select Save.
To open a document:
1. In Idle mode, select Applications → Polaris Office.
tools
2. Select My Files and then select a document.
Task Manager
With the task manager, you can view currently running
applications and memory information.
1. In Idle mode, select Applications → Task manager.
2. Use the following options:
• View list of currently running applications: Select
Active applications to view a list of all of the
applications currently running on your phone.
• Amount of memory used by applications: Select
Downloaded to view the total amount of memory
used by applications installed on your phone.
• Manage RAM on phone: Select RAM to check and
manage the RAM on your phone.
• View used and available memory: Select Storage
to view the used and available memory on your
phone and memory card.
• View help information: Select Help to view help
information about extending the battery life.
Voice Commands
Your phone provides an intelligent voice command feature
that turns your voice commands into action. You can dial a
number, send a message, search for locations or
information, or complete other tasks by speaking into your
phone.
1. In Idle mode, select Applications → Voice command.
103
2. If you are launching this application for the first time,
read the help information, and select Next → I Agree →
Finish.
3. Select Tap & Speak.
4. Say a command into the microphone.
You can use the voice command feature to dial a number,
send a message, or search for locations and information by
voice.
This feature might not be available depending on your
region or service provider.
You can use the voice command feature provided by Voice
talk to dial a number, send a message, write a memo, or
complete other tasks by speaking into your phone.
1. In Idle mode, select Applications → Voice talk.
2. If you are launching this application for the first time,
select Continue → Get Started.
tools
Voice Search
Voice Talk
3. Select Tap & Speak.
4. Say a command into the microphone.
Self serve
1. In Idle mode, select Applications → Voice Search.
You can get your account balance, top up your balance, and
add features to your service plan.
2. Select Speak now.
1. In Idle mode, select Applications → Self serve.
3. Say a command into the microphone.
2. Follow the onscreen commands.
104
settings
Settings
To access the Settings menu:
1. In Idle mode, select Applications → Settings.
2. Select a setting category and then select an option.
Wireless and Network
Change the settings for wireless network connections.
Flight mode
Disable all wireless functions on your phone. You can only
use non-network services.
Wi-Fi settings
• Wi-Fi: Turn the WLAN feature on or off. ► p. 87
• Network notification: Set the phone to notify you when
an open network is available.
105
• WPS button connection: Connect to a WLAN using a
Wi-Fi Protected Setup (WPS) button.
• Add Wi-Fi network: Add WLAN APs manually.
Wi-Fi Direct settings
Kies via Wi-Fi
Connect your phone to Samsung Kies via a WLAN.
• Bluetooth: Turn the Bluetooth wireless feature on or off.
► p. 85
• Device name: Set a Bluetooth name for your phone.
• Visible: Set your phone to be visible to other Bluetooth
phones.
• Search for devices: Search for available Bluetooth
devices.
USB utilities
Connect your phone to a PC as a mass storage device. ►
p. 94
Tethering and portable hotspot
• USB tethering: Activate the USB tethering feature to
share your phone’s mobile network connection with PCs
106
settings
• Wi-Fi Direct: Activate the WLAN Direct feature to
connect two devices via a WLAN without requiring an
access point. ► p. 89
• Configure Wi-Fi Direct: View or edit the name and
password for your device.
• Status: View the connection status.
• Disconnect Wi-Fi Direct: Deactivate the WLAN Direct
feature.
Bluetooth settings
settings
via USB. When connected to a PC, your phone is used
as a wireless modem for a PC. ► p. 92
• Portable Wi-Fi hotspot settings:
• Portable Wi-Fi hotspot: Activate the Portable
WLAN hotspot feature to share your phone’s mobile
network connection with PCs or other devices
through the WLAN feature. ► p. 91
• Configure portable Wi-Fi hotspot: Configure
network settings for your WLAN hotspot.
• Help: Learn about more USB and WLAN tethering.
• Data roaming: Set the phone to connect to another
network when you are roaming or when your home
network is not available.
• Access Point Names: Set up access point names
(APNs).
• Network mode: Select a network type.
• Network operators: Search for available networks and
select a network for roaming.
VPN settings
Customize the settings for calling features.
Set up and manage Virtual Private Networks (VPNs).
► p. 95
• Call rejection: Set to reject calls from specified phone
numbers automatically. You can add phone numbers to
the reject list. ► p. 33
• Set reject messages: Add or edit the message that will
be sent when you reject a call.
• Call alert:
Mobile networks
• Use packet data: Set to allow packet switched data
networks for network services.
107
Call
• Call forwarding: Divert incoming calls to another
number.
• Additional settings:
• Caller ID: Display your caller ID to other parties for
outgoing calls.
• Call barring: Block incoming or outgoing calls.
• Call waiting: Activate call waiting to receive an
incoming call when you are already on a call.
• Auto redial: Activate auto redial for automatically
redialling a call that was not connected or was cut off
during a call.
• Video call image: Select an image to be shown to the
other party.
• Own video in received call: Set whether or to show
your live image or preset image to the other party.
• Use call fail options: Select whether or not to retry a
voice call when a video call fails to connect.
108
settings
• Outgoing call vibration: Set the phone to vibrate
when the other party answers the call.
• Call status tones: Activate or deactivate the call
connection tone, minute minder tone, or call end
tone.
• Alerts on call: Select how the phone will alert you to
events during a call.
• Call answering/ending:
• Answering key: Set the phone to answer calls by
pressing [
].
• Automatic answering: Set to answer automatically
after a specified period (only available when a
headset is connected).
• The power key ends calls: Set the phone to end a
call when you press the Power/Lock key.
• Turns on proximity sensor: Set to turn on the proximity
sensor during a call.
• Voicemail service: Select your service provider or set
another provider to receive voicemail messages.
• Voicemail: Enter the number to access the voicemail
service. You can obtain this number from your service
provider.
settings
Sound
Change the settings for various sounds on your phone.
• Silent mode: Activate silent mode to mute all sounds,
except for media sounds and alarm ringtones.
• Vibration: Set when the phone will vibrate for various
events.
• Volume: Adjust the volume level for incoming call
ringtones, media, phone system sounds, and notification
ringtones.
• Phone ringtone: Select a ringtone to alert you to
incoming voice calls.
109
• Video call ringtone: Select a ringtone to alert you to
incoming video calls.
• Notification ringtone: Select a ringtone to alert you to
events, such as incoming messages, missed calls, and
alarms.
• Audible touch tones: Set the phone to sound when you
touch the keys on the dialling screen.
• Audible selection: Set the phone to sound when you
select an application or option on the touch screen.
• Screen lock sounds: Set the phone to sound when you
lock or unlock the touch screen.
• Haptic feedback: Set the phone to vibrate when you
touch the keys.
• Vibration intensity: Adjust the vibration intensity of the
haptic feedback.
Display
Change the settings for the display.
110
settings
• Screen display:
• Font style: Change the font type for the display text.
You can download fonts from Android Market by
selecting Get fonts online.
• Home screen:
• Wallpaper: Select a background image for the
Idle screen.
• Lock screen:
• Wallpaper: Select an image to display when the
screen is locked.
• Clock position: Select the location of the clock
on the locked screen.
• Brightness: Set the brightness of the display.
• Background effect: Select a display mode.
• Auto-rotate screen: Set whether or not to rotate the
content automatically when the phone is rotated.
• Animation: Set the phone to display animation when
you switch between windows.
• Screen time-out: Set the length of time the phone waits
before turning off the display's backlight.
• Touch key light duration: Set the duration for the touch
key backlight.
• Auto adjust screen power: Set to save power by
adjusting the brightness of the display.
• Horizontal calibration: Calibrate the accelerometer to
adjust the horizontal axis of the phone for better motion
recognition.
• Gyro sensor calibration: Calibrate the gyroscope so
that your phone can correctly recognize rotation.
settings
• Place the phone on a stable surface during
calibration. The calibration process might fail if the
phone vibrates or moves during calibration.
• Calibrate the gyroscope when tilting or panning
motions, or motion-enabled games show drifting or
unintended movements.
Power Saving Mode
• Use Power saving mode: Automatically activate Power
saving mode when the battery is low.
• Power saving mode on at: Select a power level for
Power saving mode.
• Turn off Wi-Fi: Deactivate the WLAN feature when the
device is not connected with a WLAN AP.
111
• Turn off Bluetooth: Deactivate the Bluetooth feature
when not in use.
• Turn off GPS: Deactivate the GPS feature when not in
use.
• Turn off Sync: Turn off sync when the phone is not
synchronising with the web server.
• Brightness: Set the brightness of the display.
• Screen time-out: Set the length of time that the phone
waits before turning off the phone’s backlight.
• Power saving tips: Learn how to reduce battery
consumption.
Location and Security
Change the settings for securing your phone and the SIM
card, and GPS functionality.
• Use wireless networks: Set to use WLAN and/or mobile
networks to find your location.
•
•
•
•
•
•
• Change SIM PIN: Change the PIN used to access
the SIM data.
SIM Change Alert: Activate or deactivate the mobile
tracker feature that helps you locate your phone when it
is lost or stolen. ► p. 24
Alert message recipients: Add or edit recipients for the
alert message.
Remote functions: Set to control a lost phone remotely
via the web.
Visible passwords: By default, the phone displays your
password as zzz for security. Set the phone to display
your password as you enter.
Select device administrators: View the device
administrators that are installed on your phone. You can
activate device administrators to apply new policies to
your phone.
Use secure credentials: Use certificates and
credentials to ensure the use of various applications.
112
settings
• Use GPS satellites: Set to use the GPS satellite to find
your location.
• Use sensor aiding: Set to use sensors to enhance
pedestrian positioning when the GPS signal is
obstructed. There might be variations between the
sensor estimates and your actual location.
• Set up screen lock: Set the unlock security code. When
you have set your security code, this option changes to
Change screen lock.
• None: Disable the screen lock.
• Pattern: Set an unlock pattern to unlock the screen.
• PIN: Set a PIN (numeric) to unlock the screen.
• Password: Set a password (alphanumeric) to unlock
the screen.
• Set up SIM card lock:
• Lock SIM card: Activate or deactivate the PIN lock
feature to require the PIN before using the phone.
• Install from USB storage: Install encrypted certificates
that are stored in the USB storage.
• Set password: Create and confirm a password for
accessing credentials.
• Clear storage: Erase the credential contents from the
phone and reset the password.
settings
Applications
Change the setting for managing installed applications.
• Unknown sources: Select to download applications
from any source. If you do not select this option, you can
only download applications from the Android Market.
• Manage applications: Access the list of the applications
installed on the phone and check the application
information.
• Running services: View the services that you are using
and access them to manage them.
113
• Memory usage: View the available memory and the
memory used by applications on your phone.
• Battery usage: View the amount of power consumed by
your phone.
• Development:
• USB debugging: Select to connect your phone to a
PC using a PC data cable. This is for application
development.
• Allow mock locations: Allow mock locations and
service information to be sent to a Location Manager
service for testing. This is for application
development.
• Samsung Apps: Select a network connection (Wi-Fi or
packet switched data network) to get notifications about
new applications from Samsung Apps.
This feature might not be available depending on your
region or service provider.
Accounts and Sync
Change the settings for the auto sync feature or manage
accounts for synchronisation.
Motion
Change the settings that control motion recognition on your
phone.
• Motion activation: Set to use motion recognition.
• Turn over: Set to mute incoming calls, alarms, music,
and the FM radio by placing the phone face down.
Privacy
Change the settings for managing your settings and data.
• Back up my data: Set to back up your settings and
application data when the applications are reinstalled on
your phone.
114
settings
• Background data: Select this setting to use the auto
sync feature. The auto sync will run in the background
without opening applications and synchronise data.
• Auto-sync: Set the phone to automatically synchronise
contact, calendar, and email data.
• Tilt: Set to zoom in or out while viewing images in
Gallery or browsing web pages when you tap and hold
two points with your fingers and then tilt the phone back
and forth.
• Panning: Set to move an item to another page when you
tap and hold the item and then tilt the phone to the left or
right.
• Double tap: Set to activate Voice talk by double-tapping
the phone.
• Tutorial: Learn how to control motions.
• Automatic restore: Set to restore your settings and
application data when the applications are reinstalled on
your phone.
• Factory data reset: Reset your settings to the factory
default values and delete all of your data.
settings
Storage
View memory information for your phone and memory card.
You can also format the memory card.
Formatting a memory card will permanently delete all
of the data from the memory card.
Language and keyboard
Change the settings for text input.
• Select language: Select a display language for all
menus and applications.
115
• Select Input Method: Select a default keyboard type for
text input.
• Swype:
• Language: Select languages for text input.
You cannot enter text in some languages. To enter
text, you should change the writing language to one of
the supported languages.
• Audio feedback: Set to alert you when there are no
alternative words for your input if you double-tap a
word.
• Vibrate on keypress: Set the phone to vibrate when
you touch a key.
• Word suggestion: When turned on, a flashing
indicator displays on-screen, providing help
information.
• Auto-spacing: Set the phone to automatically insert
a space between words.
• Input languages: Select languages for text input.
You cannot enter text in some languages. To enter
text, you should change the writing language to one of
the supported languages.
• XT9: Activate XT9 mode to enter text using
Predictive input mode.
• XT9 advanced settings: Activate the advanced
features of XT9 mode, such as auto completion, auto
correction, or auto substitution, and set up your own
word list.
• Keypad sweeping: Enable or disable the keypad
sweeping feature for the text input mode. You can
switch between input modes by scrolling left or right
on the keypad.
• Auto-capitalization: Set the phone to automatically
capitalise the first letter after a final punctuation
116
settings
• Auto-capitalization: Set the phone to automatically
capitalise the first letter after a final punctuation
mark, such as a period, question mark, or
exclamation mark.
• Show complete trace: Set to display the trace of
your finger while dragging on the keyboard.
• Speed vs. accuracy: Set the balance for the speed
and accuracy.
• Swype help: Access help information about using
the Swype keyboard.
• Tutorial: Learn how to enter text faster using the
Swype keyboard.
• Version: View the version information.
• Samsung keypad:
• Portrait keypad types: Select the default input
method, such as the QWERTY keyboard, traditional
keypad, or handwriting screen.
•
•
•
settings
•
mark, such as a period, question mark, or
exclamation mark.
Handwriting settings: Customise the recognition
time in Handwriting mode.
Voice input: Activate the voice input feature to enter
text by voice on the Samsung keypad.
Auto-full stop: Set the phone to insert a period
when you double-tap the space bar.
Tutorial: Learn how to enter text with the Samsung
keypad.
Voice Input and Output
Change the settings for the voice recogniser and the text-tospeech feature.
• Voice recognition: Select a voice recognition engine.
• Voice recognition settings: For the Samsung voice
recognition, use the following options.
117
• Language: Select a language for the voice
recognition.
• Auto-dial: Set to automatically dial a number when
the voice recognition result is confident.
• Use Location: Set to use your location information
for voice search results.
• Hide offensive words: Hide offensive words that
your phone has recognised from the voice search
results.
• Auto-punctuation: Set to automatically insert
punctuation marks when needed.
• Listen over Bluetooth: Set to recognise your voice
commands when using a connected Bluetooth
headset..
• About: Information about the voice recognition
software.
• Auto-start listening: Set to automatically begin
voice recognition when you launch the couce
command feature.
• Language: Select a language for the voice
recognition.
• SafeSearch: Set the phone to filter explicit text and/
or images from the voice search results.
• Block offensive words: Hide offensive words that
your phone has recognised from the voice search
results.
• Text-to-speech settings:
• Listen to an example: Listen to the spoken text for
an example. Install voice data for using the text-tospeech feature.
• Driving mode: Activate Driving mode to set the
device to read the contents aloud.
• Driving mode settings: Specify the applications to
use in Driving mode.
• Always use my settings: Set the phone to use the
settings that you specify in applications rather than
the default settings.
• Default engine: Set the speech synthesis engine to
be used for spoken text.
• Install voice data: Download and install voice data
for the text-to-speech feature.
• Speech rate: Select a speed for the text-to-speech
feature.
• Language: Select a language for the text-to-speech
feature.
118
settings
• Voice command help: Access help information for
using the voice command feature.
• Social settings: Change the settings for accessing
community websites.
• Voice talk settings: Change the settings for using
Voice talk.
• Voice talk help: Access help information for using
Voice talk.
For Google voice recognition, use the following options:
• Engines: View the text-to-speech engines
downloaded from Android Market. Select Samsung
TTS or Pico TTS.
Accessibility
settings
• Accessibility: Activate an accessibility application that
you have downloaded, such as Talkback or Kickback,
which provide voice, melody, or vibration feedback.
• The power key ends calls: Set the phone to end a call
when you press the Power/Lock key.
Docking Settings
• Audio output mode: Set to use the connected dock’s
speaker when your phone is connected to a car or
desktop dock.
119
Date and Time
Access and alter the following settings to control how time
and date are displayed on your phone:
• Automatic: Automatically update the time when you
move across time zones.
• Set date: Set the current date manually.
• Select time zone: Set your home time zone.
• Set time: Set the current time manually.
• Use 24-hour format: Set to the time to be displayed in
24-hour format.
• Select date format: Select a date format.
About Phone
Access information about your phone, check the phone’s
status, and learn how to use your phone.
troubleshooting
If you are having trouble with your mobile phone, try these troubleshooting procedures before contacting a service professional.
When you turn on your phone or while you are using the
phone, it prompts you to enter one of the following
codes:
Code
Password
Try this to solve the problem:
When the phone’s lock feature is enabled,
you must enter the password that you set
for the phone.
PIN
When using the phone for the first time or
when the PIN requirement is enabled, you
must enter the PIN supplied with the SIM
card. You can disable this feature using the
Lock SIM card menu.
Code
PUK
Try this to solve the problem:
Your SIM card is blocked, usually as a result
of entering your PIN incorrectly several
times. You must enter the PUK supplied by
your service provider.
PIN2
When you access a menu requiring the
PIN2, you must enter the PIN2 supplied
with the SIM card. For details, contact your
service provider.
120
Your phone displays network or service error messages
• When you are in areas with weak signals or poor
reception, you might lose reception. Move to another
area and try again.
• You cannot access some options without a subscription.
Contact your service provider for more details.
The touch screen responds slowly or improperly
troubleshooting
If the touch screen is not responding properly, try the
following:
• Remove any protective covers from the touch screen.
Protective covers might prevent the phone from
recognising your inputs and are not recommended for
touch screen phones.
• Ensure that your hands are clean and dry when tapping
the touch screen.
• Restart your phone to clear any temporary software
bugs.
121
• Ensure that your phone’s software is upgraded to the
latest version.
• If the touch screen is scratched or damaged, take it to
your local Samsung Service Centre.
Your phone freezes or has fatal errors
If your phone freezes or hangs, you might need to close
programs or reset the phone to regain functionality. If your
phone is frozen and unresponsive, press and hold the Power/
Lock key for 8-10 seconds. The phone will reboot
automatically.
If this does not solve the problem, perform a factory data
reset. In Idle mode, select Applications → Settings →
Privacy → Factory data reset → Reset phone → Erase
everything.
Calls are being dropped
Others cannot hear you speaking on a call
When you are in areas with weak signals or poor reception,
you might lose your connection to the network. Move to
another area and try again.
• Ensure that you are not covering the built-in microphone.
• Ensure that the microphone is close to your mouth.
• If using a headset, ensure that it is properly connected.
Outgoing calls are not connected
Audio quality is poor
• Ensure that you are not blocking the phone's internal
antenna.
• When you are in areas with weak signals or poor
reception, you might lose reception. Move to another
area and try again.
Incoming calls are not connected
When dialling from contacts, the call is not connected
• Ensure that your phone is turned on.
• Ensure that you have accessed the correct cellular
network.
• Ensure that you have not set call barring for the incoming
phone number.
• Ensure that the correct number is stored in the contact
list.
• Re-enter and save the number, if necessary.
• Ensure that you have not set call barring for the contact's
phone number.
122
troubleshooting
• Ensure that you have pressed the Dial key.
• Ensure that you have accessed the correct cellular
network.
• Ensure that you have not set call barring for the phone
number you are dialling.
The phone beeps and the battery icon flashes
Error messages appear when launching the camera
• Your battery is low. Recharge or replace the battery to
continue using the phone.
Your Samsung phone must have sufficient available memory
and battery power to operate the camera application. If you
receive error messages when launching the camera, try the
following:
The battery does not charge properly or the phone turns
off
troubleshooting
• The battery terminals might be dirty. Wipe both goldcoloured contacts with a clean, soft cloth and try
charging the battery again.
• If the battery will no longer charge completely, dispose of
the old battery properly and replace it with a new battery
(refer to your local bylaws for proper disposal
instructions).
• Charge the battery or replace it with a battery that is fully
charged.
• Free some memory by transferring files to a PC or
deleting files from your phone.
• Restart the phone. If you are still having trouble with the
camera application after trying these tips, contact a
Samsung Service Centre.
Your phone is hot to the touch
Error messages appear when launching the FM radio
When you use applications that require more power or use
applications on your phone for an extended period of time,
your phone may feel hot to the touch. This is normal and
should not affect your phone's lifespan or performance
The FM radio application on your Samsung phone uses the
headset cable as an antenna. Without a headset connected,
the FM radio will be unable to receive radio stations. To use
the FM radio, first ensure that the headset is properly
123
connected. Next, scan for and save the available radio
stations.
If you still cannot use the FM radio after performing these
steps, try accessing the station with another radio receiver. If
you can hear the station with another receiver, your phone
might require service. Contact a Samsung Service Centre.
Error messages appear when opening music files
• Free some memory by transferring files to a PC or
deleting files from your phone.
• Ensure that the music file is not Digital Rights
Management (DRM)-protected. If the file is DRM
protected, ensure that you have the appropriate license
or key to play the file.
• Ensure that your phone supports the file type.
• Ensure that the Bluetooth wireless feature is activated on
your phone.
• Ensure that the Bluetooth wireless feature is activated on
the device that you wish to connect to, if necessary.
• Ensure that your phone and the other Bluetooth device
are within the maximum Bluetooth range (10 metres).
• If the tips above do not solve the problem, contact a
Samsung Service Centre.
A connection is not established when you connect the
phone to a PC
• Ensure that the PC data cable you are using is
compatible with your phone.
• Ensure that you have the proper drivers installed and
updated on your PC.
124
troubleshooting
Some music files might not play on your Samsung phone for
a variety of reasons. If you receive error messages when
opening music files on your phone, try the following:
Another Bluetooth device is not located
health and safety
information
Comply with the following precautions to avoid dangerous or
illegal situations and to ensure peak performance of your
mobile phone.
Getting the Most Out of Your Reception
Keeping Tabs on Signal Strength
The quality of each call you make or receive depends on the
signal strength in your area. Your phone informs you of the
current signal strength by displaying a number of bars next
to the signal strength icon. The more bars displayed, the
stronger the signal. If you’re inside a building, being near a
window may give you better reception.
Understanding How Your Phone Operates
Your phone is basically a radio transmitter and receiver.
When it’s turned on, it receives and transmits radio
frequency (RF) signals. When you use your phone, the
system handling your call controls the power level. This
power can range from 0.006 watts to 0.2 watts in digital
mode.
125
Maintaining Your Phone’s Peak Performance
The design of your phone complies with updated NCRP
standards described below. In 1991-92, the Institute of
Electrical and Electronics Engineers (IEEE) and the
American National Standards Institute (ANSI) joined in
updating ANSI’s 1982 standard for safety levels with respect
to human exposure to RF signals. More than 120 scientists,
engineers and physicians from universities, government
health agencies and industries developed this updated
standard after reviewing the available body of research. In
1993, the Federal Communications Commission (FCC)
adopted this updated standard in a regulation. In August
1996, the FCC adopted hybrid standard consisting of the
existing ANSI/IEEE standard and the guidelines published
by the National Council of Radiation Protection and
Measurements (NCRP).
There are several simple guidelines for operating your
phone properly and maintaining safe, satisfactory service.
• Speak directly into the mouthpiece.
• Avoid exposing your phone and accessories to rain or
liquid spills. If your phone does get wet, immediately turn
the power off and remove the battery. If it’s inoperable,
return it to a dealer store or call Customer Support for
service.
For the best care of your phone, only authorized
personnel should service your phone and
accessories. Faulty service may void the warranty.
126
health and safety information
Knowing Radio Frequency Safety
Maintaining Safe Use of and Access to Your
Phone
Failure to follow the instructions outlined may lead to serious
personal injury and possible property damage.
health and safety information
Excessive exposure to sound at high volumes can
cause hearing damage. Always turn the volume
down before plugging the headphones into an audio
source and use only the minimum volume setting
necessary to hear your conversation or music.
Using Your Phone While Driving
Talking on your phone while driving (or operating the phone
without a hands-free phone) is prohibited in some
jurisdictions. Laws vary as to specific restrictions.
Remember that safety always comes first.
When using your phone in the car:
127
• Get to know your phone and its features, such as speed
dial and re-dial.
• When available, use a hands-free phone.
• Position your phone within easy reach.
• Let the person you are speaking to know you are driving;
if necessary, suspend the call in heavy traffic or
hazardous weather conditions.
• Do not take notes or look up phone numbers while
driving.
• Dial sensibly and assess the traffic; if possible, place
calls when stationary or before pulling into traffic.
• Do not engage in stressful or emotional conversations
that may divert your attention from the road.
• Dial 911 to report serious emergencies. It’s free from
your wireless phone.
• Use your phone to help others in emergencies.
• Call roadside assistance or a special non-emergency
wireless number when necessary.
Following Safety Guidelines
To operate your phone safely and efficiently, always follow
any special regulations in a given area. Turn your phone off
in areas where use is forbidden or when it may cause
interference or danger.
Most modern electronic equipment is shielded from radio
frequency (RF) signals. However, RF signals from wireless
phones may affect inadequately shielded electronic
equipment.
RF signals may affect improperly installed or inadequately
shielded electronic operating systems and/or entertainment
systems in motor vehicles. Check with the manufacturer or
their representative to determine if these systems are
adequately shielded from external RF signals. Also check
Consult the manufacturer of any personal medical phones,
such as pacemakers and hearing aids, to determine if they
are adequately shielded from external RF signals.
Always turn off the phone in health care facilities and
request permission before using the phone near
medical equipment.
Turning Off Your Phone Before Flying
Turn off your phone before boarding any aircraft. To prevent
possible interference with aircraft systems, the U.S. Federal
Aviation Administration (FAA) regulations require you to
have permission from a crew member to use your phone
while the plane is on the ground. To prevent any risk of
interference, FCC regulations prohibit using your phone
while the plane is in the air.
128
health and safety information
Using Your Phone Near Other Electronic
Devices
with the manufacturer regarding any equipment that has
been added to your vehicle.
Turning Off Your Phone in Dangerous Areas
health and safety information
To avoid interfering with blasting operations, turn off your
phone when in a blasting area or in other areas with signs
indicating that two-way radios should be turned off.
Construction crews often use remote-control RF phones to
set off explosives.
• Any other area where you would normally be advised to
turn off your vehicle’s engine.
Never transport or store flammable gas, liquid or
explosives in the compartment of your vehicle that
contains your phone or accessories.
Turn off your phone when you are in an area with a
potentially explosive atmosphere. Although it is rare, your
phone or its accessories could generate sparks. Sparks
could cause an explosion or a fire resulting in bodily injury or
even death. These areas are often, but not always, clearly
marked. These areas include:
Restricting Children’s Access to your Phone
•
•
•
•
Warning Regarding Display
Fueling areas such as gas stations.
Below deck on boats.
Fuel or chemical transfer or storage facilities.
Areas where the air contains chemicals or particles such
as grain, dust or metal powders.
129
Your phone is not a toy. Children should not be allowed to
play with it because they could hurt themselves and others,
damage the phone, dial 911 by mistake or make calls that
increase your phone bill.
The display on your handset is made of glass or acrylic and
could break if your handset is dropped or if it receives
significant impact. Do not use if screen is broken or cracked
as this could cause injury to you.
UL Certified Travel Adapter
Caring for the Battery
The Travel Adapter for this phone has met applicable UL
safety requirements. Please adhere to the following safety
instructions per UL guidelines.
Protecting Your Battery
The guidelines listed below help you get the most out of
your battery’s performance.
• Use only Samsung approved batteries and desktop
chargers. These chargers are designed to maximize
battery life. Using other batteries or chargers voids your
warranty and may cause damage.
• In order to avoid damage, charge the battery only in
temperatures that range from 32º F to 113º F (0º C to 45º
C).
• Don’t use the battery charger in direct sunlight or in high
humidity areas, such as the bathroom.
• Never dispose of the battery by incineration.
• Keep the metal contacts on top of the battery clean.
• Don’t attempt to disassemble or short-circuit the battery.
130
health and safety information
FAILURE TO FOLLOW THE INSTRUCTIONS OUTLINED
MAY LEAD TO SERIOUS PERSONAL INJURY AND
POSSIBLE PROPERTY DAMAGE.IMPORTANT SAFETY
INSTRUCTIONS - SAVE THESE
INSTRUCTIONS.DANGER - TO REDUCE THE RISK OF
FIRE OR ELECTRIC SHOCK, CAREFULLY FOLLOW
THESE INSTRUCTIONS.FOR CONNECTION TO A
SUPPLY NOT IN NORTH AMERICA, USE AN
ATTACHMENT PLUG ADAPTOR OF THE PROPER
CONFIGURATION FOR THE POWER OUTLET. THIS
POWER UNIT IS INTENDED TO BE CORRECTLY
ORIENTATED IN A VERTICAL OR HORIZONTAL OR
FLOOR MOUNT POSITION.
health and safety information
• The battery may need recharging if it has not been used
for a long period of time.
• It’s best to replace the battery when it no longer provides
acceptable performance. When used correctly, the
battery can be recharged hundreds of times before it
needs replacing.
• Don’t store the battery in high temperature areas for long
periods of time. It’s best to follow these storage rules:
Less than one month:
Disposal of Lithium Ion (LiIon) Batteries
-4º F to 140º F (-20º C to 60º C)
Acknowledging Special Precautions and
Industry Canada Notice
More than one month:
-4º F to 113º F (-20º C to 45º C)
For safe disposal options of your LiIon batteries, contact
your nearest service center.
Be sure to dispose of your battery properly. In some
areas, the disposal of batteries in household or
business trash may be prohibited.
For safety, do not handle a damaged or leaking LiIon
battery.
Cautions
Any changes or modifications to your phone not expressly
approved in this document could void your warranty for this
equipment, and void your authority to operate this
equipment. Only use approved batteries, antennas and
131
determined by turning the equipment off and on, the user is
encouraged to try to correct the interference by one or more
of the following measures:
Although your phone is quite sturdy, it is a complex piece of
equipment and can be broken. Avoid dropping, hitting,
bending or sitting on it.
• Reorient / relocate the receiving antenna.
• Increase the separation between the equipment and
receiver.
• Connect the equipment into an outlet on a circuit different
from that to which the receiver is connected.
Consult the dealer or an experienced radio/TV technician for
help.
Information to User
This equipment has been tested and found to comply with
the limits of a Class B digital phone, pursuant to Part 15 of
the FCC Rules. These limits are designed to provide
reasonable protection against harmful interference in a
residential installation. This equipment generates, uses and
can radiate radio frequency energy and, if not installed and
used in accordance with the instructions, may cause harmful
interference to radio communications. However, there is no
guarantee that interference will not occur in a particular
installation; if this equipment does cause harmful
interference to radio or television reception, which can be
Specific Absorption Rates (SAR) for Wireless
Phones
The SAR is a value that corresponds to the relative amount
of RF energy absorbed in the head of a user of a wireless
handset.
132
health and safety information
chargers. The use of any unauthorized accessories may be
dangerous and void the phone warranty if said accessories
cause damage or a defect to the phone.
health and safety information
The SAR value of a phone is the result of an extensive
testing, measuring and calculation process. It does not
represent how much RF the phone emits. All phone models
are tested at their highest value in strict laboratory settings.
But when in operation, the SAR of a phone can be
substantially less than the level reported to the FCC. This is
because of a variety of factors including its proximity to a
base station antenna, phone design and other factors. What
is important to remember is that each phone meets strict
federal guidelines. Variations in SARs do not represent a
variation in safety.
All phones must meet the federal standard, which
incorporates a substantial margin of safety. As stated above,
variations in SAR values between different model phones do
not mean variations in safety. SAR values at or below the
federal standard of 1.6 W/kg are considered safe for use by
the public.
133
The highest reported SAR values of the I9100M are:
GSM850: Head: 0.11 W/Kg; Body-worn: 0.49 W/Kg
GSM1900: Head: 0.13 W/Kg; Body-worn: 0.79 W/Kg
WCDMA2: Head: 0.16 W/Kg; Body-worn: 0.96 W/Kg
WCDMA5: Head: 0.09 W/Kg; Body-worn: 0.49 W/Kg
Owner’s Record
The model number, regulatory number and serial number
are located on a nameplate inside the battery compartment.
Record the serial number in the space provided below. This
will be helpful if you need to contact us about your phone in
the future.
Model: GT-I9100M
Serial No.:
warranty
information
Standard Limited Warranty
What is Covered and For How Long?
SAMSUNG Electronics Canada Inc. ("SAMSUNG")
warrants to the original purchaser ("Purchaser") that
SAMSUNG's phones and accessories ("Products") are free
from defects in material and workmanship under normal use
and service for the period commencing upon the date of
purchase and continuing for the following specified period of
time after that date:
Phone
1 Year
Batteries
1 Year
Leather Case
90 Days
Holster
90 Days
Other Phone Accessories 1 Year
134
warranty information
What is Not Covered? This Limited Warranty is conditioned
upon proper use of Product by Purchaser. This Limited
Warranty does not cover: (a) defects or damage resulting
from accident, misuse, abuse, neglect, unusual physical,
electrical or electromechanical stress, or modification of any
part of Product, including antenna, or cosmetic damage; (b)
equipment that has the serial number removed or made
illegible; (c) any plastic surfaces or other externally exposed
parts that are scratched or damaged due to normal use; (d)
malfunctions resulting from the use of Product in conjunction
with accessories, products, or ancillary/peripheral
equipment not furnished or approved by SAMSUNG; (e)
defects or damage from improper testing, operation,
maintenance, installation, or adjustment; (f) installation,
maintenance, and service of Product; or (g) Product used or
purchased outside Canada.
135
This Limited Warranty covers batteries only if battery
capacity falls below 80% of rated capacity or the battery
leaks, and this Limited Warranty does not cover any battery
if: (i) the battery has been charged by a battery charger not
specified or approved by SAMSUNG for charging the
battery; (ii) any of the seals on the battery are broken or
show evidence of tampering; or (iii) the battery has been
used in equipment other than the SAMSUNG phone for
which it is specified.
What are SAMSUNG's Obligations? During the applicable
warranty period, SAMSUNG will repair or replace, at
SAMSUNG's sole option, without charge to Purchaser, any
defective component part of Product. To obtain service
under this Limited Warranty, Purchaser must return Product
to an authorized phone service facility in an adequate
container for shipping, accompanied by Purchaser's sales
receipt or comparable substitute proof of sale showing the
date of purchase, the serial number of Product and the
sellers' name and address. To obtain assistance on where to
What Are the Limits On SAMSUNG's Liability? EXCEPT
AS SET FORTH IN THE EXPRESS WARRANTY
CONTAINED HEREIN, PURCHASER TAKES THE
PRODUCT "AS IS," AND SAMSUNG MAKES NO
WARRANTY OR REPRESENTATION AND THERE ARE
NO CONDITIONS, EXPRESS OR IMPLIED, STATUTORY
OR OTHERWISE, OF ANY KIND WHATSOEVER WITH
RESPECT TO THE PRODUCT, INCLUDING BUT NOT
LIMITED TO:
• THE MERCHANTABILITY OF THE PRODUCT OR ITS
FITNESS FOR ANY PARTICULAR PURPOSE OR USE;
• WARRANTIES OF TITLE OR NON-INFRINGEMENT;
• DESIGN, CONDITION, QUALITY, OR PERFORMANCE
OF THE PRODUCT;
• THE WORKMANSHIP OF THE PRODUCT OR THE
COMPONENTS CONTAINED THEREIN; OR
• COMPLIANCE OF THE PRODUCT WITH THE
REQUIREMENTS OF ANY LAW, RULE,
SPECIFICATION OR CONTRACT PERTAINING
THERETO.
136
warranty information
deliver the Product, call Samsung Customer Care at 1-800Samsung. Upon receipt, SAMSUNG will promptly repair or
replace the defective Product. SAMSUNG may, at
SAMSUNG's sole option, use rebuilt, reconditioned, or new
parts or components when repairing any Product or replace
Product with a rebuilt, reconditioned or new Product.
Repaired/replaced leather cases, pouches and holsters will
be warranted for a period of ninety (90) days. All other
repaired/replaced Product will be warranted for a period
equal to the remainder of the original Limited Warranty on
the original Product or for 90 days, whichever is longer. All
replaced parts, components, boards and equipment shall
become the property of SAMSUNG. If SAMSUNG
determines that any Product is not covered by this Limited
Warranty, Purchaser must pay all parts, shipping, and labor
charges for the repair or return of such Product.
warranty information
NOTHING CONTAINED IN THE INSTRUCTION MANUAL
SHALL BE CONSTRUED TO CREATE AN EXPRESS
WARRANTY OF ANY KIND WHATSOEVER WITH
RESPECT TO THE PRODUCT. ALL IMPLIED
WARRANTIES AND CONDITIONS THAT MAY ARISE BY
OPERATION OF LAW, INCLUDING IF APPLICABLE THE
IMPLIED WARRANTIES OF MERCHANTABILITY AND
FITNESS FOR A PARTICULAR PURPOSE, ARE HEREBY
LIMITED TO THE SAME DURATION OF TIME AS THE
EXPRESS WRITTEN WARRANTY STATED HEREIN.
SOME JURISDICTIONS DO NOT ALLOW LIMITATIONS
ON HOW LONG AN IMPLIED WARRANTY LASTS, SO
THE ABOVE LIMITATION MAY NOT APPLY TO YOU. IN
ADDITION, SAMSUNG SHALL NOT BE LIABLE FOR ANY
DAMAGES OF ANY KIND RESULTING FROM THE
PURCHASE, USE, OR MISUSE OF, OR INABILITY TO
USE THE PRODUCT OR ARISING DIRECTLY OR
INDIRECTLY FROM THE USE OR LOSS OF USE OF THE
PRODUCT OR FROM THE BREACH OF THE EXPRESS
WARRANTY, INCLUDING INCIDENTAL, SPECIAL,
137
CONSEQUENTIAL OR SIMILAR DAMAGES, OR LOSS OF
ANTICIPATED PROFITS OR BENEFITS, OR FOR
DAMAGES ARISING FROM ANY TORT (INCLUDING
NEGLIGENCE OR GROSS NEGLIGENCE) OR FAULT
COMMITTED BY SAMSUNG, ITS AGENTS OR
EMPLOYEES, OR FOR ANY BREACH OF CONTRACT OR
FOR ANY CLAIM BROUGHT AGAINST PURCHASER BY
ANY OTHER PARTY. SOME JURISDICTIONS DO NOT
ALLOW THE EXCLUSION OR LIMITATION OF
INCIDENTAL OR CONSEQUENTIAL DAMAGES, SO THE
ABOVE LIMITATION OR EXCLUSION MAY NOT APPLY
TO YOU.
THIS WARRANTY GIVES YOU SPECIFIC LEGAL
RIGHTS, AND YOU MAY ALSO HAVE OTHER RIGHTS,
WHICH VARY FROM PROVINCE TO PROVINCE. THIS
LIMITED WARRANTY SHALL NOT EXTEND TO ANYONE
OTHER THAN THE ORIGINAL PURCHASER OF THIS
PRODUCT AND SHALL BE PURCHASER'S EXCLUSIVE
REMEDY. IF ANY PORTION OF THIS LIMITED
OTHERWISE, INCLUDING THE ABILITY TO INTEGRATE
ANY SUCH SOFTWARE OR EQUIPMENT WITH THE
PRODUCT. THE QUALITY, CAPABILITIES, OPERATIONS,
PERFORMANCE AND SUITABILITY OF ANY SUCH
THIRD-PARTY SOFTWARE OR EQUIPMENT LIE SOLELY
WITH THE PURCHASER AND THE DIRECT VENDOR,
OWNER OR SUPPLIER OF SUCH THIRD-PARTY
SOFTWARE OR EQUIPMENT, AS THE CASE MAY BE.
THE PARTIES UNDERSTAND THAT THE PURCHASER
MAY USE THIRD-PARTY SOFTWARE OR EQUIPMENT IN
CONJUNCTION WITH THE PRODUCT. SAMSUNG
MAKES NO WARRANTIES OR REPRESENTATIONS AND
THERE ARE NO CONDITIONS, EXPRESS OR IMPLIED,
STATUTORY OR OTHERWISE, AS TO THE QUALITY,
CAPABILITIES, OPERATIONS, PERFORMANCE OR
SUITABILITY OF ANY THIRD-PARTY SOFTWARE OR
EQUIPMENT, WHETHER SUCH THIRD-PARTY
SOFTWARE OR EQUIPMENT IS INCLUDED WITH THE
PRODUCT DISTRIBUTED BY SAMSUNG OR
This Limited Warranty allocates risk of Product failure
between Purchaser and SAMSUNG, and SAMSUNG's
Product pricing reflects this allocation of risk and the
limitations of liability contained in this Limited Warranty. The
agents, employees, distributors, and dealers of SAMSUNG
are not authorized to make modifications to this Limited
Warranty, or make additional warranties binding on
SAMSUNG. Accordingly, additional statements such as
dealer advertising or presentation, whether oral or written,
do not constitute warranties by SAMSUNG and should not
be relied upon.
138
warranty information
WARRANTY IS HELD ILLEGAL OR UNENFORCEABLE
BY REASON OF ANY LAW, SUCH PARTIAL ILLEGALITY
OR UNENFORCEABILITY SHALL NOT AFFECT THE
ENFORCEABILITY FOR THE REMAINDER OF THIS
LIMITED WARRANTY WHICH PURCHASER
ACKNOWLEDGES IS AND WILL ALWAYS BE
CONSTRUED TO BE LIMITED BY ITS TERMS OR AS
LIMITED AS THE LAW PERMITS.
Samsung Electronics Canada, Inc.
©2011 Samsung Electronics Canada, Inc. SAMSUNG is a
registered trademark of Samsung Electronics Co., Ltd. and
its related entities.
warranty information
No reproduction in whole or in part allowed without prior
written approval.
Specifications and availability subject to change without
notice.
#861826 v2 | 4032342
139
index
AllShare 90
Android Market 28
Download 29
Install applications 29
Uninstall applications 29
Activating 86
Connect to other devices 86
Receive data 87
Send data 86
Brightness 22
,
Animation 21
Calculator 99 100
Applications
Access 18
Organize 19
Calendar 70
Battery
Charging 9
Installing 7
Bluetooth 85
Call barring 37
Call forwarding 37
Call waiting 37
Calls
Answering 33
Auto rejection 36
Call logs 37
From Contacts 34
International 33
Making 33
Missed 36
Options during video call 35
Options during voice call 34
Reject 33
Use headset 34
Camcorder
Settings 54
Camera
Beauty photo 49
140
Capture photo 46
Cartoon mode 50
Panoramic photo 49
Preset options for scenes 48
Series of photos 50
Settings 50
Shortcut icons 55
Smile shot mode 49
index
Clock
Alarm 97
Desk clock 99
Stopwatch 98
Timer 98
World clock 98
Contacts
Create 67
Find 68
141
Group 69
Import/Export 70
Namecard 68
View photo 57
View video 58
Game Hub 66
Current date and time 21
Google Latitude 79
Data
Synchronise automatically 31
Synchronise manually 31
Synchronize 30
Google Mail 40
Downloads 100
Google Talk 44
Email 42
GPS 92
Google Maps 78
Google Search 80
Enter Text 25
GPS navigation 80
File Formats 56
Hand Strap 13
Flight mode 105
Idle Screen
Add items 16
Add/remove panels 18
FM radio 63
Gallery 56
Move items 17
Remove items 17
IM 45
Indicator Icons 5
Instant Messaging 45
Kies air 100
Connect to PC 101
Settings 100
Market 82
Mass Storage 94
Memo 72
Memory Card 11
Messages
Sending multimedia 39
Sending text 38
Viewing multimedia 39
Viewing text 39
Mini Diary 101
Mobile Tracker
Activate 24
Music 60
Add music files 61
Play music files 61
Playlist 62
Quick list 62
Settings 62
Music Hub 63
My Files 102
Namecard 68
News & Weather 83
PC Connections 93
PC Data Cable 10
index
Internet 74
Bookmark 77
Browse 74
Format 12
Insert 11
Remove 12
Phone
Back 4
Customize 20
Front 4
Keys 5
Turn On/Off 14
Photo Editor 58
Places 79
142
Polaris Office 102
Readers Hub 82
Ringtone
Change 21
Volume 21
Samsung Apps 81
Samsung keypad 27
index
Samsung Kies 94
Self Service 104
Settings
About Phone 119
Accessibility 119
Accounts 114
Applications 113
Bluetooth 106
Call 107
143
Date and Time 119
Display 110
Dock 119
Flight mode 105
Keyboard 115
Language
115
Location 111
Mobile networks 107
Motion 114
Power Saving Mode 111
Privacy 114
Samsung Kies via Wi-Fi 106
Security 111
Sound 109
Storage 115
Sync 114
Tethering and portable hotspot 106
USB utilities 106
Voice Input and Output 117
VPN 107
Wi-Fi 105
Wi-Fi Direct 106
Shortcuts Panel 17
Silent mode 21
SIM card 7
Lock 23
Social Hub 44
Speed Dial Number 68
Swype 25
Task 71
Task Manager 103
Text
Copy 28
Entering 25
Paste 28
Samsung keypad 27
Swype 25
Voice Commands 103
Voice Dialer 104
Voice Recorder 73
Voice Search 104
WLAN 87
WLAN 87
WLAN Direct 89
YouTube 80
Zoom Pass 84
Voicemail 40
Touch tone 21
Volume
Ringtone 21
Travel Adapter 9
VPN connections 95
Unlock password 23
Wallpaper 22
Unlock Pattern 22
Unlock PIN code 23
Web
Download 29
Video Maker 59
Create video 59
Wi-Fi 87
Connect 88
index
Touch Screen
Control 15
Lock/Unlock 16
Video Player 55
Play 55
144