1
CHAPTER
1
AL
Setting Up the EOS
Rebel T3i/600D
CO
PY
RI
GH
TE
D
MA
TE
RI
C
hances are good that
you have already used
your EOS Rebel T3i/600D,
and you know where the
main controls on the camera
are located and what they
do. But to become expert in
shooting with the T3i/600D,
you need to learn the camera controls so well that you
can use them instinctively
and without hesitation. The
better you know the camera,
the fewer shots you’ll miss.
This chapter is designed to
help you become familiar
with the T3i/600D and to
provide ways to make your
everyday shooting easier
and faster. As you read,
have the camera nearby so
that you can locate the controls. Also know that the
shortest path to gaining
mastery of the camera is
using it every day.
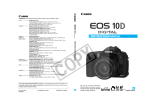
For this image of a dogwood blossom, I wanted to keep
detail through the background petals, so I used a narrow
f/8 aperture. I shot in color, and then I used the Nik
Silver Efex Pro plug-in to convert the image to a neutral
sepia tone. Exposure: ISO 200, f/8, 1/125 second using
–1/3-stop of Exposure Compensation.
Canon EOS Rebel T3i/600D Digital Field Guide Overview of the T3i/600D Camera
Controls
There are several key camera controls that you will use often. The following sections
provide methods for using the controls efficiently.
The following main controls can be used together or separately to control most functions on the T3i/600D:
X
10
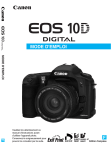
Cross keys. These controls
(shown in Figure 1.1) enable you
to make adjustments to key settings in P, Tv, Av, M, and A-DEP
shooting modes. Just press the
AF (Autofocus mode); Drive
(Drive mode), which is displayed
as an icon; WB (White Balance);
or Picture Style selection button,
to display a screen with options,
and then turn the Main dial to
adjust the setting.
White Balance
Autofocus
mode
Drive
mode
Picture Style
1.1 The cross keys
X
Main dial. In some camera menu screens, such as
the Quality screen, you also use the Main dial (shown
in Figure 1.2) for selecting different options on the
screen. You can also turn the Main dial to move
among the camera menu tabs, and then press a
cross key to select a menu option.
X
Quick Control button. This button with a Q on it not
only displays the current camera settings on the
1.2 The Main dial
LCD, but also gives you access to settings ranging
from the ISO and Exposure Compensation to the
White Balance and image quality. Just press the Q button and press one of the
cross keys to select a setting displayed on the Quick Control screen (shown in
Figure 1.3). Then turn the Main dial to change the setting. For some settings, you
can press the Set button to display all the options. For example, if you select the
White Balance, and then press the Set button, the White Balance screen appears.
Then just turn the Main dial to choose a different White Balance setting. This is
the easiest way to adjust settings when you are shooting in Program (P),
Main dial
Chapter 1 Setting Up the EOS Rebel T3i/600D
Shutter-priority
AE
(Tv),
Aperture-priority AE (Av), Manual
(M), and Automatic Depth of
Field (A-DEP) shooting modes.
X
Setting (Set) button. Press the
Set button, located in the center
of the cross keys, to confirm
changes you make to the options
you find on the camera menus,
and press it to open some submenus. Also, when you are
using the Quick Control screen,
you can select a setting, such as
White Balance, and then press
the Set button to display all the
options for the setting.
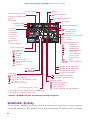
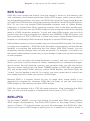
Roadmap to the
Rebel T3i/600D
Flash Exposure
Compensation
(not displayed)
Picture Style
Exposure Compensation/
Auto Exposure Bracketing
ISO speed
Shooting Shutter Aperture Highlight
mode
speed (f-stop) tone priority
Av
–3
2 1
1/4
0
F7.1
D+ 200
1 2 +3
OFF
ONE SHOT
L
Q
2184
Drive
Quick
mode
Control
screen Battery
icon
charge
Images
remaining
Auto Lighting
Optimizer
Autofocus mode
White Balance
White
White Balance
Balance Bracketing
With the clean design of the T3i/600D,
Correction (not displayed)
you can use your right thumb to
Metering
Image
quickly adjust the key controls on the
mode
quality
back of the camera. The camera has
Built-in flash
good heft that helps stabilize it in your
function
hand. The grip is deeper than on previ1.3 The Quick Control screen. If you have
ous models, and the channel pad on
the Feature guide turned on, then some of
the back is sculpted to steady your
the feature explanations cover up part of
the Quick Control screen. You can turn off
thumb when you are holding the camthe Feature guide on the Setup 3 menu.
era. When you’re shooting in positions
where it’s awkward or impossible to
look through the viewfinder, just flip out and rotate the articulated LCD screen to get a
100 percent view of the scene at the angle you need. The LCD is also indispensable
when you’re recording movies.
The T3i/600D’s most frequently accessed camera controls are easily accessible for
quick adjustments as you’re shooting. Less frequently used functions are accessible
from the camera menus. The following sections will help you get acquainted with the
11
Canon EOS Rebel T3i/600D Digital Field Guide camera’s buttons and controls. It’s a good idea to familiarize yourself with the names
of the controls because those names will be used throughout the book.
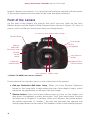
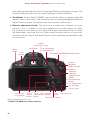
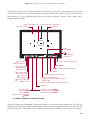
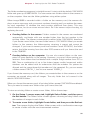
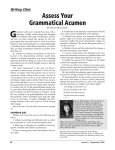
Front of the camera
On the front of the camera, the controls that you’ll use most often are the Lens
Release button and the Depth-of-Field Preview button (shown in Figure 1.4). And, of
course, you’ll use the lens mount each time you change lenses.
EF and EF-S lens mount index markers
Shutter button
Flash button
Built-in
microphone
Red-eye
Reduction/
Self-timer lamp
Remote
control
sensor
Lens Release
button
Depth-of-Field
Preview button
Grip/battery
compartment
Lens contacts Reflex mirror
1.4 Rebel T3i/600D front camera controls
From bottom left to top right, here is a look at the front of the camera:
12
X
Red-eye Reduction/Self-timer lamp. When you have Red-eye Reduction
turned on, this lamp lights to help reduce the size of the subject’s pupils, which
minimizes the appearance of red-eye in the final image.
X
Shutter button. Press this button halfway down to focus on the subject, and
then press it completely to make the picture. You’ll learn more about focusing
and exposure in Chapter 2. In addition, when you half-press the shutter button,
the camera measures, or “meters,” the light and calculates the aperture and
shutter speed based on the current ISO needed to make a well-exposed picture.
Chapter 1 Setting Up the EOS Rebel T3i/600D
X
Remote control sensor. This sensor works with the accessory Remote
Controller RC-6 that can fire the camera’s shutter from up to 16.4 feet (5 meters)
from the camera. The remote includes the options for immediate or a 2-second
delay before shutter firing.
X
Grip/battery compartment. This is the molded area where your hand grips the
camera, and it serves as the battery compartment as well.
X
Reflex mirror. This mirror provides a view of the scene when you’re composing
the image in the viewfinder, and when you press the shutter button completely,
it flips up and out of the optical path to expose the image sensor to make the
picture. In Live View and Movie shooting, the mirror also flips up to give you a
live view of the scene.
X
Lens contacts. These contacts provide communication between the lens and
the camera.
X
Depth-of-Field Preview button. Press this button to stop down, or adjust, the
lens diaphragm to the current aperture (f-stop) so that you can preview the depth
of field in the viewfinder. The larger the area of darkness in the viewfinder, the
more extensive the depth of field will be. You can also use this button when
shooting in Live View. While you press the Depth-of-Field Preview button, you
can’t change the aperture.
At the lens’s maximum aperture, the Depth-of-Field Preview button does not
show a change because the camera’s diaphragm is fully open. The maximum
NOTE
aperture is the widest lens opening for the lens you’re using and it varies by lens.
X
Lens Release button. Press this button to release the lens from the lens mount,
and then turn the lens to remove it.
X
Flash button. In P, Tv, Av, M, and A-DEP shooting modes, press this button to
pop up and use the built-in flash. In some Basic Zone shooting modes, such as
Full Auto and Portrait, the flash fires automatically.
X
Built-in microphone. The built-in monaural microphone records sound when
you’re shooting movies. See Chapter 6 for more details on the microphone.
X
EF and EF-S lens mount index markers. The lens mount has a white and a red
mark for two types of lenses. The white mark on the lens mount is for Canon
EF-S lenses that have a white mark on the lens barrel. EF-S lenses are designed
for the smaller sensor size of the T3i/600D. The red mark on the lens mount is
for Canon EF lenses. EF lenses can be used on any Canon EOS camera. Just line
up the white or red mark on the lens barrel with the same color mark on the lens
mount, and then turn the lens to the right to attach it.
13
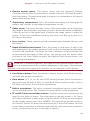
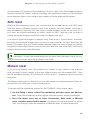
Canon EOS Rebel T3i/600D Digital Field Guide Top of the camera
Controls on the top of the camera, shown in Figure 1.5, enable you to use your thumb
and index finger on your right hand to control common adjustments quickly. Here is a
look at the top of the camera:
X
Focal plane mark. This is the point from which the lens’s minimum, or closest,
focusing distance is measured.
X
Hot shoe. You can mount an accessory Speedlite or third-party flash unit here.
The contacts provide communication between the flash and the T3i/600D.
DISP. button
ISO
speed
button
Focal plane mark
Hot shoe
Mode dial
Power switch
1.5 Rebel T3i/600D top camera controls
14
X
Mode dial. Turning this dial changes the shooting mode. Just line up the shooting mode you want to use with the white mark beside the dial. Shooting modes
are detailed in Chapter 2.
X
Power switch. This button switches the camera on and off.
Chapter 1 Setting Up the EOS Rebel T3i/600D
X
ISO speed button. Pressing this button displays the ISO speed screen on the
LCD so that you can change the ISO setting, which determines the sensor’s
sensitivity to light. In P, Tv, Av, M, and A-DEP shooting modes, you can select
Auto ISO to have the camera automatically determine the ISO from 100 to 6400,
or you can set the ISO yourself. Alternately, you can set the highest ISO setting
that the Auto ISO option uses. You can also turn on an additional high ISO setting, equivalent to 12800, by setting Custom Function I-2. In all automatic shooting modes, such as Portrait and Landscape, the camera automatically sets the
ISO between 100 and 3200.
X
DISP. button. Press this button to turn the LCD on and off, although you can
change this behavior on the Setup 2 menu. In Movie mode, holding the DISP.
button and pressing the zoom in or zoom out buttons enables you to use digital
zoom at a 3X to 10X zoom. Movie shooting is detailed in Chapter 6.
Custom Functions are detailed in Chapter 4.
CROSS REF
X
Main dial. Described earlier in this chapter.
X
Shutter button. Described in the previous section.
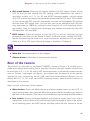
Rear of the camera
The controls on the back of the Rebel T3i/600D, shown in Figure 1.6, enable you to
make quick adjustments while you’re shooting. Some of the rear camera controls can
be used only in P, Tv, Av, M, and A-DEP shooting modes. In automatic camera modes
such as Portrait, Landscape, and Sports, the camera sets the majority of the camera
settings for you, so pressing the AF, WB, and Drive mode selection buttons has no
effect. But in P, Tv, Av, or M, and A-DEP shooting modes, these buttons function as
described in this section.
Here is a look at the back of the camera:
X
Menu button. Press the Menu button to display camera menus on the LCD. To
move among menu tabs, turn the Main dial or press the left or right cross keys on
the back of the camera. (The cross keys are the keys surrounding the Set button.)
X
Info. button. During still-image playback and in Movie mode, press Info. one or
more times to show more of less information with the image or view of the scene.
In still shooting, press the DISP. button, and then press the Info. button to switch
15
Canon EOS Rebel T3i/600D Digital Field Guide back and forth between the Quick Control and Shooting information screens. The
Camera Settings screen lists key camera settings for quick reference.
X
Viewfinder. On the Rebel T3i/600D, the viewfinder offers an approximately 95
percent view of the scene. The viewfinder uses a noninterchangeable Precision
Matte focusing screen that displays the nine autofocus (AF) points.
X
Dioptric adjustment knob. Turn this knob to adjust the sharpness for your
vision by –3 to +1 diopters. If you wear eyeglasses or contact lenses for shooting, be sure to wear them as you adjust the dioptric adjustment knob. To make
the adjustment, point the lens to a light-colored surface such as a white wall,
and then turn the control until the AF points in the viewfinder are perfectly sharp
for your vision.
Dioptric
adjustment knob
Menu
button
Viewfinder
Info.
button
Live View/Movie
shooting button
AE Lock/FE Lock/Index/Reduce button
AF-point
Selection/
Magnify button
Speaker
Aperture/
Exposure
Compensation
button
White Balance
button
AF mode button
DC cord hole
Access lamp
Quick
Drive Set Playback Erase Card slot cover
Articulated
button
LCD monitor Control mode button button
button button
Picture Style button
©Canon. Image courtesy of Canon, Inc.
1.6 Rebel T3i/600D rear camera controls
16
Chapter 1 Setting Up the EOS Rebel T3i/600D
The four cross keys and the Set button shown in Figure 1.6 are detailed separately
following this section.
X
Live View/Movie shooting button. Pressing this button enables you to begin
shooting in Live View mode, or to shoot movies when the Mode dial is set to
Movie shooting mode. During movie recording, a red dot appears on the LCD
screen to indicate that recording is underway.
X
AE Lock/FE Lock/Index/Reduce button. Pressing this button after pressing
the shutter button halfway enables you to lock the exposure on a specific point
in the scene. Then you can focus on another part of the scene. If you’re using
the built-in flash, pressing this button locks the flash exposure in the same way.
During image playback, you can press this button to display multiple images as
an index or four or nine images, or to reduce the size of an image you’ve enlarged
during image playback.
X
AF-point Selection/Magnify button. Press this button to activate the AF points
displayed in the viewfinder so that you can manually select an AF point in P, Tv,
Av, and M shooting modes. As you hold the button and turn the Main dial, you
can select one AF point, or you can select all the AF points to have the camera
automatically select the AF point or points used to focus. Then you can press
the Set button to select the center AF point, or press again to switch to automatic AF point selection. During image playback, you can press this button to
enlarge the preview image to check focus.
X
Speaker. Plays the audio recorded when you shoot a movie clip. You can adjust
the playback volume by turning the Main dial.
X
Card slot cover. Covers the housing for the SD (Secure Digital), SDHC (SD High
Capacity), or SDXC (SD Extended Capacity) memory card. Do not open this
cover while images are being recorded or erased from the memory card, and do
not turn off the camera.
X
DC cord hole. Use this connection with the accessory AC Adapter Kit ACK-E8 to
power the camera by plugging it into a household electrical outlet.
X
Access lamp. Lights when images are being written to the memory card. Do
not open the card slot cover or turn off the camera when this lamp is lit.
X
Erase button. During image playback, press this button to delete the currently
displayed image. Or you can press the left or right cross key to move to another
picture to delete.
17
Canon EOS Rebel T3i/600D Digital Field Guide X
Playback button. Press this button to display the last image or movie captured
on the LCD. To show more or less information during playback, press the Info.
button one or more times. Pressing the Index/Reduce button on the top-right
back of the camera during playback displays a grid of 2 × 2 or 3 × 3 images that
you can scroll through using the Main dial. Press the AF-point Selection/Magnify
button once or twice to return to single-image display.
X
Quick Control (Q) button. Press this button to display the Quick Control screen
on the LCD. From the Quick Control screen, you can change exposure and other
camera settings. During printing, press this button to print one or more images
from the SD card when the camera is connected to a compatible printer.
X
Aperture/Exposure Compensation button. Press and hold this button and
turn the Main dial to set Exposure Compensation in P, Tv, Av, and A-DEP shooting modes. In Manual mode, press and hold this button and turn the Main dial to
set the aperture.
X
Articulated LCD monitor. The color liquid-crystal 3-inch LCD monitor displays
the camera settings, camera menus, image previews, and the Quick Control
screen. You can choose from seven levels of LCD brightness. You can pull out
and turn the articulated LCD in virtually any direction to view the scene when
looking through the viewfinder is awkward, and when you’re shooting in Live
View and Movie modes.
The four buttons grouped around the Set button are collectively referred to as cross
keys. The functionality of the keys changes depending on whether you’re playing back
images, navigating camera menus, or changing exposure settings. Also you can adjust
the settings designated by the keys only in P, Tv, Av, M, and A-DEP modes. In automatic modes such as Portrait and Landscape, only some of the keys are available. For
example, in Portrait shooting mode, you can press the Drive mode key to select some
of the drive modes.
During image playback, the left and right cross keys move backward and forward
through the images stored on the memory card. On the camera menus, press the up
and down cross keys to move among options.
Here is a summary of the cross key and Set button functions:
X
18
AF mode button. Press this button to choose one of three autofocus modes:
One-shot AF (also known as AI Focus) for still subjects, AI Focus AF for subjects
Chapter 1 Setting Up the EOS Rebel T3i/600D
that may start to move or move unpredictably such as children and wildlife, or AI
Servo AF for tracking focus of moving subjects.
X
Picture Style button. Press this button to display the Picture Style screen
where you can choose the look of images in terms of contrast, color rendition,
saturation, and sharpness. In P, Tv, Av, M, and A-DEP shooting modes, you can
choose Auto, Standard, Portrait, Landscape, Neutral, Faithful, or Monochrome
Picture Styles, and you can create up to three of your own Picture Styles.
X
White Balance button. Press this button to display the White Balance screen
where you can choose among seven preset White Balance options, or choose
Custom White Balance in P, Tv, Av, M, and A-DEP shooting modes. In automatic
modes such as Portrait and Landscape, you can choose a similar adjustment
called Lighting or Scene type.
X
Drive mode button. Press this button to set the Drive mode in P, Tv, Av, M,
and A-DEP shooting modes and in some automatic modes. Depending on the
shooting mode, you can choose to shoot one picture at a time, to shoot continuously at 3.7 frames per second (fps), or to shoot in one of the Self-timer/Remote
control modes. The maximum burst during continuous shooting is approximately
34 Large/Fine JPEG images or 6 RAW images. During image playback, press
this button to move to a previous image.
X
Set button. Press this button to confirm changes you make on the camera
menus, and to display submenus.
Side of the camera
On the side of the T3i/600D is a set of terminals under a cover and embossed with
icons that identify the terminals, which include
X
External microphone IN terminal. This terminal enables the connection of an
external stereo microphone that you can use to record sound with videos.
X
Remote control terminal. This terminal enables the connection of an accessory Remote Switch RS-60E3.
X
Audio/Video OUT/Digital terminal. The A/V OUT terminal enables you to connect the camera to a nonhigh-definition (HD) television set using the A/V cable
supplied in the camera box to view still images and movies on the TV. This cord
is also used for printing directly from the camera to the printer.
19
Canon EOS Rebel T3i/600D Digital Field Guide X
HDMI mini OUT terminal. The HDMI (High-Definition Multimedia Interface) mini
OUT terminal is used to connect the camera to an HD television using the accessory HDMI Cable HTC-100 cable to play back still images and movies on the TV.
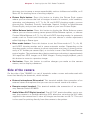
Lens controls
Depending on the lens you are using, the number and type of controls offered vary.
For example, if you are using an Image Stabilized lens, such as the lens in Figure 1.7,
the lens barrel has a switch to turn on Image Stabilization, which helps counteract the
motion of your hands as you hold the camera and lens.
Many Canon lenses offer the Focus mode switch that enables you to switch between
autofocus or manual focus. Image Stabilization (IS) lenses offer controls to turn stabilization on or off. Lens controls differ by lens.
Depending on the lens, additional controls may include the following:
20
X
Focusing distance range selection switch. Although not offered on the lens in
Figure 1.7, this switch determines and limits the range that the lens uses when
seeking focus to speed up autofocusing. The focusing distance range options
vary by lens.
X
Image Stabilizer switch. This switch turns Optical Image Stabilization on or off.
Optical Image Stabilization (IS) corrects vibrations at any angle when handholding the camera and lens. IS lenses typically allow sharp handheld images of two
or more f-stops over the lens’s maximum aperture.
X
Stabilizer mode switch. Offered on some telephoto lenses, this switch has
two modes: one mode for standard shooting and one mode for vibration correction when panning at right angles to the camera’s panning movement.
X
Zoom ring. The zoom ring adjusts the lens in or out to the focal lengths marked
on the ring.
X
Zoom setting. The focal length at which a zoom lens is set.
X
Focusing ring. For lenses that have a focusing mode switch, the lens-focusing
ring can be used at any time regardless of focusing mode by switching to Manual
Focus (MF) on the side of the lens, and then turning this ring to focus.
Chapter 1 Setting Up the EOS Rebel T3i/600D
Zoom setting
Focusing ring
Filter
mounting
thread
Zoom ring
Distance scale
Focus
mode
switch
Image Stabilizer switch
1.7 Lens controls
X
Distance scale and infinity compensation mark. This shows the lens’s minimum focusing distance to infinity, denoted as an “8” on its side. The infinity
compensation mark compensates for the shifting of the infinity focus point that
results from changes in temperature. You can set the distance scale slightly past
the infinity mark to compensate.
The LCD
With the T3i/600D, the 3-inch LCD not only displays captured images and current camera settings, but it also provides a live view of the scene when you’re shooting in Live
View and Movie modes. The LCD displays 100 percent coverage of the scene. Figure
1.8 provides LCD details.
21
Canon EOS Rebel T3i/600D Digital Field Guide Shutter speed
Aperture
Exposure level indicator
Main dial pointer
Exposure Compensation
amount
AEB range
Auto Lighting Optimizer
ISO speed
Shooting mode
Picture Style
AF mode
ONE SHOT
One-Shot AF
AI FOCUS
AI Focus AF
AI SERVO
AI Servo AF
MF
Manual Focusing
1/125
P
–3
2 1
0
F5.6
Highlight tone priority
D+ 3200
1 2 +3
Flash Exposure
Compensation
External Flash
Exposure Compensation
WB
+
ONE SHOT
Q
Built-in flash
func. setting*1
514
Image-recording quality
Quick Control icon
White Balance
Auto
Daylight
Shade
Cloudy
Tungsten light
White fluorescent light
Flash
Custom
2
1
+
Large/Fine
Large/Normal
Medium/Fine
Medium/Normal
Small 1/Fine
Small 1/Normal
Small 2 (Fine)
Small 3 (Fine)
RAW
RAW+Large/Fine
Number of possible shots
Number of possible shots
during WB bracketing
Self-timer countdown
Battery check
Drive mode
Single shooting
Continuous shooting
Self-timer: 10 sec./Remote control
Self-timer: 2 sec.
Self-timer: Continuous
Eye-Fi transmission status*2
WB
White Balance Correction
White Balance Bracketing
Metering mode
Evaluative metering
Partial metering
Spot metering
Center-weighted average metering
*1: Displayed when the built-in flash is popped up.
*2: Displayed if an Eye-Fi card is used.
1.8 Rebel T3i/600D LCD with the shooting settings displayed
Viewfinder display
On the Rebel T3i/600D, the optical, eye-level pentamirror viewfinder displays approximately 95 percent of the scene that the sensor captures. In addition, the viewfinder
22
Chapter 1 Setting Up the EOS Rebel T3i/600D
displays the AF points, a 4-percent Spot metering circle that is displayed at the center
of the viewfinder, as well as information at the bottom that displays the current shooting settings, a focus confirmation light, and other settings. Figure 1.9 provides viewfinder display details.
AF point display indicator <>
Spot metering circle
Focusing screen
AF points
<ISO>
ISO speed
WB
H
-2
1
2 ISO
1
D+
Max. burst
< >Flash-ready
Improper FE
Lock warning
< >Flash Exposure
Compensation
WB
B/W
< >Focus confirmation light
< >AE Lock/
AEB in-progress
< H>High-speed
sync (FP flash)
< *> FE Lock/
FEB in-progress
White Balance
Correction
<B/W> Monochrome shooting
ISO speed
<D+>Highlight tone priority
Exposure level indicator
Exposure Compensation amount
AEB range
Red-eye Reduction lamp-on indicator
Aperture
Shutter speed
FE Lock (FEL)
Busy (buSY)
Built-in flash recycling
( buSY)
Card full warning (FuLL)
Card error warning (Card)
No card warning (Card)
1.9 Rebel T3i/600D viewfinder display
Nine AF points are displayed in the viewfinder. You can manually select an AF point by
pressing the AF-point Selection/Magnify button and turning the Main dial until the AF
point you want is selected. If the camera automatically selects the AF point or points,
23
Canon EOS Rebel T3i/600D Digital Field Guide the selected AF point or points are highlighted in the viewfinder when you press down
the shutter button halfway.
You can verify exposure settings, focus, and more in the viewfinder before making a
picture. The display changes depending on the shooting mode you’re using.
Getting Started with the Rebel T3i/600D
Even if you’ve already set up the T3i/600D, I suggest that you review this section for
settings that you may have missed or want to adjust.
Many people are afraid that changing camera settings will “mess up” the pictures that
they’re getting, and that they won’t know how to reset the camera if they don’t like
the changes they’ve made. But there is no reason to worry because Canon provides a
reset option so that you can always go back to the original settings on the Rebel
T3i/600D and start fresh.
To reset the camera to the original settings, follow these steps:
1. Press the Menu button, and then press the right cross key to select the
Setup 3 menu.
2. Press the down cross key to select Clear settings, and then press the Set
button.
3. To reset the camera to factory settings, press the up or down cross key to
select Clear all camera settings, and then press the Set button. The Clear all
camera settings confirmation screen appears.
4. Press the right cross key to select OK.
Memory Cards
One of the important choices you make is deciding which memory card you use in the
camera. You can use SD and SDHC, SDXC, and Eye-Fi SD memory cards. Not all
memory cards are created equal, and the type and speed of media that you use affects
the Rebel T3i/600D’s performance, including how quickly images are written to the
memory card, and your ability to continue shooting during the image-writing process.
Memory card speed also affects the speed at which images display on the LCD. And
with the high-definition video capability of the Rebel, Canon recommends using a
Class 6 or higher memory card.
24
Chapter 1 Setting Up the EOS Rebel T3i/600D
In addition, the T3i/600D accepts SDXC memory cards that have a greater storage
capacity than previous SD cards. Eye-Fi SD cards have a built-in Wi-Fi transmitter and
internal antenna for wireless, high-speed transfer of images and video from the camera to the computer or to online websites from Wi-Fi-enabled locations or your home
network. Eye-Fi also supports geotagging, where geographical information is recorded
with the image metadata.
At the time of this writing, SDXC cards are not supported by all computer operating
systems. If you insert the card into a computer or card reader and receive a message
asking you to format the card, choose Cancel to avoid overwriting the SDXC format.
For more information, visit the www.sdcard.org/developers/tech/sdxc/using_sdxc
website.
The type of image file that you choose for shooting also affects the speed of certain
tasks. For example, JPEG image files write to the memory card faster than RAW or
RAW + Large JPEG files. JPEG and RAW file formats are discussed in detail later in
this chapter.
As you take pictures, the LCD on the Rebel T3i/600D shows the approximate number
of images that will fit on the memory card. The number is approximate because each
image varies slightly, depending on the ISO setting, the file format and resolution, the
Picture Style, and the image itself (different images compress differently). And as you
shoot video, the Rebel displays the recording time on the LCD. Video recording shuts
off automatically when the size of the movie file reaches 4GB. For still and video
shooting, an 8GB or 16GB card is a good size to consider.
When you buy a new memory card, be sure to always format the card in the camera
and never on your computer. Always off-load all images and movies to the computer
before formatting because formatting erases images and movies even if you’ve protected them. Also be sure to format cards that you’ve used in other cameras when
you begin using them in the Rebel T3i/600D. Formatting a memory card in the camera
also cleans any image-related data, freeing up space on the card, and it manages the
file structure on the card so the Rebel T3i/600D and memory card work properly
together.
For the following step-by-step tasks that involve the camera menus, just press
the Menu button, turn the Main dial to move to the camera menu tab you want.
NOTE
Press the up or down cross key to select an option, and then press the right cross key
to select OK.
25
Canon EOS Rebel T3i/600D Digital Field Guide To format a card in the camera, be sure that you download all images and movies to
your computer first, and then follow these steps:
1. On the Setup 1 camera menu tab, select Format, and then press the Set
button. The Format screen appears asking you to confirm that you want to format the card and lose all data on the card.
You can optionally choose the Low-level format option that takes longer but
completely erases all data and the recordable sectors on the card. The low-level
format can improve the performance of the card.
2. Select OK, or to do a Low level format, press the Erase button to place a
check mark next to Low level format, and then select OK.
3. Press the Set button. The camera formats the card, and then displays the
Setup 1 menu.
It is generally a good idea to format memory cards every few weeks in the camera.
Here’s how to avoid taking pictures when no memory card is in the camera. On
the
Shooting 1 menu, select Release shutter without card. Press the Set butNOTE
ton, select Disable, and then press the Set button again.
Avoid Losing Images
When the camera’s red access light — located on the back of the camera — is
blinking, it means that the camera is recording or erasing image data. When the
access light is blinking, do not open the card slot cover, do not attempt to remove
the memory card, do not turn off the camera, and do not remove the camera battery. Any of these actions can result in lost images and damage to the memory
card. There is a beep to let you know that images are being written to the card,
but make it a habit to use the access light as the indicator to not to open the
memory card slot cover or turn off the camera.
Choosing the File Format and Quality
When it comes to deciding what kind of image to capture, you have three choices. You
can first choose whether to shoot JPEG or RAW images, and then you can decide the
size or quality of the files. The file format and quality level decisions are important ones
because they determine not only the number of images that you can store on the
memory card, but also the size at which you can print images from the Rebel T3i/600D.
26
Chapter 1 Setting Up the EOS Rebel T3i/600D
Many people want to maximize the number of images they can store on the memory
card. And choosing JPEG images at a lower quality level enables you to store more
images on the card. But also consider that with a high-resolution camera, you also
want the best image quality that you can get. And with the lower prices of memory
cards today, you can shoot at the highest quality setting and still have room on the
memory card for lots of pictures. At the highest quality settings, you can make beautiful prints at approximately 14.5 × 21.6 inches on inkjet printers. Even if you don’t foresee printing images any larger than 4 × 5 inches, you may get a once-in-a-lifetime shot
that you want to print as large as possible. For this reason, and to take advantage of
the Rebel T3i/600D’s fine image detail and high resolution, consider setting a highestquality setting for all your shooting.
The JPEG quality options on the Rebel T3i/600D are displayed with icons on the
Quality screen that indicate the compression level of the files and the recording size.
For example, a solid quarter circle and the letter “L” indicate the largest JPEG file size,
with the solid quarter circle indicating the lowest level of file compression for the highest image quality. Likewise, a jagged quarter circle indicates higher compression levels and relatively lower quality, and “M” indicates medium quality. To help you decide
the image quality setting to use, file formats and compression are detailed next.
JPEG format
JPEG, an acronym for Joint Photographic Experts Group, is a popular file format for
digital images that provides not only smaller file sizes than the RAW files, but also
offers the advantage of being able to display your images straight from the camera on
any computer, on the web, and in e-mail messages. To achieve the small file size, JPEG
compresses images, and, in the process, discards some data from the image —
typically data that you would not easily see. This characteristic of discarding image data
during compression is why JPEG has a lossy moniker. The amount of data discarded
depends on the level of JPEG compression. High compression levels discard more
image data than low levels. The higher the compression level, the smaller the file size
and the more images that you can store on the memory card, and vice versa.
As the compression level increases to make the file size smaller, more of the original
image data is discarded, and the image quality degrades. Compression also introduces
defects, referred to as artifacts, which can create a blocky, jagged look, blurring, and
diminished color fidelity in the image. At low compression levels, artifacts are minimal, but as the level increases, they become more noticeable and objectionable. You’ll
see the effects of high compression ratios when you enlarge the image to 100 percent in an image-editing program on the computer. To get the highest-quality images,
use the lowest compression and the highest quality settings, such as Large/Fine. If
27
Canon EOS Rebel T3i/600D Digital Field Guide space on the card is tight, then use the next lower setting, Large/Normal. If you use
lower quality settings, just be aware that the image quality diminishes accordingly.
If you edit JPEG images in an editing program, image data continues to be discarded each time you save the file. I recommend downloading JPEG files to
TIP
the computer, and then saving them as TIFF (Tagged Image File Format) or PSD
(Photoshop’s file format) files. TIFF and PSD, available in Adobe’s Photoshop imageediting program, are lossless file formats.
When you shoot JPEG images, the camera’s internal software processes, or edits,
the images before storing them on the memory card. This image processing is an
advantage if you routinely print images directly from the SD card, and if you prefer not
to edit images on the computer. And because the T3i/600D offers a variety of Picture
Styles that change the way that image contrast, saturation, sharpness, and color are
rendered, you can get very nice prints with no editing on the computer.
Should You Use the S2 and S3 JPEG Options?
On the T3i/600D you have two additional JPEG options: S2 and S3. Both options
create images that are saved with low compression, but at very small sizes. The
S2 option produces images at a diminutive 3.5 × 5.1 inches with a 2.5 megapixel
recording size, but the image is at a size that fits into a digital photo frame with
no resizing needed in an editing program. The S3 option produces even smaller
images that are ready for you to send in e-mail or to post on the web, and it
records only 0.3 megapixels. These are convenient options, but because you
cannot shoot these small files in combination with a larger file size, you have to
be certain that you will never want larger versions of your S2 and S3 images.
Rather than set the image quality to these small sizes, you can instead resize L,
M, S1, and S2 images in the camera so that you have the size you need for different uses such as displaying in a photo frame or e-mailing. The process of
resizing images in the camera is detailed later in this chapter.
Picture Styles are detailed in Chapter 3.
CROSS REF
The JPEG quality options reflect the megapixels recorded for the image. At the Large
settings, images are recorded at 18 megapixels. The Medium quality options record 8
megapixels, while Small quality options record 4.5 megapixels.
28
Chapter 1 Setting Up the EOS Rebel T3i/600D
RAW format
RAW files store image data directly from the camera’s sensor to the memory card
with a minimum of in-camera processing. Unlike JPEG images, which you can view in
any image-editing program, you must view RAW files using the Canon Image Browser
or Digital Photo Professional, which are programs included on the EOS Digital Solutions
Disk. Or you can use another RAW-compatible program such as Adobe Bridge,
Lightroom, or Camera Raw. Most operating systems, such as the Mac, provide regular updates so that you can view RAW images on your computer without first opening
them in a RAW conversion program. To print and share RAW images, you must first
convert them by using a program that supports the T3i/600D’s RAW file format, and
then save them as a TIFF or JPEG file. You can use Canon’s Digital Photo Professional
program or a third-party RAW-conversion program to convert RAW images.
With all these caveats, you may wonder why you’d choose RAW shooting. The answer
is simple and compelling — RAW files offer the highest image quality and the ultimate
flexibility in correcting and perfecting the final image. With RAW images, you can
change key camera settings after you take the picture. For example, if you didn’t set
the correct white balance or exposure, you can change it when you convert the image
on the computer.
In addition, you can adjust the image brightness, contrast, and color saturation — in
effect, you have a second chance to correct underexposed or overexposed images,
and to correct the color balance, contrast, and saturation after you take the picture.
The only camera settings that the Rebel T3i/600D applies to RAW files are aperture,
ISO, and shutter speed. Other settings, such as White Balance, and Picture Style, are
“noted,” but not applied to the file. As a result, you have a great deal of control over
how image data looks when you convert a RAW image.
Because RAW is a lossless format (no loss of image data), image quality is not
degraded by compression. However, RAW files are larger, so you can store fewer
RAW images on the memory card than JPEG images.
RAW files are denoted with a .CR2 file name extension. After converting the RAW
data, you can save the image in a standard file format such as TIFF or JPEG.
RAW+JPEG
On the Rebel T3i/600D, you can also choose to capture both RAW and Large/Fine
JPEG images simultaneously. The RAW+JPEG option on the image Quality screen
shown in Figure 1.10 is handy when you want the advantages that RAW files offer,
and you also want a JPEG image to quickly post on a website or to send in e-mail. If
29
Canon EOS Rebel T3i/600D Digital Field Guide you choose RAW+JPEG, both images are saved in the same folder with the same file
number but with different file extensions. RAW files have a .CR2 extension, and JPEG
files have a .JPG extension.
Table 1.1 shows the choices you have for image quality on the T3i and how each
affects the number of images you can capture when you’re using Continuous drive
mode and shooting a series of images, called a burst. You’ll also see the maximum
number of images that you can shoot in a burst on the right side of the viewfinder.
This display only goes up to 9, so if the maximum number is greater than 9, it is displayed as “9.”
The same image quality settings are available when you are shooting movies.
Just set the Mode dial to Movie mode, and then choose the Movie 2 camera
menu to set the recording size.
TIP
Table 1.1 Image Quality, Size Options, and Burst Rates
Image quality
Approximate size File size in MB Maximum burst
in megapixels (MP)
rate (4GB card)
JPEG
17.9
Large/Fine
Large/Normal
Medium/Fine
8
Medium/Normal
Small/Fine
4.5
Small/Normal
6.4
34
3.2
1120
3.4
1070
1.7
2100
2.2
1670
1.1
3180
S2
2.5
1.3
2780
S3
0.35
0.3
10780
RAW
RAW
17.9
24.5
6
RAW
+JPEG
RAW+Large/Fine
JPEG
17.9 each
30.9
3
To set the image quality, follow these steps:
1. On the Shooting 1 menu select Quality, and then press the Set button. The
Quality screen appears with the currently selected quality setting displayed
along with the image dimensions in pixels and the approximate number of
images you can store on the current memory card in the camera.
30
Chapter 1 Setting Up the EOS Rebel T3i/600D
2. Press the right or left cross
key to select the size and
quality that you want, and
then press the Set button.
Quality
Resizing JPEG images
in the camera
18M 5184x3456 [ 1982 ]
1
2
3
2
+
If you want to have images read to
SET OK
use off the memory card in a digital
1.10 The image Quality screen
photo frame, on a web or social media
site, or to send in e-mail, you can resize most JEPG images directly in the camera.
When you resize an image, the T3i/600D creates a copy of the original file, resizes it to
the size you choose, and then saves it as a new file on the memory card. The original
image is left intact on the memory card so that you have a full-size image for editing
and printing. You can only resize JPEG images captured as Large, Medium, S1, or S2.
RAW and S3 JPEG images can’t be resized.
When you resize images, the aspect ratio and pixel count are set as well. The aspect
ratio refers to the relationship of the image width to height. Standard print sizes have
aspect ratios that may be different from the image’s aspect ratio. For example, a
4 × 6-inch print has a 3:2 aspect ratio while an 8 × 10-inch print has a 5:4 aspect ratio.
The resize option enables you to fit the image to the print’s aspect ratio with varying
amounts of cropping to make the image fit the paper size. To figure out the print size
that each aspect ratio produces, multiply each number in the ratio by 2. A 3:2 aspect
ratio translates to 6 × 4, or a 4 × 6-inch print.
You can resize the JPEG images as follows:
X
Large can be resized to M, S1, S2, or S3.
X
Medium can be resized to S1, S2, or S3.
X
S1 can be resized to S2 or S3.
You can also choose the resolution (or pixel count) and the aspect ratio as shown in
Table 1.2 when you are shooting in Live View when you’re shooting in P, Tv, Av, M,
and A-DEP shooting modes. Aspect ratios can be set for Live View shooting on the
Shooting 3 menu. Just select Aspect ratio, press the Set button, and then select the
aspect ratio you want. Then when you begin shooting in Live View, nonprinting lines
show the amount of the scene that will be in the final print based on the aspect ratio
you chose for the 4:3, 16:9, and 1:1 aspect ratios.
31
Canon EOS Rebel T3i/600D Digital Field Guide Table 1.2 Aspect Ratio Options
Quality
M
S1
S2
S3
Aspect ratio with megapixels (MP) or pixel count in parenthesis
3:2
4:3
16:9
1:1
3456 × 2304
3072 × 2304
3456 × 1944
2304 × 2304
(8 MP)
(7 MP)
(6.7 MP)
(5.3 MP)
2592 × 1728
2304 × 1728
2592 × 1456
1728 × 1728
(4.5 MP)
(4 MP)
(3.8 MP)
(3 MP)
1920 × 1280
1696 × 1280
1920 × 1080
1280 × 1280
(2.5 MP)
(2.2 MP)
(2.1 MP)
(1.6 MP)
720 × 480
640 × 480
720 × 400
480 × 480
(350,000 pixels)
(310,000 pixels)
(290,000 pixels)
(230,000 pixels)
RAW images are saved at the camera’s native 3:2 aspect ratio, but if you apply
a ratio, it is appended to the RAW file. Then when you open the image in
Canon Digital Photo Professional, the image is shown with chosen aspect ratio.
NOTE
To resize an L, M, S1, or S2 JPEG image, follow these steps:
1. On the Playback 1 menu, highlight Resize, and then press the Set button.
The image appears on the LCD with the resize icon at the upper left.
2. Press the Set button, and then select the size you want.
3. Press the Set button. The Save as new file controls appear.
4. Select OK, and then press the Set button. A message appears noting the
folder in which the image will be saved and file number.
5. Press the Set button to OK the message. The original image appears.
Working with Folders
With the T3i/600D, the camera automatically creates a folder in which to store images.
However, you can set up additional folders and that’s helpful if you want to keep
images for different scenes and subjects in separate folders. Plus using folders can
help you organize images as you download them to the computer. On the T3i/600D,
each folder can contain up to 9,999 images, and when that number is reached, the
camera automatically creates a new folder.
32
Chapter 1 Setting Up the EOS Rebel T3i/600D
The folder numbering sequence is straightforward. It starts with the default 100CANON
folder and goes up to 999CANON. You can create new folders either in the camera or
on the computer. Here are the folder guidelines using either option.
When image 9999 is recorded within a folder on the memory card, the camera displays an error message, and you cannot continue shooting until you replace the memory card, regardless of whether the card contains additional free space. This may
sound innocuous, but it can cause missed shots. So if the camera stops shooting, try
replacing the card.
X
Creating folders in the camera. Folders created in the camera are numbered
sequentially, and begin with one number higher than the last number in the
existing folder. The camera automatically creates folder 100CANON; therefore,
if you create a new folder, the next folder name is 101CANON. When you create
folders in the camera, the folder-naming structure is preset and cannot be
changed. If you insert a memory card from another Canon EOS dSLR, the folder
retains the folder naming from the other EOS camera until you format the card
in the T3i/600D.
X
Creating folders on the computer. You can also create folders on the computer for more flexibility in file naming. However, you must follow naming conventions. Each folder must be labeled with a unique 3-digit number from 101 to
999. Then a combination of up to five letters (upper- and/or lowercase) and/or
numbers can be added with an underscore after the number. No spaces are
allowed and the same three-digit number can’t be repeated. So, you can create
a folder named 102CKL_1, but not one named 102SKL_1.
If you format the memory card, the folders you created either in the camera or on the
computer are erased along with all images. The only folder that isn’t erased is the
default 100CANON folder.
When you format the memory card, all existing folders except 100CANON are deleted.
Thus you need to create new folders after you format the card.
To view an existing folder or create a new folder, follow these steps:
1. On the Setup 1 camera menu tab, highlight Select Folder, and then press
the Set button. The Select folder screen appears showing existing folders and
the number of images in each folder.
2. To create a new folder, highlight Create folder, and then press the Set button. The camera displays the Select folder screen with a confirmation message
to create a folder with the next incremented number.
33
Canon EOS Rebel T3i/600D Digital Field Guide 3. Select OK, and then press the Set button. The Select folder screen appears
with the newly created folder selected.
Choosing File Numbering
The Rebel T3i/600D automatically numbers your images for you, but you can change
the sequence to suit your work.
At the default settings, the Rebel
numbers images and assigns prefixes
and file extensions. Both JPEG and
RAW files begin with the prefix IMG.
Movie files begin with MVI_ and have
a .mov file extension. The flexibility
File numbering
Continuous
comes in because you can choose
Auto reset
the type of file-numbering method
Manual reset
that the camera uses, and your choice
can help you manage images on your
1.11 The File numbering options screen
computer. The file-numbering options
are Continuous, Auto reset, and Manual reset (shown in Figure 1.11).
Continuous file numbering
When you begin using the T3i/600D, the camera automatically numbers images
sequentially. When you replace the memory card, the camera remembers the last
highest image number and continues numbering from the last file number. Images are
numbered sequentially using a unique, 4-digit number from 0001 to 9999. The
camera continues sequential numbering until you shoot image number 9999. At that
point, the camera creates a new folder, and new images that you shoot restart with
number 0001.
This file-numbering sequence continues uninterrupted until you insert a memory card
that already has images on it. At that point, the T3i/600D notes the highest file number
on the memory card, and then uses the next highest number when you take the next
image — provided that the number is higher than the highest image number stored in
the camera’s memory. Stated another way, the camera uses the highest number that
is either on the memory card or that is stored in the camera’s internal memory. Then
the camera uses that number to continue file numbering. If it is important to you that
files be numbered consecutively, then be sure to insert formatted/empty memory
cards into the camera.
34
Chapter 1 Setting Up the EOS Rebel T3i/600D
An advantage of Continuous file numbering is that, to a point, this file-numbering option
ensures unique file names, making managing and organizing images on the computer
easier because there is less chance that images will have duplicate file names.
Auto reset
With this file-numbering option, you can have the file number restart with 0001 each
time you insert a different memory card. If the memory card has images stored on it,
then numbering continues from the highest image number stored on the card. So if
you want the image numbering to always begin at 0001, then be sure to insert a
freshly formatted memory card each time you replace the card.
If you like to organize images by memory card, Auto reset is a good option. However,
be aware that multiple images that you store on the computer will have the same file
name. This means that you should create separate folders on the computer and follow
scrupulous folder organization to avoid file name conflicts and potentially overwriting
images that have the same file name.
Now is a good time to create a system for storing images in folders on your
computer. I know from experience that the time spent creating a solid file sysTIP
tem for storing images pays big dividends over time.
Manual reset
If you choose Manual reset, the camera first creates a new folder on the memory
card, and then it saves images to the new folder starting with file number 0001. Then
the file numbering returns to Continuous or Auto reset — whichever option you used
previously.
The Manual reset option is handy if you want the camera to create separate folders for
images that you take over a span of several days.
To change the file-numbering method on the T3i/600D, follow these steps:
1. On the Setup 1 menu, select File numbering, and then press the Set button. Three file-numbering options appear with the current setting highlighted.
2. Press the down cross key to select Continuous, Auto reset, or Manual
reset, and then press the Set button. The option you choose remains in effect
until you change it with the exception of Manual reset, as noted previously.
35
Canon EOS Rebel T3i/600D Digital Field Guide Additional Setup Options
The T3i/600D has a number of handy setup options that can make your shooting easier
and more efficient. You may have already set some of these options, but in case you
missed some, you can check Table 1.3 and see which ones you want to set or change.
The additional setup options are typically those that you set up only once, although
some you may revisit in specific shooting scenarios. For example, I prefer to turn on
the autofocus confirmation beep in most shooting situations. But at a wedding or an
event where the sound of the beep is intrusive, I turn it off.
Also, you may prefer to have vertical images automatically rotate on the LCD to the
correct orientation. However, this rotation makes the LCD image smaller, so you may
prefer to rotate vertical images only for computer display.
Table 1.3 provides a guide for these additional setup options. If you don’t see an
option listed in the table, check to see which shooting mode you’ve set on the Mode
dial. Some options are not available in the automatic shooting modes such as Portrait,
Landscape, and Sports. If an option isn’t available, just change the Mode dial to P, Tv,
Av, M, or A-DEP to access the option. In other instances, the options are detailed in
later chapters of this book.
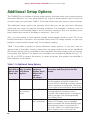
Table 1.3 Additional Setup Options
Turn the
Main dial to
choose this
Menu tab.
Press a cross
key to select
this Menu
option.
Press the Set
button to
display these
Menu suboptions
on-screen.
Press a cross key to select the option
you want, and then press the Set
button.
Shooting 1
Beep
Enable/Disable
Choose On for audible confirmation
that the camera achieved sharp focus.
Choose Off for shooting scenarios where
noise is intrusive or unwanted. The beep
is also used for the Self-timer drive mode.
36
Release shut- Enable/Disable
ter without
card
Choose Disable to prevent inadvertently
shooting when no memory card is
inserted. The Enable option is marginally
useful, and then only when gathering
Dust Delete Data.
Image review Off, 2, 4, 8
sec., and Hold
Longer durations of 4 or 8 seconds to
review LCD images have a negligible
impact on battery life except during travel,
when battery power is at a premium. I
use 4 sec. unless I’m reviewing images
with a subject; then I choose 8 sec.
Chapter 1 Setting Up the EOS Rebel T3i/600D
Press the Set
button to
display these
Menu suboptions
on-screen.
Press a cross key to select the option
you want, and then press the Set
button.
Turn the
Main dial to
choose this
Menu tab.
Press a cross
key to select
this Menu
option.
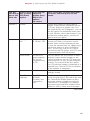
Playback 1
Rotate
Setup 1
Auto power
off
30 sec., 1, 2, 4, This setting determines when the cam8, 15 min., Off era turns off after you haven’t used it.
Shorter times conserve battery power.
To turn the camera back on, lightly press
the shutter button or press the Menu,
DISP., a cross key, and so on. Even if
you choose the Off option, the LCD turns
off automatically after 30 minutes.
Auto rotate
On the LCD
and computer,
On for the
computer only,
or Off
Two On options let you choose to automatically rotate vertical images to the
correct orientation on the LCD and computer monitors, or only on the computer
monitor. If you choose the first option,
the LCD preview image is displayed at a
reduced size. Choose Off for no rotation
on the camera or computer.
Screen color
1, 2, 3, or 4
Choose the screen color for the Shooting
settings screen.
Eye-Fi
settings
Eye-Fi Trans
(Enable/
Disable), and
Connection
info.
This menu option is available only when
you’re using an Eye-Fi SD card in the camera. Choose the Enable option to allow
automatic wireless image or movie file
transmission. Connection info. displays
the access point and MAC address information as well as other error messages.
Choose this option to rotate vertical
images to the correct orientation on the
LCD only, albeit at a smaller size. You
can rotate by 90 or 270 degrees. You can
use this option for thumbnail Index view
as well. Movies cannot be rotated. If you
set the Auto rotate option, you do not
need to use this option.
continued
37
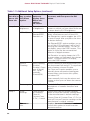
Canon EOS Rebel T3i/600D Digital Field Guide Table 1.3 Additional Setup Options (continued)
Turn the
Main dial to
choose this
Menu tab.
Press a cross
key to select
this Menu
option.
Press the Set
button to
display these
Menu suboptions
on-screen.
Press a cross key to select the option
you want, and then press the Set
button.
Setup 2
LCD
brightness
Seven levels
of brightness
Choose this menu option to display a
screen on which you can select from one
to seven levels of LCD brightness.
LCD off/on
Shutter btn.,
Shutter/DISP.,
Remains on
Choosing one of these options determines what buttons turn off the LCD.
The Shutter btn. option toggles the LCD
on and off each time you press the shutter button halfway.
The Shutter/DISP. option enables you to
turn off the LCD and keep it off by halfpressing the shutter button. To turn on
the display, press the DISP. button. This
option is most like the conventional
behavior of digital cameras.
The Remains on option keeps the LCD
on even when you half-press the shutter
button. To dismiss the LCD display,
press the DISP. button.
Sensor
Cleaning
Auto Cleaning
(Enable/
Disable), Clean
now (Cancel/
OK), Clean
manually
(Cancel/OK)
Sensor cleaning is performed when you
turn the camera on and off. To stop automatic cleaning, choose Disable.
The Clean now option enables you to
manually have automatic cleaning performed when you choose this option,
and select OK.
Clean manually locks up the mirror and
shutter so that you can clean the sensor
yourself.
Feature guide Enable, Disable The default Enable option displays brief
descriptions of camera functions and
options.
Setup 3
Clear
Settings
Firmware
Ver.
38
Clear all camera settings,
Clear all
Custom Func.
(C.Fn.), Cancel
Choose the Clear all camera settings
option to reset the camera settings back
to the manufacturer’s default settings.
Choose Clear all Custom Func. (C.Fn.) to
reset all Custom Function settings to the
manufacturer’s original settings.
Displays the current firmware version.
Choose this option to install a newer
firmware version.
Chapter 1 Setting Up the EOS Rebel T3i/600D
To change these options, press the Menu button, and then follow the instructions in
the subheadings in Table 1.3. Options for shooting movies are detailed in Chapter 6.
Adding a Copyright to Images
In broad terms, a copyright identifies your ownership of images. On the T3i/600D, you
can add your copyright information to the metadata so that your name and other information is embedded into each image that you shoot. This copyright information can
be a first step in proving your ownership of images that are used without your permission. For this and other reasons, I encourage you to enter your copyright information.
You only have to enter it once for it to be used on all your images. Also, the copyright
information appears only in the image metadata, and not on printed images.
TIP
To complete the copyright process, register your images with the United
States Copyright Office. For more information, visit www.copyright.gov.
To enter your copyright and name on your images, follow these steps:
1. On the Setup 3 camera menu tab, highlight Copyright information, and
then press the Set button. The Copyright information screen appears.
2. Highlight the option you want,
such as Enter author’s name
or Enter copyright details, and
then press the Set button. A
screen appears where you can
enter the name or details (shown
in Figure 1.12).
Enter author’s name
0/63
Q
A
. @– _ / : ; ! ? ( ) [ ] < >0 1 2 3 4 5 6 7 8 9
abcdefghijklmnopqrstuvwxyz
ABCDEFGHIJKLMNOPQRSTUVWXYZ
* # , +=$% & ' " { }
3. Press the Q button to activate
INFO. Cancel
MENU OK
the keyboard portion of the
1.12 The author name entry screen
screen, and then press the left
or right cross key or turn the Main dial to move the cursor to the letter you
want to enter. You can enter up to 63 letters, symbols, and numbers.
4. Press the Set button to insert the letter in the top portion of the screen. If
you make a mistake and want to delete a character, press the Erase (trash can)
button.
5. When you’re finished press the Menu button to return to the previous
screen where you can choose to enter copyright details or the author
39
Canon EOS Rebel T3i/600D Digital Field Guide name, whichever one you didn’t choose in Step 3. You can cancel entering
text by pressing the Info. button. To display the copyright, repeat Steps 1 and 2,
and in Step 3, choose Display copyright info.
TIP
If you need to delete the copyright information, choose Delete copyright information on the Copyright information screen in the Setup 3 menu.
Viewing and Finding Images and Movies
On the Rebel T3i/600D, you can not only view images and movies after you take
them. For still images, you can also magnify images to verify that the focus is sharp,
display and page through multiple images that you have stored on the memory card,
check the histogram and exposure information, or watch images as a slide show. The
following sections describe viewing options and suggestions for using each one.
You can also play back movies on the LCD, as detailed in Chapter 6.
NOTE
Single-image or movie playback
Single-image or movie playback is the default playback mode where the camera displays one image or movie at a time on the LCD. Canon sets the initial display time to
2 seconds to maximize battery life, but a longer display time of 4 seconds is more useful. And, if you are reviewing images with a friend or the subject of the picture, the
8-second option may be best. Alternately, you can choose the Hold option that displays the image until you dismiss it by lightly pressing the shutter button.
To turn on image review, press the Playback button on the back of the camera. If you
have multiple pictures on the memory card, you can use the left and right cross keys
to move forward and backward through the images.
In Single-image playback, you can cycle through four different displays. Each display
includes more or less information about the image. In the default display, only the
preview image is displayed. Just press the Info. button to show the image with the
exposure settings, folder and file number, and images on the memory card overlaid.
Press the Info. button once or twice more to display a small preview image with
shooting information and one or more histograms.
40
Chapter 1 Setting Up the EOS Rebel T3i/600D
Index display
Index display shows thumbnails of four or nine images at a time. This display is handy
when you need to ensure that you have a picture of everyone at a party or event, or to
quickly select a particular image on a card that is full of images.
To turn on the Index display, follow these steps:
1. Press the Playback button on the back of the camera, and then press the
AE/FE Lock button once to display an index of four images, or press it
twice to display nine images. The AE/FE Lock button has a magnifying glass
with a minus sign in the icon. The LCD displays an index of images stored on the
memory card. If you don’t have four or nine images on the card, it displays as
many images as are stored on the card.
2. Press the cross keys to move among the images. The selected image has a
border around it.
3. To move through images on the page or to select an image, press a cross
key, and then press the Set button to display the selected image; or to
move to the next page of images, turn the Main dial.
4. Press the AF-point Selection/Magnify button one or more times to return
to single-image display.
Rating images and movies
Every photographer can quickly identify the best images or movies in a series, and can
as quickly identify those that are second and third picks. With the T3i/600D, you can
now assign one- to five-star ratings to images and movies, not only to simply identify the
best ones, but also to help you quickly find your favorite images on the memory card
using the image jump technique detailed next. In addition, you can use the star ratings
when you create a slide show, and to sort images and movies in the ImageBrowser, a
program provided on the EOS Digital Solution disc that comes in the box.
To rate images or movies, follow these steps.
1. On the Playback 2 camera menu tab, highlight Rating, and then press the
Set button. An image appears on the LCD with a ribbon of rating options overlaid on the top.
2. If necessary, press the left or right cross key to select the image or movie
to rate, and then press the up or down cross key one or more times to
select a rating. Stars appear to reflect the rating.
41
Canon EOS Rebel T3i/600D Digital Field Guide 3. To continue rating images, repeat Step 2, and then press the Menu button
to exit the rating display. The Playback 2 menu appears.
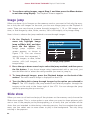
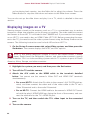
Image jump
When you have a lot of images on the memory card or you want to find only the movies or only the still images on the card, you can use Image jump on the Playback 2
menu. Then you can choose to move through images by 1, 10, or 100 images at a
time, or find images by date, folder, movies, stills (still images), or by image rating.
Here is how to choose the jump method to move through images:
1. On the Playback 2 camera
menu tab, highlight Image
jump w/[Main dial], and then
press the Set button. The
Image jump w/[Main dial]
screen appears, as shown in
Figure 1.13. You can choose
among icons that represent 1,
10, 100 images, or date, folder
movies, stills (still images), or
image rating.
Image jump w/
Jump 10 images
1
10
100
1.13 The Image jump options
2. Press the up or down cross key to select the jump method, and then press
the Set button. If you chose image rating (represented with a star icon), just
turn the Main dial to select the rating number you want to jump by.
3. To jump through images, press the Playback button on the back of the
camera. The most recent image is displayed on the LCD.
4. Turn the Main dial to jump through images by the option you selected in
Step 2. The LCD displays the jump method and relative progress through the
images on the card at the lower right of the LCD. You can change the jump
option by pressing the up cross key.
Slide show
When you want to sit back and enjoy all the pictures on the memory card, choose the
Slide show option. This is a nice option to use when you want to share pictures with
one or two of the people you’re photographing, or to verify that you’ve taken all the
shots that you intended to take during a shooting session. And to complete the ambience, you can select one or more tunes to play in the background. The only thing
missing is the popcorn.
42
Chapter 1 Setting Up the EOS Rebel T3i/600D
During the slide show, the camera does not go to sleep, which would interrupt the
image or movie playback.
If you want to play background music with the slide show, you need to copy
music to the memory card. The steps for copying music to the card are detailed
NOTE
in Chapter 6. Canon provides several song selections for you to use.
You can set up and start a slide show by following these steps:
1. On the Playback 2 camera menu tab, select Slide show, and then press the
Set button. The Slide show screen appears.
2. Select All images, and then press the Set button. Up and down arrow controls appear to the right of the All images text.
3. Press the up or down cross key to select from the options: All images,
Rating, Stills, Movies, Folder, or Date, and then press the Set button. If you
select Date, press the up or down cross key to select the date from the
Select date screen. Then press the Set button.
If you select All images, Date, Folder, or Rating, both still images and movies are
played in the slide show. To see only movies or only still images, choose the
Stills or Movies option.
4. Select Set up, and then press the Set button. The Slide show screen appears
with options to set the Display time, Repeat, Transition effect, and Background
music. If you turn on Background music, you must have first saved music to the
memory card as detailed in Chapter 6. Then you can press the up or down cross
keys to choose from music selections in the Play background music screen that
appears. To hear the songs, press the Info. button. Press the Info. button again
to stop the music. You can also choose more than one music selection. Press
the Set button when you have finished.
5. Select Display time, and then press the Set button. The Play time options
appear and are 1, 2, 3, 5, 10, or 20 seconds.
6. Select the Display time duration you want, and then press the Set button.
7. Repeat Steps 5 and 6 to set the Repeat, Transition effect, and Background
music options.
8. Press the Menu button, and then select Start.
9. Press the Set button to begin the slide show. You can pause and restart the
slide show by pressing the Set button. Press the Info. button to change the
display to single image, or images with histograms and shooting information. If
43
Canon EOS Rebel T3i/600D Digital Field Guide you’re playing back movies, turn the Main dial to adjust the volume. Press the
Menu button to stop the slide show and return to the Slide show screen.
You can also set up the slide show and play it on a TV, which is detailed in the next
section.
Displaying images on a TV
Viewing images stored on the memory card on a TV is a convenient way to review
images at a large size whether you’re at home or traveling. The video cable to connect
the camera to a non-HD TV is included in the T3i/600D box. If you want to view images
on an HD TV, you need to buy an HDMI Cable HTC-100. Before connecting the camera to the TV, you need to set the video system format using the Setup 2 menu on the
camera. The following instructions are for both HD and non-HD TVs.
1. On the Set-up 2 camera menu tab, select Video system, and then press the
Set button. The camera displays the NTSC and PAL options.
NTSC is the analog television system in use in the United States, Canada,
Japan, South Korea, the Philippines, Mexico, and some other countries, mostly
in the Americas. PAL is a color encoding system used in TV systems in parts of South
America, Africa, Europe, and other countries.
NOTE
2. Highlight the system you want, and then press the Set button.
3. Turn off the TV and the camera.
4. Attach the A/V cable or the HDMI cable to the terminals detailed
below. You cannot use the camera’s Video OUT and HDMI OUT terminals
simultaneously.
• For a non-HD TV. Attach the AV cable to the camera’s A/V OUT/Digital terminal, and then connect the other end of the video cable to the TV set’s
Video IN terminal and to the audio IN terminal.
• For an HD TV. Connect the HDMI cable to the camera’s HDMI OUT terminal with the plug’s HDMI MINI logo facing the front of the camera, and connect the other end to the TV’s HDMI IN port.
5. Turn on the TV, and then switch the TV’s video input to the connected
port.
6. Turn on the camera.
44
Chapter 1 Setting Up the EOS Rebel T3i/600D
7. Press the Playback button. Images are displayed on the TV but not on the camera’s LCD monitor. When you finish viewing images, turn off the TV and the
camera before disconnecting the cables. If your TV is HDMI CEC (Consumer
Electronics Control) compatible, you can use the TV remote to control the slide
show.
You can use the previous steps to not only display images stored on the memory card on the TV, but also to use the TV to display what would appear on the
LCD during both general shooting and when you’re shooting in Live View.
TIP
Erasing and Protecting Images
and Movies
For those of you who keep multiple images on memory cards for prolonged periods of
time, it’s important to use options on the T3i/600D that enable you to delete images
you don’t want, and to protect images you want to keep from being deleted. The following sections detail how to erase one or multiple images and how to protect them.
Erasing images and movies
Erasing images is useful provided that you are certain that you don’t want the images.
From experience, I know that some images that appear to be mediocre on the LCD
can very often be salvaged with judicious image editing on the computer. For that
reason, I recommend erasing images with caution.
With the Rebel T3i/600D, you can choose to erase images one at a time, select individual images to erase, erase all images in a folder, or erase all images on the memory
card. If you want to delete one image at a time, follow these steps:
1. Press the Playback button, and then press the left and right cross keys to
select the picture that you want to delete.
2. Press the Erase button, and then press the right cross key to select Erase.
3. Press the Set button to erase the image.
To select and erase a group of individual images that you select, follow these steps:
1. On the Playback 1 camera menu tab, highlight Erase images, and then
press the Set button. The Erase images screen appears.
45
Canon EOS Rebel T3i/600D Digital Field Guide 2. Highlight Select and erase images, and then press the Set button. The last
captured image appears on the LCD.
3. Press the left or right cross key to move to the first image you want to
delete, and then press the up or down cross key to place a check mark in
the box at the top left of the screen. This marks the image for deletion.
4. Repeat Step 3 to move to and mark additional images.
5. Press the Erase button on the back of the camera. The Erase images screen
appears with a confirmation message asking if you want to erase the selected
images.
6. Select OK, and then press the Set button. All check-marked images are
erased.
Alternatively, in Step 1 you can choose to erase all images in a folder or all images on
the memory card. If you choose the folder option, then the Select folder screen
appears where you can select the folder from which you want to delete images. Press
the Set button, and then select OK to delete images in the folder.
Protecting images and movies
To ensure that important images are not accidentally deleted, you can protect them.
Setting protection means that no one can erase the image when using the Erase
images options. I know from personal experience that it takes only a minute to accidentally delete images. In that second, important images are lost forever. This can be
prevented if you faithfully go through your images and apply protection to them. And
if several people use the T3i/600D, and they need more space on the memory card,
you can avoid having your important images deleted by adding protection.
CAUTION
Even protected images are erased if you or someone else formats the
memory card.
You can protect an image by following these steps:
1. On the Playback 1 camera menu tab, highlight Protect images, and then
press the Set button. The Protect images screen appears.
2. Select the Select images, All images in the folder, or All images on the card
option. If you choose the Select images option, the last image taken appears on
the LCD with a protection icon, denoted by a key, and a SET icon in the upperleft corner. If this isn’t the image you want to protect, press the left or right
46
Chapter 1 Setting Up the EOS Rebel T3i/600D
cross key to display the image you want to protect. A protection icon appears
above the thumbnail display and to the left of the image number.
3. Press the Set button to add protection to the image. A key icon appears at
the top of the preview image.
4. Press the left or right cross key to move to another image, and then press
the Set button. If you want to remove protection, navigate to a protected
image, and then press the Set button. Protection is removed and is indicated by
the protection icon being removed.
Alternatively, in Step 2 you can choose to protect all images in a folder or all images on
the memory card. If you choose the folder option, then the Select folder screen
appears where you can select the folder in which you want to protect images. Press
the Set button, and then select OK to protect images in the folder. If you opt to protect
all images on the memory card, a confirmation screen appears. Simply select OK to
protect all images on the memory card. To unprotect images on the card or on the
folder, select the appropriate option on the Protect images screen.
Working with Eye-Fi Cards
A handy way to transfer images and movies to the computer is to use an Eye-Fi card
that wirelessly transmits images to an online service or to your computer using a wireless local-area network. The card looks just like an SD/SDHC card but adds the wireless transfer capability as well as other features that work with the T3i/600D.
NOTE
The T3i/600D can use Eye-Fi cards, although Canon does not guarantee support for all functions on the card.
Depending on the Eye-Fi card, you can upload to your favorite networks with the
proper ID and passwords. You first set up the Eye-Fi card on your computer to choose
the network you want to use, and then you set up a folder for transferring images
and movies to the computer. Then when you insert the Eye-Fi card into the T3i/600D,
media is automatically transferred as you shoot. In addition, the card controls the
T3i/600D’s Auto power-off function so that the camera’s power remains on until the
transfers are complete.
Newer Eye-Fi cards offer endless memory, a function that deletes the oldest images
and movies that have been successfully transferred to the computer or network service to free up space on the card. You can set the card capacity point at which older
images will be deleted to make space available. The concept of endless memory
47
Canon EOS Rebel T3i/600D Digital Field Guide applies to the card, and it is endless only insofar as the amount of the space you have
on the computer or network service. Newer cards also include geotags, hotspot location, RAW file transfer, and more. Card sizes range from 4GB to 8GB.
You need to verify that wireless transmissions are permitted in certain regions and
locations. Airports, hospitals, and some businesses do not permit wireless transmissions. In such areas, you can prevent the card from emitting a signal, even when no
images are being transmitted, by removing the card from the camera.
To use an Eye-Fi card in the T3i/600D, set up the card in the computer according to the
manufacturer’s instructions and insert it in the camera. Then follow these steps:
1. On the Setup 1 camera menu tab, highlight Eye-Fi settings, and then press
the Set button. The Eye-Fi settings screen appears.
2. Select Eye-Fi trans. (transmission), and then press the Set button. The
Enable and Disable options appear.
3. Select Enable, and then press the Set button.
4. On the Eye-Fi settings screen, select Connection info., and then press the
Set button. The Connection info. screen appears.
5. Verify that an Access point Service Set Identifier (SSID) is being used, and
you can also verify the Media Access Control (MAC) address.
6. Press the Menu button three times to exit.
7. Take the first picture. The preview image is displayed. Thereafter, a transfer
icon is displayed for images that have already been transferred. The T3i/600D
has four self-explanatory icons that indicate connection status; or you can press
the Info. button to see the status on the shooting settings display screen.
48