1
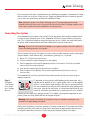
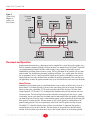
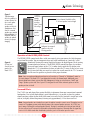
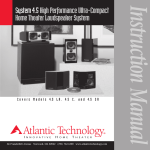
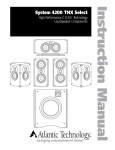
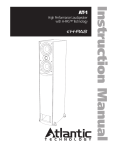
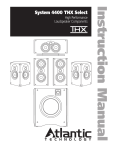
Covers Models 171 LR, 173 C, and 174 SR
Atlantic Technology
®
I
N N O V A T I V E
H
O M E
T
H E A T E R
343 Vanderbilt Avenue Norwood, MA 02062 (781) 762-6300 www.atlantictechnology.com
Instruction Manual
System 170 High Performance Compact
Home Theater Loudspeaker System
Models 171 LR, 173 C, and 174 SR
SYSTEM 170
High Performance Compact
Home Theater Loudspeaker System
Thank you for choosing Atlantic Technology home theater products. Your new speaker system is
precision crafted to give you years of enjoyable, trouble free service. This manual covers the Atlantic
Technology System 170 series of speakers for home theater. It will show you how to incorporate
System 170 components into your present setup, as well as how to assemble a complete system. The
Model 172 PBM Subwoofer is covered in detail in a separate manual. System 170 has been optimized
for use with any surround sound format including Dolby Surround®, Dolby Pro-Logic®, Dolby Digital
5.1® and DTS® digital surround formats.
Model 171 LR Front Channel Speaker
The Model 171 LR Front Channel Speakers are two-way systems intended for use only with
a quality subwoofer, such as the Atlantic Technology Model 172 PBM. Each speaker contains two
4" CCMG (coated composite molded graphite) woofers, and a 1" Ferrofluid® cooled silk dome tweeter
using a powerful neodymium magnet, in an acoustically inert MDF cabinet. The 171 LR speakers are
magnetically shielded so they may be placed right next to a TV set without concern.
Model 173 C Center Channel Speaker
It is vital to the accurate reproduction of a multi-channel soundtrack that the three front speakers have
the same sonic signature. Therefore, the Model 173 C Center Channel Speaker contains the same
two 4" CCMG woofers and 1" Ferrofluid® cooled silk dome tweeter as the 171 LR speakers. The 173 C is
designed for use in multi-channel home theater systems only as a dedicated center channel
speaker. It includes a high frequency level control that allows it to be placed directly above or below
the TV screen (which changes the sound) and still provide accurate reproduction. Since up to 85% of
dialogue and 65% of special effects are reproduced through the center channel speaker, it’s important
that its sound be accurate and timbre-matched to the other speakers in the system. The rear-mounted
High Freq control incorporated into the 173 C allows for this matching.
The 173 C center speaker is intended to be placed in a horizontal position, as opposed to the vertical
positioning intended for the 171 LR. It too is magnetically shielded so it may be placed directly
adjacent to your TV set with no adverse effects.
Model 174 SR Surround Speaker
The Model 174 SR Dipole Surround Speaker is intended for use in multi-channel audio/video
sound systems only as a dedicated surround channel speaker. Each speaker has two of the same
4" CCMG woofers as the front speakers and two broad dispersion 3/4" Modified Dome tweeters. The
drivers are angled and electronically phased to produce ambience without localization. The 174 SR’s
wide bandwidth and unique construction makes it especially suitable for advanced Dolby Digital and
DTS applications.
Important Note: There is a dedicated LEFT and RIGHT model 174 SR. This is clearly marked on the back of
each speaker. Should you hang them on the wall using the supplied keyhole adapters, you must turn the
speakers over (hanging them “upside down”) and swap them side to side for proper operation.
○ ○ ○ ○ ○ ○ ○ ○ ○ ○ ○ ○ ○ ○ ○ ○ ○ ○ ○ ○ ○ ○ ○ ○ ○ ○
2
○ ○ ○ ○ ○ ○ ○ ○ ○ ○ ○ ○ ○ ○ ○ ○ ○ ○ ○ ○ ○ ○ ○ ○ ○ ○
Atlantic Technology
®
The vast majority of the time, surround speakers are called upon to reproduce “environmental” sounds
that are used as cues to tell you “where you are.” Dipoles are undoubtedly the best and most practical
way to create such an involving and believable soundfield at home.
Note: Although the speakers in the Atlantic Technology System 170 are acoustically and cosmetically
matched to each other for best results, they may also be used with other Atlantic Technology components and
a wide variety of speakers from other manufacturers with satisfying results.
Connecting Your System
We recommend that you connect your System 170 with high quality dual conductor stranded wire of
18 gauge or larger, for lengths up to 15 feet. (Remember, the lower the gauge number, the larger the
wire). Use 16 gauge dual conductor or larger for longer runs of wire. Contact your audio/video dealer
for specific cable recommendations and further information for special circumstances.
Warning: To prevent risk of electrical shock or damage to your equipment, always switch off the amplifier or
receiver when making connections to the speaker.
You can connect your System 170 speakers by using a variety of audio connectors such as banana plugs
(single or double—North America only), pin connectors, spade lugs, etc., or you can:
1. Remove 1/2" of insulation from each wire end.
2. Twist the stranded wire together, keeping the two ends separate.
3. Place the appropriate wire through the appropriate postholes in the connectors. These holes are revealed
when you loosen the connector capscrew.
4. Screw down the capscrew tightly, but be careful not to overtighten.
5. Check the tightness of the capscrews 24 hours after hookup and occasionally after that, as they can
loosen over time.
We recommend that you check your local electrical codes to make sure that you are not using an
improper connector.
Figure 1:
Gold plated
5-way binding
posts. Accepts
up to 10 gauge
bare wire
It’s important to observe polarity while making speaker connections: red (+)
terminals on the amplifier to red (+) on the speaker, black (-) on the amplifier
to black (-) on the speaker. Look carefully at the wires you are using and note
that one of conductors of each pair will be identified by color, printing on the
outer jacket, ridges on the outer jacket, or a thread intertwined with the wire
strands. By convention, the marked wire is connected to the red (+) terminal.
Whether your are connecting a complete System 170, or adding a single speaker component to your
present system, the wiring should look like the diagram in Figure 2.
Warning: Before turning on the amplifier, be certain that no stray wire strands are touching across any
terminals as this might damage your amplifier.
Finally, check the polarity of your front speakers by listening to some music. If the sound seems hollow,
unusually spread out, or has weak bass, recheck your connections for proper polarity and reverse any
out of phase connections, if necessary. Usually one speaker wired out of phase is the culprit.
○ ○ ○ ○ ○ ○ ○ ○ ○ ○ ○ ○ ○ ○ ○ ○ ○ ○ ○ ○ ○ ○ ○ ○ ○ ○
3
○ ○ ○ ○ ○ ○ ○ ○ ○ ○ ○ ○ ○ ○ ○ ○ ○ ○ ○ ○ ○ ○ ○ ○ ○ ○
Models 171 LR, 173 C, and 174 SR
Figure 2:
Typical wiring
diagram for
speakers in a
home theater.
To optional
second
subwoofer
Placement and Operation
Speaker/room interactions have a huge impact on the sound of the system. Moving the speakers just a
little bit can make a dramatic difference in what you hear. The compact design of System 170 provides
you with maximum placement flexibility while creating a large, seamless, acoustically accurate
soundfield for your home theater or music system. The best placement of the speakers will vary from
room to room. Use the following placement guidelines and Figure 3 as a starting point. But also feel
free to experiment. In fact, it may be beneficial to hook up the speakers with some extra wire and to
simply drape the wire across the floor before installing the speakers permanently. This will allow you
the opportunity to move the speakers around easily so you can find the best sonic and visual locations.
Home Theater
Remember that the primary goal of a good home theater is not to make you believe that you are in a
movie theater. It’s to make you believe you are in the scene taking place on the screen. For a home
theater system, place your Model 171 LR speakers on either side of the television. The three front
channel speakers (171 LRs and 173 C) are magnetically shielded so they will not interfere with your
television picture. The left and right front speakers should be far enough apart that you get a good
stereo image, but not so far apart that the sound seems to come directly from the speakers, distracting
you from the picture. If you are using a center channel speaker, a wider separation of the left and right
front speakers is usually possible. You may choose to “toe” the LR speakers in, aiming them at the
prime listening position. This can be particularly useful if the front LR speakers are fairly far apart.
The Model 173 C should be directly above or below your television. It’s important the speaker is
centered on the screen, not off to the side. The foot cutouts on the speaker base should be facing
forward. Pivot the speaker up or down on its base so that it points directly at the listening position.
○ ○ ○ ○ ○ ○ ○ ○ ○ ○ ○ ○ ○ ○ ○ ○ ○ ○ ○ ○ ○ ○ ○ ○ ○ ○
4
○ ○ ○ ○ ○ ○ ○ ○ ○ ○ ○ ○ ○ ○ ○ ○ ○ ○ ○ ○ ○ ○ ○ ○ ○ ○
Atlantic Technology
®
Figure 3:
Typical arrangement for speakers in
a home theater. For
best results, place
the surround
speakers within the
shaded area. Note
that the surround
speakers are marked
Left and Right. It is
important that the
speakers be placed
correctly for proper
imaging.
Surround
speaker
should be
no closer
than 2' from
the ceiling
Center channel should be within
2' of front speaker tweeter height
Left surround
speaker
Right
surround
speaker
Ear level
Null point of surround
speaker in line with
listening position
Operation of the HI FREQ LEVEL Control
Figure 4:
Hi-Freq Level
Control on rear
panel of the
Model 173 C.
The HI FREQ LEVEL control works like a treble tone control, giving you more or less high frequency
output from the speaker. You can compensate for overly bright soundtracks or “punch up” a dull
soundtrack. Turning this control clockwise increases the high frequency level; turning
it counterclockwise reduces it. The HI FREQ LEVEL control also allows you to adjust
the overall sonic balance of the 173 C to more closely match the LR speakers even
though the 173 C is placed directly above or below the TV screen. It may be best to use
the test tone built into your receiver to adjust the overall sound of the 173 C to match
the LRs once the speakers are placed in their proper locations.
Note: Some surround sound decoders and receivers offer a choice of “Normal” or “Wide-band” modes for
the center channel. The Model 173 C was designed to be used in the Normal mode. Additionally, some
discrete digital home theater systems allow Bass Management, letting you select between “Small” and
“Large” speakers system-wide. Since System170 is designed to work with a subwoofer, please set all the
speaker positions to Small.
Surround Effects
The 174 SR’s size and shape allows greater flexibility in placement than most conventional surround
loudspeakers. Due to their dipole design’s spatial characteristics, it is possible to place the speakers
almost anywhere within the rear third of the room, but usually the best location is straight out to the
sides of, or slightly behind the primary listening area, approximately 1-2 feet above ear level.
Note: Surround speakers are intended to re-create the ambient sounds in a movie scene. Throughout most of
a movie or TV program you may not be directly aware of the surround speakers presence. So it’s OK if you
aren’t aware of hearing the surround speakers directly. Turning the surrounds up so that you hear them all
the time will only result in a much less believable surround sound experience. Remember that the signal they
receive is 99% subtle sounds that should make you believe you’re in the action up on the screen.
○ ○ ○ ○ ○ ○ ○ ○ ○ ○ ○ ○ ○ ○ ○ ○ ○ ○ ○ ○ ○ ○ ○ ○ ○ ○
5
○ ○ ○ ○ ○ ○ ○ ○ ○ ○ ○ ○ ○ ○ ○ ○ ○ ○ ○ ○ ○ ○ ○ ○ ○ ○
Models 171 LR, 173 C, and 174 SR
The orientation of the 174 SRs is important to the proper generation of an involving and diffuse
surround effect. To insure proper orientation, make sure that the RIGHT speaker is on the right side
wall of the room, and the LEFT speaker is on the left side wall of the room, as you are seated facing the
screen. The 174 SRs are marked RIGHT and LEFT on the back and have an arrow that should point
towards the front of the room. Should you hang them on the wall, using the supplied keyhole
adapters, you must turn the speakers over (hanging them “upside down”) and swap them side to side
for proper orientation.
Music Only System (Model 171 LR with subwoofer only)
If you are setting up a music only system, begin with these general guidelines:
●
The distance between your speakers should be approximately one-half their distance from your
favorite listening position.
●
If you point the front of the speakers directly towards the prime listening position, you will
achieve the most precise imaging. You will also receive the maximum amount of direct radiated
high frequency energy. If you have a “bright” or “hard” sounding room environment, aiming the
speakers straight out into the room (or just aiming them partially towards you) may make for a
more natural and pleasing sonic balance.
●
The distance from each speaker to its three closest room surfaces should be different.
●
In most rooms, you should not place your speakers in the corners.
The goal is to reproduce accurate musical timbre and natural sound. Additionally, a well set-up stereo
pair of speakers will create excellent imaging and a cohesive representation of the soundstage. Placement in the room and your listening position have an enormous impact on the ultimate sound you
will achieve from your system. The most important thing is to be creative! Try placing your speakers
along the long wall instead of the short one. Toe the speakers in or point them straight ahead. Pull
them away from the wall or push them close. Don’t be timid. You’ll find that moving your speakers,
even a few inches, can dramatically change and possibly improve their sound.
Mounting
The 171 LR and the 174 SR speakers can be mounted in a variety of ways:
On speaker stands Atlantic Technology speaker stands (Model 176 ST) provide an ideal height
(29" above the floor) for most rooms. They are available in black or white (as are the 174 SR surround
speakers). Speaker stands from other manufacturers may be used, but should be of approximately the
same height (29" to the base of the speaker). When using Atlantic stands the 1/4" x 20 threaded insert
in the back of the cabinet accepts the supplied bolts included in the stand hardware package. This
makes for an exceptionally secure and solid stand mounting system.
On the wall To mount your speakers on a wall, we have supplied metal key-hole brackets that will
attach to the back of the 171 LR and 174 SR speakers. You’ll need to turn the speakers over and attach
the keyhole bracket to the 1/4"x20 threaded insert on the back of the enclosure so the speakers hang
upside down, using the supplied 1/4"x20 bolts. As mentioned above, the SR speakers should be
swapped side to side to have the drivers aimed correctly.
Be sure to use a strong screw to drive into the wall, one whose head and shaft will fit within the keyhole opening and slot. Also be sure to drive the screw well into a stud or use a mounting device (such a
molly-bolt) that is capable of holding the weight of the speaker. Never simply drive a nail or screw into
a sheet rock or other wall materials. Always follow the above guidelines for safe speaker mounting.
○ ○ ○ ○ ○ ○ ○ ○ ○ ○ ○ ○ ○ ○ ○ ○ ○ ○ ○ ○ ○ ○ ○ ○ ○ ○
6
○ ○ ○ ○ ○ ○ ○ ○ ○ ○ ○ ○ ○ ○ ○ ○ ○ ○ ○ ○ ○ ○ ○ ○ ○ ○
Atlantic Technology
®
NOTE: There are several rubber pads supplied with your speakers. They are to be used as feet when the
speakers sit on a shelf, or on stands. When you use the keyhole mounts, place these pads on the lower rear of
the enclosure (remember, the enclosures are going to be mounted upside down), using a double thickness
(one pad on top of another). This will keep the speaker level and stop it from vibrating on the wall.
For greater flexibility you can use pivoting ball-and-socket wall brackets of suitable weight rating
(e.g., Atlantic Technology 157 WB, Omnimount 25 Series, Vogel, etc.) usually available from your local
audio/video retailer. There are also compact adjustable metal shelf style mounts from companies like
Pivotelli that are useful and unobtrusive. Please contact your A/V specialist for more information.
On a bookshelf Adhesive rubber feet are included.
In the wall There is an optional Atlantic Technology in-wall mounting kit (Model IN-RF BRKT) which
includes all the necessary hardware (excluding wall trim/moulding) to install a pair of 174 SR speakers
recessed partially in a standard wall. Please contact your local Atlantic Technolgy dealer for further
information.
Listening Levels and Power Handling – IMPORTANT!
The power recommendation for these speaker components assumes that you will not operate your
amplifier/receiver in a way that produces distortion. Even rugged speakers like System 170 can be
damaged by a moderately powered system driven beyond its intended capacity. The harsh amplifier
clipping that occurs in this situation will cause damage to the speaker system. This type of damage is
easily identifiable through examination of the damaged speaker’s voice coil and is not covered by the
warranty.
The System 170 will play very loudly when provided with enough clean power to do so. Again, consult
your dealer or Atlantic Technology for additional information.
Care and Feeding of Your Speakers
Clean your speaker cabinets using a soft cloth moistened with a mild, non-abrasive glass cleaner being
careful not to wet the edges of the cabinet. Also, be careful not to get any cleaning fluids on the driver
cones or domes. It may be best to dampen the cloth with the cleaner and then wipe the speakers.
After carefully removing the grilles from the speakers by pulling them forward, gently, clean them with
a quick pass from a vacuum cleaner with a brush attachment. This should remove any dust accumulation. Re-attach them by lining up the holes on the grilles with the pegs on the baffles and pushing
firmly but carefully.
Avoid placing your speakers in direct sunlight or near a source of heat that may, over time, damage the
finish.
Important: Save Your Boxes! If you can do so, save the cartons, packing pieces, and plastic bags that
came with your speakers. They will be useful in case you move or have to ship your loudspeakers for any
reason. In any case, save all packing materials until you are certain that the systems have suffered no
damage in shipment. If you find such damage, either visible or internal, contact your dealer immediately for
the proper return procedure.
○ ○ ○ ○ ○ ○ ○ ○ ○ ○ ○ ○ ○ ○ ○ ○ ○ ○ ○ ○ ○ ○ ○ ○ ○ ○
7
○ ○ ○ ○ ○ ○ ○ ○ ○ ○ ○ ○ ○ ○ ○ ○ ○ ○ ○ ○ ○ ○ ○ ○ ○ ○
System 170 Specifications
Model
171 LR
173 C
174 SR
Type
Sealed-box, 2-way
Sealed-box, 2-way,
High Frequency control
Sealed-box, frequency-enhanced
surround speaker
Drivers
(2) 4" CCMG woofers
(1) 1" silk dome tweeter
(2) 4" CCMG woofers
(1) 1" silk dome tweeter
(2) 4" CCMG woofers
(2) 3/4" modified dome tweeters
Frequency
Response (±3dB)
90Hz – 20kHz
90Hz – 20kHz
90Hz – 20kHz
Nominal
Impedance
8Ω
8Ω
8Ω
Crossover
Frequency
3 kHz
3 kHz
3 kHz
Sensitivity
87dB
87dB
87dB
Recommended
Amplifier Power
10 – 140 Watts
10 – 140 Watts
10 – 140 Watts
Magnetic Shielding
Yes
Yes
No
Size (W x H x D)
5.5 x 13.5 x 6.5in
140 x 344 x 166mm
13.1 x 6.1 x 6.7in with base
334 x 155 x 170mm with base
9.1 x 10.2 x 5.2in
230 x 260 x 133mm
8.4lbs; 3.8kg w/base
7.1lbs; 3.22kg
Weight (ea., unpacked) 7.6lbs; 3.4kg
Specifications are those in effect at the time of printing. Atlantic Technology reserves the right to change specifications or appearance at any time without
notice. Dolby Digital, AC-3, 5.1, Dolby Stereo and Dolby Pro Logic are trademarks of Dolby Laboratories Licensing Corporation. DTS is a registered
trademark of DTS Technology.
For Future Reference
Record your speaker(s) serial number(s) and date of purchase here:
Model Number
Serial Number
Date of Purchase
Model Number
Serial Number
Date of Purchase
Model Number
Serial Number
Date of Purchase
The serial number is found on the back of the speaker near the connecting terminals.
○ ○ ○ ○ ○ ○ ○ ○ ○ ○ ○ ○ ○ ○ ○ ○ ○ ○ ○ ○ ○ ○ ○ ○ ○ ○ ○ ○ ○ ○ ○ ○ ○ ○ ○ ○ ○ ○ ○ ○ ○ ○ ○ ○ ○ ○ ○ ○ ○ ○ ○ ○ ○ ○ ○ ○
010-1170