1
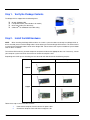
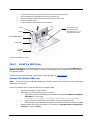
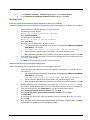
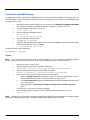
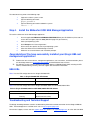
QUICK START GUIDE
[ Quick Start Guide ]
iSCSI HBA INSTALLATION
QLA®4050/4050C/4052C
QLE4060C/4062C
d
Purchasers of OEM products should consult with the OEM for support.
Support Headquarters
QLogic Corporation
12984 Valley View Road
Eden Prairie, MN 55344-3657
QLogic Web Site
www.qlogic.com
Technical Support Web Site
support.qlogic.com
Technical Support Email
[email protected]
Technical Training Email
[email protected]
North American Region
Email
[email protected]
Phone
+1 952-932-4040
Fax
+1 952-932-4018
Europe, Middle East, and Africa Region
Email
[email protected]
Phone Numbers by Language
+353 1 6924960 — English
+353 1 6924961 — Français
+353 1 6924962 — Deutsch
+353 1 6924963 — Español
+353 1 6924964 — Português
+353 1 6924965 — Italiano
Asia Pacific Region
Email
[email protected]
Phone Numbers by Language
+63-2-885-6712 — English
+63-2-885-6713 — Mandarin
+63-2-885-6714 — Japanese
+63-2-885-6715 — Korean
Latin and South America Region
Email
[email protected]
Phone Numbers by Language
+52 55 5278 7016 — English
+52 55 5278 7017 — Español
+52 55 5278 7015 — Português
Quick Start Guide
Installation Instructions
This Quick Start Guide describes how to install and configure your new QLogic SANblade® host bus adapter (HBA) and
SANsurfer iSCSI HBA Manager application in four simple steps:
❑
Step 1. Verify the package contents.
❑
Step 2. Install the HBA hardware.
❑
Step 3. Install the HBA driver.
❑
Step 4. Install the SANsurfer iSCSI HBA Manager application.
Keep the HBA in the antistatic bag until installation. The HBA contains parts that can be damaged by
electrostatic discharge (ESD). Before handling the HBA, use standard methods to discharge static
electricity. Place the HBA on the bag when examining it. Retain the bag for future use.
CAUTION!
System Requirements
Your system must have the functionality described in the following sections to support the QLogic SANblade HBA.
Minimum Software Requirements
❑
❑
❑
Windows® 2000: Service Pack (SP) 4 or later (QLA405x HBAs)
❑
Windows PE 2.0, 2004, 2005
❑
❑
Windows Vista (Business and Enterprise)
Windows® Server™ 2003 SP 1 or SP 2
Windows XP Pro SP 1 or SP 2
Linux™ Red Hat® Enterprise Linux 3.0 Update 7 or later (QLA405x HBAs), Linux Red Hat Enterprise Linux 4.0
Update 3 or later (QLA405x and QLE406xC HBAs)
❑
Novell SUSE Linux: SLES 8 Update 3 or later (QLA405x HBAs), SLES 9 Update 2 or later (QLA405x and
QLE406xC HBAs), SLES 10 (QLA405x and QLE406xC HBAs)
❑
❑
Solaris: Solaris 9 or later for Solaris SPARC and x86 (IA32 and x64)
NOTE:
VMware® 3.0.1 (QLA405x HBAs)
The operating systems listed above are applicable to all HBA models unless otherwise noted.
Minimum Hardware Requirements
❑
Empty PCI-X 32-bit or PCI-X 64-bit slot (QLA405x HBAs), 2.5-GHz PCI Express x4 slot (QLE406xC HBAs)
❑
PCI-X: 3.3-volt signaling (QLA4050 HBAs); 3.3V or 5-volt signaling (QLA4050/4052C HBAs)
❑
The correct media:
❑
❑
❑
QLA4050: 62.5/125-μM multimode fiber
QLA4050C/4052C, QLE4060C/4062C: UTP copper (Cat5E or Cat6)
The correct connectors:
❑
❑
QLA4050: LC duplex
QLA4050C/4052C, QLE4060C/4062C: RJ45
1
Step 1. Verify the Package Contents
The QLogic HBA is shipped with the following items:
❑
❑
❑
❑
QLogic SANblade HBA
Low-profile bracket (not available in all models)
Quick Start Guide (this document)
SANsurfer® for SANblade iSCSI HBAs CD(s)
Step 2. Install the HBA Hardware
NOTE:
When installing the QLogic HBA and driver in a Solaris system that does not already have QLogic HBAs or
drivers installed, please install the QLogic Solaris driver before you install the QLogic HBA hardware. This allows Solaris
to correctly bind the QLogic Solaris driver to the QLogic HBA. Failure to do so will require an additional system reboot
after the driver is loaded.
To install the HBA hardware, you need to open the computer and locate the appropriate bus slot. If necessary, consult
your computer system manual for instructions to remove the computer cover.
Depending on the HBA you are installing, the bus connector will look like one of the following samples:
PCI-X
PCI Express
QLA4050
N/A
QLA4050C
QLE4060C
QLA4052C
QLE4062C
Optical
Copper
Follow these steps to install the HBA hardware:
2
1.
Power off the computer, then disconnect the power cable.
2.
Remove the computer cover and find an empty bus slot.
3.
Pull out the slot cover (if any) by removing the screw or releasing the lever.
4.
Grasp the HBA by the top edge and seat it firmly into the slot.
5.
Refasten the HBA’s retaining bracket using the existing screw or lever.
6.
Close the computer cover.
7.
Plug in the power cable and turn on the computer.
HBA
LEVER
64-BIT PCI-X SLOT
(QLA405x HBAs) OR
SCREW
PCI EXPRESS x4, x8, x16
SLOT (QLE406xC HBAs)
BA RETAINING BRACKET
SLOT COVERS
SYSTEM
CHASSIS
Sample motherboard and slots
Step 3. Install the HBA Driver
After you have completed the hardware installation and turned on the computer, insert the applicable SANsurfer for
SANblade iSCSI HBAs CD into the CD-ROM drive, based on your operating system. Follow the instructions below for
your operating system.
The latest drivers and documentation can be found on the QLogic Web site, www.qlogic.com.
Windows 2000 (QLA405x HBAs only)
NOTE:
If an earlier version of the Windows 2000 driver is already installed, see the readme file for information about
updating the existing driver.
Perform the following steps to install the HBA driver for Windows 2000:
1.
Log onto the computer as Administrator.
2.
Download and save the HBA driver to your hard drive:
a.
3.
Type or browse the path to the QLogic driver directory on the applicable SANsurfer for SANblade
iSCSI HBAs CD. For example:
b.
<CD-ROM Drive Letter>:\autoplay\iSCSI_HBA_drivers\Windows
Locate and launch (double-click) the executable (.exe) file containing the driver.
c.
When prompted, type or browse to a location on your hard drive to store the driver files. Click OK.
Windows detects the newly installed device, then displays the Found New Hardware with Ethernet
Controller message. Click Next.
3
4.
NOTE:
In the Install Hardware Device Drivers dialog box, select Search for a suitable driver for my device
(recommended). Click Next.
5.
In the Locate Driver Files dialog box, select Specify a Location. Click Next.
6.
In the Copy manufacture's files from: dialog box, type or browse the path to the directory where you
stored the driver files (see step 2). Click OK.
7.
In the Driver Files Search Results dialog box, click Next.
8.
In the Completing the Found New Hardware Wizard dialog box, click Finish.
9.
The Found New Hardware - Network Controller message displays. The Found New Hardware Wizard
program is launched to begin installing the driver for the QLogic iSCSI HBA. Click Next.
10.
In the Install Hardware Device Drives dialog box, select Search for a suitable driver for my device
(recommended). Click Next.
11.
Select specify a location. Click Next.
12.
In the Copy manufacture's files from: field, type or browse the path to the to the directory where you
stored the driver files (see step 2).
13.
In the Driver Files Search Results dialog box, click Next.
14.
When the Digital Signature Not Found dialog box displays, click Yes.
15.
In the Completing the Found New Hardware Wizard dialog box, click Finish.
16.
If following message displays, click Yes:
Your hardware settings have changed. You must restart your computer
for these changes to take effect. Do you want to restart your
computer now?
If you are installing a dual-port QLA4052C HBA, steps 3–16 must be repeated for the second port.
Windows Server 2003
NOTE:
If an earlier version of the Windows Server 2003 driver is already installed, see the readme file for information
about updating the existing driver.
Perform the following steps to install the HBA driver for Windows Server 2003:
1.
Log onto the computer as Administrator.
2.
Download and save the HBA driver to your hard drive:
a.
3.
4
Type or browse the path to the QLogic driver directory on the applicable SANsurfer for SANblade
iSCSI HBAs CD. For example:
b.
<CD-ROM Drive Letter>:\autoplay\iSCSI_HBA_drivers\Windows
Locate and launch (double-click) the executable (.exe) file containing the driver.
c.
When prompted, type or browse to a location on your hard drive to store the driver files. Click OK.
Windows detects the newly installed device, then displays the Found New Hardware with Ethernet
Controller message.
4.
Select Install from a list or specific location (Advanced), then click Next.
5.
Select the Search for the best driver in these locations option. Type or browse the path to the directory
where you stored the driver files (see step 2), then click Next.
6.
In the Security Alert - Driver Installation dialog box, click Yes.
7.
In the Completing the Found New Hardware Wizard dialog box, click Finish.
8.
The Found New Hardware Wizard with Network Controller message displays. The Found New
Hardware Wizard program is launched to begin installing the iSCSI driver for the QLogic iSCSI HBA.
9.
Select Install from a list or specific location (Advanced). Click Next.
10.
Select the Search for the best driver in these locations option. Type or browse the path to the directory
where you stored the driver files (see step 2).
11.
In the Hardware Installation - Windows Logo dialog box, click Continue Anyway.
12.
In the Completing the Found New Hardware Wizard dialog box, click Finish.
Windows Vista
Initial Operating System Installation with the HBA Driver as Boot or as an Add-On
Perform the following steps to install the Windows Vista operating system and the HBA driver (as boot as or as an add-on):
1.
Start the Windows installation procedure using the Setup CD.
2.
The following message displays:
Which type of installation do you want?
Select Custom (Advanced).
3.
The following message displays:
Where do you want to install Windows?
Select Load Driver.
4.
Download and save the HBA driver to your hard drive:
a.
Type or browse the path to the QLogic driver directory on the applicable SANsurfer for SANblade
iSCSI HBAs CD. For example:
b.
<CD-ROM Drive Letter>:\autoplay\iSCSI_HBA_drivers\Windows
Locate and launch (double-click) the executable (.exe) file containing the driver.
c.
When prompted, type or browse to a location on your hard drive to store the driver files. Click OK.
5.
At the Load Driver screen, type or browse the path to the directory where you stored the driver files
(see step 4), then click OK.
6.
Click Next to continue with the standard installation procedure.
Adding the HBA Driver to an Existing Operating System
Perform the following steps to add the HBA driver to an existing operating system:
1.
After installing the iSCSI HBA and restarting your computer, download and save the HBA driver to
your hard drive:
a.
Type or browse the path to the QLogic driver directory on the applicable SANsurfer for SANblade
iSCSI HBAs CD. For example:
b.
<CD-ROM Drive Letter>:\autoplay\iSCSI_HBA_drivers\Windows
Locate and launch (double-click) the executable (.exe) file containing the driver.
c.
When prompted, type or browse to a location on your hard drive to store the driver files. Click OK.
2.
Windows detects the newly installed device and displays the Found New Hardware message.
The Hardware Update Wizard program starts installing a device driver for the newly installed device.
3.
Select the Driver tab, then click Update Driver to start the Hardware Update Wizard.
4.
Select Browse my computer for driver software, then click Next.
5.
Select Let me pick from a list of device drivers on my computer, then click Next.
6.
Click Have Disk.
7.
On the Install from Disk screen, select the directory where you stored the driver files (see step 1),
then click OK.
8.
When the Update Driver Software Wizard/Select QLogic iSCSI Adapter window displays, click Next.
9.
Click Close on the Update Driver Software Wizard window.
5
Linux (Driver and RAMDisk Image)
The following installation instructions are applicable to SLES 9 (or later) or Red Hat Enterprise Linux 4.0 (or later). For
more information and driver installation instructions for other Linux operating system versions, see the README.txt file
associated with the driver.
1.
Download the latest driver file qla4xxx-vx.yy.zz.tar.gz from the SANsurfer for SANblade iSCSI HBAs
CD. The driver is located in the following directory: autoplay\iscsi_HBA_drivers\Linux
2.
Type the following to uncompress the tar file:
3.
# tar -xvzf *.gz
Type the following to compile the driver:
4.
# cd x.yy.zz
# ./extras/build.sh install
Type the following to load the driver:
5.
# modprobe –v qla4xxx
Optionally, type the following to compile the driver and create a RAMDisk image that will automatically
load the driver when the system is rebooted:
# ./extras/build.sh initrd
To unload the driver, type the following:
# modprobe –r qla4xxx
Solaris
NOTE:
If an earlier version of the Solaris driver is already installed, you must un-install this driver before installing
the latest driver. For more information, see the section in the README.txt file about removing the driver.
1.
Login to the Solaris system as root.
2.
Type the following command to uncompress the package:
3.
uncompress <directory containing package file>/qla4xxx.Z
Type the following command to start the package installation:
4.
pkgadd -d <directory containing package file>/qla4xxx
Follow and answer the prompts displayed to finish the installation.
a.
When the package selection prompt displays, enter the number corresponding to the driver
package applicable to the Solaris version installed on the target system.
b.
At the driver destination prompt, press ENTER to place the driver in the default directory, which
is usually /kernel/drv.
c.
When prompted to continue and to complete the QLogic driver installation procedure,
press Y.
For more help, see the Solaris man page on pkgadd.
5.
After the pkgadd program completes, type the following command to reboot the system:
reboot -- -r
NOTE:
Modify the system sd.conf file (/kernel/drv/sd.conf) for the operating system to recognize new targets. QLogic
recommends adding up to 255 targets. The QLogic SANblade HBA supports up to 128 devices.
6
To unload the driver, perform the following steps:
1.
Login to the Solaris system as root.
2.
Type the following command:
3.
pkgrm QLA4xxx-0
Type the following command to reboot the system:
reboot -- -r
Step 4. Install the SANsurfer iSCSI HBA Manager Application
To install the SANsurfer iSCSI HBA Manager application:
1.
Insert the applicable SANsurfer for SANblade iSCSI HBAs CD into your CD-ROM drive (if the auto-run
screen does not appear, open the start_here html page with your browser.)
2.
Select your operating system.
3.
Click I Accept on the License Agreement.
4.
Click to select the specific version of your operating system.
5.
Select the SANsurfer iSCSI HBA Manager install file.
6.
Follow the on-screen directions and installation prompts.
Congratulations! You have successfully installed your QLogic HBA and
management application!
❑
To obtain the most current drivers, management applications, user instructions, and documentation, please
visit the QLogic website at www.qlogic.com/support and download the latest versions.
❑
The following section contains additional information about the SANblade QLogic HBA, including the LED
scheme, troubleshooting, warranty, technical support and certification information.
HBA LEDs
Table 1 lists the LED configuration for the QLogic QLA4050 HBA.
Table 1. QLogic QLA4050 HBA LED Scheme
Green LED
●
Activity
Link established
Table 2 lists the LED configuration for the QLogic QLA4050C/4052C and QLE4060C/4062C HBAs.
Table 2. QLogic QLA4050C/4052C and QLE4060C/4062C HBA LED Scheme
Green LED
●
Flashing
Activity
Link established
Receive/transmit activity
Troubleshooting and Technical Support
The QLogic knowledge database contains troubleshooting information and documentation for the QLogic SANblade
HBAs. The knowledge base is available to all users at http://support.qlogic.com.
For technical support, visit our web site support.qlogic.com, email us at [email protected], or call at 952-932-4040.
7
Warranty
The QLogic SANblade HBA comes with a standard three year QLogic warranty. Please check the QLogic Web site at
http://support.qlogic.com/support/warranty.asp for warranty details.
Laser Safety
FDA Notice
This product complies with DHHS Rules 21CFR Chapter I, Subchapter J. This product has been designed and manufactured according to
IEC60825-1 on the safety label of laser product.
Class 1 Laser Product
Appareil laser de classe 1
Produkt der Laser Klasse 1
Luokan 1 Laserlaite
Caution—Class 1 laser radiation when open
Do not view directly with optical instruments
Attention—Radiation laser de classe 1
Ne pas regarder directement avec des instruments optiques
CLASS I LASER PRODUCT
Vorsicht—Laserstrahlung der Klasse 1 bei geöffneter
Abdeckung
Direktes Ansehen mit optischen Instrumenten vermeiden
Agency Certification
QLogic SANblade HBAs
The following sections contain a summary of EMC/EMI test specifications performed on the following QLogic SANblade HBAs to comply
with radiated emission, radiated immunity, and product safety standards:
❑
❑
❑
❑
QLA4050
QLA4050C
QLA4052C
QLE4060C/QLE4062C
(IS0710404)
(IS0710407)
(IS0710403)
(IX4010402)
EMI and EMC Requirements
FCC Part 15 compliance: Class B
FCC compliance information statement: This device complies with Part 15 of the FCC Rules. Operation is subject to the following two
conditions: (1) this device may not cause harmful interference, and (2) this device must accept any interference received, including
interference that may cause undesired operation.
ICES-003 compliance: Class B
This Class B digital apparatus complies with Canadian ICES-003.
Cet appareil numériqué de la classe B est conformé à la norme NMB-003 du Canada.
CE Mark 89/336/EEC EMC Directive compliance:
EN55022:1998/CISPR22:1997—Class B
EN55024:1998
Immunity Standards
IEC61000-4-2
: ESD
IEC61000-4-3
: RF Electro Magnetic Field
IEC61000-4-4
: Fast Transient/Burst
IEC61000-4-5
: Fast Surge Common/ Differential
IEC61000-4-6
: RF Conducted Susceptibility
IEC61000-4-8
: Power Frequency Magnetic Filed
IEC61000-4-11 : Voltage Dips and Interrupt
IEC61000-3-2
: Harmonic Current Emission
IEC61000-3-3
: Voltage Fluctuation and Flicker
8
VCCI compliance: Class B
AS/NZS CISPR22 compliance: Class B
CNS 13438 compliance: Class B
MIC compliance: Class B
❑
Korea MIC Class B Certified
Product Name/Model
Certification holder
Manufactured date
Manufacturer/Country of origin
B class equipment
(Household purpose info/telecommunications
equipment)
❑
iSCSI HBA
QLogic Corporation
Refer to date code listed on product
QLogic Corporation/USA
As this equipment has undergone EMC registration for
household purpose, this product can be used in any area
including residential area.
Korean Language Format— Class B
Product Safety Compliance
UL, cUL product safety compliance:
UL60950
CSA C22.2 No.60950
Class 1 Laser Product per DHHS 21CFR (J)
73/23/ECC low voltage directive:
TUV:
-EN60950-1:2001
-EN60825-1
-EN60825-2
9
10
© 2005–2007 QLogic Corporation. QLogic, the QLogic logo, the Powered by QLogic logo, SANbox, SANsurfer, and
SANsurfer Management Suite are registered trademarks or trademarks of QLogic Corporation. All other brands and
product names are trademarks or registered trademarks of their respective owners. Information supplied by QLogic is
believed to be accurate and reliable. QLogic Corporation assumes no responsibility for any errors in this brochure.
QLogic Corporation reserves the right, without notice, to makes changes in product design or specifications.
*IS0054501-00C*
J
QLogic Corporation
949.389.6000
26650 Aliso Viejo Parkway
www.qlogic.com
Aliso Viejo, CA 92656
IS0054501-00 C