1
U
S
E
S
E
R
C
O
G
N
D
E
U
D
I
I
T
I
D
O
N
E
The information in this document is subject to change without notice and does not represent a
commitment on the part of ArKaos S.A. No part of this publication may be copied, reproduced or
otherwise transmitted or recorded, for any purpose, without prior written permission by ArKaos
S.A.
All product and company names are ™ or © trademarks of their respective owners.
© ArKaos S.A. 2013. All rights reserved.
T
A
B
L
E
O
F
C
O
N
T
E
N
T
S
2.1 Installing ArKaos GrandVJ – PC...................................................................... 5 2.2 Installing ArKaos GrandVJ – MAC................................................................... 5 3 Registration .................................................................................................. 6 3.1 The Activation Code ........................................................................................ 6 3.2 Activating GrandVJ on your computer ............................................................. 6 3.2.1 Activation Code (Online Method) ............................................................ 7 3.2.2 Serial Key (offline method)...................................................................... 8 3.2.3 Try GrandVJ / Try GrandVJ XT (demo mode) ........................................ 9 3.3 Deactivating GrandVJ on your computer ....................................................... 10 3.4 Periodical validation ....................................................................................... 10 3.4.1 Activation Token update ....................................................................... 11 3.4.2 Activation Token expired....................................................................... 11 3.5 Registration support....................................................................................... 12 4 Software updates ....................................................................................... 13 4.1 Minor software updates ................................................................................. 13 4.2 Upgrades ....................................................................................................... 13 4.2.1 Upgrading from our online shop............................................................ 13 4.2.2 Upgrading with an Upgrade Key ........................................................... 13 5 Introduction to the software ...................................................................... 14 5.1 Basics ............................................................................................................ 14 5.2 Overview ........................................................................................................ 14 5.2.1 Application modes................................................................................. 14 5.2.2 Output modes ....................................................................................... 14 5.3 Terminology ................................................................................................... 15 6 Interface walk-through ............................................................................... 16 6.1 Browser Panel ............................................................................................... 16 6.2 Browser preview ............................................................................................ 17 6.3 Master Preview .............................................................................................. 17 6.4 Banks ............................................................................................................. 18 6.5 Parameter Panels .......................................................................................... 19 6.6 Mixer Parameter panel (mixer mode only) ..................................................... 19 6.7 Layer Element (mixer mode only) .................................................................. 20 6.8 Mixer element (mixer mode only) .................................................................. 20 6.9 Toolbar........................................................................................................... 21 6.10 Help Box ...................................................................................................... 21 7 Using the application ................................................................................. 22 7.1 Application Modes ......................................................................................... 22 7.1.1 Synth Mode ........................................................................................... 22 7.1.2 Mixer Mode ........................................................................................... 22 7.2 Managing cells ............................................................................................... 24 7.2.1 Basics ................................................................................................... 24 7.2.2 Triggering and Mapping Cells ............................................................... 24 7.2.3 Latch and Hold (Synth mode) ............................................................... 25 7.2.4 Cell parameters..................................................................................... 25 7.2.5 Transition Tab ....................................................................................... 28 7.2.6 Cell Parameter Mapping ....................................................................... 29 7.2.7 Cell Copy / Paste .................................................................................. 29 7.3 Banks ............................................................................................................. 29 7.3.1 Bank Control ......................................................................................... 29 7.3.2 Bank Operations ................................................................................... 30 7.4 Layers (Mixer Mode) ...................................................................................... 30 7.4.1 Layer Previews ..................................................................................... 30 7.4.2 Layer Parameters ................................................................................. 31 7.4.3 Layer control ......................................................................................... 31 7.4.4 A/B Cross-fader (Mixer mode) .............................................................. 33 7.4.5 Independent preview............................................................................. 34 7.4.6 Mixer state saving ................................................................................. 34 7.4.7 Mixer pause mode preference .............................................................. 34 1 ArKaos software license agreement .......................................................... 1
2 Installation .................................................................................................... 5
9 The preferences dialog.............................................................................. 54 9.1 Display ........................................................................................................... 54 9.1.1 Instant mode ......................................................................................... 54 9.1.2 Multi-Monitor support (in Windows) ...................................................... 55 9.1.3 VideoMapper mode (GrandVJ XT only) ................................................ 56 9.1.4 Options.................................................................................................. 56 9.2 Keystoning ..................................................................................................... 57 9.3 Audio.............................................................................................................. 57 9.4 ArKaos Connect............................................................................................. 58 9.5 MIDI ............................................................................................................... 58 9.6 Open Sound Control Mapping (OSC) ............................................................ 59 9.7 Performance .................................................................................................. 59 9.8 Advanced ....................................................................................................... 60 9.9 Activation ....................................................................................................... 61 10 Media Types.............................................................................................. 62 10.1 Video............................................................................................................ 62 10.1.1 Alpha from source ............................................................................... 62 10.2 Images ......................................................................................................... 62 10.3 Audio............................................................................................................ 62 10.4 Generators ................................................................................................... 63 10.5 Effects .......................................................................................................... 63 10.6 Quartz Compositions (Mac Only)................................................................. 63 10.7 Cameras / External Sources ........................................................................ 63 10.8 Syphon (Mac only) ....................................................................................... 63 11 ArKaos connect ........................................................................................ 64 12 Performance and setup considerations ................................................ 65 12.1 How to achieve best performances with the new engine............................. 65 12.1.1 Monitor Rate vs Movie Rate................................................................ 65 12.1.2 Hardware dependencies ..................................................................... 66 12.1.3 OS dependencies ............................................................................... 66 12.2 Frame blending and software GenLock ....................................................... 66 12.3 Movie Compression ..................................................................................... 66 12.4 Widescreen & Multiscreen Presentation ...................................................... 67 12.5 Definitions .................................................................................................... 68 12.5.2 Case Studies....................................................................................... 68 12.5.3 Monitor Setup For Wide Screen Or Multi-Screen Projection .............. 69 8 Using a controller with GrandVJ............................................................... 35
8.1 Mapping templates ........................................................................................ 35
8.1.1 Using custom templates........................................................................ 35
8.2 Controller Mapping ........................................................................................ 35
8.3 The Mapping List ........................................................................................... 36
8.4 Keyboard Mapping Mode............................................................................... 36
8.5 MIDI Mapping Mode ...................................................................................... 37
8.5.1 The MIDI Mapping Dialog ..................................................................... 37
8.6 OSC Mapping Mode ...................................................................................... 37
8.6.1 Setting up OSC nodes .......................................................................... 38
8.6.2 OSC Mapping dialog ............................................................................. 38
8.6.3 Open Sound Control feedback.............................................................. 39
8.7 Bi-directional controllers & MIDI feedback ..................................................... 39
8.8 Dedicated mapping templates for specific controllers ................................... 40
8.8.1 Akai APC20 and APC40 ....................................................................... 40
8.8.2 Elation MIDIcon..................................................................................... 40
8.8.3 Korg Nano ............................................................................................. 40
8.8.4 Livid Instruments Ohm64 and OhmRGB .............................................. 40
8.9 Numark NuVJ Video Controller ...................................................................... 40
8.10 Dedicated mapping templates for DJ-style controllers ................................ 41
8.10.1 American Audio VMS2 ........................................................................ 41
8.10.2 American Audio VMS4.1 ..................................................................... 41
8.10.3 Hercules DJ controllers ....................................................................... 41
8.11 MIDI reference for template mapping .......................................................... 42
8.11.1 Introduction ......................................................................................... 42
8.11.2 GrandVJ Full Mixer Mode ................................................................... 42
8.11.3 GrandVJ Selected Mixer Mode ........................................................... 47
13 VideoMapper Extension (GrandVJ XT) .................................................. 74 13.1 Concept ....................................................................................................... 74 13.2 Hardware setup ........................................................................................... 74 13.3 Mapping workflow overview ......................................................................... 74 13.4 VideoMapper application ............................................................................. 75 13.4.1 Interface overview ............................................................................... 75 13.4.2 Toolbar options ................................................................................... 76 13.4.3 Setting up displays .............................................................................. 76 13.4.4 Setting up surfaces ............................................................................. 77 13.4.5 Cropping ............................................................................................. 79 13.5 Visual Sources ............................................................................................. 80 13.6 Export and Import of Mapping Files ............................................................. 81 13.6.1 Key Bindings ....................................................................................... 81 13.1 Output management in GrandVJ ................................................................. 82 14 Support, information and contact........................................................... 83 14.1 Solutions ...................................................................................................... 83 14.1.1 Users discussion forum....................................................................... 83 14.1.2 Knowledgebase articles ...................................................................... 83 14.1.3 Trouble ticket system .......................................................................... 83 14.1.4 Distributors and resellers .................................................................... 83 15 Index ............................................................................................................ 1 12.6 Soft-Edge ..................................................................................................... 72
12.6.1 Calibration ........................................................................................... 73
1 ARKAOS SOFTWARE LICENSE AGREEMENT
DO NOT INSTALL THIS SOFTWARE UNTIL YOU HAVE READ AND ACCEPTED ALL THE
TERMS OF THIS LICENSE. YOUR INSTALLATION OF THIS SOFTWARE WILL BE DEEMED TO
BE YOUR ACCEPTANCE OF THE FOLLOWING TERMS AND YOUR WISH TO BECOME THE
LICENSEE OF THIS GRANDVJ SOFTWARE, WHICH ACCEPTANCE SHALL BIND YOU AND
ALL OF YOUR EMPLOYEES, AGENTS OR OTHER PARTIES WHO WILL USE THIS
SOFTWARE TO THE TERMS OF THE SAID LICENSE.
The ArKaos Corporation (S.A. ARKAOS, Chaussée de Waterloo 198, B-1640 RHODE SAINT
GENESE - Belgium) is authorized to license the software of this installation (the GrandVJ
Software) and by installing the licensee accepts a non-exclusive, non-transferable License to
"Use" (as hereinafter defined) the GrandVJ Software on a single computer system ("The System"),
subject to the terms and conditions contained herein.
This License entitles the Licensee to:
a.
b.
c.
use the one copy of the Software contained in this package on the System;
use the Software strictly in accordance with the provisions of Clause 2 of this License;
receive the benefit of the warranty specified herein;
1. Acceptance of this License
The terms and conditions of this License are deemed to be accepted by the parties as follows:
a.
b.
by the Licensor upon dispatch/delivery by the Licensor of this package to the Licensee,
and
by the Licensee by installing the software.
2. Use of the Software
For the purposes of this License "Use" shall mean and include:
a.
Utilizing the whole or any part of the Software on up to TWO Systems at a time. Utilizing
means loading, transferring, copying or transmitting the Software into or within the
computer system for the processing of the system instructions or statements contained
in the Software.
b.
Merging the whole or any part of the GrandVJ Software in machine-readable form into
another software program.
c.
Copying the whole of the Software, which is in machine-readable form, into a machine
readable copy for Use by the Licensee solely on the System and for the purpose only of
understanding the contents of such readable material and for back up, PROVIDED
THAT no more than two (2) copies will be in existence under any License at any one
time without prior written consent from the Licensor.
d.
Storing the whole or any part of the GrandVJ Software on the System or other storage
unit or disk.
e.
Utilizing (but not copying) the instructional and/or operational manuals relating to the
GrandVJ Software.
f.
ACTIVATION: With its purchase of the Software the Licensee will receive a unique
Activation Code. This Activation Code shall be used by the Licensee to register the
software license on www.arkaos.net. That online registration will allow the Licensee to
generate a SERIAL KEY that will unlock the protection in the Software on his System.
1
g.
SECOND ACTIVATION: For each Activation Code registered on the Licensee's online
account on www.arkaos.net, one extra SERIAL KEY will be available. This extra SERIAL
KEY is for the Licensee facility to activate the Software on an additional System (i.e.
backup computer, laptop, etc..) that belongs to the Licensee.
h.
DEACTIVATION: The Licensee can revoke a Software activation from within the
Software on a System. This deactivation mechanism works through online verification
and is for the Licensee facility to use in case the Software must be activated on another
System due to:
¡
¡
changing vital hardware parts of the System so that the Software protection can not
identify it anymore
replacing the System by a another one
3. Licensee's Undertakings
The Licensee undertakes:
a.
Not to copy (other than for normal System operation and as specified in Clause 2
above), reproduce, translate (including electronic transfer), adapt, vary or modify the
Software nor to communicate the same to any third party without the Licensor's prior
written consent.
b.
To supervise and control Use of the GrandVJ Software in accordance with the terms of
this License.
c.
To ensure that its employees, agents and other parties who will use the GrandVJ
Software are notified of this License and the terms contained therein, and this prior to the
said employee, agent or party using the said Software.
d.
To reproduce and include the copyright notice of the Licensor on all and any copies,
whether in whole or in part, in any form, including partial copies of modifications of the
GrandVJ Software made herein.
e.
Not to provide or otherwise make available the Software in whole or in part (including
where applicable, but not limited to, serial key, activation code, program listings, object
code and source code), in any form to any person other than the Licensee's employees
or as specified in (c) above without prior written consent from the Licensor.
a.
To refrain from amending the method of working of the GrandVJ Software by way of
reverse engineering, (necessary information to achieve the interoperability of the
GrandVJ Software being available for the Licensee from the Licensor).
4. Warranty
a.
The Licensee acknowledges that software in general is not error-free and agrees that the
existence of such errors shall not constitute a breach of this License.
b.
In the event that the Licensee discovers a material error which substantially affects the
Licensee's use of the same and notifies the Licensor of the error within 90 days from the
date of dispatch of this License and the accompanying Software to the Licensee (the
"warranty period"), the Licensor shall at its sole discretion either refund the License fee
or use all reasonable endeavors to correct by patch or new release, also at its sole
discretion, that part of the GrandVJ Software which does not so comply, PROVIDED
THAT such non-compliance has not been caused by any modification, variation or
addition to the original GrandVJ Software not performed by the Licensor or caused by its
incorrect use, abuse or corruption or by use of the GrandVJ Software with other
software or on equipment with which it is incompatible.
2
5. Interoperability
The Licensor undertakes to answer in the shortest possible reasonable time, requests for
information made by the Licensee, linked to the interoperability of the GrandVJ Software.
6. Source - Escrow
The Licensor has established certain source code deposit arrangements ("accord de séquestre")
covering the source code and documentation for the "ArKaos software" with the AGENCY FOR
THE PROTECTION OF PROGRAMS (The A.P.P), W.T.C 10, route de l'Aéroport CH 125 Geneva.
While this Agreement continues to exist, the Licensee will be entitled to receive the protection of
such escrow arrangements in accordance with the rules and provisions of the "Procedure for the
Applications of the Article 6 of the APP - IDDN - General Regulation ".
7. The Licensor's Liability
a.
The Licensor shall not be liable to the Licensee for any loss or damage whatsoever or
howsoever caused arising directly or indirectly in connection with this License, the
GrandVJ Software, its use (whether or not as defined in this License) or otherwise,
except to the extent that such liability may not be lawfully excluded.
b.
Notwithstanding the generality of (a) above, the Licensor expressly excludes liability for
indirect, special, incidental or consequential loss or damage which may arise in respect
of the GrandVJ Software, its Use, (whether or not as defined in this License), the
System or in respect of other equipment or property, or for loss of profit, business,
revenue, goodwill or anticipated savings.
8. Patents, Trademarks, Copyright and Intellectual Property Rights
a.
The Licensee acknowledges that any and all of the trademarks, trade names,
copyrights, patents and other intellectual property rights used or embodied in or in
connection with the GrandVJ Software shall be and remain the sole property of the
Licensor. The Licensee shall not during or at any time after the expiry or termination of
this License in any way question or dispute the ownership by the Licensor of any such
rights.
b.
The GrandVJ Software, all copies of the software and derivative works based upon the
GrandVJ Software or any part thereof remain the property of the Licensor.
c.
The Licensee shall indemnify the Licensor fully against all liabilities, costs and
expenses which the Licensor may incur as a result of work done in accordance with the
Licensee's specifications involving infringement of any copyright patent or other
proprietary right.
9. Confidential Information
All information, data, drawings, specifications, documentation, software listings, source or object
code which the Licensor may have imparted and may from time to time impart to the Licensee,
relating to the GrandVJ Software, is proprietary and confidential. The Licensee hereby agrees that
it shall use the same solely in accordance with the provisions of this License and that it shall not at
any time during or after expiry or termination of this License, disclose the same, whether directly or
indirectly, to any third party without the Licensor's prior written consent.
The Licensee further agrees that it shall not itself or through any subsidiary, agent or third party
modify, vary, enhance, copy, sell, lease, license, sub-license or otherwise deal in the GrandVJ
Software or any part or parts, variations, modifications, copies, releases, versions or
enhancements thereof or have any software or other programme written or developed for itself
based on any confidential information supplied by the Licensor.
3
10. Force Majeure
The Licensor shall be under no liability to the Licensee in respect of anything which, apart from this
provision, may constitute breach of this License arising by reason of force majeure, namely,
circumstances beyond the control of the Licensor.
11. Assignment
The Licensee shall not assign or otherwise transfer all or any part of the GrandVJ Software or this
License without the prior written consent of the Licensor.
12. Waiver
Failure or neglect by either party to enforce at any time the provisions hereof shall not be
construed nor shall be deemed to be a waiver of that party's rights hereunder nor any way affect
the validity of the whole or any part of this License nor prejudice that party's rights to take
subsequent action.
13. Severability
In the event that any of these terms, conditions or provisions should turn out to be invalid, unlawful
or unenforceable to any extent, such term, condition or provision shall be withdrawn from the
remaining terms, conditions and provisions, which shall continue to be valid to the fullest extent
permitted by law.
14. Law
The parties hereby agree that this License concluded between them and constituted on these
terms and conditions shall be interpreted in accordance with Belgian Law.
15. Video content provided with the Software
The video clips/loops that are provided with the Software are intended for demonstration purpose
and are subject to copyright by ArKaos or by respective copyright owners.
No resale, duplication for other than personal use, or transfer of ownership of the video clips/loops
is allowed.
Disclaimer:
THE VIDEO CLIPS / VIDEO LOOPS ARE PROVIDED BY THE COPYRIGHT HOLDERS AND
CONTRIBUTORS "AS IS" AND ANY EXPRESS OR IMPLIED WARRANTIES, INCLUDING, BUT
NOT LIMITED TO, THE IMPLIED WARRANTIES OF MERCHANTABILITY AND FITNESS FOR A
PARTICULAR PURPOSE ARE DISCLAIMED. IN NO EVENT SHALL THE COPYRIGHT OWNER
OR CONTRIBUTORS BE LIABLE FOR ANY DIRECT, INDIRECT, INCIDENTAL, SPECIAL,
EXEMPLARY, OR CONSEQUENTIAL DAMAGES (INCLUDING, BUT NOT LIMITED TO,
PROCUREMENT OF SUBSTITUTE GOODS OR SERVICES; LOSS OF USE, DATA, OR
PROFITS; OR BUSINESS INTERRUPTION) HOWEVER CAUSED AND ON ANY THEORY OF
LIABILITY, WHETHER IN CONTRACT, STRICT LIABILITY, OR TORT (INCLUDING
NEGLIGENCE OR OTHERWISE) ARISING IN ANY WAY OUT OF THE USE OF THESE VIDEO
CLIPS / VIDEO LOOPS, EVEN IF ADVISED OF THE POSSIBILITY OF SUCH DAMAGE.
4
2 INSTALLATION
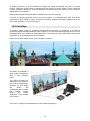
Welcome to ArKaos GrandVJ.
GrandVJ is ArKaos’ state-of-the-art video mixing and VJ software, allowing unprecedented control
over visual performances.
You can use GrandVJ to perform with visuals just like you would be playing an instrument, either
using the computer keyboard, a MIDI controller or a MIDI sequencer. Alternatively, you can also
use GrandVJ as an eight channel video mixer, allowing full and precise control over each
individual channel.
Your audience won’t believe their eyes.
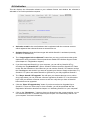
2.1 Installing ArKaos GrandVJ – PC
1.
To install the ArKaos GrandVJ software, insert the installation CD into your
computer’s CD-ROM drive.
2.
Double-click on the installation file, located in the root directory of the CD. This will
launch the InstallShield Wizard.
3.
Follow the on-screen instructions. Please note that the installation program will scan
for available video components on your computer prior to installing the software. If there
are any components that are not up to date, please install them by clicking on their
corresponding buttons before proceeding with the installation.
4.
Once the installation is complete, click “Finish”. The ArKaos GrandVJ software is
now ready to be used.
5.
Start GrandVJ by going to Start u ArKaos GrandVJ u ArKaos GrandVJ.
6.
Follow the registration procedure described further in this document.
2.2 Installing ArKaos GrandVJ – MAC
1.
To install the ArKaos GrandVJ software, insert the installation CD into your
computer’s CD-ROM drive.
2.
Double click on the ArKaos GrandVJ installer located on the CD.
3.
Follow the on-screen instructions.
4.
Once installation is complete, you will see a shortcut on the desktop. The application
will also appear in your Applications u ArKaos GrandVJ folder.
5.
Start GrandVJ.
6.
Follow the registration procedure described further in this document.
5
3 REGISTRATION
3.1 The Activation Code
Your software comes with an Activation Code. It is very important that you keep this code in a safe
place since it is the proof that you own a license and it might be needed later to re-install the
software or obtain future upgrades.
If you have a software box, the Activation Code is printed on a sticker that is attached to the
installation CD sleeve. If you have purchased a license online at www.arkaos.net, the Activation
Code appears on the web site’s “My Licenses” page, it was also sent to your e-mail address.
Activation Codes for GrandVJ licenses start with GVJ, GrandVJ XT licenses start with GVX and
Upgrade Keys (Activation Codes for upgrades) start with GVU.
Here's an example of an Activation Code for GrandVJ: GVJ-ACBD-EFGH-HGFE-DBCA
Important:
The Activation Code is not the final code that will unlock the software on your computer. To do so, you
will need to obtain a Serial Key. The Serial Key is a .gvs file that unlocks GrandVJ to run on a specific
computer.
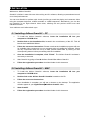
3.2 Activating GrandVJ on your computer
The registration process is fairly easy. You have the choice to either unlock GrandVJ directly from
within the application itself (if you are working on a computer that is connected to the Internet) or to
use a Serial Key that was obtained from our web site.
In any case, your current Serial Keys are stored in your customer account online at
www.arkaos.net, so you can retrieve them i.e. if you need to re-install your computer.
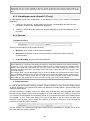
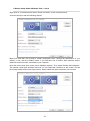
When you start the application unregistered, the registration wizard appears.
From this dialog you can choose the registration method you would like to use or to continue and
try GrandVJ or GrandVJ XT in Demo mode.
For your information, your computer’s Machine ID is displayed at the bottom of the dialog; you will
only be able to unlock GrandVJ with a Serial Key that was generated for that Machine ID.
6
The Registration Wizard offers the following options:
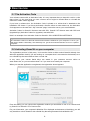
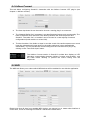
3.2.1 Activation Code (Online Method)
Choose the first option, “Activation Code”, and press next if you would like to unlock the software
directly from the application, automatically through your Internet connection. This is the easiest
option but it requires that GrandVJ can communicate with our servers and is not blocked by a
firewall or network policy restrictions.
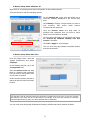
Type your Activation Code first, each group of letters in its own text field.
In the next text fields you have to specify a valid e-mail address for your online customer account.
Once you have verified all the information (make sure the e-mail address is valid!), press next.
The application will try to communicate with our servers, register your details and obtain the Serial
Key for your computer, here is how it works:
1. If you are a new ArKaos user
If you don’t have a customer account yet, we will create a new one for you; your e-mail address
will be your login and you will receive a password by e-mail. Your software license will be bound to
that new customer account.
2. If you are adding a new license in your account
If you already have an ArKaos customer account and you want to add a new software license, just
use your registered e-mail address, the new GrandVJ license will be added to your customer
account with any other existing software license.
3. If you are activating a computer in an existing license
If you already have an ArKaos customer account with a GrandVJ license registered and you want
to activate a second computer with that license, just use your registered e-mail address and your
existing GrandVJ Activation Code.
7
Note:
If the registration is successful, it will display a confirmation message and your software will be
activated automatically.
Important:
If you have purchased your software box from the ArKaos web site, you already have a customer
account with us; you can use the same e-mail address to add your license to your account (Case 2
above). If you have purchased a software license from our web site, you already have a customer
account with us and your Activation Code is already registered in your customer account; you can
use the same e-mail address and Activation Code to activate GrandVJ on your computer with a new
Serial Key from that license (Case 3 above).
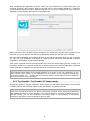
3.2.2 Serial Key (offline method)
Choose this option to activate the software manually by locating a previously downloaded Serial
Key file. This is useful if for any reason you couldn’t go through the activation process from within
the software, you can register your Activation Code manually on the ArKaos web site and
download a Serial Key from your customer account to use it to activate GrandVJ.
This option is also useful if the computer where you want to unlock GrandVJ is not connected to
the Internet. In that case, you will need to surf to our web site with another computer and generate
a valid Serial Key for the computer where you want to use GrandVJ. Remember, every computer
has a different Machine ID and a Serial Key will only unlock GrandVJ on the computer with the
corresponding Machine ID.
Important:
Before surfing to our web site to obtain a Serial Key, make sure to take note of the computer's
Machine ID (displayed at the bottom of the registration window) and have your Activation Code ready.
With a web browser, go to http://www.arkaos.net/register/ and follow the instructions there to
create a new customer account (if you don’t have one already) and obtain a Serial Key for your
Machine ID code.
8
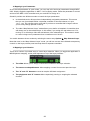
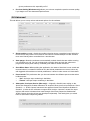
After completing the registration process online you can download your Serial Key from your
customer account’s “My Licenses” page on our web site, it’s a file named “Serial.gvs”. Transfer it
to the computer where you wish to activate GrandVJ i.e. by using a USB key then, from GrandVJ’
Serial Key screen (below), browse to the “Serial.gvs” file.
When you press next, GrandVJ will be activated. The “Serial.gvs” file has been copied into the
software, so you can remove the USB key or delete the “Serial.gvs” file from your computer.
Once you have registered your software license on our web site and activated your first computer,
you can use your Activation Code again to obtain another Serial Key and activate a second
computer by proceeding as previously explained.
Your online customer account at www.arkaos.net is also the place where you can change your
password, update your customer profile and of course retrieve your current Serial Keys, generate
a new Serial Key or upgrade your license whenever we release a new version.
Important:
One software license allows you to activate GrandVJ on up to two of your own computers (i.e. your
main computer and a backup, or your workstation and your laptop, or your production computer and
your show computer, etc.. - Please refer to the ArKaos software license agreement at the beginning
of this document for more information).
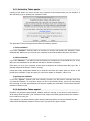
3.2.3 Try GrandVJ / Try GrandVJ XT (demo mode)
Choose this option to start the software in Demo mode, you will not be able to save your work and
a “DEMO” banner will randomly appear in the output and in the master preview.
Important:
Apart from the restrictions above, the Demo mode is fully functional. All the effects and parameters
are available and there is no time limitation. If you need to decide if a computer is capable of running
GrandVJ fluently, you can take advantage of the demo mode, it’s not necessary to activate the
software on the system uness you decide to use it for good.
9
3.3 Deactivating GrandVJ on your computer
Since your software license is personal and only allows using two computers at the same time,
you should always keep strict control of your activations. To do so, there are some cases where
you might want to deactivate GrandVJ on a computer. For example, if you want to move GrandVJ
to a new computer, if you want to use GrandVJ temporarily on a rented machine or on a computer
pre-installed in a venue, if you intend to sell your computer etc..
You cannot deactivate a computer from your customer account on the ArKaos web site. The only
way to deactivate GrandVJ on a computer is from the “Activation” tab in the “Preferences” window,
or from the “File..” menu in GrandVJ, on the computer you want to deactivate. The computer must
be connected to the Internet.
Once you press the “Deactivate..” button, GrandVJ will connect to our servers and remove its
Serial Key in your customer account. The software will then confirm successful deactivation and
quit. If you restart GrandVJ on that computer you will get the software registration dialog box and
the option to register GrandVJ or use it in Demo mode.
3.4 Periodical validation
For the activation / deactivation system to work, the software needs to check periodically with our
servers that the computer is still authorized to run the software. Each time this happens, our
servers update your GrandVJ Serial Key with a new Activation Token.
Important:
If your computer is frequently connected to the Internet while you run GrandVJ, this verification will
happen silently and you will not notice anything.
10
3.4.1 Activation Token update
If during a few weeks you never connect your computer to the Internet while you use GrandVJ, it
will start asking you to update your Activation Token.
The Activation Token message window offers the following options:
1. Online validation
If you click “Connect”: GrandVJ will try to contact our servers and update your Activation Token
automatically. Make sure you connect your computer to the Internet before choosing this option.
2. Offline validation
If you click “Browse..”: you will be invited to browse your computer for a new Serial Key (i.e. a key
that you have obtained from the ArKaos web site on another computer).
Each time you go to your customer account and re-download an existing Serial Key (.gvs file), it
actually resets the Activation Token in that key.
Using that newly downloaded Serial Key in GrandVJ will have the same effect as above; it will
update your Activation Token and give you a few more weeks of GrandVJ “offline” use.
3. Ignoring the validation
If you click “Ignore”: GrandVJ will start normally, however you will get this message each time
you start the software. To avoid this, simply use one of the options above. Once you start seeing
this message you have approximately one month to update your Activation Token before GrandVJ
switches to Demo mode.
3.4.2 Activation Token expired
GrandVJ only performs the periodical validation while it is running; if you have not used GrandVJ
at all during several months, your Activation Token might have totally expired before the software
had a chance to warn you.
If this happens, you will receive the above warning message when you launch GrandVJ but the
software will immediately switch to Demo mode if you press the “Ignore” button.
11
You will have to connect your computer to the Internet or re-download the Serial Key to unlock
GrandVJ on the computer.
3.5 Registration support
It’s important to us that legit users can use the software they have purchased; therefore we
provide priority support for problems related to software registration.
In order to get back to you with a solution to software registration problems in a timely manner, we
have made it easy for you to send us all the necessary information related to your software
license: from the “Activation” tab in the “Preferences” window you can click the button “Copy
support info to clipboard”, you can then paste the copied information in your message when you
contact our support team (also see chapter Error! Reference source not found.“Error!
Reference source not found.” for your support options).
12
4 SOFTWARE UPDATES
4.1 Minor software updates
We frequently release free software updates to fix software bugs, add new MIDI controller
templates or even some new features, these are called “minor updates”. To benefit from these
updates, no license upgrade is required; you just have to download the new software installer from
our web site and install it on your computer, it will use your previous registration information.
If you are connected to the Internet, the application will inform you at startup if a new version is
available. You can also subscribe to our periodical newsletter and get notified when there is a
software update: https://www.arkaos.net/newsletter/subscribe
4.2 Upgrades
When we release a “major update” with important changes such as a new software interface, new
advanced features or extensions we generally charge for an upgrade fee to fund development and
require that you get new license codes from your customer account to unlock the new version.
It also works the same way if you want to upgrade to a superior license version such as from
GrandVJ to GrandVJ XT.
4.2.1 Upgrading from our online shop
When an upgrade is available for one of the software licenses you own, you will be notified in your
customer account on the ArKaos web site at https://www.arkaos.net/user. From there, select which
upgrade you would like to purchase and proceed to checkout on our online store.
4.2.2 Upgrading with an Upgrade Key
If you have bought an Upgrade Pack from a reseller, you have received an installer CD and an
Upgrade Key. You can install the new software version from the CD - or download the latest one
from our web site - then you can use the Upgrade Key in the software registration wizard or in the
from the “Activation” tab in the “Preferences” window of GrandVJ.
You can also use your Upgrade Key on the ArKaos web site at http://www.arkaos.net/register/.
You will be asked to log in and then the web site will check if your customer account contains a
license which can be upgraded with your key (i.e. the previous software version).
In both cases, when you successfully end the process, your new software license will be available
in your customer account on the “My Licenses” page so you can obtain a Serial Key from it and
unlock the new software version on your computer.
Your previous software license (the one you just upgraded) will still be visible in your customer
account but you won’t be able to obtain any Serial Key from it anymore.
13
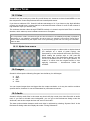
5 INTRODUCTION TO THE SOFTWARE
5.1 Basics
GrandVJ is an application that allows you to seamlessly integrate real-time audiovisual mixing with
any type of performance situation. Serving up to 8 layers of video and boasting a very wide array
of effects and control parameters, it is fully controllable via MIDI, computer keyboards or external
sequencers.
GrandVJ is designed to work with a multi video-output computer setup. The main video output
being used to display the user-interface and the previews, while the next video outputs will send
the full resolution images to external hardware displays such as projectors, plasma screens, LED
walls, video mixers, etc.
For more information on setting up multiple video-outputs, see chapter Error! Reference source
not found.“Error! Reference source not found.” and section 0“” later in this document.
5.2 Overview
The software interface consists in one main window displaying all of the information needed during
a performance. It can show the 8 individual layer previews as well as the master preview (the
image which is sent to the fullscreen video-outputs) and a parameter panel with settings for each
layer.
Parameters can either be modified through the user-interface, from the computer keyboard, a MIDI
controller or an OSC controller.
When you first start the software, the fullscreen output is disabled by default. If you want to send
the fullscreen output to the computer’s secondary video-outputs, activate fullscreen either by
selecting View uToggle Fullscreen or by pressing Ctrl+F on Windows / Cmd+F on Mac.
If you don’t have a proper dual output setup, the full screen will be activated on the main screen,
replacing the software interface. To exit full screen mode, press Ctrl+F / Cmd+F again.
5.2.1 Application modes
Depending on how you want to mix your visuals in GrandVJ, you can chose between two different
modes. For more information about Application modes, see chapter 7.1 “Application Modes”.
1. Synth Mode
This is where you play visuals like you would play an instrument. You define cells and their
properties and you “stack” cells on top each other by pressing simultaneous keys on the computer
keyboard/MIDI controller.
2. Mixer Mode
This is where you can access the eight individual layers and control them individually. In this
mode, GrandVJ becomes a full-featured eight layers software video mixer.
5.2.2 Output modes
Output modes define how / where GrandVJ is configured to output its visuals. Output modes are
independent from the application modes, they work in both Synth mode and Mixer mode. You will
find more information about Output modes at chapter 9.1 “Display”.
14
1. Instant Mode
In Instant mode, GrandVJ directly outputs the mix to a set of displays with the same resolution.
The software considers this set as a single output.
2. VideoMapper Mode (GrandVJ XT only)
When configured to run in VideoMapper mode, GrandVJ XT will send the output from each layer to
virtual “surfaces” as previously defined in the VideoMapper extension. One output can display a
full screen visual or a composition of several mapped visuals.
5.3 Terminology
Visuals: Visual is a generic term encompassing everything that produces frames: this can be
images, videos, camera streaming, generators or flash animations.
Effects: Effects are real-time processors that allow you to alter visuals. The complete collection of
available effects can be found in the Effects tab of the browser panel.
Generators: Generators are sound controlled graphical elements. They react to the sound input
from your sound card and are great to provided sound automated textures
Cells: Cells are placeholders to store a given combination of visuals / effect / transparency / copy
mode / position combination. When you 'trigger' a cell, you send the content of the cell to the
graphic engine. In synth mode, triggering cells stacks them on top of each other. In mixer mode,
triggering a cell will send it to the currently selected layer.
Banks: Banks are combination of cells forming a mini library. There are two sets of 16 banks. The
first bank set is laid out according to a matrix and referred to as the 'matrix bankset'. The second is
shaped as a MIDI keyboard layout and is referred to as the 'keyboard bankset'. The matrix bank
size can be changed to match any controller layout you would be using.
Layers: Layers represent stacks in the visual pipeline. Each layer has a set of properties matching
the cell properties: one visual, one effect, transparency, copy modes, chroma/luma keying,
position etc... GrandVJ is capable of displaying up to 8 layers. In synth mode, layers are assigned
automatically depending on the way you trigger cells and their foreground/background property. In
mixer mode, you have access to all the layer properties individually.
Mapping: Mappings represent a way to “connect” an element from the software to a control device
(MIDI controllers, MIDI sequencers or the computer keyboard). You can map the matrix bank cell
triggers, control the layer/cell properties, as well as some of the general controls of the software.
Project: A project is a collection of banks and cell definitions which are stored in a project file for
later use.
Previews: Allow you to preview the content of a layer or the main output. The main preview
window is always displayed and shows what is sent to the main output. In mixer mode, individual
layer previews are also available.
Transition: Transitions are special effects that provide a smooth change between triggered cells
or decks. The complete collection of available transitions can be found in the transition tab of the
browser panel.
Display: Displays are the devices that are connected to the computer graphical card(s) using DVI,
HDMI, DisplayPort or VGA connectors.
Output: An output represents the destination of a video mix. While VideoMapper mode allows the
use of multiple different outputs, Instant mode only allows a single one.
15
6 INTERFACE WALK-THROUGH
This section describes the different application panels and their functionality. Depending on the
application mode you are using (synth or mixer), not all panels may be available. Specifically, in
synth mode, the Mixer panel is not available.
Note:
Most panels are resizable to accommodate various screen resolutions and the software will
remember different configurations for the synth and mixer mode. If you have enough resolution, you
can unwrap the tabs of the parameter panel and the browser for example.
6.1 Browser Panel
The left side of the application is dedicated to the
browser section. The browser section contains six
tabs with the following items:
¡
¡
¡
16
The file browser allows you to browse the
file system of your computer and drag and
drop files to a cell, to the visual library or to
the layer previews (in mixer mode).
The effect browser allows you to browse
the available effects. Effects are sorted
according to categories. The browser allows
you to drag and drop effects to a cell or
directly to a layer preview (in mixer mode).
The transition list allows you to browse the
available transitions. Transitions are sorted
according to categories. The browser allows
you to drag and drop Transitions to a cell (in
synth mode) or in the Transition parameter
panel (in mixer mode).
¡
¡
¡
¡
The source browser allows you to browse visual elements; these include generators,
flash texts, and cameras available on the system. The source browser allows you to
select a source and drag and drop it to a cell or a layer preview (mixer mode only).
The visual library contains the list of all the visuals that have been loaded in the session,
no matter if it they're currently assigned to a cell or not. You can drag and drop a library
element to a cell or to a layer preview (mixer mode only). The content of the visual library
is saved with the project and restored when the project is loaded.
If you load a lot of videos, they will keep accumulating in the visual library. To get rid of
videos that are neither running nor associated to a cell, select the 'purge visual' entry from
the edit menu
The mapping list provides a summary of activated MIDI and keyboard mappings. It also
provides additional options not available through direct mapping, such as setting and type
of controller (for example, normal/incremental).
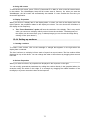
6.2 Browser preview
The browser preview panel allows to preview files,
effects, transitions, sources and visuals from the
browser section.
It will help you to decide which visual, effect,
transition, etc. you will use before applying it to a cell
in GrandVJ.
By default “Auto Preview” is enabled, thus when an
item is selected in the browser section it will
automatically try to preview this item.
The following controls are available for the preview:
¡
¡
¡
¡
Start/pause button
Stop button
Audio mute button
Seek bar
The purpose of the browser preview is to give quick preview of the different items listed in your
browser panel. Therefore the preview will automatically stop when the browser section or the
preview panel itself is out of focus. This allows saving computer processing for the fullscreen
outputs of GrandVJ.
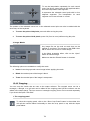
6.3 Master Preview
The master preview shows what is sent to the
currently selected output of the software.
In mixer mode, when assigning layers to either A or
B, you can use the master preview to display the
mixer’s output or to preview only the deck A or B.
For example, let’s say you are outputting the content
of deck A (by setting the cross-fader all the way to
the left).
If you toggle the preview to deck B, you can now set it up without interrupting the main output.
When you are satisfied by what is on deck B, flip back the preview to the main output (pressing B
again) and use the cross-fader to go smoothly from A to B.
17
In Synth mode, the master preview displays the end result of the layer stack. What you see is what
is sent to the full screen output(s).
In VideoMapper mode, since there can be multiple outputs, the master preview of the Mixer mode
displays the final mix corresponding to the selected layer stack. In Synth mode, the Master
Preview refers to the selected output, which can be either a single surface or a group. Refer to
chapter 13 “VideoMapper Extension (GrandVJ XT)” for more information about the VideoMapper.
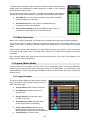
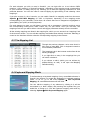
6.4 Banks
There are two sets of banks (or banksets). One is matrix-shaped, the other one is in the shape of
a MIDI keyboard.
Each bankset contains 32 banks, arranged in tabs. Of those 32, only one is 'active' at a time. The
active bank is the bank whose cells will be triggered when you press a keyboard or MIDI controller
key. The active bank is marked with a small dot sign in its tab right before its name.
Each bank contains a certain number of cells containing a visual, an effect and various mixing
parameters. On the matrix banks, cells can be triggered using one of three methods: Mouse,
Keyboard or MIDI. The keyboard banks are only triggered from a predefined MIDI scheme
corresponding to a piano keyboard.
The number of cells (horizontally/vertically) in the matrix bank set is user-definable but is the same
across all banks.
18
6.5 Parameter Panels
The parameter panels allows you to edit cell or layer parameters. In synth mode, only the cell
parameters will be accessible.
In mixer mode, both cell parameters (for cue editing) and layer parameters (to update one of the
running layers) will be accessible.
The Transition panel is only available in synth mode (cf 3.6 for transitions in mixer mode).
The parameter panel also allows you to set up the MIDI mapping of either cell parameters (synth
mode only) or layer (mixer mode only).
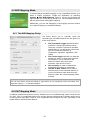
6.6 Mixer Parameter panel (mixer mode only)
When you edit a mixer’s output element (by clicking
its “Edit” button in the mixer), the mixer parameter
panel replaces the standard parameter panel.
The Transition tab lets you set control the current
transition and prepare up to 10 transition presets.
In VideoMapper mode, the Output tab lets you select
which outputs the visual mixing produced by the
related layers will be rendered on.
19
6.7 Layer Element (mixer mode only)
In mixer mode, the layer preview panel allows you to
preview the layer content. Layers are organized from
the bottom up and each layer can be controlled
independently.
A layer element is composed by the following items,
from left to right:
¡
¡
¡
¡
¡
¡
¡
one button to map the layer selection and
display the layer, if it is running.
one A button to assign the layer to deck A
one preview of the layer
one transparency slider
one button to pause/restart the layer
one button to clear the layer
one edit button to edit the layer’s properties
in the Parameter panel
6.8 Mixer element (mixer mode only)
In mixer mode, a group of layers is surmounted by a mixer element, which controls the transition
between A & B decks. In VideoMapper mode, the mixer element sends the result to the selected
output.
The mixer element is composed by the following elements, from left to right:
¡
¡
¡
¡
¡
¡
one button to remove the mixer element
one button to automate towards deck A
one cross-fader slider to control the transition between deck A & B
one button to automate towards deck B
one menu to select the outputs the mixing will be sent to
one edit button to edit the mixer’s properties in the Mixer Parameter panel
20
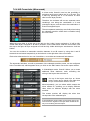
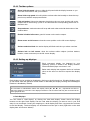
6.9 Toolbar
The toolbar provides a series of buttons and displays with the following functionality:
switches to mixer or synth mode
latch / hold (synth mode only)
kill all (stops all running layers)
Master blackout (switch off the full screen output but not the preview)
activates / deactivates full screen
audio input meter + gain control
audio output meter + volume control
displays MIDI and OSC activity
the LED lights-up when GrandVJ is connected to an audio sequencer
through the ArKaos Connect VST plug-in. The button allows to preview
the sound coming from the sequencer
monitors GrandVJ’s GPU and CPU framerate
shows / hide the browser and the matrix & keyboard bank panels
launches the VideoMapper editor (VideoMapper mode only)
6.10 Help Box
The help box is located under the browser section and displays contextual information about the
element over which the mouse is hovering.
21
7 USING THE APPLICATION
7.1 Application Modes
As we mentioned earlier, GrandVJ provides two very distinct modes of operation. It can function as
a visual instrument/performance tool or as a video-mixer. It is important to grasp the difference
between these modes in order to fully take advantage of them.
Internally, GrandVJ allows for up to 8 layers of stacked video. In synth mode, layer assignment is
done automatically depending on the order of triggering and the priority setting of the cell. In mixer
mode, the user controls the layer content directly, providing a 8 channel video mixer.
7.1.1 Synth Mode
In this mode, each cell triggered is, by default, stacked “on top” of the previous ones in the graphic
pipeline. A cell stays active from the moment it is triggered until it is released.
Cells are linked directly to the graphic pipeline, meaning that if you modify any parameter of a cell
running in the engine, it will be reported directly to the graphic pipeline. For this reason, in synth
mode, you can map cell parameters to controllers. You could, for example, map the 'transparency'
setting of a cell to a MIDI controller slider and bring it from invisible to visible once it's been
triggered.
It is also possible to assign a ‘priority’ value to cells. The priority has three values: foreground,
background and normal. If the cell is assigned a background priority, it will always be 'stacked'
under normal cells. Alternatively, if the cell is assigned a foreground priority, it will always be
stacked on top of the others. This is handy, for example, if you want to have a logo or message
continuously running above the rest while you're playing: simply put the cell in foreground and it
will stay on top, no matter what other cells you trigger.
In VideoMapper mode, each output displays the composition of the different playing cells that are
assigned to it.
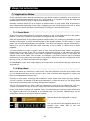
7.1.2 Mixer Mode
Mixer mode works very much like a video mixer. The main difference from the synth mode is that
you can decide which layer to send a cell to. Also, once a cell has been triggered on a layer, the
layer runs independently from the cell.
Contrary to synth mode, modifying cell properties in mixer mode won't affect any layer settings.
You can, however, act directly on all the layer parameters. To fade one layer out, you simply select
it and use the parameter panel to slowly change its transparency.
Once a cell is triggered on a layer, it will run continuously, even when you release the cell's key.
To stop a visual from running on a layer, simply press the stop button next to the layer preview.
In this mode, there is always one “selected” layer. The selected layer is the layer which will receive
any triggered cell that’s not assigned to a particular layer. The currently selected layer can be
changed by clicking on any layer’s index or preview.
Selected layers are highlighted in orange.
You can set cells to be triggered directly to a
specified layer rather than to the one
currently selected.
22
This is allows you to pre-configure specific movies, masks or effects to be sent directly to one layer
(the topmost for example) without having to switch layers. This setting is available in the visual tab
and is only available for cells.
As we just explained, in mixer mode, you can still modify cell parameters but these will only be
active when the cell is triggered. For this reason, cell parameters cannot be mapped in mixer
mode. You can only map layer parameters.
In addition to triggering cells on a layer, you can drag and drop visuals and effects directly on the
layer preview.
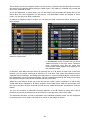
In instant mode, the eight layers of GrandVJ
display a unique mixer.
In VideoMapper mode, GrandVJ lets you insert
additional mixers in the layer stack. Therefore
every consecutive layer that are under that
mixer will be mixed together and displayed on
the selected outputs.
In GrandVJ, each Mixer has two decks. By pressing the 'A' or 'B' button on each side of the layer
preview, you can assign each layer to either the 'A' or 'B' deck. This makes the software run two
separate scene renderings, one being the combination of A and unassigned layers, and the other
the combination of B and unassigned layers. The two separated renderings are finally mixed using
the selected transition effect that’s controlled with the cross-fader.
When the cross fader is all the way to the left (on the A side), layers assigned to 'A' will be fully
visible while layers assigned to 'B' will be invisible. On the other hand, when the cross-fader is all
the way to the right, all layer assigned to B will be fully visible while layers associated to A will be
hidden.
You can also achieve an automatic transition between A and B scenes by using the A and B
buttons that are located respectively on the left and on the right side of the cross- fader.
The automatic fade time, as well as parameter of the selected transition preset, can be configured
by deploying the cross- fader control panel as shown on the image on the left.
23
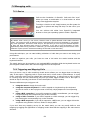
7.2 Managing cells
7.2.1 Basics
Cells are the foundation of GrandVJ. Cells work like “cues”
where you setup a combination of a visual and/or an effect
ready to be triggered at anytime.
To assign a visual to a cell, simply browse your file system for
any movie or picture and drag and drop it to the cell of your
choice.
You can achieve this either from GrandVJ’s integrated
browser or from your operating system's Finder / Explorer.
Note to PC users:
By default, when running in full screen, GrandVJ uses a special DirectX mode called “exclusive
mode”. The exclusive mode is optimal in terms of performances but has one drawback: if you activate
any other application, full screen mode will quit. This prevents you from using the Windows Explorer
to drag and drop elements while running in fullscreen. If you wish to use the Explorer (or other
applications) while running GrandVJ in fullscreen, go to the Preferences dialog and remove the “force
resolution” option (see the ‘Preferences Dialog’ section later in this document).
Using this technique, you can start building collections of cells that you want to use during your
performance.
In order to organize your cells, you have two sets of 32 banks: the matrix bankset and the
keyboard bankset.
The matrix banks can be mapped to any keyboard/MIDI controllers while the keyboard banks are
pre-assigned to MIDI notes and cannot be triggered from the keyboard.
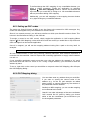
7.2.2 Triggering and Mapping Cells
Once you have a set of cells containing visuals and/or effects you can trigger them so that they
'play' in the engine. Triggering cells in synth mode and in mixer mode is quite different. In synth
mode, a cell stays active until you release the corresponding key. In mixer mode, a cell is “copied”
to a mixing layer and will continuously play until you either trigger another cell on that layer or
decide to stop it manually (see above for more description of the two modes)
There are different ways to trigger a cell:
¡
¡
¡
¡
¡
using the mouse: simply click on the cell.
using the computer keyboard: if a cell is mapped to a keyboard key (the keyboard
shortcut is shown on the top right corner of the cell), simply depress the corresponding
key.
using a MIDI controller: if your cell is mapped to a MIDI controllernote, you can trigger
it by just pressing the corresponding key on the controller.
using an OSC controller: if your cell is mapped to a OSC message, you can trigger it by
just pressing the corresponding key on the controller.
using a MIDI sequencer: If you cell is mapped to a MIDI note, you can trigger it from the
sequencer using ArKaos Connect, Rewire or simply MIDI.
If you don't have any mapping set up (on the matrix bank) you can very easily define a new
mapping by toggling the application in 'mapping' mode. Note that the mapping is the same across
all banks.
24
If the mapping for the top left cell is 'A' it will be 'A' for all banks from 1 to 32. Cells are always
triggered from the active bank, designated by a red tab.
7.2.3 Latch and Hold (Synth mode)
The latch and hold buttons on the tool bar add flexibility to triggering cells in synth mode. Normally,
a cell runs as long as the corresponding keyboard/MIDI key is held down. If latch is activated,
triggering a cell will work in a toggling fashion. The first time you trigger the cell, it is activated, the
second time it is deactivated. The hold button can be used to 'hold' all running cells, meaning that
once the cells have been triggered, you can release the corresponding key(s) and the cells will
continue to run, until you retrigger the cells.
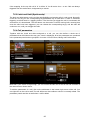
7.2.4 Cell parameters
Together with the visual and effect assigned to a cell, you can also define a whole set of
parameters that will influence the way your visual is displayed. All of the parameters are contained
in the parameter panel and are grouped in four tabs: Visual, Effects, Mixing and Position/Size.
Note that if your screen is big enough, you can undock the tabs and to see all four tab contents at
the same time as shown above.
To edit the parameters of a cell, click on the edit button in the bottom right corner of the cell. You
can right click on the cell as well. The cell will have a blue outline to show it is currently edited. The
parameter panels are blue as well when a cell is edited.
25
1. Visual Tab
The visual tab controls what visual is assigned to the cell and how it will be played.
¡
The visual thumbnail shows the visual
assigned to the cell. If you wish, you can
directly drag and drop a visual from the file
browser n the thumbnail rather than on the
cell itself.
¡
The two arrows on each side of the cell
allow you to browse through all the available
visuals. This includes any visuals already
opened in the project (and listed in the
'Visuals' browser), as well as cameras and
generators. Use the left arrow to go to the
previous visual and the right one to go to the
next one.
¡
The audio gain of each video placed on a cell can be controlled using a dedicated slider
that is in the Visual parameters panel when editing the corresponding cell.
¡
Loop modes allow you to define how the visual will be played back. The modes include,
in order: forward loop, backward loop, forward once, backward once, ping-pong, start
frame, end frame, play once forward and freeze, play once backward and freeze.
¡
The speed setting allows you to control playback speed: The center position is 0% (still),
all the way to the right is forward at 400% (4 times faster than nominal playback) and all
the way to the left is backward at 400%. Note that, like most controls in GrandVJ, you can
reset the speed to its default value (nominal playback) by right clicking the control and
selecting 'default value'. You can also reset any slider to its default value by using
Ctrl+Click [PC] / Alt+Click [Mac].
¡
The segment widget allows you to define a subset of a movie. The start and end point
define which frames will be used for the actual playback region of the movie. Note that it's
very handy to setup the playback mode to either 'start frame' or 'end frame' when setting
up the segment since it will continuously display the reference point you modify.
¡
The two scratch widgets let you control the sensitivity of the scratch and the scratch
itself. The scratch widget should be mapped to a MIDI cc that sends circular values. You
can also use one that is incremental but in this case you have to check the “circular”
checkbox when editing the MIDI mapping on this widget (right-click → “MIDI Mapping..”).
¡
The text setting is only for flash animations that support text replacement. If this field is
active, it means you can enter any text to be displayed when playing the flash file.
¡
The priority setting is only available in synth mode (see earlier in this document for a
description of the synth & mixer mode). If the priority is set 'background', the cell will be
triggered “under” already running visuals, if it is set to “foreground”, it will run on top of
cells that have either a regular or background priority.
¡
In mixer mode, you can set cells to be
triggered directly to a specified layer rather
than the one that is selected. This is allows you to pre-configure movies, masks or effects
to be sent directly to one layer (the topmost for example) without having to switch layers.
26
2. Effect Tab
The effect tab shows the cell effect and effect parameters.
Just as the visuals, you can directly drag an effect from the effect browser and drop it on the effect
thumbnail.
¡
You can also browse the effects using the
next/previous arrows located alongside
the effect thumbnail.
¡
Each effect can have up to 4 parameters.
The parameters and their values are
displayed next to the effect thumbnail.
3. Mixing Tab
The mixing tab controls how the cells are “composited” with the underlying layers.
¡
The transparency setting controls how the
visual will be mixed with the underlying
layer. If the transparency is set to zero, the
visual will be completely invisible. If it is set
to the maximum and no copy/mask mode is
selected, the visual will be opaque, possibly
hiding them completely. Changing the
transparency allows you to do fade ins/fade
outs.
¡
The copy modes express how pixels from
the cell are going to be combined with the
ones of the underlying layers. In the default
mode, pixel colors are mixed together, with
a blending value depending on the transparency, like a traditional mixer. GrandVJ also
allows you to use other ways to combine the pixels: In addition modes, the pixels from the
cell are going to be added to the ones of the underlying layers; In subtraction mode, they
will be subtracted; the multiplication mode multiplies pixels together while the two last
modes do a luminosity comparison, taking the pixel that has either the lowest or highest
brightness.
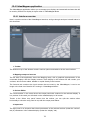
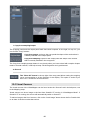
¡
The masking modes are used for luminance/chrominance masking. Masking allows you
to 'remove' part of the visual based on either the brightness (luminance keying) or color
(chrominance keying). Each mode needs the definition of a 'filter' that express which
values are let through and which values are not. Depending on whether you choose 'pass'
or 'reject' filters, the filter definition will be used to either keep or reject pixels.
Here's the example of a chrominance filter
definition:
The color bar allows you to define the center color around which the filter will be
computed. Click and drag inside it to change the center/reference color. The top handles
specify the width of the color range. The larger it is, the more colors will be
passed/rejected. The bottom handles defines the slope or 'smoothness' of the filter. The
larger it is, the smoother the transition gradient from passed to rejected colors will be.
27
¡
The color settings can be used to change the tint of the visual. Each of the R,G,B sliders
remove a certain amount of that component from the original visual.
¡
The preset button (down arrow) allows you to quickly select a combination of mask
mode, copy mode and color settings from a list of presets.
4. Position / Size Tab
The position/size tab specifies how the visual will be positioned on the screen.
¡
The position setting x / y moves the visual
across the screen. The z position acts like a
zoom.
¡
The scale setting alters the size of the
visual on the screen.
¡
The rotation parameters are used to
specify a 3D rotation of the object on which
the visual is mapped. Next to each axis slide
is a button which specifies whether the
rotation value is an absolute value or a
continuous rotation speed.
¡
The shape controls map the visual on
various 3D shapes: you can select between
plane, cube or sphere.
¡
¡
¡
The tiling parameter specifies how many times the visual is to be tiled (repeated) on the
3D shape.
The preset menu (down arrow) selects predefined combinations for the position/size
parameters.
7.2.5 Transition Tab
In Synth mode, the transition tab is only available when editing a cell. The transition tab shows the
cell’s transition and parameters that’s used when starting and stopping a cell.
Just as for the visuals, you can directly drag a
transition from the transition browser and drop it on
the transition thumbnail.
¡
You can also browse the transitions using
the next/previous arrows located
alongside the transition thumbnail.
¡
Each transition can have up to 4
parameters. The parameters and their
values are displayed next to the transition
thumbnail.
28
7.2.6 Cell Parameter Mapping
In synth mode only, most cell parameters can be mapped. To map any parameter to either a
computer keyboard key or MIDI controller, simply toggle the application in MIDI/Keyboard mapping
mode; select the control to map and move the desired controller.
Note that in mixer mode, the cells parameters are merely 'copied' to a running layer and there is
no way to map them to remote control. The live controls in mixer mode are assigned to layer
parameters (see further).
All controls can also be reset to their default values by right-clicking on the control and selecting
'default value' from the pop-up menu.
7.2.7 Cell Copy / Paste
In addition to building cells from scratch, there are ways that you can copy content or cell
parameters to other cells:
Dragging one cell to another cell will duplicate all the settings from the source cell to the target cell.
Right-clicking on a cell allows you to select copy/cut/paste the cell content from/to the clipboard. It
will also allow you to clear the cell completely or to remove its effect or visual.
Please note that since right-clicking a cell is also used to select it for edition, you need to hold the
right click for a little while before the menu shows up.
Alternatively, you can also select a cell and select copy/cut/paste from the menu or use the
keyboard shortcut.
7.3 Banks
As seen previously, banks are collections of cells. There are two groups of banks (or bank sets):
one is shaped like a piano keyboard (and is pre-assigned to MIDI notes) and the other one is in
the form of a matrix.
The matrix bankset is the only one that can be mapped. The number of row/column in the matrix is
also user-configurable by right-clicking in the gray area of the bank and selecting “set matrix size”.
The size of the matrix will be changed across all banks. Alternatively, you can also set the matrix
size by selecting the menu entry Options u Set Matrix Size...”
7.3.1 Bank Control
In each bank set, there is always one active bank.
The active bank is designated with a red indicator in
its tab:
Whenever you trigger a cell from the computer keyboard or a MIDI controller, it is ALWAYS in the
active bank that the cell is triggered. All banks share the same trigger mapping settings.
To change the active bank, you can left-click its tab with the mouse or trigger the change with a
controller. To display a bank without making it active, simply right-click its tab with the mouse.
Note:
In Synth mode, triggering a cell in a new active bank will stop all cells which were running in the
previous active bank.
29
To define which controllers will be used to control the active bank selection,
simply switch the application to either Keyboard, or MIDI or OSC mapping
mode using the options menu.
You will notice that next to the bank, a special bank-mapping panel appears.
This panel provides several ways to control the active bank in each bankset:
¡
The slider allows a continuous controller to be used to smoothly
browse iterate across all banks.
¡
The two arrows allow you to map to controllers/keys to
next/previous bank in the bankset.
¡
The 16 to 32 numbers gives the possibility to map a key or a
controller to directly select one of the 3216 banks.
7.3.2 Bank Operations
Banks can be easily duplicated. The context menu provides the usual copy/cut/paste operations.
You can also export a bank's content to a file and re-import it later. This feature allows you to
create a lot of banks according to different themes and load them in your live project as you need
them.
Keep in mind however, that loading a lot of video might slow down your system, so it's a good idea
to use the “purge visual” entry in the edit menu to get rid of unused videos taking unnecessary
resources.
Also, importing banks won't change the size of the matrix layout. If you rely on this feature, try to
always use the same configuration.
7.4 Layers (Mixer Mode)
Layer previews are only visible in mixer mode. As we said earlier, mixer mode works differently
from the synth mode. In mixer mode, rather than acting on cell parameters, you act directly on the
layer parameters. There are eight layers available at all times and all layers are shown in the layer
preview panel.
7.4.1 Layer Previews
The layer previews display the state of the different
layers, along with a few controls. Each layer has, in
order from left to right:
¡
A layer index number used for selection
¡
A / B buttons to render the layer in a
specific deck
¡
A layer preview, showing the visual
running on the layer
¡
A transparency slider, allowing direct
control of the layer's transparency
¡
A play / pause button allowing you to
temporarily pause the layer and restart it.
When paused, the layer will not be displayed.
A stop button to clear the layer
¡
30
¡
An edit button to show the layer’s parameter in the parameter panel
¡
A running indicator
You can right click on a layer preview to show a contextual menu which allows you to remove the
visual or the effect from the layer.
Layers previews can also be dragged and dropped back onto cell, creating a cue with the current
layer settings.
7.4.2 Layer Parameters
In mixer mode, there is always one layer that is selected. The selected layer is the one that will
receive cells that are triggered. (Unless of course you have set a target layer)
Once a cell has been triggered on a layer, the layer runs independently from it. This means that, to
the contrary of the synth mode, once a cell has been 'sent' on a layer, changing the cell
parameters won't affect the running layer. You can, however, directly edit the layer parameters. To
do so, simply select a layer and the parameter panel will turn Orange. It will display the layer
parameters instead of the cells parameters, which are blue.
It's important to understand at this point that in mixer mode, the same parameter panel can be
used to edit either cells (Blue) or layer (Orange) parameters, depending on which one was last
selected. Right click on a cell or left clic on the small pen icon will Edit a cell and you will see the
cell's background outline turn blue, showing it's the cell parameters that are being edited.
Layer parameters are the same as the cell parameters except that what relates to Layers is shown
in orange and what relates to cells is shown in blue, this is made to avoid the confusion when
editing the parameters.
In mixer mode, when you trigger a cell, the parameters of the cell (transparency, speed, copy
modes, etc ..) are copied to the layer if the copy control is activated..
To let you see at a glance which parameters will be copied to the layer, The three buttons
represent respectively
¡
the effect parameters:
¡
the mixing parameters:
¡
the position parameters:
,
7.4.3 Layer control
1. Locking Layer Parameters
If you can now see which parameters will be copied to the layer at a glance, you can also depress
these buttons to lock some of the layer parameters so they won't be transmitted to the layer when
you trigger a cell. For example, if you set up a transparency setting on the layer, you don't want the
transparency setting of the cell to alter the layer.
31
2. Mapping Layer Parameters
As for the cell parameters in synth mode, you can map all of the layer parameters through MIDI /
OSC. Simply toggle the application in MIDI / OSC mapping mode, select the parameter to control
and move the MIDI / OSC controller knob you would like to assign to it.
GrandVJ provides two different modes to control the layer parameters:
¡
In the default mode, all layers have independently assignable parameters. This means
that you can for example define a separate controller for the red balance on Layer
1,2,3,...,etc. This scheme works quite well if you have a controller that is large or allows
you to easily change presets on the fly.
¡
The other “Map Selected Layer” mode allows you to define a 'template' of controllers that
will always act on the selected layer. In this mode, if you assign the red balance to CC 3,
moving CC 3 will always affect the red balance of the selected layer. This makes it easier
to control a large set of parameters from a small amount of knobs.
You switch between the two modes by selecting the menu entry Options u Map Selected Layer.
Note that even in the “Map Selected Layer” mode, you still can access the individual transparency
controls on the layer preview panel and map them to separate controllers.
3. Mapping Layer Selection
There are a number of possible ways to control layer selection. When you toggle the application in
MIDI/Keyboard mapping, a new panel appears on top of the layer previews:
¡
The slider allows you to assign a continuous controller to the layer selection.
¡
The two arrow shaped buttons allow mapping a control for next and previous layer.
¡
The “A” and “B” buttons are used to map the A/B deck assignment.
¡
The play/pause and “X” buttons allow respectively pausing or stopping the selected
channel.
32
7.4.4 A/B Cross-fader (Mixer mode)
In mixer mode, GrandVJ now has the possibility of
assigning each layer to either the 'A' or 'B' deck. This
is done by pressing the 'A' or 'B' buttons on each
side from the layer preview.
Therefore, the software will run two separate scene
renderings, one being the combination of A and
unassigned layers, and the other the combination of
B and unassigned layers.
The two separated renderings are finally mixed using
the selected transition effect that’s controlled using
the cross-fader.
When the cross-fader is all the way to the left (on the A side), layers assigned to 'A' will be fully
visible while layers assigned to 'B' will be invisible. On the other hand, when the cross-fader is all
the way to the right, all layer assigned to B will be fully visible while layers associated to A will be
hidden.
You can also achieve an automatic transition between A and B scenes by using the A and B
buttons that are located respectively on the left and on the right side of the cross-fader.
Each mixer element has its own set of transitions, cross-fader and automatic fade buttons.
The automatic fade time, as well as parameter of the selected transition preset, can be configured
in the Transition tab, which appears when you click on the “Edit” button next to the output selector.
In VideoMapper mode, GrandVJ allows you to create
additional mixer elements, each controlling the
mixing of the layers that are under it.
On top of the layers stack lays an “insert
mixer” button and a global cross-fader that
let you control all the mixers’ at once:
More importantly, you can select which outputs the
mixer renders to, enabling you to display different
video mixes on different displays with the same
machine.
The master preview will display the mixer that
corresponds to the selected layer.
Note:
If several Mixers would render to the same output, the
mixer that’s the highest in the layer stack would be the
only one rendering into that output.
33
7.4.5 Independent preview
When assigning layers to either A or B, you have the possibility to use the master preview to
display the output but also to preview only the layers assigned to either deck A or B.
Suppose you are outputting the content of deck A (by setting the cross fader all the way to the left).
If you toggle the preview to deck B, you can now set it up without interrupting the main output.
When you are satisfied by what is on deck B, flip back the preview to the main output (pressing B
again) and use the cross fader to go smoothly from A to B.
7.4.6 Mixer state saving
When quitting the application, the state of the mixer is now saved and restored when it is restarted.
Note that only the locked parameters are saved, since any cell triggered will override non-locked
parameters, it doesn’t make sense to include them.
You can activate/deactivate this feature from the Preferences Dialog, in the “Advanced” tab
7.4.7 Mixer pause mode preference
This preference (also located in the “Advanced” tab) lets you chose between two different pause
modes when in Mixer mode:
¡
“Cut” (default, for compatibility reasons): the layer
disappears from the Mixer
¡
“Freeze”: the layer keeps showing in the Mixer
34
8 USING A CONTROLLER WITH GRANDVJ
8.1 Mapping templates
Controller mapping is an important part of GrandVJ. Together with external MIDI gear, MIDI
sequencers, OSC or even the computer keyboard, these are all key elements to create your
perfect live setup.
GrandVJ has built-in templates for most popular
MIDI controllers of the market. These should give
you an idea of the interaction between the software
and the MIDI controllers.
When you start GrandVJ and select “New”, you will
be prompted to select a controller template to start
with.
For each controller, you will have the choice between
Mixer mode and Synth mode.
Note that you can switch the mode later in GrandVJ,
however, since the controller is slightly differently
mapped, some of the functions might not seem to be
available.
8.1.1 Using custom templates
In GrandVJ, it is easy to create, modify or share templates with other users.
To create your own template, map and prepare all
your MIDI/OSC/Keyboard assignment and then
select the menu File uSave mapping template.
In the dialog, you can choose to either create a new
template (in which case you will need to specify a
template name and a description) or update an
existing template.
To load or manage your template set, choose the
menu File uLoad Mapping Template. This will open
the “Choose mapping template” dialog. Then simply
select a template from the list and click the Ok
button.
Alternatively, you can also reset all templates to the
factory settings or import a template that has been
given to you as .vjt file.
You can also right click on any entry to delete it, edit its name/description or export the template
definition to a separate .vjt file.
8.2 Controller Mapping
Mapping a new controller is fairly easy and can be achieved in two ways:
35
For each element you wish to map in GrandVJ, you can right click on it and choose 'MIDI
mapping', ‘OSC mapping’ or 'Keyboard mapping', depending on the mapping mode corresponding
to your controller. A dialog will pop up, allowing you to edit the mapping parameters for that
particular element. You can also clear a control mapping by right-clicking it and selecting “clear
mappings”.
If you plan to map of a lot of controls, you can switch GrandVJ to mapping mode from the menu
Options u Edit MIDI Mapping (or OSC or Keyboard, depending on the mapping mode
corresponding to your controller). Once there, all controls that can be mapped are highlighted in
green (MIDI), pink (OSC) or blue (Keyboard).
For each element you map, you will select a control, cell or parameter in GrandVJ and then move
the corresponding control (knob, fader, button, etc.) on your device. Once you are done, exit
mapping mode and you will be able to control and trigger parameters directly from the controller.
All the existing mappings are listed in the mapping list, which you can access from “mappings” tab
of the browser section. You can edit the mappings and delete them directly from there. Selecting a
control on the interface will also select the corresponding mapping in the browser.
8.3 The Mapping List
Through the previous chapters, we've seen that it is
fairly easy to map MIDI, OSC or keyboard control to
most software parameters.
The 'mappings' tab in the browser section lists all the
existing mappings.
If you right-click an entry in the mappings lists you
can edit it or delete it.
If you choose to edit it (which you can achieve by
double-clicking as well), it will open the Mapping
Definition dialog.
8.4 Keyboard Mapping Mode
To define/change a keyboard mapping of any controllable element in
GrandVJ, the easiest is to toggle the application in keyboard mapping
mode. To do so, go to the menu Options u Edit Keyboard
Mapping. All controllable elements will turn blue.
You can edit the mapping of any element by clicking it (it will be
surrounded by a black outline) and pressing the keyboard key you
would like to assign to it. Exit the keyboard mapping edit mode by
selecting Options u Edit Keyboard Mapping again.
36
8.5 MIDI Mapping Mode
To define/change the MIDI mapping of any controllable element, you
follow a similar procedure. Toggle the application by selecting
Options u Edit MIDI Mapping, select a control and activate the
key/controller you would like to assign to it. All controllable elements
will turn green when editing MIDI mapping.
Additionally, you can edit mappings in the mapping browser window
or by right-clicking any controllable element.
8.5.1 The MIDI Mapping Dialog
The dialog allows you to manually setup the
controller type and MIDI channel but also gives you
a few more options:
¡
¡
¡
¡
The incremental toggle specifies that the
controller is sending incremental values.
There are a couple of variants in the MIDI
specification so you will have to choose the
type of incremental controller: (2
complement, Signed bit, Signed bit 2, Bin
Offset)
The circular toggle specifies you want the
mapping to work in a wrap-around fashion;
for example, if you go lower than the
minimum value it goes back to the
maximum value and vice versa.
The sensitivity is used to calibrate the
incremental controllers to react better
The Min. & Max. values can be used to
limit the range of the controlled element. If
you put a maximum value lower than the
minimum value, the control mapping will be
inverted.
Note:
You can also directly access this dialog by right-clicking on any assignable control and select “edit
keyboard mapping...” or “edit MIDI mapping...”
8.6 OSC Mapping Mode
In addition to MIDI and Keyboard control, GrandVJ can be controlled through Open Sound Control
(or OSC). OSC is a networked protocol (so it works through regular wired or wireless tcp/ip) and a
lot more precise than MIDI. There is a lot of applications that support this OSC, especially in the
mobile field on devices like the iPhone.
37
To define/change the OSC mapping of any controllable element, you
follow a similar procedure. Toggle the application by selecting
Options u Edit OSC Mapping, select a control and activate the
key/controller you would like to assign to it. All controllable elements
will turn pink when editing OSC mapping.
Additionally, you can edit mappings in the mapping browser window
or by right-clicking any controllable element.
8.6.1 Setting up OSC nodes
The same way GrandVJ listens to MIDI, it can also listen to the network for OSC messages. Any
control can be mapped to any OSC address for remote control.
Since it is a network protocol, you will have to define on which port GrandVJ needs to listen. This
is done in the Preferences Dialog, in the OSC tab.
To assign a control to an OSC control, simply toggle the application in OSC mapping (Menu
Options uEdit OSC Mapping), select with the mouse the control you would like to map and send
OSC messages from the remote application.
Once it is mapped, you will see the mapping address looking like a path on the key itself. for
example:
/2/push1
All OSC communication is done using referring path-like addresses. Each address represents a
node that can be controlled. GrandVJ expects the controlling application to supply values between
0.0 and 1.0.
If your controlling application sends more than one value per address (for example a X-Y touch
pad could send one value for X and on for Y using a single address), you will need to enter the
address by hand.
To do so, right click on the control you would like to map and select OSC Mapping, this will open
the OSC Mapping dialog...
8.6.2 OSC Mapping dialog
You can there enter any address that you would like.
If you want to specify the second value of the
address (e.g. for the XY pad example we talked
about) specify a comma followed by the number of
the parameter after the address.
Similarly to MIDI mapping, you can set the mapping
as incremental and circular.
GrandVJ can take advantage of the two-coordinates
OSC controls like XY pads by letting you choose
which of the two coordinates you would like to you
for the targeted parameter.
38
Note for handled device users:
if you use an OSC application on an handled device (for example mrmr, TouchOSC, ...), don’t forget
to deactivate the accelerometer during the "OSC learn" phase, otherwise the device will send a lot of
accelerometer values and you won't be able to assign messages other than the accelerometer
controls.
8.6.3 Open Sound Control feedback
GrandVJ can send OSC feedback to compatible devices.
You can activate OSC feedback in the Preferences, at the bottom of the OSC tab:
In order for GrandVJ to send the feedback to the device, you must specify the hostname or its IP
address as well as the port. Those information should be summarized on the device itself.
8.7 Bi-directional controllers & MIDI feedback
GrandVJ supports controllers with MIDI feedback.
In the Preferences / MIDI tab, you can specify devices that will receive MIDI feedback from the
application. This means that bi-directional devices can be much better integrated since switching
layer will reflect parameter changes to the units.
You can define up to four different feedback units in the Preferences Dialog / MIDI tab. Once
selected, feedback devices will be restored each time GrandVJ is restarted.
Additionally, we also provide dedicated templates with predefined mapping for specific controllers
(see 8.1 Mapping templates).
To use MIDI Feedback with these predefined mappings, you first need to create a new project
using the desired template, then go to the Preferences Dialog / MIDI tab and choose the
corresponding device as feedback unit (if the controller supports MIDI feedback) and MIDI output.
For other feedback devices that are not listed (i.e. Behringer’s or Livid’s), simply select “Generic
MIDI” as feedback type.
39
8.8 Dedicated mapping templates for specific controllers
8.8.1 Akai APC20 and APC40
To use GrandVJ with the APC40, you first need to create a new project using one of the APC40
templates, then go to the preferences/MIDI tab and choose the APC40 device & APC40 MIDI
output as feedback unit, do the same for the APC20.
8.8.2 Elation MIDIcon
Don’t forget to load the Elation MIDIcon MIDI feedback in MIDI preferences to enable the feedback
on the controller.
¡
¡
¡
¡
¡
¡
The two page selectors control the selection of the active bank and active layer.
The 8 sliders on the left control the transparency of the layers.
The buttons above each slider control the selection of the layer, the play/pause state of
the layer and the kill function. When a layer is selected, the led above the corresponding
slider light up.
The last slider is mapped on the GrandVJ’s A/B cross-fader.
The buttons on the right block trigger the cells.
The touchpads select the transition preset. The touchpad corresponding to the active
transition is lights up. Encoders can be mapped as general-purpose encoder.
8.8.3 Korg Nano
MIDI mapping templates for Korg Nano controllers (no feedback), the following controllers are
supported:
¡
¡
Nano PAD + Nano KONTROL
Nano KEY + Nano KONTROL
8.8.4 Livid Instruments Ohm64 and OhmRGB
The OhmRGB mapping template is similar to the Ohm64 mapping template but don’t forget to load
the Livid OhmRGB MIDI feedback in GrandVJ’s MIDI preferences to enable the specific nice
colored keys.
8.9 Numark NuVJ Video Controller
Owners of a Numark NuVJ Video controller can now control GrandVJ in a NuVJ style. You need to
load the NuVJ MIDI feedback in MIDI preferences to enable the feedback on the screen and on
the pads.
¡
¡
¡
¡
¡
The template for this controller is defined as follows:
The first jog wheel controls the GrandVJ scratch parameter on layer 1
The second jog wheel controls the scratch parameter on layer 2
The master FX knob selects an effect on the top layer.
The other knobs in the center control the transparency of the effect layer (the Fx Level),
the parameters of the effect, the contrast and the brightness.
Remarks:
In GrandVJ, to reproduce exactly the behavior of NuVJ, you should assign the 9 pads on the left to
the first layer, and the 9 pads on the right to the second layer. If you want to use GrandVJ in a more
complete mode, use the two top left knobs to control the bank and layer selection.
40
8.10 Dedicated mapping templates for DJ-style controllers
We have added or updated templates with feedback support for several controllers featuring jog
wheels in order to support the scratch control feature, giving a DJ-style feeling when mixing video
with them.
8.10.1 American Audio VMS2
Don’t forget to load the American Audio VMS2 MIDI feedback in MIDI preferences to enable the
feedback on keys.
The template for this controller is defined as follows:
¡
¡
¡
¡
¡
¡
¡
¡
Deck A basically controls GrandVJ’s layer 1, and Deck B controls layer 2.
The two jog wheels are mapped to the layers scratch parameters.
The twelve keys on each deck have been mapped to the 24 cells in the matrix bank.
However, on both decks, the “SHIFT” key doesn’t send any MIDI. The “KEYLOCK”
doesn’t send MIDI either, but only on Deck A (hardware failure?).
The two central faders are mapped to layers transparency.
The two pitch faders on the sides control the layers pitch, central position being default
pitch, and lowest value pitch 0.
The cross-fader controls GrandVJ’s A/B cross-fader.
“TREBLE”, “MID” and “BASS” respectively control layer’s red, green and blue values.
“TONE” controls the audio input level, and “CUE MIX” controls the audio output level.
8.10.2 American Audio VMS4.1
Don’t forget to load the American Audio VMS4 MIDI feedback in MIDI preferences to enable the
feedback on keys.
The template for this controller is defined as follows:
¡
¡
¡
¡
¡
¡
Deck A basically controls GrandVJ’s layer 1, and Deck B controls layer 2.
The two jog wheels are mapped to the layers scratch parameters.
The “Effect”, “Sample”, “Loop” and “Smart” pads on each deck have been mapped to the
24 cells in the matrix bank. However, on both decks, the “SHIFT” key doesn’t send any
MIDI.
The right and left column of pads have been mapped to the layer selection. The
correspondent opposite knobs (“Gain”, “Treble”, “Mid” and “Bass”) controls the
transparency of the layer.
The two faders next to the jog wheels control the layers pitch.
The cross-fader controls GrandVJ’s A/B cross-fader.
8.10.3 Hercules DJ controllers
MIDI mapping templates for Hercules DJ controller series (no feedback), the following controllers
are supported:
Hercules DJ Console MP3
Hercules DJ Console MK2
Hercules DJ Control STEEL
Hercules DJ Control RMX
41
8.11 MIDI reference for template mapping
8.11.1 Introduction
Additionally to custom-made templates for existing controllers, the template library contains two
templates that expose all of the controllable parameters available in mixer mode.
The first one, GrandVJ Full Mixer Mode, maps all the layer parameters in full mode (I.e. You
control all layers independently).
The second one, GrandVJ Selected Mixer Mode, maps all the layer parameters in 'selected mode',
i.e. you always control the selected layer (see the Reference Manual for more information about
the difference between the two modes).
The following tables list the MIDI assignment of those two templates
8.11.2 GrandVJ Full Mixer Mode
Layer Parameter
MIDI CC
Channel
Visual Next
0
1-8
Visual Previous
1
1-8
Loop Mode
2
1-8
Movie Speed
3
1-8
Loop Start
4
1-8
Loop Length
5
1-8
Transparency
6
1-8
Copy Mode
7
1-8
Mask Mode
8
1-8
Mask Center
9
1-8
Mask Width
10
1-8
Mask Smooth
11
1-8
Red
12
1-8
Green
13
1-8
Blue
14
1-8
Mixing Preset
15
1-8
42
Layer Parameter
MIDI CC
Channel
Effect Next
16
1-8
Effect Previous
17
1-8
Effect Parameter 1
18
1-8
Effect Parameter 2
19
1-8
Effect Parameter 3
20
1-8
Effect Parameter 4
21
1-8
Position X
22
1-8
Position Y
23
1-8
Position Z
24
1-8
Size X
25
1-8
Size Y
26
1-8
Rot X
27
1-8
Rot Y
28
1-8
Rot Z
29
1-8
Rotation Mode X
30
1-8
Rotation Mode Y
31
1-8
Rotation Mode Z
32
1-8
Shape
33
1-8
Tiling
34
1-8
Position Preset
35
1-8
Deck A Select
125
1-8
Deck B Select
126
1-8
43
Layer Control
MIDI CC
Channel
Layer Next
36
1
Layer Previous
37
1
Layer Select (continuous)
38
1
Layer 1 Select
39
1
Layer 2 Select
40
1
Layer 3 Select
41
1
Layer 4 Select
42
1
Layer 5 Select
43
1
Layer 6 Select
44
1
Layer 7 Select
45
1
Layer 8 Select
46
1
Layer 1 Pause
48
1
Layer 2 Pause
49
1
Layer 3 Pause
50
1
Layer 4 Pause
51
1
Layer 5 Pause
52
1
Layer 6 Pause
53
1
Layer 7 Pause
54
1
Layer 8 Pause
55
1
Layer 1 Clear
57
1
Layer 2 Clear
58
1
Layer 3 Clear
59
1
Layer 4 Clear
60
1
Layer 5 Clear
61
1
44
Layer Control
MIDI CC
Channel
Layer 6 Clear
62
1
Layer 7 Clear
63
1
Layer 8 Clear
64
1
Bank Control
MIDI CC
Channel
Matrix Bank Next
65
1
Matrix Bank Previous
66
1
Matrix Bank Select (continuous)
67
1
Matrix Bank 1 Select
68
1
Matrix Bank 2 Select
69
1
Matrix Bank 3 Select
70
1
Matrix Bank 4 Select
71
1
Matrix Bank 5 Select
72
1
Matrix Bank 6 Select
73
1
Matrix Bank 7 Select
74
1
Matrix Bank 8 Select
75
1
Matrix Bank 9 Select
76
1
Matrix Bank 10 Select
77
1
Matrix Bank 11 Select
78
1
Matrix Bank 12 Select
79
1
Matrix Bank 13 Select
80
1
Matrix Bank 14 Select
81
1
Matrix Bank 15 Select
82
1
Matrix Bank 16 Select
83
1
45
Bank Control
MIDI CC
Channel
Keyboard Bank Next
84
1
Keyboard Bank Previous
85
1
Keyboard Bank Select (continuous)
86
1
Keyboard Bank 1 Select
87
1
Keyboard Bank 2 Select
88
1
Keyboard Bank 3 Select
89
1
Keyboard Bank 4 Select
90
1
Keyboard Bank 5 Select
91
1
Keyboard Bank 6 Select
92
1
Keyboard Bank 7 Select
93
1
Keyboard Bank 8 Select
94
1
Keyboard Bank 9 Select
95
1
Keyboard Bank 10 Select
96
1
Keyboard Bank 11 Select
97
1
Keyboard Bank 12 Select
98
1
Keyboard Bank 13 Select
99
1
Keyboard Bank 14 Select
100
1
Keyboard Bank 15 Select
101
1
Keyboard Bank 16 Select
102
1
General Controls
MIDI CC
Channel
46
Latch
103
1
Hold
104
1
Clear All Layers
105
1
Input Volume
106
1
Contrast
107
1
Brightness
108
1
Cross fader
120
1
Cross fader Full A
121
1
Cross fader Full B
122
1
Preview Deck A Assign
123
1
Preview Deck B Assign
124
1
8.11.3 GrandVJ Selected Mixer Mode
Layer Parameter
MIDI CC
Channel
Visual Next
0
1
Visual Previous
1
1
Loop Mode
2
1
Movie Speed
3
1
Loop Start
4
1
Loop Length
5
1
Transparency
6
1
Copy Mode
7
1
Mask Mode
8
1
Mask Center
9
1
Mask Width
10
1
47
Layer Parameter
MIDI CC
Channel
Mask Smooth
11
1
Red
12
1
Green
13
1
Blue
14
1
Mixing Preset
15
1
Effect Next
16
1
Effect Previous
17
1
Effect Parameter 1
18
1
Effect Parameter 2
19
1
Effect Parameter 3
20
1
Effect Parameter 4
21
1
Position X
22
1
Position Y
23
1
Position Z
24
1
Size X
25
1
Size Y
26
1
Rot X
27
1
Rot Y
28
1
Rot Z
29
1
Rotation Mode X
30
1
Rotation Mode Y
31
1
Rotation Mode Z
32
1
Shape
33
1
Tiling
34
1
48
Layer Parameter
MIDI CC
Channel
Position Preset
35
1
Deck A Select
118
1
Deck B Select
119
1
Layer Control
MIDI CC
Channel
Layer Next
36
1
Layer Previous 38
37
1
Layer Select (continuous)
38
1
Layer 1 Select
39
1
Layer 2 Select
40
1
Layer 3 Select
41
1
Layer 4 Select
42
1
Layer 5 Select
43
1
Layer 6 Select
44
1
Layer 7 Select
45
1
Layer 8 Select
46
1
Pause Selected Layer
47
1
Layer 1 Pause
48
1
Layer 2 Pause
49
1
Layer 3 Pause
50
1
Layer 4 Pause
51
1
Layer 5 Pause
52
1
Layer 6 Pause
53
1
Layer 7 Pause
54
1
49
Layer Control
MIDI CC
Channel
Layer 8 Pause
55
1
Clear Selected Layer
56
1
Layer 1 Clear
57
1
Layer 2 Clear
58
1
Layer 3 Clear
59
1
Layer 4 Clear
60
1
Layer 5 Clear
61
1
Layer 6 Clear
62
1
Layer 7 Clear
63
1
Layer 8 Clear
64
1
Layer 1 Transparency
109
1
Layer 2 Transparency
110
1
Layer 3 Transparency
111
1
Layer 4 Transparency
112
1
Layer 5 Transparency
113
1
Layer 6 Transparency
114
1
Layer 7 Transparency
115
1
Layer 8 Transparency
116
1
Layer 1 Deck A Select
125
1
Layer 1 Deck B Select
126
1
Layer 2 Deck A Select
125
2
Layer 2 Deck B Select
126
2
Layer 3 Deck A Select
125
3
Layer 3 Deck B Select
126
3
50
Layer Control
MIDI CC
Channel
Layer 4 Deck A Select
125
4
Layer 4 Deck B Select
126
4
Layer 5 Deck A Select
125
5
Layer 5 Deck B Select
126
5
Layer 6 Deck A Select
125
6
Layer 6 Deck B Select
126
6
Layer 7 Deck A Select
125
7
Layer 7 Deck B Select
126
7
Layer 8 Deck A Select
125
8
Layer 8 Deck B Select
126
8
Bank Control
MIDI CC
Channel
Matrix Bank Next
65
1
Matrix Bank Previous
66
1
Matrix Bank Select (continuous)
67
1
Matrix Bank 1 Select
68
1
Matrix Bank 2 Select
69
1
Matrix Bank 3 Select
70
1
Matrix Bank 4 Select
71
1
Matrix Bank 5 Select
72
1
Matrix Bank 6 Select
73
1
Matrix Bank 7 Select
74
1
Matrix Bank 8 Select
75
1
Matrix Bank 9 Select
76
1
51
Bank Control
MIDI CC
Channel
Matrix Bank 10 Select
77
1
Matrix Bank 11 Select
78
1
Matrix Bank 12 Select
79
1
Matrix Bank 13 Select
80
1
Matrix Bank 14 Select
81
1
Matrix Bank 15 Select
82
1
Matrix Bank 16 Select
83
1
Keyboard Bank Next
84
1
Keyboard Bank Previous
85
1
Keyboard Bank Select (continuous)
86
1
Keyboard Bank 1 Select
87
1
Keyboard Bank 2 Select
88
1
Keyboard Bank 3 Select
89
1
Keyboard Bank 4 Select
90
1
Keyboard Bank 5 Select
91
1
Keyboard Bank 6 Select
92
1
Keyboard Bank 7 Select
93
1
Keyboard Bank 8 Select
94
1
Keyboard Bank 9 Select
95
1
Keyboard Bank 10 Select
96
1
Keyboard Bank 11 Select
97
1
Keyboard Bank 12 Select
98
1
Keyboard Bank 13 Select
99
1
Keyboard Bank 14 Select
100
1
52
Bank Control
MIDI CC
Channel
Keyboard Bank 15 Select
101
1
Keyboard Bank 16 Select
102
1
General Controls
MIDI CC
Channel
Latch
103
1
Hold
104
1
Clear All Layers
105
1
Input Volume
106
1
Contrast
107
1
Brightness
108
1
Cross fader
120
1
Cross fader Full A
121
1
Cross fader Full B
122
1
Preview Deck A Assign
123
1
Preview Deck B Assign
124
1
53
9 THE PREFERENCES DIALOG
The preferences dialog sets various options of the application; this chapter will cover each tab you
can find in the Preferences dialog of GrandVJ.
9.1 Display
The Display tab contains the settings related to the software’s outputs.
In the Display panel, you can choose between two different modes:
¡
Using the 'Instant mode', you can directly output visuals full screen to a set of similar
displays using a single resolution for all. GrandVJ considers this set as a single output.
¡
In the 'VideoMapper mode', you will define a set of surfaces on the different displays that
are connected to your computer using the VideoMapper application. In this mode, each
display can have its own resolution, and each surface created on a display is considered
as a separate output by GrandVJ, meaning that each surface can display a different set of
visuals.
9.1.1 Instant mode
The Display panel contains the setup related to the full screen or output mode of the software. As
previously stated GrandVJ is designed to be used with a setup consisting of at least two displays,
where the first display shows the software interface and the second (and next) are dedicated to the
full screen output from the software.
As such the first video output is used to display the main interface containing all the previews and
parameters while the second video output is used to send the fullscreen image to a display.
This dialog is used to specify the characteristics of the adapter used for the full screen.
¡
Full screen monitor selects the screen adapter to use when the application is toggled in
fullscreen. Usually, you will use the second adapter, keeping the interface on the main
monitor.
54
¡
Resolution specifies the resolution that you want to use when running the engine.
¡
Force resolution: This setting has a different meaning on PC and Mac:
On PC, it runs fullscreen in so-called 'Exclusive mode'. This mode is the mode used
by most games and is optimal in terms of video performance. However, when
engaged, you can't toggle to any other application than GrandVJ. If you do so,
fullscreen will quit.
On MAC, it will change the monitor resolution to fit the setting of the resolution. If you
toggle the setting off, only a part of the screen will be covered.
¡
Custom resolution: This setting allows you to use 'exotic' resolutions that don’t match
the adapter settings. This feature is mainly intended for Mac users to allow spanning of
the display across two monitors.
¡
Start Full screen at application start-up – For most temporary or touring applications
this is unlikely to be needed but for installations in venues where you want the system
online as quickly as possible and the same output is being used every time, enabling this
ensures that the output appears as soon as the software is loaded.
¡
Hide mouse cursor in full screen – Exactly as described: with this box selected the
mouse will not be visible in full screen mode. This can be fine when you use the system
entirely by external DMX or MIDI control but if you want to be able to edit in the main
software window during a live show then leave this unchecked.
¡
Soft-Edge can be used if you split the engine's output to several beaming devices. In that
case, it is good, quality-wise, to overlap the beamer's output and introduce a mixing curve
in the overlap zone. The span allows you to specify how many beaming devices will be in
use, both vertically and horizontally. The width and curve parameters control the blending
zones of the soft edge. See “Widescreen And Multiscreen Presentation” for more details.
9.1.2 Multi-Monitor support (in Windows)
It is possible to display the output of GrandVJ across all the monitors connected to a graphics card
without using the "spanning" feature that was only available on windows XP.
It can be used to avoid going through Matrox DualHead2Go or TrippleHead2Go interfaces if your
video card has 2, 3 or more outputs.
This feature is available under Windows XP, Vista, 7 and 8.
The "Resolution" pop-up menu now proposes multiple-monitor setups (i.e. "1024x768x2" for a
2048x768 horizontal setup or 1024x1536 vertical setup) in addition to the standard single-monitor
resolutions.
The "Multi-monitor Arrangement" line has been added to the Display tab of the preference dialog
to choose the way you want to arrange your monitors. GrandVJ uses this information in
combination with the actual Windows monitor arrangement to determine a correct output.
55
Note:
Under Mac OS X it is also possible to span the output of GrandVJ over several monitors simply by
selecting the monitor on the top-left and use a custom resolution that will cover the multi-screen setup
area.
9.1.3 VideoMapper mode (GrandVJ XT only)
In VideoMapper mode, the configuration of the displays is done in the external VideoMapper
application.
¡
Clicking on the "Import..." button will let you choose a VideoMapper file that you have
previously created in the VideoMapper application.
¡
Clicking on the "Edit" button opens the selected mapping file in the VideoMapper so you
can edit it.
9.1.4 Options
1. Engine Accuracy
There are three settings for the engine accuracy:
¡
Minimal is more suited for less powerful hardware.
¡
Buffered is the default mode and ensures frame pre-buffering to achieve display
synchronization.
¡
Frame Blending: activates the Frame Blending.
Note:
Frame Blending is a technique that allows the engine to interpolate between movie frames whenever
it needs to. It’s very useful when slowing down videos a lot, since instead of producing a steppy frame
display, the engine will continuously mix from one frame to the other making the transition a lot
smoother. It’s also useful when you display movies that have a frame rate that is not ‘coherent’ with
your output display.
For example, when using a 60hz display output, you should ideally use only 60/30 fps movies to avoid
desyncronisation between the movie frame and when the monitor can display frames. GrandVJ won’t
prevent you to play a 25 fps movie, but you might end up with some jitter in the display. Activating
Frame Blending will dramatically improve the output quality of the movie in this scenario.
2. Timing Reference
In order to get the smoothest display possible, GrandVJ defaults to using the main display output
as timing reference. This ensures that frames are delivered in timely fashion, synchronized to the
display’s vertical blank.
However the timing of graphic cards is not always truly accurate: they might advertise 60Hz while
actually running slightly over/under that frequency. In most cases this is not really an issue but if
you need the movie playback to be perfectly in time (if you synchronize it with some external audio
for example, or use movies with audio) you need to be able to use the more accurate time
reference of the System clock instead. The selection of the time reference is done through the
Combo box under the engine accuracy:
Choose “Display” for a smoother image when exact timing isn’t mandatory or “System Clock” when
the video playback speed is critical.
56
9.2 Keystoning
The “Keystoning” tab configures the keystoning used
for projector output.
Keystoning is used to correct the image if the
projector is not totally perpendicular to the screen.
This tab is not available if you are running GrandVJ
XT in VideoMapper mode.
9.3 Audio
The Audio tab lets you to configure how GrandVJ handles the audio when media clips with sound
are used.
The master output volume of GrandVJ can be controlled from the toolbar on
top the main software window.
¡
Driver Type: This where GrandVJ detects your system’s audio and let you select which
sound card you wish to use.
¡
Input Device: GrandVJ will use the sound from the selected input device to feed audioreactive Flash animations or Pixel Generators. The default Input Device is usually the onboard microphone of the system. When working in high volume environments you might
want to configure it to a line-in feed – for example the audio feed from a DJ or if you wish
to be even more specific even a single instrument such as a bass drum when working
with live musicians. You can set the audio input to NONE to deactivate it.
¡
Output Device: Select the audio output device where GrandVJ will send the sound from
any clip you play that has an audio track. You can set the audio output to NONE to
deactivate it. You can also find a global volume control for output on the master section of
the main software window (see “Master output controls” at page 21) and this can be set to
zero also.
¡
Buffer Size: Here you can define the size of the audio buffer in Kilobytes (K). The default
setting is 1024k (or 1 megabyte) but this can be reduced to 256k or increased to 2048k as
required. Bigger values will lead to more stable output but may cause latency with the
video playback.
¡
Hardware Setup: This recalls the ASIO control panel for configuration under Windows
OS.
57
9.4 ArKaos Connect
This tab allows configuring GrandVJ’s interaction with the ArKaos Connect VST plug-in (see
chapter 11 ArKaos connect).
¡
The host drop-down list can be used to choose a running plug-in to connect to.
¡
The “Network Buffer Size” parameter is a tradeoff between latency and sound quality. The
lower is the buffer size, the lower is the latency between the audio sequencer and
GrandVJ. The value “low” or “medium” can be chosen for a vast majority of network
configurations (local machine or a fast LAN).
¡
Tick the checkbox “Use Audio as Input“ to use the sound of the audio sequencer as sound
input (the selected audio input device in the audio preference is then automatically
deactivated). You can preview the sound coming from the connected VST plug-in by
clicking on the “Test Audio Input” button.
The ArKaos Connect section in GrandVJ’s toolbar also displays a LED
indicating communication between ArKaos Connect and GrandVJ, and
the same button allowing to preview the sound coming from the
sequencer.
9.5 MIDI
The MIDI tab allows you to select which MIDI devices will be enabled for use with the application.
Please note that all data from enabled MIDI devices are merged so no matter what interface it
comes from, a note on message on channel 1 will have the same effect.
58
Here, you can also select whether the keyboard banks should be dedicated to one MIDI channel
or should listen to all of them.
It’s also the place where you activate MIDI feedback for selected devices (see chapter 8.7 Bidirectional controllers & MIDI feedback).
9.6 Open Sound Control Mapping (OSC)
The OSC tab allows you to select the local machine’s network port that will be used to accept
connection from OSC devices / applications.
Note:
GrandVJ automatically declares its OSC input port and IP address using the Bonjour network
protocol, meaning you won’t have to enter those information in your OSC device / application if it
supports Bonjour.
GrandVJ can also send real-time feedback information about the state of its mapped controls
through OSC. If you activate OSC feedback, you need to specify both the IP address and port of
the OSC device.
9.7 Performance
The “Performance” tab configures how GrandVJ renders previews .
¡
GPULevel gives an indication of the capabilities of your graphic card. If the level is too
low, some options become unavailable. The maximum level is 4.
¡
Preview style defines what is shown in the layer preview in mixer mode. You can choose
off, media (default) and full.
“Media” will only display the media without applying effects.
“Full’ will display both the media and the effect applied on it but this will imply that the
preview are downloaded back from the graphic card to the main memory which might
59
give a performance hit, especially on PC.
¡
Preview Quality (Windows only) allows you to down-sample the preview content quality,
if you begin to run into decreased performance.
9.8 Advanced
This tab allows you to set up various advanced options for the software.
¡
Show tooltips: enable / disable the tooltips showing above a graphical control when the
mouse cursor stays above for more than one second. Disable tooltips to make GrandVJ
more user-friendly when controlled from a touchscreen.
¡
Auto purge: allows the software to automatically unload visuals that are neither running
nor assigned to a cell. You can activate both a purging timer and ask the software to
purge when the physical memory available goes under a certain threshold.
¡
Save Mixer State: When quitting the application, the state of the mixer is now saved and
restored when it is restarted. Note that only the locked parameters are saved, since any
cell triggered will override non-locked parameters, it doesn’t make sense to include them.
¡
Pause mode: This preference lets you choose between the different pause modes when
in Mixer mode:
“Cut”: the layer stops rendering in the Mixer
“Freeze”: the layer keeps rendering in the Mixer
¡
Alternative Live Input Service (Mac only): . Originally, GrandVJ was relying on the
QuickTime Sequence Grabber framework to acquire frames from live input devices. Since
GrandVJ 1.1, QTKit Capture framework has replaced QuickTime Sequence Grabber in
GrandVJ, in order for the software to support HDV devices. However, several live input
devices still work a lot better when used through QuickTime Sequence Grabber than
QTKit Capture, since the drivers are developed separately. This setting lets you switch
back to QuickTime Sequence grabber.
60
9.9 Activation
This tab displays the information related to your software license and whether the software is
activated or not on this particular computer.
¡
Activation e-mail is the e-mail address that is registered with the customer account
which registered the software license at www.arkaos.net
¡
Software license shows the license type with which GrandVJ is activated (currently,
GrandVJ or GrandVJ XT)
¡
The “Copy support info to clipboard” button lets you copy your license codes to the
clipboard in case you need to communicate those details to the ArKaos Support Team
(see chapter 3.5 “Registration support”).
¡
If you have activated GrandVJ on your computer, you can still try GrandVJ XT by
checking the “Try GrandVJ XT” option. GrandVJ will then restart in GrandVJ XT Demo
mode, with the limitations of the Demo but you can test the GrandVJ XT features such as
the VideoMapper and decide if you want to upgrade your license. Simply uncheck the “Try
GrandVJ XT” option and restart GrandVJ to get back to your fully registered GrandVJ.
¡
The “Buy a GrandVJ XT upgrade” link will open your Internet browser on our online
shop page where you can purchase a license upgrade to GrandVJ XT. You will need to
log-in with your ArKaos customer account so we can verify that you have a GrandVJ
license that can be upgraded.
¡
Click the “Enter XT upgrade key” button if you have received an Upgrade Key to
GrandVJ XT from our online shop or from a reseller, you will be presented with the
Registration Wizard as described at chapter 3.2 “Activating GrandVJ on your computer”.
¡
Click on the “Deactivate…” button to free your license from the current machine, so you
can activate GrandVJ on another machine (see chapter 3.3 “Deactivating GrandVJ on
your computer” for more information).
61
10 MEDIA TYPES
10.1 Video
GrandVJ can play mostly any video file you will throw at it, however we have found MPEG-2 to be
the compression codec that produces the best overall performance.
If you have a multicore CPU, GrandVJ will take advantage of it. If you intent to play high definition
content you should have a system that has as at least the same number of cores as the number of
high definition layer you want to play.
The software decodes video through FFMPEG natively so it doesn’t require QuickTime or another
decoder, which takes up more hardware resources to complete.
Note:
The compression codec, file size and type can have an effect on the reliability and quality of playback
depending on your hardware configuration and show type. For example a show which uses 8 layers
of HD video simultaneously will require much more processing power than one using low resolution
video or stills.
10.1.1 Alpha from source
If you import images or videos with an alpha channel
(for example as a result of green keying), the
transparency of the media will be used in the mixing.
When setting the preview style to “full” (see the
Performance tab in the Preferences dialog) you will
see the transparent areas in the layer preview, no
matter if it comes from the original media or from
applying luminance / chrominance inside the
software.
10.2 Images
GrandVJ will accept the following file types into the library for still images:
¡
¡
¡
¡
JPG
BMP
GIF
PNG
You can import images that are bigger than the output resolution as it may be useful to achieve
specific effects, however it’s not recommended for performance reasons.
10.3 Audio
GrandVJ will play audio files in the same way that it will play sound from video files with an audio
track. If you want to disable sound altogether, you can go to the Preferences dialog under the
Audio tab; and set the output devices and set it to “No Audio”.
The best synchronization between audio and video is achieved by selecting “System Clock” in the
Preferences dialog under the Display tab under “Timing Reference”.
62
10.4 Generators
Generators are music visualizers that react to the sound of the audio input of your system. Some
generators are GPU accelerated effects while others are SWF Flash files.
You can create custom generators as Adobe Flash™ .SWF files, please check the ArKaos Blog
for a tutorial in the category “Hints and Tips”: http://vj-dj.arkaos.net/blog
10.5 Effects
GrandVJ comes with various effects that you can
mix with your other media, and we frequently add
new effects with software updates.
10.6 Quartz Compositions (Mac Only)
Under Mac OS X, GrandVJ allows to use Quartz
Composer .qtz files directly, both as sources and
effects. The compositions are rendered natively
through the fastest available interface.
You can import .qtz files as sources easily by adding them to your patch, just like you import any
standard media.
If you want to create Quartz Compositions and add them as effects , please check the ArKaos
Blog for a tutorial in the category “Hints and Tips”: http://vj-dj.arkaos.net/blog
10.7 Cameras / External Sources
GrandVJ will let use as a source any live input that is connected to your system, provided that it is
compatible with QuickTime under Mac OS X and DirectX under Windows.
Your device must be natively supported by your operating system, which means that it must be
able to work without requiring you to install any proprietary software or drivers.
Note:
GrandVJ detects any connected device during startup, make sure that your device is connected,
detected and correctly configured with your system before you launch GrandVJ.
10.8 Syphon (Mac only)
Syphon is an open source Mac OS X technology that allows applications to share frames – full
frame rate video or stills – with one another in real-time.
GrandVJ natively supports Syphon as an additional (virtual) output. Through Syphon, you can
send the output from GrandVJ to any other application that support Syphon as input, which makes
it possible to use GrandVJ as video mixer module in some more complex setups.
The Syphon output is automatically activated when a Syphon client is running, there is nothing to
configure in GrandVJ.
You can use Syphon as an input through Quartz Composer. Please refer to the official Syphon
website (http://syphon.v002.info/) for more information.
63
11 ARKAOS CONNECT
ArKaos Connect is a VST plugin for audio sequencer software that allows them to send audio and
MIDI to GrandVJ.
The audio host can run on the same machine as GrandVJ or a different one which is running on
the same local network.
The configuration of the connection in GrandVJ is pretty straightforward: just launch ArKaos
Connect from your sequencer, select the sending VST plug-in in an auto-updated list and enjoy the
new possibilities open by these interactions.
The interface of the VST plug-in is very simple:
¡
The “Connected” LED shows the connection status - the led becomes green if the plugin is connecter to an instance of GrandVJ.
¡
The “MIDI” LED blinks when MIDI messages are routed to the plug-in.
¡
The “Gain” knob lets you modify the gain of the sound sent to GrandVJ.
For more information, please refer to the ArKaos Connect Quickstart PDF document located in the
GrandVJ software installation folder, in the “Documentation” directory.
64
12 PERFORMANCE AND SETUP CONSIDERATIONS
Achieving good performance with video can be difficult because it depends on many different
factors.
The most important factors are:
¡
¡
¡
¡
¡
CPU speed
Disk speed
RAM access speed
Video card & video bus speed
Movie compression
There is no easy way to give a definitive answer in terms of what is best for every computer
setting. In ArKaos GrandVJ, most of the graphic processing is done in the graphic chip of the
video hardware, so the more powerful it is, the better performance you are going to get.
The CPU is mainly used to decompress movie frames from the disk and send them to the video
card. The faster your drives are, the faster frames will be loaded in the memory and the faster your
CPU is, the faster it will decompress the frames.
GrandVJ's engine is also heavily multi-threaded. Having several cores will help decompress movie
frames in parallel, allowing a faster throughput.
To achieve a good frame rate with a given hardware, you can:
¡
Adapt the resolution of the engine. See (Preferences/Display)
¡
Use source material that is adapted to your hardware. If you have a slow disk or older
generation of hardware, try working with smaller video sources to minimize the impact of
loading and decompressing the movie. Since all calculations are done inside the graphic
card, the automatic filtering applied when the images are scaled to the final resolution will
minimize aliasing effects.
It is very important to note that popular compressions schemes such as mpeg, divx,DV and vobs,
are very inefficient for VJing. Video files using these compression schemes will behave ‘correctly’
when used at nominal speed (100%), but will be very sluggish if you change their playback speed
or play them backwards. If you use these compression formats, you will get poor performance
from the software.
12.1 How to achieve best performances with the new engine
In order to get the best out of our new engine, you need to be attentive to quite a bit of details.
We’re going to explain here what needs to be checked:
12.1.1 Monitor Rate vs Movie Rate
If you want your movies to be really smooth, you need them to be in accordance with the monitor
frequency to ensure that each time there is a frame to show, you have a monitor refresh.
So if your movies are 30 FPS, the monitor needs to be at 60 Hz and if they are at 25 FPS, you
need to use either 50 Hz or 75 Hz.
Be also careful that depending on your chosen resolution, the choice of frequencies might change
so it’s important that once your setup is done, you put GrandVJ in fullscreen and get the monitor
reading from the status panel.
65
12.1.2 Hardware dependencies
We’ve noticed that some Graphic Cards sometimes react differently depending on the output
resolution. For example we have ATI’s that don’t provide a steady frame rate in 800x600 whilst
completely stable under 1024x780.
Also, if you do spans across the two outputs of a graphic card, there’s no guarantee the two
outputs will run at the exact same frequency. This can also produce jitter. It is sometimes more
efficient to make a wide output from one head using Matrox’s doublehead2go / triplehead2go than
to do a span across the two outputs.
12.1.3 OS dependencies
There are some performance issues that are only valid with respect to the operating system. We’ll
examine them separately here.
1. Windows
The only thing you need to make sure is that you run the software in Exclusive mode since it’s the
only mode that will ensure correct locking to vertical blanks.
To turn on Exclusive mode, make sure the option “Force Resolution” (in Preferences/Display) is
active:
2. Mac OSX
Mac OS X is a more sensitive platform. If you display the full screen on one Monitor, all system
drawing on the other monitor can cause the full screen to glitch. No matter what application. We
adapted the way we do our interface updates so that it won’t be interfering with the output but any
other program updating its GUI will most likely be a problem.
For this reason, in order to achieve the most fluid display under Mac OSX, we recommend to
either quit or hide other visible window. To give you an idea, even the refresh of the clock in the
menu bar can lead to one frame skipping.
12.2 Frame blending and software GenLock
The graphical engine of GrandVJ has been highly optimized to allow Frame Blending and
Software GenLock which, if setup correctly, can greatly help you to get great results.
Make sure you read about this in chapter 9.1.4 about the Options of the Display
12.3 Movie Compression
Beside movie size, compression scheme has a huge impact both on the fluidity of the display and
playability. The more complex the compression scheme, the more work the processor will have to
do to recover specific frames, which often results in sluggish performance. In addition to the
compression method itself, there’s the issue of key frames.
Most widely spread compression mechanisms work using incremental methods, which means they
construct a frame by storing the difference between a frame and the previous one. In order to keep
the process from deriving too much from the original material, they store an original frame every
now and then, and start coding incremental information from that frame on. These original frames
are called ‘key frames’.
66
Using sparse key frames will mean that for GrandVJ to access a given frame, it will have to find
the previous key frame and process all the intermediate frame differences until it reaches the
desired one. As you can imagine, this process is rather slow and prevents fast access to frames,
which is very important for backward playback or scratching.
That’s why compression schemes like mpeg or DivX are not at all suited for video performance.
From our experience, the best compression scheme for video performance is QuickTime’s
PhotoJPEG with a quality setting of about 80% or more. This will ensure smooth playback,
effective scratching and decent file size. If you want to use high definition content (HD) you can
also use the Quicktime H264 codec.
12.4 Widescreen & Multiscreen Presentation
In a common ArKaos GrandVJ setup, a computer with two video outputs is generally used: one
output for the desktop monitor (to display the interface and control the software) and another
output which receives the result of the visual mix. The second output is generally connected to a
video projector, a large screen or a hardware video mixer.
In this case, you will be using the
single second output to send your
final mix and, after having defined
the adapter to use and its resolution,
you are ready to go.
ArKaos GrandVJ, however, also
offers custom output resolution
possibilities. This allows you to
create multi-screen or wide screen
setups, controlled by a single
computer running ArKaos GrandVJ.
In this chapter, we’ll investigate
those specific setups.
Important:
Wide screen or multi-screen setups require high resolution output and therefore a recent / powerful
graphic card is necessary; a setup including 2 screens, each in 1024x768, will require ArKaos
GrandVJ to output in 2048x768, which may require a lot of CPU and GPU resources.
67
12.5 Definitions
1. Wide Screen
A wide screen setup consists of one
large visual mix spanning across
several screens placed next to the
other.
This is achieved by generating a
single ArKaos GrandVJ projection
in very a large resolution, which
spans
across
several
video
adapters. If you plan to use
projectors as outputs devices, you
also have a Soft-Edge option, which
allows seamless edge blending
between the two projectors.
2. Multi-screen
The multi-screen setup is the
concept as the wide screen in the
that it drives several adapters but
case you end up with different
mixes displayed on each output.
same
sense
in this
visual
The way it works is that you use the
position settings of ArKaos GrandVJ to
assign layers to part of the screen,
which is divided across the various
adapters.
12.5.2 Case Studies
In order to explain the different steps to setup ArKaos GrandVJ to produce a wide screen or multiscreen projection with several displays, let’s examine some common hardware configurations.
1. Case 1: Dual Head Graphic Card
If you only have a dual head graphic card and would like to achieve multiple outputs, you will need
to use both adapters and, since you have no more monitor available left, you will lose the interface
display.
2. Case 2: Dual Head Graphic Card + Single Head Graphic Card
Adding a supplementary graphic card to the setup described above will allow you to use it with
your desktop monitor in order to display the ArKaos GrandVJ interface and control the software
while you use the dual head graphic card and its two outputs for the wide screen or multi-screen
outputs.
68
Important:
At this stage, this option is only available on PC. The Mac version does not support accessing more
than one graphic adapter.
3. Case 3: Dual Head Graphic Card + Additional Hardware
Using an external hardware such as the Matrox™ DualHead2Go™ allows splitting one video
output into two separate signals (the DualHead2Go is a palm-sized box that sits outside of your
system and has one VGA input and two VGA outputs).
This system allows computers with a dual head graphic card to use one of the graphic card output
for the software interface and its second output to send the visuals that will be split across two
different screens. This very affordable solution will also fit perfectly with most modern laptops.
4. Other Possible Combinations
Dual head graphic card with each output split in two with a DualHead2Go; you would have a 4
screens setup.
Matrox™ also provides the TripleHead2Go™ multi-display upgrade allowing splitting a single
display adapter across 3 different screens. This can lead to up to 6 screens if you are using a
dedicated two-heads display adapter for the output.
12.5.3 Monitor Setup For Wide Screen Or Multi-Screen Projection
Earlier in this document, we’ve seen how to choose and setup a second monitor to display the
ArKaos GrandVJ visual mix. To do wide screen or multi-screen, the principle is the same in the
sense that ArKaos GrandVJ will continue to output one large visual mix, but the visual is going to
span across the multiple heads of an adapter. The way to execute the span across adapters is
very different for Mac and PC’s so we’ll examine them separately.
69
1. Monitor Setup Under Windows Vista, 7 and 8
Right click on your desktop and select “Screen resolution” in the contextual menu
A window will open with the following options:
Make sure that there are at least 2 screens displayed under “Change the appearance of your
display”. If not, click the “Detect” button. If you still don’t see 2 screens then windows doesn’t
detect the second monitor connected to your computer.
Now click on the drop down menu next to “Multiple displays”. Then select “Extend these displays”.
The second screen gets activated and now you can select the resolution for the screen. For the
best image quality and correct aspect ration, always select the native resolution of the screen.
70
2. Monitor Setup Under Windows XP
Right click on your desktop and select “Properties” in the contextual menu
A window will open with the following options:
On the Settings tab, make sure that there are at
least two monitors displayed in the central gray
area.
Click Identify to display a large number on each of
your monitors. This shows which monitor
corresponds with each icon.
Click the monitor icons and drag them to
positions that represent how you want to move
items from one monitor to another.
Click on the screen that is not yet active and check
the “Extend my Windows desktop onto this
monitor” checkbox.
Click OK or Apply to view changes
You can now close the Display Properties window
and launch GrandVJ
3. Monitor Setup Under Mac OS X
From the Apple menu, open the
System Preferences and select
“Displays”.
In the Displays window, go to the
“Arrangement” tab.
Click the monitor icons and drag
them to positions that represent
how you want to move items from
one monitor to another.
In this case the primary monitor is
placed to the left of the secondary
monitor.
Important:
You will later need to manually specify the resolution corresponding to the sum of your two monitors.
So make sure you take note of it at this stage. For example, if you have two monitors of resolution
1024x768 placed side by side, your total resolution will be 2048x768.
You can now close the System Preferences Displays window and launch ArKaos GrandVJ.
71
In ArKaos GrandVJ, go to the Preference Dialog and select the display tab. First, as output
monitor, select the monitor that is positioned at the top left of the full display. Then select the
custom resolution setting and enter the resolution corresponding to the sum of the two monitors
(2048x768 in our example).
Start full screen and the window will be created across the two monitors.
To have it correctly spanned across your two monitors it is important that they have been
positioned as they should at step 1 and that your ArKaos GrandVJ resolution corresponds to the
sum of the resolution of your two monitors.
12.6 Soft-Edge
To create a large screen by combining several video projectors it is important to be able to
seamlessly blend the edges between each projection. This can be achieved through the use of the
Soft-Edge option as it creates an overlapped area on the border of each screen with a fade on the
edge that can be overlapped with the next image.
Here is the original image (a nice view of Prague’s skyline):
And here’s an example of
what would be displayed
with a two beamers
setup:
The areas to blend are
displayed in the middle of
the visual. Positioning the
beamers so that these
two
areas
are
superposed will re-create
the
original
picture
without
any
visible
separation in the middle
of the visual.
Of course, it’s highly recommended to use two identical projectors.
72
In the “Display Tab” of the Preferences Window,
you can access Soft-Edge options, including the
number of projectors to be used horizontally and
vertically:
Once this has been setup, you can control the soft edging characteristics by changing the width
and curve of the soft edge.
¡
¡
The width of the overlapping area is defined between 2% and 50% of one screen size.
The curve factor defines the fade curve value, allowing you to fine-tune the luminosity of
the overlapping area compared to the rest of the picture.
12.6.1 Calibration
Below are the common steps to setup a wide screen with Soft-Edge in ArKaos GrandVJ (provided
that you have correctly setup your system and your graphics card driver parameters as explained
earlier in this document).
¡
Launch ArKaos GrandVJ.
¡
Setup the number of horizontal and vertical screens, and the soft-edge settings in the
“Display tab” of the Preferences Window.
¡
Import a picture appropriate for calibration and activate it.
¡
Launch the full screen mode ([Ctrl]+A or [Apple]+A in ArKaos GrandVJ)
(At this point, you should have the picture displayed on the two beamers with the softedge effect).
¡
Place the beamers correctly so that the edges blend seamlessly.
¡
Adjust the Curve parameter to obtain the desired luminosity of the overlapping area.
73
13 VIDEOMAPPER EXTENSION (GRANDVJ XT)
For a practical introduction to Video Mapping in GrandVJ, please refer to the VideoMapper
Quickstart document located in the software installation folder, in the “Documentation” directory.
13.1 Concept
The ArKaos VideoMapper is an extension for GrandVJ that allows easy mapping of video onto
irregularly shaped surfaces and through multiple outputs. Designed to let you setup mapping
projects in a very short time, it makes it incredibly simple to flow visuals on complex objects with
just a few clicks.
Once you launch the extension, GrandVJ will send the output from each layer to virtual “surfaces”
that can be scaled, deformed, and assigned to any physical output. One output can display a full
screen visual or a composition of several mapped visuals; output to a video projector and you can
map the surfaces to any physical volume (like objects or buildings).
13.2 Hardware setup
ArKaos VideoMapper is designed to output video content on any display connected to the
computer’s graphical cards.
It is advised to connect all the displays to the computer before turning it on.
The VideoMapper application will detect the connected displays and let you configure their
resolution and refresh frequency individually. This is a great tool to set up multiple outputs with
different resolutions.
13.3 Mapping workflow overview
The VideoMapper application is designed to communicate with GrandVJ. The VideoMapper and
GrandVJ can run at the same time on the same computer, so that you can edit the mapping
directly with the video content running in GrandVJ.
The VideoMapper application is only needed for the edition the video mapping itself, and can be
closed once the mapping setup is finished. The mapping will be automatically imported in
GrandVJ.
The typical workflow is:
¡
Connect the displays to the graphical card then switch on the computer.
¡
Launch GrandVJ application and switch to the “VideoMapper mode” in the Output
preferences. The application will restart in order to apply the new mode..
¡
Launch VideoMapper application. You can also launch it using the “Edit” button in
GrandVJ’s Output preferences.
Important:
The video rendering of GrandVJ occurs on one graphical card. If you would create surfaces on a
display that’s on another graphical card, be aware that you may experience reduced performances
due to memory transfers between the different graphical cards going through the main memory.
If possible, it’s advised to use the same graphical card to drive all the displays, eventually using a
video splitter device.
If you absolutely need to use several graphical cards, then you should connect the displays with the
biggest resolution to the main graphical card.
74
13.4 VideoMapper application
The VideoMapper application allows you to manage your displays and create/edit surfaces that will
be used by GrandVJ to display its layers when in VideoMapper Mode.
13.4.1 Interface overview
Here’s a quick overview of the VideoMapper interface, we’ll go through each part in detail further in
this document.
1. Toolbar
The toolbar on top of the window contains various options and switches for the user interface.
2. Mapping setup and sources
The left side of the application shows the Mapping setup, with a graphical representation of the
connected displays and the Display browser. Each display in the browser list will contain your
surfaces, which can be added, deleted or copied directly in the browser.
The Sources tab contains the visual sources that are used by the VideoMapper, it can be an
image or the feed from GrandVJ XT running in “VideoMapper Mode”.
3. Surface Editor
The “surface editor” in the center shows the output panel with surfaces for the selected display. It
is a preview of the result you will obtain on the related display in full screen.
Thanks to the “Show crop panel” button from the toolbar, you can split the surface editor
horizontally to show the crop panel on top with the output panel below.
4. Inspectors
The right panel is an inspector that shows parameters of the selected surface (under the “surface”
tab) or parameters of the selected display (under the “display” tab).
75
13.4.2 Toolbar options
Show / hide left panel: shows or hide the left panel with the display browser so you
can have more room to edit your surfaces.
Show / hide crop panel: this will split the surface editor horizontally to show the crop
panel on top with the output panel below.
Link grid points: links points between the grind on the crop zone and the grid on the
output zone so that moving a point on one will make the corresponding point move on
the other also.
Snap surfaces: surface borders will snap with each other and with the borders of the
surface editor
Enable / disable full screen: goes full screen on the active outputs.
Show cursor on full screen: show the cursor position on the full screen displays
Surface selection flash: the active display will flash each time you select a surface
Surface info on full screen: show the surface edition objects (surface borders,
handles, center and name) on the full screen display.
13.4.3 Setting up displays
Each connected display (as detected by your
operating system) is listed in the display browser.
Disconnected displays are shown in red.
Below each display item appears the list of surfaces
(click on the arrow on the left to expand the display
item).
Each display can be enabled or disabled by clicking on the left check box. Disabled displays won’t
go full screen when the global full screen button is activated (the display showing the VideoMapper
interface is disabled by default).
Note:
The first letter of identification before the display name (A1, A2, B1, etc..) represents the GPU to
which the display is connected. Two displays named A1 and A2 means that they are connected to the
same graphical card.
1. Draft Displays
You can create a “draft display” by clicking the “add draft display” button above the display
browser on the right. Draft displays can be used when the display you want to use in your final
setup is not connected. Create your mapping on a draft display and, later, copy/paste the surfaces
to the final display. The draft display can be deleted once the job is done (right-click on the draft
display item and choose “delete”).
76
2. Going full screen
To activate the full screen, press CTRL+F (Command+F on Mac) or click on the full screen button
in the toolbar. The VideoMapper keep the full screen state in memory. So, when you start the
VideoMapper, the full screen will automatically be enabled if it was enabled the last time you
closed the application.
3. Display Properties
When you click on a display item in the display editor, or when you click on the display tab in the
right inspector, the properties related to the display are shown. You can choose the resolution of
the display and its frequency.
¡
The “Force Resolution” option will force the resolution of the display. This is very useful
when you connect to a display which you don’t know the resolution. The background of
the display can be set to black, grey, or bitmap image (you can choose the image file by
clicking on the “open button”).
13.4.4 Setting up surfaces
1. Creating a surface
To create a new surface, click on the rectangle or triangle that appears on the right when the
display item is selected.
The list of surfaces on a display is like a stack of layers from top to bottom. The first surface will be
displayed on top of the others. You can change the order of the surfaces by dragging them around
in the list.
2. Surface Properties
When you select a surface, its properties are displayed in the inspector on the right.
You can modify geometrical parameters by editing the surface directly in the graphical editor (for
example modify the width or the height of a rectangle by dragging the middle handles of the
rectangle) or by enter numerical values in the inspector.
77
¡
The X and Y parameters are the
coordinates of the surface. This position is
by default the top-left corner for rectangles
and the center for triangles. If the option
“Display Top Left Coordinates” is unchecked
in the view menu, the position of the
rectangles will be centered.
¡
The R parameter is the rotation of the
surface. The rotation can also be modified by dragging the rotation handle in the graphical
editor
The other parameters depend on which surface you are editing:
¡
Triangles: You can edit the position of the three corners of the triangle (parameter X-Y in
the inspector).
¡
Rectangles
: You can modify the width and the height of the rectangle (parameter W-H in
the inspector).
The rectangle can also be deformed using a grid
pattern. To enable the grid, check the option “Edit
Grid” in the inspector. Each control point of the grid
can then be dragged separately.
To add or remove control points, use the buttons just below the edit grid option:
¡
Click
to add a point vertically.
¡
Click
to add a point horizontally.
¡
Click
to delete a point vertically.
¡
Click
to delete a point horizontally.
¡
Click
to add a point anywhere (then click with your mouse in the surface, where
you want to add the point.
¡
Click
to reset the grid and delete all the points.
The interpolation combo box lets you set the
interpolation for all the control points of the grid, it
can be set to linear or curved.
78
To set the interpolation separately for each control
point, first click a control point in the graphical editor,
then the interpolation editor appears.
It represents the selected control point with its four
adjacent segments. The interpolation for each
segment can be set to linear or curved.
The position of the selected corner box or the selected control point can also be edited with the
arrow keys of the keyboard.
¡
To move the point of 20 pixels, press alt while moving the point.
¡
To move the point of 0.05 pixels, press Ctrl (Cmd on mac) while moving the point.
3. Image Masks
Any image file can be used as mask that can be
applied on a surface. The average of the RGB colors
will be used if the source is a color image.
In the Mask properties editor, click on the “Open”
button to load an image.
Make sure that the “Enable” button is checked.
The following options are available to modify the mask:
¡
Invert: invert the greyscale source image before applying the mask
¡
Black: the masked part of the image is black
¡
Trans: the masked part of the image is transparent.
13.4.5 Cropping
You can crop the visuals that are sent to the output surfaces. The cropped zones can be a
rectangle, a triangle, or a grid and can be edited in the cropping panel just like surfaces can be
edited in the output panel. The four corners of rectangle cropping zones can be moved separately
if you check the option ”Edit Grid”.
1. The cropping panel
To show the cropping panel, click on the “Show Crop Panel” button in the toolbar, this
will split the surface editor horizontally to show the crop panel on top with the output
panel below.
79
1. Copy from sampling/output
The cropping panel and the output panel each have their inspector on the right, on top of it, you
can find the “Copy” buttons:
Copy from output: copies to the crop panel the shape of the surface that is
currently selected in the output panel
Copy from sampling: copies to the output panel the shape of the surface
that is currently selected in the crop panel
The Copy from sampling/output feature is very handy when you have to deal with complex shapes
made of several surfaces, it will help to keep a final image that won’t get distorted.
2. Show all
The “Show All” button in the top right of the crop panel allows seeing the cropping
zones corresponding to all the surfaces of the display. This option is useful if you
want “cut” a visual into several surfaces.
13.5 Visual Sources
The visual sources of the VideoMapper can be found under the “Sources” tab in the left pane, next
to the Mapping setup.
Visual sources can be an image or the feed from GrandVJ XT running in “VideoMapper Mode”. If
GrandVJ XT is running, the source will automatically switch to GrandVJ.
To add an image to the list of sources, click on the “Load Image” button above the list. Double click
on an item of the list to select that source.
80
13.6 Export and Import of Mapping Files
The VideoMapper constantly saves the mapping file internally. You can export your mapping using
the “Export” option in the “File” menu. The exported file (.vmp file) contains the configuration of the
output groups of GrandVJ XT as well. You can import external mappings using the “Import” option
in the “File” menu.
13.6.1 Key Bindings
1. Surface editor shortcut keys
¡
¡
¡
¡
¡
¡
¡
¡
¡
Middle Mouse Button : Pan View
Scroll Wheel : Zoom View in/out
Shift + Left Mouse Click : Multiple selection
Shift + Surface Rescale : Aspect-ratio rescale
arrow keys : Move selected Surface (1 pixel)
Alt + arrow keys : Move selected Surface (10 pixels)
Ctrl + arrow keys on Windows / Cmd + arrow keys on Mac : Move selected Surface (0.1
pixel)
Ctrl + I / Cmd + I: Hide all Surfaces except the selected one
Ctrl + Shift + I / Cmd + Shift + I: Show all Surfaces
2. Grid surface shortcut keys
¡
¡
¡
¡
¡
¡
¡
¡
¡
¡
R : Reset Grid
F1 : Add Horizontal Control Points
F2 : Remove Horizontal Control Points
F3 : Add Vertical Control Points
F4 : Remove Vertical Control Points
F5 : Add a control point anywhere
F6 : Change Grid Interpolation Type
F7 : Toggle Control Point Interpolation Type
TAB + arrow keys : Change Control Point Selection
Right-click inside grid: Selection Box Around Control Points
3. Application shortcut Keys
¡
¡
¡
¡
¡
¡
¡
¡
¡
Ctrl + I / Cmd + I: Move The VideoMapper Window To Cursor Position
Ctrl + G / Cmd + G: Surface Snap
Ctrl + E / Cmd + E: Show crop panel
Ctrl + F / Cmd + F: Go Fullscreen
Ctrl + N / Cmd + N: New Mapping
Ctrl + O / Cmd + O: Import a Mapping file
Ctrl + Shift + S / Cmd + Shift + S: Export a Mapping file
Ctrl + P / Cmd + P: Open the Preferences dialog
Ctrl + Q / Cmd + Q: Quit the Application
81
13.1 Output management in GrandVJ
In GrandVJ XT, you can create groups of outputs so you can display a layer on several outputs at
once.
The Groups dialog in GrandVJ XT is available
through the transition parameter panels.
It lets you create a new group of course, select and
edit an existing group, rename it or duplicate it.
82
14 SUPPORT, INFORMATION AND CONTACT
Users discussion forum
Support centre / Knowledgebase
http://forum.arkaos.net/
http://support.arkaos.net/
14.1 Solutions
As always, we are eager to hear from you. If you have any problems or questions, don't hesitate to
join our forums or to contact our support team!
14.1.1 Users discussion forum
If you just want to discuss with other ArKaos users, share tips and experiences about our products
or third party software / hardware, ask questions about particular setups etc.. Our Users
discussion forum is the place to be!
14.1.2 Knowledgebase articles
Our online Support Centre features a FAQ / Knowledgebase where a solution to the most common
registration / configuration problems has been posted.
14.1.3 Trouble ticket system
Our online Support centre also features a Trouble ticket system which allows our team to receive
your support requests and follow up the resolution of your problem as well as eventual future
issues. You can check the status of your trouble tickets, post replies to our team or create new
trouble tickets directly from our web interface.
Our support team answers your requests during office hours (CET) on weekdays, we do our very
best to answer your trouble tickets within one business day.
14.1.4 Distributors and resellers
Our distributors and resellers are also at your service if you would like to request information in
your language, advice on additional hardware or software, solutions or quotes for a particular
configuration etc..
A complete list of distributors and resellers for our software can be found on our web site.
Thank you very much for your interest in our products, we hope you will enjoy using this software
as much as we enjoyed creating it!
Have fun!
The ArKaos Team
83
15 INDEX
Activation Code ........................... 1, 2, 6, 7, 8, 9
Alpha ............................................................. 62
Audio input .................................................... 21
Generators.............................................. 15, 63
GPULevel ..................................................... 59
Graphic card ........................................... 59, 68
Grid ......................................................... 76, 78
Group............................................................ 82
B H Background ............................................. 22, 26
Backward ...................................................... 26
Banks .......................................... 15, 18, 24, 29
Blackout ........................................................ 21
Help .............................................................. 21
Hold ........................................................ 21, 25
A I Images .......................................................... 62
Import ........................................................... 81
Incremental ................................................. 37
Installation ...................................................... 5
Instant Mode ................................................. 15
Interpolation .................................................. 78
C Cells ................................ 15, 18, 23, 24, 25, 26
Chrominance................................................. 62
Chrominance................................................. 27
Clear ....................................................... 20, 29
Color ............................................................. 27
Compression ................................................. 65
Controller ........................ 14, 15, 17, 24, 30, 35
Copy / Paste ................................................. 29
Copy modes ................................................ 27
Cropping ....................................................... 79
Cross-fader ................................................... 33
Cross-fader ................................................... 17
Cube ............................................................. 28
Customer account ....... 6, 7, 8, 9, 10, 11, 13, 61
K Key frames ................................................... 67
Key-stoning .................................................. 57
Kill all ............................................................ 21
Knowledgebase ............................................ 83
L Latch ....................................................... 21, 25
Layers ................................... 15, 20, 22, 30, 32
License ............................................. 6, 7, 9, 13
License ......................................................... 61
Layer............................................................. 23
Lock parameters ........................................... 31
Loop modes ................................................ 26
Luminance .............................................. 27, 62
D Deactivate ............................................... 10, 61
Default value ................................................. 29
Demo mode .................................................... 9
Displays ................................ 15, 71, 73, 76, 77
Distributors .................................................... 83
Drag and drop ................................... 24, 26, 29
Dual output .................................................... 14
M Machine ID ................................................. 6, 8
Mapping .. 15, 17, 19, 24, 29, 35, 36, 74, 75, 81
Masking modes .......................................... 27
Matrix .......................................... 15, 18, 24, 29
MIDI activity .................................................. 21
MIDI channel .......................................... 37, 59
MIDI notes .................................................... 24
Mixer ................................................. 19, 20, 60
Mixer ............................................................. 14
Mixer ............................................................. 22
Monitors ...................................... 54, 68, 69, 71
Multi-screen .................................................. 68
Multi-threading .............................................. 65
E Effects ......................................... 15, 16, 27, 63
Export............................................................ 81
F Fade ........................................................ 22, 27
FAQ............................................................... 83
Framerate ..................................................... 21
Force resolution ............................................ 24
Foreground ............................................. 22, 26
Forum............................................................ 83
Forward ......................................................... 26
Frame rate .................................................... 65
Full screen ............................ 14, 21, 24, 76, 77
O OSC activity .................................................. 21
Output ................................... 14, 15, 74, 80, 82
G Gain control................................................... 21
1
P V Panels ..................................................... 16, 21
Parameters ....................................... 19, 25, 32
Pause ..................................................... 30, 60
Performance ........................................... 60, 65
Ping-pong...................................................... 26
Plane ............................................................. 28
Play............................................................... 30
Playback ....................................................... 26
Position ......................................................... 28
Preferences................................. 10, 12, 13, 54
Preview ................................. 15, 17, 20, 30, 59
Priority ..................................................... 22, 26
Project ........................................................... 15
Projector...................................... 14, 57, 67, 72
Purge ...................................................... 30, 60
VideoMapper .............................. 15, 19, 21, 74
Visuals ........................................ 15, 17, 26, 60
Volume control.............................................. 21
W Wide screen.................................................. 68
Q Quartz Composer.......................................... 63
R Registration ....................................... 6, 8, 9, 12
Resellers ....................................................... 83
Resolution ............................................... 55, 65
Rotation ....................................................... 28
S Segment....................................................... 26
Sequencer ......................................... 14, 15, 35
Serial Key.................... 6, 7, 8, 9, 10, 11, 12, 13
Shape ........................................................... 28
Soft-Edge .......................................... 55, 68, 72
Sound ...................................................... 15, 62
Source ........................................................... 17
Speed ........................................................... 26
Sphere .......................................................... 28
Stop......................................................... 22, 31
Support ............................................. 12, 61, 83
Surface .......................................................... 75
Surfaces .................................................. 74, 77
Synth ............................................................. 14
Synth ............................................................. 22
Syphon .......................................................... 63
T Text .............................................................. 26
Thumbnail .................................................... 26
Tiling ............................................................ 28
Toolbar .......................................................... 21
Tooltips ........................................................ 60
Transition ................................................ 15, 19
Transitions................................................... 16
Transparency .................................... 20, 27, 30
U Updates......................................................... 13
Upgrades ...................................................... 13
2