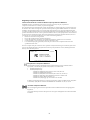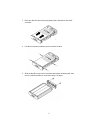
1
Adaptec ACS-300 Combo eSATA/USB 2.0 Hard Disk Drive Enclosure User’s Guide Copyright ©2006 Adaptec, Inc. All rights reserved. No part of this publication may be reproduced, stored in a retrieval system, or transmitted in any form or by any means, electronic, mechanical, photocopying, recording or otherwise, without the prior written consent of Adaptec, Inc., 691 South Milpitas Blvd., Milpitas, CA 95035. Trademarks Adaptec and the Adaptec logo are trademarks of Adaptec, Inc., which may be registered in some jurisdictions. Microsoft and Windows are trademarks of Microsoft Corporation in the US and other countries, used under license. Apple and Macintosh are trademarks of Apple Computer, Inc. in the US and other countries, used under license. All other trademarks are the property of their respective owners. Changes The material in this document is for information only and is subject to change without notice. While reasonable efforts have been made in the preparation of this document to assure its accuracy, Adaptec, Inc. assumes no liability resulting from errors or omissions in this document, or from the use of the information contained herein. Adaptec reserves the right to make changes in the product design without reservation and without notification to its users. Disclaimer IF THIS PRODUCT DIRECTS YOU TO COPY MATERIALS, YOU MUST HAVE PERMISSION FROM THE COPYRIGHT OWNER OF THE MATERIALS TO AVOID VIOLATING THE LAW WHICH COULD RESULT IN DAMAGES OR OTHER REMEDIES. ii Limited 1-Year Hardware Warranty 1 Adaptec, Inc. (“Adaptec”) warrants to the purchaser of this product that it will be free from defects in material and workmanship for a period of one (1) year from the date of purchase. If the product should become defective within the warranty period, Adaptec, at its option, will repair or replace the product, or refund the purchaser’s purchase price for the product, provided it is delivered at the purchaser’s expense to an authorized Adaptec service facility or to Adaptec. 2 Repair or replacement parts or products will be furnished on an exchange basis and will either be new or reconditioned. All replaced parts or products shall become the property of Adaptec. This warranty shall not apply if the product has been damaged by accident, misuse, abuse or as a result of unauthorized service or parts. 3 Warranty service is available to the purchaser by delivering the product during the warranty period to an authorized Adaptec service facility or to Adaptec and providing proof of purchase price and date. The purchaser shall bear all shipping, packing and insurance costs and all other costs, excluding labor and parts, necessary to effectuate repair, replacement or refund under this warranty. 4 For more information on how to obtain warranty service, write or telephone Adaptec at 691 South Milpitas Boulevard, Milpitas, CA 95035, (800) 959-7274. 5 THIS LIMITED WARRANTY DOES NOT EXTEND TO ANY PRODUCT WHICH HAS BEEN DAMAGED AS A RESULT OF ACCIDENT, MISUSE, ABUSE, OR AS A RESULT OF UNAUTHORIZED SERVICE OR PARTS. 6 THIS WARRANTY IS IN LIEU OF ALL OTHER EXPRESS WARRANTIES WHICH NOW OR HEREAFTER MIGHT OTHERWISE ARISE RESPECT TO THIS PRODUCT. IMPLIED WARRANTIES, INCLUDING THOSE OF MERCHANTABILITY, FITNESS FOR A PARTICULAR PURPOSE AND NON-INFRINGEMENT SHALL (A) HAVE NO GREATER DURATION THAN 1 YEAR FROM THE DATE OF PURCHASE, (B) TERMINATE AUTOMATICALLY AT THE EXPIRATION OF SUCH PERIOD AND (C) TO THE EXTENT PERMITTED BY LAW BE EXCLUDED. IN THE EVENT THIS PRODUCT BECOMES DEFECTIVE DURING THE WARRANTY PERIOD, THE PURCHASER’S EXCLUSIVE REMEDY SHALL BE REPAIR, REPLACEMENT OR REFUND AS PROVIDED ABOVE. INCIDENTAL OR CONSEQUENTIAL DAMAGES, INCLUDING WITHOUT LIMITATION LOSS OF DATA, ARISING FROM BREACH OF ANY EXPRESS OR IMPLIED WARRANTY ARE NOT THE RESPONSIBILITY OF ADAPTEC AND, TO THE EXTENT PERMITTED BY LAW, ARE HEREBY EXCLUDED BOTH FOR PROPERTY DAMAGE, AND TO THE EXTENT NOT UNCONSCIONABLE, FOR PERSONAL INJURY DAMAGE. 7 SOME STATES DO NOT ALLOW THE EXCLUSION OR LIMITATION OF INCIDENTAL OR CONSEQUENTIAL DAMAGES FOR CONSUMER PRODUCTS, AND SOME STATES DO NOT ALLOW LIMITATIONS ON HOW LONG AN IMPLIED WARRANTY LASTS, SO THE ABOVE LIMITATION OR EXCLUSIONS MAY NOT APPLY TO YOU. 8 This warranty gives you specific legal rights, and you may also have other rights which vary from state to state. iii Regulatory Compliance Statements Federal Communications Commission Radio Frequency Interference Statement WARNING: Changes or modifications to this unit not expressly approved by the party responsible for compliance could void the user’s authority to operate the equipment. This equipment has been tested and found to comply with the limits for a Class B digital device, pursuant to Part 15 of the FCC rules. These limits are designed to provide reasonable protection against harmful interference in a residential installation. This equipment generates, uses, and can radiate radio frequency energy, and if not installed and used in accordance with the instruction manual, may cause harmful interference to radio communications. However, there is no guarantee that interference will not occur in a particular installation. However, if this equipment does cause interference to radio or television equipment reception, which can be determined by turning the equipment off and on, the user is encouraged to try to correct the interference by one or more of the following measures: Reorient or relocate the receiving antenna. Increase the separation between equipment and receiver. Connect the equipment to an outlet on a circuit different from that to which the receiver is connected. Consult the dealer or an experienced radio/television technician for help. Use a shielded and properly grounded I/O cable and power cable to ensure compliance of this unit to the specified limits of the rules. This device complies with part 15 of the FCC rules. Operation is subject to the following two conditions: (1) this device may not cause harmful interference and (2) this device must accept any interference received, including interference that may cause undesired operation. ACS-300 European Union Compliance Statement This Information Technology Equipment has been tested and found to comply with EMC Directive 89/336/EEC, as amended by 92/31/EEC and 93/68/EEC, in accordance with: ٛ ٛ ٛ ٛ ٛ ٛ EN55022 (1998) Emissions EN55024 (1998) Immunity: – EN61000-4-2 (1998) Electrostatic discharge: ±4 kV contact, ±8 kV air – EN61000-4-3 (1998) Radiated immunity – EN61000-4-4 (1995) Electrical fast transients/burst: ±1 kV AC, ±0.5 kV I/O – EN61000-4-5 (1995) Surges ±1 kV differential mode, ±2 kV common mode – EN61000-4-6 (1996) Conducted immunity: 3 V – EN61000-4-11 (1994) Supply dips and variation: 30% and 100% In addition, all equipment requiring U.L. listing has been found to comply with EMC Directive 73/23/EEC as amended by 93/68/EEC in accordance with EN60950 with amendments A1, A2, A3, A4, A11. Canadian Compliance Statement This Class B digital apparatus meets all requirements of the Canadian Interference-Causing Equipment Regulations. Cet appareil numérique de la classe B respecte toutes les exigences du Règlement sur le matériel brouilleur du Canada. iv In this Guide... Kit Contents System Requirements Getting Started Checklist Preparing the Disk Drive for Installation Installing a Disk Drive Installing the Device Driver–Windows 98SE Only Connecting and Powering On Preparing the Disk Drive for Use Setting up Removable option – –Windows 98SE Only Connecting and Disconnecting Your Enclosure Troubleshooting About USB Technology About SATA Technology 2 2 3 3 3 5 6 7 7 8 9 10 10 ® This User’s Guide explains how to install and connect your Adaptec ACS-300 Combo eSATA/USB 2.0 Hard Disk Drive Enclosure, and provides a brief overview of USB and SATA technology. Kit Contents Adaptec ACS-300 Combo USB/eSATA Enclosure One enclosure stand One power adapter One high-quality USB cable One high-quality eSATA cable One bag of screws CD, including device drivers and documentation A disk drive is not included in this kit. The Adaptec ACS-300 Combo eSATA/USB 2.0 Enclosure supports 3.5-inch SATA I (1.5Gbps) and SATA II (3.0Gbps) hard disk drives. System Requirements To successfully install and use your Adaptec ACS-300 enclosure, your computer must meet these requirements: CD ROM drive For SATA interface: ® ® o Microsoft Windows computers must be running Windows XP, Windows 2000, Windows Me, or Windows 98SE o Available eSATA port. For USB interface: ® ® o Microsoft Windows computers must be running Windows XP, Windows 2000, Windows Me, or Windows 98SE o Apple® Macintosh® computers must be running OS 9.2.2 or later for USB 1.1 support, or OS 10.2.7 or later for USB 2.0 support o Available USB 2.0 port. 2 Getting Started Checklist o o o o o Preparing the Disk Drive for Installation (see below) Installing a Disk Drive (see below) Installing the Device Driver–Windows 98SE Only (see page 5) Connecting and Powering On (see page 6) Preparing the Disk Drive for Use (see page 7) Preparing the Disk Drive for Installation The Adaptec ACS-300 enclosure supports 3.5-inch SATA I and SATA II hard disk drives. Most of the SATA drives don’t have the jumper to set the Master, Slave, or Cable Select like the ATA/IDE drive; however, if your hard disk does equip with such jumper, please set it to Master or Device 0 mode (or equivalent) following the instructions on your disk drive. Installing a Disk Drive Note: You need a Phillips screwdriver to complete this task. To install a disk drive into your enclosure: 1 Use a screwdriver to remove the two screws on the back of the enclosure. 2 Remove the enclosure’s back panel, as shown below, and slide out the disk drive tray. 3 3 Place the disk drive into the tray and gently slide it forward into the SATA connector. 4 Use the four screws included in the kit to secure the drive. 5 Slide the disk drive tray into the enclosure and replace the back panel, then secure it with the screws you removed in Step 1 on page 3. 4 Installing the Device Driver–Windows 98SE Only Note: Windows XP/2000/Me and Macintosh users—No driver installation is required. Your Adaptec ACS-300 enclosure works with the drivers built into your operating system. This section describes how to install the USB 2.0 driver. The SATA interface will use the build-in mass storage driver from the system. Before you begin, ensure you have the most recent driver updates installed on your computer. Refer to the Microsoft Web site at www.microsoft.com to download updates. You may need your Windows 98SE CD during this installation. To install the device drivers: 1. Power on your computer, if you have not already done so. 2. Insert the Adaptec ACS-300 CD into your CD drive. 3. From the Windows Start menu, click Run, and then click Browse. 4. Browse to the CD drive, then double-click Setup.exe to begin the driver installation. 5. Follow the on-screen instructions to install the USB 2.0 driver. 5 Connecting and Powering On Note: Windows 98SE users only—You must install the device drivers before connecting and powering on the enclosure. To connect the cables and power on: 1. Connect your enclosure to your computer using either the included USB or eSATA cable: Connect the USB cable from the USB 2.0 port on the enclosure to a USB 2.0 port on your computer, or Connect the eSATA cable from the eSATA port on the enclosure to an eSATA port on your computer. Note: Do not connect both the USB 2.0 and eSATA cables. 2 Use the included power adapter to connect the enclosure to a grounded power supply. 3 Power on the enclosure by pushing the on/off switch on the back of the enclosure to the I position. The LED on the front of the enclosure illuminates. Note: The LED flashes when there’s activity on the disk drive. You have successfully installed and connected your Adaptec ACS-300 enclosure. 6 Preparing the Disk Drive for Use If you have installed a new disk drive in your enclosure, you must prepare it for use by initializing and formatting it, so that your computer can recognize and communicate with it. Caution: If you’ve used the disk drive previously and want to preserve the data on it, do not initialize and format the disk drive or you’ll erase all the data on it. Refer to your operating system documentation for more information. The process of initializing and formatting a new disk drive differs by operating system. Refer to your operating system documentation for instructions on completing these tasks. Note: For technical assistance with the initialization and formatting process, please contact Microsoft (Windows users) or Apple (Macintosh users). Setting up Removable option – Windows 98SE Only For some models of SATA hard disk, you may need to enable the “removable” option in order for the system to detect the drive. If you don’t see your drive show up in “My Computer”, please follow the steps below: 1. On your desktop, right-click My Computer, select Properties, then click the Device Manager tab. 2. Expand the Disk Drive category. Select the hard drive installed in the enclosure, and then right-click to select the Properties. 3. Click on the Setting tab and select Removable in the Option box. 4. Continue to the Reserved Drive Letters box and select the same letter for the Start & End Driver letter. 5. Restart the system when prompted. 7 Connecting and Disconnecting Your Enclosure Your Adaptec ACS-300 enclosure has one USB 2.0 and one eSATA port. It supports hot-plugging which means you can connect and disconnect your enclosure from the computer while running. However, Adaptec recommends that you follow these instructions to gracefully disconnect your enclosure from your computer. Windows To disconnect the enclosure: 1 Ensure that all activity is stopped (no files are being transferred to or from the computer). 2 Click the icon 1 shown at right, located on your system tray in the bottom right corner of your screen. Note: Windows 98SE has a different but very similar icon as shown at right. The steps to disconnect the device are alike. 3 Highlight the drive (indicated by the driver letter) that you want to disconnect then click on it. 4 A message appears telling you that the device has been stopped. Click OK. 5 Power off the enclosure. It is now safe to disconnect your enclosure. Macintosh Ensure that all activity is stopped (no files are being transferred to or from the computer). To disconnect the enclosure, click on the icon for the disk drive and drag it into the trash can. Then, power off the enclosure. It is now safe to disconnect your enclosure. 1 Depending on your operating system, the wizard may be called the Safely Remove Hardware wizard or the Unplug or Eject Hardware wizard. 8 Troubleshooting If you have problems installing or using your Adaptec ACS-300 enclosure, work through this list of suggestions: Ensure that the disk drive has been properly installed. Try connecting the enclosure to your computer through a different USB port. Try connecting the enclosure to your computer through a different eSATA port. Try using a different USB or eSATA cable. Try connecting the enclosure to a different power source. If you are using Windows with a file system other than NTFS, and the file system of the disk drive installed in the Adaptec ACS-300 is NTSF, Windows may not recognize or be able to read from the disk drive. See the Table below for compatibility information: Operating System File System FAT16 FAT32 NTFS ACS-300 Disk Drive File System FAT16 Compatibility OK FAT32 or NTFS No FAT16 or FAT32 OK NTFS No FAT16 or FAT32 or NTFS OK For technical assistance initiating and formatting your disk drive, please contact Microsoft (Windows users) or Apple Computer (Macintosh users). For Windows 98SE users — If you connected and powered on your enclosure before you installed the device drivers, your enclosure may not work properly. Follow the steps below to fix it. a. On your desktop, right-click My Computer, select Properties, then click the Device Manager tab. b. Expand the categories to find your enclosure, which will appear with a yellow exclamation mark beside it. Select the enclosure, then click the Remove button at the bottom of the window. c. Power off the enclosure and disconnect the USB or eSATA cable. d. Complete the driver installation, following the instructions on page 5. e. Reconnect the USB or eSATA cable and power on the enclosure, following the instructions on page 6. If you are using the SATA interface and you connected and powered on your computer before you turn on the enclosure, your system may not detect the enclosure with some SATA add-on card. To workaround the issue, make sure the enclosure is powered on when starting up the computer. 9 If you don’t see the hard drive under “My Computer”, follow the instructions on page 7 to enable the “Removable” option that may fix the issue. About USB Technology USB stands for Universal Serial Bus. It is the interface between your computer and the USB devices you plug into it. Your computer communicates with USB devices through the USB interface. USB devices can be plugged into USB ports only, and must be supported by USB drivers. USB 1.1 devices operate at a maximum speed of 12 Mbps (Megabits per second); USB 2.0 devices operate at a maximum speed of 480 Mbps. About USB 2.0 Performance Your Adaptec ACS-300 enclosure provides a USB 2.0 port. For it to operate at USB 2.0 speeds, it must be connected to a USB 2.0 port, and USB 2.0 drivers must be installed on your computer. If your computer does not have a built-in USB 2.0 port, Adaptec recommends connecting the enclosure to an Adaptec USB 2.0 adapter for the highest-quality USB 2.0 connection. About SATA Technology Serial ATA is the next-generation internal storage interconnect designed to replace Ultra ATA technology. Serial ATA is the proactive evolution of the ATA interface from a parallel bus to serial bus architecture. This architecture overcomes the electrical constraints that are increasing the difficulty of continued speed enhancements for the classic parallel ATA bus. Serial ATA was introduced at 150Mbytes/sec, with a roadmap already planned to 600Mbytes/sec, supporting up to 10 years of storage evolution based on historical trends. Though Serial ATA will not be able to directly interface with legacy Ultra ATA hardware, it is fully compliant with the ATA protocol and thus is software compatible. About SATA II (3Gbps) Performance Your Adaptec ACS-300 enclosure provides an industrial standard eSATA connector for external connection. It works with SATA I (1.5Gbps) or SATA II (3Gbps) hard disk drive. To operate in highest possible speed, you need a SATA II hard disk drive and an SATA II (3Gbps) add-on card that provides at least one eSATA external SATA port. If your computer does not have an eSATA port or SATA II 3Gbps speed, Adaptec recommends connecting the enclosure to an Adaptec’s SATA adapters. 10 Adaptec, Inc. 691 South Milpitas Boulevard Milpitas, CA 95035 USA ©2006 Adaptec, Inc. All rights reserved. Adaptec and the Adaptec logo are trademarks of Adaptec, Inc. which may be registered in some jurisdictions. Part Number: CDP-00145-01-A Rev A 02/06