1
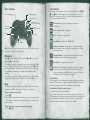
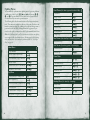
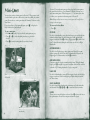
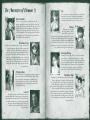
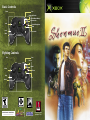
Basic Controls
Zoom
Run
Notebook/Action
System Menu/Money
Conversation
Look
Help
Cancel/Navigation
Mark
Conversation
Walk
Fighting Controls
Run
Run
Punch
Guard
Move
Help
Throw
Kick
Walk
0902 Part No. X08-87242
®
Get the strategy guide
primagames.com®
Safety Information
About Photosensitive Seizures
A very small percentage of people may experience a seizure when exposed to certain
visual images, including flashing lights or patterns that may appear in video games. Even
people who have no history of seizures or epilepsy may have an undiagnosed condition
that can cause these “photosensitive epileptic seizures” while watching video games.
These seizures may have a variety of symptoms, including lightheadedness, altered vision,
eye or face twitching, jerking or shaking of arms or legs, disorientation, confusion, or
momentary loss of awareness. Seizures may also cause loss of consciousness or convulsions that can lead to injury from falling down or striking nearby objects.
Immediately stop playing and consult a doctor if you experience any of these symptoms.
Parents should watch for or ask their children about the above symptoms—children and
teenagers are more likely than adults to experience these seizures.
The risk of photosensitive epileptic seizures may be reduced by sitting farther from the
television screen, using a smaller television screen, playing in a well-lit room, and not
playing when you are drowsy or fatigued.
If you or any of your relatives have a history of seizures or epilepsy, consult a doctor
before playing.
Other Important Health and Safety Information The Xbox Instruction Manual
contains important health and safety information that you should read and understand
before using this software.
Avoid Damage to Your Television
Do not use with certain televisions. Some televisions, especially front- or rear-projection types, can be damaged if any video games, including Xbox games, are played on
them. Static images presented during the normal course of game play may “burn in” to the
screen, causing a permanent shadow of the static image to appear at all times, even when
video games are not being played. Similar damage may occur from static images created
when placing a video game on hold or pause. Consult your television owner’s manual to
determine if video games can be played safely on your set. If you are unable to find this
information in the owner’s manual, contact your television dealer or the manufacturer to
determine if video games can be played safely on your set.
Unauthorized copying, reverse engineering, transmission, public performance, rental,
pay for play, or circumvention of copy protection is strictly prohibited.
Contents
Destiny . . . . . . . . . . . . . . . . . . . . . . . 2
Previous Events in Shenmue I . . . . . . . . . . . . . 3
Starting Ryo’s Quest in Shenmue II
. . . . . . . . . 4
Starting a Game (New Game) . . . . . . .
Continuing a Game (Continue) . . . . . . .
Viewing the Shenmue I Movie (Digest Movie)
Playing Mini-Games (Shenmue Collection) .
Changing Game Settings (Options) . . . . .
Finding Your Way
.
.
.
.
.
.
.
.
.
.
.
.
.
.
.
.
.
.
.
.
.
.
.
.
.
.
.
.
.
.
.
.
.
.
.
.
.
.
.
.
4
4
5
5
5
. . . . . . . . . . . . . . . . . . 6
Time in Shenmue II . . . . . . . .
Moving Through the Game . . . . .
The Main Screen . . . . . . . . . .
Basic Controls . . . . . . . . . . .
Movement . . . . . . . . . . . . .
Help . . . . . . . . . . . . . . . .
Icon Selector . . . . . . . . . . . .
Action Selector . . . . . . . . . . .
Taking Snapshots of the Action . . .
Searching for Objects . . . . . . .
Zooming . . . . . . . . . . . . . .
Locking onto Objects and Characters
Following Other Characters . . . . .
Navigating . . . . . . . . . . . . .
Using the System Menu . . . . . .
Sleeping . . . . . . . . . . . . . .
Saving a Game . . . . . . . . . . .
Quick Timer Events (QTEs) . . . .
Command QTE . . . . . . . . . . .
.
.
.
.
.
.
.
.
.
.
.
.
.
.
.
.
.
.
.
.
.
.
.
.
.
.
.
.
.
.
.
.
.
.
.
.
.
.
.
.
.
.
.
.
.
.
.
.
.
.
.
.
.
.
.
.
.
.
.
.
.
.
.
.
.
.
.
.
.
.
.
.
.
.
.
.
.
.
.
.
.
.
.
.
.
.
.
.
.
.
.
.
.
.
.
.
.
.
.
.
.
.
.
.
.
.
.
.
.
.
.
.
.
.
.
.
.
.
.
.
.
.
.
.
.
.
.
.
.
.
.
.
.
.
.
.
.
.
.
.
.
.
.
.
.
.
.
.
.
.
.
.
.
.
.
.
.
.
.
.
.
.
.
.
.
.
.
.
.
.
.
.
.
.
.
.
.
.
.
.
.
.
.
.
.
.
.
.
.
.
.
.
.
.
.
.
.
.
.
.
.
.
.
.
.
.
.
.
.
. 6
. 6
. 7
. 8
. 8
. 8
. 9
10
11
12
12
12
13
14
14
17
18
18
18
Fighting . . . . . . . . . . . . . . . . . . . . . . 19
Fighting Moves . . . . . . . . . . . . . . . . . . . . . . 20
Mini-Games . . . . . . . . . . . . . . . . . . . . 24
The Characters of Shenmue II . . . . . . . . . . . . 26
Destiny
From a distant land in the East, from across the sea,
he shall appear.
He does not know of the strength hidden
within him.
The strength that would destroy him.
The strength that would fulfill his wishes.
When he is ready, he shall seek me out.
And we shall brave together the rocky path.
I shall wait...
This encounter has been my destiny since ancient times.
A Dragon shall emerge from the earth, and dark clouds
shall obscure the heavens.
A Phoenix shall descend from above,
its wings will create a purple wind.
In the midst of the pitch-black night,
a morning star shall glisten, alone...
Previous Events in Shenmue I
Yokosuka, Japan - 1986
Ryo Hazuki’s quiet, tranquil life in the Hazuki family home is forever
shattered by the sudden, unexpected arrival of unwanted visitors. A man
in dark green Chinese clothing appears at the door, followed closely by
his black-suited thugs. Known as Lan Di, the leader uses his knowledge
of kung fu to kill Ryo’s noble father, Iwao. Before Ryo can compose himself, Lan Di escapes, taking away a mysterious mirror, which is clearly
what he came for.
Vowing to seek revenge, young Ryo embarks on a journey to find his
father’s killer. After several dead ends, Ryo is given a letter addressed
to his late father. Sent by a man called Yuanda Zhu, the letter warns of
danger, but also tells of a person that can be relied on if something happens – a Master Chen. Upon finding this master, Ryo learns from him
that Lan Di is one of the leaders of the Chiyoumen. And because Lan Di
has already obtained one sacred mirror, he’s likely to be searching for the
other, known as the Phoenix Mirror, because together the mirrors make
a pair.
Ryo eventually finds the Phoenix Mirror, but even with this prize he’s
still eager to seek Lan Di and avenge his beloved father’s death. Master
Chen tells of rumors that say Lan Di has left for Hong Kong, so Ryo
decides to pursue him there, but an unknown assailant attacks Ryo
before he can follow Lan Di to that exotic city.
Fighting off his attacker, Ryo comes face-to-face with the Mad Angels,
a gang with close ties to Lan Di’s Chiyoumen. With the help of Master
Chen’s son Guizhang, Ryo defeats the Mad Angels. Master Chen then
gives Ryo a letter, which introduces a man called Lishao Tao, who will
assist Ryo once he arrives in Hong Kong.
Where is Lan Di, the man who killed Ryo’s beloved father?
Who is Yuanda Zhu, the man who sent the letter to Ryo’s father warning
of danger?
What is the hidden mystery of the Phoenix Mirror?
As Shenmue II starts, Ryo arrives in Hong Kong seeking the truth behind
these mysteries. You must help him find the answers!
2
3
Starting Ryo’s Quest
in Shenmue II
Shenmue II is a one-player game.
Starting a Game (New Game)
If you’re new to this story and are playing Shenmue for the first time,
you’ll need to start a new game. Please refer to the back cover of this
manual if you’re unfamiliar with the Xbox™ game controller.
To start a new game
1. Insert the Shenmue II game disc into your Xbox video game
system console.
2. When the title screen appears, press g to display the Start Menu.
3. On the Start Menu, use the Directional Pad (D-pad) to navigate
to New Game, and then press A. After the opening movie plays,
a new game will start.
Note: To catch up with the action from Shenmue I, view the Digest Movie.
Continuing a Game (Continue)
Once you’ve explored the world of Shenmue II, you can save your
progress and resume play from where you left off.
To load a previously saved game
1. On the Start Menu, use the D-pad to navigate to Continue,
and then press A.
2. On the Load Menu, select the game you want to load (Game File 1,
Game File 2, and so on), and then press A.
The game will resume from the point where you previously saved.
Note: For more information about saving games, see page 18.
4
Viewing the Shenmue I Movie (Digest Movie)
The Shenmue II game disc includes a Digest Movie of Shenmue, Chapter
One: Yokosuka (Shenmue I).
This movie contains the memorable scenes from the original Shenmue
and will provide you the background story necessary to understand
the current story. The first time you play Shenmue II, you will view the
movie. If you want to view it again, you may select it from the
Main Menu.
To stop the Digest Movie and return to the Start Menu, press B.
Playing Mini-Games (Shenmue Collection)
The Shenmue II game disc also includes the Shenmue Collection, which
is made up of mini-games and Free Battles that are introduced during
the progress of your game. For more information on these activities, see
page 24 in this manual.
Changing Game Settings (Options)
You can use the Options Menu to modify the following settings for
the game.
Dialog/Text – Set dialog and text mode to one of these settings:
Game Mode – Play using both voice and text.
Text Mode – Play using text only.
Cinema Mode – Play using voice only. You’ll be unable to
skip conversations in this mode.
Shenmue Mode – Play using both voice and text. Text is displayed
when you choose to skip conversations.
Thumbsticks – Set the Left and Right thumbsticks to either Look
or Move.
Toggle Controls – Switch the controls of the Left and Right triggers.
To change a game setting
1. On the Options Menu, press the D-pad q or m to select an option.
2. Press the D-pad K or O to modify the setting for that option.
3. Once you’ve adjusted the settings to your preference, press B to
return to the Start Menu.
5
Finding Your Way
As Ryo Hazuki, it’s your mission to gather information so you can find
Yuanda Zhu, the man who sent the letter to your father that warned of
danger, and learn the mystery behind the Phoenix Mirror.
The Main Screen
Once you start a game, the Main Screen appears. It has four features,
shown below, that you can use to explore the world of Shenmue II.
Action Selector
Watch/Direction Ring
Time in Shenmue II
In the world of Shenmue II, time passes just as it does in the real world.
The people who live in this world go about their lives in real time. Ryo
is no exception. As the day begins, he awakes to new challenges in his
quest. When his day ends, he needs to rest. As a result, Ryo returns to
the guest house to sleep at 11:00 P.M., so he can renew his quest in
the morning.
Remember, time passes even when you’re idle. You can take time to relax
and enjoy the scenery, but time is marching on at an accelerated pace.
The game starts on a winter’s day, and you’re expected to reach your goal
before the summer arrives again. Enjoy the world of Shenmue II!
Moving Through the Game
You can move through the game in three modes: Free Quest, Free Battle,
and Quick Timer Event (QTE). In addition to these three game modes,
you can take a break from Ryo’s main quest to play mini-games, where
you can try out shorter side adventures.
Free Quest – Move freely and search at will. Ask questions of the
people you meet, gather information, search for clues, and advance
through the game.
Free Battle – When you’re caught in battle, use simple combinations
of button and trigger commands to help Ryo execute the martial arts
moves necessary to defeat his enemies.
Quick Timer Events (QTEs) – In a QTE, you have a time limit in
which you must finish your tasks. You are prompted for the task.To
successfully clear the QTE mode, press the controller buttons that correspond to the icons that appear on the game display. Be sure to do this
within the specified time limit.
Mini-Games – Mini-games give you a taste of other adventures and
quests and may show you what you’re capable of!
Choose a mini-game for more experiences in the world of Shenmue II.
Navigation Map
Icon Selector
Action Selector – Appears in the upper-left corner of the screen.
Use the D-pad q, m, k, or o to select an action.
Navigation Map – Appears in the lower-left corner of the screen.
Displays Ryo’s position if he possesses the map of that particular area.
Icon Selector – Appears in the lower-right corner of the screen. The
icons within the Icon Selector represent the actions that Ryo can take.
Watch/Direction Ring – Appears in the upper-right corner of the screen.
The Watch displays the current time. The Direction Ring (the ring
around the watch containing the letters N, E, W, and S) indicates the
direction that Ryo is facing and rotates whenever he changes direction.
Note: The four items described above appear when necessary. They may be
hidden when you don’t need them.
6
7
Basic Controls
Icon Selector
Zoom (Left trigger)
Run (Right trigger)
Notebook/Action
System Menu/
Money Conversation
Look (Left
thumbstick)
Cancel/
Navigation Mark
Help
Conversation
Walk (D-pad)
Note: The button layout on your controller may differ slightly from the one
shown here. Gameplay is exactly the same.
Movement
Press q on the D-pad to move Ryo forward, k or o to move left or
right, and m to turn around.
To make Ryo run in the direction he is facing, press and hold the Right
trigger. To change direction without moving, press and hold b while
pressing the D-pad in the direction you want to face. You can inspect
your immediate surroundings or slightly adjust the direction Ryo
is facing.
If you want to use the Left or Right thumbstick to move Ryo, change
settings through either the Options Menu or the System Menu.
Help
You can pause the game at any time to get Help. Time pauses when the
game pauses, so it’ll be the same time when you resume playing.
To pause the game and get Help
• Press g.
Help provides a simple explanation relating to your current game mode
or location and an explanation of the game controls you can use in the
current situation.
Depending on the situation, you’ll see various icons (instead of a, b,
c, and d) in the lower-right corner of the Main Screen. Press the
button that corresponds to the icon, and Ryo will perform that action.
These icons include the following:
Conversation – Initiates or continues a conversation
with others.
Action – Kicks, punches, and grabs.
Door – Knocks on or opens a door.
System Menu – Displays the System Menu.
Money Conversation – Prompts Ryo to ask about anything
related to money, such as looking for a part-time job or selling
items at pawn shops.
Navigation Mark – Displays the Navigation Mark. For more
information about marking the map, see page 14.
Cancellation – Cancels the current action.
Notebook – Records important things that Ryo hears or experiences in a notebook. This information is useful when you’ve
forgotten something or need clues on how to proceed. For more
information about the Notebook, see page 15.
Conversation
You can approach other characters in the game and initiate conversation
when the Conversation icon appears in the Icon Selector. You can only
continue conversations while the Conversation icon is rotating.
To modify the Dialog/Text mode settings
• Select Settings from the System Menu.
Ryo is not the only character who can initiate conversations in Shenmue
II. Sometimes other characters may approach Ryo and start talking. Ryo
can respond to another character’s questions, but the correct answer
depends on Ryo’s needs in that situation. So, be careful!
To hide the Help screen and resume playing the game
• Press g again.
8
9
Money Conversation
As the game progresses,
there will be times when
Ryo needs money. In
these cases, the Money
Conversation icon
appears in the Icon Selector. Conversations started
through the Money
Conversation icon will
(naturally) be related to
money. When you select
the Money Conversation
icon, the Action Selector
appears with the options Pawnshop, Gambling, Part-time Job, and Quit.
Use the D-pad to select what you want to ask for.
Action Selector
The Action Selector appears in the upper-left corner of the screen and
displays actions that apply to a given situation. For example, if Ryo
approaches someone he can talk to about money, the Icon Selector
displays the Money Conversation icon. Selecting that icon causes the
Action Selector to appear with four available actions: Pawnshop,
Gambling, Part-time Job, and Quit. Use the D-pad to select the
appropriate action.
Be aware that you only have a specific amount of time to select an
action. If you fail to make a selection within the time allotted, the game
proceeds as if you didn’t choose an action.
If you are waiting for someone or are waiting to see what will happen in
a situation, the Action Selector displays the Wait and/or Quit icons. If,
for example, you selected Wait, the time continues to pass.
Taking Snapshots of the Action
When you see a camera
icon on the screen, you
can take a snapshot of
the action. Snapshots
help you remember
clues in the quest or
simply allow you to
enjoy scenes from
the quest.
To take a snapshot
1. Press i (Black
button) to take a
snapshot.
2. Press j (White
button) to change filters.
You’ll see an “O” in the camera icon with each successful picture. If the
picture fails for some reason, you’ll see an “X” in the camera icon.
To view your snapshots
• Select Snap-shots from the System Menu.
- or • Select Shots-viewer from the Start Menu.
To change pages in the Snapshot Viewer
• Press the Left or Right trigger.
To delete a snapshot (available in the Shots-viewer)
• Press d.
To sort snapshots (available in the Shots-viewer)
• Press c.
You can sort the snapshots by the date or place:
• Newer – Sorts by newest date first.
• Older – Sorts by oldest date first.
• Place – Sorts alphabetically by place name.
Note: You can store a total of 126 snapshots in your Snapshots file.
10
11
Searching for Objects
You can help Ryo in his quest by searching for various objects, such as
a billboard, a map, or a notice board found in a town, as well as items
placed in a room.
If you press and hold the Left trigger, the camera view shifts to a firstperson perspective, as if you were seeing the world from Ryo’s eyes.
While in the first-person perspective, you can zoom in on various
objects. Use the thumbsticks or the D-pad to adjust the camera angle
as needed.
Note: You can adjust the behavior of the Left thumbstick through Settings
on the System Menu.
Option
Examine
Enables Ryo to examine an object. Use the Left or
Right thumbstick to adjust the viewing angle and
perspective as needed, or press the Left trigger
to zoom.
Open
Opens doors, drawers, boxes, and so on. When
there are objects inside, use the Left or Right thumbstick to adjust the viewing angle and perspective as
needed, or press the Left trigger to zoom.
Pick Up
Allows Ryo to grab or pick up any objects that can
be picked up. Use the D-Pad to adjust the viewing
angle and perspective as needed, or press the Left
trigger to zoom.
Take
Prompts Ryo to keep objects that are available to
be kept.
Characters
Enables Ryo to lock onto a person who is moving.
The camera automatically follows that character.
If the Conversation icon is displayed in the Icon
Selector, you can also speak with that person.
Zooming
To examine objects
close up, press the
Left trigger. The camera
view changes to a firstperson perspective.
Locking onto
Objects and
Characters
When you approach
and zoom on an object,
the camera will at times
automatically zoom in and “lock-on” to that object.
To cancel the lock-on and return to normal view
• Press B.
During lock-on you can still move to the nearest lock-on objects by
using the D-pad.
Action
Note: You can adjust the Left trigger settings through Settings on the
System Menu.
Following Other Characters
Some characters in Shenmue II will be nice enough to lead Ryo to
a particular destination when he requests it of them. Ryo will
automatically follow the person to the destination.
To stop following the person
• Press B.
To zoom without locking onto an object
• Press and hold B while you zoom (Left thumbstick).
12
13
Navigating
You can find your way
by using the Navigation
Map, which appears on
the lower-left corner
of the screen. The map
rotates when Ryo changes
direction, and a red dot
on the map indicates his
present location.
Navigation Marks
You can mark the map
with a navigation mark.
This feature is useful
when you want to note an important spot for future reference.
To display the navigation mark mode
1. Press b to select the Navigation Mark icon when it appears in the
Icon Selector.
2. Press either A, C, or D to place a colorcoded navigation mark on
the map where Ryo is currently positioned.
To delete navigation marks
• Press A + C + D simultaneously when you
want to delete any of
the navigation marks that you’ve plotted on
the map.
Map Stands
You can buy maps at map stands, which are
located on city streets.
Using the System Menu
The System Menu enables you to access various items in Ryo’s backpack
(tokens, money, notebooks, letters, maps, etc.), as well as to change the
settings of the game and to save your progress. Each of the System Menu
options are described on the following pages.
To display the System Menu
• Press D to select the System Menu icon from the Icon Selector.
To display the name of an icon on the System Menu
• Use the D-pad to place the cursor over the icon.
14
To select an item or system icon
• Use the D-pad to place the cursor over the icon, and then press A.
To examine an item in the System Menu
1. Select the item in the System Menu.
2. Use the D-pad to turn the item over; use the Right and Left triggers
to zoom in and out on the item.
3. Press b to return to the System Menu.
To close the System Menu
• Press b.
Overall Map
The Overall Map is a map of the area where Ryo is currently
positioned. This map will only display the areas for which you
have navigation maps, so be sure to collect a map of each area to
complete the Overall Map.
The red dot on the map indicates Ryo’s current location.
To zoom in and out on the Overall Map
• Use the Right and Left triggers.
To rotate the map
• Use the D-pad.
Notebook
Ryo’s notebook contains notes of his daily business, important information, and other things he has heard or experienced.
To open the notebook
• Select the Notebook icon in the Icon Selector or go to the
System Menu.
To turn to the previous or next page in the notebook
• Press the D-pad k or o.
To show the last page in the notebook
• Press the D-pad q.
To show the first page of the notebook
• Press the D-pad m.
To close the notebook
• Press b.
Token(s)
• Select this icon to display the number of slot machine coins
Ryo has in his possession.
15
Save
Select to save the current game.
To save a game
1. Select a file to save the game to.
2. Press a.
When you save the game, you can resume that game by selecting
Continue on the Start Menu.
Options
Select to modify the game settings. For details on the controls
required and the features available, select Options on the
Start Menu.
Moves Scroll
This scroll contains details of all of the martial art moves Ryo has
mastered. Select this icon to review the moves, their commands,
and Ryo’s current proficiency level. You can also select the move to
apply it in battle. For more information, see page 22.
Select this icon to display the move handbooks that Ryo has
acquired. You cannot master the moves just by acquiring them. To
master the moves, press A to see the move handbook. You can acquire
the move handbook from someone or purchase it at a store.
Ryo’s Money
Ryo’s money always appears on the System Menu, so you can
check there to see how much money he has. To earn some money,
Ryo can either sell his items at a pawnshop, gamble and win, or get a
part-time job. Whenever Ryo receives money or pays for something, the
money icon and current amount appear on screen.
Note: Money in Ryo’s possession is displayed in Hong Kong dollars. You can
look up the currency exchange rate in Ryo’s notebook.
When Ryo has money, he is able to purchase items at stores. However,
keep in mind that money is required for important events throughout
the game, so don’t spend it frivolously.
Collection
Sleeping
Snap-shots
To allow Ryo to go to sleep
• Find a lodging place, and then select Sleep from the Action Selector.
The choice to Sleep appears when it’s after 8:00 P.M. After 11:00 P.M.
Ryo will jump to the lodging place automatically and go to sleep. When
Ryo returns to a lodging place after 8:00 P.M., the following actions will
display automatically in the Actions Selector:
Select this icon to display Ryo’s collection of prizes from Capsule
Toy Machines and elsewhere. Use the Left and Right triggers to
toggle between windows if the collection items are displayed over
several pages. Select an item and press A to examine it up-close. You
can rotate each item with the D-pad and zoom in and out with the
Left and Right triggers.
Select this icon to display the pictures Ryo has taken. If there is
more than one page of snapshots, use the Left and Right triggers
to switch between pages.
Maps
Select this icon to display the maps Ryo has collected. Each area
has one or more maps. Use the D-pad to select an area, press A,
and then select the specific map you want to see and press A
again.
Pawnshop Fliers
Select this icon to display the pawnshop fliers (Sales Prices List)
that Ryo has picked up. A flier is distributed at each pawnshop.
Select the flier of the shop you would like to see and press A.
16
Move Handbook
When the day comes to an end, Ryo needs to sleep.
Option
Action
Sleep
Allows Ryo to sleep and replenish his energy.
Save
Saves the current game to a game file. Select the file to
save the game to and press A.
Options
Enables you to check or modify the game settings.
Refer to Options (see page 5) on the Start Menu
for details on the controls required and the features
available.
Cancel
Closes the available options. After 11:00 P.M., this
action will not be displayed as one of the options.
17
To choose Sleep actions
• Use the D-pad to select an action, and then press A.
Returning to a previous night’s place
When you leave a lodging place in the morning, the Action Selector will
appear for a time with the following options: Area Name, From Yesterday, or From Here. When you select Area Name, Ryo jump-starts from
that particular area. Selecting From Yesterday will jump-start Ryo to his
previous position.
Saving a Game
You can save your game from either the System Menu or by selecting
Save at a lodging place.
To save a game
1. Use the D-pad to navigate to the file you want to save.
2. Press A to select the file.
3. If you’ve already saved the game in the file, you will be asked if you
want to overwrite the file. Choose either Yes or No.
After saving a game, resume play by selecting Continue on the
Start Menu.
Quick Timer Events (QTEs)
As you progress through the Shenmue II story, Ryo will encounter events
that will require you to think and react quickly. These events are known
as quick timer events (QTEs) and you execute them using simple onebutton commands.
When a QTE occurs, various controller command icons (q, m, k, o,
a, b, c, and d) appear in turn at the center of the game display. While
the icon is being displayed, press the corresponding controller button as
quickly as possible before the icon disappears.
Fighting
As the storyline in Shenmue II develops, there are situations in which
Ryo must fight. These battles are not limited to simple one-on-one
encounters. On some occasions, Ryo must take on multiple opponents.
During battle, a strength gauge appears in the lower-left corner of the
screen. Once Ryo and his opponent(s) assume a fighting pose, the Free
Battle commences.
Use the many martial arts moves in Ryo’s repertoire to attack and defend:
slap your opponent down when they’re off guard, take advantage of your
opponent’s power, flow when attacked and turn it back on them. Be on
guard and you’ll triumph.
Run (Right trigger)
Run (Left trigger)
Punch (Hand Move)
Guard
Move (Left
thumbstick)
Throw (Hand Move)
Help
Kick (Leg Move)
Walk (D-pad)
Note: The button layout on your controller may differ slightly from the one
shown here. Gameplay is exactly the same.
Command QTE
When it’s time for a Command QTE, D-pad and a, b, c and d
icons appear on the game display.
These icons blink in a specific order, so make sure to press the correct
button sequence in time. For example, if the q, a icons appear, press
q, a before the icons disappear.
18
19
Fighting Moves
You can make Ryo perform various fighting moves by pressing different
combinations of the D-pad (q,m,k, and o) and buttons (a, b,
c, and d). You can check the Moves Scroll on the System Menu to
see what moves Ryo can use in a given situation.
The following tables list the martial art moves Ryo has previously mastered. These moves are available at the start of the game. Use these commands in situations where Ryo is facing to the right and his opponent is
positioned on the left. If Ryo is facing left and the opponent is positioned on the right, you must reverse the D-pad commands listed below.
Note: In the following table, you’ll see that there are sometimes two fighting
moves mapped to the same button sequence. You can specifiy which fighting
move you want to use. For instructions on how to do this, see “Selecting a
Move” on page 22.
Overthrow
b
Sweep Throw
ob
Vortex Throw
kb
Mist Reaper
oob
Demon Drop
kkb
Shoulder Buster
okb
Tengu Drop
kob
Rear Throws (Use when Ryo is behind his opponent)
Back Twist Drop
B
Side Throws (Use when opponent is attacking Ryo)
Hand Moves
Darkside Hazuki
B
Swallow Flip
kca
Tiger Knuckle
c
Elbow Slam or Rain Thrust
oc
Twist Knuckle or Upper Knuckle
kc
Big Wheel
c+a
Elbow Assault
ooc
Twin Hand Waves
oc + a
Katana Mist Slash or Twin Blades
okc
Backfist Willow
kc + a
Pit Blow or Sleeve Strike
koc
Avalanche Lance
ooc + a
Brutal Tiger
okc + a
Dark Moon
koc + a
Leg Moves
20
Front Throws (Use when opponent is in front of Ryo)
Power Moves
Crescent Kick or Trample Kick
a
Hold Against Leg
oa
Side Reaper Kick or Swallow Dive
ka
Mistral Flash
c
Tornado Kick
ooaa
Cyclone Kick
a
Thunder Kick or Surplice Slash
oka
Windmill
c+a
Hook Kick or Against Cascade
koa
Running Moves (Use when Ryo is running)
21
Victory and Defeat
You’ll know when Ryo has won his fight because he’ll be the only one
left standing. However, Ryo will lose if the Strength Gauge (lower-left
corner) reaches zero and Ryo’s opponent knocks him down.
Failing to execute the QTE that occurs during a fight may count as
your loss.
Moves Scroll
The fighting moves that Ryo has mastered are listed in the Moves Scroll
on the System Menu. You can verify the name, commands, and proficiency level for each move and select different moves to apply in battle.
As Ryo masters new moves, those moves are added to this scroll.
To select and view a particular move
• Use qand mon the D-pad.
When you choose a move, a description of the move appears. Also, an
image of Ryo appears on the left side of the screen. Use the Left or Right
thumbstick to view Ryo from different angles.
Selecting a Move
When an “A” appears on the left side of the move name, it indicates that
there is more than one move for that command.
To view the multiple moves for that command
• Press a.
To select the move you would like to use for this command
during battle
• Press the D-pad.
Move Ability
Each move has unique characteristics and effects, which are based on the
attributes listed in the following table. These attributes are displayed in
the Moves Scroll for each move.
Attribute
Affect
Bar Meaning
Power
Affects attacking
A longer bar means more power
and therefore more damage
dealt to the opponent.
Speed
Affects agility
A longer bar means greater
quickness.
Rigid
Affects vulnerability
A shorter bar means less
vulnerability.
Proficiency Level
Want to get faster, stronger, and stay alive in a fight? Use a move during
battle, and your proficiency level increases.
When you use moves with a higher proficiency level, your opponent’s
strength gauge does not recover as quickly.
Critical Move
Moves with the Critical Move icon to the right of their commands
have critical move attributes associated with them. These types of
moves allow you to unconditionally knock out weaker enemies with
one blow.
Learning New Moves
As the game progresses, Ryo has the opportunity to learn new moves
from various characters. These characters will provide you with precise
instructions, so simply follow what they say and press the correct commands accordingly.
Once Ryo is able to execute a move at will, it will be considered an
acquired move. Moves that you master are added to the Moves Scroll.
22
23
Mini-Games
You can play a variety of mini-games in Shenmue II. If you want to take
a break from the quest for a while and try some other skills, play a minigame. You can choose a mini-game from the Shenmue Collection on the
Start Menu.
If you forget how to play a particular game, press g to display the
Help Menu for the game controls.
To start a mini-game
1. Use k or o on the D-pad to select the mini-game category.
2. Press q or m to select the mini-game that is registered in
the list.
3. Press A to start the mini-game that you have selected.
Shenmue II saves each mini-game you have played in the main game to
the game file and adds it to your Shenmue Collection, allowing you to
access more mini-games. Titles that appear as “???” are mini-games that
you have yet to experience in the main game of Shenmue II.
Note: Changes to Ryo’s scores or money in mini-games will not affect these
settings in the main game.
To return to the Start Menu
• Press b.
OUTRUN
Use the Left thumbstick to steer the car and race it past each checkpoint
within the allotted time. Use the Left trigger to brake and the Right
trigger to accelerate. Press c to shift to high gear and a to shift to low
gear. To select the music during the title screen, use the Left or Right
thumbstick.
AFTERBURNER II
Use the Left or Right trigger to move against and destroy the enemy
without getting shot down. Press the Left thumbstick for throttle, the
Right trigger for Vulcan attacks, and the a for missiles.
ARM WRESTLING
Compete against the best in an arm wrestling contest. When the match
begins, press a as rapidly as you can. Sometimes, there will be a sudden
outbreak of QTE during the match, so be on your guard!
HANG ON
Use the Left thumbstick to steer, the Left trigger to brake, and the Right
trigger to accelerate. Ride the motorcycle past each checkpoint within
the allotted time.
Afterburner II
SPACE HARRIER
Use the Left and Right thumbsticks to maneuver and evade enemy fire
and obstacles. Press a, b, c, or d to attack and destroy enemies.
DARTS
Throw darts to earn the highest total score. Press a to throw the dart at
the right moment. You can also compete with another player.
24
Arm Wrestling
25
The Characters of Shenmue II
Ryo Hazuki
Ryo is a strong, noble young man who lost his
mother during his infancy. Raised by his strict but
loving father, Ryo devoted himself to the practice of
kung fu under his father’s guidance. Although very
reckless and hot-tempered, Ryo possesses a strong
will. Determined to solve the mystery of his father’s
death, Ryo leaves for Hong Kong in search of the
killer. What awaits him there?
Shenhua Ling
Shenhua, a beautiful and wise young woman, grew
up in a mountain village in China, surrounded
by Mother Nature. Her village has existed since
the Tang Dynasty, and the people who live there
have passed down many ancient teachings over the
generations. Shenhua herself possesses a mystical
knowledge of nature, and while courageous and
strong, she is also kind and trusts the goodness in
others. Her destiny will change forever when she
encounters Ryo.
Wuying Ren
Ren is the leader of the Heavens, a street gang whose
territory is the Beverly Hills Wharf in Hong Kong.
Ren is extremely charismatic and leads his gang
through both word and deed. Quick-witted and
good at gambling, Ren doesn’t trust others and is
obsessed with money.
Lan Di
Lan Di, the leader of the Chiyoumen and the
man who killed Ryo’s father, practices a mysterious
martial art that was rumored to have been lost long
ago. His cruel, piercing eyes unnerve his enemies,
who soon lose their fighting spirit. Those who
do fight back are brutally defeated by Lan Di’s
devastating fist.
26
Joy
Joy is a street-wise urban girl who loves to ride sleek
motorcycles. Spirited, outspoken, and misunderstood by everyone because of her bluntness, Joy is
really gentle and honest to those closest to her.
Wong
Wong is a street urchin
who views Ren as a father
figure. Wong is good with
his hands and is particularly adept at picking locks.
He often joins Ren’s gang the Heavens in mischief
and petty crimes around the Beverly Hills Wharf
area, but he’s really a good boy at heart. Wong has
a strong sense of duty even though he’s still a young
boy, and he never forgets to return a favor.
Xiuying Hong
Xiuying is a young lady who is proud of the culture
and traditions of her Chinese heritage. As a result,
she is well versed in Taoism, history, and martial arts.
A very thoughtful person who always thinks ahead
before taking action, Xiuying does not speak much,
nor does she show much expression. She hides a
great deal of sorrow behind her beautiful eyes.
Fangmei Xun
Fangmei is a cheerful fourteen-year-old girl who
likes to help people. Because of this generosity,
she is loved by everyone. Fangmei was adopted as
small child by the temple people of Taoism, and
she now works at the temple to repay that kindness.
She is respectful of her elders, but will speak her
mind if she sees that something is unjust (although
she is neither arrogant nor spiteful). Fangmei likes
to keep herself busy by taking care of people, but
she sometimes goes overboard if someone special
catches her fancy.
27
Limited Warranty For Your Copy of Xbox Game
Software (“Game”) Acquired in the United States
or Canada
Warranty
Microsoft Corporation (“Microsoft”) warrants to you, the original purchaser of the Game,
that this Game will perform substantially as described in the accompanying manual for a
period of 90 days from the date of first purchase. If you discover a problem with the Game
covered by this warranty within the 90 day period, your retailer will repair or replace the
Game at its option, free of charge, according to the process identified below. This limited
warranty: (a) does not apply if the Game is used in a business or for a commercial purpose;
and (b) is void if any difficulties with the Game are related to accident, abuse, virus or
misapplication.
Returns within 90 day period
Warranty claims should be made to your retailer. Return the Game to your retailer along with
a copy of the original sales receipt and an explanation of the difficulty you are experiencing
with the Game. At its option, the retailer will either repair or replace the Game. Any replacement Game will be warranted for the remainder of the original warranty period or 30 days
from receipt, whichever is longer. If for any reason the Game cannot be repaired or replaced,
you will be entitled to receive your direct (but no other) damages incurred in reasonable
reliance but only up to the amount of the price you paid for the Game. The foregoing (repair,
replacement or limited damages) is your exclusive remedy.
Limitations
This limited warranty is in place of all other express or statutory warranties, conditions or
duties and no others of any nature are made or shall be binding on Microsoft, its retailers or suppliers. Any implied warranties applicable to this Game or the media in which it
is contained are limited to the 90 day period described above. TO THE FULL EXTENT
ALLOWED BY LAW, NEITHER MICROSOFT, ITS RETAILERS OR SUPPLIERS ARE
LIABLE FOR ANY SPECIAL, INCIDENTAL, PUNITIVE, INDIRECT OR CONSEQUENTIAL DAMAGES ARISING FROM THE POSSESSION, USE OR MALFUNCTION OF THIS GAME. THE FOREGOING APPLIES EVEN IF ANY REMEDY FAILS
OF ITS ESSENTIAL PURPOSE. Some states/jurisdictions do not allow limitations as to
how long an implied warranty lasts and/or exclusions or limitations of incidental or consequential damages so the above limitations and/or exclusions of liability may not apply to you.
This limited warranty gives you specific rights, and you may also have other rights that vary
from state/jurisdiction to state/jurisdiction.
For questions regarding this warranty contact your retailer or Microsoft at:
Xbox Product Registration
Microsoft Corporation
One Microsoft Way
Redmond, WA 98052-9953 USA
In the U.S. or Canada, call 1-800-4MY-XBOX. TTY users: 1-866-740-XBOX.
Get an Edge on the Game!
Xbox Game Tips (Automated): Available 7 days a week including holidays, 24 hours a day.
• In the U.S., call 1-900-933-TIPS. $.95 per minute.
• In Canada, call 1-900-561-HINT. $1.50 (Canadian) per minute.
Xbox Game Tips (Support Representative): Available 7 days a week including holidays.
• In the U.S., call 1-900-933-TIPS. $1.40 per minute.
• In Canada, call 1-900-561-HINT. $1.50 (Canadian) per minute.
Important: Individuals under 18 years of age need a parent’s or guardian’s permission
to call a pay-per-call number. Local and long distance telephone toll charges may apply.
It is the customer’s responsibility to check with their telephone company to determine
if additional telephone charges will apply. Permission required from the telephone bill
payer. Prices subject to change without notice. May not be available in all areas. Requires
a touch-tone telephone. Call length is determined by user. Messages subject to change
without notice.
Games Technical Support: Available 7 days a week including holidays.
• In the U.S. or Canada, call 1-800-4MY-XBOX.
TTY users: 1-866-740-XBOX.
• In Mexico, call 001-866-745-83-12.
TTY users: 001-866-251-26-21.
Note: Xbox Game tips are not available from 1-800-4MY-XBOX. You must call Xbox Game
Tips (Automated) or Xbox Game Tips (Support Representative) for tips, hints, or codes.
For more information, visit us on the Web at www.xbox.com
Information in this document, including URL and other Internet Web site references, is subject to change
without notice. Unless otherwise noted, the example companies, organizations, products, people and events
depicted herein are fictitious and no association with any real company, organization, product, person or
event is intended or should be inferred. Complying with all applicable copyright laws is the responsibility of
the user. Without limiting the rights under copyright, no part of this document may be reproduced, stored
in or introduced into a retrieval system, or transmitted in any form or by any means (electronic, mechanical, photocopying, recording, or otherwise), or for any purpose, without the express written permission of
Microsoft Corporation.
Microsoft may have patents, patent applications, trademarks, copyrights, or other intellectual property rights
covering subject matter in this document. Except as expressly provided in any written license agreement
from Microsoft, the furnishing of this document does not give you any license to these patents, trademarks,
copyrights, or other intellectual property.
© & p 2002 Microsoft Corporation. All rights reserved.
Microsoft, Xbox, and the Xbox logos are either registered trademarks or trademarks of Microsoft Corporation
in the United States and/or other countries.
Manufactured under license from Dolby Laboratories.
Sega and Shenmue II are either registered trademarks or trademarks of Sega Corporation.