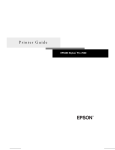
1
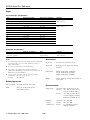
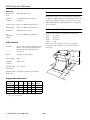
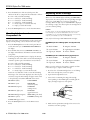
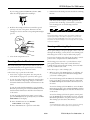
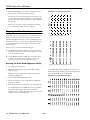
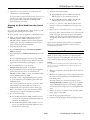
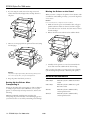
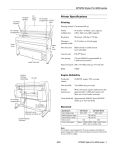
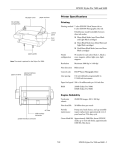
EPSON Stylus Pro 7000 series - roll paper cover Printer Specifications paper set lever ink cartridge compartment Printing Printing method On-demand ink jet control panel lower cover paper hammock Note: Nozzle configuration Black: 64 nozzles Color: 64 nozzles for each color: (cyan, magenta, yellow, light cyan, light magenta) Resolution Maximum 1440 dpi × 720 dpi Maximum printable width 23.76 inches on 24-inch paper Print direction Bidirectional or unidirectional (user-selectable) Control code ESC/P® Raster Line spacing 1/6 inch (default), programmable in 1/360-inch increments Paper feed speed 200 ± 10 milliseconds per 1/6-inch line The stand is optional. RAM 10MB Engine Reliability paper set lever optional interface shield plate Total print volume 20,000 A1 images, 30% coverage (or 5 years) Print head life Two billion dots per nozzle Periodic maintenance Waste ink system requires replacement after approximately 12,000 sheets under normal usage (parts and labor not covered under warranty) Cutter blade life Approximately 2000 A1 sheets (EPSON media up to 4.33 mil thick) AC inlet Electrical USB interface connector Specification Input voltage range 120V Model 90 to 132V Rated frequency range parallel interface connector Note: Power consumption The parallel and USB interfaces cannot be connected at the same time. 8/00 198 to 264V 50 to 60 Hz Input frequency range Rated current 220−240V Model 49 to 61 Hz 1.0A 0.5A Approx. 100W (ISO/IEC 10561 Letter Pattern) 15W or less in standby mode EPSON Stylus Pro 7000 series - 1 EPSON Stylus Pro 7000 series Paper Cut sheet paper specifications Size Dimensions in inches Dimensions in millimeters Thickness Super A1 24 × 36 610 × 914 US D 22 × 34 559 × 864 3.15 to 19.7 mil (0.08 to 0.5 mm) A1 23.4 × 33 594 × 841 B2 20.25 × 28.75 515 × 728 A2 16.5 × 23.4 420 × 594 Super A3/B* 13 × 19 329 × 483 US C 17 × 22 432 × 559 B3 14.3 × 20.25 364 × 515 US B (ledger)* 11 × 17 279 × 432 A3* 11.7 × 16.5 297 × 420 B4* 9.8 × 13.9 250 × 353 A4* 8.27 × 11.7 210 × 297 Letter* 8.5 × 11 216 × 279 B5* 6.9 × 9.8 176 × 250 3.15 to 59 mil (0.08 to 1.5 mm) *Supports auto-loading, short edge first Roll paper specifications With standard 2-inch spindle or optional 3-inch spindle Maximum roll diameter Width Thickness 5.90 in. (150 mm) 8.27 to 24 in. (210 to 610 mm) 3.15 to 19.7 mil (0.08 to 0.5 mm) Mechanical Notes: ❏ Poor quality paper may reduce print quality and cause paper jams and other problems. If you encounter problems, switch to a higher grade of paper. ❏ Do not use curled, folded, or deckle-edge paper. ❏ Depending on the media, best feed and print quality are guaranteed on EPSON paper with thicknesses of 3.15 to 4.33 mil (0.08 to 0.11 mm), 64 to 90 gsm. ❏ For best results, use paper under the following conditions: Temperature: 59 to 77 °F (15 to 25 °C) Humidity: 40 to 60% RH Paper feed Friction feed (roll and cut sheet) Paper path Roll paper or cut sheets with manual insertion Dimensions Width: 43.31 inches (1100 mm) Depth: 22.52 inches (572 mm) Height: 22.05 inches (560 mm) Weight 95.8 lb (43.5 kg) without ink cartridges or 18 lb stand Safety Approvals Safety standards UL 1950, CSA C22.2 No. 950 EMC Environmental FCC part 15 subpart B class B CSA C108.8 class B 2 - EPSON Stylus Pro 7000 series 8/00 Temperature Operation: 50 to 95 °F (10 to 35 °C) –4 to 104 °F (–20 to 40 °C) Storage: 1 month at 104 °F (40 °C) –4 to 140 °F (–20 to 60 °C), Transit stored in shipping container 120 hours at 140 °F (60 °C) Humidity (without condensation) Operation: 20 to 80% RH Storage: 20 to 85% RH Transit 5 to 85% RH (stored in shipping container) EPSON Stylus Pro 7000 series Ink Cartridges Print yield Interfaces Approximately 28 pages/A1 (720 dpi, 40% duty) Approximately 3,800 pages/A4 (360 dpi, 5% duty); print yield may vary, depending on how often you run cleaning cycles and how much you use the printer; yield of the initial cartridge set is reduced because of ink charging Parallel interface The built-in parallel interface supports compatibility and ECP modes. Compatibility mode Forward channel Cartridge life: Data format EPSON Stylus Pro 7000 ink 2 years from production date EPSON Stylus Pro 7500 ink Within 6 months after opening package, at 77 °F (25 °C) Synchronization STROBE pulse Temperature: Storage (uninstalled) –22 Storage (installed) –4 to 104 °F (–20 to 40 °C) 1 month at 104 °F (40 °C) Transit –22 Freezing Dimensions Weight Capacity 8-bit parallel, IEEE-1284 compatibility mode to 104 °F (–30 to 40 °C) 1 month at 104 °F (40 °C) to 140 °F (–30 to 60 °C) 1 month at 104 °F (40 °C) 120 hours at 140 °F (60 °C) Handshake timing BUSY Signal level TTL compatible Connector 57-30360 Amphenol connector or equivalent and ACKNLG signals Reverse channel 14 °F (–10 °C) ink thaws and is usable after at least 3 hours at 77 °F (25 °C) Width: 0.99 inches (25.1 mm) Depth: 5.6 inches (141.1 mm) Height: 4.15 inches (105.3 mm) Transmission mode IEEE-1284 Nibble mode Adaptable connector 57-30360 Amphenol connector or equivalent Synchronization Refer to the IEEE-1284 specification Approximately 0.44 lb (200 g) 3.7 oz (110 ml) 8/00 Handshaking Refer to the IEEE-1284 specification Signal level IEEE-1284 Level 1 device Data transmission timing Refer to the IEEE-1284 specification EPSON Stylus Pro 7000 series - 3 EPSON Stylus Pro 7000 series ECP mode Drivers Transmission mode IEEE-1284 ECP mode Adaptable connector 57-30360 Amphenol connector or equivalent Macintosh® System 8.5.1 or later, Windows® 95, Windows 98, Windows 2000, and Windows NT 4.0. Raster drivers are standard. For Adobe® PostScript ® support, use the optional EPSON RS-5100 Fiery® X2 Printing System or a third-party software solution. Synchronization Refer to the IEEE-1284 specification Handshaking Refer to the IEEE-1284 specification Signal level IEEE-1284 Level 1 device Data transmission timing Refer to the IEEE-1284 specification Delivery and Installation Package size for delivery (not including optional stand): width: 51.2 inches depth: 30.5 inches height: 27.8 inches weight 132 lb USB interface Standard Based on Universal Serial Bus Specifications Revision 1.0, Universal Serial Bus Device Class Definition for Printing Devices Version 1.0 Bit rate 12 Mbps (full speed device) Data encoding NRZI Adaptable connector USB Series B Recommended cable length 6 feet (2 meters) Make sure you allow adequate space for easy operation, maintenance, and ventilation, as shown in the following illustration: 47 in. 6 in. 10 in. 12 in. 34 in. Parallel interface Compatible (on Printer Setting menu) mode setting 10 in. 20 in. Supported Connections Connection Win 95 Win 98 Win NT Win 2000 Parallel X X X X USB Ethernet FireWire * X* X X X 48 in. Mac Standard/ optional standard X X standard X X otional X X optional Supported on pre-installed operating systems, not upgraded from earlier versions of Windows. 4 - EPSON Stylus Pro 7000 series 8/00 31 in. EPSON Stylus Pro 7000 series You can also use EPSON Photo Quality Ink Jet Paper, Photo Paper, and Photo Quality Glossy Film in the EPSON Stylus Pro 7000 printer. Consumables and Accessories Ink Cartridges EPSON Stylus Pro 7500 media Use these EPSON 110 ml ink cartridges before the expiration date on the package. EPSON Stylus Pro 7000 graphic arts (dye-based) ink Cartridge Part number Black ink cartridge T460011 Cyan ink cartridge T463011 Light cyan ink cartridge T465011 Magenta ink cartridge T462011 Light magenta ink cartridge T464011 Yellow ink cartridge T461011 EPSON Stylus Pro 7500 Archival (pigment) ink Paper type 24-inch roll Sheet sizes Doubleweight Matte Paper S041385 — Glossy Paper Photo Weight S041388 (22-inch roll) — Premium Semigloss Photo Paper — 13 × 19" S041327 Smooth Fine Art Paper S041431 24 × 30" S041434 Backlight Film for Archival Ink * — Synthetic Paper S041399 — Adhesive Synthetic Paper S041402 — Photo Glossy Paper SP91021 — Photo Semigloss Paper SP91022 — Adhesive Vinyl S041436 — Canvas * — Premium Luster Photo Paper * — Semimatte Paper Photo Weight * — 20.25 × 28.75" * Cartridge Part number Posterboard for Archival Ink — Black ink cartridge T480011 Textured Fine Art Paper S041447 24 × 30" S041450 Cyan ink cartridge T483011 Translight * — Light cyan ink cartridge T485011 Tyvek * — Magenta ink cartridge T482011 Scrim Vinyl * — Light magenta ink cartridge T484011 Yellow ink cartridge T481011 * Note: EPSON Paper and Other Media Both Smooth and Textured Fine Art Paper require the 3-inch high tension spindle (C811103). Both Synthetic Paper and Adhesive Synthetic Paper requre the 2-inch high tension spindle (C811093). EPSON Stylus Pro 7000 media Paper type 24-inch roll Sheet sizes Presentation Matte Paper S041295 — Glossy Paper Heavyweight S041291 — Semigloss Paper Heavyweight S041292 — Photo Glossy Paper SP91021 Photo Semigloss Paper Backlight Film Not available at time of publication. Check the EPSON web site (http://prographics.epson.com) for product code and availability. Some media may not be available in your area. Options Option Product Code — EPSON RS-5100 Fiery X2 Printing System EPSON Stylus Pro 7000 EPSON Stylus Pro 7500 C850122 C850152 SP91022 — Roll paper spindle—2 inch C811091 SP91023 — Roll paper spindle—3 inch C811101 C811093 Posterboard Semigloss — 20.25 × 28.75" S041237 High tension spindle—2 inch DuPont/EPSON Publication Proofing Paper S041320 13 × 19" (A3+) S041207, S041205 High tension spindle—3 inch C811103 Replacement cutter blade C815131 DuPont/EPSON Commercial Proofing Paper S041296 13 × 19" (A3+) S041160 Printer stand C844021 C823632A DuPont/EPSON Commercial Matte Proofing Paper S041319 EpsonNet Internal Print Server (multiprotocol 10/100 Base-TX Ethernet Card) Premium Luster Photo Paper * * 13 × 19" (A3+) S041201, S041203 — Not available at time of publication. Check the EPSON web site (http://prographics.epson.com) for product code and availability. Some media may not be available in your location. 8/00 EPSON FireWire® Interface Card C823722 Printer only service plan—1 year EPP70B1 Printer only service plan—2 years EPP70B2 Printer and EPSON RS-5100 service plan—1 year EPP70S1 Printer and EPSON RS-5100 service plan—2 years EPP70S2 EPSON Stylus Pro 7000 series - 5 EPSON Stylus Pro 7000 series Control Panel Lights and Messages Control Panel Normal printer operation Message/Light Explanation READY/ Operate light on Printer is ready to print. PRINTING/ Operate light Printer is receiving data. flashing INK DRY <number> MIN/ Pause light flashing Printer is paused to let ink dry. Wait for the number of minutes shown. INK CHARGING <number> %/Operate and Pause lights flashing Printer is charging the ink delivery system. Do not interrupt this process. TRANSPORT PREP <number> %/ Operate light Printer is draining the ink lines to prepare for transportation. flashing Control Panel Buttons and Functions RESET/ all lights flash briefly Printer is resetting. Press the Pause button to continue. Printer is warming up, initializing, or charging ink. Button Function PRESS PAUSE BUTTON/ Pause light on Power Turns the printer on and off. WAIT/ Pause light on or Cleaning Runs print head cleaning when pressed for 3 seconds. flashing Pause (Reset 3 Sec.) Stops printing temporarily. Press a second time to resume printing. PAUSE/ Pause light on Error conditions Clears print data in the printer memory if pressed and held for three seconds. Returns the printer to READY status, when pressed in SelecType mode. SelecType Causes the printer to enter SelecType mode when pressed in READY status. In SelecType mode, this button can be used to select a desired menu. Paper Source (Item) Selects the paper source: Roll Auto Cut, Roll Cutter Off, or Sheet. If you press this button during the ink drying process, you will need to press Enter to make your setting. In SelecType mode, this button can be used to select an item in a menu. Paper Feed ▲ (+) Feeds paper in reverse. In SelecType mode, a desired parameter can be selected for the item (forward order). Paper Feed ▼ (–) Feeds paper forward. In SelecType mode, a desired parameter can be selected for the item (reverse order). Cut/Eject (Enter) Printer is paused. To resume printing, press the Pause button. Ejects the cut sheet when the Sheet light is on. Feeds the roll paper before cutting it when the Roll Auto Cut light is on. Feeds the roll paper a small amount when the Roll Cutter Off light is on. Feeds the roll paper and then prints a page line below the document when the Roll Cutter Off light and Print Page Line option are on. Message/Light Explanation Response COVER OPEN/ Pause light on Lower cover is open. Close the lower cover. INK LOW/ Ink Out light(s) flashing Ink cartridge(s) are nearly empty (printing continues). Replace ink cartridge(s) indicated by Ink Out light(s). See page 8. INK OUT/ Ink Out light(s) on Ink cartridge(s) are empty (printing stops). Replace ink cartridge(s) indicated by Ink Out light(s). See page 8. LOAD PAPER/ Paper Out light on Paper set lever is down while loading paper. Pull the paper set lever up after you load the paper. LOAD ROLL PAPER LOAD SHEET PAPER/ Paper Out light on Paper source setting in print options is different from control panel. Make sure the right paper is loaded and the paper source setting is the same on the control panel and print options. MAINTENANCE REQ. <error number> A printer part will need to be replaced soon. Note the error number and contact EPSON. MAINTENANCE REQ. 0100 The waste ink system is almost full. Contact EPSON to schedule service. NO INK CARTRIDGE/ Ink Out light(s) on Ink cartridge(s) not installed. Install ink cartridges as indicated by the lights. See page 8. OPTION I/F ERROR Wrong interface card installed. Turn off the printer and remove the card. PAPER JAM/ Paper Out light Paper has jammed in the printer. Remove the jammed paper. Roll paper was not cut completely. Cut the paper manually, then remove the cut paper from the printer. Reload paper. Cut paper did not fall off. Remove the cut paper from the printer. Reload paper. flashing In SelecType mode, sets the selected parameter for an item as the default value. PAPER NOT CUT/ Paper Out light flashing 6 - EPSON Stylus Pro 7000 series 8/00 EPSON Stylus Pro 7000 series Message/Light Explanation Response PAPER NOT STRAIGHT/ Paper Out light Paper slipped and fed into the printer at an angle. Reload paper, making sure the edges are straight and aligned with both rows of holes. flashing PAPER OUT/ Paper Out light No paper is loaded. Load paper. Paper ran out. Remove any printouts or paper remaining in the printer and load more paper. If the message appears during a print job, reset the printer by pressing the Pause button for 3 seconds. Then load paper and resend the job. on RELOAD PAPER/ Paper Out light on Paper could not be reversed into the printing position. Remove the paper. Reload it so that the right and bottom edges are straight and aligned with both rows of holes. Image is too wide for the paper loaded in the printer. Resize your image or load wider paper. Paper is not fully ejected. Cut the paper at the paper insertion slot, then reload paper. PAPER NOT CUT error Reload paper. SelecType Menu Map The following illustration shows the SelecType™ menus, along with the settings available for each one. PRINTER SETTING MENU: PLATEN GAP PAGE LINE INTERFACE PARA. I/F CODE PAGE PAPER CHECK ROLLSIZE MARG PAPER INIT.ALIGN PANELCHK ROLL MARG INIT. PANEL HEAD ALIGNMENT MENU: PAPER THICK. ADJUST. PATT. #1 #2 #3 #4 #5 #6 #7 #8 #9 #10 #11 #12 CUT. REPLACE OPEN LOWER COVER REPLACE CUTTER CLOSE LOWER COVER PAPER CONFIG. MENU: PAPER NUMBER THICK. PAT. PAPER THICK. NO. SUCTION DRYING TIME Paper set lever was released. Pull the paper set lever all the way up. Restart print job for best results. Printing a Status Check An error has occurred. Note the error number, and turn the printer off and then on. If the message remains, contact EPSON. The status check shows the current default settings, amount of ink remaining in each cartridge, page count, and the status of various printer parts. All lights flashing The waste ink system is full. Contact EPSON for service. TURN PWR OFF AND ON This message appears after you clear a paper jam. Turn the printer off and then on again. UNABLE TO PRINT You tried to print a test pattern while an error condition was present. After 3 seconds, the message disappears. Press the Pause button to exit SelecType mode. If the message appears again, clear the error before you print. SERVICE REQ. 00000100/ CUTTER REPLACE MENU: Push the paper set lever down to remove the paper. Print head cleaning automatically starts. After cleaning, reload paper. light on SERVICE REQ. <error number>/ VERSION INK LEFT-K INK LEFT-C INK LEFT-M INK LEFT-LC INK LEFT-LM INK LEFT-Y CUTTER LIFE TOTAL PRINTS WASTE INK CR MOTOR PF MOTOR HEAD UNIT CLEANER Paper is too thick for print head cleaning. on SECURE PAPER LEVER/Paper Out NOZZLE CHECK STATUS CHECK PRINTER STATUS MENU: READY was cleared. REMOVE PAPER/ Paper Out light TEST PRINT MENU: Follow these steps to print the status check: 1. Load a sheet of paper in the printer. (You can print test pages on roll paper, but you will use more paper.) All lights flashing 2. Press the SelecType button on the control panel. Press it repeatedly until you see TEST PRINT MENU on the display. 3. Press the Item button until you see STATUS CHECK=PRINT on the display. 8/00 EPSON Stylus Pro 7000 series - 7 EPSON Stylus Pro 7000 series 4. Press the Enter button. The status check prints. The amount of ink left or component life is indicated as follows: Replacing an Ink Cartridge E*****F = full (or full life remaining) E**** F = 3/4 full (or 3/4 life remaining) E*** F = 1/2 full (or 1/2 life remaining) E** F = 1/4 full (or 1/4 life remaining) E* F = nearly empty (or sevice life near end) E F = empty (or service life ended) When one of the Ink Out lights is flashing (and INK LOW is displayed on the control panel), the corresponding cartridge is almost out of ink. Make sure you have a replacement cartridge. When the light stays on and INK OUT is displayed, the cartridge is empty. You must replace the cartridge before you can continue printing. 5. Press the SelecType button to exit the Test Print menu. Caution: For best results, use genuine EPSON cartridges and do not refill them. Damage to your printer attributable to the use of other consumables is not covered by EPSON’s warranty. Color accuracy may vary considerably if you use non-EPSON inks. Checking Ink Levels and Component Life Use only the following 110 ml EPSON ink cartridges: You can view printer status information on the control panel display without printing a status check. Follow these steps: EPSON Stylus Pro 7000 graphic arts (dye-based) ink 1. Press the SelecType button on the control panel. Press it several times until you see PRINTER STATUS MENU on the display. ❏ Black: T460011 ❏ Cyan: T463011 ❏ Light Cyan: T465011 2. Press the Item button. You see VERSION <number> on the display. This indicates the firmware version installed in your printer. EPSON Stylus Pro 7500 Archival (pigment) ink 3. Continue pressing the Item button to display the amount remaining for each of the 6 inks or service life remaining for a number of printer parts. The indicators read as follows: ❏ Black: T480011 ❏ Cyan: T483011 ❏ Light Cyan: T485011 E*****F = full (or full life remaining) E**** F = 3/4 full (or 3/4 life remaining) E*** F = 1/2 full (or 1/2 life remaining) E** F = 1/4 full (or 1/4 life remaining) E* F = nearly empty (or service life near end) <nn>% F = less than 10% of ink or service life remaining INK LEFT-K (black) TOTAL PRINTS WASTE INK ❏ Magenta: T482011 ❏ Light Magenta: T484011 ❏ Yellow: T481011 Before you start, make sure the printer is turned on. Then follow these steps to replace an ink cartridge: 1. Note the color of the Ink Out light that is on or flashing. This is the cartridge that you need to replace. Following is a list of the items displayed. Note that all parts on the list (except the ink cartridges and paper cutter) need to be replaced by an authorized EPSON service center. INK LEFT-C (cyan) ❏ Magenta: T462011 ❏ Light Magenta: T464011 ❏ Yellow: T461011 2. Open the ink compartment cover. 3. Locate the slot containing the empty ink cartridge (corresponding to the Ink Out light). Carefully pull the empty cartridge straight out of the printer. (waste ink system) INK LEFT-M (magenta) CR MOTOR INK LEFT-LC (light cyan) PF MOTOR INK LEFT-LM (light magenta) (paper feed motor) HEAD UNIT (print head) CLEANER (cleaning unit) (carriage motor) INK LEFT-Y (yellow) CUTTER LIFE (paper cutter) 4. Press the SelecType button to exit the Printer Status menu. 8 - EPSON Stylus Pro 7000 series 4. Make sure the replacement cartridge is the correct color, and remove it from its package. 8/00 EPSON Stylus Pro 7000 series If you’re using pigment ink (EPSON Stylus Pro 7500), shake the cartridge gently before installing it. 3. Examine the nozzle check pattern. It should look something like this: Each line should be complete, with no gaps in the dot pattern. If dots are missing, as shown below, you need to run a cleaning cycle. See the following section for instructions. 5. Hold the ink cartridge with the arrow mark face up and pointing to the rear of the printer. Then insert the ink cartridge into the slot until the corresponding Ink Out light goes off. Note: The Ink Pad number under the nozzle check pattern indicates the remaining percentage of the waste ink system. You will need to contact your authorized EPSON servicer when this number is low. The printer will stop and display an error message when the system needs to be replaced. Running a Cleaning Cycle If your printed image is unexpectedly light or faint or dots are missing from the image, you may need to run a cleaning cycle. This unclogs the nozzles so they can deliver ink properly. 6. Close the ink compartment cover. You can run a cleaning cycle either from the printer’s control panel or from a computer with the EPSON utilities. The cleaning process uses ink, so you should run it only if print quality declines. Always run a nozzle check first to confirm that the print head needs cleaning; the nozzle check uses only a small amount of ink. Running a Nozzle Check The nozzle check prints a pattern of dots that lets you see if any print head nozzles are clogged. If any dots are missing, you can run a cleaning cycle to clear the nozzles. Follow these steps to run a cleaning cycle: 1. Load a sheet of paper in the printer. (You can print the nozzle check on roll paper, but you will use more paper.) 1. Make sure none of the Ink Out lights is on or flashing. (If so, you need to replace the indicated ink cartridge before you can run a cleaning cycle.) 2. To run the nozzle check from a Macintosh, click the utility button on the Print or Page Setup dialog box. Then click the Nozzle Check button and follow the instructions on the screen. 2. To run the cleaning cycle from a Macintosh, click the utility button on the Print or Page Setup dialog box. Then click the Head Cleaning button and follow the instructions on the screen. To run the nozzle check from Windows, access the Main Printer Properties dialog box and click the Utility tab. Then click the Nozzle Check button and follow the instructions on the screen. To run the cleaning cycle from Windows, access the Main Printer Properties dialog box and click the Utility tab. Then click the Head Cleaning button and follow the instructions on the screen. To run the nozzle check from the printer’s control panel, press the SelecType button repeatedly until you see TEST PRINT MENU on the display. To run the cleaning cycle from the printer’s control panel, press the Cleaning button and hold it for at least 3 seconds. The Pause light flashes as the printer cleans its print head. The cleaning cycle takes about three minutes. Follow these steps to print the nozzle check: ❏ Press the Item button. You see NOZZLE CHECK=PRINT on the display. Caution: To avoid damaging the printer, don’t turn it off until the cleaning cycle is finished and the Pause light has stopped flashing. ❏ Press the Enter button to print the nozzle check. 8/00 EPSON Stylus Pro 7000 series - 9 EPSON Stylus Pro 7000 series 3. When the Pause light goes off, print a document or run a nozzle check to confirm that the head is clean. EPSON Stylus Pro 7000 Alignment Patterns 1 You may need to run the cleaning cycle several times to get a clean nozzle check pattern. If the lines on the pattern still appear broken after several cleaning cycles, contact EPSON for assistance. 2 3 Always run a test print or nozzle check between cleaning cycles. Otherwise, cleaning will not be effective. 4 5 6 Aligning the Print Head 7 If banding appears on your printouts, or vertical lines are not straight, you need to align the print head. You can use the Print Head Alignment utility if you have the EPSON printer driver installed. If not, you can align the print head using the control panel. Both procedures align the head for all modes and resolutions. patterns #1–5, #7, and #9–12 For best results, use 24-inch EPSON roll paper. ❏ On the EPSON Stylus Pro 7000, the process takes about 15 minutes to print 12 patterns of 7 rows. Each row extends across the width of the page. ❏ On the EPSON Stylus Pro 7500, the process takes about 7 minutes to print 6 patterns of 15 lines or boxes. The patterns are repeated across the width of the page. Running the Print Head Alignment Utility patterns #6 and #8, which print in color 1. Load roll paper in the printer. 2. Macintosh: click the utility button in the Print or Page Setup dialog box. For the EPSON Stylus Pro 7500, choose the line or box number that has the smallest gaps. In the example below, line 8 has the smallest gaps in each pattern. Windows: access the Main Printer Properties dialog box and click the Utility tab. EPSON Stylus Pro 7500 Alignment Patterns 3. Click the Print Head Alignment button. 4. Follow the messages on your screen. The head alignment patterns are printed. 5. After all the patterns have printed, do one of the following: For the EPSON Stylus Pro 7000, choose the row number that has the smallest gap in each pattern. In the first example shown, row 4 has the smallest gaps. In the second example, row 6 has the smallest gaps. 10 - EPSON Stylus Pro 7000 series 8/00 EPSON Stylus Pro 7000 series 7. Check the control panel display. 6. Select the row you chose in step 5 for each pattern (for example line 8), then click Finish. ❏ For the EPSON Stylus Pro 7000, it shows #1 = 4, indicating that row 4 is selected for pattern #1. If you can’t make a consistent choice for the patterns as you look across the width of the paper, choose the average or most frequent number. Then click the Realignment button and repeat from step 5. ❏ For the EPSON Stylus Pro 7500, it shows #1 = 8, indicating that line 8 is selected for row #1. 8. Use the + or − button to select the best aligned row for pattern #1. Then press the Enter button to register the setting. Aligning the Print Head from the Control Panel 9. Repeat steps 6 to 8 for each pattern or row you printed. If you don’t have the EPSON printer driver installed, you can align the print head using the control panel. If you can’t make a consistent choice as you look across the width of the paper, choose the average or most frequent number, then print the pattern again. Press Enter to cycle through the patterns until you reach the one you want to repeat. ❏ First you print a series of alignment or adjustment patterns. ❏ Then you determine which numbered row of patterns (EPSON Stylus Pro 7000) or numbered line or box (EPSON Stylus Pro 7500) has the best vertical alignment (smallest gaps). You enter the information on the control panel to change the print head alignment. After you have registered all the patterns, press the Pause button to exit print head alignment mode and return to normal printer operation. 1. Load roll paper in the printer. 2. Press the SelecType button until HEAD ALIGNMENT MENU is displayed. Transporting the Printer 3. Press the Item button. PAPER THICK=STD appears on the display. When you need to ship your printer, you should repack it using the original box and packing materials. Follow these steps to drain the ink and prepare the printer for transport: If you’re using EPSON paper, leave this setting on STD. If you’re using other media, enter the thickness value of the paper in 0.1 mm increments by pressing the + or − button. Caution: To avoid spilling ink inside the printer during transportation, make sure you remove the cartridges and follow these instructions for draining the ink lines. 4. Press the Enter button to save the setting. ADJUST.PATT.=ALL appears on the display. 5. Press the Enter button to print the full series of alignment patterns. Each pattern consists of 7 numbered rows (EPSON Stylus Pro 7000) or a series of 15 numbered lines or boxes (EPSON Stylus Pro 7500). 1. Make sure the printer is turned on. Then remove all the ink cartridges. 2. Make sure the paper set lever is in the secured position and the lower cover is closed. Then press the Power button to turn off the printer. If you want to print a single alignment pattern, press the + or − button until the pattern number appears. Then press the Enter button. The print head moves to the home (far right) position. TRANSPORT PREP <number> % appears on the display and the Operate light flashes for a few minutes while the ink is drained. Then the light goes off and the printer shuts down. After you have printed all the patterns, you need to check them carefully to determine which row in each set (or numbered line or box in each row) has the smallest gaps. Refer to the examples on page 10 and continue with the following steps to complete the alignment procedure. 3. Remove the power cord, interface cable, roll paper spindle, and all paper or other media. 6. Do one of the following: 4. Push in the paper guides if necessary. ❏ For the EPSON Stylus Pro 7000, examine pattern #1 (or the pattern you printed) and determine which row of lines has the smallest gaps. 5. Install the carriage shipping restraint (packaging material). ❏ For the EPSON Stylus Pro 7500, examine row #1 (or the row you printed) and determine which line or box number has the smallest gaps. 8/00 EPSON Stylus Pro 7000 series - 11 EPSON Stylus Pro 7000 series 6. If you’re using the stand, remove the wing screws and washers from the left and right sides, and keep them in a safe place. Moving the Printer on the Stand When you want to transport the printer a short distance, such as within the same building or facility, you can roll the printer on its casters. Caution: Do not roll the printer on angled or uneven surfaces. 1. Make sure that the power cord, interface cable, roll paper spindles and sheet media are removed, and the roll paper cover and lower cover are closed. You don’t need to remove the ink cartridges. 2. Release the front casters and retract the stabilizer knobs. 7. Have two or more people lift the printer off the stand, using the hand grips. 3. Carefully roll the printer to its new location. Relock the casters and extend the stabilizer knobs after moving. After you move the printer, you may need to run a cleaning cycle and realign the print head to maintain print quality. Warning: The printer weighs approximately 96 lb (43.5 kg). Always have two or more people lift it, using the hand grip areas. Related Documentation 8. Keep the printer level while you move it. Setting Up the Printer After Transporting It Setting up the printer after transporting it is almost identical to setting it up for the first time. Whenever you set up the printer, see the Assembly and Setup Instructions, and note the following: EPSON recommends installing new cartridges after transporting the printer. Because of the ink charging process, you will not be able to save ink by reinstalling used cartridges. 12 - EPSON Stylus Pro 7000 series 8/00 CPD-10836 EPSON Stylus Pro 7000 series Printer Guide CPD-10837 EPSON Stylus Pro 7000 series Quick Reference Guide 4011817 EPSON Stylus Pro 7000 Assembly and Setup Instructions 4012672 EPSON Stylus Pro 7500 Assembly and Setup Instructions