1
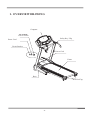
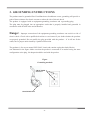
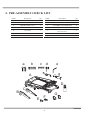
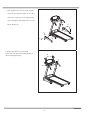
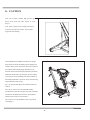
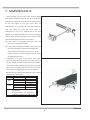
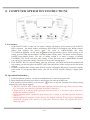
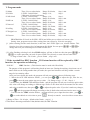
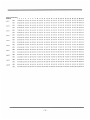
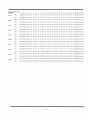
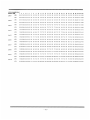
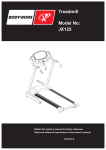
Treadmill
BODY WORX
Model No:
JX150HR
Retain this owner’s manual for future reference
Read and follow all instructions in this owner’s manual
Version A
1
INDEX
1.
OVERVIEW DRAWING
2
2.
IMPORTANT SAFETY INSTRUCTIONS
3
3.
GROUNDING INSTRUCTIONS
4
4.
PRE-ASSEMBLY CHECK LIST
5
5.
ASSEMBLY STEPS
6
6.
CAUTION
8
7.
MAINTENANCE
9
8.
COMPUTER OPERATION INSTRUCTIONS
10
-1-
1. OVERVIEW DRAWING
Computer
電子錶
電源開關
Power
Switch
Safety Key/ Clip
電源線
Power
Cord
Circuit Breaker
Power
Cord
電源線
Frame
機台主架
Base
底座
Rear End Cap
後調整盒
-2-
2. IMPORTANT SAFETY INSTRUCTIONS
When using this product, basic precautions should always be followed, including the following:
Please read the instruction carefully before starting to use this product.
Danger – To reduce the risk of electric shock:
1.
Always unplug this product from the electrical outlet immediately after using and before
cleaning the treadmill.
Warning
– To reduce the risk of burns, fire, electric shock, or physical injury:
1.
The product should never be left unattended while plugged in.
Unplug the product from the outlet when not in use or before putting on or taking off
clothes and other belongings.
2.
To avoid any danger, close supervision is necessary when this production is used by children,
invalids or disabled persons.
3.
Be sure to use the product only for its intended use as described in this manual. Do not use any
attachment(s) not recommended by the manufacturer in order to avoid any danger or accidents.
4.
Never operate the product if it has a damaged cord or plug, if it is not working properly, if it
has been damaged, or dropped into water. Please return the product to the service center or
seller for examination and repair.
5.
Do not carry this product by the supply cord or use the cord as a handle.
6.
Keep the cord away from hot surfaces or ground.
7.
Never operate the product with the air vents blocked. Keep the air vents free of lint, hair, et cetera.
8.
Never drop or insert any objects into any vent of the treadmill.
9.
Do not use or operate outdoors.
10. Do not operate where aerosol (spray) products are being used or where oxygen is thin.
11. Before turning the product power off, turn all controls to the off position then remove the plug
from the outlet.
12. Connect the product to a properly grounded outlet only.
13. If the power cord is damaged, be sure to ask the manufacturer for replacement to avoid
accidents.
-3-
3. GROUNDING INSTRUCTIONS
The product must be grounded first. If malfunction or breakdown occurs, grounding will provide a
path of least resistance for electric current to reduce the risk of electric shock.
The product is equipped with an equipment-grounding conductor and a grounding plug.
The plug must be plugged into an appropriate outlet that is properly installed and grounded in
accordance with all local codes and ordinances.
Danger – Improper connection of the equipment-grounding conductor can result in a risk of
electric shock. Check with a qualified electrician or serviceman if you doubt whether the products
are properly grounded. Do not modify the plug provided with the product – if it will not fit the
outlet, have a proper outlet install by a qualified electrician.
The products is for use on normal 220V-240V circuit and contains a plug that looks like the
one illustrated in the figure. Make sure that the product is connected to an outlet having the same
configuration as the plug. No adapter should be used with the product.
Figure
Grounding methods
GROUNDED
OUTLET
GROUNDED PIN
-4-
4. PRE-ASSEMBLY CHECK LIST
ITEM
Description
Qty
ITEM
Description
Qty
A
B
Frame
1
1
a
b
Truss Hex Screw M8xP1.25x40
2
4
c
d
Truss Philips Screw M5xP0.8x20
Left Decoration Cover
Truss Hex Screw M8xP1.25x15
C
D
Right Decoration Cover
Bottle
1
1
E
Cover-Left
1
e
F
Cover-Right
1
f
Safety Key/Clip
1
G
Cup Holder
2
g
SLILCON
1
a
b
c
d
Plastic Washer Ø8xØ22x6t
Hex Wrench + Screwdriver
5mm(70mmX70mm)
e
f
g
A
D
C
B
E
F
-5-
G
6
4
1
5. ASSEMBLY STEPS
Two persons are required to finish the
assembly steps.
(Caution!! Please follow exactly the
assembly steps below to avoid injury.)
a
1. Put up the two computer handrail tubes
of Frame (A) as shown in the right
drawing and tighten with hex screw (a).
PS. To avoid danger, always assemble
the treadmill with two or more persons,
do not assemble by yourself.
a
2. Then put up the left and right
uprights as shown in the right drawing
and tighten with hex screw(b).
PS. To avoid danger, always assemble
the treadmill with two or more
persons, do not assemble by yourself.
b
b
-6-
3. After tightened the left and right uprights,
insert left and right decoration covers (B,C)
onto frame respectively as the right drawing
shows and tighten with Philips Screw (c) and
c
Plastic Washer (d)
c
c
d
c
d
B
c
c
d
d
4. Wedge cup holder (G), left and right
covers (E,F) onto the corresponding position as
shown in the right drawing.
G
F
E
-7-
C
6. CAUTION
Note: The Cylinder contains high pressure gas.
Please avoid crash with other objects to avoid
danger.
Note: If the Cylinder is hit, it might be damaged
and cause the usage not smooth. The treadmill
might fall while folding.
This treadmill has the foldable mechanism for storage.
Stop all the movements (including stop the running belt
and take off the power cord) before storage, then pull out
the POP-Pin of the folding fixing mechanism as the
direction shown in the drawing and then lift up the frame
until the POP-Pin inserts into the frame. On the contrary,
if you want to use the treadmill, pull out the POP-Pin of
the folding mechanism as the arrow shows in the drawing
and put down the frame slowly.
(PS.1. To prevent from danger, be careful if the kids are
around.)
(PS.2. If you want to move the treadmill, fold the
treadmill at first, hold the rear adjust cap with your hands,
then lean the treadmill and do not move the treadmill
until the roller can be moved smoothly.)
(PS.3. Do not move the treadmill on uneven ground to
avoid danger.)
-8-
7. MAINTENANCE
1. If the belt tends to move off the center, stop the treadmill.
Take the Hex Wrench and adjust the Hex Screw in the Rear
End Cap. For example, if the running belt is moving towards
the left side, tighten the left Hex Screw about 1/4
turn(clockwise); if the running belt is moving towards the
right side, tighten the right Hex Screw about 1/4
turn(clockwise); Turn on the treadmill after it has been
adjusted. If you find that the belt has not moved to the proper
position, please repeat the steps above. Don’t use the treadmill
until the running belt returns to the center position.
(PS.1. This action is very important, if the belt is not in the
center, be sure to follow above steps.)
(PS.2. The position of running belt might not stay precisely in
the center with slightly towards the left and right sides,
and the situation varies with how end-users use and the
weight of end-users. No need to adjust the belt if it doesn’t
rub against the parts aside.)
2. Depending on the usage of the product, please apply
SILICON on the board according to the below chart. Use
the Hex Wrench to unscrew the bolt inside the Rear Roller.
Then pull the belt up and daub some SILICON to the center
of the board. After that, adjust the belt to the center of the
deck, followed by tightening the screw to the original set.
(PS.When the belt is sliding, please follow the above method
to lubricate the running belt. )
KGS/LBS
Speed
Interval
6KM/hr Below
1 year
KGS
6~12KM/hr
6 months
3 months
12KM/hr Above
1 year
4mile/hr Below
6 months
LBS
4~8mile/hr
8mile/hr Above
3 months
Note: This maintenance is intended for
household use.
If used for business, it is suggested to
examine the product every other month
-9-
8. COMPUTER OPERATION INSTRUCTIONS
I. Start Display:
1. If the SAFETY KEY is taken off, the matrix window will display arrow adown. If the SAFETY
KEY is replaced,the matrix window will display KGS (LBS) for avoirdupois unit. Weight window
glitters and displays the pre-set value. The value is 70KG(150LBS) and range
23~130KG(50~286LBS). At this time the light of Weight window shows. Finish setting or not
setting, press ENTER and the window will turn to Start / Ready status. The matrix window displays
pulsatile heart-shaped picture. The aim of setting weight is to make a change of burning
CALORIES. This can be only done after starting. It does not need to set in PROGRAM. It means
you can use the value after starting. You must set newly after starting again.
2. If the SAFETY KEY is removed during work out, the beeper will sound and then the treadmill will
stop running. At this time place the SAFETY KEY back and all the values will go back to the initial
position.
3. Under the common Start / Ready status, PULSE window will display HP picture if you don’t grip the
pulse sensor. If you grip the pulse sensor, you will see PULSE window starting to display pulse
value.
II. Operation Instruction:
:
1. Under Start/Ready position, you can press Mode directly to enter the program edit.
2. Under Start/Ready position, press Start to enter directly the start-up of Manu run.
to start or stop fan. Pressing once means starting
3. If the machine has fan function, you can press
and pressing twice means stopping.
** When the SAFETY KEY is taken off and then replaced, it will not make reposition action any where
it is. You need to press start key to perform the incline to reposite it.
** When power on, it will not make reposition action any where it is. You need to press start key to
perform the incline to reposite it.
** Under start/ready status, continuously press stop key for 5 seconds, it will make reposition action any
where it is.
** During perform any program, if press stop key, the program will stop. If users want to continuously
perform the program, press start key or again press stop key to leave the program and back to
start/ready status
- 10 -
III. Edit Mode:
:
1. Under Start/Ready position, press Mode to choose Manual and Program mode by press +/- key.
2. Program Mode:Press +/- key to edit the Program (P1~P8), and the PROGRAM window will flash, the
LCD window will show P1~P8 to edit, you can press +/- key to edit. Press ENTER to enter the TIME edit,
the Program pre-set value is 30min, Range is 20~99min, STEP is 1min.After edit, press ENTER or START to
start the machine. If you press START directly during edit, the rest un-edited functions are pre-set. During
edit, INCLINE and SPEED window will display first level value.
The matrix window will display the
picture.
3. WARM UP and COOL DOWN function: During WARM UP or Program position, change speed or
inclination, the value will increase or decrease in the next level. COOL DOWN is not affected and STOP is
the only function which can be carried out.
4. PROGRAM has 30 levels in all. The three anterior are WARM UP, the three later are COOL DOWN. Each
is 3 minutes. The setting time except anterior and later which mean 6 minutes will be execute averagely by
surplus 24 levels.
5. 9 HOLES mode has not functions of WARM UP or COOL DOWN. When distance is equal to 3.5KM, the
motor will stop, the INCLINE is 0 and displays” End”
IV. Program Operation and Instruction:
:
Manu Mode
1. When press START, it will begin to count down for 3 seconds, after that, the motor will start , the speed
will start at 1.0KPH. The matrix window goes contrarotate like along playground, every circle is 0.4KM
(0.25MIL).
2. Speed STEP is 0.1, you can press SPEED UP/DOWN key to select(the speed UP/DOWN step is 0.1),
or press speed instant key 1、2、4、6、8、10 to select .
3. Incline STEP is 1, you can press INCLINE UP/DOWN key to select(incline UP/DOWN step is 1), or
press incline instant key 2、4、6、8、10、12 to select.
4. When TIME can set or can’t set:
(1) When TIME can set,the window will display the countdown value from target value. When time
reaches 0:00, the treadmill will stop automatically.
(2) When TIME can’t set,the window will display positive number. When time reaches 99:00 the
treadmill will stop automatically.
5. Pressing Mode key can switch among SPEED, DISTANCE, CALORIES and can’t switch among
INCLINE, PULSE, WEIGHT. It will just display INCLINE. When there is PULSE signal, it will display
the PULSE value. When there is heartbeat value, the PULSE window will display the heartbeat value.
6. Press Stop when the motor is working, the motor will stop and the incline motor will stop, the Time
window will display Stop; If you press START key again, the motor will start after 3-seconds countdown ,
the speed will be kept at the same before stop , and the incline will be increased to the set height before
stop .
7. When it is at stop position, hold the Stop key for 3seconds, and it will go back to the Start/Ready position.
8. It will go back to the Start/Ready position after 30 seconds in the End position (or press Stop key).
9. The time pre-set value is 0, range is 20~99. When the time is 20 minutes, press +- to increase or decrease.
Increase Step is 1 and decrease is back to 0 directly. The matrix window goes contrarotate like along
playground during workout.
- 11 -
V. Program mode
P1 Manu
P2 9 Hole
P3 hill climb
P4 hill run
P5 interval
P6 rolling
P7 Weight Loss
P8 Custom
Time : Pre-set value 0min; Range 20~99min,
LEVEL : Initial Value 1
Range 1~10,
3500 metre is based on distance.
LEVEL : Initial Value 1
Range 1~10,
Time : Pre-set value 30min; Range 20~99min,
LEVEL : Initial Value 1
Range 1~10,
Time : Pre-set value 30min; Range 20~99min,
LEVEL : Initial Value 1
Range 1~10,
Time : Pre-set value 30min, Range 20~99min,
LEVEL : Initial Value 1
Range 1~10,
Time : Pre-set value 30min, Range 20~99min,
LEVEL : Initial Value 1
Range 1~10,
Time : Pre-set value 30min, Range 20~99min,
Time : Pre-set value 30min, Range 20~99min,
Step 1 min.
Step 1.
Step 1.
Step 1 min.
Step 1.
Step 1 min.
Step 1.
Step 1 min.
Step 1.
Step 1 min.
Step 1.
Step 1 min.
Step 1 min.
PROGRAM has 30 levels in all (SE01~SE30) and all the pre-set values are lowest value.
Setting: time, program execute value (setting time can execute by 30 levels averagely)
(1)After entering into the mode function, at this time, the LEVEL light is on, window flashes. This
function is to select acuteness level of movement (L1~L10). You can press
change the level you need and press ENTER to make sure.
or
(2)After finishing selecting level, then TIME window will star to flash. At this time press
to
or
to set the sport time you need. Or press STAR T key directly to start with no count down.
** range of time value:20~99 min,pre-set 30min,step 1 min.
**If the treadmill has HRC function,
,P8 Custom function will be replaced by HRC
function, the operation as following:
P8 H R C
HRC function:(This function must be used with Chest Belt)
The purpose of this program is self-training based on heart rate. During the training, when heart rate of
runner achieves the setting number that you make, the speed and elevation will keep within a certain
range for best training effort.
After you have chosen this mode, the program will ask you to input values as following steps:
1. When the AGE LED indicator flashes,you can press
or
to adjust the age, after the set,
to enter the next option.Age pre-set value :30 ; Range of age:13~80,Step is 1.
press
2.At this time, the PULSE LED indicator flashes,and the program will ask you to enter the pulse value,
this value will change according to different ages. Refer to the chart below the manual for the values
and select a suitable one, then press
or
to adjust the pulse value. If you don’t make any changes,
and the programwill change according to the de fault values and enter into the next setting.
press
3. At this time the TIME window flashes,program will ask you to input the time value,press
or
to set the desired ex ercise time or press
directly to start the exercise with no count down.
(*Range of Time:20~99 min,default value 30min,step is 1)
**This chart is about Age and Pulse Value (default value) for HRC Function.
- 12 -
BPM
Age
13
14
15
16
17
18
19
20
21
22
23
24
25
26
27
28
29
30
BPM
H
preset
L
197
196
195
194
193
192
191
190
189
188
187
186
185
184
183
182
181
181
124
124
123
122
122
121
121
120
119
119
118
118
117
116
116
115
115
114
124
124
123
122
122
121
121
120
119
119
118
118
117
116
116
115
115
114
Age
31
32
33
34
35
36
37
38
39
40
41
42
43
44
44
46
47
48
BPM
H
preset
L
180
179
178
177
176
175
174
173
172
171
170
169
168
167
167
165
164
163
113
113
112
112
111
110
110
109
109
108
107
107
106
106
106
104
104
103
113
113
112
112
111
110
110
109
109
108
107
107
106
106
106
104
104
103
Age
49
50
51
52
53
54
55
56
57
58
59
60
61
62
63
64
65
66
BPM
H
preset
L
162
162
161
160
159
158
157
156
155
154
153
152
151
150
149
148
147
146
103
102
101
101
100
100
99
98
98
97
97
96
95
95
94
94
93
92
103
102
101
101
100
100
99
98
98
97
97
96
95
95
94
94
93
92
Age
67
68
69
70
71
72
73
74
75
76
77
78
79
80
Error Signal :
E1:The treadmill Can’t read the speed feedback value.
E6: Incline motor can’t work within the ADC range.
E7: Incline is higher or lower(over range).
** If any error signal happens, please contact with the manufacturer.
- 13 -
H
preset
145
144
143
143
142
141
140
139
138
137
136
135
134
133
92
91
91
90
90
90
90
90
90
90
90
90
90
90
L
Note:This mode has a function of switching British System and Metric System. The operations are
as following:
Press ENTER key and hold it for more than 10 seconds under start/ready status after starting the
treadmill. At this time, the window will blink
0 (British System)
1 ( Metric System)
Press +- key to select.After selected, press ENTER key to confirm.
- 14 -
BODY WORX