1
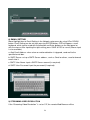
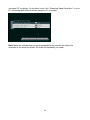
8CH/16CH H.264 Standalone DVR ADR-7608P/7616D User Manual Version 1.0 Statement The information of the product in this manual is subject to change without prior notice and does not represent a commitment on the part of vendor, who assumes no liability or responsibility for any errors that may appear in this manual. This manual contains materials protected under International Copyright Laws. All rights reserved. No part of this manual may be reproduced, transmitted or transcribed without the written consent of the manufacturer. 3 Table of Contents Section1 Introduction...........................................................................................................................5 1.1 Product Overview......................................................................................................................5 1.2 Product Features........................................................................................................................5 1.3 Product Specifications...............................................................................................................5 1.4 Package .....................................................................................................................................6 Section2 System Appearance & Installation .......................................................................................7 2.1 Front Panel.................................................................................................................................7 2.2 Rear Panel................................................................................................................................10 2.3 HDD Installation......................................................................................................................12 Section3 Menu....................................................................................................................................15 3.1 Menu Display...........................................................................................................................15 3.2 Menu Tree................................................................................................................................16 Section4 Menu Setup .........................................................................................................................18 4.1 TIME........................................................................................................................................19 4.2 RECORD.................................................................................................................................21 4.3 SCHEDULE.............................................................................................................................23 4.4 MOTION.................................................................................................................................24 4.5 ALARM...................................................................................................................................25 4.6 NETWORK.............................................................................................................................28 4.7 ADVANCED............................................................................................................................31 Section5 Live Display .......................................................................................................................41 Section6 Backup.................................................................................................................................45 Section7 PTZ Control.........................................................................................................................45 Section8 F/W Update..........................................................................................................................46 Section9 Remote Monitoring and Control via Ethernet.....................................................................47 9.1 Control DVR remotely over the web.......................................................................................47 9.2 Web troubleshooting................................................................................................................56 APPENDIX 1. Alarm Input/Output Pin Descriptions (16CH)...........................................................57 APPENDIX 2. CF card Compatible List............................................................................................59 APPENDIX 3. Play process after backing up DVR files to USB device...........................................60 4 Section1 Introduction 1.1 Product Overview Designed for globally increasing surveillance requirements, ADR-7608P/7616D is a high performance 8/16ch standalone Digital Video Recorder. It takes H.264 compression format to not only improve video quality but also extend recording time over the same hard disk capacity, and the friendly UI design also enables users even unfamiliar with computer operations can easily control this DVR. Specially, the advanced remote function of 3G mobile surveillance and CMS is added so that users can do surveillance via 3G moble phone and simultaneously operate multiple DVRs that are distributed in different areas through the network interface. The high-quality 8CH/16CH DVR is absolutely the best choice for your security surveillance. 1.2 Product Features ● ● ● ● ● ● ● ● ● ● ● ● ● ● H.264 compression format, 120fps at D1 for recording 8ch/16ch all real-time recording & display Support SATA/ eSATA high capacity storage VGA output Pentaplex: Live, Record, Playback, Backup & Network Independent channel resolution, frame rate, quality & mode setting Support USB 2.0 drive, DVD & Network for video backup Support multiple recording modes Support graphic user interface & multi-language OSD Support IR remote control Support mouse control Event notification via E-mail Support 3G mobile surveillance Support CMS (option) 1.3 Product Specifications Specifications Video Audio Record 7608P 7616D Video Input 8 (BNC) 16 (BNC) Loop Out 8 (BNC) 16 (BNC) Main Monitor Out 1 (BNC), 1 (VGA), S-video, HDMI (option) Call Monitor Out 1 (BNC) Compression Format H.264 Display Mode Full, 4, 8, 9 Full, 4, 8, 9, 16 Audio Input 8 16 Audio Output 2 2 Resolution (Adjustable) D1, Half-D1, CIF 5 240fps(D1), 240fps(Half-D1), 240fps(CIF) FPS Manual, Schedule, Alarm, Motion, Event, Always and Off mode Mode Playback Storage Backup Alarm Network Other 240fps(D1), 240fps(Half-D1), 240fps(CIF) FPS Support SATA HDD*4(3.5”) Hot SWAP Module Option External eSATA port*1 USB 2.0 port 2 (for USB 2.0 drive, DVD-RW & USB mouse) DVD-RW Internal(USB/ eSATA) CF slot Yes Alarm Input 8 16 Alarm Output 2 2 Remote Control & Monitoring Yes (IE & Firefox) 3G surveillance Option CMS Yes Jog & Shuttle Yes PTZ Pelco-D, Pelco-P protocol Power DC 19V <84W 430 (W)x 88(H) x 473(D) mm 1.4 Package ● ● ● ● ● ● ● 240fps(D1), 480fps(Half-D1), 480fps(CIF) Internal HDD Dimension ● 240fps(D1), 480fps(Half-D1), 480fps(CIF) Digital Video Recorder*1 Power Adapter & Power Cord*1 Screw Bag (for fastening HDD) Support CD*1 User Manual*1 IR remote Controller*1 Batteries (AAA)*2 (used for IR remote controller) Mouse*1 6 Section2 System Appearance & Installation 2.1 Front Panel 1. Channel Selection buttons Number buttons can be used to display given channel on monitor and input password. 2. Function buttons a) FUNC This button is reserved for future use. b) LOCK In order for only authorized person to operate buttons in front panel, this LOCK button can be utilized. If this button is pressed, all of buttons in front panel are not operated at the same time LOCK LED ON. To release button locking, password will be requested after pressing LOCK button. If correct password is input, button locking will be released. c) PTZ (Pan, Tilt and Zooming) The camera(s) with panning, tilting and zooming function would be connected with one and some of video inputs of DVR. In order to control PTZ function of the camera, PTZ button should be pressed first. And then direction buttons for panning and tilting can be pressed. d) SEARCH This button can be used to enter playback sub-menu for searching out proper recorded file for playback. e) Sequential Display button If this button is pressed, display channels would start to rotate sequentially according to the cycle time set up in display setting menu. NOTE: Sequential display icon would be shown on the left-up side of the monitor after sequential display is turned on. f) Display Mode Selection Display mode selection button is pressed for switching display modes, single picture, Quad-split, 8-split, 9-split, 16split would be switched. g) ESC This button is pressed to return upper menu. h) MENU 7 This button is pressed to enter menu for system setting. i) Save & Esc After system setting in menu, this button is used to save the settings and escape to upper menu. 3. Direction buttons and Enter Button a) Direction buttons are used to move LEFT, RIGHT, UP and DOWN in menu. b) ENTER button is used to select parameter in the menu. And in playback, it is used to select one of listed file for playback after searching recorded files. 4. REC/ STOP, REW(◄◄), PLAY/ PAUSE (►/ II), STOP( ■ ) ,and FF(►►)buttons a) ●/■ button can be pressed to start recording while emergency recording is be pressed manually for all channel recording while emergency happens. b) REW button can be used for high speed backward playback. It support 2 to 16 times playback speed. c) PLAY/ PAUSE is used to freeze playback and also restart playback while pause. d) STOP button is used to stop playback e) FF button to do high speed forward playback. It support 2 to 16 times playback speed. 5. LED Indicators a) REC/HDD This red LED will turn “ON” during recording or playback . b) ALARM This red LED will turn “ON” when motion detection or alarm have been triggered. c) NET This green LED will turn “ON”, while data through network is transmitting. d) USB This red LED will turn “ON” during data backup or F/W upgrade through USB drive. e) LOCK This red LED will turn “ON” while LOCK button is working. 6. USB port Inserting USB 2.0 Drive for data backup and FW upgrade; supports USB DVD-RW only. 7. Power Button (Power On/ Off button) This Power button can be pressed to turn off DVR power. When this button is pressed,password is requested. When right password is input, DVR power will be turned off. 8. CF slot inserting CF card for F/W upgrade and data backup. Please refer to Appendix2 for CF compatible list 9. Jog and Shuttle Jog and shuttle enable user to operate DVR easier in handling such as fast forward, fast reverse playback and one frame movement in still picture. 8 2.2 Rear Panel 1. 8/16CH Video Inputs 8/16 channel composite video inputs with BNC connectors. NOTE:NTSC and PAL video sources for 8/16CH video inputs can not be mixed. If they are mixed, DVR can’ not be operated properly. 2. 8/16CH Loop through outputs 8/16 channel composite video outputs with BNC connectors. If the connection of loopthrough video outputs into another video equipments is requested, 8/16CH Loopthrough outputs can be utilized for it. 3. Video Outputs: 2 BNC, 1 S-Video & 1 VGA the BNS connector marked “MONITOR”, S-Video and VGA output are used for main monitoring. The other BNC connector marked “CALL” is used for spot monitoring, which displays all of connected video channels sequentially and pop up the channel with event triggered. 4. 2CH Audio input (RCA) and 1CH Audio Output (RCA) Audio signal input and output with RCA jack. Connect the audio source to audio input and audio output to your amplifier because the DVR don’t amplify audio output. A speaker with an amplifier will be needed for audio playback. The audio input can be from an amplified source or directly from a microphone. 5. Ethernet Port Connect a Cat5 cable with an RJ-45 jack to the DVR connector. Remote PC viewer software via network enables you to access live viewing and other available functions. 6. eSATA Port for External Storage Expansion eSATA device like RAID system is supported for storage expansion, you can connect it to eSATA port via eSATA cable. Make sure that you have turned on the eSATA external storage device before DVR power on. 7. Alarm input and relay output 8/16 alarm inputs and 2 relay output with NO, NC. 8. Fan System Fan. 9 9. Power Input (from Adapter) Connect the adapter to the DVR for DC power supply. (DC19V / 7A). 10. HDMI Supports HDMI ouput. 11. USB Supports USB mouse only. 10 2.3 HDD Installation 1. Loosen each of the 11 screws on the front and back panels of the case with a screw driver to remove the cover. 2. Once you remove the cover on top of the DVR, unscrew the screws of the hard drive tray (2 on each side), and unplug the corresponding power cable and data cable as shown in the figure below. 3. Remove the hard disk tray carefully; avoid breaking the LED lights on the PCB board when removing the tray. 4. Place two 3.5 inch hard disks on the hard disk tray. Please beware of the direction which the hard disks are inserted; the side with the SATA port should be far away from the PCB board. Then use the provided screws to fixate the hard disks on the tray (both left and right sides). Connect the SATA cable and power cable to the SATA hard disk, as shown in the figure below: 11 5. Finally, place the cover back on and lock it in place using the screws. 12 Section3 Menu 3.1 Menu Display NO. ICON Description 1 TIME System time/ date setup 2 RECORD Recording parameters setup 3 SCHEDULE Weekly recording schedule setup for Schedule recording mode 4 MOTION Motion Area/ Sensitivity setup for Motion recording mode 5 ALARM Alarm input type selection and Buzzer setup 6 NETWORK Network parameters setup 7 ADVANCED Advanced setup for system/ display/ camera/ disk format/ backup 13 3.2 Menu Tree 1.TIME 1.1 DATE SETUP 1.2 TIME SETUP 1.3 DATA DISPLAY FORMAT 1.4 TIME DISPLAY FORMAT 1.5 TIME ZONE SETUP 1.6 DAYLIGHT SAVING 2.RECORD 2.1 RESOLUTION 2.2 FPS 2.3 QUALITY 2.4 RECORD MODE 2.5 POST RECORD 3.SCHEDULE 4.MOTION 4.1 MOTION CH 4.1 SENSITIVITY 4.3 DETECTION AREA 5.ALARM 5.1 ALARM INPUT 5.2 ALARM OUTPUT 1 5.3 ALARM OUTPUT 2 5.4 BUZZER 5.4.1 KEY TONE 5.4.2 ALARM 5.5 EMAIL NOTIFICATION 6.NETWORK 6.1 IP MODE 6.2 IP ADDRESS 6.3 SUBNET MASK 6.4 GATEWAY 6.5 PORT 6.6 DDNS 6.7 PPPoE 6.8 EMAIL SETTING 6.9 STREAMING VIDEO RESOLUTION 7.ADVANCED SETUP 7.1 SYSTEM 7.1.1 LANGUAGE 7.1.2 VIDEO FORMAT 7.1.3 DISK OVERWRITE 7.1.4 SYSTEM INFO 7.1.5 EVENT LOG 14 7.1.6 FIRMWARE UPDATE 7.1.7 SETTING IMPORT/ EXPORT 7.1.8 USER MANAGEMENT 7.1.9 PERERCORD 7.1.10 DVR NUMBER 7.2 DISPLAY 7.2.1 CAMERA TITLE DISPLAY 7.2.2 RECODE MODE DISPLAY 7.2.3 AUTO-HIDE TOOLBAR 7.2.4 DWELL 7.2.5 DATE TIME POSITION 7.2.6 RECORD DATE TIME 7.2.7 HDMI RESOLUTION 7.3 CAMERA 7.3.1 CAMERA 7.3.2 CAMERA TITLE 7.3.3 BRIGHTNESS 7.3.4 CONTRAST 7.3.5 HUE 7.3.6 SATURATION 7.3.7 ADVANCED SETUP 7.4 DISK FORMAT 7.5 SEARCH & BACKUP 7.6 ACCOUNT/ PASSWORD 7.7 LOAD FACTORY DEFAULT 15 Section4 Menu Setup For the first time using your DVR, you will want to establish the initial settings. This includes setting items such as time and date, record parameters, network and so on. In order to enter Main Menu for setup, first press MENU button of the front panel in DVR. NOTE: Password is necessary for entering main menu while AdminLock is set as ON (Default is OFF). AdminLock can be set as ON or OFF in ADVANCED >> SYSTEM NOTE: Default password is 111111 ● ● ● ● ● ● To access the DVR Menu, press MENU; To escape MENU, ESC can be used. Buttons for movement in Menu are direction buttons. Button for selection is ENTER. SAVE & ESC : to return to the previous Menu with saving the values of setup; ESC: to return to the previous Menu without saving the values of setup; SAVE & EXIT: to return to Live display with saving the values of setup; DEFAULT: all the setting values of the page will be returned to initial values. 16 4.1 TIME To access time setup, press ENTER button after moving highlight icon to TIME ICON in Menu. Time setup menu will appear on monitor shown as below. 1) DATE: Move Highlight icon to Date in the Time setup menu by using UP or DOWN button. Year, month and date can be changed after pressing ENTER button. System Date can be input by OSD keyboard. Number characters can be selected and input by using direction and ENTER buttons. After inputing the right date, press SAVE & ESC to save it. (Mouse input is also available) 2) TIME: Move Highlight icon to Time in the Time setup menu by using UP or DOWN button. Hour, minute and second can be changed after pressing ENTER button. System Time can be input by OSD keyboard. Number characters can be selected and input by using direction and ENTER buttons. After inputing the right date, press SAVE & ESC to save it. (Mouse input is also available) 17 3) DATE DISPLAY FORMAT: YY/MM/DD, MM/DD/YY, DD/MM/YY Move Highlight icon to Date Display Format in the Time setup menu by using UP or DOWN button. Date Display Format can be changed after pressing ENTER button. Use UP or DOWN and ENTER to select the parameter. 4) TIME DISPLAY FORMAT: 12 HOUR, 24HOUR Move Highlight icon to Time Display Format in the Time setup menu by using UP or DOWN button. Time Display Format can be changed after pressing ENTER button. Use UP or DOWN and ENTER to select the parameter. 5) TIME ZONE SETUP: Move Highlight icon to Time Zone Setup in the Time setup menu by using UP or DOWN button. Time Zone Setup can be changed after pressing ENTER button. Use UP or DOWN and ENTER to select the parameter.(Mouse input is also available) 6) DAYLIGHT SAVING Move Highlight icon to Daylight Saving in the Time setup menu by using UP or DOWN button. Daylight Saving can be changed after pressing ENTER button. Daylight saving ON/OFF and start-end time can be set here. 18 4.2 RECORD To access record setup, press ENTER button after moving highlight icon to RECORD ICON in Menu. Record setup menu will appear on monitor. 1) RESOLUTION: CIF, HALF-D1, D1 In the record setup menu, move to the cell of RESOLUTION and CH which is to be setup using direction (UP/ DOWN/ LEFT/ RIGHT) buttons. Recording resolution for specific CH can be changed after pressing ENTER button. Use UP or DOWN and ENTER to select the parameter. 2) FPS: 30, 15, 10, 7.5, 6, 5, 3, 2 (NTSC) In the record setup menu, move to the cell of FPS and CH which is to be setup using direction (UP/ DOWN/ LEFT/ RIGHT) buttons. Recording frames per second for specific CH can be changed after pressing ENTER button. Use UP or DOWN and ENTER to select the parameter. 3) QUALITY: HIGHEST, HIGH, NORMAL, LOW In the record setup menu, move to the cell of QUALITY and CH which is to be setup using direction (UP/ DOWN/ LEFT/ RIGHT) buttons. Recording quality for specific CH can be changed after pressing ENTER button. Use UP or DOWN and ENTER to select the parameter. 4) RECORD MODE: MANUAL, ALWAYS, MOTION, ALARM, EVENT, SCHEDULE, DISABLE In the record setup menu, move to the cell of RECORD MODE and CH which is to be setup using direction (UP/ DOWN/ LEFT/ RIGHT) buttons. Recording mode for specific CH can be changed after pressing ENTER button. Use UP or DOWN and ENTER to select the parameter. 19 Record Mode Icon Description MANUAL If MANUAL mode is set, the channel would start recording only by pressing the REC/STOP button on front panel. ALWAYS If ALWAYS mode is set, the channel would start recording after system power on. MOTION If MOTION mode is set, the channel would start recording while object movement is detected. ALARM If ALARM mode is set, the channel would start recording while sensor in is triggered. EVENT If EVENT mode is set, the channel would start recording while object movement is detected or sensor in is triggered. SCHEDULE If SCHEDULE mode is set, the channel would start recording according to the weekly recording schedule setup in schedule menu. If DISABLE mode is set, the channel would not do any recording. NOTE: While live viewing, the mode icon would be shown on each channel to indicate which mode was set. DISABLE 5) POST RECORD: 5s, 10s, 15s, 20s, 25s, 30s, 1m, 3m, 5m In the record setup menu, using direction (UP/ DOWN/ LEFT/ RIGHT) buttons move to the cell of POST RECORD and CH which is to be setup. Post recording time after event being triggered for specific CH can be changed after pressing ENTER button. Use UP or DOWN and ENTER to select the parameter. NOTE: ALL option is used for all-channel setup 20 4.3 SCHEDULE To access schedule setup, press ENTER button after moving highlight icon to SCHEDULE ICON in Menu. Schedule setup menu will appear on monitor. When the record mode in record setup is set as schedule mode, the DVR will use the weekly schedule defined here to control the recording function. Each time interval is one hour in length and the user can specify the recording mode for each hour during a week (Sunday ~ Saturday). The procedure for setting the recording schedule is shown below. <The procedure for weekly schedule setup> Step 1 Select the Recording Mode: MANUAL, ALWAYS, MOTION, ALARM, EVENT To set the recording schedule, first move the highlight icon over the desired recording mode. The default mode is MANUAL so use the UP/DOWN/LEFT/RIGHT buttons to move to the desired recording mode then press ENTER to confirm it. NOTE: The mode selected will be highlight with orange rectangle. Step 2 Schedule Recording Mode Once the recording mode has been selected, use the UP/DOWN/LEFT/RIGHT buttons to move to the desired time interval and press ENTER to apply the selected recording mode. The time interval will change to the color of the selected recording mode. Use the same procedure to set the recording modes for each time interval. Step 3 Saving the Recording Schedule After setting the recording modes for each time interval, use SAVE & ESC or SAVE & EXIT to leave Schedule Setup. If a channel's recording mode is set as schedule, its recording mode will be changed according to the recording schedule set here. 21 4.4 MOTION To access motion setup, press ENTER button after moving highlight icon to MOTION ICON in MENU. Motion setup menu will appear on monitor. 1) MOTION CH: To select the CH in which motion detection sensitivity and area would be set. 2) SENSITIVITY: Level 0 ~ 16 Move Highlight icon to Date Display Format in the Motion setup menu by using UP or DOWN button. Motion detection sensitivity can be changed after pressing ENTER button. Use UP or DOWN and ENTER to select the parameter. 3) DETECTION AREA Move Highlight icon to Detection Area in the Motion setup menu by using UP or DOWN button. Detection area setup menu will appear after pressing ENTER button. Press ENTER to change The setup mode(+ or -), And then use direction Buttons to add or cancel The detection area. NOTE:+ is for add; - is for cancel After setup is finished, press SAVE & ESC button or ESC button to return to the previous Menu with or without saving the setup. 22 4.5 ALARM To access alarm setup, press ENTER button after moving highlight icon to ALARM ICON in MENU. Alarm setup menu will appear on monitor. 4.5.1 ALARM INPUT Move Highlight icon to Alarm Input in the Alarm setup menu by using UP or DOWN button. Alarm input type setup menu will appear after pressing ENTER button. Move to CH which is to be setup by using UP or DOWN button. Alarm input type can be changed after pressing ENTER button. Use UP or DOWN and ENTER to select Alarm input type as NC or NO. 4.5.3 ALARM OUTPUT 1 The “Alarm Output” can be set to ON or OFF. When it is ON, once the “Alarm in” is triggered, it will activate the “Alarm out” in response. When it is OFF, then the “Alarm out” won’t be activated while “Alarm in” is triggered. 23 4.5.3 ALARM OUTPUT 2 The “Alarm Output” can be set to ON or OFF. When it is ON, once the “Alarm in” is triggered, it will activate the “Alarm out” in response. When it is OFF, then the “Alarm out” won’t be activated while “Alarm in” is triggered. 4.5.4 BUZZER Move Highlight icon to Buzzer in the Alarm setup menu by using UP or DOWN button. Buzzer setup menu will appear after pressing ENTER button. 1) KEY TONE: ON, OFF the key tone can be turned on or off. If OFF is set, the key tone would be mute while pressing the buttons on front panel. 2) ALARM: ON, OFF the alarm buzzer can be turned on or off. If OFF is set, the buzzer would be mute while alarm is triggering. 24 4.5.5 EMAIL NOTIFICATION Email notification; which can be set to ON or OFF. When it is ON, the network will add an “Email Setting” option for user making E-mail settings. 25 4.6 NETWORK To access network setup, press ENTER button after moving highlight icon to NETWORK ICON in MENU. Network setup menu will appear on monitor. 1) IP MODE: DYNAMIC, STATIC, PPPoE Move Highlight icon to IP Mode in the Network setup menu by using UP or DOWN button. IP mode can be changed after pressing ENTER button. Use UP or DOWN and ENTER to select IP mode as dynamic or static or PPPoE. 2) IP ADDRESS: Move Highlight icon to IP Address in the Network setup menu by using UP or DOWN button. IP can be changed after pressing ENTER button. IP Address can be input by OSD keyboard. Number characters can be selected and input by using direction and ENTER buttons. After inputing the right IP address, press SAVE & ESC to save it. (Mouse input is also available) 3) SUBNET MASK: Move Highlight icon to Subnet Mask in the Network setup menu by using UP or DOWN button. Subnet Mask can be changed after pressing ENTER button. Subnet Mask can be input by OSD keyboard. Number characters can be selected and input by using direction and ENTER buttons. After inputing the right Subnet Mask, press SAVE & ESC to save it. (Mouse input is also available) 4) GATEWAY: Move Highlight icon to Gateway in the Network setup menu by using UP or DOWN button. Gateway can be changed after pressing ENTER button. Gateway can be input by OSD keyboard. Number characters can be selected and input by using direction and ENTER buttons. After inputing the right Gateway, press SAVE & ESC to save it. (Mouse input is also available) 5) PORT: Move Highlight icon to Port in the Network setup menu by using UP or DOWN button. Port can be changed after pressing ENTER button. Port can be input by OSD keyboard. Number characters can be selected and input by using direction and ENTER buttons. After inputing the right Port, press SAVE & ESC to save it. (Mouse input is also available) 26 6) DDNS: Move Highlight icon to DDNS in the Network setup menu by using UP or DOWN button. DDNS function key: Activates or deactivates the DDNS function (deactivation by default). The DVR has a built-in DDNS key; as graphically shown in the picture below; the DVRName is the domain name of this DVR; after online to Internet over PPPoE, user now can key in http://adraaa341.ddnsservice.net:8080 (default of Port number is 8080) in the web-address column of browser and monitor the live view. DynDNS: Uses the DynDNS service of a third party. The user must apply for the DynDNS service and input the “Username/Password/Server IP Address/ Local Name” appropriately to use the service. 7) PPPoE: Move Highlight icon to PPPoE in the Network setup menu by using UP or DOWN button. PPPoE can be set after pressing ENTER button. username and password can be input by OSD keyboard, which can be used with the direction and Enter buttons on the front panel or with the mouse. After inputing the right username and password, press SAVE & ESC to save it. 27 8) EMAIL SETTING Move Highlight icon to Email Setting in the Network setup menu by using UP or DOWN button. Email Setting can be set after pressing ENTER button. OSD will appear a small keyboard, which can be used with the direction and Enter buttons on the front panel or with the mouse. After inputting the right setting, press SAVE & ESC to save it.(Mouse input is also available) a. Alert Email Address: when alarm or motion detection is triggered, send mail to the specified email box. b. SMTP Server: set up a SMTP Server address, such as Gmail or others, used to forward emails into it. c. SMTP User Name: input a SMTP Server account (in required). d. SMTP User Password: input the password (if required). 9) STREAMING VIDEO RESOLUTION If the “Streaming Video Resolution” is set as CIF, the remote Web Browser will be 28 showedat CIF resolution. On the other hand, if the “Streaming Video Resolution” is set as D1, theremote Web Browser will be showed at D1 resolution. Note: Make the setting based on actual bandwidth of the network (the higher the resolution or the more the photos, the more the bandwidth you need). 29 4.7 ADVANCED To access advanced setup, press ENTER button after moving highlight icon to ADVANCED ICON in MENU. Advanced setup menu will appear on monitor. 4.7.1 SYSTEM Move Highlight icon to System in the Advanced setup menu by using UP or DOWN button. System setup menu will appear after pressing ENTER button. 1) LANGUAGE: English, Traditional Chinese, Simple Chinese, Korean, French, Portuguese, Spanish, Japanese,Russian Move Highlight icon to Language in the System setup menu by using UP or DOWN button. Language can be changed after pressing ENTER button. Use UP or DOWN and ENTER to select the OSD Language. 2) VIDEO FORMAT: NTSC, PAL,AUTO Move Highlight icon to video format in the System setup menu by using UP or DOWN button. Video format can be changed after pressing ENTER button. Use UP or DOWN and ENTER to set the video format as NTSC or PAL or AUTO 3) DISK OVERWRITE: ON, OFF Move Highlight icon to disk overwrite in the System setup menu by using UP or DOWN 30 button. disk overwrite function can be set as on or off after pressing ENTER button. Use UP or DOWN and ENTER to turn on or off the disk overwrite function. If it is set as ON, First recorded area in HDD can be replaced with new recording data, when recording HDD is full. 4) SYSTEM INFO To show the system information including IP address, firmware version and disk capacity. 5) EVENT LOG To enable or disable the Event Log function and also allows the user to view event logs. 6) FIRMWARE UPDATE to Perform the firmware update function. 7) SETTING IMPORT/ EXPORT To imports or export the system settings. Allows the saving of user preferences. 8) USER MANAGEMENT When this function is enabled, the users must enter their login password before they enter Menu for system setup. Note: when the “User Manager” is opened, the “Advanced Menu” of upper menu will add an “Account Password” option. 9) PRERECORD When this function is enabled and active alarm or motion, built-in buffering memory will store pre alarm image. 10) DVR NUMBER Set the DVR number 000-999 when selecting a specific DVR unit among multiple DVRs. For example, if the DVR number is set to 123, how to control the DVR No. 123 remotely. Press the ‘Func” key on the remote control and press the numbers 1, 2, 3, in order. Then press the “Enter” key to control the DVR selected. 31 4.7.2 DISPLAY Move Highlight icon to Display in the Advanced setup menu by using UP or DOWN button. Display setup menu will appear after pressing ENTER button. 1) CAMERA TITLE DISPLAY: ON, OFF To enables or disable the camera title display. 2) RECORD MODE DISPLAY: ON, OFF To enables or disable the display of the recording mode for each channel on the live surveillance display. 3) AUTO-HIDE TOOLBAR: YES, NO To enable or disable the live surveillance Toolbar auto-hidden. If set as YES, the Toolbar will be hidden until the mouse cursor is moved to the bottom of the screen. 4) DWELL: 5s, 10s, 15s, 30s, OFF To set the camera cycle time for the surveillance display. 5) DATE TIME POSITION: Top, Bottom To set the system time display position on screen. 6) RECORD DATE TIME: On, Off If set as ON, a time marking will be embedded and recorded in each video channel. 7) HDMI RESOLUTION: It Offers four HDMI resolutions 1024x768, 1280x960, 1280x720p and 1920x1080p. 32 4.7.3 CAMERA Move Highlight icon to Camera in the Advanced setup menu by using UP or DOWN button. Camera setup menu will appear after pressing ENTER button. Picture of the CH to adjust Would be shown here For easier adjustment. 1) CAMERA: CH1, CH2, CH3, CH4, CH5, CH6, CH7, CH8, ...CH16 To choose the camera to be setup. 2) CAMERA TITLE: To assign a name for a camera. 3) BRIGHTNESS: 0 ~ 31 To set the brightness of the camera display. Higher values result in increased brightness. 4) CONTRAST: 0 ~ 31 To set the contrast of the camera display. 5) HUE: 0 ~ 31 To sets the hue of the camera display. 6) SATURATION: 0 ~ 31 To set the saturation of the camera display. 7) ADVANCED SETUP Move Highlight icon to Advanced Setup in the Camera setup menu by using UP or DOWN button. Advanced Setup menu will appear after pressing ENTER button. 33 1) PTZ PROTOCOL: PELCO-P, PELCO-D If the channel corresponds to a PTZ camera, setting the correct protocol allows control of the PTZ camera. 2) PTZ BAUDRATE: 2400,4800,9600,19200,38400,115200 If the channel corresponds to a PTZ camera, setting the correct baudrate allows control of the PTZ camera. 3) PTZ PANSPEED:High,Middle,Low If the channel corresponds to a PTZ camera, setting the pan speed allows control of the PTZ camera. 4) PTZ TILTSPEED:High,Middle,Low If the channel corresponds to a PTZ camera, setting the tilt speed allows control of the PTZ camera. 5) DEINTERLACE:ON,OFF To turn on or off the deinterlace of the PTZ camera. 6) MASK Some of important area would not be seen during the DVR recording. With the mask you can remove some parts of the view from the active motion detection area. 34 4.7.4 DISK FORMAT Move Highlight icon to Disk format in the Advanced setup menu by using UP or DOWN button. Disk format menu will appear after pressing ENTER button. Use the UP and DOWN buttons to select the disk drive for disk format. Press the ENTER button and then use the Up/Down/ENTER to change the setting as YES. Select the FORMAT button and press ENTER to confirm and begin disk format. Note: when first using hard drive for DVR, be sure to format the hard drive first! 35 4.7.5 SEARCH & BACKUP Search & backup function here is used to search the history video data in DVR storage for playback or backup to other backup media. Move Highlight icon to Search & Backup in the Advanced setup menu by using UP or DOWN button. Search & Backup menu will appear after pressing ENTER button. NOTE: 1) Search & backup menu can also be entered by pressing Search button on front panel. 2) During backup video, make sure to insert the backup media (CF, USB drive, or DVD) before entering the search & backup menu. 1)BACKUP TO MEDIA:USB DISK,CF CARD,DVD-ROM Move Highlight icon to Backup to Media in the Search & Backup menu by using UP or DOWN button. Backup to Media menu will appear after pressing ENTER button. To choose the USB Disk, CF or DVD-ROM which will be backup media. 2)BACKUP FILETYPE:Non Generic,Generic-TSH264 Move Highlight icon to Backup FileType in the Search & Backup menu by using UP or DOWN button. Backup FileType menu will appear after pressing ENTER button. To choose the file type for data backup.Please refer to the Appendix-3 for more detail. 3) BY CHANNEL &TIME: Search the video files for playback or backup based on the selected Channel and start/end time interval. Time can be input by OSD Keyboard or Number buttons on front panel. While using OSD keyboard, number characters can be selected and input by direction and ENTER Buttons. (Mouse input is also available) After inputing the right date, press SAVE&ESC to save it. 36 4) BY EVENT: Provides a list of event recordings for user select to playback or backup. User can use MARK function to select more than one file to backup. NOTE: Press the number button in front panel identical to the number shown in each function button, and then each function button is selected and highlighted with orange rectangle. The selected button can be executed by pressing Enter button. NOTE: Press Direction button “Right” or “Left” to switch pages 5) BY CALENDAR: 1. Select the channel, recording mode and date for video search in Search by Calendar menu shown as below. And then double click or use the direction and ENTER buttons to select the date which want to search. 2. The recording data that matches the search conditions are as shown below: Use the mouse or direction buttons to select the specific time (red frame) to playback or backup. 37 6) SNAPSHOT BACKUP: Use “UP/DOWN” moving to the SNAPSHOT Backup option; press Mark button. Select the photos to be backed up and press Backup button to back them up; as graphically demonstrated in the picture below: 38 4.7.6 ACCOUNT/ PASSWORD NOTE: This item would be shown on menu only when AdminLock is set as ON and can only be accessed by Administrator and authorized users. (AdminLock can be set as ON or OFF in ADVANCED >> SYSTEM) Move Highlight icon to Account/ Password in the Advanced setup menu by using UP or DOWN button. Account/ Password setup menu will appear after pressing ENTER button. 1) ACCOUNT: Admin, User1, User2, User3, User4 Select the account to set the password and privileges for. One Admin and four general User accounts are available. 2) PASSWORD Set the Password for the selected account. 3) ACCOUNT PRIVILEGE Admin here can set the Privilege for the selected user account. Account Privilege setup menu will appear after pressing ENTER button. System, Display, Camera, Disk Format, Search & Backup, Account/ Password, Network Video, Network Setup & PTZ can be set as ON or OFF for the account's privilege. NOTE: There is no need to set privilege for Administrator because of owning all system privilege. 4.7.7 LOAD FACTORY DEFAULT When load factory default, DVR will automatic reboot. 39 Section5 Live Display 1) Display Mode Display modes, full picture, QUAD, 8split, 9-split, 16split are supported. can be pressed for changing the display mode. A) Full Picture B) QUAD picture C) 8-Split screen D) 9-Split screen E) 16-Split screen 40 2) OSD BUTTONS for mouse input Move the mouse cursor to the down side of monitor, the tool-bar would show up as below. Button Description Click on this button with the mouse cursor to enter the Menu for DVR Setup. Click on this button with the mouse cursor and the Live display will change to the Full Picture mode. Further clicks cycles through the channels. Click on this button with the mouse cursor and the Live display will change to the Quad mode. Click on this button with the mouse cursor and the Live display will change to the 8-split mode. Click on this button with the mouse cursor and the Live display will change to the 9-split mode. Click on this button with the mouse cursor and the display will show the last event recording Click on this button with the mouse cursor and the Playback menu will appear on monitor. Click on this button with the mouse cursor and the auto-cycle icon will appear in the top left corner of the screen and the display auto-cycle function will become active. The camera cycle time can be set through "Menu / Display / Dwell". Click on this button with the mouse cursor to start the manual emergency recording. REC will appear in the top right of the screen and the button will change to "■ stop". Click again to stop recording. When the manual emergency recording is active, click on this button with the mouse cursor to stop recording. Click on this button with the mouse cursor to shut down or restart the DVR. NOTE: Down button on the front panel can also be pressed to shut down or restart the DVR. Click on this button with the mouse cursor to select the audio channel. NOTE: When the audio channel have been set, 41 the audio sign will display on corresponding video channel only. Click on this button with the mouse cursor to take pictures of the current screen. When move the mouse to this area, it will show the remaining capacity of DVR HDD. 42 Section6 Backup The DVR supports USB 2.0 drive and DVD-RW(option) for video file backup, and please refer to 4.7.5 SEARCH & BACKUP for the backup procedure. The backup file can be played via DVR file player software provided in the package. Section7 PTZ Control NOTE: Before using PTZ, please make sure that the PTZ Camera is installed. Next, go to "Advanced Setup / Camera" and set PTZ Protocol and PTZ Baudrate. After changing the settings, save and exit the menu. During live surveillance display, using the numerical buttons on the front panel to select the PTZ channel. Then press the PTZ button on the front panel and the PTZ Icon will appear in the lower right corner of the display. This can be used to pan the PTZ camera Up / Down/ Left / Right as shown below. Next, press the ENTER button on the front panel or use the mouse cursor to click on the PTZ letters in the middle of the PTZ icon. This will activate the Zoom In / Out function as shown below: 43 Section8 F/W Update Step 1. Please copy the Firmware file to the root directory of the CF card or USB drive, and then insert the CF card or USB drive into the CF slot or USB port on the front panel. Note: There are two firmware files: (1) Autorun.dat and (2) 76xxxxxx.bin. Step 2. Now go into "Menu / Advanced Setup / System / Firmware Update" and press the ENTER button to begin the update. The CF LED on the front panel will start blinking. Step 3. When the system reports that the update is completed, press the OK button to reboot the system. The update is now complete. WARNING: Do not turn off the power during the firmware is updating as this may lead to unexpected results. 44 Section9 Remote Monitoring and Control via Ethernet The ADR-7608P/7616D DVR server can be remotely monitored or controlled via the IE or Firefox browsers. Before using the remote monitoring and control function, make sure that the DVR is connected to the network and its IP address has be properly configured. Hint: Prior to first use, please download and install the VLC media player from the website: http://www.videolan.org/vlc. V1.0.5 from: http://download.videolan.org/pub/videolan/vlc/1.0.5/win32/vlc-1.0.5-win32.exe is recommended. During installation, select the Full installation option to automatically install the network components required for the IE and Firefox browsers. Once finished, this will allow live video to be monitored in real-time over the network through your browser. Note: Install VLC media player and select the required components: Mozilla Plugin (Firefox) and ActiveX plugin (IE). 9.1 Control DVR remotely over the web 1) Connect to the DVR Step1. Use either IE or Firefox and enter the IP address and Port of the remote DVR to be controlled into the address bar. Press ENTER. A log-in screen will appear. Key in “ IP address:port number ” 45 Step2. Enter your username and password. The default username and password are Admin and 111111 respectively. Click on the Login button to enter the main page shown as below: In this page user can make remote settings to the TIME, RECORD, SCHEDULE, MOTION, ALARM, NETWORK & ADVACED through network. Click this icon to watch the Live view. 2) Time Press TIME to make time-relevant setting; as graphically demonstrated in the picture below: After the setting is complete, press SAVE&ESC to return the main page. 46 3) Record Press RECORD to make record-relevant setting, as graphically demonstrated in the picture below: After the setting is complete, press SAVE&ESC to return the main page. 4) Schedule Press SCHEDULE to make scheduled-record-relevant setting, as graphically demonstrated in the picture below: After the setting is complete, press SAVE&ESC to return the main page. 47 5) Motion Press MOTION to make scheduled-record-relevant setting, as graphically demonstrated in the picture below: After the setting is complete, press SAVE&ESC to return the main page. 6) Alarm Press ALARM to make alarm-relevant setting, as graphically demonstrated in the picture below: After the setting is complete, press SAVE&ESC to return the main page. 48 7) Network Press NETWORK to make network-relevant setting, as graphically demonstrated in the picture below: After setting is complete, press SAVE&ESC and the webpage will return to top page automatically; user now needs to re-input the Username and Password for new login. 8) Advanced Press ADVANCED to make setting relevant to advanced options, as graphically demonstrated in the picture below: After the setting is complete, press SAVE&ESC to return the main page. Note: After you modify the Video Format, DVR will automatically reboot, the user now needs to re-login. 49 Upgrade the network firmware: Press Firmware Update and system will jump to the following page automatically: Follow the following steps to upgrade the network firmware: Step1. Press the "Browse" button to select the firmware file (Ex: 7604H0136.bin -Please download the firmware from http://www.acard.com). Step2. When specified the correct firmware file, please press the ''Upload'' button to start uploading. Note: Once started uploading, a window will appear, as shown below, press the OK button to confirm. 50 After recording is stopped, system will prompt that the firmware uploading is successful; as shown in the following picture. Press OK to confirm it. Step 3: After complete, press ''Pre-Check'' to certify the firmware document; after the certification is complete, a prompt window will jump out stating that the certification work is successful. Press OK to confirm it. Step4: Next, press “Burn” to start updating the firmware. Warning: during the firmware-updating process, do not offline or turn off the browser; other wise, it would cause error within the firmware-updating process that results in unable to boot normally. After the firmware updating is successful, a prompt window will jump out stating that the certification work is successful. Press OK to confirm it. 51 Step5. After the prompt window of successfully burnt of firmware appears and “OK” is pressed, the firmware-updating procedure is complete; press “Restart” to reboot the remote DVR unit. 9) Live video monitoring Use the full-screen, 4-split, buttons to switch different display mode for live monitoring. full-screen 4-split Local record After pressing the “Full Screen” at bottom of live video display, user can full-screen monitor different channels of live video by switch operation. Press the 4-partition button at bottom of the live video display to turn the display into 452 partition mode making live monitoring. 10) PTZ control Click on the PTZ-control button at the top of the main page and a window displaying the settings for Channel/ Baud Rate/ Protocol will appear on the right of the screen. Enter the correct PTZ camera parameters to enable the PTZ control function. 11) Lock record The live video files can be saved onto the local side. This allows the videos to be played locally using the bundled DVR Player. NOTE: the default save directory is in c drive. (under c:\) 53 9.2 Web troubleshooting Q1: After launching the browser and entering the DVR IP: port, the error "The page cannot be displayed" appears as shown below: A1: Check the PC's network connection and the DVR Network settings. Check that the IP address is correct and that the DVR is connected properly to the network. Q2: After login, the DVR's web page doesn't show the live video: A2: Please download and install the VLC media player software. During installation, close the browser and then check the ActiveX Plugin and Mozilla Plugin components to be installed so that the browser can play the live video properly. 54 APPENDIX 1. Alarm Input/Output Pin Descriptions (16CH) Pin NO. Pin Description 1 RS485- 2 RS485+ 3 COM1 4 Relay Output N.O1 5 Relay Output N.C1 6 COM2 7 Relay Output N.O2 8 Relay Output N.C2 9 Sensor Input 1 10 Sensor Input 2 11 GND 12 Sensor Input 3 13 Sensor Input 4 14 GND 15 Sensor Input 5 16 Sensor Input 6 17 GND 18 Sensor Input 7 19 Sensor Input 8 20 GND 55 Pin NO. Pin Description 21 Sensor Input 9 22 Sensor Input10 23 GND 24 Sensor Input11 25 Sensor Input12 26 GND 27 Sensor Input13 28 Sensor Input14 29 GND 30 Sensor Input15 31 Sensor Input16 32 GND 56 APPENDIX 2. CF card Compatible List Brand Capacity Speed A-DATA 4GB 266X 8GB Speedy Apacer 4GB 300X Hagiwara 4GB 300X Kingston 1GB N/A 4GB 266X Pertec 16GB 233X PQI 4GB 300X RIDATA 4GB 266X 8GB 233X 16GB 233X 32GB 133X 2GB N/A 4GB 266X 2GB 266X 32GB 133X SanDisk Transcend 57 APPENDIX 3. Play process after backing up DVR files to USB device (I)Formatting in advance : Reminder: if you wish to backup previous recorded historic data through the USB Port, it is suggested to first format the USB device through the DVR in order to ensure that the USB device could be accurately identified by the DVR and backup data properly; the steps are as follows: (1) Insert the USB device into the USB Port in front of the DVR. (2) Enter Menu => Advanced => Disk Format, select the USB Disk and execute the format action. 58 (II) When the formatting is complete, backup the recorded historic data : (1) Insert the USB device into the USB Port in front of the DVR. (2) Enter Menu => Advanced => Search & Backup (3) When the USB device is properly inserted, the USB Disk will appear in the Backup to Media column. (4) Next, select the backup file type: NonGeneric (dedicated format) or Generic-H264 (h.264 format) 59 (5) Then, using the "By channel & Time" backup method as an example: select the “channel/start time/end time” you wish to backup, the backup file size will be displayed, and then press the “Yes” button to start backing up. (6) When the backup is complete, a prompt will be displayed, as shown in the figure below. 60 (Ⅲ Ⅲ) When the backup is complete, files should exist in the USB device: (1) When the backup is complete, which files should exist? 1. DVRPlayer.exe => The DVR's own playback program after the backup is complete; able to play back the following two formats: NonGeneric (*.dat dedicated format file) Generic-H264 (h.264 format file ) 2. *.h264 format file => The file that was backed up when Generic-H264 was selected. 3. *.dat dedicated format file. => The file that was backed up when NonGeneric was selected. (2) *.h264 format files could also be played back with VLC Player. 61