1
CXCD470
MINI SYSTEM WITH 3-CD CHANGERS AND
DOUBLE CASSETTE RECORDER
INSTRUCTION MANUAL
WARNING
To prevent fire or shock hazard, do not expose this appliance to rain or moisture.
IMPORTANT
Since the CD circuity may cause interference to other radio tuners nearby, switch
this unit off when not in use or move it away from the affected radio tuner.
RISK OF ELECTRIC SHOCK
DO NOT OPEN
The lightning flash with arrowhead symbol, within an equilateral triangle, is intended to alert
the user to the presence of
uninsulated "dangerous voltage" within the product's enclosure that may be of sufficient
magnitude to constitute a risk of
electric shock to persons.
WARNING: TO REDUCE THE
RISK OF ELECTRIC SHOCK,
DO NOT REMOVE COVER (OR
BACK). NO USER-SERVICEABLE PARTS INSIDE, REFER
SERVICING TO QUALIFIED
SERVICE PERSONNEL.
The exclamation point within an
equilateral triangle is intended to
alert the user to presence of important operating and maintenance (servicing) instructions in
the literature accompanying the
appliance.
DANGER
INVISIBLE LASER
RADIATION WHEN
OPEN AND INTERLOCK FAILED OR
DEFEATED. AVOID
DIRECT EXPOSURE
TO LASER BEAM.
LASER SAFETY
This unit employs an optical laser beam system in the CD mechanism, designed with built -in safeguards. Do not attempt to disassemble, refer to
qualified service personnel.
Exposure to this invisible laser light beam may be harmful to the human eye.
THIS IS A CLASS-1 LASER PRODUCT. USE OF CONTROLS, OR ADJUSTMENTS OR PROCEDURES OTHER THAN THOSE SPECIFIED HEREIN, MAY
RESULT IN HAZARDOUS LASER LIGHT BEAM EXPOSURE.
2
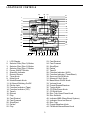
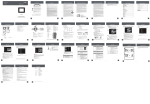
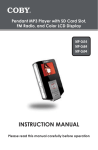
LOCATION OF CONTROLS
42
43
44
2
41
40
39
38
3
37
4
5
6
7
8
9
10
11
12
36
35
1
34
33
32
31
30
29
28
27
13
14
15
16 17
1.
2.
3.
4.
5.
6.
7.
8.
9.
10.
11.
12.
13.
14.
15.
16.
17.
18.
19.
20.
21.
22.
18 19 20 21 22 23 24 25 26
LCD Display
Selector Disc (Disc 3) Button
Selector Disc (Disc 2) Button
Selector Disc (Disc 1) Button
Power ON/OFF Button
Stand By Indicator
Remote Sensor
Timer Knob
Mute Knob
Mode/Remain Knob
Hi-Speed Dubbing On/Off
Phone Jack
Function Indicator (Tape)
Function Indicator (CD)
Tape A
Record
Play
Fast Rewind
Fast Forward
Stop/Eject
Pause
Play
23.
24.
25.
26.
27.
28.
29.
30.
31.
32.
33.
34.
35.
36.
37.
38.
39.
40.
41.
42.
43.
44.
3
Fast Rewind
Fast Forward
Stop/Eject
Pause
Tape B
Function Indicator (AUX)
Function Indicator (Tuner/Band)
Surround On/Off Knob
Memory/C-Adj. Knob
Bass Boost On/Off Knob
Volume Knob
Preset Repeat/Random
Tuning Knob
CD Play/Pause Knob
CD Stop Knob
Disc Tray Open/Close Knob
Disc Selector
Indicator BBS (Bass Boost System)
Indicator Surround Sound
Disc Tray
Preset Equalizer Knob
FM Mode Stereo/Mono Knob
59
45
46
47
48
49
50
51
52
53
60
54
56
57
55
58
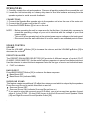
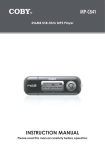
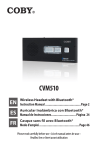
45.
46.
47.
48.
49.
50.
51.
52.
AUX In
Beat Cut Switch
Right Speaker Out Let
Left Speaker Out Let
Left Surround Speaker Out Let
Right Surround Speaker Out Let
FM Antenna
AC Voltage Selector
(for dual voltage version only.)
53.
54.
55.
56.
57.
58.
59.
60.
4
AC Main Out Let
Left Surround Speaker Box
Left Speaker Box
Right Surround Speaker Box
Right Speaker Box
Remote Handset
Surround Speaker Wires
Speaker Wires
OPERATIONS
1. Carefully unpack the unit and speakers. Remove all packing material from around the unit.
2. Locate the unit horizontally on a heavy duty stand or firm level surface and away from the
speaker system to avoid acoustic feedback.
CONNECTIONS
1. Connect the Speaker Box speaker wire to the speaker out let on the rear of the main unit.
2. Connect the AC power cord to the AC outlet.
3. Press the POWER Button [5] to turn on the unit.
NOTE: - Before operating the unit in a new area for the first time, it is absolutely necessary to
check the operating voltage of your unit is identical with the voltage of your local
power supply.
- This unit is to be operated only at the printed power source voltage on the back panel.
- Disconnect from the wall outlet when it is not be used for an extended period of time.
SOUND CONTROL
VOLUME
Press the VOLUME Button [33] to increase the volume, and the VOLUME
decrease the volume.
Button [33] to
PRESET EQUALIZER
The PRESET EQUALIZER SELECTOR [43] provides 4 different ranges of control (FLAT,
CLASSIC, ROCK AND POP ) for the audio frequency spectrum in narrow and distinct sections.
Use the selector to select the best response that suits the type of music and individual taste.
*
FLAT no indicator
BASS BOOST
Press BASS BOOST Button [32] to enhance the bass response:
- Bass Boost OFF
- Bass Boost ON (Indicator BBS)
SURROUND SOUND
This feature creates an additional 3-D effect from stereo sound which is relayed by the speakers.
Press Surround Sound to switch this effect on and off.
- Surround Sound OFF
- Surround Sound ON (Indicator Surround Sound turn on)
* If you want to enjoy the surround sound 3-D effect, you must connect two speaker (impedance of 4 ohm/12.5W - 32 ohm/6.0W) boxes to the Left Surround Sound Speaker Outlet
[49] and Right Surround Sound Speaker Outlet [50].
.
5
CLOCK ADJUSTMENT
1. Set to “TAPE” [13] or “AUX” [28] mode. The clock will appear on the LCD display
2. Press the MEMORY/C-ADJ. Button [31] once to adjust the hour. Press the button once
more to adjust the minute.
3. Press the
/TUNING Button [35] and
/TUNING Button [35] to set the time.
- Press the
/TUNING Button once to add one hour or one minute to the time setting.
When keep pressing the button, the “hour” or “minutes” setting is increased continuously
until the button is released.
- Press the
/TUNING
Button once to reduce one hour or one minute to the time
setting. When keep pressing the button, the “hour” or “minutes” setting is decreased
continuously until the button is released.
4. Press the MEMORY/C-ADJ. Button again to confirm the time setting.
5. If the unit is in the “RADIO” or “CD” mode, press the MODE/REMAIN Button [10] and
repeat step 2-4.
SETTING THE TIMER
You can set the automatic switch-on and switch-off time using the timer function. For this
purpose, set the correct time first.
1. The "MODE/REMAIN" Button [10] should be press twice. TIMER ON appears on the display unit to set the switch-on time.
2. After pressing the "MEMORY/C-ADJ." Button [31], the hours can be set using the
/
TUNING Button [35] and
/TUNING Button [35].
3. To set the minutes, press the "MEMORY/C-ADJ." Button [31], use the
/ TUNING
Button [35] and
/TUNING Button [35].
4. When the "MODE/REMAIN" Button [10] is pressed again, TIMER OFF appears on the
display unit to set the switch-off time.
5. As described above, set the switch-off time.
6. Press the "TIMER" Button [8] to switch on the timer.
7. Press the "TIMER" Button [8] again, until the message TIMER disappears from the display
unit to switch off the timer.
* TIMER OFF can only be function when the unit is switch on by TIMER ON function.
RADIO OPERATION
1. Press the POWER Button [5] once to turn the unit on. The STAND-BY indicator [6] will
turn on.
2. Press the TUNER/BAND Button [29] to “RADIO” mode.
3. Press the TUNER/BAND Button [29] to the desired band.
4. Press the
/TUNING Button or
/TUNING Button [35]; momentarily (less than 0.
5 sec.) to step up or down the receiving frequency in order to select the desired station.
5. For auto tuning, keep pressing the
/TUNING Button or
/TUNING Button (more
than 0.5 sec.) until the displayed frequency starts to change, then release the button. Tuning will stop automatically when a station is received.
6. To turn the unit off after use, simply press the POWER Button once again and the STANDBY indicator will light off.
6
FM RECEPTION
Raise and extend the FM antenna wire [51] then adjust the position for the best reception. ST
indicator will appear on the display only if an actual stereo broadcast station is being received.
AM RECEPTION
Rotate horizontally or relocated the unit for best reception as the built-in ferrite bar antenna is
directional.
PRESET STATIONS
1. Press the TUNER/BAND Button [29] to “RADIO” mode.
2. Press the TUNER/BAND Button [29] to the desired band.
3. When a desired station is tuned, press the MEMORY/C-ADJ. Button [31] and then select
the desired station you want to store by pressing the REPEAT/PRESET Button [34] or
RANDOM/PRESET Button [34].
4. Press the MEMORY/C-ADJ. Button again to confirm the preset station.
5. Repeat step 3 and 4 to enter remaining preset stations.
NOTE: The preset memory operating can be repeated to store a maximum of 20 FM station
and 20 AM station.
RECEIVING A PRESET STATION
To recall any preset station within the selected band, simply press REPEAT/PRESET
Button [34] or press RANDOM/PRESET
Button [34] until preset number selection appears on the display.
AUX IN
The cinch sockets [45] at the rear of the unit can be used for connecting external playback
machines. Check the polarity of the right and left channel is correct.
7
COMPACT DISC OPERATION
CONCERNING COMPACT DISC
1. USABLE COMPACT DISCS
Use a compact disc bearing the mark as shown.
2. Notes on handling discs
Removing the disc from its storage case and loading it.
Press the claws at
the center of the case
Lift out without touching
the recorded surface
Insert with the label facing up
Press the disc gently to insert it
Incorrect
• Do not touch the rainbow color reflecting recorded surface.
• Do not stick paper or write anything on the label surface.
• Do not bend the disc.
3. Storage
• For storage, be sure to return a disc to its case.
• Do not expose discs to direct sunlight nor high temperature such as from a heater, high
humidity and dusty places.
4. Cleaning a disc
Before operation, wipe off dust, dirt and fingerprints on the surface with a soft cloth. The
disc should be cleaned from inward to outward.
Correct
Incorrect
From the center to the edge
• Never us thinner, nezine, analog record cleaner or anustatic spray.
8-cm (3-3/16") 'CD singles'
#8-cm (3-3/16") compact disc can be used (without using AC adaptor) in this unit.
8
PLAYING CD
1. Push the POWER Button [5] to turn the unit on. The STANDBY INDICATOR [6] will light up.
2. Press the CD Button [14] to “CD” mode.
3. Press the OPEN/CLOSE Button [38] once to open the disc tray [42] and place CDs (label
side facing up) on the disc tray, press DISC SKIP Button [39], the carousel rotates, so you
can insert another CD. Then, press the OPEN/CLOSE Button [14] again, the CD disc tray
[42] will be closed. If no disc was loaded on the selected carousel, “no disc” will appear on
the display.
PLAY FUNCTION
Press PLAY/PAUSE Button [36] to start playing the disc from track number 1.
PAUSE FUNCTION
Press PLAY/PAUSE Button [36] when during play, pause the disc and mute the music from
play mode. To clear PAUSE mode, press the PLAY/PAUSE Button [36]. The system will
resume playing from the time of the disc was paused.
STOP FUNCTION
Press STOP Button [37] to stop playing or cleared of tracks stored.
REPEAT FUNCTION
REPEAT is a toggle command: No repeat
Repeat one track
Repeat all
No repeat
Press the REPEAT Button once: Repeat one track; twice: Repeat all tracks; Three times: Normal
SKIP FUNCTION
Press FORWARD SKIP
Button [35] to select the next track in the sequence. Press BACKWARD SKIP
Button [35] to select the previous track in the sequence.
SEARCH FUNCTION
Press and hold the FORWARD SKIP
[35] or BACKWARD SKIP
Button [35] to locate a
particular point in a track during playing by monitoring the high-speed cueing sound.
Button [35] to go ahead.
Press FORWARD SKIP
Press BACKWARD SKIP
Button [35] to go back.
NOTE: Release the button when you reach the point in the selection that you want.
INTRO CHECK FUNCTION
Press INTRO CHECK Button, the first 10 seconds of all (programmed) tracks are played in
turn. When the end of a disc’s playlist is reached, the system will attempt to scan tracks on the
next disc in the carousel. The system will scan disc one. When all discs have been scanned
the system will enter STOP mode automatically.
PROGRAM FUNCTION
This function allows you to play the track (up to 20 tracks) of all disc in any carousel. Enter the
program procedure as below:
1. Press the MEMORY/C-ADJ. Button [31] when the disc is not turning in stop mode, the
MEMORY icon flashes on the display.
2. Press Disc SELECTOR Button [34] or DISC 1, 2, 3 to selected disc which disc you want.
9
3. Press the FORWARD SKIP or BACKWARD SKIP Button [35] to select the desired track.
4. Press the MEMORY/C-ADJ. Button [31] again to ENTER the selection into the program
memory.
5. Repeat steps 2, 3 and 4 to enter desired tracks up to maximum of 20 selections.
6. To clear the program memory, press the STOP Button [37] while the system is in stop
mode.
DISC SELECTOR FUNCTION
Press DISC SELECTOR Button [39], the carousel will rotate to the Forward location.
OPEN/CLOSE FUNCTION
Press the OPEN/CLOSE Button [38] to drive the disc tray [42] inwards or outwards. If the disc
tray [42] is closed or closing then the current system mode. If the disc tray [42] is open or
opening the disc tray is driven inwards. The system will remain in it’s current mode, if in stop
mode. The system will search through each location to find a disc, when a disc is found, the
system will go straight into STOP mode. The total track numbers and total playing time will
show on display for that disc.
MAINTENANCE
POWER SWITCH
After using the unit, turn off the power by pressing the power switch.
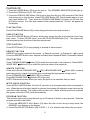
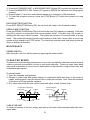
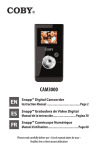
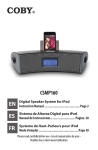
CLEAN THE HEADS
To ensure the continued high performance of your unit, periodically clean the heads and pinch
rollers to prevent accumulation of dust or tape oxide deposits. Failure to clean these parts
may result in distortion of record sound, deterioration of reproduction or high frequencies, and
inconsistent tape speed.
To clean heads:
1. Open the cassette compartment.
2. Moisten a cotton bud with heads cleaner or methylated spirit and apply to the faces of
heads, rubbing gently until all traces of dirt or oxide are removed. Also, clean the surfaces
of the pinch of rollers and the capstans.
3. Dry, clean and polish the face of the heads with piece of soft, lint-free cloth.
Cassette Record/Playback
Cassette Playback
Cotton Bud
Capstan
Erase Head
Pinch Roller
Cotton Bud
Capstan
Pinch Roller
Record/Play Head
Play Head
CLEAN THE UNIT
To retain the beauty of the unit, simply wipe with a soft clean cloth moistened with plain lukewarm water.
10
TAPE OPERATION
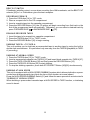
GENERAL INFORMATION ON CASSETTE TAPES
• For playback, use normal (low-noise) tape for best sound. (Metal or chrome tape is not
recommended)
• For recording, use normal tape only.
• Do not use C-120 tapes, tapes with internal reels or poor-quality tapes because they can
cause malfunctions.
• Before loading a tape into the cassette compartment, tighten the slack tape with a pen or
pencil.
• Cassette have removable tabs which prevent accidental recording from taking place. Removing the tab on the top left side protects you from erasure. Cover the tab holes with
adhesive tape to erase or record again.
CASSETTE PLAYBACK
1. Press the TAPE Button [13] to “TAPE” mode.
2. Press the STOP/EJECT Button [20]/[25] and insert a prerecorded cassette tape into the
cassette compartment.
3. Close the cassette door [15]/[27].
4. Press the PLAY Button to start playback. Also, playback will stop automatically when the
end of the tape has been reached.
FAST FORWARD REWIND
1. Press the FAST FORWARD
Button [19]/[24] to advance the tape or press the REW
Button [18]/[23] to rewind.
2. Press the STOP/EJECT Button [20]/[25] when the desired location has been reached.
NOTE: In FAST FORWARD
and FAST REWIND
mode, the tape will not automatically stop when it reaches the end.
INTERRUPT PLAYBACK
Press the PAUSE Button [21]/[26] during playback and press it again to resume playback.
RECORDING
• When recording important selections, be sure to make a preliminary test to ensure that the
desired material is being properly recorded.
• Metal and chrome tapes cannot be used for recording.
RECORDING FROM RADIO (TUNER)
1. Press the TUNER/BAND Button [29] to “TUNER” mode.
2. Press the TUNER/BAND Button [29] to the desired band.
3. Tune a desired station.
4. Insert a cassette tape into the cassette compartment.
5. Press RECORD Button [16] which also engages the PLAY Button, to being recording.
6. Press the PAUSE Button [21] to suspend recording without deactivating the record mode.
Press again to resume recording.
11
BEAT CUT SWITCH
If feedback (whistling noise) occurs when recording from AM broadcasts, set the BEAT CUT
selector [46] to I or II whichever gives the best reception.
RECORDING FROM CD
1. Press the CD Button [14] to “CD” mode.
2. Place a compact disc in the CD compartment.
3. Insert a cassette tape into the cassette compartment.
4. Press the RECORD Button [16], the CD player will begin recording from first track or the
first of the programmed track automatically. Otherwise, you can select a desired track by
press FORWARD SKIP
or BACKWARD SKIP
[35].
ERASING RECORDED TAPES
1. Insert the tape to be erased into cassette compartment.
2. Press the TAPE Button [13] to “TAPE” mode.
3. Press the RECORD Button [16] to begin erasing.
DUBBING TAPE B: > TO TAPE A:
This unit enables you to duplicate a prerecorded tape to another tape by using the built-in
double deck mechanisms. It is performed only one way, from the TAPE:B (playback) to TAPE:
A (recording).
DUBBING AT NORMAL SPEED
1. Press the TAPE Button [13] to “TAPE” mode.
2. Insert a prerecorded cassette into TAPE B [15] and insert blank cassette into TAPE A [27].
3. Press the TAPE A PAUSE Button [26] and then press the RECORD Button [16].
4. Press the TAPE B PLAY Button [22] to start dubbing.
5. To stop the dubbing operation, press both STOP/EJECT Button [20]/[25] simultaneously.
DUBBING AT HIGH SPEED
This unit is equipped with a HIGH SPEED DUBBING system which allows duplication a prerecorded tape at approximately two-thirds the time of the duration at normal speed.
Press the HIGH SPEED DUBBING Switch [11] and follow the same procedure as instructed in
“DUBBING AT NORMAL SPEED”.
When dubbing a prerecorded cassette tape at HIGH SPEED in TAPE function, a chattering
sound is heard.
12
OPERATION OF REMOTE CONTROL UNIT
LOADING BATTERIES
1. Remove the battery compartment cover.
2. Insert 2 “AAA” size (not included) batteries as indicated by the polarity marking. (Placing
the batteries in the wrong way around cause malfunction.)
3. Close the battery compartment cover.
OPERATION PROCEDURE
Plug the power cord of the system into an AC wall outlet, and press the POWER ON/STAND
BY button on the remote control unit to turn the power on. When the power is turned on, press
the key of the source component to be operated.
NOTE:- When the remote-controllable distance gets shorter than before, replace both batteries with new ones.
- Malfunction may occur if direct sunlight or the light of a high-frequency lightning fluorescent lamp enters the remote control light sensor. In such a case, change the
system installation position prevent the malfunction.
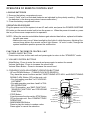
FUNCTION OF THE REMOTE CONTROL UNIT
1. POWER ON/OFF BUTTON
Press once to turn on the main unit and press again to return to the “STAND BY” mode.
2. VOLUME CONTROL BUTTONS
Mute Button : Press to mute the sound and press again to restore the sound.
Volume Up Button : Press to increase the sound level.
Volume Down Button : Press to decrease the sound level.
3. CD/RADIO/CLOCK ADJUSTMENT OPERATION BUTTONS
- UP and DOWN Buttons : (TUNING/CLOCK/CD SEARCH)
They have the same functions as the F.SKIP/TUNING UP/C-ADJ. and B.SKIP/TUNING
DOWN/C-ADJ. Button [35] on the main unit.
Transmitter
• For clock setting, see item 3 of “CLOCK ADJUSTMENT”.
• For radio operation, see item 4 and 5 of “RAPower On/Off
DIO OPERATION”.
Function
Volume Up
• For CD operation, see “SKIP FUNCTION”,
Number Keys
Volume Down
“SEARCH FUNCTION” and “PROGRAM
FM Mode/Intro
FUNCTION”.
Timer
Pre-EQ
Mute
- STOP Button
Band
Select Disc (1,2,3)
Dn/R-Skip
It has the same function as the STOP Button
Play/Pause
Up/F-Skip
[37] on the main unit. See “COMPACT DISC
Stop
M-Dn/Random
OPERATION”.
Mode-Remain
M-Up/Repeat
Memory/C-Adj.
- RANDOM/M-DN Button
Press to play the tracks in random order.
Press again to cancel the selection.
13
- MODE/REMAIN Button
• In radio operation
Press the button to change from frequency display to clock display and press again to
return.
• In CD operation
Press the button to change the display from playing time to remaining time, and then to
clock display. Press again to return.
- PLAY/PAUSE Button
It has the same function as the PLAY/PAUSE Button [36] on the main unit. See “COMPACT DISC OPERATION”.
- MEMORY/C-ADJ. Button
It has the same functions as the MEMORY/C-ADJ. Button [31] on the main unit.
• For clock setting, see item 2 and 4 of “CLOCK ADJUSTMENT”.
• For radio operation, see “PRESET STATION”.
• For CD operation, see “MEMORY PLAY”.
- REPEAT/M-UP. Button
It has the same functions as the REPEAT/M-UP Button [34] on the main unit.
• For radio operation, see “PRESET STATION”.
• For CD operation, see “PRESET PLAY”.
4. RADIO/CD NUMERIC BUTTONS
• In order operation, the numeric buttons can be used to enter the desired station directly.
• In CD operation, the numeric buttons can be used to enter the desired track directly. If the
track number or the number of selection is more than 19, follow the following examples.
- To enter 20 — +10 +10 0
- To enter 25 — +10 +10 5
5. INFRARED LIGHT-EMITTING DIODE
Operating range:
Remote Control Sensor
approx. 6m
14
SPECIFICATION
RADIO SECTION
Frequency
FM: 87.5 — 108 MHz
AM: 522 — 1620 kHz
CASSETTE SECTION
Track System
Recording System
Tape
Frequency Response
Compact Cassette Stereo
AC Bias
Normal
100 — 8000 Hz
CD SECTION
Sampling Frequency
Frequency Response
44.1 Hz
20 Hz — 20 KHz
GENERAL
Output terminal
Output Power
Weight
Terminal Speaker Sockets
5W + 5W (At 10% THD)
11.8 Kg
POWER SOURCES
Mains Operation
Power Consumption
Dimension
Main Unit
Speaker
Surround Sound Speaker
AC110V / 220V, 60Hz / 50Hz
25 W
280mm (W) x 325mm (H) x 350mm (D)
220mm (W) x 300mm (H) x 220mm (D) x 2
220mm (W) x 90mm (H) x 206mm (D) x 2
15
90 DAY LIMITED WARRANTY
COBY ELECTRONICS CORP. ("COBY") warrants this product to the original purchaser to be
free from defects in material or workmanship under normal use of 90 DAYS from the date of
original purchase. COBY agrees under this warranty, to repair or replace it with a new or
reconditioned product at no additional charge. Our warranty does not cover any product
which has been subject to neglect, unreasonable use, accident, violation of operating
instructions, or any product that has been repaired or modified by an unauthorized service
agent.
To obtain factory service, return this unit freight-prepaid to the address shown below within the
duration of this warranty. Enclose $6.00 for each item in the form of money order made
payable to COBY ELECTRONICS CORP. to cover the cost of shipping and handling. Also,
include a copy of the sales receipt to show proof of purchase and a detailed description of the
problem. The unit(s) must be packaged in such a way as to reasonably protect it from possible
shipping damage. For further information write to :
COBY ELECTRONICS CORP.
Customer Service Dept.
56 - 65 Rust Street
Maspeth, N.Y. 11378
COBY's liability under any legal theory for any loss or damage in any way related to this
product shall not be exceed the sales price of this product. In no event shall COBY be liable
for any incidental or consequential damages resulting from the use of this product, or inability
to use this product. Repair or replacement as provided under this warranty is the exclusive
right of the customer.
Except to the extent prohibited by law, no express or implied warranty of merchantability of
fitness for a particular purpose on this product shall be extended beyond the period of this
warranty. Some states prohibit the exclusion or limitation or incidental or consequential damages, so that the above limitations or exclusion may not apply to you. This warranty gives you
specific rights, and you may also have other rights that may vary from State to State.
16