1
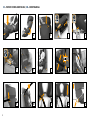
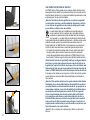
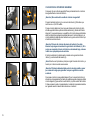
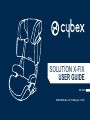
SOLUTION X-FIX
USER GUIDE
ES / EN
ECE R44/04, Gr. 2–3 | 15-36kg (ca. 3–12Y)
ES – INSTRUCCIONES ABREVIADAS / EN – SHORT MANUAL
2
1
2
3
4
5
6
7
8
9
10
11
12
13
14
15
ES
¡ADVERTENCIA! ESTAS INSTRUCCIONES SÓLO SON UN RESUMEN. PARA ASEGURAR LA MÁXIMA SEGURIDAD Y CONFORT PARA SU HIJO,
ES MUY IMPORTANTE LEER COMPLETA Y ATENTAMENTE EL MANUAL DE INSTRUCCIONES.
EN
WARNING! THIS SHORT MANUAL SERVES AS AN OVERVIEW ONLY. FOR MAXIMUM PROTECTION AND BEST COMFORT OF YOUR CHILD, IT IS
ESSENTIAL TO READ AND FOLLOW THE ENTIRE INSTRUCTION MANUAL CAREFULLY.
3
4
4
¡APRECIADO CLIENTE!
Muchas gracias por comprar una CYBEX Solution X-fix. Le aseguramos que en el desarrollo
de la CYBEX Solution X-fix se han tenido en cuenta la seguridad, el confort y la practicidad. El
producto se ha desarrollado bajo un estricto control de calidad y teniendo en cuenta todos
los estándares de seguridad.
DEAR CUSTOMER
Thank you for purchasing the CYBEX Solution x-fix. We assure you that in the process of
developing the CYBEX Solution x-fix we focused on safety, comfort and user friendliness. The
product is manufactured under special quality surveillance and complies with the strictest
safety requirements.
5
5
Manual de Instrucciones
CYBEX Solution X-fix
alzador con respaldo
RECOMENDADO PARA:
Edad: Desde los 3 a los 12 años
aproximadamente.
Peso: de 15 a 36 Kg.
Altura: hasta 150 cm.
Para vehículos equipados con cinturón de
seguridad retráctil de 3 puntos.
NORMATIVA:
ECE R-44/04, grupo 2/3, de 15 a 36 Kg.
04301298
CYBEX GmbH
Riedinger Str. 18, 95448 Bayreuth
Germany
06/2013
6
INSTRUCTION MANUAL
CYBEX Solution X-fix
booster with backrest
RECOMMENDED FOR:
Age: from approximately 3 to 12 years
Weight: 15 to 36 kg
Body height: up to 150 cm
For vehicle seats with three-point automatic
retractor belt
HOMOLOGATION:
ECE R-44/04, group 2/3, 15 to 36 kg
ESCONTENIDO
¡Advertencia! Para garantizar que su hijo se encuentre seguro, es muy
importante usar e instalar la CYBEX Solution X-fix de acuerdo con el
Manual de Instrucciones.
¡Atención! Guarde siempre el manual de instrucciones bajo la funda elástica
que encontrará en la parte trasera del respaldo para que pueda tenerlo a mano
siempre que precise consultar cualquier duda.
Instrucciones abreviadas....................................................................... 2
Advertencia / Aviso...................................................................................... 3
Licencia – Homologación.......................................................................... 6
Montaje inicial.............................................................................................. 8
Ajuste de la talla........................................................................................ 8
Ajuste del reposacabezas...................................................................... 8
Una correcta posición en el vehículo............................................. 10
Instalación de la silla de automóvil con conectores.............. 12
Extraer la Solution X–fix...................................................................... 14
Seguridad del niño................................................................................... 14
Colocación del cinturón de seguridad.......................................... 16
¿Está su hijo seguro?............................................................................. 18
Reclinado del reposacabezas............................................................. 18
Cuidado del producto............................................................................. 20
Quitar la funda del asiento.................................................................. 20
Extraer la funda del respaldo........................................................... 20
Limpieza.......................................................................................................... 22
Qué hacer después de un accidente................................................. 22
Duración del producto ......................................................................... 22
Reciclado..................................................................................................... 24
Garantía........................................................................................................ 24
ENCONTENT
Warning! For your child‘s maximum protection, it is essential to use and
install the CYBEX Solution X-fix according to the instructions in this
manual.
Note! Please keep the instruction manual close by for future reference (e.g.
under the elastic cover on the rear side of the backrest)
Short manual................................................................................................ 2
Warning / Note.............................................................................................. 3
Homologation............................................................................................... 6
First installation........................................................................................ 9
Adjustment regarding the child‘s height........................................ 9
Adjustment of the headrest.................................................................. 9
The best position in the car................................................................. 11
Installation of the car seat with connectors............................ 13
Uninstalling the Solution X-fix........................................................... 15
Securing the child.................................................................................... 15
Fastening the seat belt of your child............................................. 17
Is your child properly secured?....................................................... 19
Reclining headrest.................................................................................. 19
Product care.............................................................................................. 21
Removing the seat cover....................................................................... 21
Removing the seat cover of the backrest.................................... 21
Cleaning........................................................................................................ 23
What to do after an accident.............................................................. 23
Durability of the product .................................................................... 23
Disposal......................................................................................................... 25
Warranty...................................................................................................... 25
7
MONTAJE INICIAL
b
a
La silla de seguridad está constituida por un asiento elevador (d) y un respaldo
(a) con reposacabezas reclinable y ajustable en altura. Sólo combinando las
dos partes proporcionará al niño una correcta protección y confort.
c
a
d
d
¡Atención! Las partes de la CYBEX Solution X-fix no se deben usar
por separado o en combinación con sillas de seguridad, respaldos
o reposacabezas de otra gama o fabricante. En este caso la garantía
expiraría inmediatamente.
El respaldo (a) se ancla con el eje (c) del asiento (d) mediante la guía de
arrastre (b).
¡Aviso! Por favor, almacene este manual de instrucciones en un lugar seguro.
Debería tenerlo siempre a mano para futuras consultas. ¡Aviso! Por favor,
almacene este manual de instrucciones en un lugar seguro. Debería tenerlo
siempre a mano para futuras consultas.
¡Atención! Por favor, siempre preste atención a que ninguna parte suelta o
plástica de la silla de seguridad quede dañada por el uso diario del coche,
por ejemplo el ajuste de la silla de seguridad o la puerta del vehículo.
AJUSTE DE LA TALLA
e
El protector de hombros y reposacabezas (e) deben ajustarse óptimamente
en altura para proporcionar la mejor protección y confort para su hijo/a y así
garantizar una posición óptima del cinturón de seguridad (f). Usted puede
ajustar la altura (e) en 11 posiciones. El protector de hombros está fijado al
reposacabezas y no se debe ajustar por separado. El ajuste debe ser realizado
de tal manera que usted pueda introducir 2 dedos entre el borde final del
reposacabezas y el hombro del niño/a.
f
e
h
8
AJUSTE DEL REPOSACABEZAS
• Coloque al niño/a en la silla de seguridad
• Presione el botón de ajuste (h) para desbloquear el protector de hombros y el
reposacabezas.
• Ahora puede ajustar el protector de hombros y el reposacabezas (e) a la
altura deseada.
• En cuanto deje de pulsar el mecanismo de ajuste (h), el protector de hombros
y el reposacabezas (e) se ajustarán completamente.
FIRST INSTALLATION
The child seat consists of a booster seat (d) and a backrest (a) with height
adjustable shoulder and headrest. Only the combination of both parts provides
best protection and comfort to your child.
Warning! The parts of the CYBEX Solution X-fix must not be used
alone or in combination with boosters, backrests or headrests from
other manufacturers or of a different product series. In such cases, the
certification expires immediately.
Connect the backrest (a) to the booster (d) by hooking the guide lug (b) on the
axis (c) of the booster (d).
Note! Please keep the instruction manual close by for future reference (e.g. by
storing it under the elastic cover at the rear side of the backrest.)
Warning! Please make sure that the plastic parts of the child seat never
get jammed (e.g. in the car door or by adjusting the back seat).
adjustment regarding the child‘s height
A headrest can only provide the best protection and comfort for your child
if optimally adjusted. Only then it can guarantee the optimal position of the
diagonal belt (f). You can adjust the height of the Solution X-fix headrest (e) in
11 positions. The shoulder rest is attached to the headrest and does not have to
be adjusted separately. You can check the optimal adjustment of the headrest
by trying to fit exactly two fingers between the headrest and the shoulders of the
child.
ADJUSTMENT OF THE HEADREST
• Place your child in the child seat.
• Pull the adjustment handle (h) in order to unlock the shoulder and headrest.
• Bring the shoulder and headrest (e) in the desired position.
• As soon as you let go of the adjustment handle (h), the shoulder and headrest
(e) locks automatically.
9
f
10
UNA CORRECTA POSICIÓN EN EL VEHÍCULO
La CYBEX Solution X-fix se puede usar en cualquier asiento del vehículo que
disponga de cinturón retráctil con 3 puntos de anclaje. Se recomienda usar los
asientos traseros del automóvil, ya que la parte delantera generalmente es más
peligrosa para el niño en caso de accidente.
¡Atención! No utilice la silla de seguridad con un cinturón de seguridad
con dos puntos de anclaje o cinturón abdominal. Asegurando a su hijo/a
con un cinturón de seguridad con dos puntos de anclaje, podría causar
graves daños a su hijo/a en caso de accidente.
Los automóviles deben ser compatibles para el anclaje adicional
con los conectores X-fix. En cualquier caso, la silla debe utilizarse
únicamente en aquellos automóviles incluidos dentro de la categoría
„semi universal“, y que estén dentro de la lista adjunta de automóviles
homologados. Esta lista se actualiza periódicamente, y la última versión puede
obtenerse a través nuestro o bien accediendo a www.cybex-online.com.
Excepcionalmente, la CYBEX Solution X-fix se puede usar en el asiento del
copiloto. en este caso, debe tener en cuenta las siguientes instrucciones:
• Si el asiento del copiloto tiene airbag, debe mover el asiento hacia atrás lo
más lejos posible, pero teniendo en cuenta que el punto de anclaje del
cinturón de seguridad debe estar por detrás de la CYBEX Solution X-fix en
todo momento. Se deben seguir las instrucciones del fabricante del vehículo.
¡Advertencia! El cinturón de seguridad (f) debe llegar en diagonal desde la
parte trasera y nunca debe sobrepasar el punto más alto del cinturón de
seguridad por la parte frontal. En el caso de que el cierre del cinturón esté
fabricado de tal modo que sea muy grande para las ranuras de anclaje del
chasis, la CYBEX Solution X-fix no es adecuada para este tipo de vehículo.
El equipaje u otros objetos que se coloquen en el interior del vehículo y puedan
causar lesiones en caso de accidente deben estar fijados correctamente en
todo momento.
¡Atención! Para aquellos vehículos en los que los asientos están situados
lateralmente, el uso de esta silla infantil no está permitido. Para asientos
que están situados en contra del sentido de la marcha, por ejemplo en un
monovolumen o minibus, el uso de la silla infantil está permitido siempre
que el asiento esté homologado para un adulto. Por favor, asegúrese
de que el reposacabezas está colocado cuando instale la silla infantil
en un asiento que está situado en contra del sentido de la marcha. La
silla infantil debe atarse con el cinturón de seguridad, incluso cuando el
niño no está en ella. Esto es necesario para evitar que el conductor o el
copiloto puedan resultar heridos por una silla suelta en caso de tener que
frenar bruscamente o en caso de colisión.
¡Aviso! por favor nunca deje sin la vigilancia de un adulto a su hijo/a en el
vehículo.
THE BEST POSITION IN THE CAR
Without using the connectors the CYBEX Solution X-fix can be installed on all
vehicle seats equipped with a three-point automatic retractor belt. We generally
recommend, however, using the child seat in the back of the vehicle. In the
front, your child is usually exposed to higher risks in case of an accident.
Warning! You must not use the Solution X-fix with a two-point belt or a lap
belt. When securing your child with a two-point belt, the child may sustain
lethal injuries in an accident.
When installing the CYBEX Solution X-fix with its ISOFIX-CONNECT
system the child seat falls into the „semi-universal“ admission category,
i.e. it may only be used in certain types of vehicles. Please refer to the
list of approved cars to check your vehicle‘s compatibility. This list is
updated regularly, and the latest version can be obtained from CYBEX, your
retailer or accessed online at www.cybex-online.com. In exceptions, the child
seat may be used on the passenger seat. Please note the following for such
cases:
• In cars equipped with airbags you should push the passenger seat as far back
as possible. Please make sure that the upper point of the vehicle seat belt
stays behind the belt guide of the child seat.
• You must follow the recommendations of the vehicle manufacturer.
Warning! The seat belt (f) must run diagonally from the back and must
never lead to the front to the upper belt point of the front seat of in your
vehicle. Should you be unable to adjust this for example by pushing the
seat to the front or by using the seat on a different seat in the car, then the
child seat is not suitable for this vehicle.
Luggage or other objects in the vehicle which may cause injuries in an accident
must always be secured properly. Loose parts may turn into deadly projectiles
during an impact.
Warning! For vehicles with passenger seats that are positioned sideways,
the use of this child seat is not allowed. For seats that are positioned
against the direction of travel, e.g. in a van or a minibus, the use of the
child seat is allowed, assuming the seat is approved to carry an adult.
Please ensure that the headrest is not taken off when mounting the child
seat on a passenger seat which is positioned against the direction of
travel! The child seat must have the seat belt fastened even when not in
use. This is necessary to avoid the driver or passenger getting injured by
a loose child seat when making an emergency stop or in case of a crash.
Note! Please never leave your child unattended in the car.
11
INSTALACIÓN DE LA SILLA DE AUTOMÓVIL CON CONECTORES
La seguridad de su hijo aumentará con los conectores X-fix que
permiten unir la silla al vehículo firmemente. Su hijo debe continuar
utilizando el cinturón de seguridad de 3 puntos del vehículo.
• Conecte las dos guías de instalación X-fix (las partes largas mirando hacia
arriba) con los dos puntos de anclaje ISOFIX (i).
¡Aviso! Los puntos de anclaje ISOFIX (i) son dos ganchos de metal por asiento,
situados entre el respaldo y la base del asiento de su vehículo. En caso de
duda, por favor consulte el manual de usuario de su vehículo.
y
x
• Para realizar ajustes, por favor mueva el botón X–fix, situado en la parte baja
de la silla infantil.
• Tire de los conectores (w) tanto como pueda.
• Gire los conectores X–fix180° de forma que apunten en la dirección de las
guías de instalación.
¡Aviso! Asegúrese de que el indicador de seguridad verde (x) de los
conectores no quede a la vista. Si es necesario, suéltelo presionando y tirando
simultáneamente del botón de soltado rojo (y). Repita este procedimiento con el
otro conector.
• Presione ambos conectores X–fix (w) en las guías de instalación hasta que
oiga que quedan fijadas en los puntos de anclaje ISOFIX (i).
• asegúrese de que la silla ha quedado bien instalada tirando de ella hacia
afuera .
• El botón verde de seguridad (x) debe quedar claramente visible en ambos
botones de soltado rojos (y).
• Con el botón X–fix situado en la base de la silla infantil ahora ya puede ajustar
la posición de la silla.
¡Aviso! Si desea información adicional por favor consulte la sección „colocar la
silla en el automóvil“.
• Ahora ya puede abrochar el cinturón de seguridad de su hijo. Por favor,
consulte „abrochar el cinturón al niño“.
y
12
x
INSTALLATION OF THE CAR SEAT WITH CONNECTORS
The saftey of your child will be increased using the ISOFIX-CONNECT
system linking the child seat tightly with the vehicle. Your child will still
be buckled up using the car‘s 3-point-belt.
• Connect the two enclosed X-fix installation aids (their longer parts pointing
upwards) with the two ISOFIX anchorage points (i).
Note! The car‘s ISOFIX anchorage points (i) are two metal rings per seat,
located between the backrest and the seat cushion of your vehicle seat. If in
doubt please refer to your vehicle owner’s manual.
• For adjustment move the X-fix lever (v), located on the bottom of the seat.
• Pull the connectors (w) as far out as they will go.
• Rotate the X-fix connectors by 180° until they point into the direction of the
installation aids.
Note! Make sure that the green safety indication (x) of the connectors is not
visible. If necessary, release them by pushing and simultaneously pulling back
the red release button (y). Repeat this procedure with the other connector.
• Push both of the X-fix connectors (w) into the installation aids until you hear
them clicking into the ISOFIX anchorage points (i).
• Make sure that the child seat is connected safely by trying to pull it out.
• The green safety indication (x) must be clearly visible on both sides of the red
release buttons (y).
• With the X-fix button located on the bottom of the child seat you can now
adjust the position of the seat.
Note! For additional information please refer to the section “Placing the Seat in
the Car”.
• You can now buckle up the child. Please refer to “Buckling Up the Child”.
13
EXTRAER LA SOLUTION X–FIX
Realice todos los pasos relativos a la instalación en orden inverso.
a
• Suelte los conectores ISOFIX (w) tirando y presionando ambos botones de
soltado rojos (y).
• Suelte la silla de las guías de instalación (u).
• Rote los conectores X–fix 180°.
• Mueva el botón X–fix situado en la base de la silla de seguridad infantil y
pulse los conectores X–fix hasta el final.
¡Aviso! Este procedimiento protege el acolchado de la silla y evita que se dañe
o se manche. Daños y manchas podrían dificultar un funcionamiento suave.
1
2
SEGURIDAD DEL NIÑO
Coloque la silla de seguridad sobre el asiento elegido del coche.
• Por favor, asegúrese que el respaldo (a) de la silla de seguridad está colocado
contra el respaldo del asiento del vehículo y bajo ninguna circunstancia en
posición reclinada.
• Cuando use los anclajes ISOFIX en el automóvil, asegúrese que el
respaldo de la Solution X-fix está perfectamente alineado y en contacto
pleno con el respaldo del asiento del vehículo. La distancia puede
ajustarse gracias a la leva de ajuste (v) situada en la parte baja de la silla
infantil.
• Algunos asientos de automóvil pueden estar tapizados con materiales
delicados (p.ej.: terciopelo, cuero...) y a causa del uso de la silla de seguridad
pueden aparecer marcas de desgaste o desgarro. Para evitar que se estropee
la tapicería se debería utilizar una manta o toalla protectora debajo de la silla
de seguridad.
• Si el reposacabezas del vehículo interfiere en la colocación de la silla de
seguridad por favor cámbielo de posición o bien retírelo completamente. El
respaldo (a) debe estar perfectamente ajustado al asiento del vehículo sin
ninguna inclinación.
¡Atención! El respaldo de la Solution X-fix debería quedar plano contra la
parte superior del asiento del coche. Si aprieta la parte inferior contra el
asiento del coche, la silla debería quedar bien apretada contra el asiento
del coche. ¡Para la mejor protección posible del niño, el asiento debe estar
en posición vertical!
14
¡Aviso! En algunos asientos de automóvil realizados con material sensible (por
ejemplo cuero, terciopelo, etc.), el uso de la silla de seguridad infantil puede
dejar marcas de uso y desgaste. Para evitarlo, debería poner una sábana o una
toalla bajo la silla infantil.
UNINSTALLING THE SOLUTION X-FIX
Perform all installation steps in reverse order.
• Release the ISOFIX connectors (w) by simultaneously pulling and slinging
back the red release buttons (y).
• Pull the seat out of the installation aids (u).
• Rotate the X-fix connectors by 180°.
• Pull the X-fix lever located at the bottom of the child car seat and push the
X-fix connectors into the child seat until completely hidden.
Note! Following these steps the vehicle‘s seat pad will be protected and the
Isofix connectors will be prevented from being stained or damaged. Damages
and stains could obstruct a smooth operation.
SECURING THE CHILD
Place the child seat on the respective seat in the car.
• Please make sure that the backrest (a) of the child safety seat rests flat
against the backrest of the car seat so that the child seat is under no
circumstances in a sleeping position.
• When using the ISOFIX-anchorages in the car, make sure that the
backrest of the Solution X-fix is perfectly aligned and in full contact with
the rear vehicle seat. The position can be adjusted with the adjustment
lever (v) located on the bottom of the child car seat.
• Should the headrest of the vehicle seat interfere, please pull it out completely
and turn it around or take it off entirely. The backrest (a) optimally adjusts to
almost any inclination of the vehicle seat.
Warning! The backrest of the Solution X-fix should rest flat against the
upright part of the car seat. Pushing the booster rearwards the seat should
be tightly pressed against the seat. For the best possible protection of
your child, the seat must be in a normal upright position!
Note! On some car seat covers made of sensitive material (e.g. velours, leather
etc.) the use of child seats may lead to traces of wear and tear. To avoid this,
you should put a blanket or a towel underneath the child seat.
15
COLOCACIÓN DEL CINTURÓN DE SEGURIDAD
l
l
m
k
d
n
¡Atención! ¡Nunca debe darle vueltas al cinturón de seguridad!
Ponga la hebilla del cinturón (m) en el cierre del cinturón (l). Ésta tiene que
cerrarse con un „CLICK“ audible.
Ponga el cinturón abdominal (n) en las guías inferiores del cinturón (k) de la
silla de seguridad. Ahora ajuste el cinturón abdominal (n) tirando del cinturón
diagonal (f) y asegurándose que no queda flojo. El cinturón de seguridad debe
estar bien sujeto para proteger de posibles lesiones. El cinturón diagonal y el
cinturón abdominal deberían estar insertados en la guía de cinturón inferior por
el lado del cierre del cinturón.
f
n
Coloque al niño en la silla de seguridad. Pase por delante del niño el cinturón
de seguridad hasta el cierre del cinturón.
¡Atención! El cierre del cinturón del asiento del vehículo (l) no debe
alcanzar bajo ninguna circunstancia la guía inferior del cinturón (k). Si la
correa que acompaña al cierre del cinturón es demasiado larga, entonces
la silla no es apropiada para este vehículo.
k
El cinturón abdominal (n) debería estar colocado en las guías del cinturón
inferior (k) a ambos lados del asiento (d).
¡Aviso! Enseñe a su hijo desde un principio a vigilar la tensión del cinturón y a
hacerlo por sí mismo cuando sea necesario.
g
f
16
¡Atención! El cinturón abdominal debe estar lo más bajo posible y pasar
por encima de la ingle para garantizar la mayor seguridad en caso de
accidente.
e
f
Ahora pase el cinturón de seguridad diagonal (f) por la ranura del hombro (g)
situada en el reposacabezas (e) hasta que quede asegurado. Asegúrese que el
cinturón diagonal (f) pase entre el cuello del niño y la parte exterior del hombro.
Si fuese necesario ajuste el reposacabezas. La altura del reposacabezas debe
ser regulada cuando el asiento está colocado en el vehículo.
FASTENING THE SEATBELT OF YOUR CHILD
Put your child in the child seat. Pull out the three-point belt and lead it in front of
your child to the belt buckle (l).
Warning! Never twist the belt!
Put the belt guide (m) into the belt buckle (l). If you hear a clicking sound it is
securely locked.
Put the lap belt (n) in the bottom belt guides (k) of the child seat. Now pull the
lap belt (n) tight by pulling the diagonal belt (f) until there is no slack. The tighter
the belt the better it can protect from injuries. The diagonal belt and lap belt
should both be inserted in the bottom belt guide at the side of the belt buckle.
Warning! The belt buckle of the car seat (l) must under no circumstances
reach into the bottom belt guide (k). If the belt strap is too long, the child
seat is not suitable for this vehicle.
The lap belt (n) should be placed in the bottom belt guides (k) on both sides of
the seat (d).
Note! Teach your child from the beginning to always pay attention to a tight belt
and that it should pull the belt tight by itself if necessary.
Warning! The lap belt must, on both sides, run as low across the groin
of your child as possible in order to take optimal effect in case of an
accident.
Now lead the diagonal belt (f) through the upper red belt guide (g) in the
shoulder rest (e) until it is inside the belt guide.
Please make sure that the diagonal belt (f) runs between the outer edge of
the shoulder and your child‘s neck. If necessary, adjust the running of the belt
by adjusting the height of the headrest. The height of the headrest can still be
adjusted in the car.
17
¿ESTÁ SU HIJO SEGURO?
Para garantizar la mayor seguridad del niño, por favor compruebe los siguientes
pasos antes de poner el vehículo en marcha …
g
n
r
k
k
f+n
t
• el cinturón abdominal (n) pasa a través de las guías inferiores (k) por ambos
lados del asiento de la silla de seguridad.
• el cinturón diagonal (f) también pasa por la guía inferior (k) de la silla por el
lado del cierre del cinturón.
• el cinturón diagonal (f) pasa por la guía del cinturón (g) del protector para los
hombros, marcado en color rojo
• el cinturón de seguridad (f) llega en diagonal desde la parte posterior.
• para una completa seguridad el cinturón debe estar perfectamente tensado y
no debe haberse girado / no tiene ninguna vuelta.
• que el acolchado está fijo en su sitio a ambos lados de los
conectores X-fix y los puntos de anclaje ISOFIX
• que el respaldo (a) de la silla infantil está en contacto pleno con el
respaldo de la silla del vehículo. Esto asegura que la silla infantil se
encuentre siempre en posición vertical.
¡Aviso! El botón verde de seguridad (x) debe quedar claramente visible en
ambos botones de soltado rojos (y).
RECLINADO DEL REPOSACABEZAS
CYBEX Solution X-fix tiene un reposacabezas reclinable (r). En el caso de que
su hijo se quede dormido, le ayudará a mantener la cabeza erguida. Además
proporciona comodidad a su hijo mientras viaja en el coche.
¡Aviso! Por favor asegúrese que la cabeza del niño siempre permanezca
en contacto con el reposacabezas reclinable ya que es fundamental para
proporcionar una protección óptima en caso de impacto lateral.
El reposacabezas (r) puede ser ajustado en 3 posiciones diferentes.
¡Atención! ¡El dispositivo de reclinación (t) nunca debe ser bloqueado por
ningún objeto! En caso de accidente el movimiento del dispositivo de
reclinación debe estar garantizado para evitar que el niño se lesione.
18
IS YOUR CHILD PROPERLY SECURED?
In order to ensure the maximum safety for your child, please check prior to the
ride whether …
• the lap belt (n) runs in the bottom belt guides (k) on both sides of the seat.
• the diagonal belt (f) also runs in the bottom belt guide (k) of the seat on the
side of the belt buckle.
• the diagonal belt (f) runs through the belt guide (g) of the shoulder rest,
marked red.
• the seat belt (f) runs diagonally to the back.
• the entire belt is snugly fastened and not twisted.
• the seat pad is locked in place on both sides with the X-fix connectors
and the ISOFIX anchorage points.
• the backrest (a) of the of the child seat rests flat against the vehicle
seat, making sure the child seat always stays in an upright position.
Note! The green safety indication (x) must be clearly visible on both sides of the
red release buttons (y).
RECLINING HEADREST
The CYBEX Solution X-fix has a reclining headrest (r) preventing your child‘s
head from falling forward when asleep. Furthermore, this adjustable
headrest contributes to the comfort of your child during the car ride.
Note! Please ensure that the child‘s head always remains in contact with the
reclining headrest since otherwise the headrest cannot fulfill its optimal sidecrash protective function.
By slightly lifting the headrest, the inclination of the headrest (r) can be adjusted
in three different positions.
Warning! The locking device (t) must never be blocked by any objects!
In case of an accident, the free movement of the inclination must be
guaranteed since otherwise your child might be injured.
19
CUIDADO DEL PRODUCTO
e
e
h
a
Para garantizar la máxima seguridad de su CYBEX Solution X-fix, es necesario
que tome nota de lo siguiente:
• Todas las partes importantes de la silla de seguridad deben ser revisadas de
daños periódicamente. Las partes mecánicas deben funcionar perfectamente.
• Asegúrese de que la CYBEX Solution X-fix no ha sido dañada al presionarla
entre la puerta y el asiento del coche u otros objetos sólidos.
• La silla de seguridad debe ser comprobada por el fabricante en caso de que
caiga al suelo o en casos similares.
QUITAR LA FUNDA DEL ASIENTO
El tapizado consta de 3 partes, que se acoplan a la CYBEX Solution X-fix con
velcro o botones. Una vez haya desabrochado todas las fijaciones puede quitar
el tapizado.
para colocar de nuevo el tapizado siga las instrucciones anteriores en orden
contrario.
¡Atención! La silla de seguridad nunca debe ser usada sin el tapizado.
EXTRAER LA FUNDA DEL RESPALDO
20
1. coloque el respaldo en la posición más elevada utilizando la palanca de
regulación de altura (h).
2. Para soltar el respaldo (e), tire de la palanca (h) y al mismo tiempo presione
la parte inferior del nervio central del respaldo (a).
3. Ahora el respaldo (e) puede extraerse completamante.
4. para volverlo a montar, presione de nuevo la palanca de regulación de altura
(h) e introduzca el protector (e) en el respaldo (a).
PRODUCT CARE
In order to guarantee the best possible protection of your child seat, it is
necessary that you take note of the following:
• All important parts of the child seat should be examined for any damages on a
regular basis. The mechanical parts must function flawlessly.
• It is essential that the child safety car seat does not get jammed between hard
objects e.g. like the door of the car, seat rail etc. causing possible damage to
the seat.
• The child seat must be examined by the manufacturer after a fall or similar
situations.
REMOVING THE SEAT COVER
The seat cover consists of three parts which are fixed to the seat either by
velcros, press buttons or button holes. Once you have released all fixations, the
cover parts can be removed.
In order to put the covers back on the seat, proceed in the reversed order as
removing them.
Warning! The child seat must never be used without the cover.
REMOVING THE SEAT COVER FROM THE BACKREST
1.Pull the headrest (e) into top position, by using the release handle (h).
2.To release the headrest (e), simultaneously pull the handle (h) and the lower
rim of the upper rib of the backrest (a). Now the headrest (e) can be completely detached.
3.Now the cover can be removed.
4.For reassembly pull the adjustment handle (h) and insert the headrest (e) into
the backrest (a).
21
LIMPIEZA
Es importante utilizar únicamente los tapizados originales de la CYBEX
Solution X-fix ya que el tapizado es una parte fundamental para el correcto
funcionamiento de la silla de seguridad. Usted puede conseguir tapizados
adicionales en los puntos de venta correspondientes.
¡Atención! Lave el producto separadamente antes del primer uso. La funda
es lavable a máquina a 30ºC y con ciclo de ropa delicada. Si lo lava a una
temperatura mayor la funda podría decolorarse. Por favor, lave la funda
separadamente y nunca la seque en secadora. No seque la funda bajo la luz
directa del sol. Puede limpiar las piezas de plástico con detergente suave y
agua templada.
¡Atención! Por favor no usar detergentes químicos o lejía bajo ninguna
circunstancia!
Qué hacer después de un accidente
Si usted ha sufrido un accidente, la silla de seguridad ha podido resultar
dañada aunque a simple vista no se aprecie. En este caso, la silla de
seguridad debe ser examinada por el fabricante y si fuera necesario
debería reemplazarse.
DURACIÓN DEL PRODUCTO
CYBEX Solution X-fix está diseñada para durar hasta que el niño no la necesite,
esto es un plazo de 9 años aproximadamente (para edades de 3 a 12 años).
Debido a los grandes cambios de temperatura y a circunstancias excepcionales
dentro de un coche, es necesario tomar nota de lo siguiente:
• Quite o cubra con una prenda su CYBEX Solution X-fix si sabe que el coche
va a estar expuesto al sol durante un largo periodo de tiempo.
• Examine con regularidad que las piezas metálicas y de plástico de la silla no
hayan cambiado de forma o color. Si aprecia cualquier cambio no utilice la
silla y haga que el fabricante la examine y la reemplace en caso necesario.
• Los cambios en el tapizado del asiento, especialmente colores desteñidos o el
desgaste natural no afectan a la efectividad del producto.
22
CLEANING
It is important to use only an original CYBEX Solution X-fix seat cover since the
cover is also an essential part of the function. You may obtain spare covers at
your retailer.
Note! Please wash the cover before you use it the first time. Seat covers are
machine washable at max. 30°C on delicate cycle. If you wash it at higher
temperature, the cover fabric may lose colour. Please wash the cover separately
and never dry it mechanically! Do not dry the cover in direct sunlight! You can
clean the plastic parts with a mild detergent and warm water.
Warning! Please do not use chemical detergents or bleaching agents
under any circumstances!
WHAT TO DO AFTER AN ACCIDENT
If you had an accident, the seat might have sustained damages which are
not visible. In this case, the child seat must absolutely be examined by the
manufacturer and replaced if necessary.
DURABILITY OF THE PRODUCT
The CYBEX Solution X-fix was designed to easily fulfill its purpose for the
expected durability (adding up to 9 years). However, since high fluctuations of
temperature might occur and since there might be unforeseeable exposures to
the child seat, it is important to note the following:
• If the car is exposed to direct sunlight for a longer period of time, the child seat
must be taken out of the car or covered with a cloth.
• Examine all plastic and metal parts of the seat for any damages or changes
about their form or colour on a yearly basis. If you notice any changes, you
need to dispose of the child seat or it must be examined by the manufacturer
and replaced if necessary.
• Changes to the fabric, in particular the fading of colour, are normal after
yearlong use in a car and do not constitute a fault.
23
RECICLADO
Cuando ya haya usado su CYBEX Solution X-fix y no la necesite más
es importante una correcta eliminación de la silla. El sistema de reciclaje
de residuos es diferente en cada comunidad. Por favor, contacte con su
Ayuntamiento o con la compañía local de reciclaje para asegurarse la correcta
eliminación de CYBEX Solution X-fix.
GARANTÍA
La presente garantía sólo es de aplicación en el país en el que el consumidor
adquirió inicialmente el producto a un detallista. La garantía cubre todos los
defectos de materiales y fabricación, existentes o que puedan aparecer, por
un período de tres (3) años desde la fecha de compra inicial (garantía del
fabricante). En caso de que aparezca cualquier defecto de materiales o de
fabricación, nosotros decidiremos, según nuestro criterio, reparar el producto
sin coste o entregar un producto nuevo. Para obtener esta garantía es preciso
entregar o enviar el producto al detallista que vendió inicialmente el producto
y aportar una prueba de compra (recibo o factura) que muestre la fecha de
compra, el nombre del detallista y el modelo del producto. Esta garantía no
es de aplicación en caso de que el producto sea enviado o entregado al
fabricante o a cualquiera otra persona que no sea el detallista que vendió el
producto inicialmente al consumidor. Por favor, verifique que el producto está
completo y que no presenta ningún defecto de materiales ni de fabricación
en el momento de la compra o, si se ha adquirido a distancia, en el mismo
momento de recibirlo. En caso de apreciar cualquier defecto, deje de utilizar el
producto y entréguelo o envíelo al detallista. El producto debe entregarse limpio
y completo. Antes de contactar con la tienda lea este manual detenidamente.
La garantía no cubre ningún daño causado por un mal uso, la influencia del
entorno (agua, fuego, irregularidades del terreno, etc.) o el desgaste normal
del producto. Sólo es de aplicación en caso de que el uso del producto sea
acorde al manual de instrucciones y si cualquiera modificación o reparación ha
sido efectuada por personas autorizadas y se han utilizado piezas y accesorios
originales. La garantía no excluye, limita o afecta de ningún modo a los
derechos del consumidor establecidos por ley, incluyendo reclamaciones por
responsabilidad civil o quejas por incumplimiento de contrato que el comprador
quiera interponer contra el vendedor, el fabricante o el producto.
FERVAL International
CALLE 6TA MANZANA 20 LOCAL 20-A6 COLON FREE ZONE
Panama City / Panama
24
Tel: (562)9539325, Fax: (562)9539315
www.cybex-online.com, www.facebook.com/cybex.online
DISPOSAL
At the end of the durability of the child seat, you must dispose it properly. Waste
disposal regulations may vary regionally. In order to guarantee a proper disposal
of the child safety seat, please contact your communal waste management
or administration of your city. In all cases, please note the waste disposal
regulations of your country.
WARRANTY
The following warranty applies solely in the country where this product was
initially sold by a retailer to a customer. The warranty covers all manufacturing
and material defects, existing and appearing, at the date of purchase or
appearing within a term of three (3) years from the date of purchase from the
retailer who initially sold the product to a consumer (manufacturer’s warranty).
In the event that a manufacturing or material defect should appear, we will – at
our own discretion – either repair the product free of charge or replace it with a
new product. To obtain such warranty it is required to take or ship the product
to the retailer, who initially sold this product to a customer and to submit an
original proof of purchase (sales receipt or invoice) that contains the date of
purchase, the name of the retailer and the type designation of this product.
This warranty shall not apply in the event that this product is taken or shipped
to the manufacturer or any other person other than the retailer who initially
sold this product to a consumer. Please check the product with respect to
completeness and manufacturing or material defects immediately at the date
of purchase or, in the event that the product was purchased in distance selling,
immediately after receipt. In case of a defect stop using the product and take
or ship it immediately to the retailer who initially sold it. In a warranty case the
product has to be returned in a clean and complete condition. Prior to contacting
the retailer, please read this instruction manual carefully. This warranty does
not cover any damages caused by misuse, environmental influence (water,
fire, road accidents etc.) or normal wear and tear. It does solely apply in the
event that the use of the product was always in compliance with the operating
instructions, if any and all modifications and services were performed by
authorized persons and if original components and accessories were used.
This warranty does not exclude, limit or otherwise affect any statutory consumer
rights, including claims in tort and claims with respect to a breach of contract,
which the buyer may have against the seller or the manufacturer of the product.
CYBEX GmbH
Riedinger Str. 18 / 95448 Bayreuth / Germany
Tel: +49 0444 60 27 21, Fax: +49 0444 18 76 734
www.cybex-online.com, www.facebook.com/cybex.online
25
26
27
CYBEX GmbH
Riedinger Str. 18 | 95448 Bayreuth | Germany
[email protected]
www.cybex-online.com
www.facebook.com/cybex.online
C223_626-8_01A