1
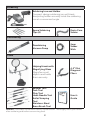
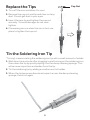
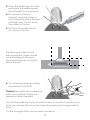
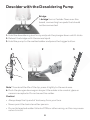
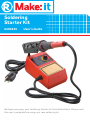
Soldering
Starter Kit
6400245
User’s Guide
We hope you enjoy your Soldering Starter kit from RadioShack. Please read
this user’s guide before using your new soldering kit.
Soldering
Soldering Iron and Holder
Compact design soldering iron with heatdissipating holder securely holds the soldering
iron at a convenient angle.
Spare Soldering
Tips (4)
Rosin Core
Solder
Desoldering
Vacuum Pump
2mm
Solder
Wick
Desoldering
Tools
Helping Hands with
Magnifying Glass
Magnifies small
objects and holds
them securely.
Reamer Tool
Fork Tool
Chip Tool
Hook Needle Tool
Knife/Scraping
Tool
Stainless-Steel
Brass Brush Tool
4.5” Mini
Diagonal
Pliers
User’s
G uide
User’s
Guide
Caution: The solder contained in this kit contains lead. Thoroughly wash your hands
after soldering and before consuming food.
2
Specifications
Output Power................................................................................................................................ 48W
Input Voltage .................................................................................................120V AC, 60Hz, 0.5A
Temperature Control ................................................................................... Up to 842°F (450°C)
Soldering Tips ..............................................................................................Copper, nickel-plated
Cord Length..................................................................................................................... 3.6 ft (1.1m)
Specifications are subject to change and improvement without notice. Actual
product may vary from the images found in this document.
Important Safety Instructions
• Read instructions before operating the product.
• Keep out of the reach of children.
• Work only in a dry area, away from flammable materials.
• Operate the soldering iron in properly ventilated rooms or rooms with a fume
extraction system. Inhalation of soldering fumes and particles from fl ux in the
solder is detrimental to health.
• Be careful! Hot soldering irons can cause severe burns and ignite fires. Do not
touch the tip and the heat sink plate or let it come in contact with any other
material.
• Do not attempt to touch the tip of a hot soldering iron or remove solder from its
surface with your hands.
• If the supplied cable is damaged, it should be repaired by the manufacturer or its
agent or a suitable qualified person in order to avoid a hazard.
• Never hold the soldering tip to the soldering point too long. This can destroy the
soldering point.
• Never operate the soldering iron without the soldering tip. This can damage the
heating device.
• When you are not using your soldering iron, be sure to turn it OFF.
• Store the soldering iron in a dry, secure place where children cannot reach it.
• Keep the soldering iron away from dust and dirt, and clean it with a damp cloth
occasionally to keep it looking new.
• This product, when used for soldering and similar applications, produces chemicals
known to the State of California to cause cancer and birth defects (or other
reproductive harm).
3
Setting Up Your Soldering Iron
1. Insert the soldering iron
holder into the slot on the
Soldering Iron Holder
stand.
2. Place the iron in the
holder.
3. Place the cleaning
sponge into the stand.
When you’re ready to use
the iron, add water to the
sponge.
4. Plug the power cord into a
grounded AC outlet.
Cleaning
Sponge
Setting Up Your Helping Hands
Alligator clips hold your project in place, and the magnifying glass lets you
see small items up close. Wing nuts let you adjust the angles.
Alligator Clip
Wing Nuts
4
Replace the Tips
Cap Nut
1. Turn off the iron and allow it to cool.
2. Remove the cap nut and tip and clear out any
dust. Do not get dust in your eyes.
3. Insert the new tip and tighten the cap nut
securely. To avoid damage, do not overtighten.
4. If loosening occurs when the iron is hot, use
pliers to tighten the cap nut.
Tin the Soldering Iron Tip
“Tinning” means coating the soldering iron tip with a small amount of solder.
1. Wait about one minute after plugging in and turning on the soldering iron,
then clean the tip by quickly wiping it on the damp cleaning sponge. This
will remove impurities and oxides from the tip.
2. Tin the soldering tip by adding a small amount of solder.
3. When the tip becomes discolored, wipe it across the damp cleaning
sponge, then tin it again.
5
Soldering
Some projects include a printed circuit board (PCB), or you can use
a standard PCB. Typically, if the board has printing to identify the
components, insert the component on the side with the printing and solder
on the other side.
While learning to solder, avoid surface-mount soldering, which requires
more experience.
Tip: It takes practice to solder electronic components quickly and properly.
Before you start an important project, try to solder several practice joints.
Temperature Control
1. Turn on the soldering iron and set
the desired temperature based on
different soldering conditions, such
as type of solder, size of solder pad
or component, etc.
2. Insert the component leads through
the correct PCB pads.
Pads
Leads
6
3. Press the soldering iron to the
pad where the lead emerges.
Heat the pad for one second.
4. Do not move the iron.
Instead, move the solder to
touch the point where the pad
and lead meet. Do not touch
the solder to the iron.
5. Pull back the solder before
you remove the iron.
Flow enough solder to hold
the component; solder should
not extend beyond the pad
and should extend only slightly
above the pad.
6. Trim the excess lead as closely
as possible to the PCB.
Caution: Be careful when soldering
and trimming leads. Protective
eyeware is recommended.
Turn off the soldering iron if not used for over 5 minutes. To protect your
tools, do not keep the iron set at a high temperature for long periods of
time.
Tin the iron again after use to prevent oxidation.
7
Desolder with the Desoldering Pump
Bridge
A bridge forms if solder flows over the
board, connecting two pads that should
not be connected.
1. Hold the desoldering tool firmly and push the plunger down until it clicks.
2. Reheat the bridge until it becomes liquid.
3. Hold the pump to the melted solder and press the trigger button.
1
2
3
Note: To extend the life of the tip, press it lightly to the work area.
4. Push the plunger down again to eject the solder into a metal, glass or
ceramic receptacle. Do not reuse this solder.
Caution:
• Always keep the tip end of tool away from your face.
• Never point the tool at another person.
• Do not let ejected solder fall onto PCBs or other wiring, as this may cause
a short circuit.
8
Desolder with the Solder Wick
1. Unspool several inches of solder wick.
2. Place the end of your solder wick
directly on the solder.
Caution: The solder wick becomes
very hot during desoldering. Do
NOT hold the solder wick directly
with your fingers. Use pliers or
hold the solder wick by its plastic
case.
3. Press the iron on top of
the solder wick. When the
solder melts, the solder
wick will soak up the
excess.
Clean the Desoldering Pump
After use, thoroughly clean the pump’s plunger, cleaning shaft, O-ring,
and barrel. Remove the tip and barrel, and then coat the O-ring and
cleaning shaft with petroleum jelly lubricant. Do not use solvents or heat.
Plunger
Barrel
Cleaning Shaft and O-Ring
9
Limited Warranty
RadioShack warrants this product against defects in materials and workmanship
under normal use by the original purchaser for ninety (90) days after the date of
purchase from a RadioShack-owned store or an authorized RadioShack franchisee or
dealer. RADIOSHACK MAKES NO OTHER EXPRESS WARRANTIES.
This warranty does not cover: (a) damage or failure caused by or attributable to abuse,
misuse, failure to follow instructions, improper installation or maintenance, alteration,
accident, Acts of God (such as floods or lightning), or excess voltage or current; (b)
improper or incorrectly performed repairs by persons who are not a RadioShack
Authorized Service Facility; (c) consumables such as fuses or batteries; (d) ordinary
wear and tear or cosmetic damage; (e) transportation, shipping or insurance costs;
(f) costs of product removal, installation, set-up service, adjustment or reinstallation;
and (g) claims by persons other than the original purchaser.
Should a problem occur that is covered by this warranty, take the product and the
RadioShack sales receipt as proof of purchase date to any RadioShack store in the
U.S. RadioShack will, at its option, unless otherwise provided by law: (a) repair the
product without charge for parts and labor; (b) replace the product with the same or a
comparable product; or (c) refund the purchase price. All replaced parts and products,
and products on which a refund is made, become the property of RadioShack. New
or reconditioned parts and products may be used in the performance of warranty
service. Repaired or replaced parts and products are warranted for the remainder
of the original warranty period. You will be charged for repair or replacement of the
product made after the expiration of the warranty period.
RADIOSHACK EXPRESSLY DISCLAIMS ALL WARRANTIES AND CONDITIONS NOT
STATED IN THIS LIMITED WARRANTY. ANY IMPLIED WARRANTIES THAT MAY BE
IMPOSED BY LAW, INCLUDING THE IMPLIED WARRANTY OF MERCHANTABILITY
AND, IF APPLICABLE, THE IMPLIED WARRANTY OF FITNESS FOR A PARTICULAR
PURPOSE, SHALL EXPIRE ON THE EXPIRATION OF THE STATED WARRANTY
PERIOD.
EXCEPT AS DESCRIBED ABOVE, RADIOSHACK SHALL HAVE NO LIABILITY OR
RESPONSIBILITY TO THE PURCHASER OF THE PRODUCT OR ANY OTHER PERSON
OR ENTITY WITH RESPECT TO ANY LIABILITY, LOSS OR DAMAGE CAUSED
DIRECTLY OR INDIRECTLY BY USE OR PERFORMANCE OF THE PRODUCT OR
ARISING OUT OF ANY BREACH OF THIS WARRANTY, INCLUDING, BUT NOT
LIMITED TO, ANY DAMAGES RESULTING FROM INCONVENIENCE AND ANY LOSS
OF TIME, DATA, PROPERTY, REVENUE, OR PROFIT AND ANY INDIRECT, SPECIAL,
INCIDENTAL, OR CONSEQUENTIAL DAMAGES, EVEN IF RADIOSHACK HAS BEEN
ADVISED OF THE POSSIBILITY OF SUCH DAMAGES.
Some states do not allow limitations on how long an implied warranty lasts or
the exclusion or limitation of incidental or consequential damages, so the above
limitations or exclusions may not apply to you. This warranty gives you specific legal
rights, and you may also have other rights which vary from state to state. You may
contact RadioShack at:
RadioShack Customer Relations
300 RadioShack Circle
Fort Worth, TX 76102
www.RadioShack.com
©2013 RadioShack Corporation. All rights reserved. RadioShack is a
registered trademark used by RadioShack Corporation.
10
04/08
Printed
in China
12A13
6400245