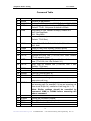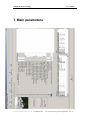
1
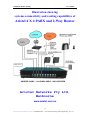
Aristel 4x4 PABX & 2 Way Router User Guide & Setting Tools Software Programming V3.6 Aristel Networks Pty Ltd Telephone Router Setting User Guide Contents 1. Introduction…………………………………………………… 4 2. Power Setting…………………………………………………. 5 2.1 Music on Hold ………..………………………………… 5 3. Main Functions……………………………………………….. 6 3.1 Internal Call……………………………………………… 6 3.2 Incoming call……………………………………………… 6 3.3 Call Pick-up………………………………………………. 6 3.4 Outgoing Call…………………………………………….. 6 3.5 Call Transfer ……………………………………………... 7 3.6 Call Forwarding …………………………………………. 8 3.7 Hot Line………………………………………………….. 8 4. Command Table………………………………………………. 9 5. System programming by a phone……………………………. 12 5.1 A case study ……………………………………………… 12 5.2 Programming DSS keys of Aristel Multiphone, SLT70…. 13 6. Setting Tool Software………………………………………… 15 6.1 File………………………………………………………… 15 6.2 Setting ………………………………………………….. 16 6.3 Read Device Data ……………………………………….. 16 6.4 Help ……………………………………………………… 16 2 Aristel Networks Pty Ltd 4x4 PABX/Router User Guide and Setting Tool Programming Rev 3.6 Telephone Router Setting User Guide 7. Main Parameters ……………………………………………… 17 7.1 Introduction ……………………………………………… 18 7.2 Main Basic Parameters ………………………………….. 19 7.3 Extension Setting ……………………………………….. 20 7.4 Trunk Setting ……………………………………… …. 20 7.5 Send Data to device ……………………………………… 20 7.6 Read Data ………………………………………………… 20 7.7 Device Version …………………………………………… 20 8. Router Numbers ………………………………………………. 21 9. Replace Dial Numbers ……………………………………….. 24 10. Query Version ………………………………………………… 26 11. Other Functions ………………………………………… 26 12. Product Specifications…………………………………………. 27 13. A Case Study (Programming by setting Tool Software).. 27 13.1 Main Parameters Setting …………………………………. 29 13.2 Router Numbers …………………………………………. 32 13.3 Replace Dial Numbers …………………………………… 33 14. Call forward programming on SLT phones…………………. 34 3 Aristel Networks Pty Ltd 4x4 PABX/Router User Guide and Setting Tool Programming Rev 3.6 Telephone Router Setting User Guide 1. Introduction The Aristel 4x4 PABX & 2Way Router is both a mini PABX and a Router. It is easy to install, and is capable of handling complex routing functions. As a mini PBX, the system has 4 exchange line and 4 extension ports, plus an external music or message on hold port. Incoming line calls can be routed to one or more phones and outgoing calls can be programmed to use specific line ports ( trunks ) by use of dial plans. Thus, the 4x4 can be connected to fixed wireless terminals and VoIP adaptors to take advantage of low or no cost calls. It can also be connected behind a large PBX, as sub PBX, to provide flexibility and expandability. Phone functions include, internal extension calls, external calls, call transfer, call pickup, call forward, hotline etc. Most of these functions can be programmed using one of the extension phones. However, a PC may be connected to the PABX Router system and all customer configurations and routing programming can be carried out using supplied Setting Tool Software. The Aristel 4x4 PABX & 2Way Router comes as a “plug and play” device. All that is required is to power up the equipment and connect 1-4 analogue (SLT) phones to Tel ports and 1-4 exchange lines or other devices such as analogue telephone adaptors (ATAs ) or Fixed Wireless Terminals (FWTs ) to the Line ports. Un programmed, the extensions assume numbers 11, 12, 13 and 14. Incoming calls on Line 1 will ring extension 11 and Line 2, extension 12 etc. Outgoing 4 Aristel Networks Pty Ltd 4x4 PABX/Router User Guide and Setting Tool Programming Rev 3.6 Telephone Router Setting User Guide calls from any extension can pick up any line. There is no need to dial 9 or 0 for outside line access. Simply dial the external number. Additional trunk lines can be terminated on the respective Line ports and activated through phone programming or PC programming. 2. Power Setting The power requirements of the device are AC230V±10% or AC110V±10% 50/60HZ. In the base of the device there is a power select switch. The 4x4 is supplied with the switch set to 230 volt. If your input power supply is AC230/240V, you should leave the power select switch as Fig.1. WARNING: DO NOT SET THE SWITCH TO 110V IN AUSTRALIA AS IN FIG. 2 230V 110V 1 2.1 2 Music on Hold The PABX has chime as internal source for music on hold. An external music source can be connected to the system using the cord provided for that purpose.. Any external Music on hold source should only be connected to the system using a suitable LIU unit. 5 Aristel Networks Pty Ltd 4x4 PABX/Router User Guide and Setting Tool Programming Rev 3.6 Telephone Router Setting User Guide 3.Main functions and Operation 3.1 Internal Call Pick up the handset, dial * followed by the extension number. Example: Your Extension number is 11, and you want to call Extension 14. Pick up the handset of Extension 11 and dial *14. Extension 14 rings, and it displays “8811”. The additional number “88” is a prefix, indicating it is a direct call. For a transferred call the prefix is “0088” 3.2 Incoming call If there is an incoming call, the called extension will ring. Pick up the handset and answer the call. 3.3 Call Pick-up An incoming call to an extension may be picked up from another extension. To pick up an incoming call of another extension go off hook and dial * 9 and talk to the calling party. 3.4 Outgoing call To call an outside party, say 9544 7696, simply dial that number and listen to ring tone. When the called party answers start your conversation. Hang up when finished. 6 Aristel Networks Pty Ltd 4x4 PABX/Router User Guide and Setting Tool Programming Rev 3.6 Telephone Router Setting User Guide 3.5 Call Transfer An established call can be transferred to another internal extension. There are two types of call transfer, (i) Blind transfer (ii) Consultation and transfer. Blind transfer (Unannounced transfer): 1. Assume A, an outside party called an internal extension, B. While A and B are talking B decides to transfer the call to another extension , called C. 2. To transfer the call, B presses flash/recall. At this moment Extension B hears dial tone and the outside party hears Music on Hold. Then B dials xx , where xx is the extension number of C. 3. If the operation was successful, B will hear ring tone and hangs up at once. 4. C rings, and A hears music while waiting for the connection. 5. C lifts the handset and answers the transferred call of A. 6. C also can transfer the call to another extension in the similar fashion. 7. In the step 4, if the C does not reply within 25 seconds, the system rings back B. If B does not answer within 30 seconds, the call gets disconnected. Consultation transfer: 1. Assume B is an extension. A is an outside party. A called B and A and B are talking. B wishes to consult C and then transfer the call. 2. B presses flash/recall, hears dial tone, dials the extension number of C. 3. If all of the above operations are correct, B will hear ring tone. Extension B does not hang up in this case. 4. While C rings, A hears music while waiting for the connection. 5. C lifts the handset to talk to B. A still hear music while waiting for the connection. 6. At this time either B or C can hang up. For example, if B hangs up first, C gets connected to A. If C hangs up, B gets connected with A. 7. In the step 4, if the C does not answer within 25 seconds, the system calls back B. At this time, B can pick-up the call and speak to A. If B does not respond within 30 seconds, the connection disconnects automatically. 7 Aristel Networks Pty Ltd 4x4 PABX/Router User Guide and Setting Tool Programming Rev 3.6 Telephone Router Setting User Guide Note a) If error tone “Du, Du” is heard after pressing flash/recall, it indicates the system is busy. You can press flash/recall again to go back to the called party. b) While transferring a call, if you dial an invalid number, the system sounds 3 short error tones. During that time you can again dial another number for transferring. c) While transferring a call, and the called phone is busy, the system will sound a 15 sec error tone. Then, you can press flash/recall to reconnect with the outside line. You may retry that extension or dial another. Important System flash time at default is 80 x 10 = 800 ms , (maximum flash time.) Therefore, a telephone flash key needs to be typically set to 100ms. In Aristel Smart phones and Multiphones a flash setting of 010 x 10 = 100ms works well. On all other ordinary phones a quick tapping of the cradle switch can give a loop break of nearly 500ms.and that works fine. 3.6 Call Forwarding. There are two types of Call forwarding: (i) Internal. (ii) External. For either type, call forwarding is immediate. In the case of Internal call forwarding, Pick up the handset and dial, * # 8 * xx where xx is the call forwarded extension number. You will get a confirmation tone at the end. To cancel Call forwarding dial * # 8 # In the case of external Call forwarding, pick up the telephone handset and dial * # 8 xxxxxxxxxx # , where xxxxxxxxxx is the external number. To cancel external call forwarding, dial * # 8 # Please note, there will be no indication that an extension has been call forwarded. 3.7 Hot Line Hotline is a feature that allows an extension ( programmed for hot line ) to automatically dial another extension or an external party, immediately the handset goes off hook. There are many applications for this feature. Connecting a Fax machine, EFTPOS machine, Door phone to extension ports or making a baby call are examples of hot line. 8 Aristel Networks Pty Ltd 4x4 PABX/Router User Guide and Setting Tool Programming Rev 3.6 Telephone Router Setting User Guide For Example to set up a Hot Line from Ext 12 to Ext 13, from Ext12 1. * # * 0000 - hear a beep Enter into programming mode 2. 732*13 - Hear one beep In this case 2 represents Extension 12 . Hot Line destination is 13 3. 712# - Hear one beep Enable Hot Line 4. Hangup. To cancel Hot Line for Ext12, go off hook from Ext12 and enter the following: 1. *#*0000 - hear one beep Enter programming mode 2. 702# Cancel Hotline on Ext 2, i.e Ext12 Example: Set up Extension 12 to call an external number xxxxxxxx as hot line. From an Extension enter the following: * # * 0000 (Enter into programming) 732xxxxxxxxx# (Register the number on Extension 2) Hang up now * # * 0000 (Enter into programming again) 712# (Activate Hot Line on Extension 2) 4. Command Table All commands shown below can be set from any extension telephone . Enter into programming state with command * # * plus Password. Go Off-hook and dial * # * 0000 to enter into programming state. The default Password is “0000”. Then enter the respective command. All commands end with a # If the command had been set correctly, the system sounds one tone “Du”. If the command had been set incorrectly, it sounds 3 tones “DuDuDu”. If there is an error inputting a command, press *and then input command again. Simply hang up at the end to terminate programming. 9 Aristel Networks Pty Ltd 4x4 PABX/Router User Guide and Setting Tool Programming Rev 3.6 Telephone Router Setting User Guide Command Table No Command 1 0000# 2 09XXXX# 3 10TT# 4 11N# 5 11TT# 6 12N# 7 8 9 10 12ab# 14X# 15TT# 16TT# 11 17TT# 12 18TT# 13 14 15 16 17 2000# 2010# 200M# 201M# 60M# 18 60MN# 19 20 21 22 23 61M# 61MN# 700# 70N# 710# Description Initialize all parameters. Setting Code Password as “XXXX”. Default: XXXX=0000 Setting a pause “p” unit delay as TT*100ms (TT=01-20). Default: TT=08 . Unit pause at default is 800ms Ring-Back on Call Transfer No Reply. Default: N=1 N=0, Not Ring-Back. N=1, Ring-Back. Call Transfer Time (TT=01-99, Unit 1 sec. Default: TT=20 Sec.) Caller ID Add Prefix. Default: N=1., N=0, Not dd. N=1, Add. Caller ID Add Prefix Number (Default: ab=88) Call Pick-up Function Key (Default: X=9) Flash Time (TT=01-20, Unit: 100ms, default :TT=08) External line Hold Time (TT=01-99, Unit: 10sec. Default: TT=18, equal to 3 min.) Transferred call Talking Time or Co-Co call disconnect time (TT=01-99, Unit 10s, Default: 24 .) Ring Time for Internal Call (TT=01-99, Unit: 1 sec. Default: TT=30 sec.) Turn On all Trunk Turn Off all Trunk Turn On Trunk M (M=1-4) Turn Off Trunk M (M=1-4) If it has an incoming call from trunk M (M=1-4), all extensions will ring. Add the extension N as ringing extension for the trunk M on incoming call. For example, if it has an incoming call from trunk M (M=1-4), extension N will ring (N=1 – 4). Note: Earlier settings should be cancelled by command 61M# or 61MN# before executing the above command. Cancel the command “60M#” Cancel the command “60MN#” Turn Off all extension hot line function Turn Off extension N hot line function Turn On all extension hot line function 10 Aristel Networks Pty Ltd 4x4 PABX/Router User Guide and Setting Tool Programming Rev 3.6 Telephone Router Setting 24 25 26 71N# 72TT# 73Nxxxx… +Hang Up 27 28 82TT# 900# 29 30 90L# 9Nxxxx# User Guide Turn On extension N hot line function Hot Line Delay Time (TT=01-99, Default: TT=04 sec.) Setting hot line number for extension N (N=1-4). The max length of the hot line number is 30. If the length less than 30, it regard “Hang up” as end. If you input two “*” in the hot number, the system regard two “*” as one unit delay. For example, input “73186**75786337898”, then hang up. It set the first extension number as “86**75786337898”. “**” is one unit delay. Notice: After set a hot line number, the system had exited from programming state. If you want to set other command, you should enter into programming state with command “*# *+Code Password” again. Charge Delay Time (TT=01-99, Default: TT=05 sec.) Initialize extension number as 11-14 , and setting “Extension Number Length” as 2 Setting “Extension Number Length” as L (L=1-4) Change the extension number of extension N (N=1-4) to xxxx. It regard “#” as end. The length of the number must match the parameter L (the command 90L#) Note: If you used the command “0000#”, you must use “ReadData” function in “Main parameters” tab of PC Software to read the default data from the device. And then you should use “Send Data to Device” to set parameters. At the end restart the device. 11 Aristel Networks Pty Ltd 4x4 PABX/Router User Guide and Setting Tool Programming Rev 3.6 Telephone Router Setting 5. User Guide System Programming by a phone - Case Study 1 Out of the box Aristel PABX/Router has the following main default capabilities. 1. 2. 3. 4. 5. 6. 7. Line 1 rings at Tele 1 only (That is extension 11 only) Line 2 rings at Tele 2 only Line 3 rings at Tele 3 only Line 4 rings at Tele 4 only. All 4 lines are activated. Out going calls can take up any one trunk, selected in a cyclic order. Call transfer, call pick up etc. work as described earlier. The system sometimes, needs to be programmed to suit the local requirements. It is very easy to program the system using a Window based Setting Tool software. However, a simple programming can be carried out through a telephone extension using the command table. 5.1 Case Study 1 A customer wants the following implemented: 1. Only two trunk lines need to be activated. 2. Four telephones installed as Tele 11, Tele12, Tele13 and Tele 14. 3. Incoming calls on Line 1 need to ring Tele 11 and Tele 14 at the same time. 4. Incoming calls on Line 2 need to ring Tele 13 only 5. Tele 13 is to have capability to Call Forward all incoming calls to his/her Mobile phone or to another extension, Tele 12, whenever desired. 6. Outgoing calls should pass through either Line 1 or Line 2. 12 Aristel Networks Pty Ltd 4x4 PABX/Router User Guide and Setting Tool Programming Rev 3.6 Telephone Router Setting User Guide Implementation Install Aristel SLT70 phones. Use only two wire line cords. Terminate Lines on Line 1 and Line 2. Use only two wire line termination. Lift the handset of one of a registered telephone and enter the following: * # * 0000 Enter into programming mode 0000# Initilise all parameters 2010# Turn off all trunks 2001# Turn on Line 1 2002# Turn on Line 2 6011# Incoming call on Line 1 to ring Tele 1 (11) Incoming call on Line 1 to ring Tele 4 (14) Cancel line 2 ringing Tele 2 6014# 6122# 6023# Incoming calls on lone 2 to ring Tele 3 (13) Set Co-Co disconnect time as 4 minutes. Terminate programming. No need to program 6 1724# Go on hook. 5.2 Programming the DSS keys of Aristel Multiphone, SLT70 phone of Tele 13 for call forwarding. Lift the handset of Tele 13 and enter the following: Press prog key, enter 00000 and cmf button Get into programming mode Press the DSS1 button ( the leftmost button in the Select DSS 1 key last row) Enter * # 8*12 Set call forward to Tele 14 Press cfm button and then prog button Confirm and enter programming again Press DSS 2 button (second rightmost button) Select DSS2 Enter *#80428888888# Set call forward to 0428888888 Press cfm button and then prog button Confirm and enter programming again 13 Aristel Networks Pty Ltd 4x4 PABX/Router User Guide and Setting Tool Programming Rev 3.6 Telephone Router Setting User Guide Press DSS 4 button Enter *# 8 # Select DSS key 4 Assign the key as Call Forward Cancel key Confirm End programming Press cfm button Go on hook By the above programming, DSS1 is assigned as Call Forward key to Tele 14 DSS2 is assigned as Call Forward key to Mobile Phone : 0428888888 DSS4 is assigned as Call Forward Cancel key. You may label the keys accordingly. On Tele 13, go off hook and press the appropriate button to activate the corresponding function and go on hook. Note: When external call forward is activated on Tele 13, any incoming external call will be call forwarded to the mobile as set. Since the maximum talk time is set to 4 minutes in system programming, at the end of 4 minutes the call will be disconnected. To extend the disconnect time pres * when a disconnect warning tone is heard. If an externally forwarded call is terminated before 4 minutes, both trunk lines will be held up to complete the 4 minutes period. To avoid trunk lines being held up this way either party that is in conversation can dial # to disconnect both lines before hanging up. 6. Setting Tools Software 14 Aristel Networks Pty Ltd 4x4 PABX/Router User Guide and Setting Tool Programming Rev 3.6 Telephone Router Setting User Guide V 1.9.2.10 Summary Most of the extension and line features can be programmed from any telephone. However, some of the advanced routing features can only be set by the PC Setting Tool Software. The Setting Tool Software is used for setting parameters of Aristel 4x4 PABX & 2Way Router using a serial RS232 cable that is supplied with the equipment. The supplied RS232 cable is a non standard serial cable and no other cable should be used for programming the router. Main menu 6.1 File [ExportAll]: It can export all parameters to a nominated file. [ImportAll]: It can import all parameters from a certain file that had beeen created by ExportAll feature. [Message Log]: The messages log of data download or upload. 15 Aristel Networks Pty Ltd 4x4 PABX/Router User Guide and Setting Tool Programming Rev 3.6 Telephone Router Setting User Guide 6.2 Setting [Comm Set]: If you want to set parameters with PC software, at first, you should connect the device to PC serial port with data cable. Then set the serial communication port and baud rate. “Send Data To Device”: Send all parameters data to the telephone router. All parameters must be sent to the telephone router, if you want the data you had modified become effective. 6.3 Read Device Data [Read Main Parameters]: Read main parameters from telephone router. [Read Router Numbers]: Read router numbers from telephone router. [Read Replace Dial Numbers]: Read dial numbers from telephone router.. 6.4 Help[About]: Display the version. 16 Aristel Networks Pty Ltd 4x4 PABX/Router User Guide and Setting Tool Programming Rev 3.6 Telephone Router Setting User Guide 7. Main parameters 17 Aristel Networks Pty Ltd 4x4 PABX/Router User Guide and Setting Tool Programming Rev 3.6 Telephone Router Setting User Guide 7.1 Introduction In the Main Parameters grid, only the slots in white can be edited. At first, introduce the line grouping function. The telephone router has 4 Trunk lines . These trunk lines can be classified in 2, 3 or 4 groups. "0" is common group. "2" is special group 2. "1" is special group 1. "3" is special group 3. For example, [Trunk 1 belongs to Trunk Group 0] indicates that the first external line belongs to “Common Group”. You should set at least one special group, that is to say, you cannot to set all trunks in group 0. [External 1 On/Off]: If this option is ticked, you are activating Line 1. [External N On/Off]: The same as above. [Use common Trunk on all special trunk busy]: If this option is ticked common trunks belonging to group 0 will be used in case special trunks go busy. In the example provided in the Main parameters grid, trunk 1 will be used if trunks 2,3 are all busy. [Use special trunk on all common trunks busy] If ticked the system allows special trunks, marked 1, 2,or 3 in the grid, to be used in an event designated common trunk goes busy. [Use other special trunk on all special trunk busy] If ticked the system allows another special trunk to be used in case the designated special trunk goes busy. [Special Trunk incoming] When ticked allows incoming calls on special trunk If un-ticked the call rings nowhere. [Common Trunk incoming] When ticked allows incoming calls on common trunk. If un-ticked the calls rings nowhere. [Special trunk outgoing] When ticked allows outgoing calls can go through the special trunks. [Common Trunk outgoing] When ticked the system allows outgoing calls to go through the common trunks. [Code password]: The telephone router has functions and parameters that can be set from a telephone. But, first you should enter *#* XXXX from the telephone where XXXX is the password. The default password is 0000. Click [Send data to device] button to transfer system parameters to telephone router and save it after modifications. 18 Aristel Networks Pty Ltd 4x4 PABX/Router User Guide and Setting Tool Programming Rev 3.6 Telephone Router Setting User Guide 7.2 Main Basic Parameters Call Pick-up Function Key (Default: 9) This function key is for “Call Pick-up”. For example, there is a call, and the Extension 11 is ringing. You can pick up the call from extension 13 by dialing *9. Ring Interval Time (Unit 100ms, Default 5 sec.) Ring Time for Internal(Inner) Call (Default 30 sec.) This is internal call ring time. Called extension stops ringing when this time expires. Call Transfer Time (Default: 20 Sec.) This is call back time. If there is no reply from a transferred station the system call back the extension that made the call transfer. Outer(External) line Hold Time (External Line Hold Time) (Default: 3 min.) Hot Line Delay Time (Default: 4 sec.) Charge Delay Time (Default: 5 sec.) Pause “p” Delay Time(Unit:100ms,Range: 200-2000ms) This introduces an ability to insert a delay at the beginning of an insert digit string or in the middle of an insert digit string. One “p” indicates one unit delay. In some cases it can set “pp” or “ppp” in the target number for 2 or 3 unit delays Flash Time (Unit: 100ms, Range: 200-1500ms) Caller ID Add Prefix Number (Default: 88) This is the prefix for caller ID. For example, Extension 11 called Extension 12 and therefore, the display on Extension will show 8811. If it is transferred call the display shows 880011, indicating it is a transferred call from 11. Extension Number Digit Length (Default: 2, Range: 1-4) Ring-Back on Call Transfer No Reply Caller ID Add Prefix Send Howler Tone Transfer Talking Time. ( Another name could be Co to Co Call Disconnect Time) When an incoming external call to an extension is call forwarded to an external number, two trunk lines are made busy. They won’t get released until this time expires. Default is set to 4 minutes (24 x 30 sec). Nearly 30 seconds before the forced disconnection of the trunk lines both parties, still continuing their talk, can hear a “du du du “ warning tone. At this time either party dialing “*” in 5 seconds can extend the disconnect timer. By dialing “#” before ending their conversation, both 19 Aristel Networks Pty Ltd 4x4 PABX/Router User Guide and Setting Tool Programming Rev 3.6 Telephone Router Setting User Guide trunk lines can be made to disconnect. 7.3 Extension settings PortID: The extension port ID, from 0 to 3. ExtNumber: The extension number, for example: 11,12,13,14. The length of extension number cannot more than “Extension Number Length”. Notice: The first number of any extension number cannot be set to 9, the Call Pick-up Function Key number” HotLine: Whether this extension is hot line or not. HotNumber: Hot number. ChargeMode: Charge mode, in general, set this parameter as 1. TransferMode: Setting unconditional transfer mode. The main “TransferMode” are “Not”, “To Out Line”. In general, it need not to set unconditional transfer to a certain extension. TransferNumber: Setting the unconditional transfer number. 7.4 Trunk settings PortID: The trunk port ID, from 0 to 3. ExtRing1: On an incoming call from this trunk, the extension1 will ring. ExtRing2: On an incoming call from this trunk, the extension2 will ring. ExtRing3: On an an incoming call from this trunk, the extension3 will ring. ExtRing4: On an incoming call from this trunk, the extension4 will ring. 7.5 Send data to device After setting all parameters, click [Send data to device] button to transfer all parameters to the PABX router. 7.6 Read Data Click [Read Data] button to read main parameters from telephone router and the parameters will display in the grid. 7.7 Device version Click [Device Version] button to read the version number of the device. It will display the version number in the label. 20 Aristel Networks Pty Ltd 4x4 PABX/Router User Guide and Setting Tool Programming Rev 3.6 Telephone Router Setting User Guide 8. Router Numbers Click title to sort 21 Aristel Networks Pty Ltd 4x4 PABX/Router User Guide and Setting Tool Programming Rev 3.6 Telephone Router Setting User Guide In this screen matching are made between dialed numbers and the trunk groups. It can add, edit or delete router number records. A maximum of 1200 records can be added. [ID] is only a series No. It has no other function. [GroupID] is trunk group ID. The value is 1-3. For example with above data, in the first line, “Router number” set as “0”, “GroupID “ set as 1. It means that all dialed telephone number beginning with “0” would be sent out through the special trunk group 1. In [Main parameters], trunk 2 had been set as group 1. So, all dialed telephone numbers that begin with “0” would going through trunk 2(External line 2). In general, there is no need set 0 group, because all telephone not in [Router Numbers] parameters belong to 0 group, the common group. Note: Do not set a nonexistent group. For example, in the Main parameters, you can see “Trunk 1 belongs to Trunk Group”: 0. “Trunk 2 belong to Trunk Group”: 1. “Trunk 3 belong to Trunk Group”: 2. “Trunk 4 belong to Trunk Group”: 3. You can realise that group 4 is not set. So, it is erronous if you set a “GroupID” as 4 in “Router Numbers” parameters. [Query]: Searching certain parameters among all router data by query option. [Delete]: Delete records by query option. [Export To Excel]: It will export router numbers data to a excel file. [Import From Excel]: To import router parameters from ax excel file. First and foremost, the format of the excel file must tally with the router format. [Send Data To Device]: Send all parameters to telephone router. [Read Data]: Read router numbers from telephone router. Add Router Number method: Select group ID in [GroupID] field, then input phone number in [Router Number] field, then click [Add] button. 22 Aristel Networks Pty Ltd 4x4 PABX/Router User Guide and Setting Tool Programming Rev 3.6 Telephone Router Setting User Guide Delete Router Number method: 1. Delete one record of router number. At first select a record, then click [Delete] button. 2. Delete a batch of seriate records of router number. Multiple lines selection: move the mouse to the position of the beginning of the line, press the left button of the mouse, drag the mouse. The selected multiple lines will be displayed with deep color. At first, make multiple line selection, then, click [Delete] button. 23 Aristel Networks Pty Ltd 4x4 PABX/Router User Guide and Setting Tool Programming Rev 3.6 Telephone Router Setting User Guide 9. Replace Dial Numbers 24 Aristel Networks Pty Ltd 4x4 PABX/Router User Guide and Setting Tool Programming Rev 3.6 Telephone Router Setting User Guide [ID] is only a series No. It has no other function. [GroupID] is trunk group. The value is 0-3. [Dial Option]: It has 5 options. 1. [Add Prefix Number Before All]: If Dial Option had been set this way, the system will add a prefix when a target number is detected. For example: GroupID: 1 Source number = Invalid TargetNumber: 17951 If the customer dialed number “00186337898”, and the number “00186337898” and that belonged to special group 1, the system will send out phone number “1795100186337898”. Note: every group must have a unique [Add Prefix Number Before All] parameter. If the [SourceNumber] is “Invalid”. [TargetNumber] can be set as blank. 2. [Add Prefix Number For Special Number]: For example: GroupID: 1 Source Number: 022 Target Number: 17909 If a customer dialed number “02286337898”, it begins with “022”, and if the number “022” is belongs to special group 1, the system will dial out a number “1790902286337898”. 3. [Replace Number]: For example: GroupID: 1 Source Number: 0 TargetNumber: 17909 If a customer dialed number “075786337898”, that begins with “0”. If the number “0” is associated with special group 1, then the system will delete 0 and substitute a prefix 17909 and then dial out “1790975786337898”. 4. [Insert Number] For example: GroupID: 1 Source Number: 123 25 Aristel Networks Pty Ltd 4x4 PABX/Router User Guide and Setting Tool Programming Rev 3.6 Telephone Router Setting User Guide TargetNumber: 17909 Then, if a customer dialed number “12386337898”, and if the number “123” belonged to special group 1, then The system will dial out phone number “1231790986337898”. 5. [Delete And Add Number]: Only [Dial Option] had been set as this option, the corresponding [DeleteLen] is valid. For example: GroupID: 1 Source Number: 00 TargetNumber: 17909 DeleteLen: 5 If a customer dialed number “0075786337898”, the digit string begin with 00. If the number “00” is associated to special group 1, then, the system will be dialing out phone number “1790986337898”. It deletes 5 digits, and replace it with 17909. [Remark]: Only a simple description about the telephone numbers. [Send Data To Device]: Send all parameters to telephone router. [Read Data]: Read “replace dial numbers” from telephone router. 10. Query Version Operation: Pick up the handset of any extension telephone and dial *#6, then hang up. The telephone set will display some number like “884048010212”. The telephone set must have Caller ID function. The “88” is “Caller ID Add Prefix Number”. The “404801” is version number. The “02” indicate the current telephone set is connected in the second extension port. The “12” is the extension number. 11. Other function [ExportAll]: It can export all parameters to a “*.zip” file. [ImportAll]: It can import all parameters from a “*.zip” file. The import file must have been previously built by [ExportAll]. For example, if you had configured all parameters and downloaded to the device, the device is working correctly, you can export [ExportAll] to make a backup of all parameters. Press the button [Export All], PC Software will store all the parameters to a file of “*.zip”. Afterwards, you can modify/change a 26 Aristel Networks Pty Ltd 4x4 PABX/Router User Guide and Setting Tool Programming Rev 3.6 Telephone Router Setting User Guide parameters. You can use PC Software [Import All] to import all the backup data and “Send Data to Device”. In this way, you can recover all the parameters as you set previously. You can also send the parameters data to your remote clients in the above method. 12. Product Specification Power Supply: AC230V±10% 50/60HZ & AC110V±10% Power consumption: ≤15W Ringing Current: AC70V±10% 50HZ Environment temperature: 0-40℃ Humidity: 10%-90% 13. Case Study - 2 (Programming by Setting Tool Software) A company called ACME wants the following implemented. Two PSTN lines terminated on Line1 and Line 2. Aristel AN1001, a GSM dialer terminated Line 4. Three SLT phones,( MultiPhone SLT70) installed as Tel1, Tel3 and Tel 4. Engenius SN902, long range cordless base station with one handset terminated as Tel2 Line 1 incoming calls are expected to ring Tel 1, Tel 2 and Tel 4 only. Line 2 incoming call to ring Tel 3 only. Incoming mobile calls through GSM dialer AN1001 is to ring Tel 1 and Tel 4 All external calls except Mobile calls need to pass through Line 1 and Line 2. All Mobile calls starting on 04 need to pass through AN1001 GSM dialer terminated on Line 4 Tel 3 should have capability to Call Forward all calls either to Tel 2 or to his Mobile 0427 888 888 and to cancel the call forward when desired. Call forwarded Mobile calls need to pass through AN1001, GSM dialer, terminated on Line 4. 27 Aristel Networks Pty Ltd 4x4 PABX/Router User Guide and Setting Tool Programming Rev 3.6 Telephone Router Setting User Guide Installation and programming. 1. Install Aristel PABX 4x4 &Two Way Router at suitable place and power on. Check red LED flashing. 2. Terminate lines 1 and 2. 3. Connect AN1001 GSM dialer to Line 4 4. Install Aristel Multiphones SLT70 on the Tele ports 1, 3 and 4 5. Connect Engenus SN902 long range phone as Tele 2 6. Connect the Com port of the PABX to the PC com port using the cable provided. 7. Power on PC 8. Load the CD provided on your PC and copy the whole content into a separate folder of your PC.. 9. Open the folder and double click RouterSet icon. 10. Telephone Router Setting screen will appear. 11. On top of the screen click Comm Set. 12. A small Comm Set screen will appear. Select your COM port and select Baud Rate 9600 and save, 13. Main Parameters screen will appear. 14. Now, click “Send Data to Device” to send raw data to the router. Then click “Read Data” to read data from the PABX/Router. 15. There are 3 windows. 1 Main Parameters 2. Router numbers 3. Replace dial Numbers. 16. Enter the following data into each screen and then save the data by clicking “Send Data to Device” 28 Aristel Networks Pty Ltd 4x4 PABX/Router User Guide and Setting Tool Programming Rev 3.6 Telephone Router Setting User Guide 13.1 Main Parameters Setting (a) 29 Aristel Networks Pty Ltd 4x4 PABX/Router User Guide and Setting Tool Programming Rev 3.6 Telephone Router Setting User Guide Main Parameters Setting (b) 30 Aristel Networks Pty Ltd 4x4 PABX/Router User Guide and Setting Tool Programming Rev 3.6 Telephone Router Setting User Guide Main Parameters Setting (c) 31 Aristel Networks Pty Ltd 4x4 PABX/Router User Guide and Setting Tool Programming Rev 3.6 Telephone Router Setting User Guide 13.2 Router Numbers 32 Aristel Networks Pty Ltd 4x4 PABX/Router User Guide and Setting Tool Programming Rev 3.6 Telephone Router Setting 13.3 User Guide Replace Dial Numbers 33 Aristel Networks Pty Ltd 4x4 PABX/Router User Guide and Setting Tool Programming Rev 3.6 Telephone Router Setting User Guide 14. Call forward programming SLT phones How to Call forward Tel 3 to Tel 2 (Engenius) Lift the handset of Tel 13 and dial * # 8 * 1 2 You will hear a confirmation beep. Hang up. You can store this dial string as a speed dial number on one of the DSS keys of SLT70.(Refer to para. 5.2) How to Call Forward Tel 3 to Mobile number 0427 888 888 Lift the handset of Tel 13 and dial * # 8 0427888888# and hang up You can store this dial string as a speed dial number on one of the DSS keys of SLT70. (Refer to para. 5.2) How to cancel Call Forwarding. Lift handset of Tel 13 and dial * # 8 # You can store this dial string as a speed dial number on one of the DSS keys of SLT70. (Refer to para. 5.2) _____☺_____ 34 Aristel Networks Pty Ltd 4x4 PABX/Router User Guide and Setting Tool Programming Rev 3.6 Telephone Router Setting User Guide NOTES 35 Aristel Networks Pty Ltd 4x4 PABX/Router User Guide and Setting Tool Programming Rev 3.6 Telephone Router Setting User Guide Illustration showing systems connectivity and routing capabilities of Aristel 4 X 4 PABX and 2-Way Router Aristel Networks Pty Ltd, Melbourne www.aristel.com.au 36 Aristel Networks Pty Ltd 4x4 PABX/Router User Guide and Setting Tool Programming Rev 3.6