1
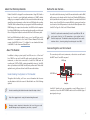
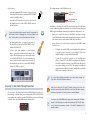
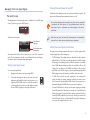
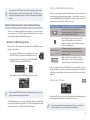
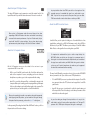
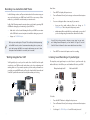
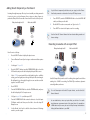
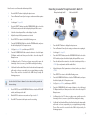
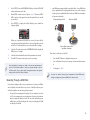
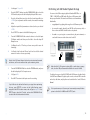
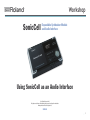
Workshop ®ÂØÒňΠ® SonicCell Expandable Synthesizer Module and Audio Interface Using SonicCell as an Audio Interface © 2008 Roland Corporation U.S. All rights reserved. No part of this publication may be reproduced in any form without the written permission of Roland Corporation U.S. SCWS02 1 About the Workshop Booklets Roland’s SonicCell is designed for modern musicians. Using USB, It adds a huge set of sounds to your digital audio workstation (or “DAW”) without adding to your computer’s workload. It’s also an audio interface that can get signals from mics, instruments, or other devices to DAW tracks for recording. SonicCell’s Editor software allows you to program SonicCell from within your DAW. Onstage, its compact size also makes SonicCell the ideal companion for a laptop DAW, letting you perform and sing along with recorded tracks. Or use it to play back sequences and audio files from a USB memory stick. Each SonicCell Workshop booklet focuses on one SonicCell topic, and is intended as a companion to the SonicCell Owner’s Manual. This booklet requires SonicCell O.S. Version 1.11 or higher. You can download the latest SonicCell O.S. for free from www.RolandUS.com. About This Booklet In addition to being a potent synth, SonicCell can act as a “front end” for a DAW. You can send SonicCell’s synth sounds and audio from a mic, instrument, or other device connected to SonicCell to DAW tracks for recording via USB. The DAW’s output automatically returns to SonicCell, where you can listen to the DAW, SonicCell, and your live audio. This booklet explains how to get the most from SonicCell as an audio interface. Understanding the Symbols in This Booklet Throughout this booklet, you’ll come across information that deserves special attention—that’s the reason it’s labeled with one of the following symbols. A note is something that adds information about the topic at hand. Before We Get Started... Since this booklet’s about using SonicCell as an audio interface with a DAW, we’ll assume you’ve already read the Using SonicCell with a DAW Workshop booklet, and know how to prepare your computer for use with SonicCell and how to connect SonicCell to the computer. We’ll also assume you know how to select and set SonicCell parameters as described in “Basic Operation of the SonicCell” on Page 20 of the SonicCell Owner’s Manual. SonicCell’s synth sounds automatically travel to your DAW via USB—for synth sounds, think of its USB connection as just another kind of SonicCell output jack. This booklet is about using SonicCell as an audio interface—that is, a box for getting live audio signals into a DAW. Connnecting Mics and Instruments The connection jacks for a mic, instrument, or other device can be found in the INPUT area of SonicCell’s rear panel. LINE (R) input INPUT LEVEL knob INPUT SOURCE switch Neutrik jack SonicCell’s Neutrik jack can accommodate several different types of connections. You use the INPUT SOURCE switch to tell SonicCell the type of input signal you’ve got. A tip offers suggestions for using the feature being discussed. Warnings contain important information that can help you avoid possible damage to your equipment, your data, or yourself. 2 If you’re using: The settings appear on the USB Audio screen: • a mic with a balanced XLR connector—connect it to the SonicCell’s current sample rate outer ring of the Neutrik jack, and set the INPUT SOURCE switch to the MIC position. These level meters show the DAW’s volume. • a mic with a 1/4” connector—connect it to the center of the Neutrik jack, and set the INPUT SOURCE switch to the MIC position. If your mic requires phantom power, SonicCell can provide it. We’ll discuss that in “Managing Your Live Input Signal” a bit later. To jump there now, click the button to the right. • an electric guitar or bass—connect it to the center of the Neutrik jack, and set the INPUT SELECT source switch to GUITAR (Hi-Z). • a stereo synth, drum machine, or other line-level device—connect the instrument’s left output to the center of the Neutrik connector, and its right output to SonicCell’s LINE (R) jack. To use the instrument in mono, connect its mono output only to the center of the Neutrik jack. In both cases, set the INPUT SOURCE switch to its LINE (L) position. In addition to showing you SonicCell current sample rate, the USB Audio screen contains two parameters that allow you to control how you hear your DAW’s output, including its previously recorded tracks, effects, and so on: • Audio Level—controls the volume of the DAW as you hear it through SonicCell. Adjust this value to set the desired balance between SonicCell’s own sounds, your live audio, and the DAW’s tracks and effects. • Assign—allows you to select how you want to hear the DAW’s sound. You can choose: • To Output—to send the DAW’s sound straight to the headphones or speaker system connected to your SonicCell. This is the standard setting for using SonicCell with a DAW. • To Input FX—if you’d like to apply one of SonicCell’s input effects, or “input FX,” to the DAW’s sound before directing it to SonicCell’s outputs for listening. (SonicCell’s input effect has its own output settings, as we’ll see.) This setting is available for special situations in which you want to modify the sound of the DAW’s entire output for some reason. For a list of the available input effects, see “Input effect settings” on Page 147 of the SonicCellOwner’s Manual. Listening to Your DAW Through SonicCell As we noted in the Using SonicCell with a DAW Workshop booklet, you listen through SonicCell when you’re working with a DAW. SonicCell offers some settings that control the sound of the DAW as you listen to it through SonicCell—press the USB AUDIO button to display them. When you’re using the To Input FX setting, make sure to turn off software monitoring within the DAW, or turn the USB Audio screen’s Audio Level parameter all the way down to avoid feedback. If you press the USB AUDIO button again while viewing the USB Audio screen, SonicCell displays its audio-interface Master EQ. This EQ allows you to adjust the frequency content of SonicCell’s headphone and speaker outputs. 3 Managing Your Live Input Signal Turning Phantom Power On and Off SonicCell provides phantom power for condenser mics that require it. The Input screen’s Phantom Power parameter turns it on or off. The Input Screen The management of incoming live audio is handled on SonicCell’s Input screen. To get there, press the INPUT button. The Input screen appears. SonicCell’s current sample rate These level meters show your input levels. The meters at the bottom of the screen let you set the level of your live audio. The two parameters on this screen—Phantom Power and Assign— also relate to your incoming live audio input signals. Setting Input Signal Levels To set an input signal’s level: 1 Navigate to the Input screen by pressing INPUT. 2 Send audio through your mic or play your connected instrument, and watch the Input screen’s meter as you adjust the INPUT LEVEL knob on SonicCell’s rear panel. Set the signal’s level as loud as possible without causing the word “CLIP” to light up to the right of the meters. Be sure that phantom power’s turned on only when you’ve connected a condenser mic that requires it. Using phantom power with any other type of mic or instrument may cause damage to the mic or instrument. Each time you power up SonicCell, phantom power is automatically turned off as a safety measure to protect your equipment. Setting the Input Signal’s Destination The Input screen’s Assign parameter allows you to set the signal path for your live signal. The possible settings are: • To COM+Output—This setting sends your live audio into the computer without effects, or “dry.” It also sends the dry signal to SonicCell’s outputs for listening, or “monitoring,” purposes. When you want to record audio into a DAW without adding any effects in SonicCell, you’ll use this setting. (You can always use the DAW’s own effects on the recorded audio later on.) It’s also the way to go if you’re performing along with a DAW onstage and you don’t want to add effects to the live audio. • To COM—This sends the live audio signal just to the computer for special recording or onstage situations in which you want to listen to the live audio only through the DAW’s effects to hear your voice or instrument through the DAW’s effects as you record or perform. • To Input FX—When this is selected, your live audio signal goes through SonicCell’s input effect. This allows you to add one of SonicCell’s input effects to the signal, of course, but it also can let you add an effect from SonicCell’s MFX3 multi-effect processor. Also, should you want to add SonicCell’s reverb, chorus, or other multi-effects strictly for listening as you record, this setting allows you to do so. 4 If you press the INPUT button again while viewing the Input screen, SonicCell displays its audio-interface Master EQ. This EQ allows you to adjust the frequency content of SonicCell’s headphone and speaker outputs. Understanding SonicCell’s Audio Interface Routing The process of sending a signal where you want it to go—into an effect, to your computer, etc.—is called “routing.” SonicCell provides lots of options, most of which begin at the In/Out Routing screen. SonicCell’s In/Out Routing Screen Most of the rest of the setup action takes place in the In/Out Routing screen. Here’s how to get there: • If you’re on the USB Audio screen or the Input screen—press the EFFECTS button to display the In/Out Routing screen. • If you’re anywhere else in SonicCell—press either USB AUDIO or INPUT, and then press the EFFECTS button. + Either method causes the In/Out Routing screen to appear. The Four In/Out Routing Sub-Screens Even more importantly, contained within the map are four switches that reveal other screens with important settings. To reveal these screens, you turn the CURSOR/VALUE dial to highlight and select the screen’s switch, and then press the dial to reveal the hidden sub-screen. When you select: Press the CURSOR/VALUE dial to show the Input FX screen on which you select the desired input effect, or THRU to pass your live audio through the input effect dry. Input FX Output screen on which you set the level of the input effect, and also set the amount of reverb or chorus you’d like to apply to the input effect signal. To Computer screen on which you select exactly what it is you want to send to the computer via USB MFX3 Location screen on which you set the MFX3 processor so that it either processes the input-effect signal or SonicCell’s synth sounds. In the “Recording Live Audio Onto DAW Tracks” section, we’ll take you stepby-step through some common setups that involve parameters on the input routing sub-screens. But first we’ll introduce you to the sub-screens and how they work. About the Input FX Screen If you press the EFFECTS button while viewing other screens, you’ll be taken to a different effect-related screen. The In/Out Routing screen is a map of the path that audio signals travel from SonicCell’s synth tone generator (“TG”), effects, analog inputs, and USB inputs on their way to SonicCell’s analog and USB outputs. On the Input FX screen, you can select the desired input effect algorithm and set the algorithm’s parameters to customize it for your use. Each effect is generated from a mathematical formula, or “algorithm”— when you choose one, you’re choosing the desired effect. 5 About the Input FX Output Screen The Input FX Output screen’s parameters control the output level of the input effect and let you add the desired amount of chorus or reverb to it. Any input effect—other than THRU—you add to a live signal can’t be removed once you’ve recorded the signal as an audio track in your DAW. If you’re not sure you want to keep an effect, you can select THRU now and add a similar effect later on within your DAW. About the MFX3 Location Screen When you’re in Performance mode—the normal place to be when sequencing a DAW’s MIDI tracks—the chorus and reverb’s own settings are saved in the current performance. If you’re in Patch mode, they’re saved with SonicCell’s system settings. You can learn about saving performance and system settings in the SonicCell Owner’s Manual. About the To Computer Screen On the To Computer screen, you select what’s to be sent over to your computer via USB. You can select • MIX—to send SonicCell’s synth sounds, all of its effects with your live audio to the computer. In essence, everything you hear in connected headphones or speakers goes to the computer with this setting. • Input FX—to send only the input effect, or technically its output, to the computer. When you’re sending your live input signal through the input effect, use this setting to send only that live signal to the computer. This option also lets you send the signal to a SonicCell multi-effect. When you’re recording live audio as you perform along with sequenced tracks playing SonicCell patches, you can send the live signal through the input effect for processing, and use the Input FX setting here. In the upcoming “Recording Live Audio Onto DAW Tracks” section, you’ll see the practical uses of these two settings. SonicCell offers you the option of adding one of its multi-effects to a live signal before sending it to a DAW. In Performance mode, this is MFX3; in Patch mode, it’s just “MFX.” This allows you to add any of SonicCell’s built-in killer effects to a live signal before recording it into your DAW. It’s important to understand that, just as with an input effect, the MFX3/MFX effect you add to your live signal is a permanent part of that signal—it can never be removed or adjusted once you’ve recorded the signal as an audio track in your DAW. While this is great for effects you’re sure you’ll want to keep forever, do make sure you’re prepared to make that commitment before recording. The way SonicCell handles your options here is to let you place MFX3/MFX where you want it to be. If you set this screen’s TYPE parameter to • TG—the MFX3/MFX processor is positioned at the outputs of SonicCell’s tone generator (hence the “TG”) where it can be applied to SonicCell’s synth sounds. • Input FX—the processor is positioned to catch the signal coming out of the input effect. This is the setting to select when you want to add a multi-effect to a live audio signal. As your live audio goes through the input effect on its way to the multi-effect, you don’t have to add an input effect to it. The input FX processor has a THRU option that passes the signal on unchanged. 6 Recording Live Audio Onto DAW Tracks In the following sections, we’ll present instructions for the various ways you can record audio into your DAW from SonicCell. You can use any of these methods, so just find the one that suits your current needs. Here’s how: 1 Press INPUT to display the Input screen. 2 Turn on Phantom Power if you’re using a condenser mic that requires it. 3 You can set Assign in either or two ways. If you want to: In all of the following examples except where noted, start by pressing USB AUDIO and setting up your monitoring of your DAW. Set: • hear your live audio without effects—set Assign to TO • Audio Level—to the desired listening level for your DAW. You can return • add an input effect or multi-effect to your live audio—proceed as if COM+Output. This is the quick ‘n dirty way to work. to the USB Audio screen at any time to tweak this setting as you work. you’re recording using the instructions later in this booklet. • Assign—to To COM+Output. While you can set Assign to To Input FX to add input effect processing to the DAW’s sound, we don’t recommend recording this way since you won’t be hearing the DAW’s true sound, and because you won’t have the input effect available for use with your live audio. If you’d like to hear reverb or chorus on your signal as you work, see “Adding Reverb Temporarily as You Record” on Page 8. See the SonicCell Owner’s Manual to learn more about these two effects. 4 Press INPUT to return to the Input screen for recording. Listening to and Recording a Dry Audio Signal Working Alongside Your DAW You’ll typically only record your live audio from SonicCell and its synth sounds into your DAW as audio tracks when you’re done rehearsing and working them out. If you want to practice your live audio performance as you refine your synth MIDI tracks, you’ll need to hear both the live audio and SonicCell’s synth at the same time to really know what you’re doing. The simplest, most typical way to record is listen to your live audio dry, without effects, in SonicCell as you send it without effects to your DAW. What you hear through SonicCell What’s sent to the DAW USB cable DAW output MIDI cable To do this: 1 Press the INPUT button to display the Input screen. 2 Turn on Phantom Power if you’re using a condenser mic that requires it. 3 Set Assign to To COM+Output—SonicCell is ready to record. 7 Adding Reverb Temporarily as You Record Listening through temporary effects you’re not actually recording can make it easier to get a good performance from a singer or player. Singers, in particular, often prefer to hear a bit of reverb on their voices as they record. What you hear through SonicCell If you’d like to temporarily add chorus to your signal, set the Chorus Send Level parameter as desired on the Input FX Output screen. 11 Press EFFECTS, turn the CURSOR/VALUE dial to select the MFX3 LOC switch, and then press the dial. 12 On the MFX3 Location screen, make sure Type is set to TG. 13 Press INPUT to return to the Input screen for recording. What’s sent to the DAW See the SonicCell Owner’s Manual to learn about editing reverb and chorus settings. Reverb DAW output Recording Live Audio with an Input Effect What you hear through SonicCell What’s sent to the DAW Here’s how to set this up: 1 Press the INPUT button to display the Input screen. 2 Turn on Phantom Power if you’re using a condenser mic that requires it. 3 Set Assign to To Input FX. 4 Press the EFFECTS button, turn the CURSOR/VALUE dial to select the IN FX switch, and press the dial to display the Input Effect screen. 5 Select 0:THRU as your input effect on the display’s top line—with this setting, your live signal passes through the input effect unchanged. We still want it to go through it, though, since we can then send the signal to SonicCell’s reverb. 6 Press EFFECTS. 7 Turn the CURSOR/VALUE dial to select the TO COM switch, and press the dial to display the To Computer screen. 8 Set Type to Input Effect, and then press EXIT. 9 Turn the CURSOR/VALUE dial counter-clockwise to select the Input FX Output switch, and then press the dial to show the Input FX Output screen. 10 Set the Reverb Send Level to add the desired amount of listening reverb to your live signal. Input Effect DAW output Input Effect with optional Reverb and Chorus SonicCell’s input effect provides tools for refining a live signal’s sound before sending it to a DAW for recording. You’ll find EQ, an enhancer, dynamiccontrol algorithms, and more. For a full description of SonicCell’s input effects, see the SonicCell Owner’s Manual. As we noted before, since any input effect you add to a live audio signal becomes a permanent part of the signal when it’s recorded on a DAW audio track, be sure you want to keep the input effect before hitting the Record button in your DAW. 8 Here’s how to record live audio with an input effect: Recording Live Audio Through SonicCell’s Multi-FX What you hear through SonicCell What’s sent to the DAW 1 Press the INPUT button to display the Input screen. 2 Turn on Phantom Power if you’re using a condenser mic that requires it. 3 Set Assign to To Input FX. 4 Press the EFFECTS button, turn the CURSOR/VALUE dial to select the IN FX switch, and press the dial to display the Input Effect screen. 5 Select the desired input effect on the display’s top line. 6 Adjust the input effect’s parameters as desired. 7 Press EFFECTS to return to the In/Out Routing screen. 8 Turn the CURSOR/VALUE dial to select the TO COM switch, and press the dial to display the To Computer screen. 1 Press the INPUT button to display the Input screen. Set Type to Input Effect, and then press EFFECTS. 2 Turn on Phantom Power if you’re using a condenser mic requiring it. Turn the CURSOR/VALUE dial counter-clockwise to select the Input FX Output switch, and then press the dial to show the Input FX Output screen. 3 Set Assign to To Input FX. 4 Press the EFFECTS button, turn the CURSOR/VALUE dial to select the IN FX switch, and press the dial to display the Input Effect screen. 11 Set Output Level to 127 unless you have some specific reason for lowering it—this is, in essence, your DAW recording level setting. 5 Press the dial, and then turn it to select the desired input effect, or 0:THRU if you only want to add the multi-effect. 12 Set Reverb Send Level and Chorus Send Level as desired to temporarily add reverb or chorus, respectively, to your signal during recording. These effect won’t be recorded in the DAW—they’re strictly for listening purposes. 6 Adjust the input effect’s parameters as desired, unless you selected 0:THRU. 7 Press EFFECTS to return to the In/Out Routing screen. 8 Turn the CURSOR/VALUE dial to select the TO COM switch, and press the dial to display the To Computer screen. 9 Set Type to Input Effect, and then press EFFECTS. 9 10 See the SonicCell Owner’s Manual to learn about editing reverb and chorus settings. 13 Press EFFECTS, turn the CURSOR/VALUE dial to select the MFX3 LOC switch, and then press the dial. 14 On the MFX3 Location screen, make sure Type is set to TG. 15 Press INPUT to return to the Input screen for recording. Input Effect MFX3 DAW output Input Effect MFX3 with optional Reverb and Chorus 10 Turn the CURSOR/VALUE dial counter-clockwise to select the Input FX Output switch, and then press the dial to show the Input FX Output screen. 11 Set Output Level to 127 unless you have some specific reason for lowering it—this is, in essence, your DAW recording level setting. 12 Set Reverb Send Level and Chorus Send Level as desired to temporarily add reverb or chorus, respectively, to your signal during recording. These effects won’t be recorded in the DAW—they’re strictly for listening purposes. 9 13 14 15 Press EFFECTS, turn the CURSOR/VALUE dial to select the MFX3 LOC switch, and then press the dial. • your DAW may or may not be able to record the effect—Some DAWs allow you to capture their effects along with audio as you record it; some may not, though you can still add it later. Consult your DAW’s documentation to learn more about this. On the MFX3 Location screen, set Type to Input FX. This causes MFX3/ MFX to catch your live signal as it exits the input effect so it can add its own effect. What you hear through SonicCell What’s sent to the DAW Press EFFECTS to display the In/Out Routing screen, which has changed slightly. DAW output When you re-positioned MFX3/MFX to process the input effect’s output, a new switch was added to the screen as shown above circled in red. The F3 switch provides access to the multi-effect’s settings. 16 Select the F3 switch and press the CURSOR/VALUE dial to display the MFX processor’s settings. 17 Select the desired multi-effect and set its parameters as desired. 18 Press INPUT to return to the Input screen for recording. Your multi-effect’s settings are saved in the current performance if you’re in Performance mode, or with your system settings if you’re in Patch mode. You can learn about saving performance and system settings in the SonicCell Owner’s Manual. DAW Effect You’re most likely to want to use this setup with an electric guitar. Here’s how to set this up in SonicCell: 1 Press the INPUT button to display the Input screen. 2 Turn on Phantom Power if you’re using a condenser mic that requires it. 3 Set Assign to To COM. Set your live audio’s listening level compared to other DAW tracks during recording using the new DAW track’s level control. Recording Through a DAW Effect If you plan on adding an effect to your signal once it’s inside your DAW, it can be helpful to hear that effect as you record. SonicCell can allow you to do this, though there are two things to keep in mind: • the speed of your computer and its settings—If you computer’s too slow, or if it’s set up improperly, you may experience latency, a lag between what you play and what you hear. This can make performing more difficult since you’ll be hearing the live audio only through the DAW, not directly in SonicCell. 10 Recording with Chorus, Reverb and Mastering Effects If you like, you can record audio that takes advantage of SonicCell’s reverb, chorusing, or mastering effects in your DAW. What you hear through SonicCell Input FX MFX3* Reverb, Chorus, Mastering DAW output *MFX optional What’s sent to the DAW Input FX MFX3* Reverb, Chorus, Mastering Here’s how to record with SonicCell’s reverb, chorus, or mastering effect: 1 Press the INPUT button to display the Input screen. 2 Turn on Phantom Power if you’re using a condenser mic that requires it. 3 Set Assign to To Input FX. 4 Press the EFFECTS button, turn the CURSOR/VALUE dial to select the IN FX switch, and press the dial to display the Input Effect screen. 6 Press EFFECTS to return to the In/Out Routing screen. 8 Turn the CURSOR/VALUE dial counter-clockwise to select the Input FX Output switch, and then press the dial to show the Input FX Output screen. 9 Set Output Level to 127 unless you have some specific reason for lowering it—this is, in essence, your DAW recording level setting. 10 Set Reverb Send Level and Chorus Send Level to add the desired amount of reverb or chorus, respectively. See the SonicCell Owner’s Manual to learn how to customize the reverb and chorus, and how to enable and set up the mastering effect. 11 Turn the CURSOR/VALUE dial to select the TO COM switch, and press the dial to display the To Computer screen. 12 Set Type to MIX. 13 Press INPUT to return to the Input screen for recording. *MFX optional Since your DAW will receive every sound coming out of SonicCell with the following setup, be sure to mute all of SonicCell’s synth sounds while recording live audio so you don’t record them on the live audio’s DAW track along with your audio. You can do this by muting the synth sounds’ MIDI tracks in your DAW, or by muting their parts in the SonicCell Editor on your computer. 5 7 Press the dial, and then turn it to select the desired input effect, or 0:THRU if you only want to add the reverb, chorus and/or mastering effect. Adjust the input effect’s parameters as desired, unless you selected 0:THRU. If you’d like to also add multi-effects to your signal when recording this way, press EFFECTS to return to the In/Out Routing screen, navigate to the MFX3 Location screen, and set Type to Input FX. SonicCell as an Onstage Audio Interface Using SonicCell with a DAW Onstage SonicCell makes a great onstage companion for a laptop running a DAW. Here’s how to set it up: 1 Press the INPUT button to display the Input screen. 2 Turn on Phantom Power if you’re using a condenser mic that requires it. 11 3 Set Assign to To Input FX. 4 Press the EFFECTS button, turn the CURSOR/VALUE dial to select the IN FX switch, and press the dial to display the Input Effect screen. 5 Press the dial, and then turn it to select the desired input effect, or 0:THRU if you only want to add the reverb, chorus and/or mastering effect. 6 Adjust the input effect’s parameters as desired, unless you selected 0:THRU. 7 Press EFFECTS to return to the In/Out Routing screen. 8 Turn the CURSOR/VALUE dial counter-clockwise to select the Input FX Output switch, and then press the dial to show the Input FX Output screen. 9 Set Output Level to 127 unless you have some specific reason for lowering it. 10 Set Reverb Send Level and Chorus Send Level to add the desired amount of reverb or chorus, respectively. Performing with SMF/Audio Playback Onstage You can use SonicCell onstage to play back Standard MIDI Files—or “SMFs” —WAV, AIFF, and MP3 audio files from a USB memory stick when you perform live. This turns SonicCell into a sort of mini-mixer that handles • song playback—by playing back songs from a USB memory stick. • its own synth sounds—played by an SMF file on the memory stick, or from a connected MIDI controller such as a keyboard. • live audio—as you sing into a connected mic, play an instrument, or send audio from some other device into SonicCell. See the SonicCell Owner’s Manual to learn how to customize the reverb and chorus, and how to enable and set up the mastering effect. 11 Turn the CURSOR/VALUE dial to select the TO COM switch, and press the dial to display the To Computer screen. 12 Set Type to MIX. 13 Press INPUT to return to the Input screen for recording. If you’d like to also add multi-effects to your signal when performing this way, press EFFECTS to return to the In/Out Routing screen, navigate to the MFX3 Location screen, and set Type to Input FX. Press EFFECTS again, select the F3 switch, and use the CURSOR/VALUE dial to select and edit the desired multi-effect. When SonicCell’s USB system is playing SMFs or audio from a memory stick, its other USB port becomes unavailable for use with a DAW. To play back songs, use SonicCell’s SMF/Audio File Player as described in the SonicCell Owner’s Manual. To play its synth sounds, connect a MIDI controller and select, edit them, and play them as described in the SonicCell Owner’s Manual. For live performance, we’ll assume you’ve connected your amplification system to SonicCell’s L/MONO and R OUTPUT jacks. 12 Here’s how to set up the audio-interface side of things when you’re performing along with SonicCell’s SMF/Audio File Player: 1 Press the INPUT button to display the Input screen. 2 Turn on Phantom Power if you’re using a condenser mic that requires it. 3 Set Assign to To Input FX. 4 Press the EFFECTS button, turn the CURSOR/VALUE dial to select the IN FX switch, and press the dial to display the Input Effect screen. 5 Press the dial, and then turn it to select the desired input effect, or 0:THRU if you only want to add the reverb, chorus and/or mastering effect. If you’d like to also add multi-effects to your live signal, press EFFECTS to return to the In/Out Routing screen, navigate to the MFX3 Location screen, and set Type to Input FX. Press EFFECTS again, select the F3 switch, press the CURSOR/VALUE dial, and then use the dial to select and edit the desired multi-effect. The End We hope you’ve found this workshop helpful. Keep an eye out for other SonicCell Workshop booklets available for downloading at www.RolandUS. com. The input effect’s Equalizer, Enhancer, Compressor, and Limiter algorithms are ideally suited for optimizing the sound of a live vocal or instrument performance. 6 Adjust the input effect’s parameters as desired, unless you selected 0:THRU. 7 Press EFFECTS to return to the In/Out Routing screen. 8 Turn the CURSOR/VALUE dial counter-clockwise to select the Input FX Output switch, and then press the dial to show the Input FX Output screen. 9 Set Output Level to the desired volume in relation to the song you’re playing back, and SonicCell’s synth sounds. 10 Set Reverb Send Level and Chorus Send Level to add the desired amount of reverb or chorus, respectively. See the SonicCell Owner’s Manual to learn how to customize the reverb and chorus, and how to enable and set up the mastering effect. 13 14