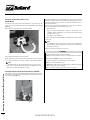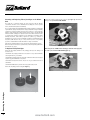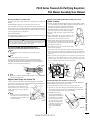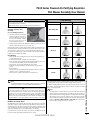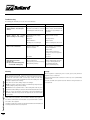
1
PA30 Series Powered Air-Purifying Respirator PA3 Blower Assembly User Manual (for use with Loose-Fitting Headtops) Approval No. TC-21C-0807 PA3 - Powered Air-Purifying Respirator with High Efficiency (HE) Filters (2) NIOSH Approval No. TC-23C-2236 PA3 - Powered Air-Purifying Respirator with PA3NBC cartridges (3) for chlorine, hydrogen chlorine, sulfur dioxide, chlorine dioxide, hydrogen fluoride, ammonia, methylamine, and particulates Approval No. TC-23C-2357 PA3 - Powered Air-Purifying Respirator with OV-AG-HE Cartridges (3) for organic vapors, chlorine, hydrogen chloride, sulfur dioxide, chlorine dioxide or hydrogen fluoride and particulates PA30 PAPR Cautions and Limitations Warning A.Not for use in atmospheres containing less than 19.5% oxygen. B.Not for use in atmospheres immediately dangerous to life or health. C.Do not exceed maximum use concentrations established by regulatory standards. F.Do not use respirator if airflow is less than four cfm (115 lpm) for tight fitting face pieces or six cfm (170 lpm) for hoods and/or helmets. H.Follow established cartridge and canister change schedules or observe ESLI to ensure that cartridges and canisters are replaced before breakthrough. I.Contains electrical parts that may cause an ignition in flammable or explosive atmospheres. J.Failure to properly use and maintain this product could result in injury or death. K.The Occupational Safety and Health Administration regulations require gas-proof goggles to be worn with this respirator when used against formaldehyde. L.Follow the manufacturer’s user instructions for changing cartridges and/or filters. M.All approved respirators shall be selected, fitted, used and maintained in accordance with MSHA, OSHA and other applicable regulations. N.Never substitute, modify, add or omit parts. Use only exact Bullard replacement parts in the configuration as specified by the manufacturer. O.Refer to User’s Instructions and/or maintenance manuals for information on use and maintenance of these respirators. P.NIOSH does not evaluate respirators for use as surgical masks. Use strictly in accordance with instructions, labels and limitations pertaining to the PA30 respirator. 1.The PA30 respirator does not supply oxygen. Use only in adequately ventilated areas containing at least 19.5% oxygen. 2.Do not use when concentrations of contaminants are immediately dangerous to life or health (IDLH). This term is defined in 29CFR 1910.134 (b). 3.Do not use these respirators for respiratory protection during abrasive blasting or clean up. 4.Do not use in circumstances where the airborne concentration level of contaminant exceeds maximum use concentration for this type of respirator as established by regulatory standards. 5.Leave area immediately if: • Breathing becomes difficult • Dizziness or other distress occurs • You taste or smell the contaminant • Unit becomes damaged • Voltage alarm activates 6.This apparatus must not be worn with the blower unit switched off. If the blower is switched off, a rapid build-up of carbon dioxide and depletion of oxygen may occur, which could result in death or serious injury. 7.Never alter or modify this respirator. Use only Bullard NIOSH -approved PA30 components and replacement parts for this respirator. Failure to follow these warnings could result in death or serious injury. Table of Contents Warnings, Cautions and Limitations............................................................................. Principle of Operation ................................................................................................... Battery Pack................................................................................................................... Pre-Operational Inspection........................................................................................... Mounting the Breathing Tube........................................................................................ Checking Air Flow.......................................................................................................... Air-Purifying Elements................................................................................................... 1 2 3 3 4 4 5 Mounting and Replacing Cartridges............................................................................... 6 Donning the Blower.................................................................................................... 7-9 Low Battery Alarm......................................................................................................... 9 Troubleshooting........................................................................................................... 10 Cleaning and Storage.................................................................................................. 10 Niosh Approval Label................................................................................................. 11 Ordering Information................................................................................................... 12 www.bullard.com PA3 - Principle of Operation The PA30 Powered Air-Purifying Respirator (PAPR) System is supplied in six parts: 1.The blower assembly (Part No. PA3) which includes: PA3BU Blower Unit PA1SB Belt or PA1DB Decon Belt PA1AFI Air Flow Indicator The blower unit draws in ambient air through the filters/cartridges. The purified air is blown into the wearer’s hood through the breathing tube. A flow indicator is provided to check that there is an adequate volume of air available to the wearer prior to use. The units are designed for use at temperatures from 10ºF to 120ºF (-12ºC to 49ºC). The system is designed to operate at a minimum air flow of approximately seven cubic feet of air per minute (210 liters per minute) in the hood under normal use. 2.The battery pack (Part No. PA3BP). One or two packs can be used. One fully charged pack will power the blower for approximately four to five hours. The battery pack(s) mount in compartment(s) on the back of the blower. One fully charged battery pack will power the blower for approximately four to five hours (PA3BU). Two fully charged packs (PA3BU) will run for approximately eight to ten hours. 3.The breathing tube, which is available in five different versions. The PA3BU is fitted with an alarm which will sound when voltage is low. PAHBT Powered Air Hood Breathing Tube Assembly (standard length) PAHBTXS Powered Air Hood Breathing Tube Assembly (short length) PAHBTXL Powered Air Hood Breathing Tube Assembly (long length) PA1BT Hood breathing tube assembly with clamp (standard length) PA1BTXS Hood breathing tube assembly with clamp (short length) PA1BTXL Hood breathing tube assembly with clamp (long length) PA20LFBT Loose fitting facepiece breathing tube assembly (standard length) PA20LFBTXS Loose fitting facepiece breathing tube assembly (short length) PA20LFBTXL Loose fitting facepiece breathing tube assembly (long length) CC20 and RT Series Airline Respirator NIOSH Approval No. TC-19C-154, Type C and TC-19C-412, Type C 4.The cartridges are available in different types for most toxic contaminants. (See page 6 for a listing of the filters and cartridges.) The types include High Efficiency particulate only, chemical cartridges for gases and vapors, and combination cartridges for gases, vapors and particulates. The CC20 and RT SAR air flow control devices and other components are described in the CC20 and RT Series User Instructions. Most of the same headpieces approved for use with the CC20 and RT Series of supplied air respirators (SARS) are also approved for use with the PA30 Series of powered airpurifying respirators. CC20 and RT Series respirators provide a high level of respiratory protection and user comfort over long work periods, in a wide variety of hazardous environments. Principle of Operation 5.The hood with headband suspension and/or hard hat, or loose fitting facepiece. The following hood models may be used with the PA3BU blower unit: 2 RT1/RT1T Hood with long inner and outer bib (NIOSH approved for use without a headband suspension) RT2/RT2T Hood with long inner and outer bib (NIOSH approved for use without a headband suspension) RT3/RT3T Hood with long inner and outer bib (NIOSH approved for use without a headband suspension) RT4/RT4T Hood with long inner and outer bib (NIOSH approved for use without a headband suspension) 20TJ/20TJT Hood 20TIC/20TICT Hood with inner bib 20TICH/20TICHT Hood for use with Bullard hard hat 20TICS/20TICST Hood with taped and sealed seams 20SIC/20SICT Hood with taped and sealed seams 20SICV/20SICVT Hood with taped and sealed seams and PVC lens 20SICH/20SICHT Hood with taped and sealed seams for use with Bullard hard hat 20SICVH/20SICVHT Hood with taped and sealed seams and PVC lens for use with Bullard hard hat 20TPC/20TPCT Hood with solvent resistant lens and inner bib 20TP/20TPT Hood with solvent resistant lens 20LFM Loose fitting facepiece, medium size 20LFL Loose fitting facepiece, large size 20LF2M Loose fitting facepiece (narrow profile), medium size 20LF2L Loose fitting facepiece (narrow profile), large size 20LF2S Loose fitting facepiece (narrow profile), small size 6.The Battery Charger: PA3SMC Quick Charger PA3GC Gang Charger www.bullard.com PA30 Series Powered Air-Purifying Respirator PA3 Blower Assembly User Manual Battery Pack Initial Charging Procedure with Quick Charger A fully charged battery pack will power a blower unit to provide adequate air volume for the respirator for approximately four to eight hours for the PA3BU under normal working conditions, depending on whether one or two battery packs are used. To ensure a full charge on a new battery pack, follow these important guidelines. These guidelines also apply to battery packs that have been in storage for extended periods of time. To charge the battery pack, do the following: For new battery packs or packs that have been in storage for extended periods of time, follow the directions above under “Battery Pack”, and when the light begins to flash on the charger, do the following: • Open the battery latch and remove the battery from the back of the blower. • Remove the battery pack. Wait 15 seconds. Replace the battery pack in the nest. The charger light will now remain on. • When the light begins flashing again, remove the battery pack. Wait 15 seconds. Replace the battery pack in the nest again. The charger light will now remain on. The charger light will flash a third time, indicating that the battery is fully charged. This procedure should also be followed after periods of prolonged storage. Without periodic charging, the nickel metal hydride batteries will lose up to 1%–2% of their charge per day. Allowing a battery to self-discharge during periods of prolonged storage will not damage the battery. Warning DO NOT charge batteries in hazardous areas. Pre-Operational Inspection Figure 1 • Place each battery in the charging ports of the battery charger. Ensure that the battery contacts line up with the contacts in the charger port (see Figure 1). • Connect the battery charger to a 115-volt AC electrical outlet. Prior to each work shift, perform the following Pre-Operational Inspection to ensure proper operation and to insure that the unit is complete. Charge the battery pack for approximately eight hours. • Check that the unit is clean and undamaged. • Inspect for deterioration, physical damage, and improper assembly. • Ensure that the correct filters/cartridges for the appropriate contaminant are properly mounted on the blower unit. Screw the cartridges into the ports until handtight. While the PA3BP battery is charging, the light on the charger will remain on. The charger light will flash when charging is complete. Table-top gang chargers (Part No. PA3GC, with 5 ports) are also available. 1.Belt Mounted Blower Unit, Part No. PA3BU Consult the NIOSH approval label and your own in-plant safety professional if you have any questions as to the suitability and efficiency of the Air-Purifying Element. Warning PA3BP battery packs MUST be used with PA3 blower units. Interchanging these batteries with other blowers may cause damage to the blower and battery AND the blowers will not operate as intended and may put the wearer at risk. Failure to follow these instructions may result in death or serious injury. • Check that the battery is not damaged. • Place the battery pack in the battery compartment on the blower by first engaging the tab on the pack under the lip on the edge of the compartment. Then close the latch. Place a second battery pack in the other compartment, if desired (PA3BU only). If only one battery is used, install the PA3BPC battery port cover over the unused port (for PA3BU). 3. Hood with Suspension or Hard Hat, or Loose Fitting Facepiece • CC20 Series and RT Series hoods are constructed of either Tychem QC or Tychem SL. Depending on the model selected, it may be used with either a headband suspension or a hard hat. The loose fitting facepiece is constructed of Tychem QC and features an internal suspension. • All CC20 Series and RT Series hoods and loose fitting facepieces are approved for use with the PA3BU Blower Unit. • Inspect the hood or loose fitting facepiece for any physical damage. www.bullard.com Battery Pack/Pre-Operational Inspection To maximize battery life, these guidelines should be followed: • Charge the battery pack before it is completely discharged. The low voltage alarm indicates that the battery needs to be charged; operating the PAPR for more than 20 minutes after the alarm has been activated may damage the battery. Deeply discharged batteries may cause the charger to falsely indicate a complete charge. • Always charge the batteries at room temperature or less. At higher temperatures, the battery pack may not accept a full charge. If the battery pack feels hot, let it cool for 30 minutes before charging. • Do not charge battery packs in an enclosed cabinet without ventilation. • Battery capacity may be checked with the battery analyzer/conditioner. 2.Battery Pack 3 Mounting the Breathing Tube on the PA3BU Blower Ensure that a rubber gasket is in place in the breathing tube coupler on the blower unit. Apply a light downward pressure to the Airflow Indicator to get a reasonable seal at the breathing tube end. Ensure that the air outlet holes in the Airflow Indicator tube are not blocked. Two hands may be used if preferred, one to hold the breathing tube and one to hold the Airflow Indicator. Screw one end of the breathing tube into the blower unit (hand tight is sufficient) (see Figure 2). The position of the ball in the Airflow Indicator should be observed. If any part of the ball is below the PASS LINE on the Airflow Indicator, check for: Ensure that neither the breathing tube nor the filter is blocked. • Blower malfunction. • Clogged or damaged Air-Purifying filter elements on the HE filters or the combination cartridges with HE filters. See “Mounting and Replacing Cartridges on the Blower Unit” on page 7. • Low voltage or battery malfunction. If the ball is completely above the PASS LINE on the Airflow Indicator, then the system is ready for use. NOTE n the PA3BU unit, due to the back-pressure of the ball, the Low Voltage Alarm O may sound when a reading is being taken. If the ball bounces, let it stabilize, and then read the lowest point. When the blower passes the flow test, it is ready to use. Gasket Warning Figure 2 Ensure that the ON/OFF Switch is in the OFF position. Switch on the blower. If the Low Voltage Alarm sounds at this time, the battery needs to be recharged. See instructions on page 4 regarding properly charging the battery. NOTE On the PA3BU unit, the low voltage alarm will sound a short beep as the power switch is cycled on and off, indicating that the alarm is functioning properly. The alarm will sound continuously to indicate low voltage. If the blower malfunctions during use in a hazardous area: DO NOT remove the respirator hood, blower or waist-belt while in the hazardous area. DO remain calm and LEAVE the hazardous area immediately. After reaching a hazard-free area, immediately remove the respirator. DO NOT use a blower that fails the flow test. Use only Bullard cartridges which comply with and have the NIOSH approval label and which are appropriate for the contaminant. Failure to observe these warnings could result in death or serious injury. Mounting the Breathing Tube/Checking Airflow Checking Airflow with the Airflow Indicator (PA1AFI) 4 With the blower switched ON and the filters/cartridges mounted, take the free end of the breathing tube in one hand, hold it upright and place the Airflow Indicator into the end of the tube (see Figure 3). Figure 3 www.bullard.com PA30 Series Powered Air-Purifying Respirator PA3 Blower Assembly User Manual PA3BU Air-Purifying Elements Principle of Operation The following filter/cartridge protection classification applies when used with any of the hoods or loose fitting facepieces. In the following table “Quantity” refers to the number of filters/cartridges which must be attached to the blower unit to provide the required protection. Protection Filter/Cartridge Type QuantityNIOSH / ANSI Color Code for Cartridge Label HE OV/CL/HC/SD/CD/HF/HE CL/HC/SD/CD/HF/FM/AM/MA/HE PAPRFC12 Purple PAPRFC2 3 Yellow and Purple PA3NBC* 3 Olive Green and Purple *The PA3NBC cartridge provides protection for acid gases, formaldehyde, and ammonia and therefore is effective against a wide range of Toxic Industrial Chemicals. The High Efficiency (HE) Particulate Filter provides protection against airborne bacteria, viruses, and other particulates. Although not NIOSH-approved for use against the following contaminants, independent laboratories have tested and verified that the PA3NBC cartridge is effective against many chemical warfare agents and/or their recognized surrogates. These agents/surrogates are listed below. PA3NBC CARTRIDGE CHEMICAL WARFARE GAS PERFORMANCE TESTING Gas Challenge Test Flow Breakthrough Time to ConcentrationRate Concentration Breakthrough DMMP 3000 mg/m3 50 lpm .04 mg/m3 >120 minutes* Sarin (GB) 4000 mg/m3 32 lpm .04 mg/m3 >120 minutes* Cyanogen Chloride (CK) 4000 mg/m3 32 lpm 8.0 mg/m3 30 minutes* Chloropicrin (PS) 15000 mg/m3 30 lpm 0.7 mg/m3 60 minutes Hydrogen Cyanide (AC) 5500 mg/m3 30 lpm 5.0 mg/m3 >30 minutes Tear Gas (CS) 23 mg/m3 64 lpm 0.4 mg/m3 >480 minutes Tear Gas (CN) 101 mg/m3 64 lpm 0.3 mg/m3 >480 minutes *These tests are part of the performance specifications for the C2A1 military canister. The PA3NBC Cartridge meets or exceeds the performance requirements of the C2A1 canister for these gases. HE particulate filters are 99.97% effective against all particulate aerosols. Filters and cartridges are supplied in quantities of six per box. The following abbreviations are approved by NIOSH to indicate the particulates, gases or vapors which are removed by the gas/vapor cartridges: Use only the filter/cartridge described in the above table. Used/particulate-laden cartridges must be changed as a set and not individually. All cartridges must be of the same type. Do not change cartridges while in a hazardous atmosphere. Incorrect cartridge selection will invalidate all performance statements and approvals for this equipment. Three (3) of the same type of filter/cartridge must be used on the PA3BU blower unit, with the exception of the PAPRFC1 filters which are used two (2) at a time, in conjunction with the PA3PG plug. DO NOT use the PA3PG plug to close off a port with any other cartridge type. These respirators are not NIOSH-approved for use against chemical warfare agents. The respirator and cartridges should not be used beyond eight (8) hours after initial exposure to chemical warfare agents to avoid possibility of agent permeation. If liquid exposure is encountered, the respirator should not be used for more than two (2) hours. Follow established cartridge change schedules to ensure that cartridges are replaced before breakthrough occurs. Failure to follow these warnings could result in death or serious injury. www.bullard.com Air-Purifying Elements CL Chlorine CD Chlorine Dioxide HC Hydrogen Chloride SD Sulfur Dioxide FM Formaldehyde AM Ammonia MA Methylamine OV Organic Vapors HF Hydrogen Fluoride HE High Efficiency Particulate Air Filter for PoweredAir-Purifying Respirators WARNING 5 Mounting and Replacing Filters/Cartridges on the Blower Unit Screw the air-purifying elements into the receptacles (see Figure 5) until the filter/ cartridge is hand tight. DO NOT OVER-TIGHTEN. The useful life of a chemical cartridge for vapors and gases will vary with the concentration and nature of the contaminant, the breathing rate of the respirator wearer, and ambient temperature and humidity. The Occupational Safety and Health Administration (OSHA) regulations 29 CFR 1910.134 require that the employer must implement a change schedule when using Air-Purifying respirators for protection against gases and vapors, if there is no end-of-service-life indicator on the cartridges. The change schedule must be based on objective data that will ensure that the cartridges are replaced before the end of their service life. Factors to consider include workplace conditions such as contaminant concentration, relative humidity, temperature, work activities, respirator use pattern (e.g., continuous or intermittent use), presence of other contaminants, potential for contaminant migration/ desorption, health effects of the gas or vapor, and the presence of any warning properties. Contact Bullard for further information on change-out schedules. High efficiency particulate filters must be replaced when retained particles clog the filters and reduce air flow below acceptable levels, as indicated by testing with the Air Flow Indicator. See page 5. To Replace Filters/Cartridges Remove the air-purifying element from its packaging, and inspect for damage. If in doubt do not use. Figure 5 When using the two PAPRFC1 filter cartridges, install the filter plug into one of the ports. DO NOT OVER-TIGHTEN (Figure 6). Check that the air-purifying element has not exceeded its “use-by” date and that the connecting thread is in good condition. Check that the air-purifying element is appropriate to the hazard. If in doubt consult your respirator program administrator or supervisor. Check that the threads in the blower unit port are in good condition and clear of contaminant. Check that the PA3BU blower ports have the rubber gasket seals present. Remove the air-purifying element seals (see Figure 4). Mounting the Cartridges Figure 6 6 Figure 4 www.bullard.com PA30 Series Powered Air-Purifying Respirator PA3 Blower Assembly User Manual Donning the Blower and Respirator Prepare to don the blower, battery and hood in a safe, hazard-free area and do the following: Check that the filters/cartridges are properly mounted on the blower unit. Prior to assembling the system, place the battery in the battery compartment on the back of the blower. One or two battery packs may be used (See instructions and warning on page 4). Fit the blower and belt around the user’s waist. With the blower at the rear of the user, adjust the belt for a comfortable fit. Remove the belt and blower. Ensure that the filters/cartridges used are suitable for the contaminant in question and are compatible with the PA3BU Blower Unit. Warning The use of any filter/cartridge not approved with the PA3BU blower unit may put the user at risk and could result in death or serious injury. Donning the PA3BU with the CC20 Series Hood Adjusting and Installing Headband Suspension in Hood NOTE 20LF and 20LF2 series loose-fitting facepiece hoods have a sewn-in headband. NOTE RT Series hoods do not use a suspension. To change the headband size, unlock the four pins from the sizing holes. Place the headband on your head. Pull down, allowing headband to expand until it feels comfortable. The headband will automatically adjust to your size. Lock into place by pushing the four pins into the sizing holes (Figure 7). Adjusting and Installing Hard Hat in Respirator Hood (20SICH & 20TICH) 1. Assemble and adjust the standard Bullard hard hat suspensions RS4PC or RS6PC or the optional ratchet suspensions RS4RC or RS6RC by following the directions on instruction sheet attached to headband on hard hat. Read all hard hat warning labels and instructions. The following Bullard hard hat models are NIOSH approved for use with CC20 Series respirator hoods: C30, C30R, S51 and S51R. 2. If desired, install and adjust optional ES42 hard hat chinstrap. 3. Before inserting hard hat into hood, remove the two adhesive-backed Velcro® strips attached to the Velcro piece that is sewn into the hood (see Figures 10 & 11). 4. Peel the backing off the longer Velcro tab and apply it to the inside center rear of the hard hat, about 1/4” up from the edge. Apply shorter Velcro tab to the underside of the brim Figure 9 of the hard hat (see Figure 10). 5. Insert hard hat into respirator hood with cap visor facing front of hood (see Figure 11). 6. Tuck cap brim on top of front elastic Velcro band sewn into hood (see Figure 19). 7. Loop the Velcro strip sewn inside the hood around the back of the cap and affix it to the corresponding Velcro tab previously installed inside the hard hat in step 4 (see Figure 11). 8. Remove protective plastic from plastic lens of respirator hood. If desired, apply optional 20LC or 20LCL adhesive-backed lens covers designed to protect the respirator’s plastic lens. Apply 2-3 lenses at a time. When lens becomes soiled, remove by pulling tab at edge of lens cover to clear your vision. Velcro strip 8 64 77/8 73/4 75/8 63 62 61 SIZE 71/2 73/8 71/8 60 59 58 7 57 Window 6 5/8 61/2 6 7/8 6 3/4 54 53 56 55 Figure 7 NOTE If using the optional 20RT ratchet headband suspension, refer to the instruction sheet provided with the 20RT. Adjust Crown Straps for Vertical Fit Figure 8 Velcro tabs Figure 10 Figure 11 Installing Breathing Tube Assembly in CC20 Hoods For hoods without a threaded port at the rear, Breathing Tubes PA1BT, PA1BTXS and PA1BTXL will attach to the hood with a clamp as follows: 1. Remove nylon clamp from plastic anchor plate on hood (see Figure 12). 2. Insert the open end of the breathing tube approximately five inches into hood’s air entry sleeve (see Figure 13). Do not insert breathing tube into hood air entry sleeve more than 6 inches as it may cause a flow restriction. 3. Install nylon clamp over air entry sleeve and breathing tube, inserting clamp locks through two holes in plastic anchor plate that is sewn into hood. Locks should face away from user’s neck (see Figure 14). The air entry sleeve seams should be on the top and bottom of the breathing tube when properly installed and worn. www.bullard.com To remove To tighten To tighten Figure 12 Donning the Blower/CC20 Hood Use To improve suspension comfort, adjust crown straps vertically by repositioning the crown strap posts in the crown straps. Vertical adjustment makes the headband ride higher or lower on the wearer’s head. To adjust, push crown strap post from slot, move to new Crown strap slot, and snap in to secure. Move key to desired vertical position. Repeat for other crown strap Crown post (Figure 8). strap post NOTE If the hood rises off your head during use, first verify proper air pressure, then select a different hood for your application, or use the optional chin strap. Brow pad Velcro Strip Front elastic band 7 4. Engage clamp locks and squeeze together until tight. Air entry sleeve should not be twisted or restricted (see Figure 15). If so, then remove the clamp and repeat steps 2-4. For hoods with a threaded port at the rear (designated with a “T” suffix), Breathing Tubes PAHBT, PAHBTXS, PAHBTXL will attach to the hood by the threading into the port at the rear (See Figure 13A). RT Series Hood Use Installing Breathing Tube Assembly in RT Series Respirator Hoods For hoods without a threaded port at the rear, Breathing Tubes PA1BT, PA1BTXS and PA1BTXL will attach to the hood with a clamp as follows: 1. R emove nylon clamp from the breathing tube (see Figure 12). 2. I nsert the open end of the breathing tube approximately five inches into hood’s air entry sleeve (see Figure 19). Do not insert breathing tube into hood air entry sleeve more than 6 inches as it may cause a flow restriction. Figure 13 Figure 13A Twisted – incorrect Figure 19 3. I nstall nylon clamp over air entry sleeve and breathing tube. If desired, 2 or more clamps may be used(see Figure 20). The air entry sleeve seams should be on the sides of the breathing tube when properly installed and worn. 4. Engage clamp locks and squeeze together until tight. Air entry sleeve should not be twisted or restricted (see Figure 21). If so, then remove the clamp and repeat steps 2-4. Correct Figure 15 warning Do not put on or remove these respirators in a hazardous atmosphere except for emergency escape purposes. Failure to heed these warnings could result in death or serious injury. Donning the CC20 and PA30ISBU 1.With PAPR Blower Unit Running, put on CC20 Series respirator hood. 3.If using an optional chin strap, pull elastic strap under your chin. Adjust for a secure and comfortable fit. CC20 Hood Use/RT Hood Use Figure 21 The RT3 and RT4 hoods have an adjustable velcro strap near the top of the lens that allows the user to customize the curvature of the lens to his/her personal preference. This strap may be removed if desired. 7. M ake sure that the breathing tube is not twisted after donning. Figure 17 8. Tuck inner bib of hood into shirt or protective clothing (see Figure 16). 9. P ull respirator outer bib over collar of shirt or protective clothing. Pull the long outer bib down on the outside of clothing and secure with tie down straps or tape (if employer operating procedures will allow.) Incorrect Correct 8 Correct NOTE 4.Tuck inner bib of hood into shirt or protective clothing if using hood with inner bib (see Figure 16). Figure 16 6. E nsure that the neck cuff is down below the chin and that the air outlets of the cuff are not restricted. If the neck cuff (see Figure 17) is not below the chin, then pull down before continuing (See Figure 18). For hoods with a threaded port at the rear (designated with a “T” suffix), Breathing Tubes PAHBT, PAHBTXS, PAHBTXL will attach to the hood by the threading into the port at the rear (See Figure 13A). 2.Position headband suspension or hard hat for a comfortable fit. 6.Ensure that the neck cuff is down below the chin and that the air outlets of the cuff (see Figure17) are not restricted. If the neck cuff is not below the chin, then pull down before continuing (See Figure 18). Twisted – incorrect 5. With PAPR blower unit running, put on RT Series respirator hood. Pull the hood over your head until the neck cuff is securely around your neck. Figure 14 5.Pull respirator outer bib over collar of shirt or protective clothing. Figure 20 Figure 18 PA30 Series Powered Air-Purifying Respirator PA3 Blower Assembly User Manual WARNING Final Donning The user should ensure that the neck cuff is unrestricted all around the neck to allow proper inflation and reduce restrictions. Battery run time will be reduced by a restricted or improperly donned hood. Front Loose-Fitting Facepiece Use CC20 Single Bib Installing Breathing Tube Assembly in Loose-Fitting Facepieces 1. T he 20LFM, 20LFL, 20LF2S, 20LF2M and 20LF2L loose-fitting facepieces have a sewn-in breathing tube connector on the back. The PA20LFBT breathing tube has a special connector on the hood end with bayonet type pins. Back Figure 22 CC20 Double Bib 2. I nsert the bayonet connector of the PA20LFBT breathing tube in the hood connector and turn clockwise until it locks in place (see Figure 22). Available in large 20LF2L or 20LFL, medium 20LF2M or 20LFM, and small 20LF2S. Select the size that fits most comfortably and matches your head size. Remove the protective cover from the visor. Pull the hood over your head and adjust the headband around your head and the elasticized edge of the faceseal under your chin. Make sure that the breathing tube is not twisted after donning. RT Series Final Donning: NOTE For additional information on hood donning, doffing, usage and care consult the CC20 Series or RT Series user manuals available at www.bullard.com. Warning Do not enter a hazardous area until you are sure that the blower and hood are fully operational and the blower is running. The user should periodically leave the hazardous area to check the airflow through the system. If the PA3BU voltage Alarm should sound, or if the user experiences any difficulty in breathing, or senses any taste or any odors from the hazard, the user should leave the hazardous area immediately. Failure to observe these warnings could result in death or serious injury. PA3BU Low Voltage Alarm 20LFL 20LF2L If the airflow indicator indicates insufficient airflow, the battery should be fully charged (see “Battery Pack” on page 3), and/or the filter/cartridge should be replaced. The PA3BU Low Voltage Alarm must not be solely relied upon as an indication of a low air flow condition. Only the Air Flow Indicator should be utilized for checking for adequate air flow, as required by NIOSH. NOTE T he PA3BU blower is provided with a circuit to protect the battery. It will not allow the battery to be discharged below a safe voltage for the cells, regardless of airflow, without the Alarm sounding. When the Low Voltage Alarm sounds and the filter cartridges are not clogged, the battery should be recharged to protect the battery and thereby prolong the working life of the unit. If the ball in the Airflow Indicator is BELOW or PARTLY BELOW the PASS LINE with a fully charged battery, the filter cartridges may need to be changed. The PA3BU Blower unit is equipped with a Low Voltage Alarm. This device will activate if the battery voltage is below acceptable levels. The PA3BU Low Voltage Alarm is an electronic 77 dba beep. The alarm is internal to the blower and the sound will be carried up the breathing tube into the hood. Sounding of the alarm indicates that insufficient airflow may be imminent. The user should immediately do the following: Leave the hazard area, remove the headpiece, disconnect the breathing tube from the hood and check the airflow with the airflow indicator (see page 4). www.bullard.com Loose-Fitting Facepiece Use/Final Donning/Low Voltage Alarm • Attach the other end of breathing tube to blower unit (if not already attached) by screwing adapters together. • Remove any protective film covering the lens of the headpiece. • Put on the belt and blower assembly and make any final adjustments to the belt as necessary, keeping the breathing tube and hood behind the head. • Turn the blower on by depressing and holding the on/off switch. • Buckle the belt onto the waist (blower unit should be in the lower back of the wearer). • Don the headpiece. • Place the hood on the head making any final adjustments to the fit as required at this time to ensure a comfortable and stable fit. •Tuck inner bib into coveralls or shirt if using a hood with inner bib. 9 Troubleshooting The following guide will enable you to locate and correct malfunctions: Malfunction Possible Cause Solution Low Voltage Alarm is sounding, but Airflow Indicator shows adequate air flow Low Voltage Air inlet to hood is twisted or constricted, or breathing tube inserted incorrectly Re-charge battery. Remove, inspect, and reinsert PA1BT Breathing Tube approximately 5” into hood inlet. No/low airflow into covering (Alarm sounding for low voltage) Clogged/damaged air-purifying filter element Replace the filter cartridge. Battery low Re-charge battery. Blower malfunction Replace blower. Breathing tube or hood damaged Replace breathing tube and/or hood. Equipment damaged or filter needs to be replaced Leave hazardous area immediately and check equipment. Replace filter. If the problem persists and no damage is found, return equipment for repair. Low airflow See above. Improper initial charge Prolonged storage of unit not on charger Deeply discharged battery Review “Initial Charging Procedure” on page 4. Review guidelines for for maximizing battery life, page 3 (under Battery Pack) Smell or taste contaminant Blower unit does not run for full service life PA3 (8-10 hours with 2 battery packs; 4-5 hours with 1 battery pack) Cleaning Storage Warning Troubleshooting/Cleaning and Storage Avoid contaminant entry into the breathing tube, as this will compromise respiratory protection and could result in death or serious injury. Consult your local safety professional if you suspect that contaminant has entered the breathing tube. When cleaning the equipment, do the following: 10 Ensure water does not enter cartridges. Replace wet cartridges. DO NOT use gasoline, organic-based solvents, or chlorinated degreasing fluids (such as trichloroethylene) as they will cause damage. DO NOT immerse the equipment in water or other cleaning fluid as this may cause contamination in the breathing tube and blower interior that will be difficult to remove. Failure to observe the instructions and warnings in this manual invalidates all performance statements and approvals for this equipment and could result in death or serious injury. Once cartridges have reached the end of their useful life, discard in accordance with federal, state, and local guidelines, and in conformance with plant safety regulations. Use a lint-free cloth moistened in a mild solution of soap and warm water to clean the outer surface of the equipment. Consult the CC20/RT Series Tychem Hood User Manual available at www.bullard.com for cleaning instructions for the hood components. When the apparatus is completely dry, store in a clean, dry area, away from direct sunlight and sources of direct heat. The storage temperature should be between 32º F to 125º F (0º C to 51º C) with humidity less than 90% RH. Consult the CC20/PA30 Series Tychem Hood User Manual for storage instructions on hood components. TC# PROTECTION ALTERNATE HOOD ASSEMBLIES CAUTIONS AND LIMITATIONS NIOSH Label A. Not for use in atmospheres containing less than 19.5% oxygen. B. Not for use in atmospheres immediately dangerous to life or health. C. Do not exceed maximum use concentrations established by regulatory standards. F. Do not use powered air-purifying respirators if airflow is less than four cfm (115 lpm) for tight-fitting facepieces or six cfm (170 lpm) for hoods and / or helmets. H. F ollow established cartridge and canister change schedules or observe ESLI to ensure that cartridges and canisters are replaced before breakthrough occurs. I. Contains electrical parts that may cause an ignition in flammable or explosive atmospheres. J. Failure to properly use and maintain this product could result in injury or death. L. Follow the manufacturer’s instructions for changing cartridges and / or filters. 2 ALTERNATE SUSPENSION / HARD HAT ASSEMBLIES ALTERNATE BREATHING TUBES ACCESSORIES CAUTIONS AND LIMITATIONS2 X X X X X X X X X X X X X X X X X X X X X X X X X X X X X X X X X X X X X X X X X X X X X X X X X X X X X X X X X X X X X X X X X X X X X X X X X X ABCFIJLMNOP X X X X X X X X X X X X X X X X X X X X X X X X X X X X X X X X X X X X X X X X X X X X X X X X X X X X X X X X X X X X X X X X X X X X X X X X X ABCFHIJLMNOP X X X X X X X X X X X X X X X X X X X X X X X X X X X X X X X X X X X X X X X X X X X X X X X X X X X X X X X X X X X X X X X X X X X X X X X X X ABCFHIJLMNOP M. All approved respirators shall be selected, fitted, used and maintained in accordance with MSHA, OSHA and other applicable regulations. N. Never substitute, modify, add or omit parts. Use only exact replacement parts in the configuration specified by the manufacturer. O. Refer to User’s Instructions, and/or maintenance manuals for information on use and maintenance of these respirators. P. NIOSH does not evaluate respirators for use as surgical masks. HE - High Efficiency Particulate Air Filter for Powered Air Purifying Respirators AM - Ammonia CD - Chlorine dioxide CL - Chlorine FM - Formaldehyde HC - Hydrogen chloride HF - Hydrogen fluoride MA - Methylamine OV - Organic Vapors SD - Sulfur Dioxide 1 21C-0807 HE 23C-2357 OV/CL/HC/HF/SD/CD/HE 23C-2236 AM/CL/HC/MA/FM/HF/SD/CD/HE PROTECTION1 RESPIRATOR COMPONENTS Cynthiana, KY 41031 USA 1-800-827-0423 Bullard BLOWER UNIT PORT PLUG FILTER This respirator is approved only in the following configurations: ALTERNATE CARTRIDGES PA30 Powered Air-Purifying Respirator ALTERNATE BELTS 20LFL 20LFM 20LF2L 20LF2M 20LF2S 20TJN 20TJNT 20TPN 20TPNT 20TICN 20TICNT 20SICVN 20SICVNT 20TPCN 20TPCNT 20SICN 20SICNT 20TICSN 20TICSNT 20TICH 20TICHT 20SICH 20SICHT 20SICVH 20SICVT RT1 RT1T RT2 RT2T RT3 RT3T RT4 RT4T 20TG 20RT 30XXR 30XXP 51XXR 51XXP PA1BT PA1BTXS PA1BTXL PAHBT PAHBTXS PAHBTXL PA20LFBT PA20LFBTXS PA20LFBTXL PA3BU PA3PG PAPRFC1 PA3NBC PAPRFC2 PA1AFI PA3BP PA1SB PA1DB PA3SMC PA1EB PA1DEB 20NC ES42 20LCL PA3GC PA3BPC 20SLBTC PAPRPF1 PAPRSC1 PAPRPFCOVER1 20QCBTC POLYBTC 20LFLEF 20LF2LEF 20LF2MEF 20LF2SEF RTLC AIR FLOW INDICATOR BATTERY PA30 Approval Label www.bullard.com 11 Ordering Information CATALOG NUMBERDESCRIPTION CATALOG NUMBERDESCRIPTION Respirator Assemblies (*Add DB suffix for vinyl belt) PA30LFLSB 20LFL Loose-Ftting Facepiece System with Standard Comfort Belt PA30TJB 20TJ Single Bib Hood System with Standard Comfort Belt PA30TICSB 20TIC Double Bib Hood System with Standard Comfort Belt PA30TICHSB 20TICH Double Bib Hood for Hard Hat System with Standard Comfort Belt PA30SICSB 20SIC Double Bib Saranex Coated Hood System with Standard Comfort Belt PA30SICHSB20SICH Double Bib Saranex Coated Hood For Hard Hat System with Standard Comfort Belt PA30TPSB 20TP Single Bib Hood for Painting System with Standard Comfort Belt PA30TPCSB 20TPC Double Bib Hood for Painting System with Standard Comfort Belt PA30TICSSB 20TICS Extra Long Double Bib Hood System with Standard Comfort Belt PA30RTISBRT1 Headband Free Extra Large Lens Double Bib Hood System with Standard Comfort Belt PA30RT2SBRT2 Headband Free Extra Large Lens Double Bib Saranex Coated Hood System with Standard Comfort Belt Blower Assemblies Double bib hood for use without a headband suspension RT1/RT1T Tychem QC RT2/RT2T Tychem SL RT3/RT3T Tychem QC RT4/RT4T Tychem SL Accessory Items for All Hoods 20LC Mylar lens covers (25/pkg) 20LCL Mylar lens covers (25/pkg) Headband Suspensions and Hard Hats 20TG Standard headband suspension 20RTSure-Lock® ratchet headband suspension 30XXP Hard hat with standard suspension 30XXR Hard hat with ratchet suspension 51XXP Hard hat with standard suspension 51XXR Hard hat with ratchet suspension Accessories for Headbands Suspension and Hard Hats ESULTRA Standard replacement suspension for 3000 hard hat ESRTSL Replacement ratchet suspension for 3000R hard hat RS4PC Standard replacement suspension for 51WHP hard hat RS4RC Replacement ratchet suspension for 51WHR hard hat 20NC Chin strap for 20TG and 20RT headband suspension ES42 Chin strap for 3000 and 5100 hard hats Replacement Parts and Accessories PA3Tri-filter blower unit (ivory color) with low voltage alarm, battery, battery port cover, and belt. Breathing tube, replacement battery and charger sold separately. Battery Chargers PA3SMC Quick charger for PA3BP (2 ports) PA3GC Table top gang charger for PA3BP (5 ports) Replacement Cartridges PAPRFC1 HE (6 per box) PAPRFC2 OV/CL/HC/SD/CD/HF/HE (6 per box) PA3NBC CL/HC/SD/CD/HF/FM/AM/MA/HE (6 per box) Respirator Hoods Single bib hood, for use with headband suspension 20TJ/20TJT Tychem QC 20RT headband suspension 20TJN/20TJNT Tychem QC No headband suspension 20TP/20TPT Tychem QC 20RT headband suspension, solvent-resistant polyester lens 20TPN/20TPNT Tychem QC No headband suspension, solvent-resistant polyester lens Double bib hood for use with headband suspension 20TIC/20TICT Tychem QC 20RT headband suspension 20TICN/20TICNT Tychem QC No headband suspension 20TPC/20TPCT Tychem QC 20RT headband suspension, solvent-resistant polyester lens 20TPCN/20TPCNT Tychem QC No headband suspension, solvent-resistant polyester lens 20TICS/20TICST Tychem QC 20RT headband suspension, taped and sealed seams 20TICSN/20TICSNT Tychem QC No headband suspension, taped and sealed seams 20SIC/20SICT Tychem SL 20RT headband suspension, taped and sealed seams 20SICN/20SICNT Tychem SL No headband suspension, taped and sealed seams 20SICV/20SICVT Tychem SL 20RT headband suspension, taped and sealed seams, PVC lens 20SICVN/20SICVNT Tychem SL No headband suspension, taped and sealed seams, PVC lens Double bib hood for use with Bullard hard hat 20TICH/20TICHT Tychem QC Hard hat not included 20SICH/20SICHT Tychem SL Hard hat not included, taped and sealed seams 20SICVH/20SICVHT Tychem SL Hard hat not included, taped and sealed seams, PVC lens Loose Fitting Facepieces with Sewn-In Suspension 20LFM Tychem QC, facial seal, medium 20LFL Tychem QC, facial seal, large 20LF2S Tychem QC, facial seal, narrow profile, small 20LF2M Tychem QC, facial seal, narrow profile, medium 20LF2L Tychem QC, facial seal, narrow profile, large Americas: Bullard 1898 Safety Way Cynthiana, KY 41031-9303 Toll free: 877-BULLARD (285-5273) Tel: 859-234-6616 Fax: 859-234-8987 Europe: Bullard GmbH Lilienthalstrasse 12 53424 Remagen • Germany Tel: +49-2642 999980 Fax: +49-2642 9999829 PA1SB Standard belt PA1DB Decon belt PA1EB Extension standard belt kit PA1DEB Extension decon belt kit PA1AFI Air flow indicator PA3BU Blower housing unit, motor and impeller PAHBT Powered air hood breathing tube assembly; standard length PAHBTXS Powered air hood breathing tube assembly; short length PAHBTXL Powered air hood breathing tube assembly; long length PA1BTHood breathing tube assembly; includes tube and clamp; standard length PA1BTXS Hood breathing tube assembly; includes tube and clamp; short length PA1BTXL Hood breathing tube assembly; includes tube and clamp; long length PA20LFBT Loose fitting facepiece breathing tube assembly; standard length PA20LFBTXS Loose fitting facepiece breathing tube assembly; short length PA20LFBTXL Loose fitting facepiece breathing tube assembly; long length PA1BTS Breathing tube/cartridge seal PA3BP 4 hour battery pack S18051 Breathing tube clamp PA3PG Plug for blower port pa3bpc Battery port cover Asia-Pacific: Bullard Asia Pacific Pte. Ltd. LHK Building 701, Sims Drive, #04-03 Singapore 387383 Tel: +65-6745-0556 Fax: +65-6745-5176 www.bullard.com ISO 9001 certified ©2012 Bullard. All rights reserved. Tychem is a registered trademark of E.I. DuPont de Nemours & Company. 6081508332B (0312)