1
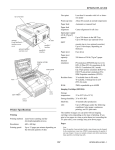
EPSON ActionLaser 1600
Since the quality of any particular brand
or type of paper may be changed by the
manufacturer at any time, EPSON cannot
guarantee the use of any particular brand
or type of paper. Always test samples of
paper stock before purchasing large
quantities.
Paper weight:
Plain paper: 60-90 g/ m2, 16-24 lb
Card stock: 90-157 g/ m2, 24-42 lb
(single-sheet feed only)
Paper size:
Paper:
Letter
Legal
Half-letter
Executive
Government Legal
Government Letter
A4
A5
B5
F4
Printer Specifications
Printing
Printing method
Laser beam scanning and dry
electrophotographic process
Envelopes:
Resolution:
600 x 600 dpi or 300 x 300 dpi, switchable
Printing speed:
Up to 6 pages per minute (depending on
the font and quantity of data)
First print:
Less than 20 seconds, face down or face up
Warm-up time:
35 seconds or less at normal temperature
Internal
emulations:
0
0
0
0
HP® LaserJetTM4 emulation
ESC/ P 2TM24-pin printer-LQ-570/ 1070
ESC/ P® 9-pin printer-FX-870/ 1170
EPSON GL/ 2
Type
Monarch
Commercial-10
DL
C5
International B5
Size
8.5 x 11 inches
8.5 x 14 inches
5.5 x 8.5 inches
7.25 x 10.5 inches
8.5 x 13 inches
8.5 x 10.5 inches
210 x 297 mm
148 x 210 mm
182 x 257 mm
210 x 330 mm
Size
3% x 7t/2 inches
4th x 9th inches
110 x 220 mm
162 x 229 m m
176 x 250 m m
Printable area:
LJ4 emulation:
100 dots from page edge (at 600 dpi)
ESC/ P 2, FX
emulations:
150 dots from paper edge (at 600 dpi)
Center alignment for all sizes
Cartridge slot:
1 slot for font cartridges
Paper feed
alignment and
direction:
Resident fonts:
45
Paper feed:
Automatic or manual feed
Input paper
supply
(75 g/ m2 or
20 lb paper):
150 sheets (for standard built-in paper tray)
250 sheets (for optional lower paper
cassette unit)
5-10 envelopes, depending on thickness
Paper eject:
Face down or face up (optional)
Paper eject
capacity
(75 g/ m2 or
20 lb paper):
Face down, 100 sheets
Face up, 20 sheets with optional face-up
output tray
Paper specifications
Types:
Laser Printers
0 Plain paper
0 Special paper
0 Labels
0 Envelopes
0 Transparencies
0 Colored paper
0 Card stock
5/10/94
AL1600-1
EPSON ActionLaser 1600
Consumable products
Options
Imaging cartridge: (S051016)
Storage
temperature:
0° to 35°C (32° to 95°F)
Shelf life:
18 months after production
Lowerpaper cassette unit (C812301)
The optional lower paper cassette unit allows you to feed up
to an additional 250 sheets of letter-size paper into the
printer.
Storage humidity: 30 to 85% RH
Life:
Face-up output tray (C812311)
Typical imaging cartridge life is up to
6000 pages under the following
conditions: Letter- or A4-size paper,
continuous printing, and 5% print ratio
To feed single sheets of paper types such as envelopes,
transparencies, labels, or heavy paper, use the face-up output
tray. The face-up feed method reduces curling of such paper
types and the tray catches the paper at the paper ejection
area at the top back of the printer. Use the face-up output
tray for print jobs of 20 pages or less and when you want
paper delivered face up.
Note:
The number of pages that you cm print with an imaging cartridge
varies depending on the type ofprinting you do. If you print a few
pages at a time or print dense text exceeding 5% print ratio, your
cartridge may print fewer pages.
Single In-Line Memory Modules (SIMMs)
Mechanical
Dimensions and
weight:
Durability:
Height
Width
Depth
Weight
226 mm (8.9 inches)
368 mm (14.5 inches)
456 mm (18.0 inches)
Approx. 10 kg (22 lb)
including the imaging cartridge
5 years or 180,000 sheets, whichever
comes first
Electrical
Rated voltage:
90 to 132 VAC
Rated frequency:
50 to 60 Hz ± 3 Hz
Power
consumption:
Less than 500 W (powers down to less
than 30 W after 15 minutes of inactivity)
Rated current:
5.0 A ± 10%
EPSON Script™ for PC (C832091)
The EPSONScript for PC option allows you to use your
printer to print documents formatted for PostScript® Level 1
and Level 2.
EPSON Talkm for ActionLaser 1600 (MACLP3)
The EPSON Talk for ActionLaser 1600 kit contains
everything you need to connect your printer to an Apple®
Macintosh® It includes software, a LocalTalk® interface
module, and a PostScript Level 2-compatible module.
EPSON Type B Interface boards
The printer has an additional interface slot that allows you to
install one of a variety of optional interfaces.
To add a parallel or serial interface to your printer, use one of
the following:
Controller hardware
CPU:
MB86930,17.6 MHz RISC
RAM:
2MB expandable to 64MB
Environmental
Temperature:
Operation:
Storage:
10° to 35° C (50° to 95° F)
0° to 35° C (32° to 95° F)
Humidity:
Operation:
Storage:
15 to 85% RH
30 to 85% RH
Altitude:
2500 meters (8200 feet) maximum
AL1600-2
You can install one or two SIMMs that have a capacity of 1,2,4,8,
16, or 32MB. This allows you to increase memory capacity up to
64MB.
C823071/C823081
C823101
32KB serial interface
32KB parallel interface
To add a direct connection to an IBM@ mini or mainframe
computer, use one of the following:
C823151
C823141
Twinax interface board
Coax interface board
To add a direct connection to a Novell@ network, use the
following:
C823241
5/10/94
Ethernet board
Laser Printers
EPSON ActionLaser 1600
Installing the Face-up Output Tray
Installing the Lower Paper Cassette Unit
1. Hold the output tray tilted at a slight angle away from you.
Then insert it into the back of the printer by placing the
pins on the bottom side corners of the tray into the holes
on each side of the paper ejection slot one at a time as
shown below.
Turn off the printer. Remove any interface cables and
unplug the printer’s power cord from the electrical outlet
and from the printer.
Move the printer to one side. Then set the lower cassette
unit where your printer normally rests, keeping the paper
cassette facing you.
Note:
When lowering theprinter, be sure the interface cable is not
pinched between theprinter and the lower paper cassette unit.
Lift the printer and align it over the cassette unit using the
two alignment pins on the lower cassette unit as guides.
Lower the printer so that the pins tit securely into the
holes on the bottom of the printer as shown below.
2. Set the paper path selector on the top left of the printer to
the face-up position as shown below.
When you want printed pages to feed face down on top of
the printer, reset the paper path selector to the face-down
position.
Note:
Theprinter is heavy, so you may need to have someone help you
lift it.
Adding Memory
Reconnect the power cord and the interface cable or cables
you removed and plug the power cord into an electrical
outlet.
Turn on the printer.
If you are having difficulty printing complex, graphicsintensive pages or if you regularly use downloaded fonts,
you may want to install additional memory. Your printer’s
controller board comes with 2MB RAM installed. To add
memory, you need to install one or two SIMMs on the
controller board. You can thus increase the printer’s memory
until it totals 64MB, including the resident memory.
You can purchase SIMMs from various vendors. Be sure the
SIMMs you purchase meet the following requirements:
0 72-pin type
0 Capacity of 1,2,4,8, 16, or 32MB
0 Access speed 70ns or less
0 Dimensions within 108 mm (4.25 inches) x 36 mm
(1.4 inches), with a diameter of 10 mm (0.4 inches)
Laser Printers
5/10/94
AL1600-3
EPSON ActionLaser 1600
SIMMs are installed on the controller board so you first need
to remove the controller board. To do so, you need a
cross-head screwdriver.
6. Pull the tab on the bottom of the bracket to release the
controller board.
Warning:
High voltages arepresent inside theprinter when the power is
on. Do not attempt to remove the controller board unless the
printer is turned off and the power cord is unplugged. Also,
try not to touch the contacts on the board because many of the
components can be damaged by the static electricity in your
body.
Removing the controller board
Turn off the printer and unplug the power cable from the
electrical outlet.
7. Grasp the board with both hands and pull it straight out of
its slot.
Remove the optional font cartridge or lower paper cassette
unit, if installed.
Disconnect all interface cables from the interface connectors
Turn the printer so that its left side faces you. Use a
cross-head screwdriver to remove the two screws
securing the interface board cover. Then pull off the cover.
Keep the screws handy so that you can use them later.
8. Place the controller board on a clean, flat surface with the
bracket (connector) facing to your right.
Installing the SIMM
Remove the three silver screws that secure the metal
bracket on the left side of the printer. Keep the screws
handy so that you can use them to reinstall the controller
board.
Caution:
Beforeyou remove the controller board, make sure that you
have removed any optional cartridges. Otherwise, you may
damage them.
AL1600-4
The two memory module slots are located at the left of the
board when the board is facing you as shown below.
If you are installing one SIMM, use the back slot. If you are
installing two SIMMs, use the back slot for the first SIMM, and
the front slot for the second.
5/10/94
Laser Printers
EPSON ActionLaser 1600
To install a SIMM:
Attach the interface board cover with the two screws you
removed earlier.
1. Hold the SIMM as shown below and insert it into the slot
at an angle as shown below. Make sure the pin number of
both the slot and the SIMM matches, showing 1 or 72.
Note:
Do not attach the interface cover if an optional interface is
installed.
2. Press the SIMM in firmly, in the direction shown in the
illustration, until it snaps into the notch of the connector.
Do not apply too much force.
Reconnect any interface cables you removed
Insert the interface cable or cables into the U-shaped part of
one cable clip. Lift the left side of the printer up slightly.
Then hook the short lip of the clip into the forward slot
and push the bottom of the clip under the printer until it
clicks in place. Repeat this procedure with the second clip
and insert it into the back slot.
Be sure the power is turned off, then plug the power cord
into an electrical outlet.
Checking the memory
3. Reinstall the controller board as shown in the next section.
Reinserting the controller board
1. Hold the controller board level and fit its right edge into
the right groove inside the board slot. Then gently tit its
left edge into the left groove.
Turn on the printer. When the RAM Check message appears,
make sure the printer displays the total amount of RAM that
you now have installed, including the 2MB of standard
memory.
If an incorrect amount appears, turn off the printer and
remove the controller board. Make sure you installed each
SIMM in the correct direction and that it is fully seated. If the
RAM Check message is still incorrect, contact your dealer or
a qualified service person for assistance.
Option Specifications
Face-up output tray
Dimensions and
weight:
Without the printer:
Height
47 mm (1.7 inches)
Width
251 mm (9.9 inches)
Depth
275 mm (10.8 inches)
Weight
0.1 kg (0.2 lb)
Paper eject
capacity :
20 sheets (80 g/ m2)
2. Slide the controller board into the printer until it locks in
place. If the controller board does not fit smoothly into the
printer, do not force it. Remove it and make sure the
edges tit properly into the grooves inside the slot.
3. Secure the board with the three silver screws you removed
earlier.
Laser Printers
5/10/94
AL1600-5
EPSON ActionLaser 1600
Lower paper cassette unit
Sharing Your Printer
AC Power supply: DC 24V supplied by the printer
Paper weight:
60-90 g/ m2 (16-24 lb)
Paper feed:
Automatic feed delivery system:
Tray capacity up to 250 sheets
(75 g/m2 or 20 lb paper)
Feeding speed:
For the first sheet, 22 seconds or less.
For subsequent sheets, up to 6 pages per
minute.
Paper type:
Plain paper, such as copier paper,
memo sheets, and letterhead
Dimensions and
weight:
Without the printer:
Height
79 mm (3.1 inches)
Width
354 mm (13.9 inches)
Depth
407 mm (16 inches)
including the cassette
Weight
2.8 kg (6.2 lb)
including the cassette
Up to four computers can be connected directly to the printer
if you install optional interfaces and if each computer is
connected to a different interface port. If you need to connect
more than four computers or if you need to connect multiple
computers to the same port, you can indirectly connect the
computers to the printer by using a switch box.
The ActionLaser 1600 comes with a built-in parallel interface
(Centronics® compatible) and a serial (RS-232C/RS-422)
interface. The printer has a slot for one optional Type-B
interface board.
SelecTypeTM Settings
The following table lists the items available on the SelecType
menus.
IIMenu
Menu
Items
PRINTING
COPIES
PAGE SIZE
ORIENTATION
MANUAL FEED
RITech
CONFIG
STD TRAY*
OPTTRAY*
SIZEIGNORE
AUTO CONT
STANDBY
DENSITY
AUTO SENSE
TOP OFF SET
LEFT OFF SET
TONER
TONER LIFE
PAGE COUNT
SelecTYPE INIT
LJ4
FONT SRC
FONTNUMBER
PITCH
HEIGHT
SYM MET
FORM
PARALLEL
SPEED
BI-D
JOB
PAGE PROTECT
RESOLUTION
TIMEOUT
SERIAL
SERIAL TYPE
WORD LENGTH
BAUD RATE
PARITY
STOP BIT
DTR
XON/XOFF
DSR
TEST
STATUS SHEET
LJ4 FONT SAMPLE
ESC P2 FONT
SAMPLE
FX FONT SAMPLE
FACTSHEET
RlTech TESTPAGE
Selecting the Printer Driver
Your printer has several resident printer emulations: HP
LaserJet 4 (LJ4), EPSON ESC/ P 2, EPSON FX, and EPSON
GL/2. The HP emulation is the default setting. Because it
gives you the fullest range of features, you will probably not
change it.
For each emulation, you need to select an appropriate printer
driver. A printer driver translates the margins, fonts, and all
the other selections you have entered into control codes that
the printer understands.
For the HP emulation, use the ActionLaser 1600 driver,
which is included with the printer, to take full advantage
of your printer’s features. You may also use any of the HP
LaserJet drivers listed below:
ActionLaser 1600
HP LaserJet 4
HP LaserJet 4Si
HP LaserJet IIISi
HP LaserJet IIIP/IIID
HP LaserJet III
If none of the above printers is listed, select any LaserJet
printer model.
EMULATION PARALLEL
SERlAL
L/T*
AUX*
TRAY SIZE
For the LQ or FX emulations, select one of the following:
LQ-570
LQ-510/550
LQ-500
LQ-860
LQ-850
AL1600-6
STD SIZE
OPTSIZE*
Items
Available only with option
FX-870/1170
FX-850/1050
FX-800/1000
LX-100
LX-810/850
LX-800
5/10/94
Laser Printers
EPSON ActionLaser 1600
MANUAL- @age size)
Status and Error Messages
Manual feed is specified for the current job. Make sure the
specified paper size is loaded in the standard paper tray and
press the On Line button.
Status, error, and caution messages notify you of the printer
status and alert you to problems. Some messages tell you
how to correct the problem. This section contains an
alphabetical list of these messages.
MEM OVERFLOW
The printer has insufficient memory available for the current
task. To correct the error, press the Continue button. If the
message remains, reset the printer. You can also clear this
message by turning the printer off and back on again.
If the red Continue light flashes when an error is detected,
correct the problem and then press the Continue button to
clear the error. If the AUTO CONT option in SelecType is
ON, some errors clear automatically even though the
problem remains. In most instances, you should leave AUTO
CONT set to OFF.
If you continually receive this message when printing a
particular page, try simplifying the page by reducing the
number and size of fonts or by using 300-dpi resolution. You
can also add more memory to the printer.
CHECK PAPER SIZE
The paper size specified from the software is different than
the paper size specified by the STD SIZE and OPT SIZE
settings. Check to see if the correct paper size is loaded in the
standard tray or optional lower cassette. You may need to
change the STD SIZE and OPT SIZE settings to match the
paper size.
PAPER JAM
Paper is jammed in the paper path. Open the printer cover
and clear the jammed paper.
PAPER OUT (Paper source) (paper size)
There is no paper in the specified tray. Load paper of the
specified size and press the On Line button.
EPROM ERROR
The printer found illegal data in the EEPROM memory. Press
the Continue button to continue. You should also check that
any SelecType settings you changed from the factory defaults
are still in effect.
PAPER SET (paper source) (paper size)
The paper loaded in the specified tray does not match the
required size. Replace the paper in the tray with paper of the
specified size and press the Continue button.
FEED JAM
PC INSTALL
Paper is not feeding into the printer from the specified tray
or cassette or has jammed on its way into the printer.
Remove thejammed paper and press the Continue button.
The optional lower paper cassette is not installed but it is
specified as the paper source. Turn the printer off, wait ten
seconds, and turn the printer back on.
ILLEGALCART
The printer cannot read the font cartridge inserted. To correct
this error, turn off the printer. Then remove the cartridge and
reinsert it.
IMAGE OPTlMUM
There is insufficient memory to print the page using the
specified print quality. The printer automatically reduces the
print quality so it can continue printing. If the printout is not
acceptable, try simplifying the page by reducing the number
of fonts or font sizes or by switching the resolution to 300
dpi. You may also need to increase the amount ofprinter
memory.
INSERT CART
You may have removed an optional font cartridge while the
Form Feed light was on (indicating print data was received
but not yet printed). To correct the error, reinsert the font
cartridge and press the Continue button.
Check the Printers dialog box in your software to be sure that
the standard tray is selected.
PRINT OVERRUN
The required time to process the print data exceeds the print
engine speed because the current page is too complex. Press
Continue to resume printing. If this message appears again,
change the PAGE PROTECT setting in the JOB menu.
PRINTER OPEN
The printer cover is open. Close the printer cover to continue
printing.
RAM ERROR 1 or 2
The specified SIMM cannot be used. Remove SIMM 1
(installed in the CN8 slot) or SIMM 2 (installed in the CN9
slot) as appropriate. Reinstall the SIMM.
READY
The printer is ready to receive data or to print.
Laser Printers
5/10/94
AL1600-7
EPSON ActionLaser 1600
REMOVE CART
You may have inserted an optional font cartridge while the
Form Feed light was on. To correct the error, remove the
cartridge, reinsert it into the slot, and press the Continue
button.
The printer’s current interface port has been reset and the
buffer cleared. However, other interface ports are still active
and retain their settings or data.
Feed Jam
When the printer stops printing and the FEED JAM message
appears, follow these steps:
1. Open the paper cover. Carefully remove all the paper in the
paper tray along with any sheets that have fed part way
into the printer.
RESET ALL
All printer settings have been reset to the specified settings.
RESET TO SAVE
You have changed a SelecType setting but the new setting
has not yet been enabled. To enable the new setting, hold
down the Alt button and press Reset.
SELF TEST
The printer is performing an internal check cycle. Please wait
a few seconds until the check is finished.
SERVICE REQ.XXXX
A controller error or a print engine error has been detected.
Write down the error number listed on the display and turn
off the printer. Wait at least five seconds and then turn it
back on. If the error message still appears, turn off the
printer, unplug the power cord, and contact a qualified
service person.
2. If the paper tears when you remove it, make sure you
remove any pieces remaining in the printer. To do this,
gently open the printer cover.
+ Warning:
Opening the printer cover exposes the fuser, which is marked
by a CAUTION HOT SURFACE label. Be careful not to
touch the fuser.
Remove the imaging cartridge. Next remove any paper
from the paper feed path and reinsert the imaging
cartridge.
STANDBY
The printer is currently in a low-power state. (When the
printer is not used for 15 minutes, it enters standby mode.)
Press any button or send data to warm up the printer.
Warm-up takes approximately 30 seconds.
Close the printer cover.
Tap the edges of the paper stack on a flat surface and
carefully reload it into the paper tray. (Do not reload
curled or wrinkled sheets.) Close the paper cover.
TONER LOW
The printer is almost out of toner. When you see this
message, you must replace the imaging cartridge soon.
The jammed page is automatically reprinted. If you did not
open the printer cover to clear the feed jam, press the
Continue button.
TONER OUT
You must replace the imaging cartridge.
To print one additional page, press the Continue button.
WARMING UP
The printer is warming up. Warm-up takes approximately
30 seconds.
Paper Jam
When the printer stops printing and the PAPER JAM
message appears, follow these steps:
1. Gently open the printer cover and remove the imaging
cartridge.
+ Warning:
Opening theprinter exposes the fuser, which is marked by a
CAUTION HOT SURFACE label. Be careful not to touch the
fuser.
AL1600-8
5/10/94
Laser Printers
EPSON ActionLaser 1600
2. Gently pull out the paper. The direction you should pull
depends on where the paper is jammed. If it tears, make
sure you remove any pieces remaining in the printer.
Information Reference List
Engineering Change Notices
None.
Product Support Bulletins
None.
Technical Information Bulletins
None.
Related Documentation
TM-AL1600
ActionLaser 1600 Service Manual
PL-AL1600
ActionLaser 1600 Parts Price List
4002596
ActionLaser 1600 Reference Guide
4002595
ActionLaser 1600 Read This First Guide
Note:
Because the toner on the paper inside theprinter may not have
been fixed on the page, toner may come off on your hands when
you remove thepaper. If you spill toner on your clothing, rinse
it off with cold water. Using hot water may leave a permanent
stain
3. Reinstall the imaging cartridge.
4. Close the printer cover.
After a paper jam, the jammed page is automatically
reprinted
Data Dump Mode
The data dump mode is a special feature that makes it easy
for experienced users to find the cause of communication
problems between the printer and computer. The data dump
mode produces an exact printout of the codes reaching the
printer.
1. Make sure that the printer is loaded with paper and turned
off.
2. Hold down the On Line button while you turn on the
printer. Make sure you hold the button down until the
DUMP MODE appears on the display.
3. Run any program that causes the printer to print (either an
application program or a program written in any
programming language). Your printer prints out all of the
codes sent to it in hexadecimal format.
4. To stop printing and turn off data dump mode, press the
On Line button to go off line. Then turn off the printer
after printing stops.
Laser Printers
5/10/94
AL1600-9