1
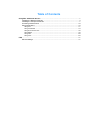
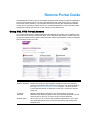
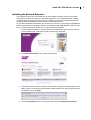
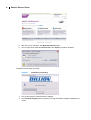
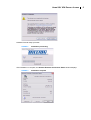
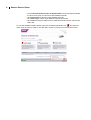
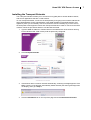
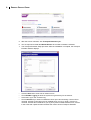
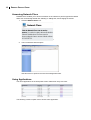
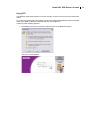
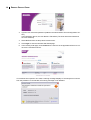
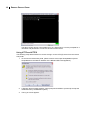
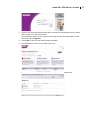
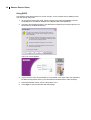
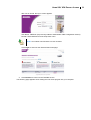
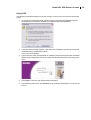
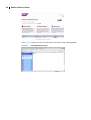
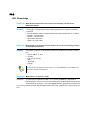
Billion Electric Co., Ltd.
BiGuard S5 VPN Starter Pack
Remote Portal Guide
BiGuard S5 Preface
Copyright Information
© 2006 Billion Electric Corporation, Ltd.
The contents of this publication may not be reproduced in whole or in part, transcribed, stored, translated,
or transmitted in any form or any means, without the prior written consent of Billion Electric Corporation.
Published by Billion Electric Corporation. All rights reserved.
Version 1.0, September 2006
Disclaimer
Billion does not assume any liability arising out of the application of use of any products or software
described herein. Neither does it convey any license under its patent rights nor the patent rights of others.
Billion reserves the right to make changes in any products described herein without notice. This publication
is subject to change without notice.
Trademarks
Mac OS is a registered trademark of Apple Computer, Inc.
UNIX is a registered trademark of The Open Group.
Windows 98, Windows NT, Windows 2000, Windows Me and Windows XP are registered trademarks of
Microsoft Corporation.
All other trademarks are the property of their respective owners.
FCC Interference Statement
This device complies with Part 15 of FCC rules. Operation is subject to the following two conditions:
• This device may not cause harmful interference.
• This device must accept any interference received, including interference that may cause undesired
operations.
This equipment has been tested and found to comply with the limits for a Class B digital device pursuant to
Part 15 of the FCC Rules. These limits are designed to provide reasonable protection against harmful
interference in a commercial environment.
If this equipment does cause harmful interference to radio/television reception, which can be determined
by turning the equipment off and on, the user is encouraged to try to correct the interference by one or
more of the following measures:
• Reorient or relocate the receiving antenna.
• Increase the separation between the equipment and the receiver.
• Connect the equipment into an outlet on a circuit different from that to which the receiver is connected.
• Consult the dealer or an experienced radio/TV technician for help.
Notice:
Changes or modifications not expressly approved by the party responsible for compliance could void the
user’s authority to operate the equipment.
i
ii
BiGuard S5 REMOTE PORTAL GUIDE
Safety Information
The BiGuard S5 is built for reliability and long service life. For your safety, be sure to read and follow these
guidelines and safety warnings:
• Read this installation guide thoroughly before attempting to set up the BiGuard S5.
• The BiGuard S5 is a complex electronic device. DO NOT open or attempt to repair it yourself. Opening
or removing the covers can expose you to high voltage and other risks. In the case of malfunction, turn
off the power immediately and have it repaired at a qualified service center. Contact your vendor for
details.
• Connect the power cord to the correct supply voltage.
• Carefully place connecting cables to avoid people from stepping or tripping on them. DO NOT allow
anything to rest on the power cord and DO NOT place the power cord in an area where it can be
stepped on.
• DO NOT use the BiGuard S5 in environments with high humidity or high temperatures.
• DO NOT use the same power source for the BiGuard S5 as other equipment.
• DO NOT use the BiGuard S5 and any accessories outdoors.
• If you wall mount the BiGuard S5, make sure that no electrical, water or gas pipes will be damaged during installation.
• Without surge protection, installation of the BiGuard S5 during a thunderstorm is not recommended.
• DO NOT expose the BiGuard S5 to dampness, dust, or corrosive liquids.
• DO NOT use the BiGuard S5 near water.
• Be sure to connect the cables to the correct ports.
• DO NOT obstruct the ventilation slots on the BiGuard S5 or expose it to direct sunlight or other heat
sources. Excessive temperatures may damage your device.
• DO NOT store anything on top of the BiGuard S5.
• Only connect suitable accessories to the BiGuard S5.
• Keep packaging out of the reach of children.
• If disposing of the device, please follow your local regulations for the safe disposal of electronic products to protect the environment.
Table of Contents
Using SSL VPN Portal Access ...........................................................................................1
Installing the Network Extender ..................................................................................... 3
Installing the Transport Extender ................................................................................... 7
Accessing Network Place ............................................................................................10
Using Applications ....................................................................................................... 10
Using FTP ................................................................................................................ 11
Using Telnet/SSH ......................................................................................................13
Using HTTP and HTTPS ............................................................................................16
Using RDP5 .............................................................................................................. 18
Using VNC ................................................................................................................ 20
Using CIFS ...............................................................................................................23
FAQ .....................................................................................................................................17
SSL Knowledge ...........................................................................................................17
iv
BiGuard S5 Remote Portal Guide
Remote Portal Guide
The BiGuard S5 provides a secure and flexible enterprise-wide solution for data and application
access anytime and anywhere. By using the BiGuard S5 SSL VPN portal services, organizations with a mobile workforce, a remote office and telecommuters gain available and reliable
access to their company's network resources, centralized application control, and critical data
management without the sacrifice of user-experience and performance.
Using SSL VPN Portal Access
This chapter deals with the features that make the BiGuard S5 the ideal, secure gateway solution for the novice and the professional alike. From a standard web browser, remote users can
access personalized portal pages quickly and easily. Tailored personalized access is managed
with the simple click of a mouse.
Application
Definition
Network Extender Browser based plug-in that simplifies clientless remote access deployments, while delivering full network connectivity for any IP-based application. See Installing the Network Extender on page 3. Click on the icon
to the Network Extender to obtain full access to the company's network
resources.
Transport
Extender
Browser based plug-in that allows only specified Protocol and IP
addresses with SSL encryption access to pre-defined applications on the
network.Click on the icon to connect to the Transport Extender.
Network Place
Click on the icon to connect to the predefined applications in your office.
This application allows users to access network files and transfer files
between them.
2
REMOTE PORTAL GUIDE
Application
Definition
FTP
File Transfer Protocol between network locations. Click Connect to easily
access the files on the FTP server.
Telnet
JAVA based plug-in protocol for accessing remote systems. Click Connect
and follow the on-screen instructions to complete the connection.
SSH
JAVA based plug-in interface for the secure transfer of files. Click Connect
and follow the on-screen instructions.
HTTP
Click Connect to connect to the HTTP server in the office.
HTTPS
Click Connect to connect to the HTTP server in the office.
RDP5
Multi-channel protocol that allows users terminal service connection to a
computer. Click Connect and follow the on-screen instructions. ActiveX
plug-in must be installed for client to be established.
VNC
JAVA based plug-in protocol (Virtual Network Computing) for the remote
control of another computer. Click Connect and follow the on-screen
instructions.
NOTE: Portal access authorization is only required if the user name and password do not match the network settings.
USING SSL VPN PORTAL ACCESS
Installing the Network Extender
The Network Extender is a web based plug-in that simplifies clientless remote access while
delivering full network connectivity for IP-based applications. The Network Extender enables
combined IPSec and SSL VPN in one solution, simplifying remote access deployments while
providing maximum flexibility for diverse remote access requirements.
To use Web Portal Network Extender, first connect to the device by typing https://wanipaddress
(where wanipaddress is the WAN IP address of the BiGuard SSL VPN appliance. After successfully connection and login to the device, the web portal screen appears.
1. Type the WAN IP Address or Domain Name in the Address bar of the browser and log
into the BiGuard SSL VPN remote portal as previously configured.
2. Click Network Extender in the remote portal window.
3. If the browser does not launch ActiveX automatically, a warning message appears. Click
OK to continue. If the browser automatically installs ActiveX, the warning message does
not display, then go to Step 7.
4. Click the Information bar on the top of the page and click Install ActiveX Control.
3
4
REMOTE PORTAL GUIDE
5. After the screen refreshes, click Network Extender again.
6. You are required to install the XTunnel.cab. Click Install to install the software.
Network Extender setup proceeds.
FIGURE 1
Installation proceeding
7. You are prompted to install the SSLDrv Adapter.
8. Click Continue Anyway when prompted to accept the SSLDrv Adapter. Installation proceeds.
USING SSL VPN PORTAL ACCESS
Network Extender setup proceeds.
FIGURE 2
Installation proceeding
After installation is complete, the Network Extender Connection Status window displays.
FIGURE 3
Installation complete
5
6
REMOTE PORTAL GUIDE
• Check Uninstall On Disconnect or Browser Exit to have the system uninstall
the driver every time you disconnect the Network Extender.
• Click Disconnect to disconnect the Network Extender.
• Click View Log to view a log of Network Extender processes.
• Click Close to close the status screen. Network Extender remains active in the
status bar.
To view the Network Extender status, right-click the Network Extender icon
and select an
option from the menu in order to view the status screen or perform one of the actions above.
USING SSL VPN PORTAL ACCESS
Installing the Transport Extender
The Transport Extender enables you to access an encrypted path to another distant network,
and access applications that are on that network.
To use Transport Extender, connect to the web portal by first typing in the browser address bar
https://wanipaddress (where wanipaddress is the WAN IP address of the BiGuard SSL VPN
appliance). After you successfully connect to the device and successfully log in to the device,
the web portal screen appears. Please click Transport Extender in order to connect to the office
network. Follow the procedures below to use the Remote Portal.
1. Type the WAN IP Address or Domain Name in the Address bar of the browser and log
into the BiGuard SSL VPN remote portal as previously configured.
2. Click Transport Extender
3. If the browser does not launch ActiveX automatically, a warning message appears. Click
OK to continue. If the browser automatically installs ActiveX (the warning message does
not display), then go to Step 7.
4. Click the Information bar on the top of the page and click Install ActiveX Control.
7
8
REMOTE PORTAL GUIDE
5. After the screen refreshes, click Transport Extender again.
6. You are required to install the MenloLSP.cab. Click Install to install the software.
7. The Transport Extender Setup proceeds. After the installation is complete, the Transport
Extender window displays.
•
•
•
•
Click the Error tab to view a list of session errors.
Check Enable Logging to allow the system to log all activity for the session.
Click View Log to view a session log.
Check Uninstall if you want to uninstall the driver upon disconnecting. If this is left unchecked, ActiveX Control will not to be installed when you log on again. If the box is
checked, ActiveX will uninstall when you log off to prevent unauthorized access, such as
in the event that a public domain terminal was used to access Transport Extender.
USING SSL VPN PORTAL ACCESS
•
•
Click Disconnect to disconnect the Transport Extender.
Click Close to close the Transport Extender screen. Transport Extender is still active in
the status bar.
To view the Transport Extender screen again, or disconnect the Transport Extender, right-click
the Transport Extender icon
and select an option from the menu.
9
10
REMOTE PORTAL GUIDE
Accessing Network Place
Network Place enables you to access locations on the network to perform typical file related
tasks such as browsing shared files, deleting or adding files, and changing file names.
1. Click the Network Place icon.
o
2. The local intranet network opens.
Use this screen to perform common file management tasks.
Using Applications
The list of applications in the web portal screen makes them easy to access:
The following sections explain how to access each application.
USING SSL VPN PORTAL ACCESS
Using FTP
The following steps demonstrate how a user will log in to the FTP server from the remote web
portal.
To access the remote web portal, please connect to the https://wanipaddress (where wanipaddress is the WAN IP address of the BiGuard SSL VPN appliance).
A Security Alert message appears.
1. Click Yes to proceed (to accept the certificate sent by the BiGuard system).
The log in screen appears.
11
12
REMOTE PORTAL GUIDE
User Name: FTPUser (As previously added in Administrator FTP Configuration section)
Domain: Select BiGuard from the drop-down menu.
NOTE: User Name and Password are case sensitive.
2. Click Login to enter into the Remote Web Portal page.
3. Click Connect to connect to the TestFTP service.
If the user account is the same as the FTP server's account, you will not be asked to input the
user name and password, and the FTP session screen appears (see Figure 44).
If your user name differs from the FTP server's account, the following message appears.
FIGURE 4
FTP login
USING SSL VPN PORTAL ACCESS
User name: user
Password: Type in the password.
(In this example, both user name and password are user)
FIGURE 5
FTP session
You are logged in to your account in the designated FTP server.
Using Telnet/SSH
The following steps demonstrate how a user can log in to the Telnet server from the remote web
portal.
1. To access the remote web portal, please connect to the https://wanipaddress (where
wanipaddress is the WAN IP address of the BiGuard SSL VPN appliance).
2. When prompted, click Yes on the security alert message that appears to accept the certificate and proceed with the process.
The log in screen appears
13
14
REMOTE PORTAL GUIDE
3. Type the user name and password (Added in the Administrator Telnet Configuration section)
In the illustration above, the User Name is TelnetUser (The User Name and Password
are case sensitive)
4. Select BiGuard from the drop-down Domain menu.
5. Click Login to enter the Remote Web Portal page.
6. In the remote portal page, click Connect in the Connect in the applications frame to connect to the TestTelnet service.
If a certificate has expired or is invalid, a warning message displays. If the Always trust content
from this publisher is not selected, the warning message is not disabled.
USING SSL VPN PORTAL ACCESS
7. Click Yes to accept the certificate.
8. If the name of the site does not match the name of the certificate, the warning message
below displays, click Run to continue and enter the service
The Telnet screen appears.
9. Type the user name and password in the login screen. In the illustration above, the user
name and password are designated as User.
The Welcome screen appears.
15
16
REMOTE PORTAL GUIDE
The above screen shows a successful log in on a Telnet server. You are prompted for a
username and password to connect to the remote SSH server.
Using HTTP and HTTPS
The following steps demonstrate how a user will log in to the HTTP(S) server from the remote
web portal.
1. To access the remote web portal, please connect to the https://wanipaddress (where
wanipaddress is the WAN IP address of the BiGuard SSL VPN appliance).
2. A Security Alert message appears, when prompted click Yes to proceed (to accept the
certificate sent by the BiGuard system).
3. The log in screen appears.
USING SSL VPN PORTAL ACCESS
4. Type the user name and password that were set under the Administrator HTTP Configuration section, then select the domain.
In the illustration below, the user name is HTTPUser and the selected domain from the
drop-down menu is Biguard.
5. Click Login to enter into the Remote Web Portal page.
6. Click Connect to connect to the TestHTTP service.
The screen below shows a successful access to the remote HTTP(S) server.
17
18
REMOTE PORTAL GUIDE
Using RDP5
The following steps demonstrate how a user will log in to the Terminal Service (RDP5) server
from the remote web portal.
1. To access the remote web portal, please connect to the https://wanipaddress (where
wanipaddress is the WAN IP address of the BiGuard SSL VPN appliance).
2. A security alert message appears, click Yes when prompted to proceed (accepts the certificate sent by the BiGuard system).
The log in screen appears.
3. Type in the user name and password as it was added in the steps under the Administrator RDP5 Configuration section (The User Name and Password are case sensitive).
4. Select the BiGuard domain from the drop-down menu.
5. Click Login to enter the Remote Web Portal page.
USING SSL VPN PORTAL ACCESS
6. Click Connect to connect to the TestRDP5 service.
If the user account is the same as the Terminal Service’s account, you will not be asked to input
user name and password again. Proceed to step 5.
If your user name is different from the Terminal Service’s account, the following message
appears.
FIGURE 6
Logon message
7. Click OK and the Window’s log on screen appears.
8. Type in the user name and password of the Terminal Service’s account, and click OK to
continue.
After establishing connection, the remote computer’s screen (see below) is displayed through
the Terminal Service (RDP5). You successfully configured the Terminal Service (RDP5).
19
20
REMOTE PORTAL GUIDE
Using VNC
The following steps demonstrate how a user can log in to the VNC server from the remote web
portal.To access the remote web portal, please connect to the https://wanipaddress (where
wanipaddress is the WAN IP address of the BiGuard SSL VPN appliance).
A Security Alert message appears.
1. Click Yes to proceed (to accept the certificate sent by the BiGuard system).
USING SSL VPN PORTAL ACCESS
After Yes is clicked, the log in screen appears.
User Name: VNCUser (As previously added in Administrator VNC Configuration section)
Domain: Select BiGuard from the drop-down menu.
NOTE: User Name and Password are case sensitive.
Click Login to enter into the Remote Web Portal page.
2. Click Connect to connect to the TestVNC service.
The following page appears when loading the VNC client program into your computer.
21
22
REMOTE PORTAL GUIDE
FIGURE 7
VNC loading
Next, the VNC Authentication log on screen appears.
3. Input the VNC server password, and click OK.
The above screen shot represents the remote computer as accessed through the VNC server.
USING SSL VPN PORTAL ACCESS
Using CIFS
The following steps demonstrate how a user will log in to the FTP server from the remote web
portal.
1. To access the remote web portal, please connect to the https://wanipaddress (where
wanipaddress is the WAN IP address of the BiGuard SSL VPN appliance).
2. A Security Alert message appears, click Yes when prompted to proceed (to accept the
certificate sent by the BiGuard system).
The log in screen appears.
3. Type in the user name and password as created in the previous steps under the Administrator CIFS Configuration section and select the BiGuard domain from the drop-down
menu.
4. Click Login to enter into the Remote Web Portal page.
5. In the Remote Web Portal, click Connect on the TestCIFS application to connect to the
service.
23
24
REMOTE PORTAL GUIDE
In the Figure 8 below, you can see a successful connection to the CIFS application.
FIGURE 8
CIFS application log in
FAQ
SSL Knowledge
QUESTION: What browser and version do I need to successfully connect to the
BiGuard S Series?
ANSWER:
It is strongly recommended that the following browsers be used for successful
connection:
•
•
•
•
•
Internet Explorer 6.0SP1 (supports Microsoft Internet Explorer 5.01 or newer)
Mozilla 1.7.1 and newer
Firefox 1.0.6 and newer
Opera 8.02 and newer
Safari 1.3.1 and newer
QUESTION: What needs to be activated on the browser for me to successfully connect
to the BiGuard S Series?
ANSWER:
The following options on the browser need to be enabled for successful connection:
•
•
•
•
•
•
SSLv2, SSLv3, or TLS
Cookies
Pop-ups for the site
Java
Javascript
ActiveX
NOTE: ALTHOUGH SSLV2 IS SUPPORTED, IT IS RECOMMENDED TO USE SSLV3 OR
TLS FOR OPTIMUM COMPATIBILITY.
QUESTION: What version of Java do I need?
ANSWER:
You will need to install Sun’s JRE 1.3.1 or newer (available for download at
http://www.java.com) to use some of the features on the BiGuard S Series, but we
recommend using version 1.5 or newer (Note: the Sun designation is version 5.0).
If you are experiencing issues with the RDP5 Java component, upgrade to the newest Java version.
18