1
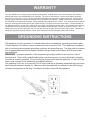
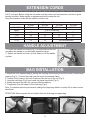
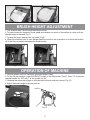
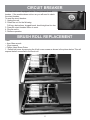
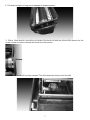
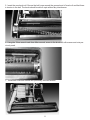
Sanitaire®
WIDE AREA
MOTORIZED
VACUUM SWEEPER
SC6093A
Part No. SC6093A Rev 1 (11/13)
Owner’s Guide
IMPORTANT
Do not return this product to the store.
Call 1-800-800-8975*
Monday - Friday 8:00 AM to 7:30 PM
and Saturday 10 AM to 6:30 PM
Central time or visit our web site,
www.sanitairevac.com for any of the
following:
• assembly problems
• replacement of broken or missing
items
• to review repair parts list
• to order replacement parts and
accessories
• to locate the nearest Sanitaire
warranty station
*En Mexico llame al 5670-6169
www.sanitairevac.com
PLEASE RETAIN
We suggest you record the model, type, and serial numbers
below. They are located on the silver rating plate on your
unit. For prompt and complete service information, always
refer to these numbers when inquiring about service.
Model & Type____________________________
Serial No._______________________________
It is also important to keep your receipt as proof of date of
purchase.
©2013 Electrolux Home Care Products Ltd.
1
WARRANTY
Your new Sanitaire unit is a high quality, precision-made product. All parts used in the manufacturing of this unit have
passed rigid quality control standards prior to assembly. The motor is warranted for 1 year from the date of purchase
as shown on your receipt / invoice. All other parts are warranted for 90 days from the date of purchase. Failures due to
misuse, neglect, abuse or normal wear and tear are not covered by this warranty. Sanitaire shall not be responsible for
any incidental or consequential damages. Please safeguard the original receipt / invoice. If you experience any problems
with your unit during the warranty period, the original receipt / invoice will act as proof of purchase. Contact Sanitaire for
any warranty inquiries. Do not return a failed unit to the place of purchase or service center. Any charges for the shipping
of a Sanitaire unit under warranty are purchaser’s responsibility unless Sanitaire requests such return in writing. This
warranty gives you specific legal rights, and you may also have other rights, which vary from state to state. There are no
warranties, express or implied, written or verbal, which extend beyond the description found in this manual.
GROUNDING INSTRUCTIONS
This appliance must be grounded If it should malfunction or breakdown, grounding provides a path
of least resistance for electric current to reduce the risk of electric shock. This appliance is equipped
with a cord having an equipment grounding conductor and grounding plug. The plug must be inserted
into an appropriate outlet that is properly installed and grounded in accordance with all local codes
and ordinances.
WARNING - Improper connection of the equipment grounding conductor can result in a risk of
electric shock. Check with a qualified electrician or service person if you are in doubt as to whether
the outlet is properly grounded. Do not modify the plug provided with the appliance, if it will not fit the
outlet, have a proper outlet installed by a qualified electrician.
This appliance is for use on a nominal 120-volt circuit and has a grounding attachment plug that looks
like the plug illustrated in sketch (A). Make sure that the appliance is connected to an outlet having
the same configuration as the plug. No adaptor should be used with this appliance.
2
SAFETY INSTRUCTIONS & WARNINGS
IMPORTANT SAFETY INSTRUCTIONS
READ AND UNDERSTAND ALL INSTRUCTIONS BEFORE USING THIS UNIT
Read and understand this owner’s manual and all labels on the unit before operating. Safety is a
combination of common sense,staying alert and knowing how your unit works. Use this unit only
as described in this manual. To reduce the risk of personal injury or damage to your unit use only
Sanitaire recommended accessories
When using an electrical appliance, basic precautions should always be followed including the
following:
WARNING: TO REDUCE THE RISK OF FIRE, ELECTRICAL SHOCK OR INJURY:
• Do not run the unit unattended.
• WARNING - To reduce the risk of Electrical Shock - Use indoors only.
• WARNING - To Reduce the Risk of Fire - Do not use a flammable or combustible liquid to clean a
floor.
•
•
•
•
•
•
•
•
•
•
•
•
•
•
•
•
•
•
•
•
•
•
Do not use this unit near flammable liquids, gases, or explosive vapors like gasoline or other fuels, lighter
fluids, cleaners, oil-based paints, natural gas, hydrogen, or explosive dusts like coal dust, magnesium dust,
grain dust, or gun powder. Sparks inside the motor can ignite flammable vapors or dust.
Keep the cord away from heated surfaces.
Do not expose to rain. Store indoors in an area above 32°F where the machine will not freeze.
Do not unplug by pulling on cord. To unplug, grasp the plug.
Do not use with damaged cord, plug, or other parts.
If the unit is not working as it should, has been dropped, damaged, left outdoors, or dropped into water,
return it to a service center.
Do not pull or carry by the cord, use the cord as a handle, close a door on a cord, or pull cord around sharp
edges or corners.
Do not run the unit over the cord.
Do not handle the plug or the unit with wet hands.
To reduce the risk of health hazards from vapors or dusts, do not vacuum toxic materials.
Do not store near hazardous materials.
Do not use the unit with a damaged filters or without the filters installed.
Do not allow it be used as a toy. Close attention is necessary when used by or near children.
To reduce the risk of injury from accidental starting, unplug power cord before cleaning, making
adjustments or repairs.
Do not leave the unit unattended when plugged in. Unplug from wall outlet when not in use and before
servicing.
Turn off all controls before unplugging.
Do not put any object into ventilation openings. Do not operate with any ventilation openings blocked; keep
free of dust, lint, hair or anything that may reduce air flow.
To reduce the risk of falls, use extra care when using the unit on stairs.
Do not pick up flammable or combustible liquids, such as gasoline, or use in areas where they may be
present.
Do not pick up hot ashes, coals, toxic, flammable or other hazardous materials.
This vacuum cleaner creates suction and contains a revolving brush roll. Keep hair, loose clothing, fingers,
and all parts of body from openings and moving parts.
Keep your work area well lit.
SAVE THIS MANUAL FOR FUTURE REFERENCE
3
EXTENSION CORDS
When using an extension cord with your unit, refer to the following table to determine the required
A.W.G. wire size. Before using the unit make sure the power cord and extension cord are in good
working condition. Make repairs or replacements before using the unit.
Only use extension cords that are rated for outdoor use.
110V-120V
Amps
0-6
7-10
11-12
13-16
Length of Extension Cord
25 Feet
50 Feet
100 Feet
150 Feet
7.5 Meter
15.25 Meter
30.5 Meter
45.7 Meter
A.W.G. Wire Size
18
16
16
14
18
16
14
12
16
16
14
12
14
12
Not recommended
HANDLE ADJUSTMENT
1. Loosen the handle lock levers (Fig 1) on both sides of the unit
and adjust the handle to a comfortable operation height.
2. Tighten the handle lock lever on both sides to lock the handle
in place.
Fig 1
BAG INSTALLATION
1. Attach the cloth zippered bag by placing the opening seal securely around the neck of the exhaust
opening (Fig 2). Connect the snap from the bag to the exhaust frame.
2. Connect the 2 snaps in the front of the bag onto the top of the unit (Fig 3).
3. Unzip the cloth bag (Fig 4) and install the paper bag inside (Fig 5).
4. Attach the paper bag onto the vacuum exhaust opening.
5. Completely close the zipper of the cloth bag (Fig 6).
Note: To maintain optimum performance change the paper bag when it is nearly full or when suction
diminishes.
ATTENTION: Never operate the unit without both the cloth bag and paper bag.
Fig 2
Fig 3
4
Fig 4
Fig 5
Fig 6
BRUSH HEIGHT ADJUSTMENT
1. This machine has 5 brush height adjustment levels.
2. To lower the brush: depress to lower pedal and release one notch of the ratchet at a time until the
desired height is reached (Fig 7).
3. To raise the brush: depress the top pedal (Fig 8).
4. When the machine is not in use, always place the nozzle in the up position to lift the brush bristles
off of the floor to prevent damaging the brush bristles.
Fig 7
Fig 8
OPERATION OF MACHINE
1. Plug the power cord into a properly grounded power outlet.
2. To turn On the machine, press the ON/OFF switch to the ON position (Fig 9). Note: “O” is the international symbol for “Off” and “l” is the symbol for “On”.
3. Squeeze the brush start trigger to activate both the brush and the vacuum (Fig 10)
4. Adjust the brush height for proper pick-up.
SWITCH
OFF
ON
Fig 9
BRUSH START
TRIGGERS
Fig 10
5
CIRCUIT BREAKER
Your new unit comes equipped with a 15 amp manual circuit
breaker. If the machine does not turn on you will need to check
the circuit breaker.
To reset the circuit breaker:
1. Unplug the unit.
2. Check the unit for the following:
Full bag, obstructions, clogged brush, brush height set too low.
3. Press the circuit breaker button to reset.
4. Plug the unit in.
5. Resume operation.
BRUSH ROLL REPLACEMENT
Tools:
• 4mm Allen wrench
• 10mm wrench
• Phillips Head Screw Driver
1. Detach belt cover by removing the 4 belt cover screws as shown in the picture below. This will
expose the belt connected to the brush roll.
6
2. Pull down bumper on long end of sweeper to expose screws.
3. With a 10mm wrench, secure the nut inside of the brush roll and use a 4mm Allen wrench for the
screw. Loosen screws to release the brush from the vacuum.
4. Pull out old brush roll from the sweeper. This will release the tension from the belt.
7
5. Insert the new brush roll. Ensure the belt loops around the grooved end of brush roll and that there
is tension in the belt. The brush should be able to spin without any interference.
6. Using the 10mm wrench and 4mm Allen wrench, screw in the brush roll with screws and nuts previously used.
7. Install belt cover and secure with previously removed screws.
8
ROUTINE MAINTENANCE INSTRUCTIONS
After each use, carefully wrap power cord around the handle and check cord for wear or damage. If
cord is damaged have the cord replaced by an authorized service center immediately.
TROUBLESHOOTING
THE MACHINE DOES NOT TURN ON
CAUSE:
1) The circuit breaker has tripped
2) Plug is broken or has loose contact
3) Branch circuit breaker has tripped
SOLUTION:
1) Reset circuit breaker
2) Replace cord
3) Find circuit breaker box and reset
THE BRUSH DOES NOT ROTATE
CAUSE:
1) Broken brush belt
2) Brush obstruction
CAUSE:
1) Vacuum inlet blocked
2) Defective motor
SOLUTION:
1) Replace belt
2) Clear obstruction
LOSS OF VACUUM SUCTION
SOLUTION:
1) Visually inspect and clear blockage
2) Replace motor
UNIT DOES NOT PICK UP
CAUSE:
1) Strings/threads wrapped around brush
2) Brush obstruction
SOLUTION:
1) Remove strings/threads
2) Clear obstruction
9