1
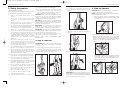
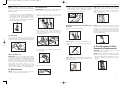
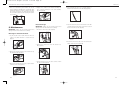
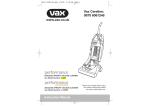
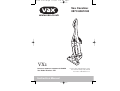
Vax VX1 V2 D1 JN.qxd
5/17/05
4:24 PM
Page 1
Vax Careline:
0870 6061248
www.vax.co.uk
VX1
BAGLESS UPRIGHT VACUUM CLEANER
Vax Model Number: VX1
Instruction Manual
Please read carefully before using
the cleaner. Always fully extend
the mains cable before use.
Vax VX1 V2 D1 JN.qxd
5/17/05
4:24 PM
Page 2
Parts Overview
Parts Overview
1. Diagram
FRONT
1
24
BACK
25
2
3
13
14
26
15
14
15
4
5
6
17
16
Fig.1/2
7
18
19
6
7
6
5
20
8
27
21
9
10
22
11
12
28
23
Fig.1/1
Fig.1/3
1
2
3
4
5
6
7
8
9
10
11
12
Soft grip handle
Brushbar on/off switch
Power on/off switch
Motor protection switch
Stretch hose handle
Stretch hose release button
Removable flexible hose (inside tube)
Brush edge
Stair hose anchor
Suction channel cover
Brushbar
Patented edge cleaning
2
13
14
15
16
17
18
19
20
21
22
23
Cord clip
On-board crevice tool
On-board stair tool
Container release (push down) and
carrying handle (lift up)
Stair hose anchor clip
Lifetime HEPA filter
Dirt container
Post-motor filter
Cord rewind pedal
Plug
Wheels
24
25
26
27
28
Filter agitator button
HEPA filter eject button
Dirt container release button
Hose release button
Flexible hose
5
6
7
8
14
15
Stretch hose handle
Stretch hose release button
Removable flexible hose (inside tube
Brush edge
Crevice tool (stored on-board)
Stair cleaning tool (stored on-board)
3
Vax VX1 V2 D1 JN.qxd
5/17/05
4:24 PM
Page 4
Safety Information/Use & Function
2. Safety Information
Use & Function/How to Operate
19. Turn off the switch before unplugging.
20. Use only CE-approved 13 amp extension cords.
FOR HOUSEHOLD USE ONLY.
Non-approved extension cords may overheat.
When using the vacuum cleaner, basic safety precautions
Care should be taken to arrange the cord so that
should always be observed, including the following:
the cord cannot be pulled or tripped over.
1.
2.
3.
4.
5.
6.
7.
8.
9.
2. To store the accessories, flip-down the
accessories holder at the back of the cleaner
(Fig.3/2).
Do not pull or carry by the cord. Do not use the
cord as a handle, close a door on the cord or pull
the cord around sharp edges or corners. Do not
run the vacuum cleaner over the cord. Keep the IMPORTANT: Always remove the power plug from the
electrical outlet before assembling or removing
cord away from heated surfaces.
accessories.
Do not handle the plug or vacuum cleaner with wet
hands. Do not use outdoors or on wet surfaces.
1. Push the bottom end of the stretch hose tube on to
the opening at the bottom of the vacuum cleaner
Do not put any objects into openings. Do not use
(Fig.3/1). Push the tube handle towards the vacuum
with any openings blocked and do not restrict air
cleaner until it clicks into place (Fig.3/1A).
flow. Keep all openings free of dust, lint, hair or
anything that may reduce airflow.
IMPORTANT: Switch off the brushbar to obtain the best
results on smooth surfaces and hard floors.
NOTE: The brushbar is automatically switched off when it
is the vertically parked position.
WARNING: Always switch off and unplug the vacuum
Only use the vacuum cleaner indoors on dry
cleaner from the electrical outlet before assembling,
surfaces.
opening or emptying the dirt container, or before
Turn off the vacuum cleaner controls before connecting/disconnecting the attachments.
connecting to or disconnecting from the mains
CAUTION: The vacuum cleaner is a very powerful unit.
supply.
Before plugging the cord into the outlet make sure the
Always unplug the vacuum cleaner before switch is in the ‘off’ position. Hold the vacuum cleaner
connecting or disconnecting the vacuum hose.
firmly when starting and in use.
Use only as described in this manual. Use only the IMPORTANT: If the vacuum inlet or hose is blocked,
manufacturer’s recommended attachments.
switch off the vacuum cleaner and remove the
Close attention is necessary when used by or near blockage(s) before re-starting the vacuum cleaner.
children. Do not allow children to use as a toy.
IMPORTANT: Cleaning filters regularly improves
Do not use the vacuum cleaner with a damaged vacuum performance. Make sure all filters are replaced
cord or plug. Do not use the vacuum cleaner if it back into the vacuum cleaner before using.
has been dropped, damaged, left outdoors or This vacuum cleaner is intended for household use
dropped into water. Return the vacuum cleaner to only and not for commercial or industrial use.
a Vax Authorised Service Agent or suitably
PLEASE KEEP THESE INSTRUCTIONS FOR
qualified person for examination, repair or
FURTHER USE.
adjustment.
4. How to Operate
1.
Switch the vacuum cleaner on by pressing the power
on/off switch (Fig.4/1). Press the switch again to turn
the cleaner off.
Fig.3/2
3. Attach the crevice tool and stair cleaning tool
(Fig.3/3).
Fig.4/1
2. Place foot onto vacuum cleaner head and at the same
time tilt the vacuum cleaner back to start vacuuming
(Fig.4/2). The handle can be lowered to provide a low
profile to fit under furniture. For vacuuming on different
surfaces, the brushbar automatically adjusts to the
surface.
3. Use & Function
Fig.3/3
4. Push in the accessories holder (Fig.3/4).
10. Keep hair, loose clothing, fingers and all parts of
the body away from openings and moving parts.
3.
11. Do not pick up hot coals, cigarette butts, matches
or any hot, smoking or burning objects.
Fig.4/2
The brushbar is switched on/off using the brushbar
on/off switch located on the handle (Fig.4/3). The
edge-to-edge brushbar picks up dirt right up to the
skirting boards (Fig.4/3A).
12. Do not pick up flammable or combustible materials
(lighter fluid, petrol, kerosene, etc) or use in the
presence of explosive liquids or vapours.
13. Do not vacuum up harmful or toxic material
(chlorine bleach, ammonia, drain cleaner, etc).
14. Do not vacuum up hard or sharp objects such as
glass, nails, screws, coins, etc.
15. Do not use without the filters in place.
Fig.3/4
16. Use extra care when vacuuming on stairs.
17. Keep vacuuming area well lit.
18. Store the vacuum indoors in a cool, dry area.
4
Fig.3/1
Fig.3/1A
IMPORTANT: Once all of the attachments are in
place unwind the cable fully and insert the plug into
a wall outlet. For easier handling while vacuuming,
hook the power cord into the cord clip.
Fig.4/3
Fig.4/3A
5
Vax VX1 V2 D1 JN.qxd
5/17/05
4:24 PM
Page 6
Accessories/Dirt Container & Filter: Removal & Replacement
How to Operate/Accessories
NOTE: For passing over obstacles or vacuuming on
thick carpets, place the cleaner in its vertical parked
position and pass the cleaner over the obstacle by
tilting the cleaner.
4. If vacuuming needs to be paused briefly bring the
vacuum cleaner into its vertical locking position.
The brushbar switches off automatically to prevent
any damage to the carpet (Fig.4/4). To resume
vacuuming tilt the cleaner back and the brushbar
will switch on again automatically.
Vacuuming Stairs
IMPORTANT: For safety reasons when vacuuming
stairs, leave the vacuum cleaner at the bottom.
5. Use the stair cleaning tool for corners and stair
treads (Fig.5/5). The stair cleaning tool can be
rotated to clean the risers and allow for vacuuming
in poorly accessible areas (Fig.5/5A).
A
1. Press the stretch hose tube release button
(Fig.5/1). The stretch hose tube can be used on its
own or accessories can be added.
Fig.5/5
Vacuuming Upholstery, Furniture and
Curtains
Fig.5/1
Fig.4/4
Stair tool: To clean curtains, use the stair tool
(Fig.5/9). Air vents in the tool reduce the suction.
Twist the head tool for the best contact with the
curtains. The stretch hose tube can be added for
hard to reach areas.
Remove the stretch hose (Fig.5/6).
2. To prevent the vacuum cleaner from tipping over
when using the hose, connect the stair hose
anchorclip to the stair hose anchor at the base of
the cleaner (Fig.5/2).
Fig.5/9
NOTE: After vacuuming, slide the stretch hose back
into the stretch hose tube. This can be done
manually or by switching on the vacuum cleaner,
covering the end of the tube with a hand and
pressing the hose release button. The resulting low
pressure pulls the stretch hose back into the tube
automatically (Fig.5/10).
Cord Rewind
After use, turn the vacuum cleaner off and unplug
from the electrical outlet. Press the pedal for the cord
rewind to draw the power cord automatically (Fig.4/5).
Fig.5/6
Crevice tool: For upholstery and furniture use the
crevice tool to fit into corners and small spaces
(Fig.5/7).
6. Dirt Container & Filter:
Removal & Replacement
Fig.5/2
3. Press the stretch hose release button and pull out
the hose (Fig.5/3).
WARNING: To reduce the risk of injury from moving
parts, unplug before servicing.
Fig.4/5
NOTE: Unplug the vacuum cleaner before changing
the filter. For best performance, regularly clean filters.
Motor Thermostat
IMPORTANT: The motor is equipped with a thermal
cut out. If, for any reason the vacuum cleaner should
overheat, the thermal cut-out will automatically turn
the unit off. Should this occur, unplug the vacuum
cleaner from the wall outlet and turn off the switch.
Check for blockages. Remove the dirt container and
empty. Allow the vacuum cleaner to cool for
approximately one hour. To restart, plug into a wall
outlet and switch back on. If the vacuum cleaner still
does not start, contact Vax Care on 0870 6061248.
Fig.5/10
Fig.5/7
Brush edge: When cleaning surfaces use the brush
edge tool on the end of the stretch hose tube to avoid
scratching (Fig.5/8).
1. The dirt container must be emptied as soon as or
before the maximum capacity mark is reached
(Fig.6/1).
Fig.5/3
4. Attach the accessory (Fig.5/4).
5. Accessories
Fig.6/1
Fig.5/8
NOTE: The two accessory parts may be used on the
stretch hose tube and/or the stretch hose.
Fig.5/4
6
7
Vax VX1 V2 D1 JN.qxd
5/17/05
4:24 PM
Page 8
Dirt Container & Filter: Removal & Replacement
2. Unlock and remove the dirt container by pushing
the carry handle down and away from the machine
(Fig.6/2).
Fig.6/2
3. Tapping the container several times will help to
loosen any dirt that may have become attached to
the filter (Fig.6/3).
Dirt Container & Filter: Removal & Replacement/Rotating Brushbar: Removal & Replacement
6. Close the dirt container and replace back into the
vacuum cleaner until you hear it click (Fig.6/6).
4. Tap the filter gently on its base. This will dislodge
the dirt (Fig.6/9). Do not wash, brush or scour the
filter this is due to the delicate membrane that can
be damaged.
2. Lift out the post-motor grille by pressing the
locking tab and remove it (Fig.6/12).
Fig.6/6
Fig.6/12
NOTE: Check the dirt container is secured in place
before lifting the vacuum cleaner.
Fig.6/9
5. Replace the filter back into the dirt container until
it clicks into place (Fig.6/10).
HEPA Filter Blocked
3. Remove the post-motor filter and shake it clean
(Fig.6/13). Replace the cleaned post-motor filter
and fit the post-motor grille back into position.
WARNING: To reduce the risk of injury from moving
parts, unplug before servicing.
NOTE: Unplug the vacuum cleaner before changing
filter.
NOTE: For best performance clean filters regularly.
Fig.6/3
4. Press the filter agitator button three times to loosen
any dirt that has become stuck to the filter itself
(Fig.6/4).
Under certain conditions, eg. when vacuuming fine
particles, the filter may become blocked resulting in a
loss of suction.
1. Switch off the vacuum cleaner and unplug from wall
outlet. Remove and empty the dirt container.
Fig.6/10
6. Replace the filter container and click it into place
by turning it in a clockwise direction (Fig.6/11).
Close the flap and refit the dirt container.
2. Remove the filter cover by turning it anti-clockwise
and pulling it away from the dirt container (Fig.6/7).
7. Rotating Brushbar:
Removal & Replacement
The motor switches off automatically if the brushbar
is blocked during operation by vacuuming up foreign
objects, or if strands of carpet are wrapped around it.
IMPORTANT: Switch off the vacuum cleaner and
unplug it from the wall outlet before servicing.
Fig.6/4
5. Empty the container by pushing the dirt container
release button over a rubbish bin (Fig.6/5).
Fig.6/13
Fig.6/7
3. Press the HEPA filter eject button, located on the
top of the dirt container to release the filter (Fig.6/8).
Fig.6/11
Cleaning the Post-motor Filter
IMPORTANT: Switch off the vacuum cleaner and
unplug from the wall outlet.
1. Lay the vacuum cleaner down on a flat surface
and turn over to expose the brushbar. Using a pair
of scissors, cut through any threads or hairs
caught by the brushbar that have wrapped around
the guides (Fig.7/1).
NOTE: Vax recommend changing the post-motor
filter every 12 months. Call Vax Care on 0870
6061248 or visit www.vax.co.uk for further
information.
1. Remove the dirt container.
Fig.6/5
Fig.6/8
8
Fig.7/1
9
Vax VX1 V2 D1 JN.qxd
5/17/05
4:24 PM
Page 10
Rotating Brushbar: Removal & Replacement/Maintenance
2. There is an automatic system which cuts off the
power supply if the brushbar gets clogged up. After
cleaning the brushes, wait for 2 minutes then plug
the vacuum cleaner into the wall outlet and press
the reset button (Fig.7/2) before pressing the power
on/off switch.
Maintenance
4. Replace the channel cover before attaching the
hose collar by turning it in an anti-clockwise
direction (Fig.8/4).
4. After removing the hose use a feather duster to
brush it clean and remove the blockage (Fig.8/8).
Fig.8/4
Fig.8/8
Fig.7/2
8. Maintenance
IMPORTANT: Switch off the vacuum cleaner and
unplug it from the wall outlet before servicing.
Hose Blockage
IMPORTANT: Switch off the vacuum cleaner and
unplug it from the wall outlet before servicing.
5. Push the stretch hose back onto the inlet on the dirt
container and insert the other end of the hose back
into the stretch hose tube (Fig.8/9).
1. Lift out the stretch hose tube (Fig.8/5).
Blockage in Suction Channel
1. Lay the vacuum cleaner down and rotate the hose
collar in a clockwise direction to release the hose
(Fig.8/1).
Fig.8/9
Fig.8/5
2. Remove the stretch hose from the stretch hose
tube (Fig.8/6).
6. Return the stretch hose tube to the vacuum cleaner
until it clicks into place (Fig.8/10).
Fig.8/1
2. Remove the suction channel cover and remove any
blockage beneath it (Fig.8/2).
Fig.8/10
Fig.8/6
Fig.8/2
3. Pull the stretch hose to one side to remove it from
the dirt container (Fig.8/7).
3. Remove the suction pipe and use a feather duster
to brush out the hose (Fig.8/3).
Fig.8/3
10
Fig.8/7
11
Vax VX1 V2 D1 JN.qxd
5/17/05
4:24 PM
Page 12
Troubleshooting
UK Service & Help/Technical Specification
8. Troubleshooting
9. UK Service & Help
WARNING: TO REDUCE RISK OF PERSONAL INJURY, UNPLUG VACUUM CLEANER BEFORE
SERVICING
Vax Care 0870 6061248
PROBLEM: Cleaner won’t run
Cause: Not properly plugged into wall outlet.
Solution: Plug in firmly.
Cause: No electricity in wall outlet.
Solution: Check fuse or breaker.
Cause: On/off switch not turned on.
Solution: Push on/off switch to on.
Monday-Friday 9.00am to 5.00pm.
An answerphone is available outside of these hours.
Any queries or concerns about using the Vax, call the
Vax Careline. Calls are charged at the UK national rate.
Please make a note of the serial number and model
number of the carpet cleaner before calling. There are
over 400 approved Vax Service Agents in the UK. For the
nearest Service Agent, please call the Vax Careline.
10. Technical Specification
Power supply:
Motor power:
Dirt container:
Filter system:
Cord length:
Weight:
230-240V ~50Hz
1600W
4.2 litres
Lifetime HEPA filter
Post-motor filter
7.8m
8.4kg
Subject to technical change without notice.
www.vax.co.uk
Cause: Motor thermostat tripped.
Solution: Reset motor thermostat (see page 6).
Cause: Blown fuse/tripped breaker.
Solution: Reset circuit breaker or replace fuse.
PROBLEM: Cleaner won't pick up
Cause: Full or clogged dirt container.
Solution: Clean dirt container.
Cause: Clogged nozzle.
Solution: Remove obstruction.
Cause: Clogged dirt inlet.
Solution: Remove suction channel cover and remove obstruction.
Cause: Clogged hose.
Solution: Remove obstruction.
Cause: Hose not inserted fully.
Solution: Push hose in securely.
Cause: Dirty filters or filter container.
Solution: Clean/change filters or filter container.
PROBLEM: Accessories won't pick up
Cause: Accessories not attached correctly.
Solution: Refer to page 6 for fitting information.
PROBLEM: Brushbar does not turn
Cause: Brushbar blocked.
Solution: Remove blockages, wait 2 minutes and press the motor protection switch.
PROBLEM: Air flow restricted with attachment use
Cause: Attachment use restricts air flow.
Solution: Check attachment.
Cause: New carpet debris clogging air path.
Solution: Remove obstruction.
12
13
Vax VX1 V2 D1 JN.qxd
5/17/05
4:24 PM
Page 14
This page has been intentionally left blank.
14
This page has been intentionally left blank.
15
Vax VX1 V2 D1 JN.qxd
5/17/05
4:24 PM
Page 16
EEC STATEMENT OF COMPLIANCE
Manufacturer/EEC importer: Vax Limited, hereby on our own responsibility, declare that the declare that the
product VX1 is manufactured in compliance with the following:
Safety: 73/23/EEC Low Voltage Directive, as modified by 93/68/EEC
EMC: 89/336/EEC Electromagnetic Compatibility Directive, as modified by 93/68/EEC
Waste electrical products should not be disposed of with household waste. Please recycle where
facilities exist. Check with your Local Authority or retailer for recycling advice.
Vax Ltd., Kingswood Road, Hampton Lovett, Droitwich, Worcestershire, WR9 OQH, UK
email: [email protected] - website: www.vax.co.uk
Version 1