1
BOSCH
Dishwasher
Use & Care Manual
for SHU 3030 Series
Quick Reference Index
IMPORTANT
SAFETY
GROUNDING
INSTRUCTIONS
INSTRUCTIONS
2
2
ABOUT YOUR DISHWASHER
GETTING TO KNOW YOUR DISHWASHER
3
3
BEFORE
4
USING
FOR THE FIRST
TIME
GETTING STARTED
PREPARATIONS
FOR WASHING
SPECIAL
INSTRUCTION,
TABLE
4
4
1
LOADING
LOADING THE TOP RACK
LOADING THE LOWER RACK
USING
THE DISPENSERS
DETERGENT
USE
DETERGENT
DISPENSER
RINSE AGENT INDICATOR
RINSE AGENT DISPENSER
RINSE AGENT REGULATOR
5
6
6
7
7-8
7
8
8
CYCLE SELECTION
CYCLE
SELECTION
OPERATION
TO INTERRUPT
OR RESET
UNLOADING
CARE & CLEANING
SERVICE
READ
THIS MANUAL
for important safety and operating instructions
CHART
and REPAIR
PROGRAM
10
10
l0
10-11
12
SELF-HELP
13
WARRANTY
14
IMPORTANT
SAFETY
INSTRUCTIONS
WARNING -- When using your dishwasher, basic safety precautions should always be followed to
reduce the risk of fire, electric shock, and/or injury to persons, including the following:
1. Bosch dishwashers are provided with two manuals: an Installation Instruction Manual and a
Use and Care Manual. Read all instructions before using the dishwasher.
2. Use the dishwasher only for its intended function.
3. Use only detergents or wetting agents recommended for use in a dishwasher and keep them out
of the reach of children.
4.
5.
6.
7.
8.
9.
10.
11.
12.
When loading items to be washed:
a. Locate sharp items so that they are not likely to damage the door seal; and
b. Load sharp knives with the handle up to reduce the risk of cut-type injuries.
Do not wash plastic items unless marked "dishwasher safe" or the equivalent. For plastic items
not so marked, check the manufacturer's recommendations.
Do not touch the heating element during or immediately after use.
Do not operate your dishwasher unless all the enclosure panels are properly in place.
Do not tamper with controls.
Do not abuse, sit on, or stand on the door or dish rack of the dishwasher.
To reduce the risk of injury, do not allow children to play in or on the dishwasher.
Under certain conditions, hydrogen gas may be produced in a hot water system that has not
been used for two weeks or more. Hydrogen gas is explosive. If the hot water system has not
been used for such a period, before using the dishwasher turn on all hot water faucets and let
the water flow from each for several minutes. This will release any accumulated hydrogen gas.
As the gas is flammable, do not smoke or use an open flame during this time.
Remove the door to the washing compartment when removing an old dishwasher from service
or discarding.
WARNING -- This dishwasher must be grounded in accordance with the National Electrical Code
and/or local codes. These must be carefully followed in all cases. See Installation Instructions
provided with this dishwasher for complete installation information. Make sure this dishwasher has
been properly grounded and installed by a qualified installer before using.
SAVE THESE
GROUNDING
INSTRUCTIONS
INSTRUCTIONS
This appliance must be connected to a grounded metal, permanent wiring system; or an equipment grounding conductor must be run with the circuit conductors and connected to the equipment grounding terminal
or lead on the dishwasher.
2
HOUSEHOLD
ABOUT
YOUR
USE ONLY
DISHWASHER
Congratulations
on having selected a BOSCH
dishwasher,
the choice of those that demand quiet and
exceptional cleaning performance
from their dishwasher.
The Bosch SHU 3030 series dishwashers
offer the
•
•
following standard features:
•
Stainless steel inner liner and inner door
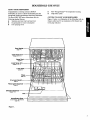
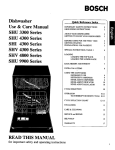
Figure 1, below, is an illustration of the dishwasher
with its
features called out. For an explanation of the feature turn
to the page indicated.
•
•
Exceptionally
low water consumption
Four spraying levels
Door Gasket
(page 11)
_
Upper Spray Arm.
(pages 4, 10, 11)
Lower Spray
Ipages 4, 10, 11)
Lower Rack.
(pages6)
(page 10)
Silverware
Basket
(page 7)
Rinse
Agent Dispenser
(page 8)
Detergent
Dispenser
(pages 7, 8)
Venl
Name/Rating
(at side of door, as indicated)
(page 12)
Figure 1.
Flow-Through Heater
Triple filter system
GETTING
TM
for temperature boosting
TO KNOW YOUR
DISHWASHER
BEFORE
USINGFORTHEFIRSTTIME
Before beginning to use your dishwasher for the first
time:
l. Check to make sure that the voltage on which the
dishwasher is to operate is the same as shown on
the rating plate.
2. Check to make sure that the water valve to the
dishwasher is open. The installer may have closed
the valve upon completing the installation.
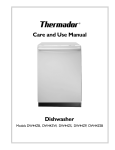
Start and Run Knob
/
BOSCH
I
On/000
_
Temp Temp $ Hold
High Regular
Wash
wash Rinse
Temp Op_o_s
_les
SHU 3030 Series
Control Panel
On/Off
Handle
Button
Figure 2.
GETTING STARTED
The operation of your Bosch dishwasher is summarized
below:
1. Load the dishwasher.
Refer to Table l for items suitable for washing in the
dishwasher. The dishwasher should be loaded with
pots, pans, dishes and silverware according to the
instructions provided under the following section
titled LOADING.
2.
3.
4.
5.
6.
Add detergent and check rinse agent.
Detergent must be placed in the detergent dispenser
compartment as described in the following section
titled DETERGENT USE. The use of a rinse agent is
required to ensure good cleaning and drying result.
See section titled RINSE AGENT DISPENSER.
Check motion of wash arms.
The wash arms must be free to move and should not
be blocked by any item extending so far above lower
rack as to block upper arm or by any items hanging
below either the upper or lower rack to obstruct the
motion of the wash arms. See following section titled
OPERATION.
Close the door of the dishwasher.
Make sure that the door is completely closed and latched.
Select a wash cycle, see Table 2.
Start the dishwasher.
Turn the "Start and Run Knob" to the cycle you desire
(Power Scrub or Regular Wash). Then choose the
temperature option you want for the cycle you chose
by depressing the "High Temp. Wash" or the "Regular
Temp. Wash" buttons. If you choose the "Rinse and
Hold" Cycle on the "Start and Run Knob", then you
also need to choose the Rinse & Hold" button. After
you are finished selecting your cycle and temperature,
then depress the On/Off button. The indicator light
above the On/Off button will become illuminated and
the dishwasher will start. The "Start and Run Knob"
7,
will rotate clockwise as the dishwasher cycle progresses.
It is possible to discern at what stage the cycle is in,
by noting the position of the knob indicator.
To stop dishwasher.
Depress the On/Off button. The indicator light above
the On/Off button will turn off. See the following
section titled TO INTERRUPT OR RESET CYCLE.
PREPARATIONS FOR WASHING
Very little preparation is required before placing dishes,
pots, pans, etc. into the dishwasher. However, some
preparation is required:
•
Large solids, such as, bones, large seeds, shells, skins,
leafy vegetables, meat trimmings, etc. should be
removed either by scraping into a wastebasket, or into
your food disposer.
•
Large amounts of any type of leftover food should also
be scraped into a wastebasket or into your food disposer.
•
Pots and pans that have burned-on food, the food is
blackened, should be pre-soaked and scoured. The
dishwasher cannot remove burned-on food.
•
Do not place the following items in the dishwasher:
> toothpicks
> small bones and bone slivers
> paper products such as paper plates and paper
napkins
> plastic bags or plastic packaging material.
In general, try to remove food scraps and place the items
to be washed in the dishwasher
before the food has had a
chance to dry-on. Dried-on food is more difficult to
remove. If there will be an extended period of time before
the dishwasher
will be run it is recommended
that the
"Rinse
& Hold" cycle be used.
Other than the above, no special preparation or pre-rinsing
is required for dishes, pots and pans or utensils with
normal amounts of food soil.
MATERIAL
DISHWASHER
USE
COMMENTS AND/OR SPECIAL INSTRUCTIONS
ADHESIVE
JOINED ITEMS
NOT
RECOMMENDED
Items joined by adhesives, whether plastic, wood, bone, steel, copper or
tin, etc. may be loosened.
ALUMINUM
USUALLY SAFE
Colored anodized aluminum may fade over time. Minerals in the water may
cause spotting or darkening of aluminum. This can usually be removed by
scouring with a soap filled steel wool pad.
BONE
HANDLED
UTENSILS
NOT
RECOMMENDED
Handles may separate.
CHINA &
STONEWARE
USUALLY SAFE
It is highly recommended however that "on-glaze" decorated china,
handpainted and gold or platinum trimmed, or antique china or stoneware
be hand washed. If there is any doubt, please check with the manufacturer
of your set or test by washing one piece with each load for a month and
comparing this piece with the rest of the set to determine if there has been
any fading or discoloration.
CRYSTAL
USUALLY
SAFE
Decorated crystal, those handpainted,
"on-glaze",
or metal trimmed, may
discolor, fade, or spot. It is recommended
that these be hand washed. Also,
fragile glassware is highly breakable, be sure to set the pieces so that they
do not topple during washing and so that they do not knock against other
pieces.
GLASS
USUALLY
SAFE
Milk glass may yellow.
NON-STICK
COATINGS
USUALLY
SAFE
After drying the non-stick
vegetable oil.
IRON
NOT
RECOMMENDED
Iron will rust. Wash by hand and dry immediately.
PEWTER
NOT
RECOMMENDED
Pewter will tarnish. Wash by hand and dry immediately.
PLASTIC
USUALLY
SAFE
Only wash "dishwasher
STAINLESS
STEEL
USUALLY
SAFE
Do not let stainless
silverplate items.
STERLING
SILVER &
SILVERPLATE
USUALLY
SAFE
Do not allow to come in contact
TIN
NOT
RECOMMENDED
Tin will rust. Wash by hand and dry immediately.
WOOD
NOT
RECOMMENDED
Wooden bowls, wooden
or lose their finish.
NONDISHWARE
ITEMS
NOT
RECOMMENDED
The Bosch dishwasher
is only intended
household dishware items.
Table
1.
coating
should be covered
safe" plastic
of
items.
steel items contact
utensils
with a light coating
copper
with stainless
or sterling
silver or
steel or copper
and wood handled
utensils
for use in cleaning
items.
can warp, crack
standard
LOADING
LOADING
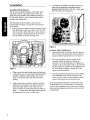
THE TOP RACK
The top rack is designed for glasses, cups, plates, bowls
and saucers. Glasses, cups, plates, bowls, saucers and
small pots may be loaded in many different positions to
fit your needs. Figure 3, shows a typical mixed load for
an upper rack washing load.
The dishwasher
At completion of loading of the upper rack check to
make sure that nothing is protruding through or
hanging beneath the bottom of the rack, which could
block the rotation of the spray arm.
should be loaded so that water can
circulate freely and reach every part of every item that is
to be cleaned:
•
Cups, glasses and containers
should be placed in upper
rack upside down so that water drains off of them and
does not collect in them. Tall narrow vessels, such as a
vase or tall glass, should be placed in the lower rack,
near the middle, for the best cleaning result.
Figure 4.
LOADING THE LOWER RACK
•
Large and/or heavily soiled items should be placed in
the lower rack of the dishwasher. Heavily soiled pots
and pans should be placed face down. See figure 4.
Figure 3.
China, crystal and other delicate items must be placed
so that they do not touch each other during dishwasher
operation. Chipping or other damage may occur if
items can touch each other while the dishwasher is
running.
Large serving spoons and forks, spatulas, tongs and
large knives can be placed in the top rack. Be sure to
space these large utensils so that water may flow
freely over them and so that water does not collect in
them; - - - serving spoons and ladles should be placed
facing downward so as not to collect water.
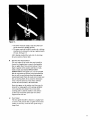
Silverware should be mixed when placed in the
silverware basket. The purpose of mixing the
silverware is to avoid having them nest together. For
example, if spoons were placed side by side in the basket, they might 'nest together'. If this happened, then
the water would not properly circulate across the
spoons to clean the surfaces.
Silverware should be placed in the silverware basket
with the handles down, with the exception of the
knives, which in order to avoid accidentally cutting
oneself, should be placed with the handles up.
If you do inadvertently load the silverware basket with
the knife blades up it is recommended, to avoid cutting
yourself when unloading, that you remove the silverware
basket from the dishwasher and tip the contents out onto
a cutting board.
USING THE DISPENSERS
For the best washing result it is important to use the correct
amount of detergent and rinse agent.
DETERGENT
USE
Use only fresh dishwashing detergent (powder is
recommended) manufactured specifically for dishwasher
use. Use of other types of detergents will result in
excessive suds. Be sure to check the phosphate content of
the detergent to be used. Phosphate helps prevent the
minerals in hard water from forming a film or spots on
dishes. Hard water requires your detergent to work harder.
In hard water areas you will find that detergents with high
phosphate levels will provide a better result. If the
phosphate level is low, below 8.7%, you may have to use
extra detergent in hard water areas.
Be sure to follow the dishwasher detergent manufacturer's
instructions when using the detergents. Concentrated
detergents usually call for lower usage than do standard
detergents.
Note:
Do not use detergent when the Rinse & Hold cycle
has been selected.
........
Release
Figure 6.
The amount of detergent to be used depends on the cycle
selected and the water hardness:
•
•
•
For water of medium hardness and "Regular Wash"
cycle it is recommended that the detergent dispenser
be filled to the 25 milliliters, (5 tsp.) level.
With hard water, or with the "Power Scrub" cycle,
it is recommended that the detergent dispenser be
completely filled, roughly 9 teaspoons.
With soft water the amount of detergent may be
reduced.
If you have water of medium or higher hardness and the
dishes do not come out clean, the cause (in the majority of
cases) is the use of too little detergent rather than too
much. If you have very soft water, or chemically treated
soft water, special care should be taken to use the minimum amount of detergent. For these situations a high quality, low phosphate detergent is recommended. Too much
detergent combined with soft water may cause etching of
glassware.
After filling the detergent compartment close the cover
by sliding it over the detergent chamber and pressing
down on the button until it clicks shut. The detergent will
be dispensed automatically during the wash portion of the
cycle.
Figure 5.
DETERGENT
DISPENSER
The detergent dispenser on the Bosch dishwasher is
located on the inside of the door, see figure 1 as well as
figure 9 and 10. The detergent dispenser cover may be
opened by pulling the release tab (figure 10) toward you.
Once the cover is open you will see two level marks:
"25" and "15". These refer to the volume when filled level
in milliliters.
the detergent
45 milliliters,
15 milliliters is equivalent to 3 teaspoons.
dispenser is completely filled it can hold
or roughly 9 teaspoons.
If
If the cover of the detergent dispenser is closing fully but
it won't latch, this is most likely due to the dishwasher
having been stopped in mid cycle. Check the position of
the "Start and Run Knob", see Figure 2, to see if cycle has
been completed. If the cycle is not completed please refer
to section of this manual titled TO INTERRUPT OR
RESET CYCLE to reset cycle.
RINSE AGENT
INDICATOR
There is level indicator on the dispenser, see Figure I 1
and 13. This indicator shows the level of rinse agent that is
in the rinse agent reservoir. As received, and when empty,
the level indicator on the dispenser will appear blank.
When the rinse agent reservoir is full the level indicator on
the dispenser will appear dark.
7
RINSE AGENT DISPENSER REGULATOR
The rinse agent reservoir of the Bosch dishwasher is
provided with a regulator calibrated from 1 to 6. See
Figure 13. This regulator controls the amount of rinse
agent dispensed. The dishwasher leaves the factory
preset to 3_. This has been chosen as the average setting,
however:
•
if you see streaks, it is recommended
be turned to a lower number.
that the regulator
•
if water spots appear, it is recommended that the
regulator be turned to a higher number.
Rinse Agent Level Indicator
Figure 7.
Indicatou
IMPORTANT
Rinse agent, or a rinse aid, is used to diminish water
spotting and to provide optimum drying results. Rinse
agent must he used at all times with the Bosch
dishwasher.
RINSE AGENT DISPENSER
The rinse agent dispenser is located next to the detergent
dispenser. See figure 12. Rinse agent is available in liquid
or solid form. Do not use the solid type of rinse agent in
the Bosch dishwasher.
To
•
•
•
•
fill the rinse agent reservoir (refer to Figure 12):
Open the dishwasher door fully.
Open the cover of the rinse agent dispenser.
Add rinse agent to the reservoir until the clear level
indicator turns completely dark. The reservoir is full
when the level indicator is dark.
Close the cover of the rinse agent dispenser. Make
sure that it is firmly snapped closed.
Dosage
Control
Figure 9.
TO ADJUST SETTING:
•
Open the cover of the rinse agent dispenser.
•
Turn the setting indicator to the desired setting. See
Figure 13.
•
Close the cover of the rinse agent dispenser. Make
sure that it is firmly snapped closed.
CYCLE SELECTION
The dishwasher will wash and dry the contents based on
cycle selection made. Refer to the CYCLE SELECTION
CHART, Table 2. The most appropriate cycle for the load
to be washed can be selected from this table by comparing
the load type and the amount and condition of the food on
the items to the charts recommendations.
Figure 8.
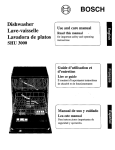
Cycle Selection Chart for SHU 3030
Type of dishware
e.g.china,
Pu°_pans'IN°n'deli'l
ilca.seeys'
Type of food
remains
Amount of
food remains
Wash
cycle
J _
Soups, casseroles,
sauces, potatoes,
pasta, rice, eggs,
roast or fried food
Soups, potatoes,
pasta, rice, eggs,
roast or fried food
- a,ot•
Condition of
food remains
[___
!
!
!
"
loosely attached
4!, 4!, 4!,
/ Scrub
Coffee, cakes, milk,
salami, cold drinks,
salads
a,o,
- Ia,i
- ,ela,
•
stuck on hard
Scrub
_
/ | Wash
4!,
/ | Wash
_ower
]r _owar
1["ego'arl
[.e_u,sr
4!,
Rinse
& Hold
(High
/ (Regular / /
(High / | (Regular
Temp.Wash) LTemp,Wash)_ LTemp.Wash)_ LTemp.Wash)
Cycle
sequence
Pre-rinse ] I Pre-rinse ]
f Pre-rinse ]
one
Rinse-aid t
DryingI
Cycle
details
127
119
98
9O
9
Water consumption
in gallons
8.9
8.9
6.7
6.7
1.19
Water consumption
in litres
33.75
33.75
25.35
25.35
4.5
Duration
In
minutes
Shown above are the range of values that may be obtained while running the dishwasher under normal
conditions. Actual values may vary. The actual cycle duration, water and energy usage are dependent upon
inlet water temperature.
Note: When you select "Rinse & Hold" on the "Start and Run Knob", you must also select "Rinse & Hold" on
the "Temp. Options" button. Otherwise the water will not get hot and your dishes will be rinsed in cold
water for an extended period of time and the detergent dispenser will not open.
Table 2.
9
OPERATION
Once detergent has been added and before closing the door
of the dishwasher check the wash arms to ensure that they
are free to move. With the detergent in the dishwasher and
arms free to move:
•
Close the door of the dishwasher making sure that
door latch is closed.
•
Depress
the button for the temperature
you desire.
Turn the "Start and Run Knob" to "Power Scrub",
"Regular Wash", or "Rinse & Hold" (depending
upon the cycle you choose) and depress the On/Off
button. See Figure 2. The indicator light above the
On/Off button will become illuminated to indicate that
the dishwasher is on and the cycle will begin.
Note: DO NOT USE DETERGENT IF YOU CHOOSE
"RINSE & HOLD."
TO INTERRUPT
OR RESET CYCLE
To interrupt cycle simply depress the On/Off button to stop
operation. If you are interrupting the cycle during a wash
or rinse cycle please wait until the water noises stop before
opening the door. After opening the door leave it ajar for a
few minutes. The cycle then may be resumed by closing
the door and depressing the on/off button.
As a safety feature the dishwasher will automatically turn
itself off whenever the door is unlatched. However, if the
door is opened quickly while in a wash or rinse cycle some
water may splash out of the dishwasher. For this reason it
is recommended that the machine always be switched to
off before opening the door.
If you wish to reset the cycle to its beginning after
stopping the dishwasher:
1. Close the door of the dishwasher. Make sure that the
door is completely closed and latched.
2.
3.
Turn the "Start and Run Knob" to your cycle
selection.
The dishwasher is now reset and ready to mn your
selected wash cycle.
UNLOADING
When
unloading
the dishwasher
always
unload
the lower
rack first and then unload the upper rack. This will
minimize the chance of drops from the upper rack falling
on the dishes in the lower rack. The silverware basket
of the Bosch
unloading.
dishwasher
may be removed
for easy
Also, when unloading, it is recommended
that the dishes
be allowed to cool before handling. The dishes will cool
more quickly if the door is opened slightly.
10
Coarse/Microfilter
Fine Filter
Figure 10.
CARE
and CLEANING
The Bosch dishwashers have a triple filter system
comprised of: a microfilter, a fine filter and a coarse
The microfilter is self-cleaning,
but the coarse filter
fine filter will sometimes be found to have collected
from bones to toothpicks or straws that been left on
plates or in the glasses. For this reason
maintenance
should be observed:
filter.
and
items;
the
the following
Filters
The filters should be checked on a regular basis. To
remove the filters, turn the knurled ring handle of the
coarse/microfilter ¼turn counter-clockwise, see Figure
10, and lift out the coarse/microfilter. After removing
the coarse/microfilter the fine filter should also be
inspected from time to time. Examine the filters. If
large solids, such as bones, or large seed(s) are present,
remove the filters and dispose of the large solids by
emptying into a waste basket. If any other items have
been trapped by the filters, paper labels for example,
these should also be removed while you have the filters out of the dishwasher. These smaller items can
usually be flushed out under running water if you have
trouble removing them by hand.
After cleaning, reinsert the filters in the dishwasher
making sure to press the filters firmly into position,
and then turning the knurled ring ¼ turn clockwise
until locked. Pull gently on the knurled ring to make
sure the filters are again locked in place.
Other areas requiring periodic maintenance
are the wash
arms, stainless steel tank, inner door, and door gasket:
•
Wash Arms
The wash arms should be checked on a regular basis
to assure that the spray orifices are clear and
unobstructed.
If the wash arms require cleaning they
are easily removable:
Figure 11.
> The lower wash arm simply snaps into place and
can be removed by pulling upwards.
> The upper wash arm is held in position by a locking
ring that can be released by turning it approximately
1/8 turn. See figure 15.
After cleaning, reattach the wash arms by reversing
the action used to remove them.
Stainless Steel Tank and Door
The outer edges of the inside door panel should be
cleaned on a regular basis to remove food particles
that can gather there from normal loading. If spots
begin to appear on the stainless steel door or tank,
check to make sure that the RINSE AGENT
RESERVOIR has rinse agent in it. It is also possible
that the wash arms are blocked, which prevented the
door as well as your dishware from being properly
washed and rinsed. Check the wash arms to make sure
they are moving freely. If not, clear the obstruction
away so that the arms may rotate freely and then
rewash the load of dishes in the dishwasher.
Spots that appear on the stainless steel door may be
removed by wiping gently with a sponge sprinkled
with a stainless steel cleaner. Do not use metal
scouring pads to clean the stainless steel surfaces
as these can scratch the surface and leave metal
fragments that can rust.
Door Gasket
The door gasket should be cleaned on a regular basis
to remove food particles that can gather from normal
loading. If necessary, clean the door gasket using a
damp cloth.
11
SERVICE and REPAIR
The Bosch dishwasher requires no special care other than
the care and cleaning noted above. If you are having a
problem with your dishwasher, before calling for service
please refer to Table 3, SELF-HELP section. If service
becomes necessary, contact your dealer, installer, or an
authorized service center. Do not attempt
to repair the appliance yourself. Any work performed by
unauthorized personnel may VOID THE WARRANTY.
Please be sure to include, if writing; or have available if
calling, the following information:
•
Model Number
•
Serial Number
If you are having a problem with your BOSCH dishwasher
and are not pleased with the service you have received:
You will find the model number and serial number
information on the rating plate located on the door of the
dishwasher. See Figure 1.
•
•
•
•
•
•
Date of Original Purchase
Date Problem Originated
Explanation of Problem
Daytime Phone Number
First, please contact your installer or the Bosch
Authorized Service Contractor in your area and
explain to them why you are not satisfied. This will
usually correct the problem.
If after working with your installer or service person
the problem still has not been resolved to your
satisfaction, please let us know by either writing to us
at:
BSH Home Appliances Corp.
5551 McFadden Avenue
Huntington Beach, CA 92649
or,
calling us at:
1-800/944-2904.
(Staffed,
8:30 AM - 4:30 PM CST.)
Model #
Figure 12.
THIS
12
INFORMATION
CAN ALSO
BE FOUND
ON YOUR
INVOICE.
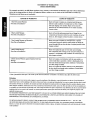
SELF-HELP
Dishwashers may exhibit problems that are unrelated to a malfunction of the dishwasher itself. The following table may serve
to answer your question about a problem you are having without having to call a serviceman.
PROBLEM
POSSIBLE
CAUSE
Dishes do not dry
Rinse-aid dispenser is empty. Fill rinse-aid dispenser.
Indicator light(s) do
not come on
A fuse may have blown or a circuit breaker tripped. Replace fuse or reset circuit breaker at
your fuse box/breaker box.
Dishwasher does not
start
Door of dishwasher not properly closed. Close dishwasher making sure that door latches.
Dishwasher runs a
long time
If the dishwasher completes the cycle, but the run time seem exceptionally long it is probably
due to cold incoming water. To avoid this problem it is recommended that before starting the
dishwasher: open the hot water faucet at the sink nearest the dishwasher and run the water
until the water is hot. Then turn off the water and start the dishwasher.
Machine cycle does
not advance to rinse
Water line is closed or inlet filter is blocked. Open water valve and/or check inlet filter.
Water not pumped
from dishwasher
Kink in drain hose. Filter clogged. Kitchen sink clogged. Air gap (type installed at sink)
clogged. Check drain hose and fine and coarse filters (see section titled CARE and
CLEANING). Check kitchen sink to make sure it is draining well. If problem is kitchen sink
not draining you may need a plumber rather than a serviceman for the dishwasher.
Detergent dispenser
lid will not close
A program was not completely finished.
Lower spray arm does
not rotate freely
Remove lower spray arm and clean arm and spray arm mounts.
White deposits left on
dishes
Too little rinse-aid.
Streaks on glassware
Too much rinse-aid used.
Rattling noises
Utensils not properly arranged.
Suds in dishwasher
Incorrect type of detergent used. Use only automatic dishwasher detergents.
Unsatisfactory
washing result
•
•
•
•
•
•
Incorrect amount of detergent or rinse agent.
Utensils incorrectly arranged or rack overloaded.
Wash arm rotation blocked by utensils.
Filters not properly fitted into position.
Clogged nozzles in wash arm(s)
Unsuitable program selected.
TABLE 3.
13
STATEMENT
OFWARRANTIES
BOSCHDISHWASHER
The warranties provided by the BSH Home Appliances Corp. ("Bosch") in this Statement of Warranties apply only to Bosch Dishwashers
sold to the first using purchaser by Bosch or its authorized dealers, retailers or service centers in the United States or Canada. The
Warranties provided herein are not transferable.
LENGTH OF WARRANTY
SCOPE OF WARRANTY
1 Year Full Limited Wan'anty
From Date of Installation*
Bosch will repair or replace any component part that proves
2 Year Limited Warranty
From Date of Installation*
Bosch will provide replacement parts free of charge for any
component part that proves defective under conditions of normal
home use, labor charges excluded (excludes: cosmetic items).
5 Year Limited Warranty on Electronics
From Date of Installation*
Bosch will repair or replace any microprocessor or printed
circuit boards that prove defective under normal use during the
second through fifth year from the date of original purchase, labor
charges excluded.
5 Year Limited Warranty
From Date of Installation*
Bosch will replace the upper or lower dish rack (excluding
rack components) free of charge, if the rack proves defective in
materials or workmanship under conditions of normal home use,
labor charges excluded.
Lifetime Limited Warranty against Stainless Steel Rust
Through
From Date of Installation*
Bosch will replace your dishwasher with the same model or a
defective under conditions of normal home use free of charge,
labor and shipping costs included. Repair service must be
performed by an Authorized Bosch Service Center (excludes:
cosmetic items).
current model that is equivalent or better in functionality if the
inner liner should rust through under conditions of normal home
use, labor charges excluded.
Bosch will replace the stainless steel door of any dishwasher if
the door should rust through under conditions of normal home
use, labor charges excluded.
* Date
of installation
shall refer to the earlier
of the date the dishwasher
is installed
or ten business
days after the delivery
date.
Exclusions.
This warranty does not cover service calls or repairs to correct the installation of the dishwasher, to provide instructions on the use of your dishwasher, to
replace house fuses or correct plumbing or the electric wiring in your home or to repair any dishwasher that's use was in a manner other than what is normal
and customary for home use. In addition, the warranties provided in this Statement exclude any defects or damage arising from accident, alteration, misuse,
abuse, improper installation,
unauthorized
service work, extomal forces beyond Bosch's control, such as fire, flood, and other acts of God, or installation not
in accordance with local electrical and plumbing codes. Labor charges incurred in the repair or replacement
of any dishwasher after the one year from date of
installation shall not be covered by this warranty. Any and all replaced and/or repaired parts shall assume the identity of the original for purposes of the
applicable warranty period.
TO THE EXTENT PERMITTED
THE IMPLIED WARRANTIES
RESPONSIBILITY
BY LAW, THIS WARRANTY
OF MERCHANTABILITY
FOR INCIDENTAL
TO OBTAIN WARRANTY
IS IN LIEU OF ALL OTHER EXPRESS AND IMPLIED WARRANTIES,
AND FITNESS FOR A PARTICULAR
OR CONSEQUENTIAL
CORP. DIRECTLY AT: BSH HOME APPLIANCES
BEACH, CA 92649. BE SURE TO PROVIDE YOUR DISHWASHER'S
AND ADDRESS. 1
14
INCLUDING
BOSCH DOES NOT ASSUME ANY
DAMAGES.
SERVICE, CONTACT THE NEAREST BOSCH AUTHORIZED
OR WRITE BSH HOME APPLIANCES
PURPOSE.
SERVICE CENTER OR CALL 1 - 800 / 944 - 2904,
CORP., 5551 McFADDEN AVENUE, HUNTINGTON
MODEL, SERIAL NUMBER, PURCHASE
DATE AND THE SELLER'S
NAME
NOTES
15
NOTES
16