1
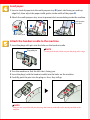
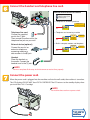
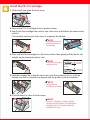
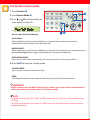
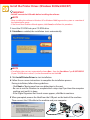
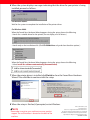
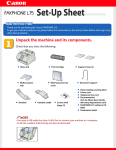
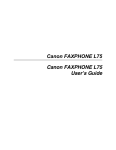
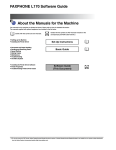
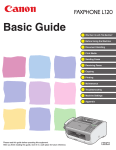
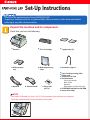
Set-Up Instructions Thank you for purchasing the Canon FAXPHONE L80. To get your machine ready for use, please follow the instructions in this document before referring to any other documentation. Unpack the machine and its components. Check that you have the following: ● Machine ● FX-3 S Cartridge ● Support trays (2) ● Multi-purpose tray ● Multi-purpose tray cover ● Document support ● ● ● ● ● Handset NOTE ● Handset cradle ● Plugs with pins (2) Paper loading warning label Power cord Telephone line cord Documentation Set-Up Instructions Basic Guide Warranty Registration card (for USA only) ● FAXPHONE L80 Software CD-ROM ● Destination labels • You need a USB cable (less than 16.4 ft./5 m) to connect your machine to a computer. • To lift the machine, hold it firmly and level as illustrated. Remove the shipping materials from the machine. 1 Place the machine on a flat surface. 2 Remove all shipping tapes from the exterior of the machine. 3 Gently open the operation panel ➊ (it only opens partially) and remove the protective sheet ➋ from the ADF. 4 Close the operation panel by pressing at the center until it locks into place. NOTE Ë • Do not remove the USB label on the back of the machine at this stage. USB label Assemble the machine. 1 Attach the paper loading warning label. 2 Insert the multi-purpose tray into the slots on the machine. Multi-purpose tray Paper loading warning label Multi-purpose tray cover 5 Insert the document support into the slots on the machine. Document support 4 Insert the other support tray into the slots above the ADF. Support tray 3 Insert one of the support trays into the slots above the delivery slot. NOTE • Place the multi-purpose tray cover on the machine after loading paper (see the next page). Load paper. 1 Insert a stack of paper into the multi-purpose tray ➊ (print side facing you and top edge first), then adjust the paper width guides to the width of the paper ➋. 2 Attach the multi-purpose tray cover to prevent dust accumulating inside the machine. Ë Multi-purpose tray cover Ë Paper width guide Attach the handset cradle to the machine. 1 Insert the plugs with pins into the holes on the handset cradle. Plug with pin NOTE • Do not push the pins all the way into the plugs at this stage. 2 Turn the machine so that the left side is facing you. 3 Insert the plugs (with the handset cradle) into the holes on the machine. 4 Carefully push the pins into the plugs as far as they will go. NOTE • If the pins are not pushed fully into the plugs, the handset cradle will not be securely attached to the machine. Connect the handset and telephone line cord. Connect external devices as follows: = Telephone line jack = External device jack = Handset jack • Telephone or answering machine Telephone or answering machine Telephone line Telephone line cord Connect the supplied cord to the L jack. Then connect the other end to the telephone line jack on your wall. External device (optional) Connect the cord of an extension telephone, answering machine or data modem to the t jack. Machine • Telephone and answering machine LINE TEL Telephone line Telephone Answering machine Machine • Built-in computer modem and telephone LINE TEL Telephone Computer Telephone line Machine Handset Place the handset on the cradle. Connect the handset cord to the h jack. NOTE • You must complete all the steps in this document to receive faxes properly. Connect the power cord. When the power cord is plugged into the machine and into the wall outlet, the machine is turned on. The LCD displays PLEASE WAIT, then PUT IN CARTRIDGE. The LCD returns to the standby display when you install the FX-3 S Cartridge. NOTE • The machine does not have a power switch. Install the FX-3 S Cartridge. 1 Lift the latch and open the front cover. 2 Remove the FX-3 S Cartridge from its protective bag. 3 Gently rock the cartridge from side to side a few times to distribute the toner evenly inside it. •Print quality may be poor if the toner is unequally distributed. NOTE • Do not open the drum protective shutter on the cartridge. 4 Place and hold the cartridge on a flat, clean surface, then gently pull the plastic tab straight out to remove the plastic seal. NOTE SIDE VIEW • Use a firm, even pull to remove the seal. PULL WITHIN THIS RANGE TOP VIEW PULL WITHIN THIS RANGE 5 Hold the cartridge by its handle and insert it into the machine as far as it will go, making sure that its side tabs are aligned with the guides inside the machine. NOTE • Always hold the cartridge by its handle. 6 Use both hands to close the front cover. NOTE • The FX-3 S Cartridge is a starter cartridge supplied with the machine. The replacement cartridge is the FX-3 Cartridge separately available from Canon. Set the fax receive mode. 1 Press Function ➊. Clear 01 02 03 04 05 06 07 08 Set 2 Press Receive Mode ➋. 3 Press or ➌ until the mode you want appears in the LCD: Data Delayed Registration Transmission 10 09 Polling 13 ex. You can select from the following: 11 Report 14 Memory Reference Space Receive Mode 12 Hook Start/Copy Stop/Reset Function 15 Fax/Tel Mode: When the handset or the extension telephone is connected to the machine, the machine automatically switches between faxes and voice calls. MANUAL MODE: When the handset or the extension telephone is connected to the machine, you can receive faxes by pressing Start/Copy before hanging up the handset or the extension telephone. ANS.MACHINE MODE: If you want to receive faxes automatically and route voice calls to an answering machine. 4 Press Set ➍ to return to standby mode. FAX ONLY MODE: If you use your machine to receive only faxes. DRPD: To distinguish between fax and voice calls by using Distinctive Ring Pattern Detection. IMPORTANT • Before sending a fax, you MUST register the fax number, your name, and the current date and time in the machine. For details, see p. 2-5 of the Basic Guide. NOTE • For details on setting FAX ONLY MODE or DRPD mode, see p. 8-2 of the User’s Guide included in the CD-ROM. • The DRPD mode requires subscription to a DRPD service. For more information, contact your local telephone company. Install the Printer Driver. (Windows 98/Me/2000/XP) IMPORTANT • DO NOT connect the USB cable before installing the software. NOTE • When installing the software in Windows XP or Windows 2000, log onto the system as a member of the Administrator group. • If the Found New Hardware Wizard appears, click Cancel, and follow this procedure. 1 Insert the CD-ROM into your CD-ROM drive. 2 If AutoRun is enabled, the installation starts automatically. NOTE • If installation does not start automatically, choose Run... from the Start Menu. Type D:\SETUP.EXE (if your CD-ROM drive is drive D:) in the command line and click OK. 3 Click Install Printer Driver to start installation. 4 Follow the on-screen instructions to complete the installation process. During installation, follow these guidelines: • Click Next or Yes to move from one dialog box to the next. • Be sure to wait for Windows to complete each setup step. If you hear the computer working, wait until it is done. • If the Digital Signature Not Found screen appears, click Yes to continue. 5 When prompted, remove the label from the USB port on the back of the machine. Then connect the USB cable to the machine and your computer. USB label USB cable USB port 6 When the system displays messages indicating that the driver for your printer is being installed, proceed as follows: For Windows 98/Me: Wait for the system to complete the installation of the printer driver. For Windows 2000: When the Found New Hardware Wizard appears during the setup, choose the following: • Search for a suitable driver for the printer. (Do not display a list of drivers.) • Search only on the installation disk. (Click CD-ROM drives only, and clear the other options.) For Windows XP: When the Found New Hardware Wizard appears during the setup, choose the following: • Select Install the software automatically (Recommended). 7 When the printer driver is installed, click Finish to close the Found New Hardware Wizard. Then click Yes to continue with the setup. 8 When the setup is finished, if prompted, restart Windows. Part no. FA7-5436 (000) NOTE • Remember to register your machine to ensure product support. The serial number is located on the back of the machine. © 2003 Canon Inc. Canon is a registered trademark of Canon Inc. All other products and brand names are registered trademarks or trademarks of their respective owners. Specifications subject to change without notice. PRINTED IN CHINA