1
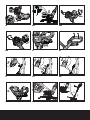
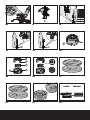
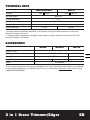
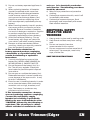
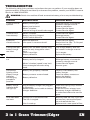
3 in 1 Grass Trimmer/Edger
Coupe gazon/Taille-bordure 3 en 1
3 en 1 Cortadora de cesped/Ribeteadora
HElPliNE NumBER
1-866-354-woRx (9679)
EN
P06
F
P15
ES
P25
WG160 WG160.1 WG175
7
9
10
8
1
2
11
15
3
14
12
4
13
6
5
b
a
A
B1
B2
9
B3
C
D
15
14
E
F1
F2
11
16
G
H1
H2
10
H3
I1
I2
17
J1
J2
K1
K3
L1
18
19
20
22
K2
21
RIGHT
L2
L3
L4
WRONG
1. Rear Handle
2. Battery Pack
3. Telescopic Shaft
4. Pivot Head Locking Knob
5. Safety Guard
6. Flower Guard/Edger Guide
7.Auxiliary Handle
8. Telescopic Shaft Adjustment Trigger
9.Lock Off Button
10.On/Off Switch
11.Auxiliary Handle Locking Lever
12.Edger/Trimming Support Wheels
13.Line Cutter
14. Lower Shaft Coupling
15. Upper Shaft
16. Motor Housing of Trimmer Head
6
17. Line Feed Button (See Fig. K1)
18 Spool Cap Cover (See Fig. K2)
19 Cap Release Latch (See Fig. K2)
20. Spool (See Fig. K2)
21. Cutting Head (See Fig. K2)
22. Eyelet (See Fig. K2)
Not all the accessories illustrated or described are included in standard delivery.
3 in 1 Grass Trimmer/Edger
EN
TECHNICAL DATA
WG160 WG160.1
Voltage
20V
WG175
Max*
No load speed
32V
7600/min
Cutting diameter
12”
Line diameter
0.065”
Charging time
3hr approx.
Machine weight
Max**
5.7lbs
6.2lbs
* Voltage measured without workload. Initial battery voltage reaches maximum of 20 volts.
Nominal voltage is 18 volts.
** Voltage measured without workload. Initial battery voltage reaches maximum of 32 volts.
Nominal voltage is 28.8 volts.
Accessories
WG160
WG160.1
Safety Guard
WG175
1
Charger
1 (WA3732)
1 (WA3740)
Battery Pack
1 (WA3525)
1 (WA3537)
Edger/Trimming Support Wheels
Spool
1
2
1
3 (WA0004)
Only use the appropriate accessories intended for this tool. Accessory information can be found
on the product packaging, at a WORX dealer or on our website at www.worx.com or by calling
1-866-354-WORX(9679).
3 in 1 Grass Trimmer/Edger
EN
7
SAFETY INSTRUCTIONS
WARNING! Some dust created by
power sanding, sawing, grinding,
drilling and other construction activities
contains chemicals known to the state of
California to cause cancer, birth defects or
other reproductive harm. Some examples of
these chemicals are:
• Lead from lead-based paints.
• Crystalline silica from bricks and cement
and other masonry products, and
• Arsenic and chromium from chemicallytreated lumber.
Your risk from these exposures varies,
depending on how often you do this type
of work. To reduce your exposure to these
chemical:
• Work in a well ventilated area.
• Work with approved safety equipment,
such as those dust masks that are
specially designed to filter out microscopic
particles.
8
WARNING: When using cordless
gardening appliances, basic safety
precautions should always be followed to
reduce the risk of fire, electric shock, and
personal injury, including the following:
WARNING: READ ALL
INSTRUCTIONS
FOR ALL APPLIANCES
1) Avoid Dangerous Environment - Don’t use
appliances in damp or wet locations.
2) Don’t Use In Rain.
3) Keep Children Away - All visitors should
be kept at a distance from work area.
4) Dress Properly - Do not wear loose
clothing or jewelry. They can be caught in
moving parts. Wear protective clothing;
use of work gloves, long pants, a long
sleeved shirt and substantial footwear is
recommended when working outdoors.
Wear protective hair covering to contain
long hair.
5) Use Safety Glasses - Always use face or
dust mask if operation is dusty.
6) Use Right Appliance - Do not use
appliance for any job except that for which
it is intended.
7) Avoid Unintentional Starting - Don’t
carry plugged-in appliance with finger
on switch. Be sure switch is off when
plugging in.
8) Don’t Force Appliance - It will do the
job better and with less likelihood of a
risk of injury at the rate for which it was
designed.
9) Don’t overreach - Keep proper footing and
balance at all times.
10) Stay Alert - Watch what you are doing.
Use common sense. Do not operate
appliance when you are tired.
11) Store Idle Appliances Indoors - When
not in use, appliances should be stored
indoors in dry, and high or locked-up place
- out of reach of children.
12) Maintain Appliance With Care - Keep
cutting edge sharp and clean for
best performance and to reduce the
risk of injury. Follow instructions for
lubricating and changing accessories.
Inspect appliance cord periodically,
and if damaged, have it repaired by
an authorized service facility. Inspect
extension cords periodically and replace
if damaged. Keep handles dry, clean, and
free from oil and grease.
13) Check Damaged Parts - Before further use
of the appliance, a guard or other part that
is damaged should be carefully checked
to determine that it will operate properly
and perform its intended function. Check
for alignment of moving parts, binding
of moving parts, breakage of parts,
mounting, and any other condition that
may affect its operation. A guard or other
part that is damaged should be properly
repaired or replaced by an authorized
service center unless indicated elsewhere
in this manual.
INSTRUCTION MANUAL FOR BATTERY –
OPERATED GARDENING APPLIANCES
1. The instruction manual for all batteryoperated gardening appliances shall
contain the following or equivalent
instructions:
1) Do not charge appliance in rain, or in wet
locations.
3 in 1 Grass Trimmer/Edger
EN
2) Do not use battery-operated appliance in
rain.
3) When replacing batteries, all batteries
should be replaced at the same time.
Mixing fresh and discharged batteries
could increase internal cell pressure
and rupture the discharge battery (ies).
(Applies to products employing more
than one separately replaceable primary
battery.)
4) When inserting batteries into this product,
the proper polarity or direction must be
observed. Reverse insertion of batteries
can result in leakage or explosion. (Applies
to product employing more than one
separately replaceable primary battery.)
5) Avoid Unintentional Starting – Do not
insert battery with finger on switch. Be
sure switch is off when inserting battery.
6) Remove or disconnect battery before
servicing, cleaning or removing material
from the gardening appliance.
2. The instruction manual for all
battery-operated products employing
a detachable or separable battery shall
contain the following or equivalent
instructions:
1) Use only the following type and size
battery(ies): WORX model WA3525 (for
WG160, WG160.1). WA3537 (WG175).
2) Do not dispose of the battery (ies) in a
fire. The cell may explode. Check with
local codes for possible special disposal
instructions.
3) Do not open or mutilate the battery (ies).
Released electrolyte is corrosive and may
cause damage to the eyes or skin. It may
be toxic if swallowed.
4) Exercise care in handling batteries in order
not to short the battery with conducting
materials such as rings, bracelets, and
keys. The battery or conductor may
overheat and cause burns.
3. The instruction manual for a batteryoperated gardening appliance employing
a vented wet cell battery supply
intended to be initially or periodically
filled by the user shall include the term
“CAUTION” followed by the following or
equivalent: “The electrolyte is a dilute
sulfuric acid that is harmful to the skin
and eyes. It is electrically conductive
and corrosive. The following procedures
should be observed:
a) Wear full eye protection and protective
clothing.
b) If electrolyte contacts the skin, wash it off
immediately with water.
c) If electrolyte contacts the eyes, flush
thoroughly and immediately with water.
Seek medical attention.
ADDITIONAL SAFETY
RULES FOR GRASS
TRIMMERS
1. Keep guards in place and in working order
2. Keep hands and feet away from cutting
area.
3. Do not use heavier lines than
recommended in this manual.
4. Do not unapproved use line materials of
other types – for example, metal wire,
rope, and the like.
9
SAVE THESE INSTRUCTIONS
3 in 1 Grass Trimmer/Edger
EN
SYMBOLS
ASSEMBLY
Warning
Read the manual
Do not expose to rain or water
Do not burn
40-105ºF
Always charge the battery pack
between temperatures 40°F
(4.5°C)-105°F (40.5.°C).
Do not dispose of batteries, return
exhausted batteries to your local
collection or recycling point
10
BATTERY PACK REMOVAL AND
PREPARATION FOR RECYCLING
To preserve natural resources,
please recycle or dispose of
batteries properly. This product
contains lithium-ion batteries.
Local, state or federal laws may
prohibit disposal of lithiumion batteries in ordinary trash.
Consult your local waste authority
for information regarding
available recycling and/or
disposal options.
Edging
Trimming
1. ASSEMBLY OF THE SAFETY GUARD
(See Fig. A)
Remove a screw from the Guard; attach the
Safety Guard to the trimmer head. Align the
Guard so it slides into the slots located on the
trimmer head. Turn the tool over and secure
the Safety Guard onto the trimmer head with
the screw (a) provided.
2. ASSEMBLY OF THE EDGER/TRIMMING
SUPPORT Wheels (See Fig. B1, B2, B3)
With the tool right side up, slide the Edger/
Trimming Support Wheels (12) assembly onto
the metal plate located on the side of the
Cutting Head (See Fig. B1) or underneath the
Safety Guard (5) (See Fig. B2, B3). Make sure
the grooves of the Edger/Trimming Support
Wheels assembly locks onto the metal plate,
you will hear it click into place.
To remove the wheels assembly, press the
release button (b) on the wheel and pull the
wheels outside.
OPERATION INSTRUCTIONS
Warning! The charger and Battery
Pack are specially designed to work
together so do not attempt to use any other
devices. Never insert or allow foreign metallic
objects into your charger or Battery Pack
connections because of electrical failure and
other hazards that will occur.
1. BEFORE USING YOUR CORDLESS
GRASS TRIMMER
Your Battery Pack is UNCHARGED and it
must be fully charged once before it is used.
The battery charger supplied is matched to the
Li-Ion battery for use with this tool. Do not use
another battery charger.
2. CHARGING YOUR BATTERY PACK
The Li-Ion battery is protected against deep
discharging. When the battery is empty,
the trimmer will switch off by means of a
protective circuit: The trimmer head will stop
rotating.
NOTE: In a warm environment or after heavy
use, the Battery Pack may become too hot to
3 in 1 Grass Trimmer/Edger
EN
permit charging. Allow time for the battery to
cool down before recharging.
3. TO REMOVE OR INSTALL BATTERY
PACK (See Fig. C)
Depress the battery release button to remove
Battery Pack (2) from your trimmer. After
recharging, insert the Battery Pack onto
trimmer’s battery bracket. A simple push and
slight pressure will be sufficient.
4. SAFETY ON/OFF SWITCH (See Fig. D)
The safety switch is locked off to prevent
accidental starting. Depress the Lock Off
Button (9) then depress the On/Off Switch (10)
and release Lock Off Button. Your trimmer is
now on. To switch off, just release the on/off
switch.
Warning! The cutting head
continues to rotate after the
trimmer has been switched off; wait until
it has completely stopped then lay down
the tool.
5. ADJUSTMENT OF THE TELESCOPIC
SHAFT (See Fig. E)
Step one foot on the Safety Guard, then
use one hand to pull up the Telescopic Shaft
Adjustment Trigger (8), adjust the length of
the Telescopic Shaft to the most comfortable
length. Release the Telescopic Shaft.
Adjustment Trigger to lock in position.
6. MAIN HANDLE ROTATION
(See Fig. F1, F2)
First, hold down the lower housing with your
foot and pull upward on the Upper Shaft (15).
Then rotate the Upper Shaft clockwise 90
degrees (See Fig. F1) and release; the Shaft
will be locked in position automatically (See
Fig. F2).
7. ADJUSTMENT OF AUXILIARY HANDLE
Pull up the Auxiliary Handle Locking Lever (11).
Hold the Locking Lever and rotate the Auxiliary
Handle to the most comfortable and balanced
position (See Fig. G).
Release the lever, your Auxiliary Handle has
been locked.
8. ADJUSTMENT OF THE TRIMMER
HEAD ANGLE TO THE SHAFT
(See Fig. H1, H2 & H3)
Warning: Make Sure the Safety
Switch is Locked Off to Prevent
Accidental Starting.
To adjust the Upper Shaft angle or convert the
tool from trimming mode and edging mode,
unlock the Pivot Head Locking Knob by hand,
and using adequate force, pull the trimmer
head into the desired position, then lock the
Pivot Head Locking Knob.
9. Flower Guard/Edger Guide
Pull the Flower Guard/Edger Guide out before
trimming, as shown in Fig. I1.
When edging, pull Flower Guard/Edger Guide
out also, and keep to a side (See Fig. I2).
Before trimming or edging make sure the
flower guard is locked firmly in position.
OPERATION
Warning: Always wear the eye
protection. Never lean over the trimmer
head. Rocks or debris can ricochet or be
thrown into eyes and face and cause
blindness or other serious injury. When
operating unit, check for the following:
Wear eye protection and heavy clothing. Hold
front handle with one hand and Auxiliary
Handle with the other hand. Keep unit below
waist level. Work only from your right to your
left to ensure debris is thrown away from you.
Without bending over, keep line near and
parallel to the ground (perpendicular when
edging) and not crowded into material being
cut.
Warning: Make sure that line is
fed out before operation. Make
sure motor is up to full speed before
trimming or edging.
Warning: Only use 0.065”(1.65mm)
diameter cutting line. Other sizes of line
will not feed properly and will result in
improper cutting head function or can cause
serious injury. Do not use other material such
as wire, string, rope, etc. Wire can break off
during cutting and become a dangerous
projectile that can cause serious injury.
3 in 1 Grass Trimmer/Edger
EN
11
EDGER/TRIMMING SUPPORT WHEELS
There are three optional positions for the
Edger/Trimming Support Wheels to attach
when assisting in Trimming and Edging.
Position 1: Using the guide wheels
when trimming in a forward or
reverse direction (See Fig. J1)
Position the Grass Trimmer in the trimming
position. Underneath the Safety Guard there is
a metal plate that the Edger/Trimming Support
Wheels will attach to. Slide the Support
Wheels horizontally onto the metal plate until
they lock into position so both the wheels are
facing in the forward direction (See Fig. B3).
The wheels should provide support when
you are trimming in the forward or reverse
direction.
12
Position 2: Using the guide wheels
when trimming Side to Side
Position the Grass Trimmer in the trimming
position. Underneath the Safety Guard there is
a metal plate that the Edger/Trimming Support
Wheels will attach to. Slide the Support Wheels
vertically onto the metal plate until it locks
into position (See Fig. B2). The wheels should
provide support when you are trimming in a
horizontal side to side direction (See Fig. J2).
NOTE: you could also use the machine
without the guide wheels on guard when
trimming.
Position 3: Using the guide wheels
when edging (See Fig. i2)
Warning: Make Sure the Safety
Switch is Locked Off to Prevent
Accidental Starting.
Change the tool from trimming into the edging
mode, the Edger /Trimming Support Wheels
(12) will attach on the side the trimmer head
as shown in Fig. B1, rotate the main handle as
described in ‘’MAIN HANDLE ROTATION’’,
then unlock the Pivot Head Locking Knob, and
using adequate force, pull the trimmer head
into the desired position. Make sure to adjust
the trimmer head angle to be in the lowest
horizontal setting. Finally, lock the Pivot Head
Locking Knob and position the wheel on the
ground for the edging mode. While edging,
keep the Flower Guard/Edger Guide aligned
with the sidewalk edge, this will assist to
edge in a straight path. Only the tip of the line
will make contact with area being worked
on. Do not force the line. The edging wheels
help protect the unit and keep the unit from
contacting the ground. Take extra caution
while edging, as objects can be thrown from
the trimmer line.
Automatic line feed system
When initially switching on the trimmer, a
small length of line is fed out. Each time the
tool is started from rest it will advance about
0.25 inches of trimmer line.
A ‘clattering’ noise will be heard when
the lines hit the Line Cutter. DO NOT BE
ALARMED this is quite normal. After about
5 seconds the line will be cut to the correct
length and the noise will reduce as the motor
gains full speed.
If the noise of the line being cut can’t be heard,
more line will need to be fed out.
To feed more line, it is first necessary to allow
the trimmer to stop completely; it must come
to a complete rest, then restart, allowing the
motor to reach full speed.
Repeat above until you hear the line hitting
against the Line Cutter.
To manually feed the line
(See Fig. K1)
Turn off the trimmer and remove the battery.
If required, line can be fed out manually.
To operate, press and release manual Line
Feed Button (17), while gently pulling out the
line until it is long enough to reach the Line
Cutter.
If the line extends past the Line Cutter, too
much line has been fed out.
If too much line is fed out, remove the Spool
Cap and turn Spool counter-clockwise until the
line is at the desired length.
To remove the Spool Cap Cover
(See Fig. K2)
Press and hold in the two Cap Release Latches
(19) (See Fig. K2).
Pull the Spool Cap Cover (18) away from the
3 in 1 Grass Trimmer/Edger
EN
Cutting Head (21). Keep the Spool Cap Cover
and the inside of the Cutting Head clean from
debris. To replace the Spool Cap Cover, press
it firmly onto the Spool Holder. Ensure that
it is correctly connected by trying to remove
it without depressing the two Cap Release
Latches.
user serviceable parts in your power tool.
Never use water or chemical cleaners to
clean your power tool. Wipe clean with a dry
cloth. Always store your power tool in a dry
room temperature location. Keep the motor
ventilation slots clean. Keep all working
controls free of dust.
Replace the trimmer line and
Spool (See Fig. K3).
Turn off the trimmer and remove the battery.
Remove Spool Cap Cover.
For your convenience it is recommended you
buy replacement spools with the trimmer line
preinstalled. You can order your Free Spools
for Life WORX spools at www.worx.com or by
calling 1-866-354-WORX(9679).
Remove the old Spool from Spool Holder.
Clear any broken line or cutting debris from
the spool area. Pull the line from the new
replacement Spool through the eyelet of the
Spool Holder. Place new Spool into the holder
with the cut out areas of the Spool facing
inward or down. When installed into the
Spool Holder, the smooth side of the
Spool should be visible.
Release line from cleat on the Spool.
Refit the Spool Cap Cover.
13
To Manually Wind line
(See Fig. L1-L4)
Take approximately 10ft (3m) of line. Insert
5/8”(15mm) of line into the Spool holes and
wind line in the direction of the arrows on the
top of the Spool.
Leave approximately 4” (100mm) of line
unwound and place into the cleat.
Ensure that the line is neatly coiled on
the Spool. Failure to do so will impair the
efficiency of the automatic line feed.
Then fit the Spool as described above in “Rep
lace the trimmer line and Spool”
MAINTENANCE
After use, disconnect the battery from the tool
and check for damage.
Your power tool requires no additional
lubrication or maintenance. There are no
3 in 1 Grass Trimmer/Edger
EN
Troubleshooting
The following table gives problems and actions that you can perform if your machine does not
operate correctly. If these do not identify and correct the problem, contact your WORX Customer
Service at 1-866-354-WORX.
Warning: Switch the machine off and remove the battery prior to any troubleshooting.
Problems
Possible Causes
Corrective Action
Trimmer fails to
operate.
Battery discharged.
Battery too hot/cold.
Motor is broken.
Internal wiring of machine damaged.
Recharge battery; also see the
content in charger manual.
Allow to cool/warm.
Contact Service Agent.
Contact Service Agent.
Trimmer runs
intermittently.
Motor is broken.
Battery not fully charged.
On/Off switch defective.
Contact Service Agent.
Recharge battery.
Contact Service Agent.
Excessive
vibrations/noise.
Machine defective.
Line spool is not wound well.
Contact Service Agent.
Rewind the line. See ’’ To fit spool
and line assembly.’’
Cutting time per
battery charge
too short.
Battery has not been used for long
period or only charged for short
term.
Grass is too high.
Battery defective.
Fully charge battery; also see
the content in charger manual.
Line broken.
Battery not fully charged.
Replace the line.
Recharge battery; also see the
content in charger manual.
Contact Service Agent.
Remove grass.
14
Machine does not
cut.
Motor is broken (speed is too low).
Grass entangled around cutting
head.
Cut in stages.
Replace the battery.
Continuous
lighting of the
battery charge
indicator.
No charging
procedure
possible.
Battery not (properly) inserted.
Battery charge
indicator does
not light up.
Plug of battery charger not plugged
in (properly).
Socket outlet, mains cable or battery
charger defective.
Insert mains plug (fully) into the
socket outlet.
Check the mains voltage; have
the battery charger checked by
an authorized after-sales service
agent.
Auto feed does
not work
Cutting line is not wound well.
The line is tangled.
Manually feed the line, if still can
not feed out, remove the Spool
out and rewind the line.
Replace with a new spool of line.
Battery contacts contaminated.
Battery defective.
Line is used up.
Properly insert battery into
battery charger.
Clean the battery contacts or
replace the battery.
Replace the battery.
3 in 1 Grass Trimmer/Edger
EN