1
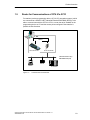
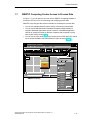
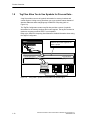
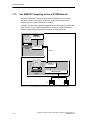
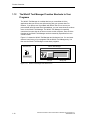
Important Information, Contents
SIMATIC
Product Overview
Installing WinAC Slot 41x
Windows Automation Center
WinAC Slot 412/WinAC Slot 416
Version 3.1
Getting Started
Using the Tool Manager
Appendices
Overview
This manual is part of the documentation package with order no:
6ES7 673-6CC01-8BA0
A5E00065531-03
06/2000
Index
1
2
3
4
Safety Guidelines
This manual contains notices which you should observe to ensure your own personal safety, as well as to
protect the product and connected equipment. These notices are highlighted in the manual by a warning
triangle and are marked as follows according to the level of danger:
!
!
!
Danger
indicates that death, severe personal injury or substantial property damage will result if proper precautions are not taken.
Warning
indicates that death, severe personal injury or substantial property damage can result if proper precautions are not taken.
Caution
indicates that minor personal injury or property damage can result if proper precautions are not taken.
Note
draws your attention to particularly important information on the product, handling the product, or to a
particular part of the documentation.
Qualified Personnel
Only qualified personnel should be allowed to install and work on this equipment. Qualified persons
are defined as persons who are authorized to commission, to ground, and to tag circuits, equipment,
and systems in accordance with established safety practices and standards.
Correct Usage
Note the following:
!
Warning
This device and its components may only be used for the applications described in the catalog or the
technical descriptions, and only in connection with devices or components from other manufacturers
which have been approved or recommended by Siemens.
This product can only function correctly and safely if it is transported, stored, set up, and installed correctly, and operated and maintained as recommended.
Trademarks
WinAC, SIMATIC, SIMATIC HMI and SIMATIC NET are registered trademarks of SIEMENS AG.
Some of other designations used in these documents are also registered trademarks; the owner’s rights
may be violated if they are used by third parties for their own purposes.
Copyright Siemens AG 1998-2000 All rights reserved
Disclaimer of Liability
The reproduction, transmission or use of this document or its contents is not
permitted without express written authority. Offenders will be liable for
damages. All rights, including rights created by patent grant or registration of
a utility model or design, are reserved.
We have checked the contents of this manual for agreement with the hardware and software described. Since deviations cannot be precluded entirely,
we cannot guarantee full agreement. However, the data in this manual are
reviewed regularly and any necessary corrections included in subsequent
editions. Suggestions for improvement are welcomed.
Siemens AG
Automation and Drives (A&D)
Industrial Automation Systems (AS)
Postfach 4848, D- 90327 Nürnberg
Index-2
Siemens Aktiengesellschaft
Siemens AG 1998-2000
TechnicalCenter
data subject
to change.
Windows Automation
WinAC
Slot 412/WinAC Slot 416 Version 3.1
A5E00065531-03
A5E00065531
Important Information
Purpose of the manual
The software and hardware components of the Windows Automation Center
(WinAC) allow you the combined solution consisting of data processing, control,
visualization and communications on your PC (PC-based control). The following
versions of the WinAC product are available:
WinAC Slot 412
WinAC Slot 416
This manual will familiarize you with the individual components of the WinAC Slot 412
and WinAC Slot 416 product versions by way of an overview.
Windows Automation Center WinAC Slot 412/WinAC Slot 416 Version 3.1
A5E00065531-03
iii
Important Information
Package as supplied
This package has the Order Number 6ES7 673-6CC01-8BA0 and consists of three
manuals and a list of instructions containing the following:
Overview of the Windows Automation Center WinAC Slot 412/WinAC Slot 416
Overview of the components of WinAC
Instructions for installing the software
Getting started
Manual “WinAC Controlling with CPU 412-2 PCI/CPU 416-2 PCI; Set-Up, CPU Data”
Installing and wiring CPUs 41x-2 PCI and the PS extension board
Commissioning CPUs 41x-2 PCI and the PS extension board
Description of control panel, router, time synchronization
Technical specifications
Compatibility with CPU 416-2 DP ISA/CPU 416-2 DP ISA Lite
Manual “SIMATIC Computing”
Function and running of the SIMATIC Computing software
Description of the controls
S7-400 instruction list
Instruction set for all CPUs
Brief description of instructions and execution times
List of OBs, system events, SSL IDs, SFCs/SFBs
Audience
This manual is intended for engineers, programmers, and maintenance personnel
who have a general knowledge of programmable logic controllers.
Scope and usage of the manual
The functions and running of the software for WinAC Slot 41x is described in the
form of an overview. It contains:
iv
overviews of the components contained in the WinAC Slot 41x package
instructions for installing the software for WinAC Slot 41x
Windows Automation Center WinAC Slot 412/WinAC Slot 416 Version 3.1
A5E00065531-03
Important Information
Applicability
The manual contains information that is valid at the time of the manual being
published. We reserve the right to enclose further information in the form of a
Product Information bulletin.
Additional support
Should you have any questions on using the products described in the manual to
which you cannot find answers in the manual, please get in touch with your contact
at your local Siemens agency or office.
If you have any questions or suggestions concerning this manual, please fill in the
form at the end of this manual and return it to the specified address. Please feel
free to enter your personal assessment of the manual in the form provided.
We offer a range of courses to help get you started with the SIMATIC S7
automation system. Please contact your local training center or the central training
center in Nuremberg, D-90327 Germany (tel. +49 (911) 895-3200).
Constantly updated information
You can obtain up-to-the-minute information on SIMATIC products:
On the Internet at http://www.ad.siemens.de/
By dialing the fax polling number +49-8765-93 00-55 00
In addition, the SIMATIC Customer Support provides up-to-date information and
downloads for users of SIMATIC products:
On the Internet at http://www.ad.siemens.de/simatic-cs
Via the SIMATIC Customer Support mailbox at the following number:
+49 (911) 895-7100
To access the mailbox, use a modem with up to V.34 (28.8 kbps), and set the
parameters as follows: 8, N, 1, ANSI. Alternatively, access it using ISDN
(x.75, 64 kbps).
You can reach SIMATIC Customer Support by telephone at +49 (911) 895-7000
and by fax at +49 (911) 895-7002. Queries can also be addressed to us by Internet
mail or by mail to the mailbox specified above.
Windows Automation Center WinAC Slot 412/WinAC Slot 416 Version 3.1
A5E00065531-03
v
Important Information
vi
Windows Automation Center WinAC Slot 412/WinAC Slot 416 Version 3.1
A5E00065531-03
Contents
Important Information
1
Product Overview
1.1
What Are WinAC Slot 412 and WinAC Slot 416? . . . . . . . . . . . . . . . . . . . .
1-2
1.2
CPU 41x-2 PCI Is for Controlling Your Process . . . . . . . . . . . . . . . . . . . . . .
1-5
1.3
The PS Extension Board Makes You Independent of a PC . . . . . . . . . . . .
1-6
1.4
Communication Options with CPU 41x-2 PCI . . . . . . . . . . . . . . . . . . . . . . .
1-7
1.5
Router for Communications of CPU 41x-2 PCI . . . . . . . . . . . . . . . . . . . . . .
1-9
1.6
Time Synchronization (PLCTimeSync) . . . . . . . . . . . . . . . . . . . . . . . . . . . . .
1-10
1.7
SIMATIC Computing Creates Access to Process Data . . . . . . . . . . . . . . . .
1-11
1.8
Tag Files Allow You to Use Symbols for Process Data... . . . . . . . . . . . . . .
1-12
1.9
Tag Files Allow You to Access Multiple Control Engines... . . . . . . . . . . . . .
1-13
1.10
Use SIMATIC Computing across a DCOM Network . . . . . . . . . . . . . . . . . .
1-14
1.11
Using OPC to Connect Third-Party Applications to
SIMATIC Computing . . . . . . . . . . . . . . . . . . . . . . . . . . . . . . . . . . . . . . . . . . . . .
1-15
The WinAC Tool Manager Provides Shortcuts to Your Programs . . . . . . .
1-16
1.12
2
3
Installing WinAC Slot 41x
2.1
Overview of the Installation . . . . . . . . . . . . . . . . . . . . . . . . . . . . . . . . . . . . . . .
2-1
2.2
Installing and Uninstalling the WinAC Slot 41x Software . . . . . . . . . . . . . .
2-3
Getting Started
3.1
3.1.1
3.1.2
3.1.3
3.1.4
4
A
The Task: Communications Via the Router . . . . . . . . . . . . . . . . . . . . . . . . . .
Creating a Project . . . . . . . . . . . . . . . . . . . . . . . . . . . . . . . . . . . . . . . . . . . . . . .
Configuring the Access Point . . . . . . . . . . . . . . . . . . . . . . . . . . . . . . . . . . . . .
Starting the Router . . . . . . . . . . . . . . . . . . . . . . . . . . . . . . . . . . . . . . . . . . . . . .
Communications . . . . . . . . . . . . . . . . . . . . . . . . . . . . . . . . . . . . . . . . . . . . . . . .
3-2
3-3
3-12
3-14
3-14
Using the Tool Manager
4.1
Creating a Toolbar for Easy Access to Your Programs . . . . . . . . . . . . . . . .
4-2
4.2
Using the WinAC Tool Manager without a Mouse . . . . . . . . . . . . . . . . . . . .
4-4
4.3
Changing the Language . . . . . . . . . . . . . . . . . . . . . . . . . . . . . . . . . . . . . . . . . .
4-6
Distributed Component Object Model (DCOM)
A.1
Using DCOM to Expand the Capabilities of WinAC . . . . . . . . . . . . . . . . . . .
A-2
A.2
Connecting to a Specific Control Engine Using DCOM . . . . . . . . . . . . . . . .
A-4
Windows Automation Center WinAC Slot 412/WinAC Slot 416 Version 3.1
A5E00065531-03
vii
Contents
B
OLE for Process Control (OPC)
B.1
Using OPC with SIMATIC Computing . . . . . . . . . . . . . . . . . . . . . . . . . . . . . .
B-2
Control Panel . . . . . . . . . . . . . . . . . . . . . . . . . . . . . . . . . . . . . . . . . . . . . . . . . . .
Using the CPU 41x-2 PCI in WinAC Slot 41x . . . . . . . . . . . . . . . . . . . . . . . .
PS Extension Board . . . . . . . . . . . . . . . . . . . . . . . . . . . . . . . . . . . . . . . . . . . . .
Communication Options with the CPU 41x-2 PCI . . . . . . . . . . . . . . . . . . . .
Communication via the Router . . . . . . . . . . . . . . . . . . . . . . . . . . . . . . . . . . . .
Clock synchronization . . . . . . . . . . . . . . . . . . . . . . . . . . . . . . . . . . . . . . . . . . . .
Accessing the Process Data with SIMATIC Computing . . . . . . . . . . . . . . .
Using STEP 7 Symbols to Access Data in the Control Engine . . . . . . . . .
Using a Tag File to Access Data from Several Control Engines . . . . . . . .
Connecting WinAC on Several Computers across a DCOM Network . . .
Using OPC to Connect Third-Party Applications to
SIMATIC Computing . . . . . . . . . . . . . . . . . . . . . . . . . . . . . . . . . . . . . . . . . . . . .
WinAC Tool Manager and Shortcut Icon . . . . . . . . . . . . . . . . . . . . . . . . . . . .
Installing the Components of WinAC Slot 41x . . . . . . . . . . . . . . . . . . . . . . .
Communication via the Router . . . . . . . . . . . . . . . . . . . . . . . . . . . . . . . . . . . .
Creating a Project . . . . . . . . . . . . . . . . . . . . . . . . . . . . . . . . . . . . . . . . . . . . . . .
Selecting a Mounting Rack . . . . . . . . . . . . . . . . . . . . . . . . . . . . . . . . . . . . . . .
Assigning a CP . . . . . . . . . . . . . . . . . . . . . . . . . . . . . . . . . . . . . . . . . . . . . . . . .
Configuring the Hardware of the S7-400 Station . . . . . . . . . . . . . . . . . . . . .
MPI Connection . . . . . . . . . . . . . . . . . . . . . . . . . . . . . . . . . . . . . . . . . . . . . . . . .
Bus Connection . . . . . . . . . . . . . . . . . . . . . . . . . . . . . . . . . . . . . . . . . . . . . . . . .
Creating a Connection . . . . . . . . . . . . . . . . . . . . . . . . . . . . . . . . . . . . . . . . . . .
Connection Properties . . . . . . . . . . . . . . . . . . . . . . . . . . . . . . . . . . . . . . . . . . .
Setting the PG/PC Interface . . . . . . . . . . . . . . . . . . . . . . . . . . . . . . . . . . . . . .
Setting the CP Properties . . . . . . . . . . . . . . . . . . . . . . . . . . . . . . . . . . . . . . . .
WinAC Tool Manager . . . . . . . . . . . . . . . . . . . . . . . . . . . . . . . . . . . . . . . . . . . .
Inserting Icons into the WinAC Tool Manager . . . . . . . . . . . . . . . . . . . . . . . .
Changing the Language for WinAC . . . . . . . . . . . . . . . . . . . . . . . . . . . . . . . .
Using WinAC Components with DCOM on a Standalone Computer . . . .
Using WinAC on Several Computers with DCOM . . . . . . . . . . . . . . . . . . . .
Connecting to a Specific Control Engine over DCOM . . . . . . . . . . . . . . . . .
Applications Working with Many OPC Servers . . . . . . . . . . . . . . . . . . . . . . .
Using the WinAC OPC Server to Access Your Process Data . . . . . . . . . .
1-4
1-5
1-6
1-7
1-9
1-10
1-11
1-12
1-13
1-14
Keyboard Operations for the WinAC Tool Manager . . . . . . . . . . . . . . . . . .
4-5
Index
Figures
1-1
1-2
1-3
1-4
1-5
1-6
1-7
1-8
1-9
1-10
1-11
1-12
2-1
3-1
3-2
3-3
3-4
3-5
3-6
3-7
3-8
3-9
3-10
3-11
4-1
4-2
4-3
A-1
A-2
A-3
B-1
B-2
1-15
1-16
2-2
3-2
3-3
3-4
3-5
3-6
3-7
3-9
3-10
3-11
3-12
3-13
4-2
4-3
4-6
A-2
A-3
A-4
B-2
B-2
Tables
4-1
viii
Windows Automation Center WinAC Slot 412/WinAC Slot 416 Version 3.1
A5E00065531-03
Product Overview
1
Overview
The WinAC Slot 41x package consists of the following components:
the Slot PLC “CPU 412-2 PCI” or “CPU 416-2 PCI”, two CPUs from the range
of products for the S7-400 for PC-based applications.
the optional PS extension board (PS: power supply; power supply module) for
PC-independent power supply.
the control panel that displays the controls of the CPU 41x-2 PCI on a screen.
the router for the communications of the CPU 41x-2 PCI via a
SIMATIC NET CP (Industrial Ethernet or PROFIBUS) or a network card.
the time synchronization for synchronization of the CPU 41x-2 PCI via a
SIMATIC NET CP (Industrial Ethernet or PROFIBUS).
the SIMATIC Computing software. The SIMATIC Computing software provides
ActiveX controls, which you can use specifically to visualize your process. In
SIMATIC Computing, you can use third-party ActiveX controls in addition to S7
Controls to monitor and modify process data.
Furthermore, SIMATIC Computing has an OPC server (OPC = OLE for
Process Control) which other OPC applications use to access the data in the
controlled device.
WinAC Tool Manager for working with your applications. It is a toolbar that lets
you arrange all the applications you want to use while working with your
process data.
Windows Automation Center WinAC Slot 412/WinAC Slot 416 Version 3.1
A5E00065531-03
1-1
Product Overview
In this chapter
Section
1.1
Contents
Page
1.1
What Are WinAC Slot 412 and WinAC Slot 416?
1-2
1.2
CPU 41x-2 PCI Is for Controlling Your Process
1-5
1.3
The PS Extension Board Makes You Independent of a PC
1-6
1.4
Communication Options with CPU 41x-2 PCI
1-7
1.5
Router for Communications of CPU 41x-2 PCI
1-9
1.6
Time Synchronization (PLCTimeSync)
1-10
1.7
SIMATIC Computing Creates Access to Process Data
1-11
1.8
Tag Files Allow You To Use Symbols for Process Data
1-12
1.9
Tag Files Allow You to Access Multiple Control Engines...
1-13
1.10
Use SIMATIC Computing across a DCOM Network
1-14
1.11
Using OPC to Connect Third-Party Applications to SIMATIC
Computing
1-15
1.12
Tool Manager Provides Shortcuts to Your Programs
1-16
What Are WinAC Slot 412 and WinAC Slot 416?
PC-based control with WinAC Slot 412/WinAC Slot 416
In the top range of the PLC applications, the number of PC tasks such as data
processing and visualization is increasing. The use of PC-based control (= use of a
PC with an integrated PLC) is then frequently the solution to be preferred
compared to the use of a standard PLC with a PC link for communications.
PC-based control is the combination of a PLC and data processing on a PC with
WinAC Slot 412/WinAC Slot 416.
WinAC Slot 412/WinAC Slot 416 combines the automation tasks of open-loop and
closed-loop control, data processing, communications and visualization on a PC.
WinAC Slot 412/WinAC Slot 416 is based on the original Windows NT and uses
standard interfaces for integration into the Office world. WinAC stands for
Windows Automation Center.
1-2
Windows Automation Center WinAC Slot 412/WinAC Slot 416 Version 3.1
A5E00065531-03
Product Overview
WinAC Controlling with CPU 41x-2 PCI
WinAC Controlling is the control component with WinAC Slot 412/ WinAC Slot 416.
WinAC Controlling performs the tasks of a conventional programmed logic
controller and is completely integrated in the PC.
WinAC Controlling consists optionally of the CPU 412-2 PCI or CPU 416-2 PCI.
These CPUs exhibit typical PLC features:
warm restart (restart) or precise complete restart as commanded (with
PS extension board)
deterministic behavior with real-time response times
real-time clock
data retentivity using battery backup (with PS extension board)
external load memory for saving the PLC program independently of the PC hard
disk
integrated MPI for connecting a programmer for servicing purposes, for
programming or for networking with other stations
integrated PROFIBUS-DP interface for connecting the I/O
Furthermore, there are interfaces to PC applications.
Windows Automation Center WinAC Slot 412/WinAC Slot 416 Version 3.1
A5E00065531-03
1-3
Product Overview
Operation
The CPU 41x-2 PCI is operated from control panel that is displayed on the PC
screen. The panel is modeled on the front panel of an S7 CPU and makes
available the functions that it features.
Access to the PLC from the control panel can be protected by a password so that
only authorized persons can modify the settings.
Sets the operating mode
of the CPU 41x-2 PCI.
Shows the status of the
CPU 41x-2 PCI.
Resets the memory areas
Figure 1-1
Control Panel
Programming
Configuration and programming of the CPU 41x-2 PCI is accomplished in a
manner similar to that for the SIMATIC S7 with STEP 7. For these tasks, you can
use the programming languages LAD, CSF, STL, S7-SCL and all graphics
programming languages such as S7-GRAPH, S7-HiGRAPH and CFC.
1-4
Windows Automation Center WinAC Slot 412/WinAC Slot 416 Version 3.1
A5E00065531-03
Product Overview
1.2
CPU 41x-2 PCI Is for Controlling Your Process
CPU 41x-2 PCI features an effective hardware solution for your automation
projects (refer to Figure 1-2). The I/O is connected via PROFIBUS-DP.
CPU 41x-2 PCI
Distributed I/O
Figure 1-2
Using the CPU 41x-2 PCI in WinAC Slot 41x
Windows Automation Center WinAC Slot 412/WinAC Slot 416 Version 3.1
A5E00065531-03
1-5
Product Overview
1.3
The PS Extension Board Makes You Independent of a PC
The PS extension board (PS: power supply) is used to supply voltage to the
CPU 41x-2 PCI independently of the PC power supply unit. In this way it is
possible to operate the CPU 41x-2 PCI even when the PC has been powered
down.
By connecting the backup battery, warm restart (restart) and complete restart are
possible for the CPU 41x-2 PCI.
In addition, you can operate the fan in the PC with the PS extension board.
Figure 1-3
1-6
PS Extension Board
Windows Automation Center WinAC Slot 412/WinAC Slot 416 Version 3.1
A5E00065531-03
Product Overview
1.4
Communication Options with CPU 41x-2 PCI
PC
WinCC
Windows
application
STEP 7
CPU 41x-2 PCI
MPI/DP*
DP
Communication CP
Router/
Clock synchronization
Industrial Ethernet or
PROFIBUS subnet
Industrial Ethernet / PROFIBUS subnet
MPI PROFIBUS-DP
CPU 41x-2 PCI
PC
PG/PC
Router/time synchronization
CP
S7-300
PROFIBUS-DP
OP/OS
ET 200S
PROFIBUS-DP
OP/OS
ET 200M
MPI subnet
MPI PROFIBUS-DP
CPU 41x-2 PCI
PG/PC
PC
S7-400
*: transfer via STEP 7/Configure Hardware
Figure 1-4
Communication Options with the CPU 41x-2 PCI
Figure 1-4 shows the communication options open to you with the CPU 41x-2 PCI.
The CPU 41x-2 PCI has one PROFIBUS-DP interface and one
MPI/PROFIBUS-DP interface.
Windows Automation Center WinAC Slot 412/WinAC Slot 416 Version 3.1
A5E00065531-03
1-7
Product Overview
If you wish to perform communications via Industrial Ethernet or PROFIBUS
subnet, you must install an additional communication processor (CP) on your PC.
The communication options to other nodes are as follows:
1. Connection to PROFIBUS-DP through the integrated interface.
2. Connection to MPI or PROFIBUS-DP through the second integrated interface.
3. Connection to PC through the PCI interface.
4. Connection to another network such as Industrial Ethernet/PROFIBUS via a
communication processor (CP).
Note
With SIMATIC Manager (STEP 7), which is installed on the same PC as the
CPU 41x-2 PCI, you cannot simultaneously operate the CPU 41x-2 PCI and the
CPUs connected via Industrial Ethernet or PROFIBUS subnet.
You have to assign parameters to the corresponding S7ONLINE access points
(STEP 7) using “Set PG/PC interface”.
1-8
Windows Automation Center WinAC Slot 412/WinAC Slot 416 Version 3.1
A5E00065531-03
Product Overview
1.5
Router for Communications of CPU 41x-2 PCI
For stations (such as programming device, OP, OS, S7 automation system), which
are connected to a SIMATIC NET (Industrial Ethernet/PROFIBUS (IE/PB)), to be
able to communicate with the CPU 41x-2 PCI, a router has to be installed on the
programming device or PC and the access points configured. Data transfer is
possible in both directions.
PC
Router
CPU 41x-2 PCI
IE CP or PB CP
Industrial Ethernet (IE)
PROFIBUS-DP (PB)
OP/OS
PG/PC
S7 Station
Figure 1-5
Communication via the Router
Windows Automation Center WinAC Slot 412/WinAC Slot 416 Version 3.1
A5E00065531-03
1-9
Product Overview
1.6
Time Synchronization (PLCTimeSync)
The CPU 41x-2 PCI can be synchronized, together with other nodes (for example,
S7 components) with a central time-of-day transmitter.
The time synchronization service in the PC supplies the CPU at intervals with the
current date and time. The time-of-day transmitter furnishes the time of day at
periodic intervals on the Industrial Ethernet or PROFIBUS (IE/PB). Only the ISO
protocol is supported by Industrial Ethernet.
PC
Clock synchronization
CPU 41x-2 PCI
IE CP or PB CP
Industrial Ethernet (IE)
PROFIBUS-DP (PB)
Time-of-day
transmitter
OP/OS
PG/PC
S7 station
Figure 1-6
Clock synchronization
Note
The time synchronization facility is only provided for certain communication
processors (CPs). You will find information on this in the Product Information
document.
1-10
Windows Automation Center WinAC Slot 412/WinAC Slot 416 Version 3.1
A5E00065531-03
Product Overview
1.7
SIMATIC Computing Creates Access to Process Data
In Figure 1-7, you can see how you can use the SIMATIC Computing software to
access the CPU 41x-2 PCI for monitoring and modifying process data.
SIMATIC Computing provides several methods for accessing the process data:
You can use standard ActiveX controls (OCX) to access the process data.
You can use DCOM (Microsoft’s Distributed Component Object Model) to
integrate distributed applications across a network. A distributed application
consists of several processes or different computers that cooperate to jointly
solve a task (refer to section 1.10).
You can use an OPC (OLE for Process Control) server which other OPC clients
use to access the data in the controlled device (refer to section 1.11).
S7SoftContainer - [S7Soft1]
Help
File Edit View Mode Options Window
ÎÎÎÎÎÎÎÎÎÎÎÎÎÎÎÎÎÎÎÎ
ÎÎÎÎÎÎÎÎÎÎÎÎÎÎÎÎÎÎÎÎ
ÎÎÎÎÎÎÎÎÎÎÎÎÎÎÎÎÎÎÎÎ
ÎÎÎÎÎÎÎÎÎÎÎÎÎÎÎÎÎÎÎÎ
ÎÎÎÎÎÎÎÎÎÎÎÎÎÎÎÎÎÎÎÎ
ÎÎÎÎÎÎÎÎÎÎÎÎÎÎÎÎÎÎÎÎ
ÎÎÎÎÎÎÎÎÎÎÎÎÎÎÎÎÎÎÎÎ
ÎÎÎÎÎÎÎÎÎÎÎÎÎÎÎÎÎÎÎÎ
S7Soft1
OFF
CPU 416-2 PCI
File CPU Help
ON
PS
ON
BATF
RUN-P
CPU
Ready
Design
SIMATIC Computing
INTF
RUN
EXTF
STOP
BUSF1
BUSF2
FRCE
RUN
STOP
Figure 1-7
MRES
Accessing the Process Data with SIMATIC Computing
Windows Automation Center WinAC Slot 412/WinAC Slot 416 Version 3.1
A5E00065531-03
1-11
Product Overview
1.8
Tag Files Allow You to Use Symbols for Process Data...
A tag file provides a source of symbolic information for memory locations and
control engines. Linking to a tag file allows you to use symbolic names instead of
absolute addresses when assigning tags in SIMATIC Computing (refer to
Figure 1-8).
The TagFile Configurator creates a tag file that provides a source of symbolic
information for the memory locations and control engines. The tag file can then be
used on a computer on which STEP 7 is not installed.
Refer to the SIMATIC Computing User Manual for detailed information about using
the TagFile Configurator.
STEP 7
The tag file includes the symbol
table and the control engine for the
STEP 7 project
SIMATIC Projects
Master_Mixer
@PC_1
WinAC
Mixer
Tag File
Control Engine Symbol
PC_1_WinAC
STEP 7 Path
Computer Name
WinAC\@PC_1\WinAC\Mixer
@PC_1
CPU
41x-2 PCI
Distributed
I/O
Figure 1-8
1-12
Using STEP 7 Symbols to Access Data in the Control Engine
Windows Automation Center WinAC Slot 412/WinAC Slot 416 Version 3.1
A5E00065531-03
Product Overview
1.9
Tag Files Allow You to Access Multiple Control Engines...
Multiple STEP 7 programs can be mapped into a single tag file, with each program
providing access to a different computer and control engine. This allows SIMATIC
Computing to access data from different computers and control engines
simultaneously.
As shown in Figure 1-9, you can connect your program to control engines residing
on several different computers. You use the TagFile Configurator to insert more
than one control engine into a tag file. Refer to the SIMATIC Computing User
Manual for detailed information about using the TagFile Configurator.
STEP 7
STEP 7
SIMATIC Projects
SIMATIC Projects
Master_Mixer
@PC_2
WinAC
Mixer
My_Drain
@PC_3
WinAC
Drain
Tag File
Control Engine Symbol
STEP 7 Path
Computer Name
PC_2_WinAC
WinAC\@PC_2\WinAC\Mixer
@PC_2
PC_3_WinAC
WinAC\@PC_3\WinAC\Mixer
@PC_3
PC 1
Figure 1-9
CPU 41x-2 PCI
PC 2
CPU 41x-2 PCI
PC 3
SIMATIC
Computing
Using a Tag File to Access Data from Several Control Engines
Windows Automation Center WinAC Slot 412/WinAC Slot 416 Version 3.1
A5E00065531-03
1-13
Product Overview
1.10
Use SIMATIC Computing across a DCOM Network
Microsoft’s Distributed Component Object Model (DCOM) is a set of program
interfaces in which client program objects can request services from server
program objects on other computers in a network.
In WinAC, you can connect distributed applications across a network using DCOM
(refer to Figure 1-10). A distributed application consists of multiple processes or
different computers that cooperate to accomplish a single task jointly.
SIMATIC
Computing
PC 1
Client
DCOM
components
Network
PC 2
DCOM
components
CPU 41x-2 PCI
Server
I/O
Figure 1-10
1-14
Connecting WinAC on Several Computers across a DCOM Network
Windows Automation Center WinAC Slot 412/WinAC Slot 416 Version 3.1
A5E00065531-03
Product Overview
1.11
Using OPC to Connect Third-Party Applications to
SIMATIC Computing
OLE for Process Control (OPC) provides a standard mechanism for
communicating with numerous data sources. It is immaterial in this case whether
these sources are machines in your factory or a database in your control room.
OPC is based on the OLE/COM technology from Microsoft. For more information
about OPC, refer to the OPC specification OLE for Process Control Data Access
Standard, version 2.0 from the OPC Foundation.
As shown in Figure 1-11, you can use the OPC server provided with the SIMATIC
Computing software to communicate with the control engine and provide access to
the process data. SIMATIC Computing provides an OPC server that allows any
OPC client application to access data in the control engine. SIMATIC Computing
does not provide any OPC client application.
The OPC server is called: OPCServer.WinAC
SIMATIC Computing allows you to use OPC for connecting either to a single
control engine or to several control engines. You can also connect to the control
engine across a network, such as a local area network (LAN).
Third-party application
(OPC client)
OPC
SIMATIC Computing
WinAC OPC server:
OPCServer.WinAC
MPI server
CPU 416-2 PCI*
WinLC*
I/O
*:
I/O
MPI card
MPI = n
cannot be operated simultaneously
Figure 1-11
Using OPC to Connect Third-Party Applications to SIMATIC Computing
Windows Automation Center WinAC Slot 412/WinAC Slot 416 Version 3.1
A5E00065531-03
1-15
Product Overview
1.12
The WinAC Tool Manager Provides Shortcuts to Your
Programs
The WinAC Tool Manager is a toolbar that lets you consolidate all of the
applications that you want to use while working with your process data. For
instance, if you plan to use Visual Basic with WinAC Slot 41x or want to put
process data into a Microsoft Excel spreadsheet, you can insert shortcuts to those
items on the WinAC Tool Manager. The WinAC Tool Manager is especially
convenient for users who do not have a mouse on their computer, since all of the
functions of the WinAC Tool Manager can be accessed by keystrokes from one
central location.
Figure 1-12 shows the WinAC Tool Manager and its shortcut icon. You can insert
shortcut icons for any of your programs into the WinAC Tool Manager tray. You
then use the WinAC Tool Manager to start these programs.
Shortcut icon
WinAC Tool Manager
WinAC Tool Manager
WinAC
Tool Manager
S7 logo
Figure 1-12
1-16
Empty tray
WinAC Tool Manager and Shortcut Icon
Windows Automation Center WinAC Slot 412/WinAC Slot 416 Version 3.1
A5E00065531-03
2
Installing WinAC Slot 41x
In this chapter
Section
2.1
Contents
Page
2.1
Overview of the Installation
2-1
2.2
Installing and Uninstalling the WinAC Slot 41x Software
2-3
Overview of the Installation
The WinAC Slot 41x software features separate setup features for the
CPU 412-2 PCI and the CPU 416-2 PCI, together with the other software
components (control panel, SIMATIC Computing, Tool Manager, router and time
synchronization).
System requirements
For installing the components of WinAC, we recommend the following
requirements for your computer:
A personal computer (PC) with the following:
– Pentium processor running at 166 MHz or faster
– 32 MB RAM
– Microsoft Windows NT 4.0, Service Pack 5 or higher.
A color monitor, keyboard, and mouse (or other pointing device) that are
supported by Microsoft Windows NT
A hard drive with 50 Mbytes of free space
At least 25 Mbyte free memory capacity on drive C for the Setup program
(Setup files are deleted when the installation is complete.)
1 PCI slot for 3/4-length cards at standard spacing and one adjacent vacant slot
for an optional PS extension board.
Requirements
You must log on with administrator privileges. If not, important entries in the
Windows NT registry cannot be made effectively and the installation will remain
incomplete.
Windows Automation Center WinAC Slot 412/WinAC Slot 416 Version 3.1
A5E00065531-03
2-1
Installing WinAC Slot 41x
Installing the components of WinAC Slot 41x
Section 2.2 explains the steps you have to take to install the software. Figure 2-1
shows the dialog box that allows you to choose which components to install. Select
the components that you want to install. Setup automatically highlights the
components that it could not find on your PC.
Figure 2-1
2-2
Installing the Components of WinAC Slot 41x
Windows Automation Center WinAC Slot 412/WinAC Slot 416 Version 3.1
A5E00065531-03
Installing WinAC Slot 41x
2.2
Installing and Uninstalling the WinAC Slot 41x Software
The WinAC Slot 41x software includes a setup feature for each CPU type that
performs automatic installation.
Starting the installation program
The Setup program guides you step by step through the installation process. You
can switch to the next step or to the previous step from any position. To start the
installation program, proceed as follows:
1. Insert the CD in your CD-ROM drive.
2. Double-click the “setup.exe” file to select it.
3. Follow the instructions displayed by the installation program one at a time.
Once the installation has been completed successfully, a message to that effect is
displayed on the screen.
If an older version of WinAC has already been installed
Before installing your new software, you should uninstall any earlier version which
may be installed on your computer. Overwriting an old version with a new version
has the disadvantage that if you then uninstall, any remaining components of the
old version are not removed.
Note
WinAC Slot 41x and WinAC Basis both use the same software components –
SIMATIC Computing, Tool Manager and the control panel.
This will possibly update these components if, for example, you have already installed
WinAC Basis.
You will find further information in the current Readme files for the software
components concerned.
Windows Automation Center WinAC Slot 412/WinAC Slot 416 Version 3.1
A5E00065531-03
2-3
Installing WinAC Slot 41x
Troubleshooting any errors that occur during installation
The following errors will result in installation being aborted:
Inadequate memory: you require at least 50 MB of space on your hard disk.
Defective CD: if you establish that the CD is defective, please contact your
local Siemens agent.
Notes on uninstalling
Note the following points before proceeding to uninstall:
The corresponding software components must not be in use when the software
is uninstalled.
Uninstalling the components of the WinAC Slot 41x software
Perform the following steps to remove the WinAC Slot 41x software from your
computer:
1. Double-click on the “Software” icon on the Control Panel.
2. Select one of the WinAC Slot 41x components you want to have uninstalled
from the list of installed software. Click the “Add/Remove” button to uninstall the
software.
3. If the “Remove Enabled Files” dialog box appears, click the “No” button if you
are unsure how to respond.
Note
Study the Readme files of the software components concerned.
2-4
Windows Automation Center WinAC Slot 412/WinAC Slot 416 Version 3.1
A5E00065531-03
3
Getting Started
In this chapter
Section
3.1
Contents
Page
The Task: Communications Via the Router
3-2
3.1.1
Creating a Project
3-3
3.1.2
Configuring Access Points
3-13
3.1.3
Starting the Router
3-15
3.1.4
Communications
3-15
Information on this Getting Started
In this chapter you will learn how to work with WinAC Slot 41x as demonstrated by
an example of establishing a connection. We will perform practical exercises to
show you the most important screen-based dialog boxes and approaches.
It will be helpful if you are already in a position to work with a mouse, windows,
pull-down menus, etc. and have a basic knowledge of PLCs.
There are training courses in which you can add to the knowledge you have
acquired with Getting Started and learn how to create complete automation
solutions with STEP 7.
Requirements for working with Getting Started
To be able to perform the practical exercise in this Getting Started, you will need:
a Siemens programming device or a PC
the STEP 7 software package and the authorization disk
a SIMATIC S7-400 automation system
We wish you lots of pleasure and success!
Your SIEMENS AG
Windows Automation Center WinAC Slot 412/WinAC Slot 416 Version 3.1
A5E00065531-03
3-1
Getting Started
3.1
The Task: Communications Via the Router
In our example, we want to connect a PC station to a CPU 416-2 PCI and a
SIMATIC S7-400 station via Industrial Ethernet (IE).
PC
Router
CPU 416-2 PCI
CP 1613
Industrial Ethernet
S7 station
Figure 3-1
3-2
Communication via the Router
Windows Automation Center WinAC Slot 412/WinAC Slot 416 Version 3.1
A5E00065531-03
Getting Started
3.1.1
Creating a Project
Perform the following steps:
1. Create a project called “RouterIE”.
2. Insert Box PC 620 by entering Insert > Station > SIMATIC PC Station and call
the PC station Box PC 620.
3. Insert the S7-400 station by entering Insert > Station > SIMATIC 400 Station
and call the SIMATIC S7-400 station S7-400.
Figure 3-2
Creating a Project
Windows Automation Center WinAC Slot 412/WinAC Slot 416 Version 3.1
A5E00065531-03
3-3
Getting Started
Hardware configuration of the Box PC 620
Selecting a mounting rack
1. Select Box PC 620.
2. Open “HWConfig” by double-clicking “Configuration”.
3. Open the catalog and branch to SIMATIC PC Station > Controller.
4. Drag and drop the CPU 416-2 PCI onto slot 3.
Result: the “Properties – PROFIBUS Interfaces DP Master” opens.
5. Do not connect the subnet for the DP master.
6. Click “OK” to apply the settings.
Note
Note the current order number when making a selection.
Figure 3-3
3-4
Selecting a Mounting Rack
Windows Automation Center WinAC Slot 412/WinAC Slot 416 Version 3.1
A5E00065531-03
Getting Started
Assigning a CP
1. Branch to SIMATIC PC Station > CP Industrial Ethernet.
2. Drag and drop CP 1613 into slot 9.
Result: the “Properties – Ethernet Interface CP 1613” dialog box opens.
3. Click “OK” to apply the settings.
4. Close with “Save and Compile”.
Note
Note the current order number when making a selection.
Figure 3-4
Assigning a CP
Windows Automation Center WinAC Slot 412/WinAC Slot 416 Version 3.1
A5E00065531-03
3-5
Getting Started
Hardware configuration of the S7-400 station
1. Select the components listed below and configure them as shown in Figure 3-5.
Rack
Power supply
CPU 416-1
CP 443-1
2. Do not connect the subnet for the CP 443-1.
3. Close with “Save and Compile”.
Note
Note the current order number when making a selection.
Figure 3-5
3-6
Configuring the Hardware of the S7-400 Station
Windows Automation Center WinAC Slot 412/WinAC Slot 416 Version 3.1
A5E00065531-03
Getting Started
Establishing a connection
MPI connection
1. Select the “Router” project.
2. Double-click MPI(1) to open it.
3. Double-click the MPI/DP node of the Box PC 620 to select it.
4. Select “MPI(1)” from the subnet list.
5. Open the properties dialog box, change the network name from “MPI(1)” to
“MPI-Net”.
6. Set address “2”.
7. Double-click the CPU 416-1 to select it.
8. Select “MPI-Net” from the subnet list.
9. Open the properties dialog, and select MPI-Net.
10.Set address “10”.
11. Click “OK” to apply the dialogue.
12.Close with “Save and Compile”.
Figure 3-6
MPI Connection
Windows Automation Center WinAC Slot 412/WinAC Slot 416 Version 3.1
A5E00065531-03
3-7
Getting Started
Industrial Ethernet connection
1. Select the “RouterIE” project.
2. Insert the Industrial Ethernet subnet by entering
Insert > Subnet > Industrial Ethernet and renaming Ethernet (1) to IE-Net.
3. Double-click IE-Net to open it.
4. Double-click the CP 1613 node to select it.
5. Select IE-Net.
6. Assign the MAC address: 08.00.06.01.00.00 (Default address).
7. Exit with “OK”.
8. Double-click the CPU 443-1 node to select it.
9. Select IE-Net.
10.Assign the MAC address: 08.00.06.01.00.01.
11. Click “OK” to apply the settings.
12.Double click the DP master of the PC Box 620 to select it.
13.Open the interface properties.
14.Select a new network. Assign the name “PB-CPU 416-2” and address “2”.
15.Click “OK” to apply the dialogue.
16.Close with “Save and Apply”.
3-8
Windows Automation Center WinAC Slot 412/WinAC Slot 416 Version 3.1
A5E00065531-03
Getting Started
Figure 3-7
Bus Connection
Windows Automation Center WinAC Slot 412/WinAC Slot 416 Version 3.1
A5E00065531-03
3-9
Getting Started
Configuring a connection
A connection defines the communication relationship between two nodes. The
following parameters are specified in it:
– The two communication nodes
– The type of the connection (in this case an S7 connection)
– Specific properties that depend on the type of the connection (whether a
connection remains open continuously, for example, or whether it is
established and cleared dynamically in the user program).
To enter a connection, proceed as follows:
1. Select the CPU 416-2 PCI module (the connection table is visible).
2. Double-click a blank line in the connection table, or select Insert > New
Connection... from the menu. As a result, the “New Connection” dialog box
opens.
3-10
Windows Automation Center WinAC Slot 412/WinAC Slot 416 Version 3.1
A5E00065531-03
Getting Started
Figure 3-8
Creating a Connection
3. In the “Station” and “Module” boxes, select the programmable module to which
the connection is to lead (also referred to as a connection partner or remote
node).
4. Select the connection type (S7 connection only) in the “Type” box.
5. Select the “Open Properties Dialog Box” check box.
Windows Automation Center WinAC Slot 412/WinAC Slot 416 Version 3.1
A5E00065531-03
3-11
Getting Started
6. Confirm with “Apply”. The “Connection Properties” dialog box appears
(Figure 3-9).
Figure 3-9
Connection Properties
7. Check the settings (interface and type) as in Figure 3-9.
8. Accept your entries by clicking “OK”.
The first connection has thus been created. The second connection is created in
an analogous manner. Begin at step 1 with the CPU 416-1.
STEP 7 enters the connection in the connection table of the local node and
assigns to this connection the local ID and, if applicable, the partner ID that you
require when programming the communication function blocks (value for the “ID”
block parameter).
These settings conclude the configuration of the “Router” project.
9. Load the data in the relevant station.
3-12
Windows Automation Center WinAC Slot 412/WinAC Slot 416 Version 3.1
A5E00065531-03
Getting Started
3.1.2
Configuring the Access Point
1. Open the router control panel by selecting the task bar:
Start > Simatic > PC Based Control >
CPU 41x-2 PCI Router Configuration.
2. On the “Assignment” tab, press the “Set PG/PC Interface” button.
Figure 3-10
Setting the PG/PC Interface
3. Select the “CP1613” CP from the “Interface Parameter Assignment Used” list
box.
Windows Automation Center WinAC Slot 412/WinAC Slot 416 Version 3.1
A5E00065531-03
3-13
Getting Started
4. Select the settings for the corresponding node CP under “Properties” as in
Figure 3-11.
Note
The station addresses and network-related settings must be the same as the
settings used in the S7 project.
Figure 3-11
Setting the CP Properties
5. Terminate the “Set PG/PC Interface” program.
3-14
Windows Automation Center WinAC Slot 412/WinAC Slot 416 Version 3.1
A5E00065531-03
Getting Started
3.1.3
Starting the Router
Once you have configured the hardware, set the connections for the project and
configured the access points, data can be transferred using the router.
1. Open the router control panel by choosing the following from the taskbar:
Start > Simatic > PC Based Control >
CPU 41x-2 PCI Router Configuration.
2. Start the router by clicking “Start”.
The set connections now appear on the “Connections” router tab.
3.1.4
Communications
Embed the appropriate communication blocks (for example, Put/Get) in your user
program.
Windows Automation Center WinAC Slot 412/WinAC Slot 416 Version 3.1
A5E00065531-03
3-15
Getting Started
3-16
Windows Automation Center WinAC Slot 412/WinAC Slot 416 Version 3.1
A5E00065531-03
4
Using the Tool Manager
In this chapter
The WinAC Tool Manager provides quick access to the programs on your
computer. The Tool Manager is configurable. You can insert a shortcut icon for any
of your programs into the tray. You can then access that program from the Tool
Manager.
Section
Description
Page
4.1
Creating a Toolbar for Easy Access to Your Programs
4-2
4.2
Using the Tool Manager without a Mouse
4-4
4.3
Changing the Language
4-6
Windows Automation Center WinAC Slot 412/WinAC Slot 416 Version 3.1
A5E00065531-03
4-1
Using the Tool Manager
4.1
Creating a Toolbar for Easy Access to Your Programs
Figure 4-1 shows the WinAC Tool Manager and its shortcut icon. You can change
the size of the WinAC Tool Manager. You can also display the WinAC Tool
Manager either horizontally or vertically.
Shortcut icon
WinAC Tool Manager
WinAC Tool Manager
WinAC
Tool Manager
S7 logo
Figure 4-1
empty tray
WinAC Tool Manager
Inserting icons into the WinAC Tool Manager
There are two methods for inserting shortcut icons into the WinAC Tool Manager:
You can insert the program or its shortcut icon in Windows Explorer by
dragging and dropping into the WinAC Tool Manager.
Choose Insert from the menu in WinAC Tool Manager (refer to Figure 4-2).
Note
Some shortcut icons – for example, that of the control panel of the CPU 41x-2 PCI
– pass command line parameters (cmdline). To insert a shortcut for these
programs, you must use Windows Explorer to drag and drop the shortcut onto the
WinAC Tool Manager. Using the Insert menu command results in the command
line parameter being lost.
Perform the following steps to drag and drop icons onto the WinAC Tool Manager:
1. Open Windows Explorer by choosing Start > Programs > Windows NT
Explorer from the menu.
2. Open the WinAC Tool Manager by choosing Start > SIMATIC > PC Based
Control > WinAC Tool Manager from the menu (or by double-clicking the
shortcut icon for the WinAC Tool Manager).
3. In Windows Explorer, select the program whose icon is to be inserted into the
WinAC Tool Manager.
4-2
Windows Automation Center WinAC Slot 412/WinAC Slot 416 Version 3.1
A5E00065531-03
Using the Tool Manager
4. Holding down the left mouse button, drag the program to the tray of the WinAC
Tool Manager.
5. Release the left mouse button to drop the icon into the WinAC Tool Manager.
WinAC Tool Manager
Click the right button of the
mouse to display the WinAC
Tool Manager menu
Restore
Icon
Horizontal
Vertical
Insert
Select Language
Select the Insert command to
display a browser that allows you
to insert program icons into the
WinAC Tool Manager
Always On Top
Full Path Name
Fit to screen
Auto Size
Rebuild Tool Manager
Help
F1
Exit
Figure 4-2
Inserting Icons into the WinAC Tool Manager
Perform the following steps to insert icons into the WinAC Tool Manager:
1. Open the WinAC Tool Manager by choosing Start > SIMATIC > PC Based
Control > WinAC Tool Manager from the menu.
2. Open the menu in WinAC Tool Manager by right-clicking (refer to Figure 4-2).
3. Select the Insert menu command to display a browser for selecting program
icons.
4. Select the icons from the browser and confirm.
Windows Automation Center WinAC Slot 412/WinAC Slot 416 Version 3.1
A5E00065531-03
4-3
Using the Tool Manager
Customizing the display options for the WinAC Tool Manager
You can use the mouse to resize the WinAC Tool Manager. You can likewise use
menu commands (refer to Figure 4-2) to customize the WinAC Tool Manager:
Select either the Horizontal or Vertical menu command to choose the
orientation for the WinAC Tool Manager.
Select the Always On Top menu command to always display the WinAC Tool
Manager on top of the application, instead of being hidden behind an open
application.
Select the Auto Size menu command to automatically size the WinAC Tool
Manager to the width (or height) of the screen.
Select the Full Path Name menu command to display the path name for the
shortcut icons.
Select the Rebuild Tool Manager menu command to update (refresh) the
icons for existing program or to remove the icons for programs that have been
removed or deleted.
Pressing F1 or selecting the Help menu command displays the online Help for the
WinAC Tool Manager.
4.2
Using the WinAC Tool Manager without a Mouse
Table 4-1 lists the specific keyboard operations for various key combinations to
work with the WinAC Tool Manager. Using the keyboard, you can access all the
functions of the WinAC Tool Manager:
4-4
Pressing F1 displays online Help for the WinAC Tool Manager.
Pressing the Tab key changes the focus between the S7 logo and the shortcut
icons. If the WinAC Tool Manager is running, display the WinAC Tool Manager
by pressing the key combination ALT + TAB.
Pressing the Return key when a shortcut icon has the focus starts the
associated program.
Windows Automation Center WinAC Slot 412/WinAC Slot 416 Version 3.1
A5E00065531-03
Using the Tool Manager
Table 4-1
Keyboard Operations for the WinAC Tool Manager
Description
Key Combination
Tab
Shows the Windows taskbar: jump with the TAB key to the
S7 logo to bring the WinAC Tool Manager into focus.
Alt + Tab
Alternates the focus between the S7 logotype and the
selected shortcut icon
When focus is on the S7 logotype...
Page Up or Page Down
Displays the WinAC Tool Manager in a horizontal or
vertical orientation
Left arrow or Right arrow
Displays the application menu when the WinAC Tool
Manager is oriented vertically
Shift + (Left or Right arrow)
Moves the WinAC Tool Manager left or right
Ctrl + (Left or Right arrow)
Moves the WinAC Tool Manager to the left or right edge of
the screen
Alt + (Left or Right arrow)
Stretches or shrinks the WinAC Tool Manager when the
WinAC Tool Manager is oriented horizontally (not available
in Auto Size mode)
Up arrow or Down arrow
Displays the application menu when the WinAC Tool
Manager is oriented horizontally
Shift + (Up or Down arrow)
Moves the WinAC Tool Manager up or down
Ctrl + (Up or Down arrow)
Moves the WinAC Tool Manager to the top or bottom edge
of the screen
Alt + (Up or Down arrow)
Stretches or shrinks the WinAC Tool Manager when the
WinAC Tool Manager is oriented horizontally (not available
in Auto Size mode)
Enter
Minimizes or restores the WinAC Tool Manager
When focus is on a shortcut icon...
Home or End
Sets focus to the first or last shortcut icon
Enter
Runs the application of the shortcut icon that has focus
Delete
Deletes the shortcut icon that has focus
Left arrow or Right arrow
WinAC Tool Manager is oriented horizontally: moves the
cursor left or right.
WinAC Tool Manager is oriented vertically: displays the
menu.
Up arrow or Down arrow
WinAC Tool Manager is oriented horizontally: displays the
menu.
WinAC Tool Manager is oriented vertically: moves the
cursor left or right.
Windows Automation Center WinAC Slot 412/WinAC Slot 416 Version 3.1
A5E00065531-03
4-5
Using the Tool Manager
4.3
Changing the Language
The WinAC Tool Manager provides a menu command for changing the language
setting for all of the WinAC components. You can choose between English, French
and German for the menus and dialog boxes of the WinAC Slot 41x software (if all
languages were installed when you installed WinAC Slot 41x).
Use the following procedure to change the language setting:
1. Open the WinAC Tool Manager by choosing Start > SIMATIC > PC Based
Control > WinAC Tool Manager from the menu (or by double-clicking the
shortcut icon for the WinAC Tool Manager).
2. Open the menu in WinAC Tool Manager by right-clicking (refer to Figure 4-3).
3. Choose the Select Language menu option to open the menu in which you can
select the language for WinAC (refer to Figure 4-3).
4. Select the language for WinAC.
5. Restart your applications to change the language for the menus and dialog
boxes for the WinAC software.
WinAC Tool Manager
Click the right button of the
mouse to display the
WinAC Tool Manager menu
Restore
Icon
Horizontal
Vertical
Insert
Select Language
English
Always On Top
French
Full Path Name
English
Fit to screen
Auto Size
Italian
Select the language for the
WinAC software products
Spanish
Rebuild Tool Manager
Help
F1
Exit
Figure 4-3
4-6
Changing the Language for WinAC
Windows Automation Center WinAC Slot 412/WinAC Slot 416 Version 3.1
A5E00065531-03
Distributed Component Object Model
(DCOM)
A
In this appendix
WinAC allows you to communicate across networks using Microsoft’s Distributed
Component Object Model (DCOM). You can use DCOM to integrate distributed
applications by way of a network. A distributed application consists of multiple
processes or different computers that cooperate to accomplish a single task jointly.
DCOM is a set of Microsoft concepts and program interfaces in which client
program objects can request services from server program objects on other
computers in a network. The Component Object Model (COM) provides a set of
interfaces that allow clients and servers to communicate within the same computer
(running Windows 95 or Windows NT).
Section
Description
Page
A.1
Using DCOM to Expand the Capabilities of WinAC
A-2
A.2
Connecting to a Specific Control Engine over DCOM
A-4
Windows Automation Center WinAC Slot 412/WinAC Slot 416 Version 3.1
A5E00065531-03
A-1
Distributed Component Object Model (DCOM)
A.1
Using DCOM to Expand the Capabilities of WinAC
You can run the components of WinAC on a standalone computer, as shown in
Figure A-1. In this model, this computer provides the complete control system.
Third-party control
Siemens button control
Siemens label control
Siemens edit control
Siemens slider control
DCOM
components
Siemens S7 data control
MPI server
PC 1
WinLC*
I/O
*:
CPU 416-2 PCI*
MPI card
I/O
MPI = n
cannot be operated simultaneously
Figure A-1
Using WinAC Components with DCOM on a Standalone Computer
You can also utilize Microsoft’s DCOM technology to create a network of
computers that cooperate to provide the control system for a machine or process.
Figure A-2 shows how one computer running an application that uses ActiveX
controls (from SIMATIC Computing) can use DCOM to communicate with a
different computer that uses WinLC (or other PLCs) to control a process.
The Windows NT operating system features a configuration tool (dcomcnfg) for
setting up your DCOM security. Use this tool to configure the server and client
computers.
A-2
Windows Automation Center WinAC Slot 412/WinAC Slot 416 Version 3.1
A5E00065531-03
Distributed Component Object Model (DCOM)
Third-party control
Siemens button control
Siemens label control
Siemens edit control
Siemens slider control
Siemens S7 data control
DCOM
components
Network
PC 1
Client
DCOM
components
WinAC configuration tool
Note: STEP 7 cannot connect
to the MPI server using DCOM.
MPI server
PC 2
CPU 416-2 PCI*
WinLC*
I/O
I/O
Server
*:
MPI card
MPI = n
cannot be operated simultaneously
Figure A-2
Using WinAC on Several Computers with DCOM
Note
You install the WinAC authorization on the server computer; you install the
SIMATIC Computing authorization on the client computer. If you want to run
SIMATIC Computing on a PC other than the PC running WinAC, then you must
purchase the standalone version of SIMATIC Computing.
Windows Automation Center WinAC Slot 412/WinAC Slot 416 Version 3.1
A5E00065531-03
A-3
Distributed Component Object Model (DCOM)
A.2
Connecting to a Specific Control Engine Using DCOM
As shown in Figure A-3, you can use the SIMATIC data control to connect your
program to a control engine residing on a different computer.
Note
If you set up SIMATIC Data Control for a direct connection to a control engine, you
cannot assign a tag file. In other words, you cannot use symbol names for the tags
in the control engine.
To use symbol names, select the option for connecting via a tag source and
browse to a tag file that contains symbols for only one control engine. Use the
TagFile Configurator to create tag files and connect to control engines using
DCOM. See the SIMATIC Computing User Manual for information about using
STEP 7 and the TagFile Configurator.
Third-party control
Siemens button control
Siemens label control
Siemens edit control
Siemens slider control
Siemens S7 data control
PC 1
DCOM
PC 2
CPU 41x-2 PCI
Figure A-3
A-4
Connecting to a Specific Control Engine over DCOM
Windows Automation Center WinAC Slot 412/WinAC Slot 416 Version 3.1
A5E00065531-03
OLE for Process Control (OPC)
B
In this appendix
OLE for Process Control (OPC) provides a standard mechanism for
communicating with numerous data sources. It is immaterial in this case whether
these sources are machines in your factory or a database in your control room.
You can use the OPC server provided with the SIMATIC Computing software to
communicate with the control engine and thus provide access to the process data.
SIMATIC Computing provides an OPC server that allows any OPC client
application to access data in the control engine. SIMATIC Computing does not
provide any OPC client application.
SIMATIC Computing implements the mandatory interfaces, as defined in the OPC
documentation, version 2.0, from the OPC Foundation. SIMATIC Computing also
implements the IOPC BrowseServerAddressSpace interface.
OPC is based on the OLE/COM technology from Microsoft. For more information
about OPC, refer to the OPC specification OLE for Process Control Data Access
Standard, version 2.0 from the OPC Foundation.
Section
B.1
Description
Using OPC with SIMATIC Computing
Windows Automation Center WinAC Slot 412/WinAC Slot 416 Version 3.1
A5E00065531-03
Page
B-2
B-1
OLE for Process Control (OPC)
B.1
Using OPC with SIMATIC Computing
OPC allows you to access data from the plant floor and integrate the data into your
existing business systems. You can use off-the-shelf tools (such as SCADA
packages, databases, spreadsheets) to assemble a system that meets your
needs. As shown in Figure B-1, OPC provides an open and effective
communication architecture which concentrates on data access and not the types
of data.
Application
X
OPC Client Interface
OPC Server
A
Figure B-1
Application
Y
OPC Client Interface
SIMATIC Computing OPC Server
OPCServer.WinAC
OPC Server
C
Applications Working with Many OPC Servers
Your OPC client connects to the OPC server object provided by SIMATIC
Computing. Due to this connection, you can create and edit OPC groups. OPC
groups structure the data that are accessed. You can activate or deactivate a
group as a unit, or you can “subscribe” to the list in a group of items so that you
can be notified when the data change. (A group is a collection of items.) Figure B-2
shows the connection from the OPC client application through WinAC to the
process data.
Third-party OPC client application
SIMATIC Computing: OPCServer.WinAC
WinAC
Control engine
Distributed I/O
Figure B-2
Using the WinAC OPC Server to Access Your Process Data
To access the OPC server provided by the SIMATIC Computing software, browse
to: OPCServer.WinAC
B-2
Windows Automation Center WinAC Slot 412/WinAC Slot 416 Version 3.1
A5E00065531-03
Index
A
access point configuration, getting started,
3-13
accessing memory areas (S7), OPC controls,
B-2–B-4
accessing process data, OPC controls,
B-2–B-4
ActiveX Controls, 1-1
applicability, of this manual, v
audience, iv
C
client application (OPC), B-2–B-4
connecting to WinAC Computing, B-2–B-3
communicating, using DCOM, 1-14–1-16
communication options with CPU 41x-2 PCI,
1-7
communications
getting started, 3-15
of CPU 41x-2 PCI, 1-9
options, 1-8
through router, 1-9
using DCOM, A-1
via router, getting started, 3-2
via SIMATIC NET CP, 1-1
Component Object Model. See DCOM
Component Object Model (COM), 1-14–1-16,
A-1
Computing
See also SIMATIC Computing
Tool Manager, 4-1–4-7
connecting distributed applications (DCOM),
A-1
connecting to data via OPC, B-2–B-4
connection configuration, getting started, 3-10
connection table, getting started, 3-10
contents of the manuals, iv
control engine
OPC access, B-2
OPC controls, B-2–B-4
control objects, OPC server, B-2–B-4
control panel, 1-1
controls, 1-1
courses, v
CP, 1-1
CP assignment, getting started, 3-5
CPU 412-2 PCI, 1-1
CPU 416-2 PCI, 1-1
CPU 41x-2 PCI, 1-5, 1-7
creating a project, getting started, 3-3
customer support, v
D
data, OPC controls, B-2–B-4
databases, sharing data via OPC, B-2
DCOM, 1-14–1-16, A-1, A-2
defective CD, errors during installation, 2-4
display options for Tool Manager, 4-4
distributed applications (DCOM), 1-14–1-16,
A-1
Distributed Component Object Model. See
DCOM
Distributed Component Object Model (DCOM),
1-14–1-16, A-1
E
establishing a connection, getting started, 3-7
example, 3-1
F
fax polling, v
Windows Automation Center WinAC Slot 412/WinAC Slot 416 Version 3.1
A5E00065531-03
Index-1
Index
feedback form, v
K
keyboard (with Tool Manager), 4-4–4-6
G
getting started, 3-1
communications, 3-15
configuring a connection, 3-10
configuring the access point, 3-13
connection table, 3-10
CP assignment, 3-5
establishing a connection, 3-7
hardware configuration of S7-400 station,
3-6
hardware configuration of the PC station,
3-4
Industrial Ethernet connection, 3-8
information, 3-1
MPI connection, 3-7
project creation, 3-3
requirements, 3-1
Set PG/PC Interface, 3-13
starting the router, 3-15
task, 3-2
mailbox, v
manual
applicability, v
S7-400 instruction list, iv
SIMATIC Computing, iv
SIMATIC Controls for SIMATIC Computing
Version 2, iv
WinAC Controlling with CPU 412-2 PCI,
CPU 416-2 PCI; set-up, CPU data, iv
Windows Automation Center WinAC Slot
412/WinAC Slot 416, iv
memory areas of S7 controllers, OPC controls,
B-2–B-4
monitoring and modifying data, OPC controls,
B-2–B-4
MPI, 1-7
MPI connection, getting started, 3-7
N
H
hardware components, iii
hardware configuration of S7-400 station,
getting started, 3-6
hardware configuration of the PC station,
getting started, 3-4
I
Industrial Ethernet, 1-1, 1-7
Industrial Ethernet connection, getting started,
3-8
inserting icons into Tool Manager, menu
command, 4-3
inserting shortcut icons in Tool Manager, drag
and drop, 4-2
install, WinAC Slot 41x, 2-2
installation
errors during installation, 2-4
requirements, 2-1
WinAC Slot 41x, 2-1
insufficient memory, errors during installation,
2-4
integrating distributed applications (DCOM),
1-14–1-16
Internet, up-to-date information, v
Index-2
M
network card, 1-1
network communications, using DCOM,
1-14–1-16, A-1
O
off-the-shelf applications, OPC controls, B-2
OLE
OPC controls, B-2–B-4
OPC documentation, B-1
OPC controls, B-2–B-4
OPC documentation, B-1
sharing data among applications, B-2
used with WinAC Computing, B-2
OPC server name, B-2
overview, OPC controls, B-2–B-4
P
package supplied, iv
PC-based control, iii, 1-2
PLCTimeSync. See time synchronization
power supply module, 1-1
process data, OPC controls, B-2–B-4
Windows Automation Center WinAC Slot 412/WinAC Slot 416 Version 3.1
A5E00065531-03
Index
product overview, OPC (OLE for Process
Control), B-2–B-4
product versions, iii
PROFIBUS, 1-1, 1-7
PROFIBUS-DP, 1-7
programming device/PC setting interface, 1-8
PS extension board, 1-1
purpose of the manual, iii
third-party OCX, OPC controls, B-2–B-4
time synchronization, 1-1, 1-7, 1-10
time-of-day synchronization service, 1-10
Tool Manager, 1-16, 4-1–4-7
display options, 4-4
inserting icons, menu commands, 4-3
inserting shortcut icons, drag and drop, 4-2
using via keyboard, 4-4–4-6
training center, v
R
requirements
getting started, 3-1
installation, 2-1
router, 1-1, 1-7, 1-9
starting, getting started, 3-15
routing tables, 1-8
U
uninstall, WinAC Slot 41x, 2-3
up-to-date information, v
usage of manual, iv
W
S
S7 controllers, OPC controls, B-2–B-4
S7-400, 1-1
S7-Controls, 1-1
scope of this manual, iv
server object (OPC), B-2–B-3
Set PG/PC Interface, getting started, 3-13
setup feature, 2-1
sharing data among applications, OPC
controls, B-2–B-4
Siemens points of contact, v
SIMATIC Computing, 1-1
SIMATIC Manager, 1-7
SIMATIC NET CP, 1-1
Slot PLC, iii
software components, iii
spreadsheets, sharing data via OPC, B-2
STEP 7, Tool Manager, 1-16, 4-1–4-7
support, additional, v
system requirements, 2-1
WinAC, 1-2
DCOM, 1-14–1-16, A-2
WinAC Basis, uninstalling, 2-3
WinAC Computing
OPC controls, B-2–B-4
Tool Manager, 1-16
WinAC Controlling, 1-3
control panel, 1-4
programming, 1-4
WinAC Slot 412, iii, 1-1, 1-2
WinAC Slot 416, iii, 1-1, 1-2
WinAC Slot 41x, 1-1
example, 3-1
getting started, 3-1
installation, 2-1
installing, 2-2
software, 2-1
uninstalling, 2-3
WinAC Tool Manager. See Tool Manager
WinCC, 1-7
Windows Automation Center, iii, 1-2
WinLC, accessed by OPC controls, B-2–B-4
T
technical specifications, OLE for Process
Control, B-1
Windows Automation Center WinAC Slot 412/WinAC Slot 416 Version 3.1
A5E00065531-03
Index-3
Index
Index-4
Windows Automation Center WinAC Slot 412/WinAC Slot 416 Version 3.1
A5E00065531-03
Siemens AG
A&D AS E82
Postfach 1963
D–92209 Amberg
Germany
From:
Your Name:
. .................................................................
Your Title:
. .................................................................
Company Name:
. .................................................................
Street:
..................................................................
City, Zip Code:
. .................................................................
Country:
..................................................................
Phone:
..................................................................
Please check any industry that applies to you:
Automotive
Pharmaceutical
Chemical
Plastic
Electrical Machinery
Pulp and Paper
Food
Textiles
Instrument and Control
Transportation
Nonelectrical Machinery
Other . . . . . . . . . . . . . . . . . . . . . . . . . . . . . . . . .
Petrochemical
Windows Automation Center WinAC Slot 412/WinAC Slot 416 Version 3.1
A5E00065531-03
1
Remarks Form
Your comments and recommendations will help us to improve the quality and usefulness of our
publications. Please take the first available opportunity to fill out this questionnaire and return it
to Siemens.
Please give each of the following questions your own personal mark within the range from 1 (very
good) to 5 (poor).
1.
Do the contents meet your requirements?
2.
Is the information you need easy to find?
3.
Is the text easy to understand?
4.
Does the level of technical detail meet your requirements?
5.
Please rate the quality of the graphics/tables:
Additional comments:
. ..................................................................................
...................................................................................
...................................................................................
...................................................................................
...................................................................................
...................................................................................
...................................................................................
...................................................................................
...................................................................................
...................................................................................
...................................................................................
...................................................................................
...................................................................................
...................................................................................
...................................................................................
...................................................................................
2
Windows Automation Center WinAC Slot 412/WinAC Slot 416 Version 3.1
A5E00065531-03