1
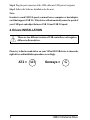
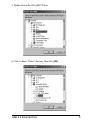
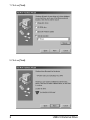
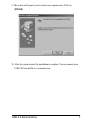
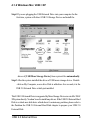
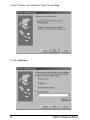
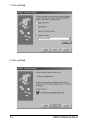
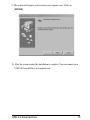
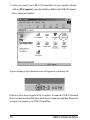
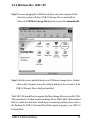
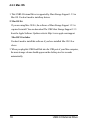
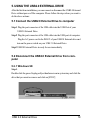
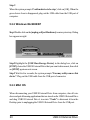
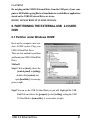
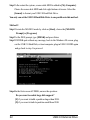
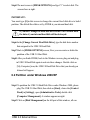
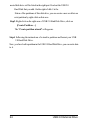
External Drive
USER MANUAL
ViPowER
www.vipower.com
CONTENTS
1. INTRODUCTION …………....…………………………………….……1
2. SYSTEM REQUIREMENTS ………….....………………………….…...1
3. HARDWARE INSTALLATION …...................................................................1
4. DRIVERS INSTALLATION …...................................………………..……2
4.1 DRIVERS INSTALLATION (AT2).............................................................3
4.1.1 WINDOWS 98SE………......……....…….....…..…………..……..3
4.1.2 WINDOWS ME/2000/XP ……………..…..…………….…..…….9
4.1.3 Mac OS …………………....…………...…………………...….10
4.2 DRIVERS INSTALLATION (Genesys)....................................................11
4.2.1 WINDOWS 98SE…………..……....…….....…..…………..…....11
4.2.2 WINDOWS ME/2000/XP …………….............………….….……17
4.2.3 Mac OS ………………….……………….......……………....…18
5. USING THE USB 2.0 EXTERNAL DRIVE ………...............……………19
5.1 Connect the USB 2.0 External Drive to computer ………….......………19
5.2 Disconnect the USB 2.0 External Drive from computer ……...…….…..19
6. PARTITIONING THE USB 2.0 EXTERNAL HARD DISK DRIVE ..........21
6.1 PARTITION UNDER WINDOWS 98/ME ………….........................…..21
6.2 PARTITION UNDER WINDOWS 2000/XP ………………......……...23
1. INTRODUCTION
The USB 2.0 External Drive is a portable compact storage drive that incorporates
the USB 2.0 (Universal Serial Bus 2.0) high speed interface. The USB 2.0 External
Drive provides a fast and easy way to add more storage space to your computer. The
Plug & Play feature gives you a great convenience on the road, the USB 2.0 External
Drive can re-connected while the computer is running.
The USB 2.0 External Drive is compatible with Apple Macintosh and Windows
Computers.
Note:
In order to reach USB 2.0 speed, you must have a computer or host adapter
card that has USB 2.0 support. This device will auto sense the speed of your USB
port and adjust between USB 1.0 and USB 2.0 speed.
2. SYSTEM REQUITEMENTS
Hardware:
Notebook and desktop computer with USB or USB 2.0 port supported.
Operation system:
Windows 98SE / Me / 2000 / XP, and Mac OS 8.6 or above.
3. HARDWARE INSTALLATION
Step 1 Boot-up your computer make sure the USB / USB 2.0 Port device driver
has installed and is available in operation system.
Step 2 Plug the port connector of the USB cable into the USB Port of your USB
2.0 External Drive.
Step 3 Plug the power cord to the inlet of your USB 2.0 External Drive and
power on the drive. Your USB 2.0 External Drive will be ready to use.
USB 2.0 External Drive
1
Step 4 Plug the port connector of the USB cable into USB port of computer.
Step 5 Follow the Software Installation for the next.
Note:
In order to reach USB 2.0 speed, you must have a computer or host adapter
card that support USB 2.0 . This device will automatically sense the speed of
your USB port and adjust between USB 1.0 and USB 2.0 speed.
4. Drivers INSTALLATION
There are two different versions of USB controllers, each reguires
different software driver.
Please try to find a round sticker on your ViPowER USB device to choose the
right driver and installation procedure accordingly.
AT2 = AT2
2
Genesys =
G
USB 2.0 External Drive
4.1 Drivers INSTALLATION (AT2)
4.1.1 Windows 98SE
If this is the first time you use USB 2.0 External Drive, you have to run the
[STEPUP.EXE] from USB 2.0 install CD before you connect your USB 2.0
External Drive to computer.
1. Connect your USB 2.0 external drive to your computer.
2. A “Add New Hardware Wizard” will pop-out. Click on [Next].
USB 2.0 External Drive
3
3. Select “Display a list of all drivers” then click on [Next].
4. Click on [Browse].
4
USB 2.0 External Drive
5. Double click on the ViPowER CD icon.
6. Click to choose “Driver” directory, then click [OK].
USB 2.0 External Drive
5
7. Click on [Next].
8. Click on [Next].
6
USB 2.0 External Drive
9. The system will request you to restart your computer now. Click on
[FINISH].
10. After the system restart, the installation is complete. You can connect your
USB 2.0 External Drive to computer now.
USB 2.0 External Drive
7
11. After you connect your USB 2.0 External Drive to your computer. Double
click on [My Computer], a new drive Disk is added, it is the USB 2.0 External
Drive which just installed.
A green Unplug or Eject hardware icon will appear in system tray too.
If the new drive doesn’t appear in My Computer, it means this USB 2.0 External
Drive is a whole new hard disk drive which doesn’t contain any partition. Please refer
to chapter 6 to prepare your USB 2.0 Hard Disk.
8
USB 2.0 External Drive
4.1.2 Windows Me / 2000 / XP
Step1 If you are plugging the USB External Drive into your computer for the
first time, system will detect USB 2.0 Storage Device and install the
driver of [USB Mass Storage Device] from system files automatically.
Step2 After the system installed the driver of USB mass storage device. Double
click on My Computer, a new drive Disk is added in a few seconds, it is the
USB 2.0 External Drive which just installed.
This USB 2.0 External Drive is supported by Mass Storage Device in win Me/ 2000/
XPsystem directly. You don’t need to install any drivers. If the USB 2.0 External Hard
Disk is a whole new disk drive which doesn’t contain any partition, please refer to
the Partition the USB 2.0 External Hard Disk chapter to prepare your USB 2.0
External Disk.
USB 2.0 External Drive
9
4.1.3 Mac OS
1. This USB2.0 External Drive is supported by Mass Storage Support 1.3.5 in
Mac OS. You don’t need to install any drivers.
2. Mac OS 8.6
If you are using Mac OS 8.6, the software of Mass Storage Support 1.3.5 is
required to install. You can download The USB Mass Storage Support 1.3.5
from the Apple Software Updates web site Http://www.apple.com/support.
Mac OS 9.0 or latter
You don’t need to install this software if you have installed Mac OS 9.0 or
above.
3. When you plug this USB Hard Disk into the USB port of your Mac computer,
the mass storage volume should appear on the desktop in a few seconds
automatically.
10
USB 2.0 External Drive
4.2 Drivers INSTALLATION (Genesys)
4.2.1 Windows 98SE
If this is the first time you use USB 2.0 External Drive, you have to run the
[STEPUP.EXE] from USB 2.0 install CD before you connect your USB 2.0
External Drive to computer.
1. Connect your USB 2.0 external drive to your computer.
2. A “Add New Hardware Wizard” will pop-out. Click on [Next].
USB 2.0 External Drive
11
3. Select “Display a list of all drivers” then click on [Next].
4. Click on [Browse].
12
USB 2.0 External Drive
5. Double click on the ViPowER CD icon.
6. Click to choose “Driver” directory, then click [OK].
USB 2.0 External Drive
13
7. Click on [Next].
8. Click on [Next].
14
USB 2.0 External Drive
9. The system will request you to restart your computer now. Click on
[FINISH].
10. After the system restart, the installation is complete. You can connect your
USB 2.0 External Drive to computer now.
USB 2.0 External Drive
15
11. After you connect your USB 2.0 External Drive to your computer. Double
click on [My Computer], a new drive Disk is added, it is the USB 2.0 External
Drive which just installed.
A green Unplug or Eject hardware icon will appear in system tray too.
If the new drive doesn’t appear in My Computer, it means this USB 2.0 External
Drive is a whole new hard disk drive which doesn’t contain any partition. Please refer
to chapter 6 to prepare your USB 2.0 Hard Disk.
16
USB 2.0 External Drive
4.2.2 Windows Me / 2000 / XP
Step1 If you are plugging the USB External Drive into your computer for the
first time, system will detect USB 2.0 Storage Device and install the
driver of [USB Mass Storage Device] from system files automatically.
Step2 After the system installed the driver of USB mass storage device. Double
click on My Computer, a new drive Disk is added in a few seconds, it is the
USB 2.0 External Drive which just installed.
This USB 2.0 External Drive is supported by Mass Storage Device in win Me/ 2000/
XPsystem directly. You don’t need to install any drivers. If the USB 2.0 External Hard
Disk is a whole new disk drive which doesn’t contain any partition, please refer to
the Partition the USB 2.0 External Hard Disk chapter to prepare your USB 2.0
External Disk.
USB 2.0 External Drive
17
4.2.3 Mac OS
1. This USB2.0 External Drive is supported by Mass Storage Support 1.3.5 in
Mac OS. You don’t need to install any drivers.
2. Mac OS 8.6
If you are using Mac OS 8.6, the software of Mass Storage Support 1.3.5 is
required to install. You can download The USB Mass Storage Support 1.3.5
from the Apple Software Updates web site Http://www.apple.com/support.
Mac OS 9.0 or latter
You don’t need to install this software if you have installed Mac OS 9.0 or
above.
3. When you plug this USB Hard Disk into the USB port of your Mac computer,
the mass storage volume should appear on the desktop in a few seconds
automatically.
18
USB 2.0 External Drive
5. USING THE USB2.0 EXTERNAL DRIVE
After the first time installation, you can connect or disconnect the USB2.0 External
Drive without power off the computer. Please follow the steps when you want to
do the above actions:
5.1 Connect the USB2.0 External Drive to computer
Step 1 Plug the port connector of the USB cable into the USB Port of your
USB2.0 External Drive.
Step 2 Plug the port connector of the USB cable into the USB port of computer.
Plug the AC power cord to the INLET of your USB2.0 External drive and
turn on the power switch on your USB 2.0 External Drive.
Step3 USB2.0 External Drive is ready for use immediately
5.2 Disconnect the USB2.0 External Drive from computer
5.2.1 Windows 98:
Step1.
Double click the green Unplug or Eject hardware icon in system tray and click the
drive that you want to remove and click on [STOP]
USB 2.0 External Drive
19
Step 2
When the system prompts ‘Confirm device to be stop’, click on [OK], When the
green Arrow Icon is disappeared, plug out the USB cable from the USB port of
computer.
5.2.2 Windows Me/2000/XP
Step1 Double-click on the [unplug or Eject Hardware] icon in system tray. Dialog
box appears as right
Step2 Highlight the [USB Mass Storage Device] in the dialog box, click on
[STOP], choice the USB2.0 External Drive that you want to disconnect, then click
on [STOP] again on next screen.
Step 3 Wait for few seconds, the system prompts “You may safely remove this
device”. Plug out the USB cable from the USB port of connector.
5.2.3 MAC OS
When disconnecting your USB2.0 External Drive from computer, close all windows and quit all running applications that are stored on the USB2.0 External Drive
and drag USB2.0 External Drive’s icon into “Trash” to dismount it from the
Desktop prior to unplugging the USB2.0 External Drive from the USB port.
20
USB 2.0 External Drive
CAUTION!!
Do not plug out the USB2.0 External Drive from the USB port of your computer or HUB while copying files to or from the device or while files or applications
stored on the USB2.0 External Drive are in use.
DOING SO MAY RESULT IN LOSS OF DATA.
6. PARTITIONING THE EXTERNAL USB 2.0 HARD
DISK
6.1 Partition under Windows 98/ME
Boot-up the computer into windows 98/ME system. Plug your
USB 2.0 Hard Disk Drive.
There are two methods to partition
and format your USB 2.0 Hard Disk
Drive.
Method 1
Step1 Click on [start], choice the
[control panel] in [setting],
double click [system] and
open [hard disk]. A screen appears as right.
Step2 You can see the USB 2.0 Hard Disk you just add. High light the USB
Hard Disk and choice the [property], select [setting], setting the USB
2.0 Hard Disk to [removable]. A screen show as right.
USB 2.0 External Drive
21
Step3 After restart the system, a removable HDD is added to [My Computer].
Choice the removable HDD and click right bottom of mouse. Select the
[format] to format your USB 2.0 Hard Disk Drive.
You only can set the USB 2.0 Hard Disk Drive to one partition in this method.
Method 2
Step1 Go into the MS-DOS mode by click on [Start], choice the [MS-DOS
Prompt] in [Programs]
Step2 At the DOS prompt, type [FDISK] and press Enter.
Step3 If FDISK quit without any message, back to the Windows 98 screen, plug
out the USB 2.0 Hard Disk, re-boot computer, plug in USB 2.0 HDD again
and go back to step 1 to proceed.
Step4 In the first screen of FDISK, answer the question:
Do you want to enable large disk support?
[Y] if you want to build a partition larger than 2GB.
[N] if you want to build a partition small than 2GB.
22
USB 2.0 External Drive
Step5 The next screen is [FDISK OPTIONS], and type”5” to select disk. The
screen show as right.
IMPORTANT:
You must type [5] in this screen to change the current fixed disk drive to build
partition. The default fixed drive set by FDISK is your internal hard disk.
If you don’t change the fixed disk drive to the USB 2.0 Hard Disk,
the data of your internal hard disk will be destroyed.
Step6 In the [Change Current Fixed Disk Drive], type the disk drive number
that assigned to the USB 2.0 Hard Disk.
Step7 Back to [FDISK OPTIONS] screen, Now you can create or delete the
partition of the USB 2.0 Hard Disk.
Step8 After you finish FDISK, back to the Windows screen, plug out and plug
in USB 2.0 Hard Disk again to activate these changes. Double click on
[My Computer] icon, the USB 2.0 Hard Disk Drive that you already par
titioned will appear.
6.2 Partition under Windows 2000/XP
Step1 To partition the USB 2.0 Hard Disk Drive under Windows 2000, please
plug The USB 2.0 Hard Disk, then click on [Start], choice the [Control
Panel] in [Settings], open [Administrative Tools], double click
[Computer Management]. A window appears as right.
Step2 Click on [Disk Management] on the left part of this window, all con
USB 2.0 External Drive
23
nected disk drive will be listed in the right part. Find out the USB 2.0
Hard Disk that you add. On the right of disk # is the
Status of the partitions of this disk drive, you can create a new or delete an
exist partition by right-click on this area.
Step3. Right-click on the right area of USB 2.0 Hard Disk Drive, click on
[Create Partition….]
The “Create partition wizard” will appears.
Step4. Following the instructions of wizard to partition and format your USB
2.0 Hard Disk Drive.
Now, you have built a partition in the USB 2.0 Hard Disk Drive, you can write data
to it.
24
USB 2.0 External Drive
TRADEMARKS
MS-DOS, Windows, Windows 95/98/NT/2000/Me/XP are trademarks of Microsoft
Corporation.
Macintosh and Mac are trademarks of Apple Computer
*All of the third-party brands and names are the property of their respective owners.