1
To our customers,
Old Company Name in Catalogs and Other Documents
On April 1st, 2010, NEC Electronics Corporation merged with Renesas Technology
Corporation, and Renesas Electronics Corporation took over all the business of both
companies. Therefore, although the old company name remains in this document, it is a valid
Renesas Electronics document. We appreciate your understanding.
Renesas Electronics website: http://www.renesas.com
April 1st, 2010
Renesas Electronics Corporation
Issued by: Renesas Electronics Corporation (http://www.renesas.com)
Send any inquiries to http://www.renesas.com/inquiry.
Notice
1.
2.
3.
4.
5.
6.
7.
All information included in this document is current as of the date this document is issued. Such information, however, is
subject to change without any prior notice. Before purchasing or using any Renesas Electronics products listed herein, please
confirm the latest product information with a Renesas Electronics sales office. Also, please pay regular and careful attention to
additional and different information to be disclosed by Renesas Electronics such as that disclosed through our website.
Renesas Electronics does not assume any liability for infringement of patents, copyrights, or other intellectual property rights
of third parties by or arising from the use of Renesas Electronics products or technical information described in this document.
No license, express, implied or otherwise, is granted hereby under any patents, copyrights or other intellectual property rights
of Renesas Electronics or others.
You should not alter, modify, copy, or otherwise misappropriate any Renesas Electronics product, whether in whole or in part.
Descriptions of circuits, software and other related information in this document are provided only to illustrate the operation of
semiconductor products and application examples. You are fully responsible for the incorporation of these circuits, software,
and information in the design of your equipment. Renesas Electronics assumes no responsibility for any losses incurred by
you or third parties arising from the use of these circuits, software, or information.
When exporting the products or technology described in this document, you should comply with the applicable export control
laws and regulations and follow the procedures required by such laws and regulations. You should not use Renesas
Electronics products or the technology described in this document for any purpose relating to military applications or use by
the military, including but not limited to the development of weapons of mass destruction. Renesas Electronics products and
technology may not be used for or incorporated into any products or systems whose manufacture, use, or sale is prohibited
under any applicable domestic or foreign laws or regulations.
Renesas Electronics has used reasonable care in preparing the information included in this document, but Renesas Electronics
does not warrant that such information is error free. Renesas Electronics assumes no liability whatsoever for any damages
incurred by you resulting from errors in or omissions from the information included herein.
Renesas Electronics products are classified according to the following three quality grades: “Standard”, “High Quality”, and
“Specific”. The recommended applications for each Renesas Electronics product depends on the product’s quality grade, as
indicated below. You must check the quality grade of each Renesas Electronics product before using it in a particular
application. You may not use any Renesas Electronics product for any application categorized as “Specific” without the prior
written consent of Renesas Electronics. Further, you may not use any Renesas Electronics product for any application for
which it is not intended without the prior written consent of Renesas Electronics. Renesas Electronics shall not be in any way
liable for any damages or losses incurred by you or third parties arising from the use of any Renesas Electronics product for an
application categorized as “Specific” or for which the product is not intended where you have failed to obtain the prior written
consent of Renesas Electronics. The quality grade of each Renesas Electronics product is “Standard” unless otherwise
expressly specified in a Renesas Electronics data sheets or data books, etc.
“Standard”:
8.
9.
10.
11.
12.
Computers; office equipment; communications equipment; test and measurement equipment; audio and visual
equipment; home electronic appliances; machine tools; personal electronic equipment; and industrial robots.
“High Quality”: Transportation equipment (automobiles, trains, ships, etc.); traffic control systems; anti-disaster systems; anticrime systems; safety equipment; and medical equipment not specifically designed for life support.
“Specific”:
Aircraft; aerospace equipment; submersible repeaters; nuclear reactor control systems; medical equipment or
systems for life support (e.g. artificial life support devices or systems), surgical implantations, or healthcare
intervention (e.g. excision, etc.), and any other applications or purposes that pose a direct threat to human life.
You should use the Renesas Electronics products described in this document within the range specified by Renesas Electronics,
especially with respect to the maximum rating, operating supply voltage range, movement power voltage range, heat radiation
characteristics, installation and other product characteristics. Renesas Electronics shall have no liability for malfunctions or
damages arising out of the use of Renesas Electronics products beyond such specified ranges.
Although Renesas Electronics endeavors to improve the quality and reliability of its products, semiconductor products have
specific characteristics such as the occurrence of failure at a certain rate and malfunctions under certain use conditions. Further,
Renesas Electronics products are not subject to radiation resistance design. Please be sure to implement safety measures to
guard them against the possibility of physical injury, and injury or damage caused by fire in the event of the failure of a
Renesas Electronics product, such as safety design for hardware and software including but not limited to redundancy, fire
control and malfunction prevention, appropriate treatment for aging degradation or any other appropriate measures. Because
the evaluation of microcomputer software alone is very difficult, please evaluate the safety of the final products or system
manufactured by you.
Please contact a Renesas Electronics sales office for details as to environmental matters such as the environmental
compatibility of each Renesas Electronics product. Please use Renesas Electronics products in compliance with all applicable
laws and regulations that regulate the inclusion or use of controlled substances, including without limitation, the EU RoHS
Directive. Renesas Electronics assumes no liability for damages or losses occurring as a result of your noncompliance with
applicable laws and regulations.
This document may not be reproduced or duplicated, in any form, in whole or in part, without prior written consent of Renesas
Electronics.
Please contact a Renesas Electronics sales office if you have any questions regarding the information contained in this
document or Renesas Electronics products, or if you have any other inquiries.
(Note 1) “Renesas Electronics” as used in this document means Renesas Electronics Corporation and also includes its majorityowned subsidiaries.
(Note 2) “Renesas Electronics product(s)” means any product developed or manufactured by or for Renesas Electronics.
TM V.3.20A Release note
Be sure to read this note.
TM V.3.20A Release note
Second edition
Renesas Solutions Corporation
Microcomputer Tool Development Department
Debugger Group
February 20,2006
Abstract
Welcome to TM V.3.20A. This document contains supplementary descriptions to User’s Manual. When you read
certain items in the User’s Manual, please read this document as well.
Please read it before using. By using the software, you are accepting and agreeing to such terms.
Contents
1. Software Version List
3
2. Operating Environment
3
3. Upgrading of the TM
4
3.1 Installation
3.2 Compiler and real time OS Combinations
4. Precautions
4
4
5
4.1 File and Directory names
5
4.2 Scan All Dependencies
5
4.3 Computer Virus Check Program
5
4.4 Network drive
5
4.5 Inspector
5
4.6 Makefile of library source.
5
4.7 The TM project of the former version was taken over.
6
4.8 Use real time OS
6
4.8.1 In the case of MR308 (for the M16C/80, M32C/80 series) ---------------------------------------- 6
4.8.2 In the case of MR30 (for M16C/60, 20 series) ------------------------------------------------------ 6
4.8.3 In the case of MR79 (for 7900 series) ---------------------------------------------------------------- 7
4.8.3.1 All version..................................................................................................................................................... 7
4.8.3.2 When combining with the version before V.2.10 Release1.................................................................... 7
4.8.4 In the case of MR7700 (for 7700 series) ------------------------------------------------------------- 8
4.8.5 In the case of MR32R (for M32R series)------------------------------------------------------------- 9
5. Tool News
10
5.1 MESCT-TM-001016D
5.1.1 On Performing Build---------------------------------------------------------------------------------5.2 MESCT-TM_2-001216D
5.2.1 On canceling builds ----------------------------------------------------------------------------------5.3 MESCT-TM-021216D
Rev.2.00 Februray. 20, 2006
REJ10J0019-0200
page 1 of 21
10
10
10
10
11
TM V.3.20A Release note
5.3.1 Information on Releasing the Function-Enhancing Patch Tool for TM V.3.20(A) Included with the
Windows' Versions of C Compilers M3T-CC32R, M3T-NC308WA, and M3T-NC30WA ------- 11
5.4 RSO-TM-030916D
12
5.4.1 On scanning the dependencies of header files on a source file ---------------------------------- 12
5.5 RSO-TM-031016D
13
5.5.1 On editing commands using the project editor ---------------------------------------------------- 13
5.6 RSO-TM-040416D
13
5.6.1 On Scan All Dependencies Function---------------------------------------------------------------- 13
5.7 RSO-TM-041201D
13
5.7.1 On using the inspector -------------------------------------------------------------------------------- 13
5.8 RSO-TM-050116D
14
5.8.1 On changing the directory to which created files are output ------------------------------------- 14
6. Version Report
16
6.1 V3.20->V.3.20A
6.2 V.3.11->V.3.20
6.3 V.3.10->V.3.11
6.4 V.3.01->V.3.10
6.5 V.3.00->V.3.01
6.6 V.2.11->V.3.00
16
16
16
17
17
17
7. Manual supplement
18
8. A former project and opening of existent makefile
19
8.1 Setup Contents
8.2 Setup Procedure
Rev.2.00 Februray. 20, 2006
REJ10J0019-0200
19
19
page 2 of 21
TM V.3.20A Release note
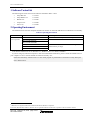
1. Software Version List
The following lists each version of the software included in TM V.3.20A.
∗
ProjectBar.exe
V.3.20.01
∗
ProjectEditor.exe
V.3.20.05
∗
Builder.exe
V.3.20.00
∗
Inspector.exe
V.3.20.00
∗
Server.exe
V.3.20.00
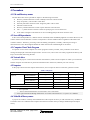
2. Operating Environment
The table below lists the host computers and the OS versions on which the TM has been confirmed to run normally.
Table 2-1 Operating Environment
Host Name
OS Version
Handling instructions
IBM 1 PC/AT
Microsoft 2 Windows95
More than Internet Explorer4.0 is being installed.
and compatible
Microsoft Windows98
Microsoft WindowsMe
Microsoft WindowsNT Workstation 4.0
Microsoft Windows2000 Professional
To install TM, the user have to be granted the
administrator privilege.
Microsoft WindowsXP
Note that the TM does not run on Windows 3.1, Windows NT 3.51 or earlier, and EWS.
If you are using any other host computer or OS version than those listed above, please consult the manufacturer of
your computer or OS to confirm whether the TM runs normally on it.
Please note that utility software such as a virus check program or performance acceleration tool may affect part
of the TM functions.
1 IBM and AT are registered trademarks of International Business Machines Corporation.
2 Microsoft, MS, MS-DOS, Windows, Windows NT are registered trademarks of Microsoft Corporation in the US and other countries.
Rev.2.00 Februray. 20, 2006
REJ10J0019-0200
page 3 of 21
TM V.3.20A Release note
3. Upgrading of the TM
3.1 Installation
The installer of TM V.3.20A is stored in the following directory of the CD-ROM.
\TM\W95e\Setup.exe (English version)
\TM\W95j\Setup.exe (Japanese version)
TM V.3.20A can coexist on same PC as the version before V.2.xx. In that case, it does not operate normally when
installing it in the same directory as the version before occasionally. Install it in the surely different directory.
3.2 Compiler and real time OS Combinations
TM V.3.20A operates normally in one of the following combinations of compilers and real time OS. Use TM
V.2.01 when you combine and use compiler or real time OS except for these.
Table 3-1 Compiler and real time OS Combinations
TM
Compiler Product
Real time OS Product
V.3.20A
After NC30WA V.4.00 Release 1
After NC308WA V.3.00 Release 1
MR30 V.3.00 Release 1*
After MR30 V.3.20 Release 1
MR308 V.1.00 Release 1*
After NC79WA V.4.00 Release 1
After MR308 V.1.00 Release 2
MR79 V.1.10 Release 1*
After MR79 V.2.00 Release 1
After CC32R V.3.00 Release 1
After NC77WA V.5.20 Release 4
After MR32R V.3.30 Release 1
MR7700 V.3.20 Release 3*
After SRA74 V.4.10 Release 1
----------
When using any product marked by “*” and TM V.3.20A in combination
Once, Carry out “V2CVT.EXE” of the CD-ROM directory ([TM_V2]-[W95e]) which a TMV.2.01 installation
program is in through. This program is Wizard form in the same way as the installation program. When operation
is completed in accordance with the process, TM recognizes the product of the “*” mark.
Rev.2.00 Februray. 20, 2006
REJ10J0019-0200
page 4 of 21
TM V.3.20A Release note
4. Precautions
4.1 File and Directory names
The file names that can be specified are subject to the following restrictions.
●
Directory and file names that contain a multibyte character cannot be used.
●
Only one period (.) can be used in a file name.
●
Network path names cannot be used. Assign the path to a drive name.
●
Shortcuts cannot be used.
●
Directory and file names that contain a space character cannot be used.
●
The “...” symbol cannot be used as a means of specifying two or more directories.
●
A file name in length of 128 characters or more including path specification cannot be used.
4.2 Scan All Dependencies
In the “Scan All Dependencies”, #define sentence is defined, and an undefined judgment is not done. Moreover, the
content of the source file between # if-#else is analyzed for # if-#else-#endif sentence regardless of the truth of the
condition sentence. Therefore, processing is done in building (compilation, assembly, and link) processing as
described in the source file though the header file which the customer intended might not be found.
4.3 Computer Virus Check Program
If a specific version of the computer virus check program is memory-resident, it may sometimes occur that no
message are displayed in the TM's Output window. In such a case, remove the virus check program from memory and
keep it nonresident while using the TM.
4.4 Network drive
If you have the project or source files located on network drive, make sure the computer on which you run the TM
and the computer on which files are placed are matched in time. Otherwise, build may not work correctly.
4.5 Inspector
In the project which used the compiler shown below, since an inspector has use restrictions, please be careful.
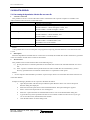
Table 4-1 Inspector
Inspector
SRA74
NC77WA
CC32R
function definition
---
---
*
function reference
---
---
---
variable definition
---
---
*
variable reference
---
---
---
MAPViewer
---
---
*
STKViewer
---
---
---
inspector
* : Use is possible.
--- : That an informational display is impossible or use is impossible.
"---" is the right information although STKViewer of CC32R is described to be "*" by the User’s Manual.
4.6 Makefile of library source.
A project can’t make it normally when makefile.dos of the compiler accessory is read with TM. Carry out Make in
accordance with User’s Manual of the compiler from the Dos window when you change standard input and output
library.
Rev.2.00 Februray. 20, 2006
REJ10J0019-0200
page 5 of 21
TM V.3.20A Release note
4.7 The TM project of the former version was taken over.
Precondition: With NC30WA, NC308WA, and NC79WA in the combination
When the project made with TM of the former version is read, Inspector information output option “-finfo” isn’t
added automatically, and it can’t indicate information with Inspector. Carry out building after you add a “-finfo”
option to CFLAGS and AFLAGS to indicate Inspector information.
4.8 Use real time OS
Be careful because a compilation option and the designation of link library must be changed when you change the
next definition item of Configration file.
And, refer to the manual of the real time OS which copes with it for Configration file and the details of each
definition item.
4.8.1 In the case of MR308 (for the M16C/80, M32C/80 series)
1)
When 32 was specified in the message size.
Compilation option
: -Dfar_msg=1 is specified.
Link library
: mr308lm.lib and c308mrlm.lib are specified.
<Example>
system {
:
message_size = 32;
:
};
2)
When 16 was specified in the message size or designation was omitted.
Compilation option
: -Dfar_msg=1 isn’t specified.
Link library
: mr308.lib and c308mr.lib are specified.
<Exapmle>
system {
:
message_size = 16;
:
};
3)
4)
5)
When you put the source file of C besides “Working Directory” (.\).
Compilation option
: -I.
When you put the assembler source file besides “Working Directory” (.\).
Assembly option
: -I.
When you specify the output destination of the objects besides “Working Directory” (.\).
mr308tbl option
: The directory is specified at the output destination.
4.8.2 In the case of MR30 (for M16C/60, 20 series)
1)
When 32 was specified in the message size.
Compilation option
: -Dfar_msg=1 is specified.
Link library
: mr30lm.lib and c30mrlm.lib are specified.
<Expamle>
system {
:
message_size = 32;
:
};
Rev.2.00 Februray. 20, 2006
REJ10J0019-0200
page 6 of 21
TM V.3.20A Release note
2)
When 16 was specified in the message size or designation was omitted.
Compilation option
: -Dfar_msg=1 isn’t specified.
Link library
: mr30.lib and c30mr.lib are specified.
<Example>
system {
:
message_size = 16;
:
};
3)
4)
5)
When you put the source file of C besides “Working Directory” (.\).
Compilation option
: -I.
When you put the assembler source file besides “Working Directory” (.\).
Assembly option
: -I.
When you specify the output destination of the objects besides “Working Directory” (.\).
mkmrtbl option
: The directory is specified at the output destination.
4.8.3 In the case of MR79 (for 7900 series)
4.8.3.1 All version
1)
2)
3)
The option which you must surely specify
Assembly option
: -DC_inc=0
When you put the source file of C besides “Working Directory” (.\).
Compilation option
: -I.
When you put the assembler source file besides “Working Directory” (.\).
Assembly option
: -I.
4.8.3.2 When combining with the version before V.2.10 Release1
1)
24 was specified in the message size. When STANDARD was specified in the interruption prohibition
model or designation was omitted.
Compilation option
: -Dfar_msg=1 –fMJI is specified.
Link library
: mr79lm.lib and c79mrlm.lib are specified.
<Expamle>
system {
:
message_size = 24;
interrupt_model = STANDARD;
:
};
2)
When 24 was specified in the message size and SHORT was specified in the interruption prohibition model.
Compilation option
: -Dfar_msg=1 is specified, and –fMJI isn’t specified.
Link library
: mr79lmi.lib and c79mrlmi.lib are specified.
<Example>
system {
:
message_size = 24;
interrupt_model = SHORT;
:
};
Rev.2.00 Februray. 20, 2006
REJ10J0019-0200
page 7 of 21
TM V.3.20A Release note
3)
When 16 was specified in the message size or designation was omitted, and STANDARD was specified in
the interruption prohibition model or designation was omitted.
Compilation option
: -Dfar_msg=1 isn’t specified, and –fMJI is specified.
Link library
: mr79sm.lib and c79mrsm.lib are specified.
<Example>
system {
:
message_size = 16;
interrupt_model = STANDARD;
:
};
4)
When 16 was specified in the message size and or designation was omitted, and SHORT was specified in
the interruption prohibition.
Compilation option
: -Dfar_msg=1 isn’t specified, and –fMJI is specified.
Link library
: mr79smi.lib and c79mrsmi.lib are specified.
<Example>
system {
:
message_size = 16;
interrupt_model = SHORT;
:
};
5)
When a time-out function is used.
Compilation option
:
-Dtimeout=1 is specified.
:
-Dtimeout=1 isn’t specified.
<Example>
system {
:
timeout = YES;
:
};
6)
When a time-out function isn’t used.
Compilation option
<Example>
system {
:
timeout = NO;
:
};
4.8.4 In the case of MR7700 (for 7700 series)
1)
When you put the source file of C besides “Working Directory” (.\).
Compilation option
: -I.
2)
24 was specified in the message size. When STANDARD was specified in the interruption prohibition
model or designation was omitted.
Compilation option
: -Dfar_msg=1 is specified.
Link library
: mr77lm.lib and c77mrlm.lib are specified.
<Expamle>
system {
:
message_size = 24;
interrupt_model = STANDARD;
:
};
Rev.2.00 Februray. 20, 2006
REJ10J0019-0200
page 8 of 21
TM V.3.20A Release note
3)
When 24 was specified in the message size and SHORT was specified in the interruption prohibition model.
Compilation option
: -Dfar_msg=1 is specified.
Link library
: mr77lmi.lib and c77mrlm.lib are specified.
<Example>
system {
:
message_size = 24;
interrupt_model = SHORT;
:
};
4)
When 16 was specified in the message size or designation was omitted, and STANDARD was specified in
the interruption prohibition model or designation was omitted.
Compilation option
: -Dfar_msg=1 isn’t specified.
Link library
: mr77sm.lib and c77mrsm.lib are specified.
<Example>
system {
:
message_size = 16;
interrupt_model = STANDARD;
:
};
5)
When 16 was specified in the message size and or designation was omitted, and SHORT was specified in
the interruption prohibition.
Compilation option
: -Dfar_msg=1 isn’t specified.
Link library
: mr77sm.lib and c77mrsmi.lib are specified.
<Example>
system {
:
message_size = 16;
interrupt_model = SHORT;
:
};
4.8.5 In the case of MR32R (for M32R series)
1)
2)
When you put the source file of C besides “Working Directory” (.\).
Compilation option
: -I.
When you put the assembler source file besides “Working Directory” (.\).
Assembly option
: -I.
Rev.2.00 Februray. 20, 2006
REJ10J0019-0200
page 9 of 21
TM V.3.20A Release note
5. Tool News
The tool news which remain as a problem are shown below. Be careful like notes.
5.1 MESCT-TM-001016D
5.1.1 On Performing Build
1.
Versions Concerned
TM V.3.00 -- V.3.20(A)
2.
Description
Even if a compile error arises, build is performed without stopping until linking is complete. However, link errors
will be detected because compilation is improperly terminated.
3.
Condition
This problem occurs if any of the assemble command options, for example, -as30, is used as an option for
compilation.
4.
Workaround
Should build not stop running even after a compile error arises, cancel the build by selecting [Action] --> [Cancel
Build] menu.
5.2 MESCT-TM_2-001216D
5.2.1 On canceling builds
1.
Versions Concerned
TM V.3.00 -- V.3.20(A)
2.
Problem
When builds or rebuilds are canceled, the cancellation cannot properly be terminated. So, TM may not continue its
operation.
3.
Conditions
This problem occurs if the following two conditions are satisfied:
(1) The host OS is Windows 2000 or Windows NT.
(2) A build is canceled before the message indicating the state of the build is displayed on the Builder window
after pressing the Build or Rebuild button on TM.
4.
Workaround
Avoid satisfying the above conditions.
If the problem occurs, restore Builder to its previous state with the following steps:
(1) Press CTRL+ALT+DEL to display Windows' Security window.
(2) Click the Task Manager button and invoke Windows' task manager.
(3) Click the Process tab.
(4) Select the following Image Names out of the processes displayed and click the End Process button:
a. cmd.exe
b. make.exe
c. mtmsubp.exe
Notes:
* Be sure to close the processes in order of (a), (b) and (c). However, you need not close processes not shown in
the Process tab.
* Check the state of Builder every time a process is closed. When the Cancel button on the Builder window is
displayed in shades of gray, it indicates the normal state, so do not close the process.
Rev.2.00 Februray. 20, 2006
REJ10J0019-0200
page 10 of 21
TM V.3.20A Release note
5.3 MESCT-TM-021216D
5.3.1 Information on Releasing the Function-Enhancing Patch Tool for TM V.3.20(A) Included with the
Windows' Versions of C Compilers M3T-CC32R, M3T-NC308WA, and M3T-NC30WA
1.
Feature of the Patch Tool
The patch tool to be released enhances the function of scanning the dependencies of files as follows:
Previously, the dependencies of included files on a source file have been created by making effective the lines
containing the #include preprocessor-directive statement in C language.
After the scanning function has been enhanced, on the contrary, the dependencies of files are created by excluding
the #include statements contained in the lines that become ineffective within the #if--#else--#endif block.
This change enables you to obtain the list of the include files dependent on a source file more correctly.
2.
Products and Versions Concerned
The patch tool can be used in the TM V.3.20(A) contained in the following C compiler products and their versions:
∗
M3T-CC32R V.2.10 Release 1--V.4.00 Release 1 (Windows version only)
∗
M3T-NC308WA V.3.00 Release 1--V.3.10 Release 3 (Windows version only)
∗
M3T-NC30WA V.4.00 Release 1--V.5.00 Release 2 (Windows version only)
3.
Source Files Concerned
The dependencies of header files on the following source files are scanned:
(1) For M3T-CC32R
C source files (Assembly source files are excluded.)
(2) For M3T-NC308WA and M3T-NC30WA
C and assembly source files
4.
How to Get and Install the Patch Tool
(1) Download the patch tool. (
http://www.renesas.com/jpn/products/mpumcu/toolhp/toolnews/files/tmv3patch_e.exe )
(2) When TM is running, close it.
(3) Execute the downloaded tmv3patch_e.exe file; then the installer will be invoked.
(4) Install the patch tool according to the installer's instructions.
[NOTICES:]
*This patch tool enhances the scanning function by making changes to the settings on the cross tool, not on the
TM. So, the patch tool must be executed each time a cross tool is installed since it has no effect on cross tools
that are only installed after a run of patch tool.
*To uninstall cross tools for which the patch tool has ever been executed, be sure to uninstall "Product Type TM
V.3 Information" first
Rev.2.00 Februray. 20, 2006
REJ10J0019-0200
page 11 of 21
TM V.3.20A Release note
5.4 RSO-TM-030916D
5.4.1 On scanning the dependencies of header files on a source file
1.
Versions Concerned
This problem occurs if a version of the TM is used in combination with a specific compiler or assembler. The
relations between them are shown in the table below.
TM
Compilers and Assemblers
V.3.20A
M3T-CC32R V.3.00 R1 through V.4.10 R1,
M3T-NC308WA V.3.00 R1 through V.5.00 R1, and
M3T-NC30WA V.4.00 R1 through V.5.00 R2
V.3.00 through V.3.20(*)
M3T-CC32R V.3.00 R1 and later,
M3T-NC308WA V.3.00 R1 and later, and
M3T-NC30WA V.4.00 R1 and later
V.3.00 through V.3.20A
M3T-NC79WA V.4.00 R1 and later,
M3T-NC77WA V.5.20 R4 and later, and
M3T-SRA74 V.4.10 R1 and later
V.3.20 and V.3.20A
M3T-ICC740 V.1.00 R1 and V.1.00 R1A
NOTE:
* The problem does not occur if the patch tool program for improving the TM's functions is executed on the TM
V.3.20.
Description
When the dependencies of header files on a source file are scanned, the include files saved in the directory specified
in the environment variable INCxx cannot be searched for.
2.
3.
Workaround
This problem can be circumvented in either of the following ways:
(1) Specify the relative or absolute path name of each header file written in the #include statement of a source
file.
(2) If the -I option is available which specifies directories where include files are searched for(*), use the
directory specified in the environment variable INCxx as a parameter of this option.
NOTE:
* All our compilers and assemblers provide the -I option except rasm77.exe in the M3T-NC77WA and sra74.exe
in the M3T-SRA74.
Example of Setting a parameter of the -I option in the M3T-NC30WA
a. Open Project Editor and select Project and then Option Browser menu. You will see the Option
Browser dialog box displayed.
b. Select the CFLAGS option-macro and click the Edit button. The Option dialog box appears.
c. Select "Control of Compile Driver" out of Categories.
d. Select the -I option and then click the Parameter button. You see the Set Parameter dialog box.
e. Type the directory name specified in the INCxx environment variable into the text box. If you type
two or more directories, delimit them with commas.
f.
Click the OK buttons on all the dialog boxes.
Rev.2.00 Februray. 20, 2006
REJ10J0019-0200
page 12 of 21
TM V.3.20A Release note
5.5 RSO-TM-031016D
5.5.1 On editing commands using the project editor
1.
Versions Concerned
TM V.3.20 -- V.3.20A
2.
Description
If a command is edited in the following steps, a link error that does not appear before editing may arise because the
contents of the command file are not updated correctly (if a rebuild is executed, the TM works properly):
(1) The project editor is displayed.
(2) The <Project name>.cmd file is opened in the project tree and then the "Project" -> "Edit item" ->
"Command" menu is selected.
(3) A command that includes no redirection character (> or >>) is placed in the first line of the command file in
the Command dialog box.
3.
Workaround
Be sure to place a command that includes a redirection character (> or >>) in the first line of the command file.
5.6 RSO-TM-040416D
5.6.1 On Scan All Dependencies Function
1.
Products and Versions Concerned
(1) The TM V.3.20 or V.3.20A used together with the M3T-CC32R V.4.20 Release 1
(2) The TM V.3.20 or V.3.20A used together with any of the M3T-CC32R V.2.10 Release 1 through V.4.00
Release 1 coming with the patch tool for enhancing the Scan All Dependencies function
2.
Description
When the dependencies of include files on a C-language source file are scanned, the include files that are specified
in the #include statement of the source file using their absolute pathnames cannot be included in the dependencies.
3.
Workaround
This problem can be circumvented in either of the following methods.
Especially, if include files are saved on different drives from the one where the C-language source file resides,
follow method (2):
(1) Specify the include files using their relative pathnames to the C-language source file.
(2) If only the names of include files are typed, use compile option -I. This option allows you to use an
absolute path or a relative path to specify the directory in which you search for an include file.
When the relative path is used, the working directory (the one where the project has been created) is taken as the
current directory.
5.7 RSO-TM-041201D
5.7.1 On using the inspector
1.
Products and Versions Concerned
TM V.3.00 through 3.20 used in any of the following C compiler packages:
M3T-NC308WA V.3.00 Release1 and later
(for the M32C/90, M32C/80 and M16C/80 series of MCUs)
M3T-NC30WA V.4.00 Release1 and later
(for the M16C/60, M16C/30, M16C/Tiny, M16C/20 M16C/10 and R8C/Tiny series of MCUs)
Rev.2.00 Februray. 20, 2006
REJ10J0019-0200
page 13 of 21
TM V.3.20A Release note
2.
Description
If a source file in a project contains an enum-type variable declared using typedef, the inspector is abnormally shut
down as soon as it is invoked.
3.
Conditions
This problem occurs if the following conditions are all satisfied:
(1) This problem occurs if the following conditions are all satisfied:
(2) The type name defined in (1) is re-defined as another using typedef.
(3) Another variable is defined using the type name re-defined in (2).
Example:
---------------------------------------------------------------------typedef enum _NUMBER{ NUM_0,NUM_1,NUM_2} NUMBER; /* Condition (1) */
typedef NUMBER NUM; /* Condition (2) */
NUM number;
/* Condition (3) */
----------------------------------------------------------------------
4.
Workaround
This problem can be circumvented either of the following ways:
(Example 1) Don't use the type name of an enumeration type defined using typedef.
-----------------------------------------------------------------typedef enum _NUMBER{ NUM_0,NUM_1,NUM_2} NUMBER;
typedef enum _NUMBER NUM; /* Type name of enum type
defined using typedef */
NUM number;
/* NUMBER not used */
-----------------------------------------------------------------(Exmaple 2) Don't re-define the type name of an enum-type variable as another using typedef.
-----------------------------------------------------------------typedef enum _NUMBER{ NUM_0,NUM_1,NUM_2} NUMBER;
/* typedef NUMBER NUM; */
/* NUM number; */
NUMBER number;
------------------------------------------------------------------
5.8 RSO-TM-050116D
5.8.1 On changing the directory to which created files are output
1.
Versions Concerned
TM V.3.00 through V.3.20A
2.
Description
If a source file is deleted or added after changing the output directory, information on the source file may not
correctly be updated in the project concerned. This problem occurs as follows:
(1) Select the OUTDIR macro from the Macro name list in the Macro Browser dialog box and click the Edit button.
The Add Macros dialog box will open. Then make a change to the content of the Value text box in this dialog box.
(2) Next, delete a source file entered in the project. The information on this source file seems to be deleted correctly
from the project at least on the display of the Project Editor dialog box, but actually it remains in the project.
(3) Or, if another source file that exists in a different directory from the one where the deleted source file resided
and that has the same name as the deleted file is added to the project, the OUTDIR information on the added file
will inherit the same one as before a change is made to the content of the Value text box, though the other items of
Rev.2.00 Februray. 20, 2006
REJ10J0019-0200
page 14 of 21
TM V.3.20A Release note
information are all updated.
Workaround
If a change is made to the OUTDIR macro in the Macro Browser dialog box, close the project editor once and then
reopen it to continue your operations.
3.
Rev.2.00 Februray. 20, 2006
REJ10J0019-0200
page 15 of 21
TM V.3.20A Release note
6. Version Report
6.1 V3.20->V.3.20A
There is no change of a function and specification.
6.2 V.3.11->V.3.20
The change point of TM V.3.20 is as the following from TMV.3.11
•
Known problem described in the February 1, 2001 issues of Tool News have been solved.
*
On scanning the dependencies of header files on a source file
•
Known problem described in the April 16, 2001 issues of Tool News have been solved.
*
On build after changing the output directory
*
On changing project names or output directories
•
Known problem described in the May 16, 2001 issues of Tool News have been solved.
*
On scanning the dependencies of header files on a source file
*
On setting projectbar appearance to AutoHide
•
Known problem described in the June 1, 2001 issues of Tool News have been solved.
*
On scanning the dependencies of header files on a source file
•
Known problem described in the August 16, 2001 issues of Tool News have been solved.
*
On TM V.3.xx reading project created by TM V.2.xx
•
Known problem described in the October 1, 2001 issues of Tool News have been solved.
*
On setting library paths in compiler M3T-CC32R for the M32R family MCUs
•
Known problem described in the November 16, 2001 issues of Tool News have been solved.
*
On scanning the dependencies of header files on a source file
•
Known problem described in the December 1, 2001 issues of Tool News have been solved.
*
On changing linking orders
•
Known problem described in the February 1, 2002 issues of Tool News have been solved.
*
On library projects
•
The jump function to "Development Support Tools HP" and "MCU Technical Information HP" was added
to the homepage button of a projectbar.
6.3 V.3.10->V.3.11
The change point of TM V.3.11 is as the following from TMV.3.10
•
Improvement in the speed of “Build”.
The processing time of “Build” was shortened.
•
Known problem described in the January 16, 2001 issues of Tool News have been solved.
*
On running TM on Windows 2000
*
On operations in the working directory
*
On using function "Open Project" on the project bar
•
Known problem described in the February 1, 2001 issues of Tool News have been solved.
*
On reading projects created by TM V.2.00 or V.2.01 into TM V.3.00, V.3.01, or V.3.10
•
Known problem described in the February 16, 2001 issues of Tool News have been solved.
*
On adding source files
Rev.2.00 Februray. 20, 2006
REJ10J0019-0200
page 16 of 21
TM V.3.20A Release note
6.4 V.3.01->V.3.10
The change point of TM V.3.10 is as the following from TMV.3.01
•
It corresponded to CC32R, NC77WA, and SRA74.
•
The window form of Inspector has been improved.
All information is displayed in one window.
•
Known problem described in the September 1, 2000 issues of Tool News have been solved.
*
On reading projects created by TM V.2.xx into TM V.3.xx
•
Known problem described in the October 16, 2000 issues of Tool News have been solved.
*
On scanning the dependencies of header files on the source file
*
On adding files to the project
•
Known problem described in the November 16, 2000 issues of Tool News have been solved.
*
On using build options
6.5 V.3.00->V.3.01
The change point of TM V.3.01 is as the following from TMV.3.00.
•
The support of English edition
English edition was supported.
•
Known problem described in the July 16, 2000 issues of Tool News have been solved.
*
When the user who didn’t have the authority of Administrator with Windows NT did building, an
error occurred, and the problem that a target file couldn’t be formed was repaired.
*
When renewal related to dependence was done, the problem that the header file described to the source
file wasn’t added to the project automatically was repaired.
6.6 V.2.11->V.3.00
The change point of TM V.3.00 is as the following form TMV.2.01.
Only Japanese edition
•
The change of the composition window form (GUI).
A function divides a window separately, and s start and so on is controlled from the ProjectBar. Therefore, a
screen is effectively available without opening the window which it unnecessary for.
•
The reading function addition of existent makefile.
Because makefile is read and a project can be made, a smooth switchover from the development
environment of the command base becomes possible.
•
The analytic function addition that a function and a variable are static
The absolute object file formed by building is read, and information on the function and the variable is
indicated.
•
The addition of registration item of the project
It learned to add a document and the information of the development member in the project. It can be
managed data such as the specification which related are collected.
As for the operation of each function, see an User's Manual.
Rev.2.00 Februray. 20, 2006
REJ10J0019-0200
page 17 of 21
TM V.3.20A Release note
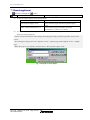
7. Manual supplement
button was changed into
button.
Home Page Display Button
Shows the home page of the Tool or MCU information.
(1) A click of a button displays the following menus.
Menu item
Function
Development Support Tools
Shows the home page of the Development Support
Tools.
MCU Technical Information ***
Shows the home page of the MCU Technical
Information (*** series or *** family).
(2) If a menu is chosen, the Internet browser software related with HTML by Windows will be started, and
home page will be displayed.
* "MCU Technical Information" menu changes the homepage to display with the target MCU chosen in the
project.
* The homepage to display turns into a Japanese version -> Japanese page and an English version -> English
page.
* When the project is not opened, a menu becomes a " Development Support Tools".
Fig. 7-1 Example of a menu display
Rev.2.00 Februray. 20, 2006
REJ10J0019-0200
page 18 of 21
TM V.3.20A Release note
8. A former project and opening of existent makefile
The project file (extension “.mtm”) made with TM of the former version, and makefile (extension “.mak”),
makefile of the user definition are read, and a setup is done so that the function of V.3.20A may be available. When a
setup is completed, the project file (extension “.tmi”) of the V.3.20A from and makefile (extension “.tmk”) are made
newly.
8.1 Setup Contents
The items that need to be set are listed below.
•
The confirmation of makefile
A makefile name to read is confirmed.
A made makefile famous (extension “.mak”) is set up automatically when the project file (extension
“.mtm”) made with TM of the former version is read.
•
The setup of the automatic detection
It is chosen whether a compiler tool package is set up by itself.
•
The choice of the compiler tool package
A compiler tool package to use is chosen.
•
Setting the real-time OS
Confirm whether or not you were using the real-time OS. If you were using the real-time OS, set up the
project to convert it into a MR-based project.
•
Confirmation
A setup item is confirmed.
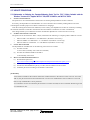
8.2 Setup Procedure
Do clicking of [Open Project] button of the tool bar if you click on [Open Project] button of the ProjectBar or you
choose menu [File]-[Open Project] of ProjectEditor. Complement Wizard of ProjectEditor starts with “A file is opend”
dialog when the project made with TM of the former version, or makefile is chosen and it clicks on Open button. Do
the operation of complement Wizard with the following process.
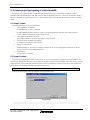
Step 1. The confirmation of makefile
It clicks on [Next] button when the makefile name indicated is right.
Fig. 8-1 Step1
Rev.2.00 Februray. 20, 2006
REJ10J0019-0200
page 19 of 21
TM V.3.20A Release note
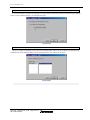
Step 2. The setup of the automatic detection
It is chosen whether a compiler tool package is set up by itself. Choose [Yes] usually, and click on [Next] button.
When it clicks on [Back] button, it is returned to the step 1.
Fig. 8-2 Step2
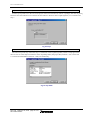
Step 3. The choice of the compiler package
Choose a compiler tool package to use, and click on [Next] button. The list of the compiler tool package being
installed in the list is indicated. When it clicks on [Back] button, it is returned to the step 2.
Fig. 8-3 Step3
Rev.2.00 Februray. 20, 2006
REJ10J0019-0200
page 20 of 21
TM V.3.20A Release note
Step 4. Setting the real-time OS
Examine [Yes] check box in the case of the project which uses real time OS. Choose a package, and click on [Next]
button because the indication box of the list becomes effective. When it clicks on [Back] button, it is returned to the
step 3.
Fig. 8-4 Step4
Step 5. Confirmation
The item set up in the step 4 from the step 1 is confirmed. Click on [Return] button, and do a setup again when
there is an error in the setup item. When it clicks on [Finish] button, the project file (extension “.tmi”) of the TM
V.3.20A from and makefile (extension “.tmk”) are made newly.
Fig. 8-5 Step Finish
Rev.2.00 Februray. 20, 2006
REJ10J0019-0200
page 21 of 21