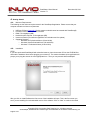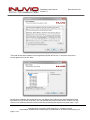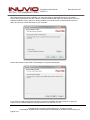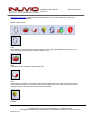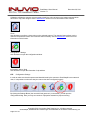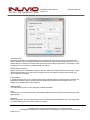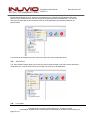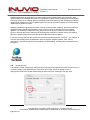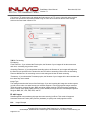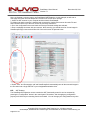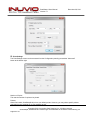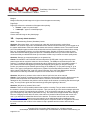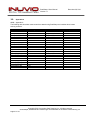
1
ScanSharp 6 User Manual Version 1.0 December 29, 2011 6 User Manual Copyright © 2011 Innovative Card Scanning, Inc. All rights reserved. ScanSharp®, ScanOCR® and related logos are trademarks of Innovative Card Scanning, Inc. Page 1 of 27 ScanSharp 6 User Manual Version 1.0 December 29, 2011 1. Welcome Congratulations on your purchase of INUVIO’s industry-leading ScanSharp® software. INUVIO™ solutions are the original card scanning application and have been used in over 250,000 installations worldwide since 2002. We encourage you to go through the User Manual to learn more about your new software. Look to the Contact INUVIO™ section if you have any questions on the manual or use of your software. 2. Disclaimer The software described in this manual is furnished under an End-User License Agreement (EULA) and may be used only in accordance with the terms of the agreement. The products described in this document are distributed under licenses restricting its use, copying, distribution, and de-compilation / reverse engineering. No part of this document may be reproduced in any form by any means without prior written authorization of INUVIO™. THE DOCUMENTATION IS PROVIDED “AS IS” AND ALL EXPRESS OR IMPLIED CONDITIONS, REPRESENTATIONS AND WARRANTIES, INCLUDING ANY IMPLIED WARRANTY OF MERCHANTABILITY, FITNESS FOR A PARTICULAR PURPOSE OR NON-INFRINGEMENT, ARE DISCLAIMED, EXCEPT TO THE EXTENT THAT SUCH DISCLAIMERS ARE HELD TO BE LEGALLY INVALID. INUVIO SHALL NOT BE LIABLE FOR INCIDENTAL OR CONSEQUENTIAL DAMAGES IN CONNECTION WITH THE FURNISHING, PERFORMANCE, OR USE OF THIS DOCUMENTATION. THE INFORMATION CONTAINED IN THIS DOCUMENTATION IS SUBJECT TO CHANGE WITHOUT NOTICE. The documentation may include technical inaccuracies or typographical errors and occasionally variations exist between what is in the documentation and the current software version. The descriptions and specifications were effective at the time of the publication of this manual. INUVIO™ will produce updated versions of this manual at any time without notice and without occurring obligations. Innovative Card Scanning, Inc. DBA INUVIO™ 1100 Jupiter Road Suite 170 Plano, TX 75074 214-550-5995 214-292-8813 Fax 800-291-1471 Toll Free www.inuvio.com 3. Contact Us 3.1. Technical Support INUVIO™ maintains a support center in Dallas, Texas. Technical Support’s primary role is to respond to questions about product features and functionality. The Technical Support group also authors content for updated manuals and our online Knowledge Base which can be found at www.inuvio.com. The group works collaboratively with the other groups within INUVIO™ to answer your questions in a timely fashion. ScanSharp® 6.0 includes an industry-leading 24 months of warranty, maintenance and support for FREE! Copyright © 2011 Innovative Card Scanning, Inc. All rights reserved. ScanSharp®, ScanOCR® and related logos are trademarks of Innovative Card Scanning, Inc. Page 2 of 27 ScanSharp 6 User Manual Version 1.0 December 29, 2011 INUVIO™ offers both telephone and web-based Technical Support. Phone support is available from 8AM to 6PM Central time by dialing 1-800-291-1471 option 2. Web support is available through an account login at www.scansharp.com/MyAccount. You may also contact us at [email protected]. Technical Support is available to assist with the following types of issues: Questions regarding product licensing or serialization Troubleshooting hardware and software issues Product registration updates such as address or name changes Latest information about product updates and upgrades Before contacting Technical Support, make sure you have satisfied the system requirements that are listed in the product documentation. Also, you should be at the computer on which the problem occurred, in case it is necessary to recreate the problem. When you contact Technical Support, please have the following information available: Hardware Information / Serial Numbers Operating system (OS) / Windows Version Information Software Version / License KEY Information Problem description, including error messages and troubleshooting that was performed before contacting ICS 3.2. Development Support INUVIO™ offers both free telephone and web-based development support. Phone support is available from 8AM to 6PM Central time by dialing 1-800-291-1471option 4. Web support is available through an account login at www.scansharp.com/MyAccount. You may also contact us at [email protected]. Development Support is available to assist with the following types of issues: Integrator support questions Software Development Kit questions Customer Development and Integration questions 3.3. Sales Support INUVIO™ offers both free telephone and web-based sales support. Phone support is available from 8AM to 6PM Central time by dialing 1-800-291-1471 option 3. Web support is available through an account login at www.scansharp.com/MyAccount. You may also contact us at [email protected]. Sales Support is available to assist with the following issues: General Product Information Phone Orders / Order Tracking Non-Technical Presales Questions Product Integration Questions / Concerns Copyright © 2011 Innovative Card Scanning, Inc. All rights reserved. ScanSharp®, ScanOCR® and related logos are trademarks of Innovative Card Scanning, Inc. Page 3 of 27 ScanSharp 6 User Manual Version 1.0 December 29, 2011 Table Of Contents 1. WELCOME .................................................................................................................. 2 2. DISCLAIMER .............................................................................................................. 2 3. CONTACT US .............................................................................................................. 2 3.1. 3.2. 3.3. 4. GETTING STARTED ..................................................................................................... 6 4.1. 4.2. 4.3. 5. MINIMUM REQUIREMENTS ..........................................................................................................................6 INSTALLATION .............................................................................................................................................6 LICENSING ...................................................................................................................................................9 SCANSHARP® AND YOUR SCANNER (HARDWARE) ................................................... 10 5.1. 5.2. 6. TECHNICAL SUPPORT ..................................................................................................................................2 DEVELOPMENT SUPPORT .............................................................................................................................3 SALES SUPPORT ...........................................................................................................................................3 TWAIN INTERFACE ..................................................................................................................................10 SCANNER (HARDWARE) MAINTENANCE ....................................................................................................10 CONFIGURATION ..................................................................................................... 11 6.1. USER INTERFACE EXPLAINED ....................................................................................................................11 6.1.1. Directory Explorer ..........................................................................................................................11 6.1.2. Image Viewer ..................................................................................................................................12 6.1.3. Scanner Selection ............................................................................................................................13 6.1.4. Image Toolbar .................................................................................................................................14 6.2. CONFIGURATION SETTINGS ........................................................................................................................15 6.2.1. Image Concatenation ......................................................................................................................17 7. SCANNING ............................................................................................................... 18 7.1. USAGE EXAMPLE .......................................................................................................................................18 7.2. AUTO-SCAN ..............................................................................................................................................18 7.3. SAVE & EMAIL ..........................................................................................................................................19 7.4. LIVE UPDATE.............................................................................................................................................19 7.5. HEADER & FOOTER ...................................................................................................................................20 7.6. OUTPUT SETTINGS .....................................................................................................................................21 7.6.1. Save to Location ..............................................................................................................................21 7.6.2. Save to FTP .....................................................................................................................................21 7.6.3. File Naming ....................................................................................................................................22 8. ADF SUPPORT .......................................................................................................... 22 8.1. 8.2. 9. USAGE EXAMPLE .......................................................................................................................................22 ADF SETTINGS ..........................................................................................................................................23 PRINT SETTINGS ..................................................................................................... 24 10. FREQUENTLY ASKED QUESTIONS ............................................................................. 25 Copyright © 2011 Innovative Card Scanning, Inc. All rights reserved. ScanSharp®, ScanOCR® and related logos are trademarks of Innovative Card Scanning, Inc. Page 4 of 27 ScanSharp 6 User Manual Version 1.0 10.1. 10.2. December 29, 2011 TROUBLESHOOTING SCANNER (HARDWARE) ISSUES ............................................................................25 TROUBLESHOOTING SOFTWARE (SCANSHARP®) ISSUES ......................................................................26 11. APPENDICES ............................................................................................................ 27 11.1. APPENDIX A .........................................................................................................................................27 Copyright © 2011 Innovative Card Scanning, Inc. All rights reserved. ScanSharp®, ScanOCR® and related logos are trademarks of Innovative Card Scanning, Inc. Page 5 of 27 ScanSharp 6 User Manual Version 1.0 December 29, 2011 4. Getting Started 4.1. Minimum Requirements The following are the minimum requirements for the ScanSharp® application. Please ensure that your computer meets the minimum requirements. 4.2. USB port (Refer to Appendix A for the scanner models that we have tested with ScanSharp®) Processor: Intel Pentium 4 3GHz Processor RAM: 512 megabytes (MB) Hard disk space required: 10.8 megabytes (MB) Internet connection (for software registration and activation and live update) Operating Systems: o Windows XP Professional/Home (32 and 64 bit) o Windows Vista Professional/Home (32 and 64 bit) o Windows 7 Professional/Home (32 and 64 bit) Installation STOP: If you have purchased ScanSharp® with a bundled scanner, place the scanner CD into the CD-ROM first and load the hardware driver before plugging your scanner in. The scanner hardware driver application will prompt you to plug the scanner in at the appropriate time. Then you can proceed with ScanSharp®. After you click on Install Software the first screen of the installation will open. This is the first screen you see if you are installing from a downloaded version of the software. Click on “Next” to continue the install. Copyright © 2011 Innovative Card Scanning, Inc. All rights reserved. ScanSharp®, ScanOCR® and related logos are trademarks of Innovative Card Scanning, Inc. Page 6 of 27 ScanSharp 6 User Manual Version 1.0 December 29, 2011 Then read the End User Software License Agreement (EULA) and click on “I Accept the terms of the license agreement” and click “Next”. By default the installation will load shortcuts into your Startup folder (this will auto start ScanSharp® each time when you log onto your computer), onto your desktop and into your Quick Launch Toolbar. You may choose not to install the shortcuts at these locations by deselecting the checkmark by each option. If you Copyright © 2011 Innovative Card Scanning, Inc. All rights reserved. ScanSharp®, ScanOCR® and related logos are trademarks of Innovative Card Scanning, Inc. Page 7 of 27 ScanSharp 6 User Manual Version 1.0 December 29, 2011 have a bundled scanner with the software, you may now choose to install the drivers for your scanner. Choose the correct scanner from the “Drivers” list and the software will install your drivers at the end of the software installation. If your scanner is already installed you may still choose to load the drivers from the disk if they are more recent than those on your computer. Choose the location for the install of ScanSharp® or accept the default path. If you chose to install scanner drivers during the install, the installation will now prompt you to plug your scanner into an available USB port. Plug the scanner in now and click on “OK”. Copyright © 2011 Innovative Card Scanning, Inc. All rights reserved. ScanSharp®, ScanOCR® and related logos are trademarks of Innovative Card Scanning, Inc. Page 8 of 27 ScanSharp 6 User Manual Version 1.0 December 29, 2011 This concludes the software installation. Product licensing will immediately follow. 4.3. Licensing INUVIO grants to you the right to use one copy of ScanSharp® software on a single computer or on single network server. If you install the ScanSharp® software on a network server, you must acquire and dedicate a license for each separate computer that will be used to operate the software. A license for ScanSharp® software may not be shared or used concurrently on more than one computer. When executing the software for the first time the software will request your license KEY for the product Your permanent or trial license KEY should be entered at this time. The license KEY is automatically converted to uppercase and the dashes are added as you type. Press “OK” to continue to product registration. The license KEY will usually be delivered via E-MAIL from [email protected]. After entering a permanent license KEY and pressing “OK”, you will be prompted with a product registration dialog. Here we request some important information that will help us improve the quality of our support. Please take the time to enter the required information. If your license KEY is temporary you will Copyright © 2011 Innovative Card Scanning, Inc. All rights reserved. ScanSharp®, ScanOCR® and related logos are trademarks of Innovative Card Scanning, Inc. Page 9 of 27 ScanSharp 6 User Manual Version 1.0 December 29, 2011 see the following screen. The information provided will help you transition to a permanent license KEY. There is a counter displaying the number of days remaining for the trial period. You may click “Buy Online…” to be directed to the ScanSharp® website at www.scansharp.com to purchase a new permanent KEY or contact our sales department at [email protected]. After purchasing a license KEY, click “Enter License Key…” If you choose not to purchase it at this time, and there are 30 days remaining in the trial period, click “Continue” to launch the ScanSharp® application. 5. ScanSharp® and your Scanner (Hardware) 5.1. TWAIN Interface ScanSharp® uses the TWAIN interface to interact with your scanner. As long as your scanner supports the standard TWAIN interface, you should be able to use ScanSharp® with your scanner. You can find out if your scanner supports the standard TWAIN interface by going to the Scanner Manufacturer’s website. If you have purchased your scanner with us, you can rest assured that our scanners fully support the standard TWAIN interface and will work with ScanSharp®, especially DocketPORT® and EcoScan®. 5.2. Scanner (Hardware) Maintenance Your scanner from time to time may require calibration or cleaning depending on the model of scanner that you purchased. Please read the sections below to learn more about the maintenance that your scanner may require. Calibrating your scanner Not all scanners require calibration. Calibration will help the scanner more accurately identify the color variance on the images scanned which will result in crisp, clear images. For the scanners that support calibration, it is recommended that you run calibration every 6 months. Scanners that need calibration will often show long straight lines running down the length of their scan results. If you have purchased your scanner with us, you can rest assured that our scanners fully support the calibration feature. However, EcoScan ADF (Automatic Document Feed) scanners calibrate automatically and require no calibration. You can calibrate your scanner by clicking on the “Calibrate” button to start the calibration process. Insert the calibration paper as required. The calibration sheets, which come with the scanners, are white sheets of paper with black bars on both sides. If you lose your calibration sheets you can use a white sheet of paper, but it is better to buy replacements, if possible. Calibration sheets can be ordered at www.inuvio.com/store. Cleaning your scanner Not all scanners support cleaning. The cleaning feature allows you the clean the faceplate and rollers on the scanner when necessary. In time all scanners will get dirty. For example, you may notice some dark lines on scans or the scanner having trouble with minor paper jams or paper feed issues. You can find out if your scanner supports the cleaning feature by going to the Scanner Manufacturer’s website. If you have purchased your scanner with us, you can rest assured that our scanners fully support the cleaning feature. Copyright © 2011 Innovative Card Scanning, Inc. All rights reserved. ScanSharp®, ScanOCR® and related logos are trademarks of Innovative Card Scanning, Inc. Page 10 of 27 ScanSharp 6 User Manual Version 1.0 December 29, 2011 To initiate the cleaning feature with the scanner we have sold you, apply just a little isopropyl alcohol and spread it out on the white porous sheet (cleaning paper) that came with your scanner. Click on the “Clean” button to start the cleaning process. Insert the cleaning paper as required. Cleaning sheets can be ordered at www.inuvio.com/store. 6. Configuration 6.1. User Interface Explained After you set up ScanSharp® for first use, you will next encounter the main scanning screen as pictured below: 6.1.1. Directory Explorer Copyright © 2011 Innovative Card Scanning, Inc. All rights reserved. ScanSharp®, ScanOCR® and related logos are trademarks of Innovative Card Scanning, Inc. Page 11 of 27 ScanSharp 6 User Manual Version 1.0 December 29, 2011 This is the directory explorer in ScanSharp®. Using the directory explorer, you can select a folder to view your scanned, merged, or imported files. When you click on a folder and the folder becomes highlighted, ScanSharp® will look for any files in the selected folder that have been scanned, merged, or imported into ScanSharp®. If files are found, ScanSharp® will put them into thumbnail form into the file viewer. When you scan images or import them, they will be saved into the default directory that you have selected in configuarion. 6.1.2. Image Viewer The Image Viewer is useful when there are two or more images in a scan scheme, and you wish to save, rotate, or print a specific image. Additionally, the Image Viewer is used when you wish to save, rotate, or print the selected image. Copyright © 2011 Innovative Card Scanning, Inc. All rights reserved. ScanSharp®, ScanOCR® and related logos are trademarks of Innovative Card Scanning, Inc. Page 12 of 27 ScanSharp 6 User Manual Version 1.0 December 29, 2011 6.1.3. Scanner Selection At the top of the main screen, you will see “File” and then a “Select Scanner” dropdown box from which you can select the currently used scanner. Next to it is the “Options” dropdown, from which you can configure some settings, such as Image, Output, Header & Footer, Print and more. From the Options menu, you may also choose to calibrate or clean your scanner. The buttons directly below these menus allow you to manually scan, (if auto-scan is disabled), file, print, calibrate, clean, change settings, and ask for help. When you load ScanSharp®, the configurations will populate a list of available TWAIN drivers for your machine. After you click the dropdown and select your scanner and ScanSharp® will automatically try to detect the scanner you have selected. If you do not see your scanner in the Scanner list, and we have provided you with your scanner, please refer to the CD that came with the scanner or visit our site at Copyright © 2011 Innovative Card Scanning, Inc. All rights reserved. ScanSharp®, ScanOCR® and related logos are trademarks of Innovative Card Scanning, Inc. Page 13 of 27 ScanSharp 6 User Manual Version 1.0 December 29, 2011 www.inuvio.com/service and download the TWAIN drivers for your scanner. Otherwise, refer to your scanner manufacturer’s website. 6.1.4. Image Toolbar Scan Use this button to command the connected scanner to scan. If the auto-delay feature is turned on, this button will appear grayed out and you will be unable to use it. Save This button saves or outputs the active image to file. Print Use this button to perform a print action on the selected images types. This action will send the current viewing image to the printer. The Printer Dialog screen always allows you to select a printer and choose certain print options. See the Print Section for more information. Calibrate Copyright © 2011 Innovative Card Scanning, Inc. All rights reserved. ScanSharp®, ScanOCR® and related logos are trademarks of Innovative Card Scanning, Inc. Page 14 of 27 ScanSharp 6 User Manual Version 1.0 December 29, 2011 Calibration will help the scanner more accurately identify the color variance on the images scanned which will result in crisp, clear images. See the Maintenance section for more information on this function. Clean Use this button to perform a clean action on the selected scanner. The cleaning feature allows you the clean the faceplate and rollers on the scanner when necessary. See the Maintenance section for more information on this function. Configuration / Settings Use this button to open the configuration window. Information / About / Help Use this button to open the information / help window. 6.2. Configuration Settings In order to make sure that the unprocessed data delivered by the scanner to ScanSharp® is accurate and clear, it is important to make sure that your scanner has been configured properly. By clicking the Settings Button (the one with 3 little gears on it) in the toolbar, you will open the configuration dialog. Here you may set a number of properties essential to proper scanning. Copyright © 2011 Innovative Card Scanning, Inc. All rights reserved. ScanSharp®, ScanOCR® and related logos are trademarks of Innovative Card Scanning, Inc. Page 15 of 27 ScanSharp 6 User Manual Version 1.0 December 29, 2011 Auto-Scan Delay This property will indicate to ScanSharp® that the scanner is to wait until a document is detected in the device, and then wait a configurable number of seconds before automatically scanning the document. The default value is 0.5 second, but newer users may choose to have the program wait 2 or 3 seconds in order to make sure the documents go straight through the scanner. Disable Duplex Scanning Duplex scanning can be disabled for duplex scanners in order to get single sided scans as desired. Check “Disable Duplex Scanning” to scan only one image at a time (for example, business cards usually only have 1 side with information). Timeout Delay If, during the middle of a scan, a certain number of seconds pass without a new image being scanned, the program will determine that the scheme has been prematurely terminated and complete it as is. This setting can be changed under Timeout Delay. Scanning Mode You may choose to scan in Color, Grayscale, or Black and White. Color Selecting color, you can expect scans to take slightly longer and result in larger file sizes, but having much higher quality. Grayscale Selecting grayscale, you can expect scans to come in white and different shades of gray. The image sizes are smaller than a color scan but the quality is also lower. Copyright © 2011 Innovative Card Scanning, Inc. All rights reserved. ScanSharp®, ScanOCR® and related logos are trademarks of Innovative Card Scanning, Inc. Page 16 of 27 ScanSharp 6 User Manual Version 1.0 December 29, 2011 Black and White Selecting black and white, you can expect scans to come only in black and white. The image size would be slightly smaller than that of grayscale images, but the quality would be significantly lower. DPI DPI stands for Dots Per Inch. This setting controls the resolution of the scanned images. The higher the resolution, the higher the quality of the image, but it also increases the size of the file. We recommend 150 DPI because we believe it gives the best balance of quality and file size. Scan Size / Width and Height This tells ScanSharp® the size of the document you intend to scan. There are many pre-defined selections, but you may choose your own by selecting custom. You may also choose to keep the default option, “Auto detect size”, which will allow ScanSharp® to make this decision automatically for each document. ADVANCED - Sides to Scan This property tells ScanSharp how many images will be read by the scanner before applying Post-Actions. If your device is set to scan in duplex, (both sides) each pass through the scanner counts as two sides. ADVANCED - Brightness Brightness, simply, is a measure of how light an image will appear after being scanned in. By default, this value is zero, but if your image comes in too dark, you may adjust it by increasing this property. 6.2.1. Image Concatenation By default, ScanSharp® will concatenate 2 scans into a single image (front and back into one image). When this item is checked, ScanSharp® will know to combine all of the images from the completed scan into one image. You may choose the order in which they are placed relative to each other and whether they will be “Vertical” or “Horizontal” based on the Concatenation Style selection you make in the configuration screen. Copyright © 2011 Innovative Card Scanning, Inc. All rights reserved. ScanSharp®, ScanOCR® and related logos are trademarks of Innovative Card Scanning, Inc. Page 17 of 27 ScanSharp 6 User Manual Version 1.0 December 29, 2011 ScanSharp® can be configured to suit almost any need for scanning. ScanSharp® has many settings that can be switched between on the fly as needed. Settings define ScanSharp®’s scanning flexibility. 7. Scanning 7.1. Usage Example Here, we illustrate a common way to use ScanSharp® Scanning Mode. In this example, we scan the front and back side of an insurance card and save the image in a location for image retrieval. 1. Attach a scanner to your computer, make sure that scanner’s driver has been installed, and Launch ScanSharp®. Tip: Make sure that the scanner is connected by checking the scanners listed in the dropdown menu under File and Select Scanner. If your scanner is installed and connected you will see if listed in this drop down menu. If not, you need to install and/or connect your desired scanner. Your scanner may also have a little green LED light on top of it which will light up when the drivers are installed and the scanner is connected properly. 2. Go to the configuration screen found under Options and Configurations and make sure that your desired settings are selected. 3. Scan a card with your scanner. If auto scan is on (the scanner icon in the top left will be grayed out), the scanner will start scanning automatically. Otherwise, click the scanner icon to start the scanning process. If you have a simplex scanner, a second scan will be necessary to capture the back side of the card. After scanning, you should see a list of new images in ScanSharp® as pictured below. 4. Ideally you are using all the automated features of ScanSharp® and the image is scanned, cropped, merged, saved and named automatically for you. Your image is now created and is ready to be saved to your selected target destination drive on your computer or server for your use such as importation into your database software. ScanSharp® makes it fast and easy to scan images and documents. 7.2. Auto-Scan Copyright © 2011 Innovative Card Scanning, Inc. All rights reserved. ScanSharp®, ScanOCR® and related logos are trademarks of Innovative Card Scanning, Inc. Page 18 of 27 ScanSharp 6 User Manual Version 1.0 December 29, 2011 By default ScanSharp® is set to “auto-scan” meaning that your selected scanning hardware will sense when an item is inserted into the scanner opening and beginning scanning automatically. You can turn auto scan off under Options and AutoScan at the top of the application by unchecking AutoScan as pictured below. You can set the time between scans or auto scan delay in the main configuration panel. 7.3. Save & Email The “Save & Email” feature allows you to save the current scanned image on the main screen and email it at the same time. Save & Email can be found under File at the top of the application. 7.4. Live Update Copyright © 2011 Innovative Card Scanning, Inc. All rights reserved. ScanSharp®, ScanOCR® and related logos are trademarks of Innovative Card Scanning, Inc. Page 19 of 27 ScanSharp 6 User Manual Version 1.0 December 29, 2011 ScanSharp® features an automated live update system geared towards limited user interaction. With updates enabled, ScanSharp® will search for new updates or apply existing updates prior to ScanSharp® executing. If there are no existing updates, ScanSharp® will finish starting up and download any available updates in the background. The LiveUpdate system will notify the user when updates are found and when updates will be applied on restart. Software updates are important and must be carefully considered when installing. We have provided an application called “ScanSharp LiveUpdate” which is used to check the INUVIO Server for available updates. The ScanSharp LiveUpdate is very useful in that it can give you feedback on the download process. Because the service utilizes the BITS (Background Intelligence Transfer Service) provided by Microsoft, updates will download much like Microsoft Windows receives updates. If you wish to simply exit from the service but continue the download process, click “Exit”. Use “Restart” to re-launch after shutting down ScanSharp® in order to apply the available updates. Click “Cancel Downloads” if you wish to stop all the new updates from downloading, including those completed but not yet applied. 7.5. Header & Footer The Header & Footer configuration setting allows you superimpose a label above, below and/or on top of a completed image. These labels become a part of the final image. Check the header, footer or superimpose text boxes to enable watermarking and then enter your message in the open field. Copyright © 2011 Innovative Card Scanning, Inc. All rights reserved. ScanSharp®, ScanOCR® and related logos are trademarks of Innovative Card Scanning, Inc. Page 20 of 27 ScanSharp 6 User Manual Version 1.0 December 29, 2011 Font The fonts available on the computer running ScanSharp will be available in the Font menu - along with options to set the font color, size, and opacity (higher opacity will result in darker text). Header, Footer and Superimposed Text For each of these, you may choose to display the available watermarks: Static Text – Custom text entered by the user. Time Stamp – Time when the scanned image is saved. File Name – The filename (e.g. file.jpg) once the image is saved. File Path – The file path (the directory and filename, e.g. C:\My ScanSharp\file.jpg) once the image is saved. File Directory – The file directory (the directory without the filename, e.g. C:\My ScanSharp\) once the image is saved. 7.6. Output Settings The Output settings control how the final image is stored. When a scan is finished the image is then saved according to the Output Settings. 7.6.1. Save to Location The Save to Location option saves the final image to the hard drive. Location The location is the default file path that will be used when saving the final image. If you click the “…” button to the right of the Location box, you can browse your local machine or network for a directory to select. 7.6.2. Save to FTP Copyright © 2011 Innovative Card Scanning, Inc. All rights reserved. ScanSharp®, ScanOCR® and related logos are trademarks of Innovative Card Scanning, Inc. Page 21 of 27 ScanSharp 6 User Manual Version 1.0 December 29, 2011 The Save to FTP option saves and uploads the final image to an FTP server. Using this option requires that the user provide the information needed to log on to the server as well as the file name settings similar to the ones listed in Save to File. 7.6.3. File Naming File Naming Fixed Filename – If you selected the Fixed option, the filename of your images will be the same name each time, overwriting any previous saves. Ascending Filename – If you selected the Ascending option, the filename of your images will begin with the filename you specified in the Filename box and end with an ascending number from the Ascending Filename Number box. No overwriting occurs in this setting and is ideal for batch scanning. Timestamp – If you selected the Timestamp option, the filename of your images will be the exact date and time when they were created. Image-Type This setting determines the format of the final image. If you are importing this image into another system, you will want to make sure what formats your software supports. Color and grayscale images saved as JPGs will produce compact file sizes. Black and white images saved as TIFs will have the smallest file sizes, but have lower quality. BMPs produce a more detailed, but larger file size. ScanSharp® supports 6 file types: BMP, GIF, JPG, PDF, PNG, and TIF. 8. ADF Support ScanSharp® will accommodate multi-page document scanning in offices. This mode will support a Automatic Document Feeder (ADF) scanner (hardware) to quickly scan multi-page documents. 8.1. Usage Example Copyright © 2011 Innovative Card Scanning, Inc. All rights reserved. ScanSharp®, ScanOCR® and related logos are trademarks of Innovative Card Scanning, Inc. Page 22 of 27 ScanSharp 6 User Manual Version 1.0 December 29, 2011 Here, we illustrate a common way to use ScanSharp® ADF Scanning. In this example, we will scan a multi-page document into ScanSharp® and convert it into a PDF file for storage. 1. Attach an ADF scanner to your computer and then launch ScanSharp®. Tip: Make sure that the scanner is installed and connected by checking the scanner list under File and Select Scanner at the top of the main screen as previously mentioned. 2. Go to the configuration screen and make sure that your desired settings are selected. 3. Scan a multipage document with your scanner. After scanning, you should see a list of new images in ScanSharp® image viewer at the bottom left of the main screen as pictured below. 4. Select “save” and file extension .pdf and ScanSharp® will automatically save all the scanned images in the file viewer into a single PDF file on your designated destination drive. 8.2. ADF Settings The ScanSharp® configuration screen controls the ADF functionality as well. It can be accessed by pressing the “Configuration” button in the control panel. Remember, after changing any configuration property it will affect all your scanning from there forward. You can change your configuration at any time. Copyright © 2011 Innovative Card Scanning, Inc. All rights reserved. ScanSharp®, ScanOCR® and related logos are trademarks of Innovative Card Scanning, Inc. Page 23 of 27 ScanSharp 6 User Manual Version 1.0 December 29, 2011 9. Print Settings The Print Settings screen can be accessed from the Configuration panel by pressed the “Advanced” button at the bottom right. Number of Copies This sets the number of copies to be printed. Printers When first loaded, ScanSharp® will print to your default printer. However, you may select specific printers connected to your computer or on your network as well. Copyright © 2011 Innovative Card Scanning, Inc. All rights reserved. ScanSharp®, ScanOCR® and related logos are trademarks of Innovative Card Scanning, Inc. Page 24 of 27 ScanSharp 6 User Manual Version 1.0 December 29, 2011 Margins Margins offset the printed image to the right or down the paper as necessary. Page Style Page style refers to the orientation of the paper when printing. Portrait – paper is in portrait style Landscape – paper is in landscape style Center Image Centers the final image on the printed page. 10. Frequently Asked Questions 10.1. Troubleshooting Scanner (Hardware) Issues Question: Scans have either: red or purple tinge, extra dark area, horizontal or vertical lines. Answer: Your scanner may need to be calibrated and/or cleaned. Please make sure you are logged on as the system administrator. Select the calibrate button and insert the calibration sheet. The scanner should pull in the calibration paper and the sheet should slide back and forth through the scanner before coming back out. ScanSharp® will inform you of the calibration status. Similarly for cleaning, select the clean button and insert the cleaning paper and press ok. ScanSharp® will inform you of the clean status. We recommend that you calibrate and clean your scanners at least every 6 months to ensure quality scans. Question: Scanner not connected properly or not powered on. Answer: DocketPORT and EcoScan® scanners ship with a 5ft USB cable. Longer cords may cause power issues and can cause the scanner to lose connection. The USB port could also be part of the problem. Try switching USB ports or disconnecting other USB devices to see if the problem persists. If your scanner worked at the beginning of the day and stopped working after you left your computer inactive, the problem may be Windows power saving in the USB ports. To turn power saving off, go to Start -> Run, type in devmgmt.msc and press ok. Expand “Universal Serial Bus controllers”. For each device named “USB Root Hub”, right click, select Properties. Go to the Power Management tab and uncheck the box that says “Allow the computer to turn off this device to save power”. Question: Why does my scanner make noise but doesn’t pull in the item to be scanned. Answer: If your scanner is making noise when you attempt to scan but does not pull in the document, the problem could be with the rollers inside the scanner. After time, the scanner’s rollers may become damaged or dirty. Sometimes the problem could as simple as the scanner not catching the document right away. You may need to guide the document through during the beginning of the scan. Question: Why does my scanner fail to scan? Solution: There are a few possible problems that could be occurring. First, you want to make sure that the scanner is securely connected to the computer. Then you want to go to the device manager and make sure that the scanner is recognized by the computer. To go to the device manager go to Start -> Run and type in devmgmt.msc and press ok (Windows XP only). The scanner will usually be listed under Imaging Devices. If Imaging Devices does not exist or the scanner is located in Other Devices with a error icon over it, you will need to reinstall the drivers for the scanner. The drivers can be found at our website, www.inuvio.com/service. Make sure you are logged in an as administrator before installing the new drivers. If the scanner’s drivers are installed correctly but the computer still fails to recognize the device as the correct scanner, then a failure in the scanner’s chip is probable and the scanner will need to be replaced. Copyright © 2011 Innovative Card Scanning, Inc. All rights reserved. ScanSharp®, ScanOCR® and related logos are trademarks of Innovative Card Scanning, Inc. Page 25 of 27 ScanSharp 6 User Manual Version 1.0 December 29, 2011 10.2. Troubleshooting Software (ScanSharp®) Issues Question: Why does ScanSharp® get an error during startup? Answer: Usually, customers have this problem when they have installed ScanSharp® using a nonadministrator account. However, it could be possible that one of ScanSharp’s critical files has been corrupted. If you uninstall ScanSharp® and reinstall using your CD and still have the same issues, then you may need the latest version of ScanSharp®. Please contact our technical support to obtain the link for the latest version of ScanSharp® at [email protected]. Question: Why are scanned images not saved at the location I specified? Answer: If images are not being saved at the location or the previous image is not being replaced, then there may be a problem with the file permissions. Sometimes the problem can be solved by manually deleting the previous file. However if that does not solve the problem, you may not have the rights on your computer to delete files. If you are not logged in as the system administrator, then please contact the system administrator to make sure you have access to delete and modify files in that folder. Question: How can I rename a file before I save it? Answer: By default, ScanSharp® will save the filename as Image.jpg. However if you would like to change the save settings, go to the configuration and select the Output Settings tab of the Configuration window. Make sure Save to Location is selected. You can change the way ScanSharp® names and saves files in the File Naming section of this tab. Question: How do I change scanners? Answer: You can select from a list of supported scanners under File Select Scanner. Question: Why does my software not start up when my computer boots up? Answer: Make sure that ScanSharp® is in the Startup folder by going to Start -> Programs -> Startup. If it is not, make a shortcut of ScanSharp® and drag it into the Startup folder. Question: How can I change the concatenation styles? Answer: After you have set your configuration, ScanSharp® will concatenate all scanned images into one image. To change the order the images are concatenated, go to configurations and press the “Advanced” button and then choose the desired configuration mode. More FAQs can be found at www.inuvio.com/solutions. Copyright © 2011 Innovative Card Scanning, Inc. All rights reserved. ScanSharp®, ScanOCR® and related logos are trademarks of Innovative Card Scanning, Inc. Page 26 of 27 ScanSharp 6 User Manual Version 1.0 11. December 29, 2011 Appendices 11.1. Appendix A The following table describes scanners we have tested using ScanSharp and consider these known working scanners. Scanner ScanShell 800 ScanShell 800N ScanShell 2000 ScanShell 2000N ScanShell 2000R ScanShell 2000NR ScanShell 3000D ScanShell 3000DN TravelScan 464 TravelScan 662 Fujitsu fi-5120C Fujitsu fi-60F Epson CX3810 DocketPORT 465 DocketPORT 467 DocketPORT 485 DocketPORT 487/488 DocketPORT 665 DocketPORT 667 DocketPORT 685 DocketPORT 687/688 ScanSharp® Yes Yes Yes Yes Yes Yes Yes Yes Yes Yes Yes Yes Yes Yes Yes Yes Yes Yes Yes Yes Yes Scanner EcoScan® i6s EcoScan® i6d EcoScan® i4s EcoScan® i4d EcoScan® iMd EcoScan® iAd Panasonic KV-S1025C Panasonic KV-S1045C Fujitsu fi-6130 Fujitsu fi-6140 Canon DR2010c EcoScan® i5s EcoScan® i5d Kodak i2600 ScanSharp® Yes Yes Yes Yes Yes Yes Yes Yes Yes Yes Yes Yes Yes Yes Copyright © 2011 Innovative Card Scanning, Inc. All rights reserved. ScanSharp®, ScanOCR® and related logos are trademarks of Innovative Card Scanning, Inc. Page 27 of 27