1
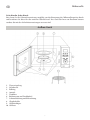
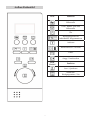
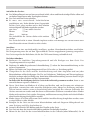
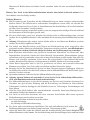
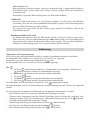
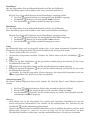
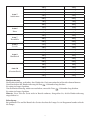
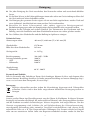
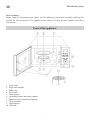
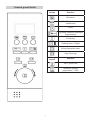
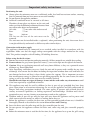
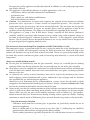
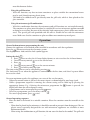
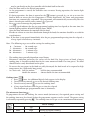
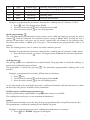
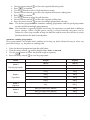
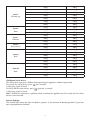
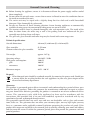
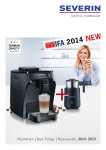
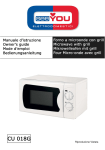
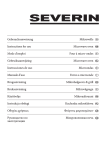
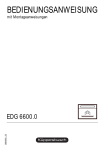
Gebrauchsanweisung Instructions for use Mikrowelle 쮕 Microwave oven Liebe Kundin, lieber Kunde, vielen Dank für Ihr Vertrauen. Wir freuen uns, dass Ihre Wahl auf ein SEVERIN Qualitätsprodukt gefallen ist und gratulieren Ihnen zu dieser Entscheidung. Die Marke SEVERIN steht seit über 115 Jahren für Beständigkeit, deutsche Qualität und Entwicklungskraft. Jedes Gerät der Marke SEVERIN wurde mit Sorgfalt geprüft und hergestellt. In den sechs Kategorien Frühstück, Küche, Grillen & Genießen, Haushalt, Beauty & Wellness und Kühlen & Gefrieren bietet SEVERIN mit über 200 verschiedenen Produkten ein umfassendes Sortiment an Elektrokleingeräten an. Wir haben für jeden Anlass genau das richtige Produkt für Sie. Besuchen Sie uns auch im Internet unter www.severin.de oder www.severin.com. Viel Spaß mit Ihrem neuen Gerät. Ihre Geschäftsleitung und Mitarbeiter der SEVERIN Elektrogeräte GmbH 2 쮕 Mikrowelle Liebe Kundin, lieber Kunde bitte lesen Sie die Gebrauchsanweisung sorgfältig vor der Benutzung des Mikrowellengerätes durch und bewahren Sie diese für den weiteren Gebrauch auf. Das Gerät darf nur von Personen benutzt werden, die mit den Sicherheitsanweisungen vertraut sind. Aufbau Gerät 1. 2. 3. 4. 5. 6. 7. 8. 9. 10. Türverriegelung Sichtfenster Rollring Antrieb Türöffner Bedientasten und Drehknebel Schutzabdeckung und Beleuchtung Glasdrehteller Grillheizkörper Grillrost 3 Aufbau Bedienfeld Taste Funktion Mikrowelle Grill / Kombi. Grill und Mikrowelle Uhr Bestätigungstaste für individuelles Programmieren Auftauen Kurzzeitmesser / Gewicht Timer Stopp / Unterbrechen DrehKnebel Funktion Start / Quickstart AutomatikKochprogramme / Zeit 4 Sicherheitshinweise Aufstellen des Gerätes: z Das Mikrowellengerät nur auf eine ausreichend stabile, ebene und hitzebeständige Fläche stellen und vor hohen Temperaturen oder Feuchtigkeit schützen. z Das Gerät nicht im Freien aufstellen. z Es muss eine ausreichende Luftzirkulation gewährleistet sein. Daher dürfen keine Gegenstände auf das Gerät gelegt werden und zu den Wänden müssen folgende Abstände eingehalten werden: eine Seite: 7,5 cm; andere Seite frei Hinten: 7,5 cm Oben: 30,0 cm Die Aufstellfüße des Gerätes dürfen nicht entfernt werden. Das Gerät darf nicht in einen Schrank eingebaut werden. Die Montage des Gerätes direkt unter einer Platte oder einem Schrank ist nicht erlaubt. Anschluss: Das Gerät nur an eine vorschriftsmäßig installierte, geerdete Schutzkontaktsteckdose anschließen. Die Netzspannung muss der auf dem Typenschild des Gerätes angegebenen Spannung entsprechen. Das Gerät entspricht den Richtlinien, die für die CE-Kennzeichnung verbindlich sind. Vor Inbetriebnahme: z Entfernen Sie sämtliches Verpackungsmaterial und alle Einlagen aus dem Gerät. Das Verpackungsmaterial ist recycelbar. z Entfernen Sie nicht die graubraune Schutzabdeckung (7) neben der Innenraumbeleuchtung an der rechten Garraumseite. z Halten Sie Kinder von Verpackungsmaterial fern. Es besteht u.a. Erstickungsgefahr! z Überprüfen Sie das Gerät und die Anschlussleitung nach dem Auspacken und vor jeder Inbetriebnahme auf Beschädigungen. Die Tür, incl. Sichtfenster, Türdichtung und Türverriegelungen, darf nicht verbogen oder beschädigt sein, damit keine Mikrowellenstrahlung austreten kann. Dies gilt auch für das gesamte Gehäuse und die Garraumwände. Im Falle einer Beschädigung darf das Gerät nicht in Betrieb genommen werden, bevor es von einem Fachmann repariert worden ist. z Dieses Gerät kann von Kindern ab 8 Jahren und darüber und von Personen mit reduzierten physischen, sensorischen oder mentalen Fähigkeiten oder Mangel an Erfahrung und/oder Wissen benutzt werden, wenn sie beaufsichtigt oder bezüglich des sicheren Gebrauchs des Gerätes unterwiesen wurden und die daraus resultierenden Gefahren verstanden haben. Kinder dürfen nicht mit dem Gerät spielen. Reinigung und Benutzerwartung dürfen nicht durch Kinder ohne Beaufsichtigung durchgeführt werden. z Kinder jünger als 8 Jahre sollten vom Gerät und der Anschlussleitung ferngehalten werden, wenn es eingeschaltet ist oder abkühlt. z Reinigen Sie das Gerät vor der ersten Inbetriebnahme und nach längerem Nichtgebrauch wie unter Reinigung und Pflege beschrieben ist. z Setzen Sie den Antrieb, den Rollring und den Glasteller in das Gerät. z Das Gerät nie ohne den Antrieb, den Rollring und den Glasdrehteller betreiben. z Heizen Sie das Gerät bei der ersten Inbetriebnahme in der Grillstufe (ohne Mikrowelle!) für 10 5 Minuten auf. Hierbei kann ein leichter Geruch entstehen, daher für eine ausreichende Belüftung sorgen. Hinweis: Das Gerät in der Mikrowellenfunktion niemals ohne Inhalt in Betrieb nehmen. Das Gerät könnte sonst beschädigt werden. Wichtige Hinweise: z Eine Erwärmung von Getränken mit der Mikrowelle kann zu einem verzögert ausbrechenden Kochen führen. Die üblicherweise auftretenden Dampfblasen treten nicht auf, obwohl der Siedepunkt schon erreicht ist. Daher ist beim Hantieren mit dem Behälter, z.B. bei der Entnahme aus dem Gerät, besondere Vorsicht geboten. Dieser Siedeverzug kann vermindert werden, wenn ein temperaturbeständiger Glasstab während des Erwärmens in die Flüssigkeit gestellt wird. z Eier mit Schale oder ganze hart gekochte Eier dürfen nicht in Mikrowellengeräten erwärmt werden, da sie explodieren können, selbst nachdem die Erwärmung durch Mikrowellen beendet ist. z Achtung: Flüssigkeiten oder andere Speisen dürfen nicht in verschlossenen Behältern erwärmt werden, da sie leicht explodieren können. z Der Inhalt von Babyfläschchen und Gläsern mit Kindernahrung muss umgerührt oder geschüttelt werden, damit eine gleichmäßige Temperaturverteilung entsteht. Anschließend muss die Temperatur vor dem Verbrauch überprüft werden, um Verbrennungen zu vermeiden! z Beim Erwärmen oder Kochen von Speisen in brennbaren Materialien, wie Kunststoff- oder Papierbehälter, besteht die Gefahr, dass dieses Material sich entzündet. Ebenso können Speisen austrocknen und sich entzünden, wenn eine zu lange Einschaltzeit gewählt wurde. Fette oder Öle können sich ebenfalls entzünden. Daher muss das eingeschaltete Gerät laufend überwacht werden. Brennbare Flüssigkeiten, z.B. konzentrierter Alkohol, dürfen nicht erwärmt werden. z Wenn Rauch abgegeben wird, ist die Tür geschlossen zu halten, um eventuell auftretende Flammen zu ersticken. Das Gerät sofort ausschalten und den Netzstecker ziehen. z Benutzen Sie bei der Entnahme der Speisen aus dem Garraum geeignete Topflappen. Nicht nur im Grillbetrieb wird das Geschirr heiß, sondern auch im Mikrowellenbetrieb, da die heiße Speise auch das Geschirr erwärmt. z Speisenthermometer sind nicht für den Mikrowellenbetrieb geeignet. z Achtung: Speisen können sich entzünden. Lassen Sie das Gerät während dem Mikrowellen-, Grill- und Kombinationsbetrieb niemals unbeaufsichtigt. z Das Mikrowellenkochgerät ist für die Erwärmung von Speisen und Getränken bestimmt. Das Trocknen von Speisen oder Kleidung und die Erwärmung von Heizkissen, Hausschuhen, Schwämmen, feuchten Putzlappen und Ähnliches kann zu Verletzungen, Entzündungen und Feuer führen. z Wird das Gerät falsch bedient oder zweckentfremdet verwendet, kann keine Haftung für evtl. auftretende Schäden übernommen werden. z Das Gerät ist nicht dazu bestimmt, mit einer externen Zeitschaltuhr oder einem separaten Fernbedienungssystem betrieben zu werden. z Das Gerät ausschalten und den Netzstecker ziehen: - vor jeder Reinigung, - bei Störungen während der Benutzung. z Das Gerät wird an berührbaren Oberflächen (Tür und Außenflächen) heiß und an den Entlüftungsöffnungen kann heißer Dampf austreten. Verbrennungsgefahr! z Achten Sie darauf, dass weder das Gehäuse noch die Anschlussleitung einer heißen Kochplatte oder offenen Flammen zu nahe kommt. Die Anschlussleitung nicht herunterhängen lassen und von heißen 6 Geräteteilen fernhalten. z Das Gerät muss in regelmäßigen Abständen gesäubert und von Speiseresten befreit werden. Wenn das Gerät nicht regelmäßig gesäubert wird, kann es dazu kommen, dass die Oberflächen verschleißen und die Lebensdauer stark eingeschränkt wird. Weiterhin kann es zur Einschränkung der Sicherheit und Funktion des Gerätes führen. z Das Gerät ist dazu bestimmt, im Haushalt und ähnlichen Anwendungen verwendet zu werden, wie z.B. - in Küchen für Mitarbeiter in Läden, Büros und anderen gewerblichen Bereichen - in landwirtschaftlichen Betrieben - von Kunden in Hotels, Motels und anderen Unterkünften - in Frühstückspensionen z Achtung: Es ist für alle anderen, außer für den Fachmann, gefährlich, irgendwelche Wartungsoder Reparaturarbeiten auszuführen, die die Entfernung einer Abdeckung erfordern, die den Schutz gegen Strahlenbelastung durch Mikrowellenenergie sicherstellt. Dies gilt auch für den Austausch der speziellen Anschlussleitung oder der Beleuchtung. Schicken Sie daher im Reparaturfall das Gerät zu unserem Kundendienst. Die Anschrift finden Sie im Anhang der Anweisung. z Dieses Produkt ist ein ISM-Gerät der Gruppe 2 Klasse B. Gruppe 2 umfasst alle ISM-Geräte (industrielle, wissenschaftliche, medizinische) in denen Radiofrequenzenergie entsteht und/oder in Form von elektromagnetischer Ausstrahlung zur Bearbeitung von Material benutzt wird, sowie Funkenerosionsgeräte. Klasse B sind Geräte für den Hausgebrauch oder an Stromversorungsnetzen, die Wohnunsgebäude speisen. Funktion der Mikrowelle (Gruppe II nach EN 55011:1998+A1+A2) Im Gerät werden elektromagnetische Wellen erzeugt, die die in den Speisen enthaltenen Moleküle, hauptsächlich Wassermoleküle, zu starken Schwingungen anregen. Aufgrund dieser Schwingungen entsteht Wärme. Lebensmittel mit einem hohen Flüssigkeitsgehalt erwärmen sich daher schneller als relativ trockene Lebensmittel. Die Erwärmung entsteht besonders schonend direkt im Lebensmittel. Das Geschirr wird nur indirekt von der Speise mit erwärmt. Geeignetes Geschirr verwenden: z Legen Sie die Lebensmittel zum Garen nicht direkt auf den Glasdrehteller, sondern benutzen Sie geeignetes Geschirr. Das Geschirr darf nicht über den Drehteller hinausragen. z Mikrowellen werden von metallischen Flächen reflektiert und können das Gargut nicht erreichen. Es kann außerdem zur Funkenbildung kommen, wenn sich Metall im Garraum befindet und das Gerät könnte hierdurch Schaden nehmen. z Bestecke oder Metallbehälter dürfen daher nicht im Mikrowellengerät verwendet werden. Einige Verpackungen enthalten, z.B. unter einer Papierschicht, Alu-Folie oder Drähte und sind daher ebenfalls ungeeignet. Sollte der Einsatz von Aluminiumfolie in einem Rezept empfohlen werden, muss diese eng an der Speise anliegen. Es muss sichergestellt sein, dass zwischen den Garraumwänden und der Aluminiumfolie mindestens ein Abstand von 2,5 cm eingehalten wird. z Geschirr darf kein Metalldekor enthalten, z.B. Goldrand oder metallhaltige Farben. Ungeeignet ist auch Bleikristall. Im Geschirr, z.B. in den Griffen, dürfen sich keine geschlossenen Hohlräume befinden. Poröses Geschirr kann eventuell beim Spülen Wasser aufnehmen und ist daher nicht geeignet. Geschirr aus dem Kunststoff Melamin nimmt Energie auf und ist ungeeignet. - Mikrowellenbetrieb - Geschirr aus hitzebeständigem Glas oder Porzellan eignet sich gut für den 7 Mikrowellenbetrieb. - Kunststoff kann verwendet werden, wenn er bis mindestens 180 °C temperaturbeständig ist. Bratschläuche oder -beutel sollten mit Löchern versehen werden, damit ein Druckanstieg vermieden wird. Im Handel ist spezielles Mikrowellengeschirr aus Kunststoff erhältlich. - Grillbetrieb - Für den Grillbetrieb können Sie alle hitzebeständigen Geschirrarten und Behälter verwenden, die auch für einen herkömmlichen Backofen geeignet sind. Kunststoffgeschirr darf im Grillbetrieb nicht verwendet werden! - Das Gargut kann auch direkt auf den Grillrost gelegt werden. Der Grillrost wird auf den Glasdrehteller gestellt. - Kombination Mikrowelle-Grill - Im Kombinationsbetrieb wird die Mikrowelle und der Grill wechselweise zugeschaltet. Daher muss das Geschirr mikrowellengeeignet und hitzebeständig sein. Kunststoffgeschirr kann aufgrund der hohen Temperaturen nicht benutzt werden. Der spezielle mitgelieferte Grillrost ist mikrowellengeeignet. Das Geschirr darf kein Metall enthalten. Bedienung Allgemeines zur Programmierung Das Gerät an eine vorschriftsmäßig installierte, geerdete Schutzkontaktsteckdose anschließen. Im Anzeigefeld wird „Willkommen Anleitung vor Gebrauch lesen“ angezeigt. Drücken Sie jetzt zum Aktivieren der Elektronik die Taste. Im Anzeigefeld steht nun 1:01 und das Uhrensymbol wir angezeigt. Uhr : 1. Die Taste einmal drücken und der 12 Stundenmodus wird angezeigt. Wird die Taste zweimal gedrückt, wird der 24 Stundenmodus angezeigt. 2. Drehknebel drehen, um die korrekte Stunde einzustellen. 3. Die Taste drücken. 4. Drehknebel drehen, um die korrekten Minuten einzustellen. 5. Die Taste drücken, um die Uhrzeiteinstellung abzuschließen. Die Einstellung der Uhr kann durch Drücken der Taste abgebrochen werden. Bei Inbetriebnahme und bei Unterbrechung der Stromversorgung muss die Uhrzeit neu eingestellt werden. Das Gerät arbeitet mit modernster Elektronik, um ein optimales Garergebnis zu erzielen. – Beim Drücken einer Taste ertönt ein Signalton, der die Eingabe bestätigt. – Während eines Programms kann die aktuelle Einstellung durch Drücken der jeweiligen Taste angezeigt werden. Wird z.B. während eines Mikrowellen-Programms die Taste gedrückt, erscheint im Anzeigefeld die eingestellte Leistung. – Um die Programmierung zu unterbrechen, die Taste einmal drücken. – Zum Neustart der Programmierung den Drehknebel drücken. – Zum Abbrechen der Programmierung die Taste 2 mal drücken. 8 Allgemeine Bedienfolge – Die zu erhitzende Speise in ein geeignetes Geschirr geben und auf den Glasdrehteller in den Garraum stellen. - Speisen im Mikrowellenbetrieb abdecken, damit ein Austrocknen verhindert wird. Mikrowellengeeignete Abdeckhauben aus Glas oder Kunststoff sind im Handel erhältlich. - Im Kombinations- oder Grillbetrieb keine Abdeckung verwenden. Der Grillrost kann auf den Glasdrehteller gestellt werden. Das Gargut dann direkt auf den Grillrost legen. – Die Tür schließen und gewünschtes Programm einstellen. – Nach dem Starten des Programms beginnt sich der Glasdrehteller sofort zu drehen und die Beleuchtung wird während des Garvorgangs zugeschaltet. – Wenn während dem Garvorgang die Tür geöffnet oder gedrückt wird, um z.B. die Speise zur gleichmäßigen Wärmeverteilung umzurühren, wird das Gerät abgeschaltet und die eingestellte Garzeit solange angehalten. Nachdem Sie die Tür wieder geschlossen und den Drehknebel gedrückt haben, läuft die Zeit weiter und der Garvorgang wird fortgesetzt. – Zum Abbrechen des Programms 2 mal drücken. – Nach Ablauf der eingestellten Zeit ertönen vier Signaltöne, die Beleuchtung im Gerät erlischt und im Display erscheint „ENDE“. – Die Tür öffnen und das Geschirr mit der Speise entnehmen. – Lassen Sie die Speise noch einige Minuten ruhen, damit sich die Wärme gleichmäßig in der Speise verteilen kann. Hinweis: Wenn die Tür nicht direkt nach Ablauf der eingestellten Zeit geöffnet wird, ertönen alle zwei Minuten vier Signaltöne. Hinweis: Die Zählschritte beim Einstellen der Garzeit sind wie folgt: 0 – 5 Minuten : 10 Sekunden-Schritte 5 – 10 Minuten : 30 Sekunden Schritte 10 – 30 Minuten : 1 Minute-Schritte 30 – 90 Minuten : 5 Minuten-Schritte – – – – Die Garzeiten sind abhängig von vielen Faktoren. Die Mikrowellen dringen durch die Oberfläche in die Speise ein. Daher benötigen große Stücke bei gleichem Gewicht eine längere Garzeit als die gleiche Menge kleingeschnittener Stücke. Speisen daher auch gleichmäßig auf dem Geschirr verteilen. Damit eventuelle Keime in den Speisen sicher abgetötet werden, müssen die Speisen entsprechend hohe Temperaturen für eine ausreichende Zeit erreichen. Als Faustregel gilt: Halbe Menge - halbe Zeit. Doppelte Menge - fast doppelte Zeit. Kurzzeitmesser : 1. Die Taste einmal drücken. Im Anzeigefeld erscheint zusätzlich eine digitale Uhr. 2. Drehknebel drehen und die gewünschte Zeit einstellen. 3. Den Drehknebel drücken und die Uhr beginnt zu laufen. 4. Wenn die eingestellte Zeit abgelaufen ist ertönen 1 Signaltöne. Die maximal einstellbare Laufzeit beträgt 90 Minuten. Mikrowellen : Zum Programmieren eines Garvorganges muss die Funktion (Mikrowelle) und die Leistung gewählt, die Dauer des Garvorganges eingestellt und das Programm gestartet werden. Die Leistung wird durch mehrfaches Drücken der Taste eingestellt. Die maximal einstellbare Garzeit beträgt 90 9 Minuten. Leistung Typ 1 mal 900W Hoch Flüssigkeiten erhitzen, Garen 2 mal 750W Mittelhoch Eingefrorene Gerichte auftauen und Erhitzen 3 mal 450W Mittelhoch Eingefrorene Gerichte auftauen und Erhitzen 4 mal 300W Mittel 5 mal 150W Auftauen von Lebensmitteln 6 mal 80W Auftauen von empfindlichen Lebensmitteln. Garen von empfindlichen Lebensmitteln Beispiel: Die Mikrowelle soll 5 Minuten bei einer Leistung von 750 W garen. 2 mal drücken. Im Anzeigefeld erscheint 750 W. 1. Die Taste 2. Drehknebel drehen, bis im Anzeigefeld 5:00 erscheint. 3. Den Drehknebel drücken um das Programm zu starten. Quick-Programm : Durch Drücken des Drehknebels sind häufig genutzte Mikrowellen-Zeiten sofort wählbar. Die Mikrowellenleistung beträgt immer 100%. Bei jedem Druck des Drehknebels werden in den ersten 2 Minuten 30 Sekunden und anschließend 1 Minute zu der Garzeit hinzugefügt. Die längste einstellbare Zeit ist 12 Minuten. Hinweis: Der Garvorgang beginnt direkt nach Drücken des Drehknebels. Beispiel: Die Mikrowelle soll bei einer Leistung von 100% 2 Minuten garen. 1. Den Drehknebel 4 mal drücken. Im Anzeigefeld erscheint 2:00 und die Mikrowelle startet. Grillen : Beim Grillen wird mit Strahlungswärme gegart. Das Grill-Programm kann zum Überbacken oder Grillen von dünnen Fleischstücken verwendet werden. Die Auswahl des Programmes erfolgt durch Drücken der Taste . Die maximal einstellbare Garzeit beträgt 90 Minuten. Beispiel: Das Gerät soll 30 Minuten grillen. 1. Die Taste einmal drücken. 2. Drehknebel drehen, bis im Anzeigefeld 30:00 erscheint. 3. Den Drehknebel drücken, um den Garvorgang zu starten. Beobachten Sie beim Grillen das Fleisch, um nach Erreichen einer ausreichenden Bräunung dieses zu wenden bzw. bei einer ausreichenden Garung zu entnehmen. Kombinationsprogramme Grill und Mikrowelle : Für diese Kombination von Grill und Mikrowelle gibt es zwei Einstellungen. Die maximal einstellbare Garzeit beträgt 90 Minuten. 10 Einstellung 1: 30% der eingestellten Zeit im Mikrowellenbetrieb und 70% im Grillbetrieb. Diese Einstellung eignet sich besonders zum Garen von Fisch und Gratin. Beispiel: Das Gerät soll 30 Minuten im der Einstellung 1 betrieben werden. 1. Die Taste zweimal drücken. Im Anzeigefeld wird KOMBI 1 angezeigt. drehen, bis im Anzeigefeld 30:00 erscheint. 2. Drehknebel 3. Den Drehknebel drücken, um den Garvorgang zu starten. Einstellung 2: 55% der eingestellten Zeit im Mikrowellenbetrieb und 45% im Grillbetrieb. Diese Einstellung eignet sich besonders zum Garen von Kartoffeln und Geflügel. Beispiel: Das Gerät soll 12 Minuten im der Einstellung 2 betrieben werden. dreimal drücken. Im Anzeigefeld wird KOMBI 2 angezeigt. 1. Die Taste 2. Drehknebel drehen, bis im Anzeigefeld 12:00 erscheint. 3. Den Drehknebel drücken, um den Garvorgang zu starten. Timer Die Mikrowelle kann auch so eingestellt werden, dass sie zu einem bestimmten Zeitpunkt startet. Überprüfen Sie vor Beginn, ob die Uhrzeit an der Mikrowelle richtig gestellt wurde. 1. Uhrzeit stellen (siehe Uhr einstellen). 2. Gewünschtes Programm einstellen. Drücken Sie jedoch noch nicht den Drehknebel am Ende. 3. drücken. 4. Stellen Sie mit dem Drehknebel die gewünschte Stundenanzeige (zwischen 0-23) ein, wann die Mikrowelle starten soll. 5. drücken. Die eingestellte Stunde und die aktuellen Minuten werden angezeigt. 6. Stellen Sie mit dem Drehknebel die gewünschte Minutenanzeige (zwischen 0-59) ein, wann die Mikrowelle starten soll. 7. drücken. Es wird die eingestellte Uhrzeit angezeigt. Das eingestellte Programm startet zur vorher eingestellten Zeit. Beim Start ertönt ein Signalton. Auftau-Programm : Bei diesem Auftau-Programm kann durch Angabe des Gewichts Fleisch und Geflügel aufgetaut werden. 1. Die Taste einmal drücken für Fleisch oder zweimal drücken für Geflügel. 2. Mit der Taste das entsprechende Gewicht einstellen (100g bis 1800g) 3. Den Drehknebel drücken, um den Auftauvorgang zu starten. Im Anzeigefeld wird die verbleibende Auftauzeit angezeigt. Hinweise: – Nach Ablauf von 2/3 der eingestellten Zeit ertönen zwei Signaltöne. Entnehmen Sie jetzt die bereits aufgetauten Lebensmittel, bzw. wenden sie das aufzutauende Gut. Drücken Sie den Drehknebel um den Auftauvorgang fortzusetzen. – Wenn Sie das Lebensmittel in einem Plastikbehälter aus der Tiefkühltruhe nehmen welcher nicht Mikrowellen geeignet ist, tauen Sie erst nur so lange auf, bis das Lebensmittel aus dem Plastikbehälter entfernt werden kann, um dann mikrowellensicheres Geschirr zu verwenden. 11 Mehrere Programme programmieren Sie können das Gerät mit bis zu 3 Programmen programmieren, um z.B. erst aufzutauen, dann mit Mikrowelle und anschließend mit dem Grill zu garen. Beispiel: Sie möchten erst auftauen, dann mit Mikrowelle und anschließend mit dem Grill garen. 1. Mit der Taste eine niedrige Mikrowellenleistung einstellen. drehen um die gewünschte Zeit einzustellen. 2. Drehknebel 3. Mit der Taste bestätigen. 4. Mit der Taste eine hohe Mikrowellenleistung einstellen. 5. Drehknebel drehen um die gewünschte Zeit einzustellen 6. Mit der Taste bestätigen. 7. Mit der Taste die Grillfunktion auswählen. 8. Drehknebel drehen um die gewünschte Zeit einzustellen 9. Den Drehknebel drücken um das gesamte Programm zu starten. Hinweis: Das Auftauprogramm, die Automatik-Kochprogramme und das Quickprogramm sind hierbei nicht einsetzbar. Tipp: Diese Funktion kann optimal beim Garen durch Einstellen von unterschiedlichen Mikrowellenleistungen genutzt werden. Zu Beginn des Garprozesses eine hohe Leistung einstellen. Anschließend eine niedrige Leistung, damit dem Gargut noch Wärme zugeführt wird. Die Wärme kann sich dann noch optimal verteilen, obwohl sich das Gargut schon in der sogenannten Ruhephase befindet. Automatik-Kochprogramme Durch die Automatik-Kochprogramme können Lebensmittel gegart werden ohne die Leistung oder die Garzeit einzustellen. 1. 2. 3. 4. Gewünschtes Programm aus untenstehender Tabelle auswählen Den Drehknebel drehen, bis im Anzeigefeld Auto 1 bis Auto 10 angezeigt wird. Stellen Sie durch Drücken der Taste das gewünschte Gewicht bzw. die Menge ein. Den Drehknebel drücken, um das Programm zu starten. Menü Gewicht Anzeigefeld Auto 1 Flüssigkeiten aufwärmen 200 ml 200 ml 400 ml 400 ml 600 ml 600 ml 150 g 150 g 300 g 300 g 450 g 450 g 600 g 600 g 99 g 099 g 100 g (in 400 ml kaltem Wasser) 100 g Auto 2 Gemüse Auto 3 Popkorn Auto 4 Nudeln 200 g (in 800 ml kaltem Wasser) 200 g 300 g (in 1200 ml kaltem Wasser) 300 g 12 Auto 5 Aufwärmen Auto 6 Pizza Auto 7 Kartoffeln Auto 8 Gericht Auto 9 Rindfleisch Auto 10 Schweinefleisch 200 g 200 g 300 g 300 g 400 g 400 g 500 g 500 g 600 g 600 g 700 g 700 g 800 g 800 g 150 g 150 g 300 g 300 g 450 g 450 g 200 g 200 g 400 g 400 g 600 g 600 g 250 g 250 g 500 g 500 g 200 g 200 g 300 g 300 g 400 g 400 g 500 g 500 g 600 g 600 g 100 g 100 g 200 g 200 g 300 g 300 g 400 g 400 g 500 g 500 g Kindersicherung: Die Kindersicherung verhindert, dass Kinder das Gerät unerwünscht in Betrieb nehmen können. Zum Einschalten der Kindersicherung die Taste 3 Sekunden lang drücken. Es ertönt ein langer Signalton. Um die Kindersicherung wieder auszuschalten, erneut die Taste 3 Sekunden lang drücken. Es ertönt ein langer Signalton. Hinweis: Lässt sich das Gerät nicht in Betrieb nehmen, überprüfen Sie, ob die Kindersicherung eingeschaltet ist. Beleuchtung: Bei geöffneter Tür und bei Betrieb des Gerätes leuchtet die Lampe. Ist ein Programm beendet erlischt die Lampe. 13 Reinigung z Vor jeder Reinigung das Gerät ausschalten, den Netzstecker ziehen und ausreichend abkühlen lassen. z Es darf kein Wasser in die Lüftungsöffnungen innen oder außen am Gerät eindringen, daher darf das Gerät nicht mit Wasser behandelt werden. z Zur Reinigung des gesamten Gerätes eignet sich ein nur leicht angefeuchtetes weiches Tuch und etwas Spülmittel. Anschließend mit einem weichen Tuch trockenreiben. z B enutzen Sie keine S cheuermittel o der andere aggressive Reinigungsmittel. Backofenreinigungsspray oder ein Dampfreiniger dürfen ebenfalls nicht verwendet werden. z Reinigen Sie den Garraum nach jedem Gebrauch. Die Türinnenseite, der Türrahmen und der Rollring, sowie die Lauffläche unter dem Glasdrehteller müssen stets sauber gehalten werden. z Den Grillrost, den Glasdrehteller und den Rollring im Spülwasser reinigen. Technische Daten Abmessungen außen: 483 mm (L) x 402 mm (T) x 281 mm (H) Glasdrehteller: Höhe über dem Glasdrehteller: Ø 270 mm 185 mm Gerätegewicht: ca. 14,5 kg Betriebsspannung: Leistungsaufnahme gesamt: – Grill: – Mikrowelle: 230-240V~ 50 Hz 1400 W 1000 W 1400 W Abgabeleistung – Mikrowelle: 80 W - 900 W Ersatzteile und Zubehör Falls Sie Ersatzteile oder Zubehör zu Ihrem Gerät benötigen, können Sie diese auch bequem über unseren Internet-Bestellshop bestellen. Sie finden unseren Bestellshop auf unserer Homepage http:// www.severin.de unter dem Unterpunkt „Ersatzteilshop“. Entsorgung Altgeräte unbrauchbar machen, indem die Netzzuleitung abgetrennt wird. Unbrauchbar gewordene Geräte sind in den dafür vorgesehenen öffentlichen Entsorgungsstellen zu entsorgen. Garantie Severin gewährt Ihnen eine Herstellergarantie von drei Jahren ab Kaufdatum. In diesem Zeitraum beseitigen wir kostenlos alle Mängel, die nachweislich auf Material- oder Fertigungsfehlern beruhen und die Funktion wesentlich beeinträchtigen. Weitere Ansprüche sind ausgeschlossen. Von der Garantie ausgenommen sind: Schäden, die auf Nichtbeachtung der Gebrauchsanweisung, unsachgemäße Behandlung oder normalen Verschleiß zurückzuführen sind, ebenso leicht zerbrechliche Teile wie z. B. Glas, Kunststoff oder Glühlampen. Die Garantie erlischt bei Eingriff nicht von uns autorisierter Stellen. Sollte eine Reparatur erforderlich werden, senden Sie bitte das 14 Gerät ohne Zubehörteile, gut verpackt, mit Fehlererklärung und Kaufbeleg versehen, direkt an den Severin-Service. Die gesetzlichen Gewährleistungsrechte gegenüber dem Verkäufer und eventuelle Verkäufergarantien bleiben unberührt. 15 Microwave oven Dear Customer, Before using the microwave oven, please read the following instructions carefully and keep this manual for future reference. The appliance must only be used by persons familiar with these instructions. Parts of the appliance 1. 2. 3. 4. 5. 6. 7. 8. 9. 10. Door locks Inspection window Roller ring Drive unit Door opener Operating buttons and rotary control Protective cover and interior lighting Glass turntable Grill element Grill rack 16 Control panel detail Button Function Microwave Grill / Grill and microwave combination Clock Operating button for individual programming Defrosting Cooking timer / Weight Delayed operation timer Stop / Interrupt Rotary control Function Start / Quick start Automatic cooking programmes / Time 17 Important safety instructions Positioning the unit: z Always place the microwave oven on a sufficiently stable, level and heat-resistant surface, ensuring that it is protected from any heat source or excessive humidity. z Do not operate the appliance outdoors. z Sufficient ventilation must be ensured at all times. Therefore, do not place any objects on the unit, and make sure that the following minimum distances from any wall or other object are maintained: One side: 7.5 cm; other side unobstructed Rear: 7.5 cm Top: 30.0 cm The feet on the base of the unit must not be removed. The unit must not be installed inside a cupboard; when positioning the unit, also ensure that it is not placed directly underneath a shelf or any other similar object. Connection to the mains supply The appliance should only be connected to an earthed socket installed in accordance with the regulations. Make sure that the supply voltage corresponds with the voltage marked on the rating label. This product complies with all binding CE labelling directives. Before using for the first time: z Remove any exterior and interior packaging materials. All these materials are suitable for recycling. z Do not remove the grey-brown protective cover (7) next to the light on the right of the interior. z Caution: Keep any packaging materials well away from children, as they are a potential source of danger e.g. from suffocation. z After unpacking, and before every use, check the unit and its power cord carefully for any signs of damage. Also ensure that the door, including the inspection window, door seals and locks, are not damaged or bent and that it closes firmly against the support. This is important to ensure that no microwave energy is allowed to escape during operation. For the same reason, the entire casing as well as the inside of the oven must be carefully checked. Should the unit show any signs of damage, it must not be used under any circumstances until it has been repaired by a qualified technician. z This appliance may only be used by children (at least 8 years of age) provided they have been given supervision or instruction concerning the use of the appliance and fully understand all dangers and safety precautions involved. The same applies to persons with reduced physical, sensory or mental capabilities, or lacking experience and knowledge. Children must not be permitted to carry out any cleaning or maintenance work on the appliance. z Children under 8 years of age must be kept well away from the appliance and its power cord while connected to the mains, or while it is cooling down after use. z Before the appliance is used for the first time, or after extended periods of non-use, it should be thoroughly cleaned as described in the section General Care and Cleaning. z Insert the drive unit, the roller ring and the glass turntable into the unit. z Do not operate the appliance without the drive unit, roller ring and glass turntable properly fitted. z Before the microwave oven is used for the first time, let the appliance heat up on the grill setting 18 (without the microwave function activated) for 10 minutes. A slight odour may be emitted; this is quite normal, but ensure there is sufficient ventilation. Note: Never switch the unit on in the microwave function unless the food to be heated or cooked has been placed inside the oven. Operating the appliance empty could result in damage to the unit. Important notes: z When heating liquids in your microwave oven, the liquid may heat up beyond boiling-point without visible evidence of bubbling. It is therefore important to exercise extreme caution when handling any containers, e.g. when removing them from the oven. The risk of such over-boiling may be reduced by placing a heat-resistant glass rod in the liquid during the heating process. z Eggs in their shells (or whole hard-boiled eggs) must not be heated up in a microwave oven, since they may explode even after the microwave heating process has finished. z Caution: It is also highly dangerous to heat up liquids or any kind of solid food items in closed containers in the unit, since there is a real danger of explosion. z The content of baby bottles or glass containers with baby food must be thoroughly stirred or shaken to ensure that the temperature is evenly distributed. To avoid painful and dangerous scalding, always check the temperature before feeding a child. z When heating or cooking food contained or wrapped in combustible materials such as plastic or paper, there is a danger of those materials igniting. It is also possible that food will dry out or even ignite if the selected cooking time is excessive. Fat or oil can also ignite. It is therefore important to constantly supervise the appliance during operation. Highly inflammable liquids such as concentrated alcohol must of course not be heated up. z Should any smoke be noticed during operation, keep the door closed to inhibit or smother any flames. Switch the unit off immediately and remove the plug from the wall socket. z To prevent burns, a suitable oven-cloth must always be used when removing food items from the oven, since the utensils and cooking containers heat up not only during use of the grill function, but also during microwave operation. z Special food thermometers (as used in conventional baking ovens) are not suitable for use with microwave ovens. z Caution: Certain types of food can catch fire. Do not, under any circumstances, leave the appliance unattended when using the microwave, grill or combination functions. z This microwave oven is intended for heating up food and beverages only. Caution: any attempt to dry food or clothing, to heat up warming pads, house slippers, sponges, wet or moist cleaning cloths etc. may cause injuries, combustion or fire. z No responsibility is accepted if damage results from improper use, or if these instructions are not complied with. z The appliance is not intended to be operated by means of an external timer or separate remotecontrol system. z Always switch the appliance off and remove the plug from the wall socket: - before cleaning, - in case of any malfunction. z Caution: The exterior surfaces of the appliance become hot during operation. There is also a danger of steam being emitted through the ventilation slots: Danger of scalding. z Do not allow the appliance or its power cord to get near to hot cooking plates or naked flames. Do not let the power cord hang free and keep it away from any hot parts. z It is important that the appliance is thoroughly cleaned at regular intervals and that any food residues are removed. Excessive wear may otherwise be caused to the exposed surfaces and the 19 life expectancy of the appliance considerably reduced. In addition, its safety and proper operation may also be affected. z This appliance is intended for domestic or similar applications, such as in - staff kitchens, offices and other commercial environments, - agricultural areas, - hotels, motels etc. and similar establishments, - bed-and-breakfast guest houses. z Caution: Any maintenance or repair work requiring the removal of any microwave radiation protection cover represents a serious hazard to unqualified persons. This includes the replacement of the special power cord or an interior light bulb. The unit must not be opened, except by qualified personnel. If repairs are needed, please send the appliance to one of our customer service departments. The address can be found in the appendix to this manual. z This appliance is a group 2 class B ISM device. Group 2 contains all ISM devices (industrial, scientific, medical) generating radio frequency energy and/or using radio frequency energy in the form of electro-magnetic radiation to process materials; it also comprises spark erosion devices. Class B specifies devices designed for domestic use, or any similar devices integrated in the general power grid supplying domestic units. The microwave function (Group II in compliance with EN 55011:1998+A1+A2) Electromagnetic energy is generated inside the unit, causing the molecules in the food (mainly water molecules) to oscillate and subsequently causing the food to become hot. Food with high water content will therefore heat up faster than relatively dry food. The heat is generated gradually inside the food. Any utensils, container or plates used are heated up only indirectly as a result of the food temperature. Always use suitable kitchen utensils: z Do not place the food directly onto the glass turntable; always use a suitable plate or cooking container. Make sure that the container does not protrude over the rim of the glass turntable. z Metal objects are to be avoided since microwaves are reflected from metal surfaces and might not reach the food to be cooked. Any metal in the oven could also cause sparks, resulting in possible damage to the unit. z As a general rule, cutlery or metal containers must not be used in the microwave oven. Some food wrappings contain aluminium foil or wires underneath a layer of paper and are therefore also unsuitable for use with microwave appliances. Should the use of aluminium foil be recommended in a recipe, ensure that the food is tightly wrapped in the aluminium foil (avoiding any air blisters). Ensure a minimum distance of 2.5 cm between the aluminium foil and the interior walls of the oven. z Always make sure that the cooking container or plate used does not contain any metal decoration such as a gold rim or colour containing metal particles. Lead crystal objects are also not suitable. Always make sure that no parts of the cooking containers used are hollow (e.g. the handles). Porous materials may have absorbed water during cleaning and are again not suitable. Cooking containers or utensils made of ‘Melamine’ plastic material absorb energy and are also unsuitable. - Using the microwave function - Containers made from heat-resistant glass or porcelain are particularly suitable for use in microwave appliances. - Plastic is suitable only if it is heat-resistant up to at least 180° C. Cooking bags etc. should be punctured to be able to release any high pressure during cooking. Plastic cooking containers especially designed for use with microwave ovens are available at 20 most kitchenware dealers. - Using the grill function - With this function, any heat-resistant containers or plates suitable for conventional ovens may be used, though not any plastic items. - The food to be cooked can be put directly onto the grill rack, which is then placed on the glass turntable. - Using the microwave/grill combination - With this combination function, the microwave and grill functions are activated alternately. The containers or plates must therefore be suitable for use in a microwave appliance as well as being heat-resistant. Because of the relatively high temperatures, plastic items must not be used. The special grill rack provided with this unit is suitable for use with the microwave oven. Make sure that the container or plate used does not contain any metal parts. Operation General information on programming the unit Connect the appliance to an earthed socket installed in accordance with the regulations. Press the button to activate the electronic system. The display shows 1:01, and the clock symbol appears. Setting the clock : 1. Press once to select the 12-hour display format, or twice to select the 24-hour format. 2. Turn the rotary control to set the correct hour. 3. Press . 4. Turn the rotary control to set the correct minutes. 5. Press to finish setting the time. The time setting process can be cancelled by pressing . The clock must be set when the appliance is connected for the first time, and also if a power failure has reset the clock. To ensure optimum results, this appliance uses state-of-the-art electronics. – When any control button is pressed, the correct input is acknowledged by one-beep signal. – While a programme sequence is running, the current setting can be called up by pressing the appropriate button. E.g., if during the microwave programme the button is pressed, the display will show the selected power setting. – A programme can be interrupted by pressing once. – To restart a programme, press the rotary control . – To cancel a programme, press twice. General operating sequence – Place the food to be heated in a suitable container. Place the container onto the turntable in the oven. - When food is placed in the microwave, it should be covered to prevent it from drying out. Glass or plastic covers especially designed for use with microwave appliances are available at most kitchenware dealers. - When using the combination or grill function, do not cover the food to be cooked. The grill rack 21 may be put directly on the glass turntable with the food itself on the rack. Close the door and set the desired programme. As the programme is started, the turntable starts to rotate. During operation, the interior light remains on. – If, during operation, the door is opened or the button is pressed (e.g. to stir or to turn the food in order to ensure that the temperature is evenly distributed), the timer and programme functions are automatically suspended. The programme will automatically resume only after the door is closed again and the rotary control is pressed. – Press twice to interrupt the programme. – A 4-beep signal indicates that the pre-programmed cooking time has elapsed; at the same time, the interior lighting switches off and the display shows 'ENDE'. – Open the door and remove the container with the food. – In order to achieve an even heat distribution through the food, the container should be set aside for several minutes. Note: If the door is not opened immediately after the pre-programmed operating time has elapsed, a 4-beep signal is heard every 2 minutes. – – Note: The following steps are used for setting the cooking time: 0 – 5 minutes : 10-second steps 5 – 10 minutes : 30-second steps 10 – 30 minutes : 1-minute steps 30 – 90 minutes : 5-minute steps – – – – The cooking times generally depend on several factors. Microwave radiation penetrates the surface of the food. For larger pieces of food, a longer cooking time is therefore needed than for the same amount of food if cut into pieces. The food should also be evenly distributed on the plate. To ensure that any germs in the food are safely destroyed, the food needs to be exposed to high temperatures for a sufficiently long period. As a basic rule: half the amount - half the time recommended double the amount - almost double the time recommended. Cooking timer : 1. Press once. An additional digital clock appears in the display. 2. Turn the rotary control to set the desired cooking time. 3. Turn the rotary control to start the cooking timer . 4. A beep signal indicates that the pre-set time has elapsed. The maximum pre-programmable time is 90 minutes. The microwave function : To programme the unit for cooking, the correct mode (microwave), the required power setting and the cooking time must be selected, before the programme sequence can be started. The power setting is selected by repeatedly pressing . The cooking time can be pre-set to a maximum of 90 minutes. Power settings Type 1x 900W High Heating up liquids, cooking 22 2x 750W Medium high Defrosting and heating up deep-frozen dishes 3x 450W Medium high Defrosting and heating up deep-frozen dishes 4x 300W Medium 5x 150W Defrosting Defrosting food Cooking delicate food 6x 80W Defrosting Defrosting delicate food. Example: to programme the microwave function for a cooking time of 5 minutes at 750 W. 1. Press twice. The display shows 750 W. 2. Turn the rotary control until the display shows 5:00. 3. Press the rotary control to start the programme. Quick-programming : The most commonly used microwave time-settings can be called up simply by pressing the rotary control . With this function, the microwave power setting is always 100%. During the first 2 minutes of operation, each press on the rotary control adds 30 seconds to the cooking time; thereafter, one minute is added with each press. The maximum pre-programmable time is 12 minutes. Note: the cooking process starts as soon as the rotary control is pressed. Example: to programme the microwave function for a cooking time of 2 minutes at 100% power. 1. Press the rotary control 4 times. The display shows 2:00 and the microwave operation starts. Grill function : The grilling process uses radiation heat to cook the food. The programme is suitable for cooking ‘au gratin’ or for grilling thin pieces of meat. The programme is selected by pressing . The maximum programmable cooking time is 90 minutes. Example: to programme the unit for a grilling time of 30 minutes. 1. Press once. 2. Turn the rotary control until the display shows 30:00. 3. Press the rotary control to start the cooking process. As the meat needs to be turned after one side is sufficiently browned, and taken out once it is done on both sides, this process should be closely monitored. Grill/microwave combination programmes : For this grill/microwave combination, two programme settings are available. The cooking time can be pre-set to a maximum of 90 minutes. Setting 1: The microwave function is active for 30% of the pre-programmed time, the grill function for 70%. This programme is suitable for cooking fish or cooking ‘au gratin’. Example: to programme the unit for a cooking time of 30 minutes at setting 1 1. Press twice. KOMBI 1 appears in the display. 23 2. Turn the rotary control 3. Press the rotary control until the display shows 30:00. to start the cooking process. Setting 2: The microwave function is active for 55% of the pre-programmed time, the grill function for 45%. This programme is suitable for cooking potatoes or poultry. Example: to programme the unit for a cooking time of 12 minutes at setting 2 1. Press three times. KOMBI 2 appears in the display. 2. Turn the rotary control until the display shows 12:00. 3. Press the rotary control to start the cooking process. Delayed operation timer The microwave can be pre-programmed in such a way that it starts operating at a pre-determined time. However, always check first that the time on the unit has been correctly set prior to using the timer delay function. 1. Set the time (see Setting the clock). 2. Set the desired programme. However, do not press rotary control yet. 3. Press . 4. Use the rotary control to select the desired hour setting (between 0-23), at which you want the unit to start operating. 5. Press . The selected hour setting and the current minutes are shown. 6. Use the rotary control to select the desired minute setting (between 0-59), at which you want the unit to start operating. 7. Press . The display returns to the current time. The selected programme will start at the preprogrammed time. A beep signal indicates the programme is starting. Defrost programme : This programme is useful for defrosting meat and poultry simply by setting their weight. 1. Press once for meat or twice for poultry. 2. Use the button to set the appropriate weight (100g to 1800g) 3. Press the rotary control to start the defrost programme. The remaining defrosting time is shown in the display. Helpful notes: – Two beep signals indicate that 2/3 of the programmed defrosting time has elapsed. Turn the food over, taking out any that is already defrosted. Press the rotary control to continue the programme. – Food stored in plastic containers that are not suitable for use in microwave ovens should be left for a while after being taken from the freezer. Wait until the food can be easily detached from the plastic, before it is put into the oven inside a container suitable for use with microwave ovens. Setting multiple programmes Prior to operation, the microwave can be set for up to 3 programmes to run consecutively, e.g. defrosting first, followed by the microwave and then the drill function. Example: using the defrost function first, followed by the microwave and then the grill function. 1. Use the button to select a reduced microwave setting for defrosting. 24 2. Turn the rotary control to select the required defrosting time. 3. Press to confirm. 4. Use the button to select a high microwave setting. 5. Turn the rotary control to select the required microwave cooking time. 6. Press to confirm. 7. Use the button to select the grill function. to select the required grilling time 8. Turn the rotary control 9. Press the rotary control to start the multiple programme selection. Note: The defrost programme, the automatic cooking programmes and the quick-programme are not suitable for multiple programming. Hint: This function is especially helpful when using the microwave to cook food at different power settings. While a higher power setting is selected initially, the power can be reduced at a later stage in order to keep the food hot, and to ensure that the heat is evenly distributed when the food is already done. Automatic cooking programmes These programmes are helpful when cooking or heating up food without having to select any particular settings, e.g. for power or cooking time. 1. 2. 3. 4. Select the desired programme from the table below. Turn the rotary control until the display shows Auto 1 to Auto 10. Use the button to select the desired weight or quantity. Press the rotary control to start the programme. Menu Auto 1 Heating up liquids Auto 2 Vegetables Auto 3 Popcorn Auto 4 Pasta Weight Display 200 ml 200 ml 400 ml 400 ml 600 ml 600 ml 150 g 150 g 300 g 300 g 450 g 450 g 600 g 600 g 99 g 099 g 100 g (in cold water, 400 ml) 100 g 200 g (in cold water, 800 ml) 200 g 300 g (in cold water, 1200 ml) 300 g 25 Auto 5 Heating up Auto 6 Pizza Auto 7 Potatoes Auto 8 Ready meals Auto 9 Beef Auto 10 Pork 200 g 200 g 300 g 300 g 400 g 400 g 500 g 500 g 600 g 600 g 700 g 700 g 800 g 800 g 150 g 150 g 300 g 300 g 450 g 450 g 200 g 200 g 400 g 400 g 600 g 600 g 250 g 250 g 500 g 500 g 200 g 200 g 300 g 300 g 400 g 400 g 500 g 500 g 600 g 600 g 100 g 100 g 200 g 200 g 300 g 300 g 400 g 400 g 500 g 500 g Childproof safety device: This safety device prevents children from operating the appliance without supervision. for 3 seconds. To activate the safety device, press A long beep signal is heard. To switch off the safety device, press again for 3 seconds. A long beep signal is heard. Note: Should you experience a problem when switching the appliance on, first verify that the safety device is not activated. Interior lighting: The interior light comes on when the door is opened; it also remains on during operation. It goes out once a programme has finished. 26 General Care and Cleaning z Before cleaning the appliance, ensure it is disconnected from the power supply and has cooled down completely. z Do not clean the unit with water: ensure that no water is allowed to enter the ventilation slots on the inside or outside of the unit. z The entire unit may be wiped with a slightly damp lint-free cloth and a mild household detergent. Wipe thoroughly dry afterwards. z Do not use abrasives or harsh cleaning solutions. Steam cleaning appliances or commercially available cleaning sprays for conventional baking ovens are not to be used. z The interior surfaces must be cleaned thoroughly after each operation cycle. The inside of the door, the door frame, the roller ring as well as the guiding track area underneath the glass turntable must be kept clean at all times. z The grill rack, glass turntable and roller ring may be cleaned with warm soapy water. Technical specifications Outside dimensions: 483 mm (L) x 402 mm (D) x 281 mm (H) Glass turntable: Clearance above the glass turntable: Ø 270 mm 185 mm Unit weight: approx. 14.5 kg Operating voltage: Total power consumption: – grill: – microwave: 230-240V~ 50 Hz 1400 W 1000 W 1400 W Microwave output: 80 W - 900 W Disposal Old or damaged units should be rendered unusable by removing the power cord. Should you be unsure about the recycling facilities for such appliances in your area, please inquire of the relevant local authority department. Guarantee This product is guaranteed against defects in materials and workmanship for a period of three years from the date of purchase. Under this guarantee the manufacturer undertakes to repair or replace any parts found to be defective, providing the product is returned to one of our authorised service centres. This guarantee is only valid if the appliance has been used in accordance with the instructions, and provided that it has not been modified, repaired or interfered with by any unauthorised person, or damaged through misuse. This guarantee naturally does not cover wear and tear, nor breakables such as glass and ceramic items, bulbs etc. This guarantee does not affect your statutory rights, nor any legal rights you may have as a consumer under applicable national legislation governing the purchase of goods. If the product fails to operate and needs to be returned, pack it carefully, enclosing your name and address and the reason for return. If within the guarantee period, please also provide the guarantee card and proof of purchase. 27 Kundendienstzentralen SEVERIN Service Am Brühl 27 59846 Sundern Telefon (02933) 982-460 Telefax (02933) 982-480 [email protected] I/M No.: 8477.0000