1
SOUNDWARE XS SPECIAL EDITION HOME THEATER SPEAKERS
SOUNDWARE S HOME THEATER SPEAKERS
Español
5.1 Sistema de parlantes
de sonido envolvente
Manual del Propietario /
Instrucciones de Seguridad /
Información de Cumplimiento
Italiano
5.1 Sistema di
altoparlanti surround
Manuale dell’utente/
Istruzioni di sicurezza/
Informazioni sulla conformità
Français
Système de haut-parleur
Surround 5.1
Guide de l’utilisateur /
Instructions de sécurité /
Informations relatives à la
conformité
Svenska
5.1 Surroundhögtalarsystem
Bruksanvisning /
säkerhetsanvisningar /
information om
överensstämmelse
Deutsch
5.1-SurroundLautsprechersystem
Bedienungsanleitung /
Sicherheitshinweise /
Konformitätserklärung
OWNER’S MANUAL / SAFETY INSTRUCTIONS / COMPLIANCE INFORMATION
5.1 Home Theater Speakers
E
N
G
L
I
S
H
IMPORTANT SAFETY INSTRUCTIONS
This symbol found on the apparatus indicates hazards
arising from dangerous voltages.
WARNING! To reduce the risk of fire or electrical shock,
do not expose this apparatus to rain or moisture.
This symbol found on the apparatus indicates the user
should read all safety statements found in the user
manual.
This symbol found on the apparatus indicates that
the apparatus must be placed in a separate collection
facility for electronic waste and not disposed with
household waste.
This symbol found on the apparatus indicates double
insulation.
1.
2.
3.
4.
5.
6.
7.
8.
9.
10.
11.
12.
2
Read these instructions.
Keep these instructions.
Heed all warnings.
Follow all instructions.
Do not use this apparatus near water.
Clean only with dry cloth.
Do not block any ventilation openings. Install in accordance
with the manufacturer’s instructions.
Do not install near any heat sources such as radiators, heat
registers, stoves, or other apparatus (including amplifiers) that
produce heat.
Do not defeat the safety purpose of the polarized or grounding
type plug. A polarized plug has two blades with one wider
than the other. A grounding-type plug has two blades and
a third grounding prong. The wide blade or the third prong
is provided for your safety. If the provided plug does not fit
into your outlet, consult an electrician for replacement of the
obsolete outlet.
Protect the power cord from being walked on or pinched
particularly at plugs, convenience receptacles, and the point
where they exit from the apparatus.
Only use attachments/accessories specified by the
manufacturer.
Unplug this apparatus during lightning storms or when
unused for long periods of time.
13.
14.
15.
16.
17.
18.
19.
Refer all servicing to qualified service personnel. Servicing is
required when the apparatus has been damaged in any way,
such as power-supply cord or plug is damaged, liquid has
been spilled or objects have fallen into the apparatus, the
apparatus has been exposed to rain or moisture, does not
operate normally, or has been dropped.
Maintain a minimum distance of 2” (50mm) around the front,
rear, and sides of the apparatus for sufficient ventilation. The
ventilation should not be impeded by covering the ventilation
openings or placing on or around the apparatus items such as
newspapers, table-cloths, curtains, etc.
No open flame sources, such as lighted candles, should be
placed on the apparatus.
The apparatus shall not be exposed to dripping or splashing.
No objects filled with liquids, such as vases, shall be placed on
the apparatus.
Either the power inlet connector on the rear of the apparatus
or the power plug at the wall must remain accessible, to be
able to disconnect power from the apparatus.
To completely disconnect this apparatus from the AC
Mains, disconnect the power supply cord plug from the AC
receptacle.
The mains plug of the power supply cord shall remain readily
operable.
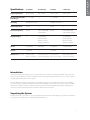
Specifications
XS Satellite
XS Subwoofer
S Satellite
S Subwoofer
Frequency Response:
150Hz – 20kHz
40Hz - 150Hz
132Hz – 20kHz
32HZ - 150Hz
—
10 – 125 watts
—
Recommended Amplifier 10 – 100 watts
Power Range:
Sensitivity:
85dB [SPL/2.8v at 1m] —
87dB [SPL/2.8v at 1m] —
Nominal Impedance:
8 ohms
—
8 ohms
—
Crossover Frequency:
5000Hz
60Hz - 180Hz 24dB/
octave lowpass
4200Hz
60Hz - 180Hz 24dB/
octave variable lowpass
Amplifier Output:
—
100 watts RMS,
(250 watts Peak);
BassTrac® circuitry
eliminates distortion
Woofer:
21/2” (64mm)
8” (203mm)
31/2” (89mm)
10” (254mm) DCD
Tweeter:
1/2” (13mm)
—
3
⁄4” (19mm)
—
Dimensions: (H x W x D)
45⁄16 x 41⁄2 x 33⁄4”
(108 x 113 x 94mm)
121⁄4 x 113⁄16 x 159⁄16” 51/2 x 51/2 x 511⁄16”
(310 x 284 x 395mm) (138 x 138 x 143mm)
E
N
G
L
I
S
H
200 watts RMS,
(300 watts Peak);
BassTrac® circuitry
eliminates distortion
133⁄8 x 127⁄16 x 173⁄16”
(339 x 315 x 435mm)
.
Introduction
Thank you for purchasing a Boston Acoustics Speaker System. These speakers incorporate high-quality components that
produce the famous Boston sound. The SoundWare Home Theater System is ideally suited for use as a 5.1 channel solution
in a high-quality home theater or music system.
The SoundWare Home Theater System delivers exceptionally articulate on-screen dialog, music, effects, and room filling
bass from a small, sleek package. Compact driver placement and quality, system-specific crossovers assure a wide uniform
dispersion for complete coverage of a listening room. All speakers also feature MagnaGuard® magnetic shielding which
ensures the speakers’ magnetic field does not interfere with the television’s picture.
Unpacking the System
Carefully unpack the system. If there is any sign of damage from transit, report it immediately to your dealer and/or delivery
service. Keep the shipping carton and packing materials for future use.
3
E
N
G
L
I
S
H
Placement Options
The SoundWare speaker can be wall mounted using the supplied hardware or simply placed on a shelf. If it is being placed on
a shelf you can simply attach the adhesive-backed rubber feet and connect the speaker wires.
Attaching the Pivoting Ball Mount
If you plan to use the mounting brackets you must attach the pivoting ball mount to
the speaker. Use the four supplied flat-head machine screws as shown in the illustration.
Mounting the Wall Bracket
Brackets for mounting the speakers on a flat wall or in a corner are supplied. One thing
that is not supplied is hardware to attach the bracket to the wall. Why? Because there
are so many different kinds of surfaces on which the speakers could be mounted. It could
be basic drywall which may or may not have a stud behind it. It could be a wood panel or even a
concrete foundation wall. There is no one type of fastener that we could supply that would work
in all the possible situations. So taking into account the surface the speaker is being mounted on,
acquire the appropriate type of fasteners. You’ll need four for each speaker. If you’re not sure what type of fastener to use, take
the mounting bracket to a friendly hardware store, tell them about the wall you’re mounting the speaker on, and ask them to
recommend an appropriate fastener. Keep in mind the weight of the speaker.
Speaker Wires
For short runs of less then 20 feet or so you can use 18 gauge wire. For runs of more than 50 feet use 16 gauge wire.
Speaker Connection Polarity
All the speakers in a system must be hooked up with the same polarity or “in phase.” The terminals on the SoundWare
speakers are color coded to identify the “+” (red) and “–” (black) connections. All wire is marked in some way so you can tell
one conductor from the other. The marking may be a ridge molded into the insulation of one conductor, or it may have a
stripe on the insulation, or it may be color coded. Use the marking on the speaker wires to be sure that the “+” terminal of the
amplifier is connected to the “+” terminal of the speaker, and “–” is connected to “–”, at every connection.
Connecting the Speakers
Separate the two conductors of the wire. Remove about /” of insulation from the
end of the wire. Push down on the top of the terminal to open the hole for the
wire. Insert the wire and release the terminal to secure it. Be sure there are no loose
strands of wire. Note: there is a channel in the back of the speaker for the wire (for
wires up to 18 gauge), to keep it neat and out of sight.
Mounting the Speakers
Once you have the bracket mounted and the speaker connected the rest is easy.
1 Put the rounded end of the speaker mount in the bracket
and slide it down to lock it in place.
2 Optional – Insert and tighten the screw to secure everything.
3 Snap the cover over the bracket.
1
2
Pivot Set
Screw
3
4
The SoundWare speakers pivot on their mounts. Vertically they can go from
facing straight out to being tilted down 40 degrees. When the flat wall
mounting bracket is used they can pivot side to side 20 degrees. (Note:
Corner mounting will not allow the speaker to pivot side-to-side.) Loosen the
pivot set screw on the front of the pivoting ball mount, pivot the speaker into
position and retighten the screw.
E
N
G
L
I
S
H
«ÛÌÃÊ
`ÜÊ{äc
«ÛÌÃÊÓäc
i>V
ÊÜ>ÞÊ
The SoundWare speakers can also be mounted using
the supplied corner bracket.
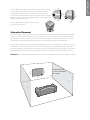
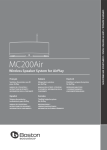
Subwoofer Placement
Place the subwoofer next to a wall or in a corner near your main speakers. The sound is typically best when the subwoofer
is within 15 feet (4.5m) of the main speakers. The sharp 24dB/octave crossover roll-off permits placement farther from the
main speakers if necessary. Since the ear is unable to localize the low frequencies of the subwoofer, the bass still appears
to come from the main speakers. Experimentation is key, however most positions in the room will work well.
The level of bass output from the subwoofer will vary at different positions in a room. When placed near walls, its loudness
is emphasized. Corner placement provides the most bass output. Placement completely away from walls may produce
too little bass. Regardless of the natural bass level within the room you will always have the ability to adjust the level of the
subwoofer from the built in volume control. If at any time you move the subwoofer be sure to check all of your settings.
IMPORTANT: Do not place the subwoofer where there is a chance of contact between the rear panel and drapes or furniture.
Position subwoofer
in corner for maximum
bass output
32:(567$1'%<
,13876(/(&7
(;,7
92/80(
0(18 (17(5
83
/()7
5,*+7
'2:1
5
E
N
G
L
I
S
H
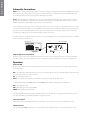
Subwoofer Connections
NOTE: Power is always supplied to the subwoofer electronics unless it is unplugged or switched to the off position using the
power switch located on the rear panel. The auto-on circuitry only activates or deactivates the power amplifier. Make sure
your subwoofer and receiver are unplugged when making the connection.
Power: When plugging your subwoofer in be sure to use a wall outlet, or dedicated electrical outlet. Some receivers will
provide a switched outlet. Do not use this. These on board electrical outlets do not offer the amount of current or proper
isolation required by a power amplifier, such as the one in your subwoofer.
Select ”subwoofer-yes” from your receiver’s set-up menu. If the receiver gives a choice of crossover filter frequency, use 150Hz
or 120Hz. Hooked up this way, the receiver’s amplifier is relieved of having to reproduce the difficult low bass signals that can
drive the receiver into audible distortion. In some cases, it can also depend on several other settings within a receiver. We
recommend consulting your receiver manual for further assistance in this area.
Turn off all power. Use a subwoofer cable, as shown, to connect your digital receiver’s LFE subwoofer output to the subwoofer.
Connect the other end to the Line In.
Digital Receiver
Subwoofer Amplifier
SoundWare S Home Theater Speakers
Adjusting the Crossover Control
Set the crossover control on the subwoofer to 180Hz. Fine-tune the crossover setting by ear for the smoothest blend with
your main speakers. The best setting of the crossover control will depend on speaker placement and personal preference.
Operation
Power On/Off
Plug the subwoofer’s AC cord into a wall outlet. Do not use the outlets on the back of the receiver. Set the power switch to
the desired setting.
OFF – The subwoofer is off and will not produce any sound. You may want to turn your subwoofer off if you will not be using
it for some time or wish to conserve electricity.
ON – The subwoofer is always on.
MUTE – If no signal is detected after several minutes, it will automatically enter the Mute mode.
An LED indicator between the Power switch and the Polarity switch indicates what mode the subwoofer is in.
OFF – The subwoofer is off
RED – MUTE (No signal detected, Audio Off )
GREEN – ON (Signal detected, Amp On)
The subwoofer will automatically enter the Mute mode after several minutes when no signal is detected from your system.
The subwoofer will then power ON instantly when a signal is detected.
Crossover Control
Adjusts the frequency of the low pass filter for the subwoofer. Set the crossover control on the subwoofer to 180Hz.
Volume Control
Turn the subwoofer Volume control to the 11 o’clock position. If the subwoofer makes no sound, check the AC-line cord,
6
Power switch, and input cables. (Are the connectors on the cables making proper contact? Is the AC-line cord connected to a
“live” receptacle, is the subwoofer in either the Auto or On position?)
Adjust the subwoofer Volume control until you hear a match between the main speaker and subwoofer. Bass response should
not overpower the room but rather be adjusted so there is a natural blend across the entire musical range.
Polarity Control
(0° or 180°): Selects regular (0°) or inverted (180°) phase for the subwoofer. Set this switch to provide the fullest, most
dynamic bass. The effect of phase will be most audible on low-frequency percussion instruments or music with a
continuously repeating bass line.
Maintenance and Service
.
All wiring connections should be inspected and cleaned or remade at least once a year. If a problem does occur, make sure
that all connections are properly made, secure and clean. If a problem occurs in one loudspeaker, rewire that speaker in
a different location within the system. Should the problem persist in this speaker the problem is within the speaker. If the
speaker sounds fine in the new position it is a strong indication of a more in depth issue with the electronics in the system. In
the event that your SoundWare home theater speakers ever needs service, contact your local Boston Acoustics dealer or visit
bostonacoustics.com for a list of dealers in your area.
If your subwoofer does not play, check that all the connectors on the cables are making proper contact and that the AC plug
connected to a “live” receptacle.
Limited Warranty
Boston Acoustics warrants to the original purchaser of our SoundWare system that it will be free of defects in materials and
workmanship in its mechanical parts for a period of 5 years from the date of purchase. The warranty period for the electrical
components of SoundWare home theater speakers is 1 year.
Your responsibilities are to install and use them according to the instructions supplied, to provide safe and secure transportation
to an authorized Boston Acoustics service representative, and to present proof of purchase in the form of your sales slip when
requesting service.
Excluded from this warranty is damage that results from abuse, misuse, improper installation, accidents, shipping, or repairs/
modifications by anyone other than an authorized Boston Acoustics service representative.
This warranty is limited to the Boston Acoustics product and does not cover damage to any associated equipment. This
warranty does not cover the cost of removal or reinstallation. This warranty is void if the serial number has been removed or
defaced. This warranty gives you specific legal rights, and you may also have other rights which vary from state to state.
If Service Seems Necessary
United States
First, contact the dealer from whom
you purchased the product. If that is
not possible, send an email to: [email protected]
or write to:
Boston Acoustics, Inc.
100 Corporate Drive
Mahwah, NJ 07490 USA
Canada
First, contact the dealer from whom
you purchased the product. If that is
not possible, send an email to: [email protected]
or write to:
D&M Canada
5-505 Apple Creek Blvd
Markham, ON L3R 5B1
All Other Countries
Contact the dealer from whom you purchased the product or contact your local distributor. For more information, please visit
bostonacoustics.com/support
7
E
N
G
L
I
S
H
For EU Customers Only
This symbol found on the product indicates that the product must not be disposed of with household waste. Instead, it may be
placed in a separate collection facility for electronic waste or returned to a retailer when purchasing similar product. The producer
paid to recycle this product. Doing this contributes to reuse and recycling, minimizes adverse effects on the environment and
human health and avoids any fines for incorrect disposal.
Sólo para clientes de la UE
Este símbolo que aparece en el producto indica que éste no debe ser eliminado con los residuos domiciliarios. En vez de ello debe
colocarse en un punto de recogida especial para desechos electrónicos o ser devuelto a un comercio minorista cuando compre
un producto similar. El fabricante ha pagado para reciclar este producto. Al hacerlo contribuye a la reutilización y el reciclado,
minimiza los efectos adversos sobre el medioambiente y la salud humana, y evita cualquier multa por una eliminación incorrecta.
Uniquement pour les clients des États-Unis
Ce symbole placé sur l’appareil indique que celui-ci ne doit pas être éliminé dans les ordures ménagères. Il doit plutôt être recyclé
séparément dans un centre de collecte d’appareils électroniques, ou retourné au détaillant lors de l’achat d’un appareil similaire.
Le fabricant est rémunéré pour le recyclage de ce produit. Une telle pratique contribue à la réutilisation et au recyclage de
composants réduisant ainsi les effets néfastes pour l’environnement et la santé humaine et à éviter des amendes prévues pour une
élimination incorrecte.
Solo per i clienti dell’UE
Questo simbolo sull’apparecchio indica che lo stesso non può essere trattato come rifiuto domestico ma deve essere smaltito
separatamente in un contenitore apposito per rifiuti di apparecchiature elettriche ed elettroniche (RAEE) o deve essere restituito
al venditore quando viene acquistato un prodotto nuovo dello stesso tipo. Il produttore ha pagato per lo smaltimento di questo
prodotto; ciò contribuisce al riutilizzo e al riciclaggio dello stesso, riducendo al minimo gli effetti dannosi sull’ambiente e sulla
salute delle persone, e inoltre evita sanzioni dovute ad un errato smaltimento.
För kunder inom EU
Den här symbolen på produkten upplyser om att produkten inte får kasseras tillsammans med hushållsavfall. Istället får den
placeras i ett separat kärl för elektroniskt avfall eller returneras till återförsäljaren i samband med inköp av en likadan produkt.
Fabrikanten har betalat för återvinning av denna produkt. Detta bidrar till återanvändning och återvinning, minskar allvarlig
inverkan på miljön och människors hälsa, samt förhindrar böter för felaktig avfallshantering.
Nur für Kunden in der EU
Dieses Symbol auf dem Produkt gibt an, dass das Produkt nicht mit dem Hausmüll entsorgt werden darf. Es muss bei einer
besonderen Sammelstelle für Elektromüll entsorgt oder beim Kauf eines ähnlichen Produkts an den Händler zurückgegeben
werden. Der Hersteller hat für die Wiederverwertung dieses Produkts bezahlt. Dies trägt zu Wiederverwendung und
Rückgewinnung von Rohstoffen bei, verringert ungünstige Folgen für Umwelt und Gesundheit und vermeidet Geldbußen für
unsachgemäße Entsorgung.
300 Jubilee Drive, Peabody, MA 01960 USA
www.bostonacoustics.com
© 2011 Boston Acoustics, Inc. Boston, Boston Acoustics, B/A ellipse symbol, BassTrac, and MagnaGuard are registered
of Boston Acoustics, Inc. Dolby Digital and Dolby Pro Logic are registered trademarks of Dolby Laboratories.
Specifications are subject to change without notice. 142-004141-0